
Quick Start Guide
This section describes the basic operations of the device, getting you from a new device to a compliant flight.
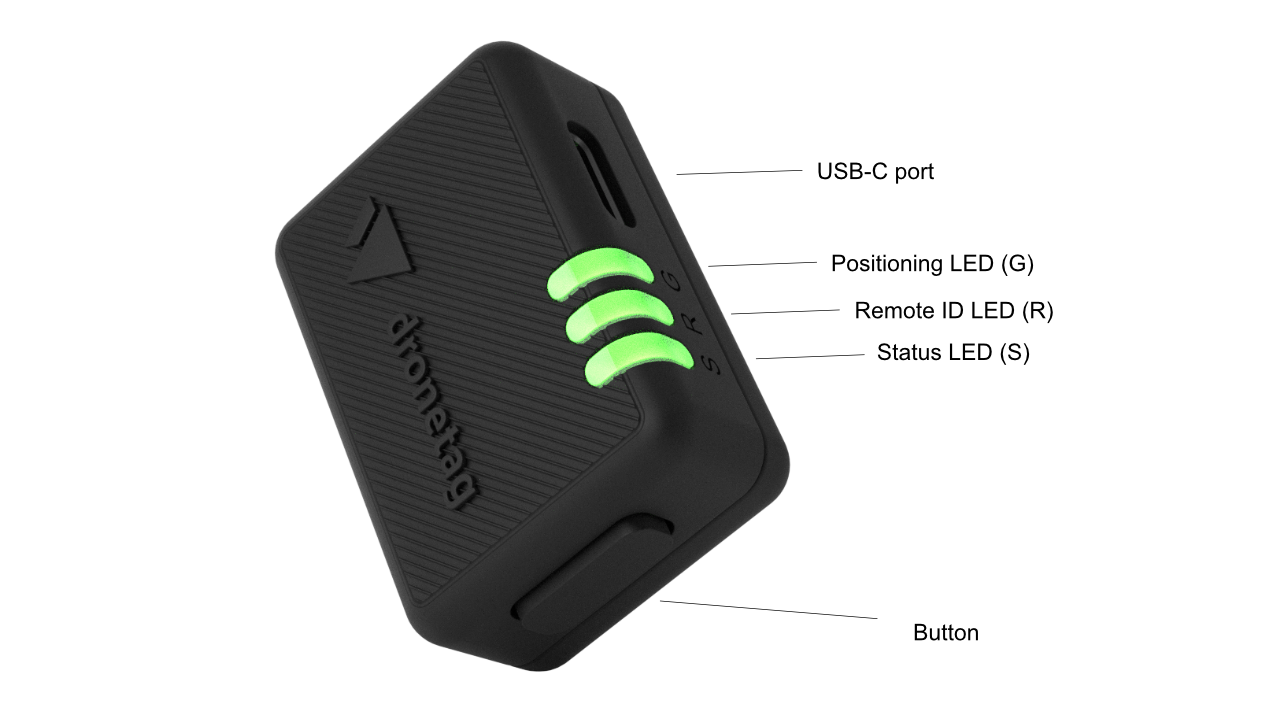
- ① USB-C
- ② Positioning LED
- ③ Remote ID LED
- ④ Device status LED
- ⑤ Button
User Interactions
Dronetag Beacon is operated with the single button located on the shorter side of the device.
- Long press (2 s): Switch the device ON or OFF
- Short press (0.1 s): Start flight or end flight (while the device is turned on)
- Short press (0.1 s): Battery indication (while the device is turned off)
- Extra-long press (4-8 s): Force device hardware restart
General Usage
Your device works in most outdoor areas where a GNSS signal is available.
Here's how to get started quickly:
- Check the battery: While the device is off, press the button briefly (0.1 s). The LEDs will show the current battery level.
- Turn it on: Press and hold the button for 2 seconds.
- Wait for readiness: Once all components are ready, the three LEDs will turn solid green.
- Start the flight: Depending on your Flight auto-start setting, the flight will either start automatically or you'll need to press the button once to begin.
- Do your mission: The device broadcasts your Remote ID during the whole flight.
- End the flight: Press the button briefly (0.1 s).
- Turn it off: When finished, press and hold the button for 2 seconds to power down.
Getting Started with Dronetag Beacon
To fly compliantly with the Dronetag Beacon, follow these steps:
1. Charge the device
Before your first flight, give the Beacon a full charge using the included USB-C cable and any 5V USB source.
Charging is indicated by blue LEDs - three solid blue LEDs mean fully charged, and once charging is complete the LEDs turn off.
2. Attach it to your drone
One part of the 3M Dual Lock fastener is already on the Beacon. Stick the supplied counterpart to your drone:
- Clean the chosen surface with the alcohol pad and let it dry for three minutes.
- Peel the foil off the counterpart and press it onto the surface.
- Wait five minutes for the glue to harden, then snap the Beacon on.
Avoid curved surfaces and soft plastic covers, keep the Beacon away from the flight controller, IMU, GNSS antennas and RF transceivers, and make sure the button and all LEDs stay reachable and visible. See Attaching to the Drone for details.
3. Power it on
Press and hold the button for 2 seconds. The LEDs will light up to show status:
- Positioning (G) - satellite positioning status
- Remote ID (R) - Network & Direct Remote ID status
- Device status (S) - overall device status
You're ready when all three LEDs are solid green. Yellow pulsing means a component is still waiting (typically a GNSS fix), red means an error - see LED Indications.
4. Connect with your Dronetag account
Pair the Beacon with the Dronetag App on your phone. The app is available for iOS, Android, or as a Web App.



- If you don't have a Dronetag account yet, create one in the app or at dronetag.app/signup.
- In the app, go to Profile → My Devices → Register new.
- Select Dronetag Beacon and follow the instructions.
- Enter your Operator ID so the Beacon broadcasts the correct identifier - see Configuration.
5. Start your flight
Once the LEDs are green, the Beacon is ready to broadcast.
- If Flight auto-start is enabled (default), the flight starts automatically.
- If it's disabled, press the button once to start the flight.
End the flight with another short button press, and switch the device off with a long press.
6. Test before real use
We recommend a quick table test to be sure everything works:
- Turn on the Beacon following the steps above and start a flight.
- Open the Drone Scanner app on your phone.
- Check that the Beacon appears with your Operator ID and live position data.