
Dronetag App
- Document
- Dronetag App
- Chapters
- 29
- Source
- help.dronetag.cz/print/dronetag-app
Dronetag App
The Dronetag App is the central hub for managing all Dronetag devices (Mini, RIDER, Scout, Beacon, …).
It allows you to register devices, configure their settings, manage Data Bundles, and view detection or flight history.
The app is available as:
- Mobile app for iOS and Android
- Web app at dronetag.app


Account & Login
- Sign up or sign in with your email.
- One account can manage multiple devices.
- Account settings: update personal information, change password, manage subscriptions.
Device Registration
To use a Dronetag device with the cloud, it must be registered in the app:
- Open Profile > My Devices > Register New Device
- Enter or scan the serial number
- Confirm registration
After registration, the device will appear in your list of devices.
RIDER Connect
Dronetag RIDER and some other devices require a data plan for online mode.
- View current RIDER Connect status (expiry date) in device details.
- Purchase a new plan directly in the app via Profile > Account > RIDER Connect.
- Activation is done by entering a code (automatically filled if bought in the app).
👉 More about connectivity plans: RIDER Connect
Device Configuration
Each registered device can be configured directly in the app.
Options vary per device, but typically include:
- GNSS options (enable/disable GNSS, constellation, SBAS settings)
- USB mode toggle
- LED indications overview
- Reset to Factory Defaults
- Firmware update
Data Visibility & Sharing
The app allows you to define how your data is shared:
- Public – detection/flight data is visible to other Dronetag users
- Private – only visible to you
⚠️ This setting applies to your whole account, not just one device.
Change it via: Profile > Preferences > Default data visibility.
Notifications
- Email and push notifications keep you updated about Data Bundle usage.
- Alerts about device connectivity or firmware availability.
Diagnostic & Troubleshooting
The app helps you diagnose issues and contact support:
- Obtain diagnostic logs (Profile > My Devices > Troubleshooting > Obtain Logs)
- Hard reset or Factory reset options
- Firmware update wizard
- Error status (e.g. red LINK LED, no GNSS fix) visible directly in the app
👉 For more troubleshooting steps, see RIDER Troubleshooting.
Web vs Mobile App
- Mobile App: For on-the-go monitoring, Bluetooth connections, and push notifications.
- Web App: For convenient access on desktop, easier management of multiple devices, and API integrations.
Related Topics
Receivers
(RIDER, Scout)
Dronetag App is the central hub for managing all Dronetag devices – both transmitters (that broadcast Remote ID) and receivers (that detect and process Remote ID).
You can use it on iOS, Android, or Web (dronetag.app).
Receivers (RIDER, Scout)
Device Registration
Registering RIDER or Scout is the same as transmitters:
- Power on the device.
- In the app, go to Profile > My Devices > Register new.
- Select RIDER or Scout and follow the steps.
Operating Modes (Scout only)
In the app, you can switch between Scout’s modes:
- Sensor / Sensor+ – raw detection data only (no license needed)
- On-Premise – local visualization without Internet
- Cloud – full remote monitoring via Dronetag App (license + Internet required)
👉 More info: Scout Operating Modes Help
Connectivity Plan (RIDER)
RIDER requires a Connectivity Plan (or free trial) for online use via LTE.
In the app you can:
- Purchase a Connectivity Plan
- Activate it on your RIDER
- Check expiry under Profile > My Devices > RIDER
Without a Connectivity Plan, RIDER can still be used via Bluetooth with Drone Scanner (Gen. 2) but without cloud features.
License Management (Scout)
For Cloud or On-Premise operation, Scout requires a license.
You can purchase and activate licenses in the app:
- Go to Profile > Account > Licenses
- Enter license code
- Assign license to your Scout
Changing Call Sign and Color Tag
You can customize your device’s Call Sign (name shown to others) and Color Tag (map indicator color) directly in the Dronetag app.
This feature is available for all Dronetag devices except Scout.
- Turn your Mini (or another Dronetag device) on.
- Open the Dronetag app.
- Go to Profile → My Devices → choose the Dronetag device you want to set up.
- Scroll down to Change Call Sign and Color Tag.
- Choose your new Call Sign and Color Tag.
- Confirm your selection.
Your updated Call Sign and Color Tag will now appear in the app and in live data views where your device is visible.
This setting is stored locally on the device and helps identify it visually in the app’s map and lists.
The SCOUT model does not support changing Call Sign or Color Tag.
Sharing Live Data from RIDER or Scout
In the Dronetag app, you can share live data from your Dronetag RIDER or Dronetag Scout device with another user who also has a Dronetag account.
This allows them to see your device in their list and view its current position on the map in the app.
📱 How to Start Sharing
You can share data either in the Dronetag mobile app or in the Dronetag Web App:
- Go to Profile → My Devices.
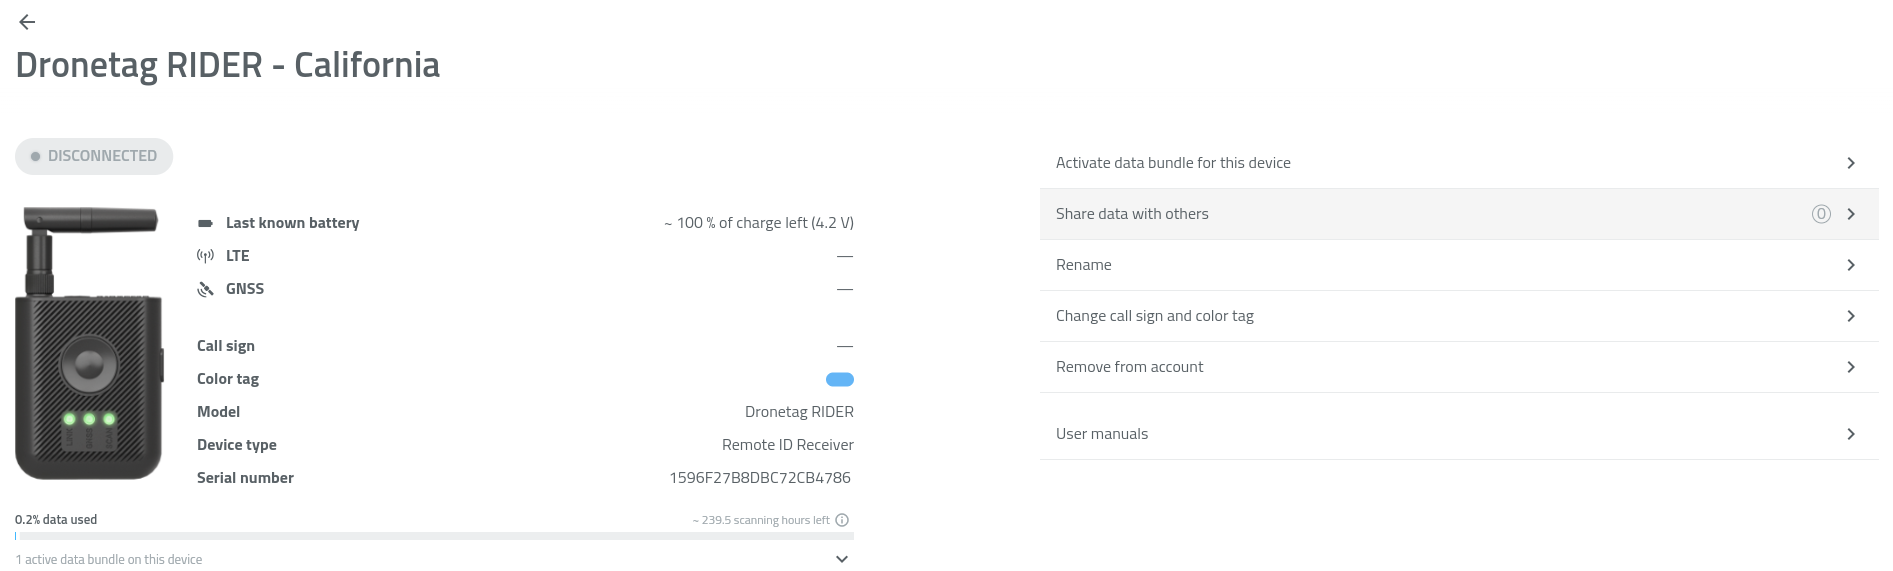
- Select your Dronetag RIDER or Dronetag Scout.
- Tap Share data with others.
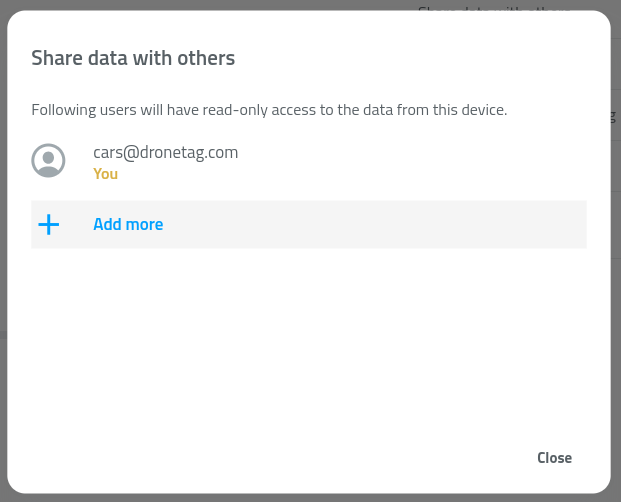
- Tap + Add more.
- Enter the email address of the user (the email must be registered in the Dronetag app).
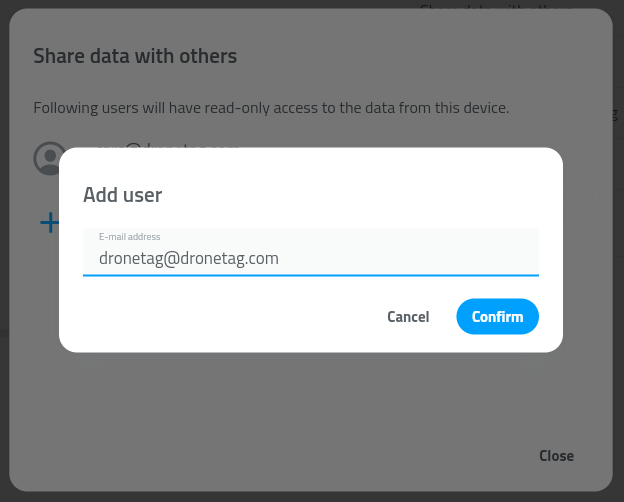
- Confirm by tapping Confirm.
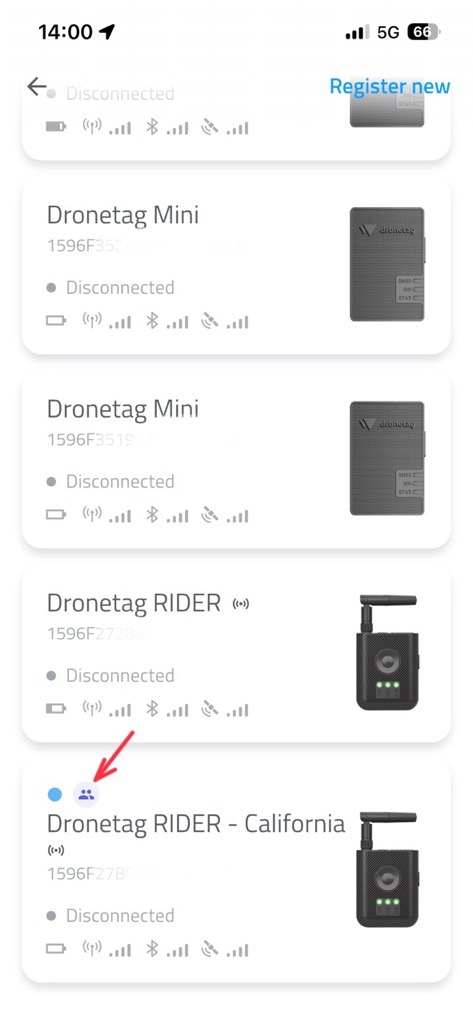
✅ The selected user will now see your RIDER or Scout under My Devices, marked with a shared-device icon.
They will also see the device’s live position on their map in the app.
🗑️ How to Stop Sharing
To remove sharing with a specific user:
- Go to Profile → My Devices.
- Select your Dronetag RIDER or Dronetag Scout.
- Tap Share data with others.
- Find the user in the list of accounts.
- Tap the trash bin icon next to their name.
- Confirm by tapping Delete.
General Data Visibility
As with transmitters, this setting applies to your entire account, not just a single RIDER or Scout.
Choose Public or Private under Profile > Preferences > Default data visibility.
Firmware Update
Update RIDER or Scout firmware directly through the app:
- Go to Profile > My Devices
- Select your device
- Tap Update Firmware
🛰️ Assisted-GNSS
To activate Assisted-GNSS for your Dronetag RIDER:
- Turn your RIDER on.
- Open the Dronetag app.
- Go to Profile → My Devices → Dronetag RIDER → A-GNSS.
- Follow the steps in the app to complete the process.
Once done, your RIDER will update its satellite assistance data and acquire a GNSS fix much faster.
⚙️ How It Works
Normally, a GNSS receiver needs to download satellite data (ephemeris and almanac) directly from orbiting satellites — a process that can take up to 30–60 seconds.
With Assisted-GNSS, this information is fetched via the Dronetag Cloud or your mobile internet connection, allowing the device to calculate its position almost instantly.
When uploaded, Assisted-GNSS allows your device to:
- Reduce time to first fix (TTFF) — get GPS lock within seconds instead of minutes.
- Stabilize position data more quickly after startup.
Use Assisted-GNSS when:
- You’ve just powered on the RIDER after a long time.
- You’ve moved to a new location (more than ~100 km from the last fix).
- You’re operating in urban, mountainous, or indoor environments where satellite visibility is limited.
Assisted-GNSS only accelerates satellite acquisition — it doesn’t replace GNSS signals.
Make sure your device has at least partial view of the sky to get an accurate fix.
Diagnostic Logs
If requested by support, you can send logs directly from the app:
- Open Profile > My Devices > RIDER/Scout
- Go to Troubleshooting > Obtain Diagnostic Logs
These will be automatically packaged and sent to the support team.
Troubleshooting Tools
From the app you can:
- Reset to Factory Defaults (works on firmware v1.4.1+)
- Perform Hard Reset by button combination on the device, or trigger reset from the app.
Setting Up Alerts and Alert Zones
The Alerts feature is currently in experimental mode. It allows you to receive real-time notifications when a new detection occurs.
Please note that this feature is still under development and may occasionally experience issues or unexpected behavior.
🔔 Alerts
Alerts work only when the Dronetag app is running in the foreground — the screen must be on and the app actively open.
Alert settings are stored locally on your device, meaning they:
- Are not synced with your Dronetag account.
- Do not affect alert settings physically stored on your Dronetag RIDER.
🔔 How to Enable Real-Time Alerts
- Open the Dronetag app.
- Go to Profile → Alerts.
- Toggle Enable real-time alerts to ON.
Your app will now start showing alert notifications (when active in the foreground) for newly detected drones.
🚫 How to Ignore Drones
You can choose which drones should be ignored — the app will then not trigger alerts for them.
- Go to Profile → Alerts.
- Scroll down to the Ignored drones section.
- In the UA Identifier field, enter the serial number of the drone you want to ignore.
- Tap Add.
The ignored drones will appear in a list below the input field.
🗺️ Alert Zones (GeoJSON)
You can set up geographical zones where alerts will be triggered only when a detected drone enters the defined area.
Alert zones use the GeoJSON format for defining geographic boundaries.
Learn how to set up Alert Zones in this chapter.
Account & General Settings
Profile Management
Manage your account details, password and linked devices.
Default Data Visibility
Set the default for all your data: Public or Private.
Adjust this under Profile > Preferences.
Purchase History
In the app you can see:
- Your active and expired Data Bundles
- Subscriptions for transmitters
- License purchases
Notifications
RIDER and Scout users will receive push and email notifications when bundles are nearly consumed.
You can configure notification preferences in the app.
Transmitters
(Beacon, Mini, Mini 4G, BS, DRI)
Dronetag App is the central hub for managing all Dronetag devices – both transmitters (that broadcast Remote ID) and receivers (that detect and process Remote ID).
You can use it on iOS, Android, or Web (dronetag.app).
Device Registration
To register your transmitter:
- Turn on the device.
- Open the Dronetag App and sign in.
- Go to Profile > My Devices > Register new.
- Select your device type and follow the on-screen instructions.
🆔 Entering Operator ID
Before you fly with your Dronetag device, you need to enter your Operator ID in the app. This ensures full compliance with Remote ID / UAS identification regulations in your region.
We support different formats and rules depending on the region you operate in: EU & Singapore, Japan, USA.
The format of the Operator ID and whether you need to enter it depends on your region. Follow the section below for your specific region.
EU & Singapore
Format
- EU: Your Operator ID consists of two parts: a public part (16 alphanumeric characters) and a private/suffix part (often 3 characters) which you do not normally affix to your drone.
- Example public part:
CZEabc123def456 - Private suffix: e.g.
-xyz(used internally, not for display)
- Example public part:
- Singapore: Similar format (12-digit Operator ID issued via UA Portal) effective from 1 Dec 2025.
How to Enter into Dronetag App
- Open the Dronetag app.
- Go to Profile → My Devices → [Choose Your Device] → Operator ID.
- Enter your 16-character public part (e.g.,
CZEabc123def456). - Do not enter the private suffix (e.g.,
-xyz) unless instructed. - Your Operator ID will be uploaded to the device and broadcast.
Where to Get the ID
- Register with the national aviation authority in your country (for EU residents) or via the UA Portal (for Singapore).
- Ensure the ID is visible on every drone you own.
Japan
Format
- A 15-character operator registration number issued by the Ministry of Land, Infrastructure, Transport and Tourism (MLIT) via the national UAS portal.
How to Enter into Dronetag App
- Open the Dronetag app.
- Go to Profile → My Devices → [Your Device] → Operator ID.
- Enter the full 15-character code as given by MLIT.
- Your Operator ID will be uploaded to the device and broadcast.
Where to Get the ID
- Register your drone/operator via Japan’s UAS registration portal.
USA
Format
- In the USA, you register as an operator with the Federal Aviation Administration (FAA) and receive a registration number. However — you typically do not need to separately enter an Operator ID in the Dronetag app for Remote ID purposes, since standard Remote ID drones broadcast the required info and the operator number is linked via the DroneZone system.
What to Do in the Dronetag App
- Since no extra Operator ID entry is required, simply ensure your drone is correctly registered with the FAA and that your device is Remote ID compliant.
Where to Get the ID
- Register via FAA DroneZone and obtain your operator registration number. Ensure your drone meets Remote ID rules.
Changing Call Sign and Color Tag
You can customize your device’s Call Sign (name shown to others) and Color Tag (map indicator color) directly in the Dronetag app.
This feature is available for all Dronetag devices except SCOUT.
- Turn your Dronetag device on.
- Open the Dronetag app.
- Go to Profile → My Devices → choose the Dronetag device you want to set up.
- Scroll down to Change Call Sign and Color Tag.
- Choose your new Call Sign and Color Tag.
- Confirm your selection.
Your updated Call Sign and Color Tag will now appear in the app and in live data views where your device is visible.
This setting is stored locally on the device and helps identify it visually in the app’s map and lists.
🛰️ Assisted-GNSS
To activate Assisted-GNSS for your Dronetag device:
- Turn your Dronetag device on.
- Open the Dronetag app.
- Go to Profile → My Devices → your Dronetag device → A-GNSS.
- Follow the steps in the app to complete the process.
Once done, your Dronetag device will update its satellite assistance data and acquire a GNSS fix much faster.
⚙️ How It Works
Normally, a GNSS receiver needs to download satellite data (ephemeris and almanac) directly from orbiting satellites — a process that can take up to 30–60 seconds.
With Assisted-GNSS, this information is fetched via the Dronetag Cloud or your mobile internet connection, allowing the device to calculate its position almost instantly.
When uploaded, Assisted-GNSS allows your device to:
- Reduce time to first fix (TTFF) — get GPS lock within seconds instead of minutes.
- Stabilize position data more quickly after startup.
Use Assisted-GNSS when:
- You’ve just powered on the Dronetag device after a long time.
- You’ve moved to a new location (more than ~100 km from the last fix).
- You’re operating in urban, mountainous, or indoor environments where satellite visibility is limited.
Assisted-GNSS only accelerates satellite acquisition — it doesn’t replace GNSS signals.
Make sure your device has at least partial view of the sky to get an accurate fix.
Configuration
Transmitters can be configured directly in the app:
- Set device name
- Adjust flight profile
- Configure signal parameters (e.g., GNSS, SBAS, etc.)
General Data Visibility
Data Visibility is an account-wide setting (not per device).
You must decide whether to share all your flight and detection data with other Dronetag users or keep them private.
- Public: Default setting for shared airspace awareness
- Private: Data visible only to you
Adjust this in the app under Profile > Preferences > Default data visibility.
Firmware Update
Keep your device updated for stability and new features:
- Open the Dronetag App
- Go to Profile > My Devices > [Your Device]
- Select Update Firmware
Troubleshooting Tools
In the app you can also:
- Reset to Factory Defaults
- Obtain Diagnostic Logs for support
Subscriptions
Some transmitters require subscriptions or credits. Manage and view your subscription status in the app under Profile > Account.
Detection Detail & Search Improvements
All features described below are available in the Dronetag App starting from version v2.167.1, with additional updates in v2.170.2.
These features focus on detection visibility, playback, and data clarity for RIDER and Scout users.
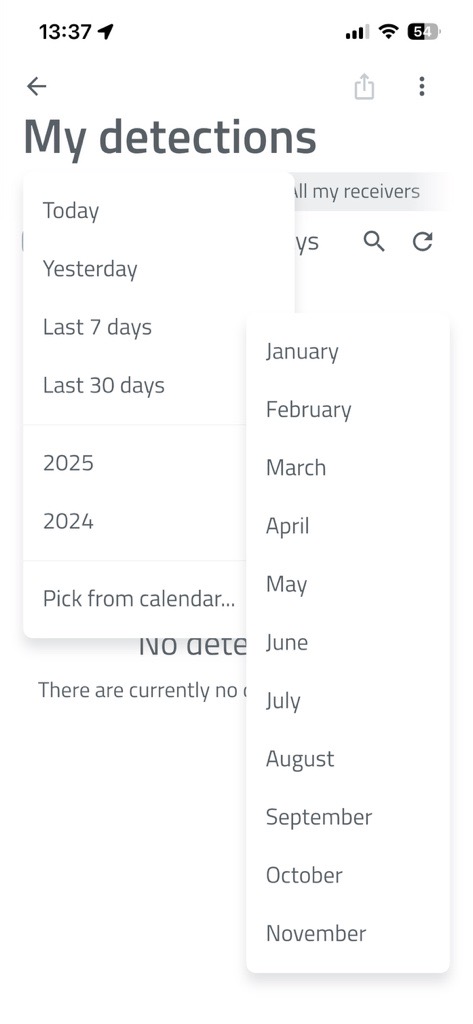
Improved Filtering in "My Detections"
The filtering panel includes:
- Quick-select dropdown for entire months
- Display of "X of X detections found" during searches
How to Set Advanced Detection Filters in the Dronetag App
📱 Step-by-Step Guide
-
Open the Dronetag App and go to Profile > My Detections.
-
On this page, you will see basic filtering options:
- Filter by date
- Filter by receiver that detected the drone (RIDER or Scout)
- Filter by drone status (Seen / Unseen)
-
For advanced filtering, tap the three-dot button in the top right corner.
-
A panel will open where you can set minimum and maximum values for:
-
UA – Sensor Distance
Distance between the detected drone and the receiver (RIDER or Scout). -
Relative Height (ATO)
Drone height relative to the take-off point. -
UA – Operator Distance
Distance between the drone and its operator.
-
-
After setting your desired values, tap the Apply Filters button.
The app will then display only the detections that match your selected criteria.
Server-Side Search in Detections
- The search happens on the server for faster and more efficient results.
- You can find specific drones that flew by weeks ago without downloading everything first.
Reception Technology Display
- The app shows which reception technology received the data - such as Bluetooth, Wi-Fi, or ADS-B.
- This is especially useful for Scout units with ADS-B support.
Detection Detail: Receiver Positions
- The detection detail screen lists all receivers that participated in a detection.
- Detailed timing (which receiver caught which packet).
Detection History & Trajectory Loading
- Trajectory loading features a progress bar at the top, showing how much data has been loaded and how long it may take.
- This makes it clear to users what is happening during data retrieval.
Detection Detail View
- The app has detection detail view with an integrated player.
- You can replay an entire operation from the start and selectively hide telemetry types (for example, hide operator movement).
- The screen also includes summary information and allows you to export or delete detections directly from the app.
Seen vs. New Detections
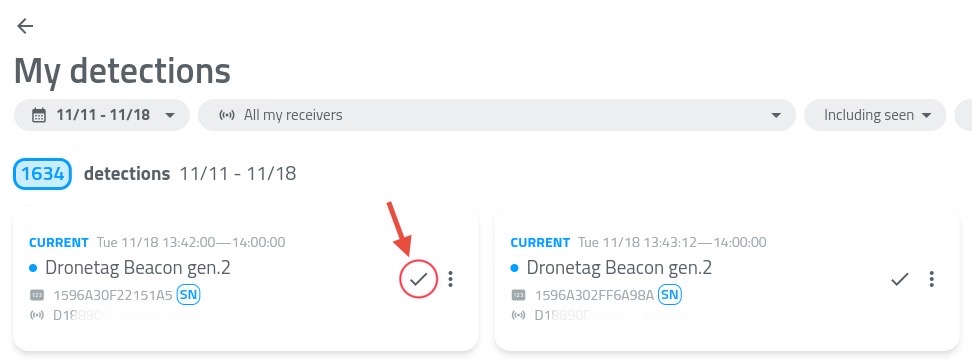
- The detections list now visually distinguishes between seen and new detections.
- You can mark a detection as "seen" to ignore it in the future.
Use the checkmark button highlighted in the picture.
How to Export and Visualize Detections
The Dronetag App allows you to record and review drone detection history. For a more detailed, 3D spatial review of flight paths (such as navigating through urban landscapes or verifying antenna tests), you can export your detection data and visualize it using external tools like Google Earth.
1. Exporting Detections from the Dronetag App
To export a specific flight or detection history:
- Open the Dronetag App and log in to your receiver's account.
- Navigate to the Detections tab.
- Select the specific detection or flight session you wish to export.
- Click the Export button and choose the KML format.
- Save the generated file to your device.
Pro Tip – Bulk Export
Need to analyze multiple flights at once? You can select multiple detections from the list and export them together into a single combined KML file.
This allows you to visualize and compare several flight paths simultaneously in Google Earth.
Why KML?
KML (Keyhole Markup Language) is the standard format for displaying geographic data in Earth browsers.
Dronetag uses advanced KML elements, specifically gx:Track, to ensure high-fidelity flight telemetry while maintaining the exact path, altitude, and timestamps of the drone.
2. Visualizing Detections in Google Earth
Google Earth is the recommended platform to visualize Dronetag KML exports. It renders the 3D space accurately, which is especially useful when analyzing flights in complex environments such as dense urban areas or between skyscrapers.
Option A – Google Earth Pro (Desktop) — Recommended
The desktop version of Google Earth provides the most robust support for 3D flight paths.
- Download and install Google Earth Pro for desktop.
- Open the application.
- Navigate to
File → Open... - Select your exported Dronetag KML file.
- The flight path will automatically render, allowing you to pan, tilt, and explore the drone route in full 3D.
Option B – Google Earth Web (Browser Version)
If you prefer using the browser-based version of Google Earth, you can still visualize your detections. However, due to limitations in how the web version parses gx:Track data, a specific import method must be used.
Important for Google Earth Web users
Do not use the standard “Import KML” button.
The web parser may fail to properly interpret gx:Track elements when imported this way, which can result in an invisible or broken flight path.
- Open:
https://earth.google.com/web/ - Navigate to the Projects tab in the left-hand menu.
- Click Open (or New Project).
- Select Open KML file from computer.
- Choose your exported KML file.
Google Earth Web should now correctly parse the gx:Track element and display the full 3D flight path.
Detection KML export for testing
Want to try opening a detection in Google Earth but don't have your own file? Download a test KML file - the same that is used in the video above.
3. Example Use Cases
Urban Environment Analysis
Visualize exactly how a drone navigated through a city environment, including altitude clearance above buildings and proximity to skyscrapers.
Hardware Testing
Review flight paths to analyze signal strength and coordinate accuracy during antenna or hardware testing.
Compliance & Auditing
Maintain a precise visual 3D record of compliant flights for operational logging and auditing purposes.
Push Notifications
Make sure you're on the 2.227.0 app version or newer to access these features.
Dronetag app provides a range of notifications to keep you informed about your devices, flights, and airspace activity.
These include standard app notifications, such as device status or flight alerts, as well as Push Notifications for drone detection, which allow you to receive alerts even when the app is not actively running.
Detection Notifications
The Push Notifications system for drone detection devices supports Dronetag Scout and Dronetag RIDER, and lets you receive alerts even when the app is running in the background on iOS, Android, and Web.
Once enabled, you can set up your Scout or RIDER, close the app, and still be notified when a new aircraft is detected.
How to enable Detection Notifications
Before push notifications can work correctly, you first need to allow the Dronetag application to send notifications on your device.
For the web application, you also need to allow notifications in your web browser settings.
The Dronetag app should normally request this permission automatically on first use. However, it is possible that:
- the permission request was previously denied
- notifications are blocked by your browser settings
- notifications are restricted by company or system policies on your computer
Chrome
Settings → Privacy and security → Site Settings → Notifications
Edge
Settings → Privacy, search, and services → Site permissions → All permissions → Notifications
Firefox
Settings → Privacy & Security → Notifications
Safari
Settings → Websites → Notifications
1. Update the app to v2.227.0 or newer.
2. Navigate to Notifications settings
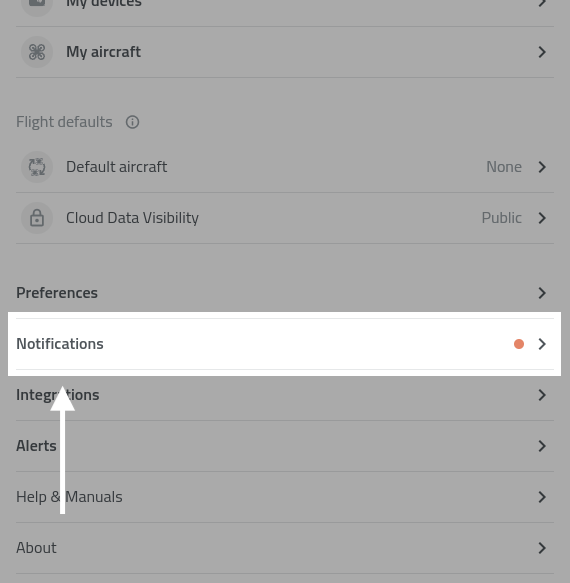
3. Open Notification settings and tap the blue Upgrade box.
- If the blue box is not visible, log out and log back in to refresh your account settings.
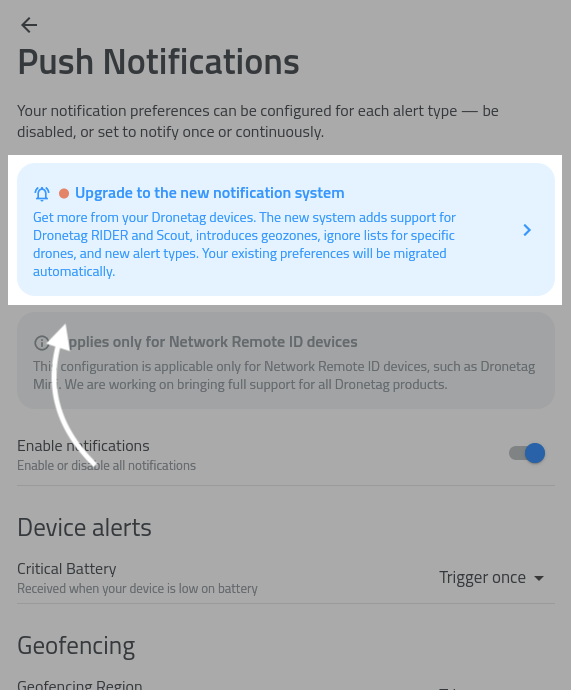
4. App will confirm the setup process was successful:
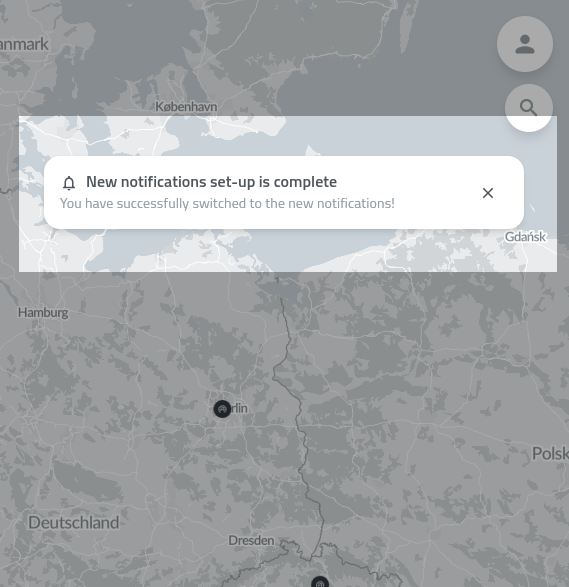
5. Now check the notifications setup is set to your actual needs.
- Push Notifications are available on Web, iOS, and Android.
- If you are signed in on multiple devices, you can enable notifications on each one independently.
- Make sure OS notification permissions are granted before enabling notifications in the app.
List of features
Find a detailed list of detection-related features below:
Notification Regions
Notification regions let you limit detection alerts to specific geographic areas. For example, you can define a region around a building and only receive alerts when a drone is detected within that area.
The app does not yet include a built-in visual editor for regions in early access. We recommend using geojson.io to create and edit regions – you can draw a polygon or circle, export it as GeoJSON, and paste the result into the app.
How to set up a notification region:
- Open Notification settings.
- Select Manage notification regions.
- Tap the + button to add a new region.
- Enter a name for the region and paste the GeoJSON content into the text field.
- Tap Save.
- ☝️ Enable the "Restrict notifications to defined regions" toggle in Notification settings. This is the main switch that controls whether your defined regions are applied – without it, you will receive notifications from all areas regardless of any regions you have set up.
You can edit, temporarily disable, or delete regions at any time. All regions are also shown on the map for easy reference.
Enabling "Restrict notifications to defined regions" applies globally. If a device has no specific regions defined, it will stop sending notifications entirely. Ensure all your devices have designated regions to maintain coverage.
Ignore Lists
The ignore list lets you suppress notifications for specific drones. Once a UAS ID, most often a drone or module serial number, is added, you will no longer receive alerts for that drone.
How to add a drone to the ignore list:
- Open Notification settings.
- Select Manage ignored UAS IDs.
- Enter the UAS ID, usually the drone serial number, and tap Add to ignore list.
You can add as many UAS IDs as needed and remove them at any time.
Sound and Visual Effects
Detection notifications produce in-app sound and visual effects on your device while the app is open, similar to the older Alerts functionality.
To configure these effects, tap the preferences icon next to the New detection alerts category in Notification settings.
When the app is closed, the notification sound follows your system settings.
Notifications history
You can view past detection alerts in the Notification history screen for later review.
Other Notifications in Dronetag App
In addition to detection alerts, the app provides several other notification types to keep you informed about your devices and operations.
Shared Devices Notifications
Receive updates related to devices shared with you. This includes activity and events from devices operated by other users within your shared environment.
Detection Notifications
Get notified whenever a new aircraft is detected in your vicinity when using the app in the foreground.
NRI Flight Notifications
Notifications related to your own flights using Network Remote ID devices.
- Proximity alerts – when another aircraft gets too close
- Altitude alerts – when your device exceeds a defined altitude threshold, for example 120 m
Device Notifications
Stay informed about the status of your devices.
- Low battery warning – when a device is running low on battery
- Error status – when a device encounters an issue
Account Notifications
Updates related to your account, such as changes in settings or important account-related events.
This feature is still in development and may be unstable.
If you encounter any issues or have feedback, please contact your representative or reach out to our support team.
We are continuing to expand the Push Notifications system. Coming soon:
- ⭐️ SMS & e-mail notifications
- Visual editor for notification regions
- Sharing notification regions with other users
Device Data Sharing
Available in the Dronetag App starting from version v2.167.1, with follow-up improvements in v2.170.2.
In the Dronetag app, you can share live data from your Dronetag RIDER, Dronetag Scout, or even Dronetag Mini 4G device with another user who also has a Dronetag account.
This allows them to see your device in their list and view its current position on the map in the app.
You’ll see all detections in your Detections history, starting from the day you got access to the shared data.
Device Sharing from the App
- Devices (Mini 4G, RIDER, Scout) can be shared directly from the app.
- Once shared, the invited account immediately sees new detections and flight data from the shared device.
- This makes collaboration and multi-account operations much smoother.
💡 How to Share Live Data
Here’s how to start your first live sharing session.
You can configure your RIDER or Scout directly from the app and watch detections appear in real time.
📱 How to Start Sharing
You can share data either in the Dronetag mobile app or in the Dronetag Web App:
- Go to Profile → My Devices.
- Select your Dronetag RIDER or Dronetag Scout.
- Tap Share data with others.
- Tap + Add more.
- Enter the email address of the user (the email must be registered in the Dronetag app).
- Confirm by tapping Confirm.
✅ The selected user will now see your RIDER or Scout under My Devices, marked with a shared-device icon.
They will also see the device’s live position on their map in the app.
🗑️ How to Stop Sharing
To remove sharing with a specific user:
- Go to Profile → My Devices.
- Select your Dronetag RIDER or Dronetag Scout.
- Tap Share data with others.
- Find the user in the list of accounts.
- Tap the trash bin icon next to their name.
- Confirm by tapping Delete.
⚙️ Data Sharing Limitations & Future Improvements
While the data sharing feature makes it easy to collaborate across multiple accounts and devices, there are several current limitations to be aware of.
🚧 Current Limitations
-
Device status is not shared
- When you share a device with another account, the recipient does not see the device’s live status (online / in-flight / scanning / offline).
- They will still receive new detection and telemetry data in real time, but the status will remain displayed as offline.
- This behavior is known and will be addressed in a future update.
-
Invalid account error handling
- When entering an email address or account that does not exist, the app currently returns an error message.
- Make sure to double-check that the entered email corresponds to a valid Dronetag account before confirming the share action.
-
Historical data is not shared
- Shared users only receive newly collected data from the moment sharing begins.
- Historical detections or flight logs are not included in the share.
- This limitation also applies if you later re-enable or remove sharing for the same account.
🔭 Future Improvements
We plan to extend the Data Sharing feature with additional functionality in upcoming updates, including:
- Shared access to historical data (detections, flights, telemetry)
- Improved handling of invalid or inactive accounts
- Live synchronization of device status for shared users
Map Features & Performance Updates
All features and improvements described below are available in the Dronetag App starting from version v2.180.4.
This feature brings significant improvements to how maps work in the Dronetag app — including brand new official flight grid layers and smoother overall map handling.
Map Layers – Official Flight Grids for US and Czech Republic
- This feature brings support for additional map layers.
- We’re starting with flight grid overlays for the United States and the Czech Republic, based on official data sources from FAA and ŘLP.
- These datasets are updated automatically on a regular basis, ensuring you always have the latest airspace information available.
How to Enable Map Layers
🗺️ To enable a map layer in the app:
- Open the Dronetag App.
- On the Home screen, tap the two overlapping squares icon (as shown in the image).
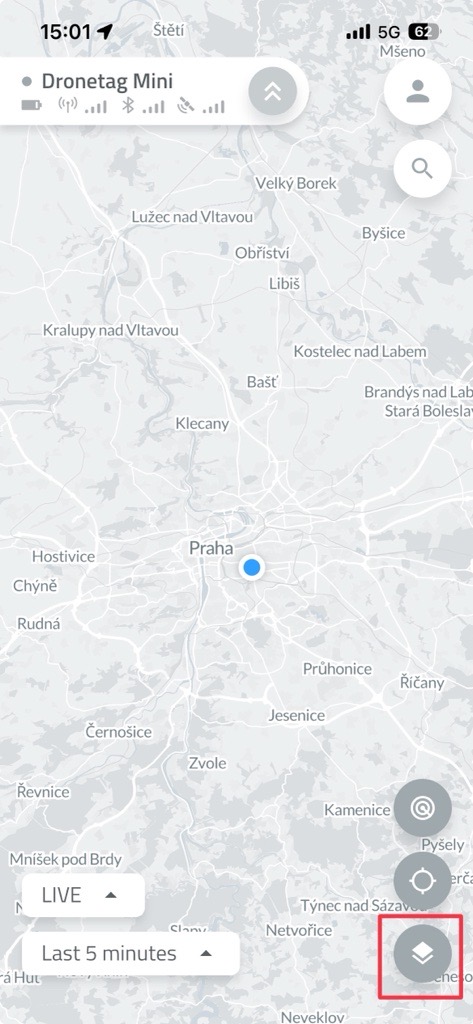
-
Scroll down to the list of available layers.
-
Select the layers you want to display by toggling them on.
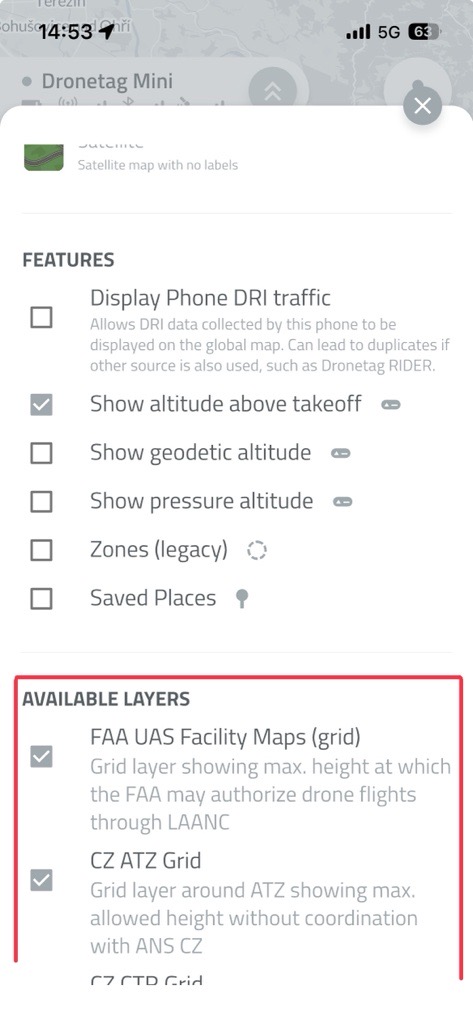
- The selected layers will now appear on your map view.
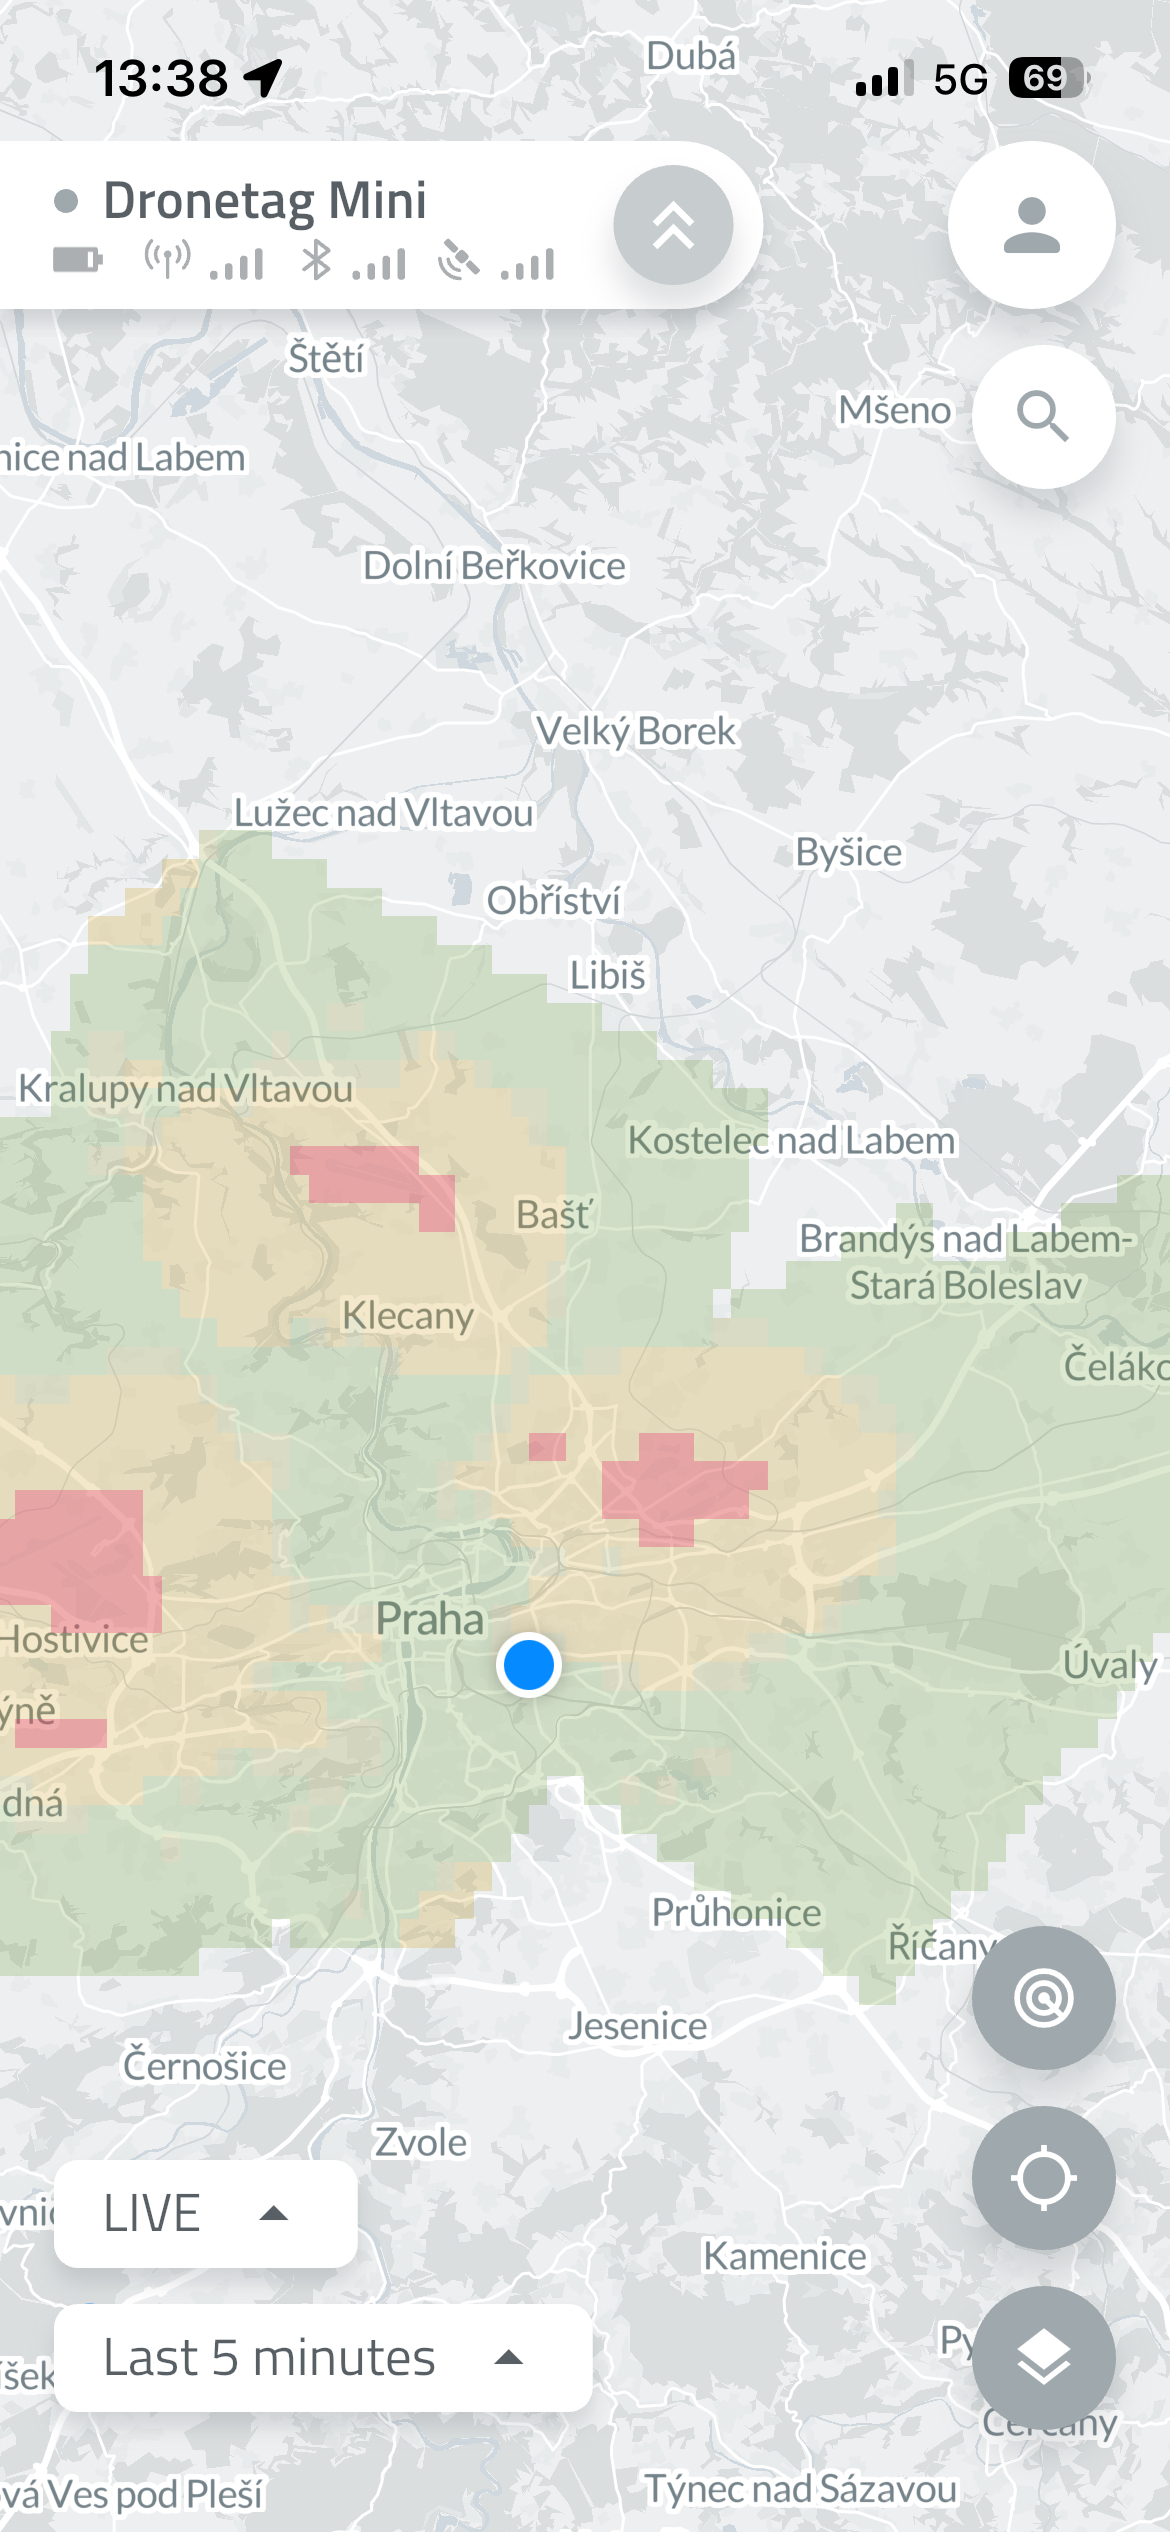
You can enable multiple layers at once - the map will automatically adjust to show all relevant information.
Smart Map Settings Panel
- The map settings panel intelligently shows only relevant overlays for your region.
(Exception: for the US, the FAA dataset currently covers almost the whole planet — we’re working on smarter filtering there.)
Improved Map Loading Performance
- The map loading process has been refined — no more unnecessary reloads after every move!
- The app refreshes map data only when you make a large zoom-out or move far away from your current position.
Safe Restarts and Firmware Updates
- Devices can only restart or update firmware while in flight.
- This prevents firmware issues during active operation.
(Does not apply to Dronetag RIDER while scanning.)
Integration Portal Update
- The integration portal supports empty payloads.
- Some partners use this feature to verify integration functionality even when no telemetry data is available.
Known Aircraft
Known Aircraft lets you identify and keep notes on drones you have detected before, so you don't have to rely on remembering their serial numbers.
You can assign a color tag, set an affiliation, and add your own note to any known drone. Once saved, this information is associated with the drone's serial number and can be viewed whenever the drone is detected again.
How to add a Known Aircraft
There are three ways to add a drone to Known Aircraft:
1. From the Profile page
Go to your Profile and select Known Aircraft. Tap Add Known Aircraft and enter the drone's serial number. You can then add a color tag, affiliation, and note.
2. From a live detection
You can also add a drone directly while viewing a live detection. Open the detected drone's details and select add a color, affilitation or note.
3. From My Detections
Known Aircraft can also be created from a previously recorded detection. Open My Detections, select detection with the drone you want to identify, scroll down to aircraft detail and add a color, affilitation or note.
Known Aircraft is about identifying and annotating drones. It lets you add a color tag, affiliation, and personal notes so you can recognize and keep context about drones you have detected before.
Whitelisting is about notifications. Whitelisted drones remain saved, but notifications for their detections are suppressed.
In short:
- Known Aircraft → Who/what is this drone? Add color tags, affiliation, and notes.
- Whitelisting → Should I be notified about this drone? Disable notifications for saved drones.
Label and Color for Detections
The Label and Color feature allows you to assign a custom tag and color to any device detected in the app based on its serial number or identifier. For aviation receivers, this function can also be used to label planes and other aircraft.
There are multiple ways to do this:
From the Map View
Simply click on the device icon and assign your preferred label and color.
From the Detection View
Open any detection log or list view to apply the same customizations.
Once applied, these visual identifiers persist across the app, making it easier to instantly track and categorize specific drones, controllers, or aircraft.
This setting works as an overlay and changes the label and color throughout the entire app for both live and historical data.
If you are using a Dronetag Mini as an NRI flight transmitter, it is recommended not to use this function together with the Color Tag and Call-sign features available in the My Devices menu.
If both are configured, the new Label and Color setting will take precedence and be displayed throughout the application.
Example Use Cases
1. Tracking Repetitive Intruders or Chronic Offenders
If a specific drone (identified by its unique serial number) repeatedly scouts a perimeter over several days, operators can label it "Repeat Offender – Scouting" and assign it an Orange color.
This immediately alerts the security team when the drone reappears, indicating that this is not a one-time hobbyist flight but a recurring surveillance threat.
2. Distinguishing Known "Friendly" Drones from Unknown Threats
In commercial facilities or secure sites, security teams often operate their own drones for inspections, patrols, or maintenance tasks.
By labeling these internal devices as "Friendly – Inspection" and assigning them a Green color, operators can quickly ignore known activity and focus on unclassified or suspicious detections.
This helps teams concentrate on unauthorized drone activity instead of reviewing their own operations.
3. Multi-Agency Coordination
During large public events such as stadium concerts, festivals, or political rallies, multiple organizations may be authorized to operate drones simultaneously.
Operators can assign different colors to drone serial numbers based on the responsible organization:
- Blue – Law Enforcement
- Yellow – Approved Media
- Purple – Event Production Teams
This provides clear airspace awareness and helps prevent authorized partner drones from being mistakenly reported as threats.
Flight Synchronization
This feature allows the user to keep flight logs and history even when the device is not connected to the cloud or doesn't have network & cloud capabilities. On this page, you will learn how to enable and use this function and how it works.
The function in the Dronetag app utilizes the new flight store function available on the latest Dronetag devices firmware, which can store flight data locally. Before you start using this feature, please ensure you have the latest version of the Dronetag App installed on your phone (2.82.0 and later) and that your Dronetag device is updated to the newest firmware version.
How to enable the function
Updating your device to the latest version will automatically enable the flight store on your device. But it's best to check if the function is enabled using the following steps:
To enable the function, turn on your Dronetag device, open the Dronetag App, and navigate to "My Devices". On the device detail, navigate to "Configuration" and check that the "Enable flight store" toggle is enabled. Save the updated settings by Menu and Save, then restart the device.
You're now ready to perform flights with your Dronetag device. The flight data will be stored locally on the device's flash memory, which you can synchronize in the app later.
If you cannot find the "Enable flight store" configuration item, please check you're using the latest version of Dronetag App, you have the latest firmware installed and your device supports the function.

How to synchronize the flights
After enabling the function, your latest flights should now be stored in the device's memory and can be synchronized using your phone to the cloud platform.
To synchronize your flights, turn on your Dronetag device, open the Dronetag App, and navigate to "My Devices". On the device detail, navigate to "Synchronize flights" which will download the list of data available on your device. This action will not synchronize the data yet.
After you tap the "Synchronize all flight data" button, the synchronization process will begin. During the synchronization, please do not turn off your device or close the app.
Keep in mind that after the data are synchronized, they will be deleted from the device's memory to free up space for new flights and make the next synchronization more effective. If you use both Dronetag App and Dronetag Toolbox, we recommend synchronizing the data only in one of the apps.
After the process finishes, you should see the synchronized flights in the "My Flights" section of the app. The flights are now available on the cloud platform, and you can view them on the web app as well.
If you encountered problems during the synchronization, please check the troubleshooting section below.
How it differs from cloud flights
You may wonder how the Flight Synchronization feature differs from the Cloud Flights feature. The NRI-enabled devices (such as Dronetag Mini) transmit the flight telemetry data in real-time to our cloud platform. After your flight finishes, the received flight data are processed, and the flight is available on the cloud platform for you to view immediately.
DRI-only devices (such as Dronetag Beacon or Dronetag BS) cannot provide such functionality because the flight telemetry broadcasts only locally using Bluetooth. Our servers cannot receive the telemetry data, and therefore, the flight cannot be processed and stored on the cloud platform immediately after the flight is finished.
The flight synchronization allows you to store the flight data post-flight by synchronizing the data from the device using your phone.
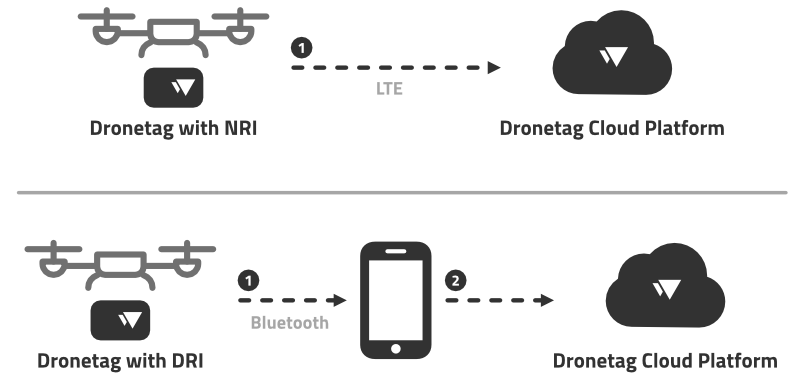
Using NRI and flight synchronization
You can still use regular NRI flights with the Flight Synchronization feature. Don't worry. The flights won't get duplicated, and you can synchronize the locally stored data even though they have been previously transmitted over the network to the cloud platform. After synchronization, the locally stored data are "added" to the existing flights without duplications.
The flight trajectory in an existing flight will stay the same, or even become more accurate. For a flight which lost the LTE connectivity for a brief period of time — after the flight is finished, the period where the device lost the LTE connectivity will have missing flight data. After you synchronize the flight data from the device, the flight will be updated with the missing data, and the flight trajectory will be more accurate.
Troubleshooting
If you do not find your problem listed below, please see the Support and Troubleshooting Guide page for more troubleshooting options.
I can't find the "Enable flight store" configuration item
If you cannot find the "Enable flight store" configuration item, please check you're using the latest version of Dronetag App, you have the latest firmware installed and your device supports the function.
We are currently working on bringing the Flight Synchronization feature to the Dronetag Toolbox app as well. We will update this page when it's available in both apps.
Synchronizations fail to finish
If the synchronization process fails, please retry the operation. If the problem persists, try restarting the app (or your phone) and retry again. If the problem still persists, there is a chance that the data on the flash memory got corrupted. In this case, please navigate to: My devices › Device detail › Troubleshooting and tap both the "Clear offline flight records" and "Clear offline telemetry" items. This will clear the data on the flash memory, and you can try to synchronize the flights again. You will lose your flight history on the device, so please perform this step as a last resort.
Synchronization is taking too long
Large amounts of flight data stored in the memory can take up to a few minutes to transfer to your phone.
Alert zones
This is a legacy function (still working in on premise setups). Please switch to the new Notifications function.
Alert zones let you define geographic areas to limit where the local detection alerts will be triggered. Zones are defined with GeoJSON and imported in the app UI. Only Polygon and MultiPolygon features are supported.
How the app uses zones
When a detection falls inside a defined zone, the system treats that detection as being within that zone. Each zone is treated separately and you will receive an alert for each of the zones (if you use overlapping zones).
Please keep in mind that the legacy alert zones are only local detection alerts. Defined alert zones are not synchronized with the account and work only in your browser/phone on your device. For server-based notifications, use the new Notifications function.
Step-by-step — create and import an alert zone (recommended workflow)
Create the GeoJSON
- Open a GeoJSON editor such as https://geojson.io
- Draw one or more polygons using the drawing tools (or paste coordinates directly)
- Ensure each polygon/area is represented as a Feature and the document is a FeatureCollection
Add properties
-
Add a
propertiesobject for each feature and include thenameandfillkeys if you want a custom label and color. Other properties are not supported. Example:"properties": {
"name": "No-Fly Zone A",
"fill": "#FF0000"
} -
namemust be a string.fillshould be a hex color string (#RRGGBB)
-
Export / copy GeoJSON
- Copy the entire FeatureCollection JSON from the editor (do not copy just a single geometry)
Paste into the app
- In the app go to Profile > Alerts and scroll to the bottom
- Paste the full GeoJSON into the GeoJSON text field
The zone(s) should appear on the map.
Minimal valid example
{
"type": "FeatureCollection",
"features": [
{
"type": "Feature",
"properties": {
  "name": "No-Fly Zone A",
  "fill": "#FF0000"
},
"geometry": {
"type": "Polygon",
"coordinates": [
[
[14.42076, 50.08804],
[14.42176, 50.08804],
[14.42176, 50.08704],
[14.42076, 50.08704],
[14.42076, 50.08804]
]
]
}
}
]
}
Fly Now Function
The Fly Now function can be used to quickly start your flight, without planning the flight in advance.
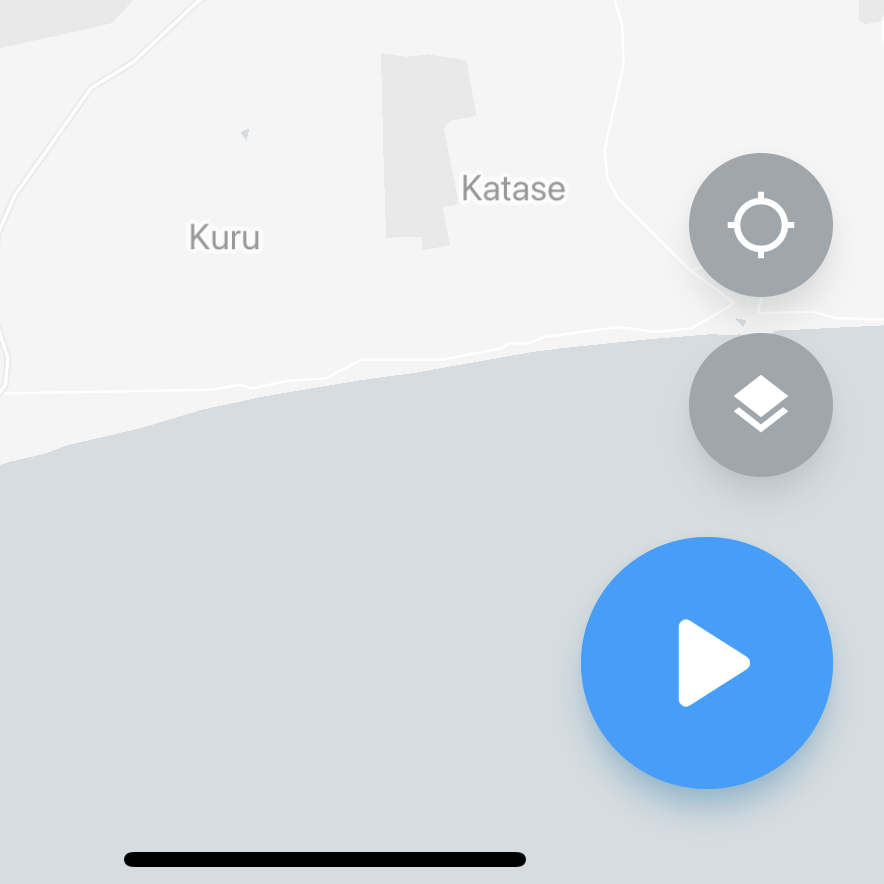
Fly Now from app
Using the Fly button on the dashboard screen of our mobile app, you can quickly create a plan using your current position, default aircraft selection and pre-defined radius of the flight region.
This is effectively the same as you would create the plan normally. You've just skipped the part where you mark the flight region on the map and manually select the aircraft you‘re flying with.
Fly Now from the device
Turn on your device and start the flight with the button (or automatically). This is similar to using Fly Now in the app, with the only difference that the flight plan is performed immediately after its creation.
The default flight plan will be created automatically with a 500m radius circle (current position used for center, the radius can be configured in your user preferences), 120 meters maximum height and your default aircraft (can be set in your profile).
Registering your Dronetag with MLIT (Japanese CAA)
To utilize the Dronetag devices for Remote ID in Japan, you must use the Dronetag app, and your DIPS app account, provided by Japan's Ministry of Land, Infrastructure, Transport, and Tourism (MLIT). Below, you will find the detailed procedure for enrolling your Dronetag device in this application to ensure compliance with local regulations.
Our Remote ID solution fully aligns with the standards set by the MLIT. Currently, Dronetag is the only provider offering Remote ID solutions that meet the regulatory requirements of Japan, the United States, and the European Union. This allows drone pilots to use Dronetag’s technology when flying globally.
Configuration Guide
The following steps will guide you through the registration process.
Ensure your drone and your Dronetag device are registered with MLIT
Before you begin, ensure that both your drone and Dronetag device are registered on your account in the DIPS app. To accomplish this, you will need the Serial Number of your Dronetag device.
Make sure you're on the latest firmware & app version
You may need to update your Dronetag device to the latest firmware. Please ensure your device is updated before proceeding. This firmware update manual applies universally to all Dronetag devices.
The minimum supported firmware versions are as follows:
- For Dronetag Beacon, use version 1.4.0 or later
- For Dronetag BS, use version 2.2.0 or later
Connect your DIPS account to the Dronetag App
First, you will need to link your DIPS account with your Dronetag account.
- On the home screen, tap on the profile icon and navigate to the Account screen
- Select Connect DIPS account at the bottom of the screen
- Enter your DIPS account credentials
- Confirm the form to sign in
When the link is successful, you will see a green checkmark and confirmation, and you should see the name of your account. Please make sure the name of your account matches your account before continuing.
Register your Dronetag with your aircraft
After signing in, you will need to register your Dronetag device with the DIPS app to receive the signing key, which will be automatically uploaded to the device.
- Ensure your Dronetag device is powered on and within range
- Go to My devices and choose the Dronetag device you want to register
- Select Link DIPS aircraft to this device
- Choose the aircraft from the list of available options
- Follow the on-screen instructions
Once completed, you will be ready to operate with Japanese Remote ID.
(Optional) Verify the correct registration in DIPS App
To confirm that the registration key has been successfully uploaded to your Dronetag device, install the DIPS app provided by the Japanese MLIT and use the "Transmission Check" function. Check the Usage Manual for the DIPS APP.
国土交通省(日本のCAAに相当)へのDronetag製品の登録について
日本国内でリモートID用Dronetagデバイスを利用するには、Dronetagアプリと国土交通省が提供するDIPSアプリアカウントを使用する必要があります。以下に、Dronetagデバイスをこのアプリに登録し、現地の規制を遵守するための手順をご説明します。
弊社のリモートIDソリューションは、国土交通省の定める基準に準拠しています。現在、Dronetagは日本、米国 the United States、EU the European Union.の各規制要件を満たすリモートIDソリューションを提供する唯一のプロバイダーであり、これにより、ドローンパイロットはグローバルに飛行させる場合にDronetagの技術を使用することが可能となっています。
設定ガイド
以下の手順で登録手続きを行います。
ご自身のドローンとDronetagデバイスが国土交通省に登録されていることを確認
DIPSアプリ内でのご自身のアカウント your account in the DIPS app. に、ドローンとDronetagデバイスの両方が登録されていることを確認してください。そのためには、Dronetagデバイスのシリアルナンバー Serial Number が必要です。
ファームウェアとアプリのバージョンが最新であることを確認
Dronetagデバイスを最新のファームウェアにアップデートする必要があるかもしれません。先に進む前にデバイスが最新の状態であることをご確認ください。このファームウェアアップデートマニュアルは、すべてのDronetagデバイスに適用されます。 This firmware update manual applies universally to all Dronetag devices.
対応ファームウェアの最低限のバージョンは以下の通りです:
- Dronetag Beaconの場合、バージョン1.4.0以降をご使用ください。
- Dronetag BSの場合、バージョン2.2.0以降をご使用ください。
DIPSアカウントとDronetagアプリの接続
まず、DIPSアカウントとご自身のDronetagアカウントを接続する必要があります。
- ホーム画面でプロフィールアイコンをタップし、「アカウント」画面に移動
- 画面下部の「DIPSアカウントに接続する」を選択
- DIPSアカウント情報を入力
- サインインの送信フォームで入力内容を確認
接続が完了すると、緑色のチェックマークと確認画面が表示され、ご自身のアカウント名が表示されます。続行する前に、アカウント名がご登録のアカウントと一致していることをご確認ください。
Dronetagデバイスを機体に登録
サインイン後、DIPSアプリにDronetagデバイスを登録し、自動的にデバイスにアップロードされる認証キーを受け取ります。
- Dronetagデバイスの電源がオンになっていて、動作範囲内にあることを確認
- 「自分のデバイス」に移動し、登録したいDronetagデバイスを選択
- 「DIPS機体をこのデバイスにリンクする」を選択
- 利用可能なオプションのリストから機体を選択
- 画面の指示に従う
登録が完了すると、日本のリモートIDでフライトできるようになります。
(任意) DIPSアプリに正しく登録されているか確認
登録キーがDronetagデバイスに正常にアップロードされたことを確認するには、日本の国土交通省が提供するDIPSアプリをインストールし、「発信情報詳細」確認機能を使用します。DIPS APPの取扱説明書をご確認ください。 Check the Usage Manual for the DIPS APP.
Full Flight Detail
Full flight detail screen allows you to observe real-time data of flying aircraft. The shown flight information can come from two sources: Direct Remote ID (DRI) or Network Remote ID (NRI). Currently, only NRI from Dronetag devices is supported and an internet connection is required to show them on this screen. DRI is now supported only from Dronetag devices. However, work is being done on supporting NRI from multiple providers and displaying DRI according to the prEN 4702-2 and ASTM F3411 standards. These features will be coming in the next few weeks.
If you want to track your flight, the In-flight Overview screen is a better choice because it brings some additional functionality (e.g. in-flight notifications).
Tips & Tricks
- Scroll down the fields to see additional flight information.
- Long press your finger against the field to copy its value.
- The interactive map is present only on the dashboard with a short flight detail.
- The DRI data are not stored in the mobile app and are cleared when the app closes.
Field Explanations
- Source - The origin of the received data. Possible values are:
- Network Remote ID (NRI)
- Direct Remote ID (DRI)
- Mixed (both NRI & DRI).
- UAS ID - The unique serial number of the drone or add-on device compliant with the ANSI/CTA-2063 standard.
- Operator ID - The unique identifier assigned to the pilot by the local National Aviation Authority in the EU member state. Also known as the UAS Operator ID.
- Flight category - The category of flight operation (Open, Specific, or Certified) as defined in Implementing Act (EU) 2019/947.
- Height - The vertical distance of a drone’s position above the take-off location.
- Altitude (pressure) - The elevation above a standard datum air-pressure plane 1013.25 hPa.
- Altitude (geo) - The aircraft’s vertical distance from the WGS-84 ellipsoid.
Dashboard
The dashboard is the main entry point of the mobile and web applications. It allows you to inspect airspace zones, open up flight detail, or have a quick overview of your device status. Any airborne aircraft will be shown with a triangle-shaped icon on the map. If the aircraft belongs to you, it is highlighted in blue so you can easily distinguish it from others. Moreover, basic map layer changes are possible and further map customization will be soon introduced.
Airspace Zones
The app currently shows three types of airspace zones:
-
Airports
-
Controlled airspace
-
Special use airspace.
In most cases, you are not allowed to fly close to the airports without authority/airport permission. Flying in controlled airspace is mostly possible, but care must be taken to not exceed certain height limits to not endanger manned aviation. Special use airspace includes national parks, forbidden zones, temporary reserved area (TRA), and temporary segregated area (TSA), and flying in those is generally forbidden without permission. However, TSA and TRA might not be active all the time or their lower altitude level might not start at the ground surface.
Short Flight Detail
After tapping on any aircraft icon on the map, the short flight detail panel appears. It contains basic information about the flight and allows you to further open Full Flight Detail. If you need as much space as possible on the dashboard, you can toggle the minimalistic version of the panel. The minimalistic version could also be set as the default option in Preferences.
Notifications
The dashboard also contains functionality to show notifications in the same manner as in the In-flight overview screen. Please see Notification Settings for further details.
In-flight Overview
The in-flight overview screen shows information about your ongoing flight. Currently, the application only supports the transfer of NRI data from the Dronetag devices and an internet connection is required to view it on this screen. The Dronetag Mobile app currently supports combining data from NRI with DRI received from Bluetooth 4 Legacy. Other DRI protocols and NRI support from other providers are coming soon. Besides flight information, the in-flight overview also displays notifications about potential hazards and alerts.
Field Explanations
- Flight category - The category of flight operation (Open, Specific, or Certified) as defined in Implementing Act (EU) 2019/947.
- Last seen - Elapsed time in seconds since the last telemetry was received.
- Takeoff Location - Latitude and longitude coordinates of drone's takeoff.
- Location - Latitude and longitude coordinates of drone's current position.
- Height - The vertical distance of a drone’s position above the take-off location.
- Altitude (pressure) - The elevation above a standard datum air-pressure plane 1013.25 hPa.
- Altitude (geo) - The aircraft’s vertical distance from the WGS-84 ellipsoid.
Subscriptions
Find out more about Subscription plans for transmitters and Connect Plans for RIDER and how to manage them.
Whether you’re broadcasting Remote ID or monitoring Remote ID signals in the airspace, Dronetag subscriptions keep your devices connected to cloud (Mini, Mini 4G) and powerful.
Learn about Subscriptions for transmitters and RIDER Connect Plans for RIDER - what they do, how they work, and how to manage them directly in the Dronetag App.
Checking Connectivity Plan Status
You can check your current Connectivity Plan status anytime in the Dronetag App (mobile or web):
Option 1 – From Home Screen
On the home screen with the map, tap your RIDER profile card to open the device detail screen.
You’ll see the current state of your Connectivity Plan usage.
Option 2 – From Profile
Open Profile → Account Details, where you’ll find a list of all your active, expired, or pending bundles.
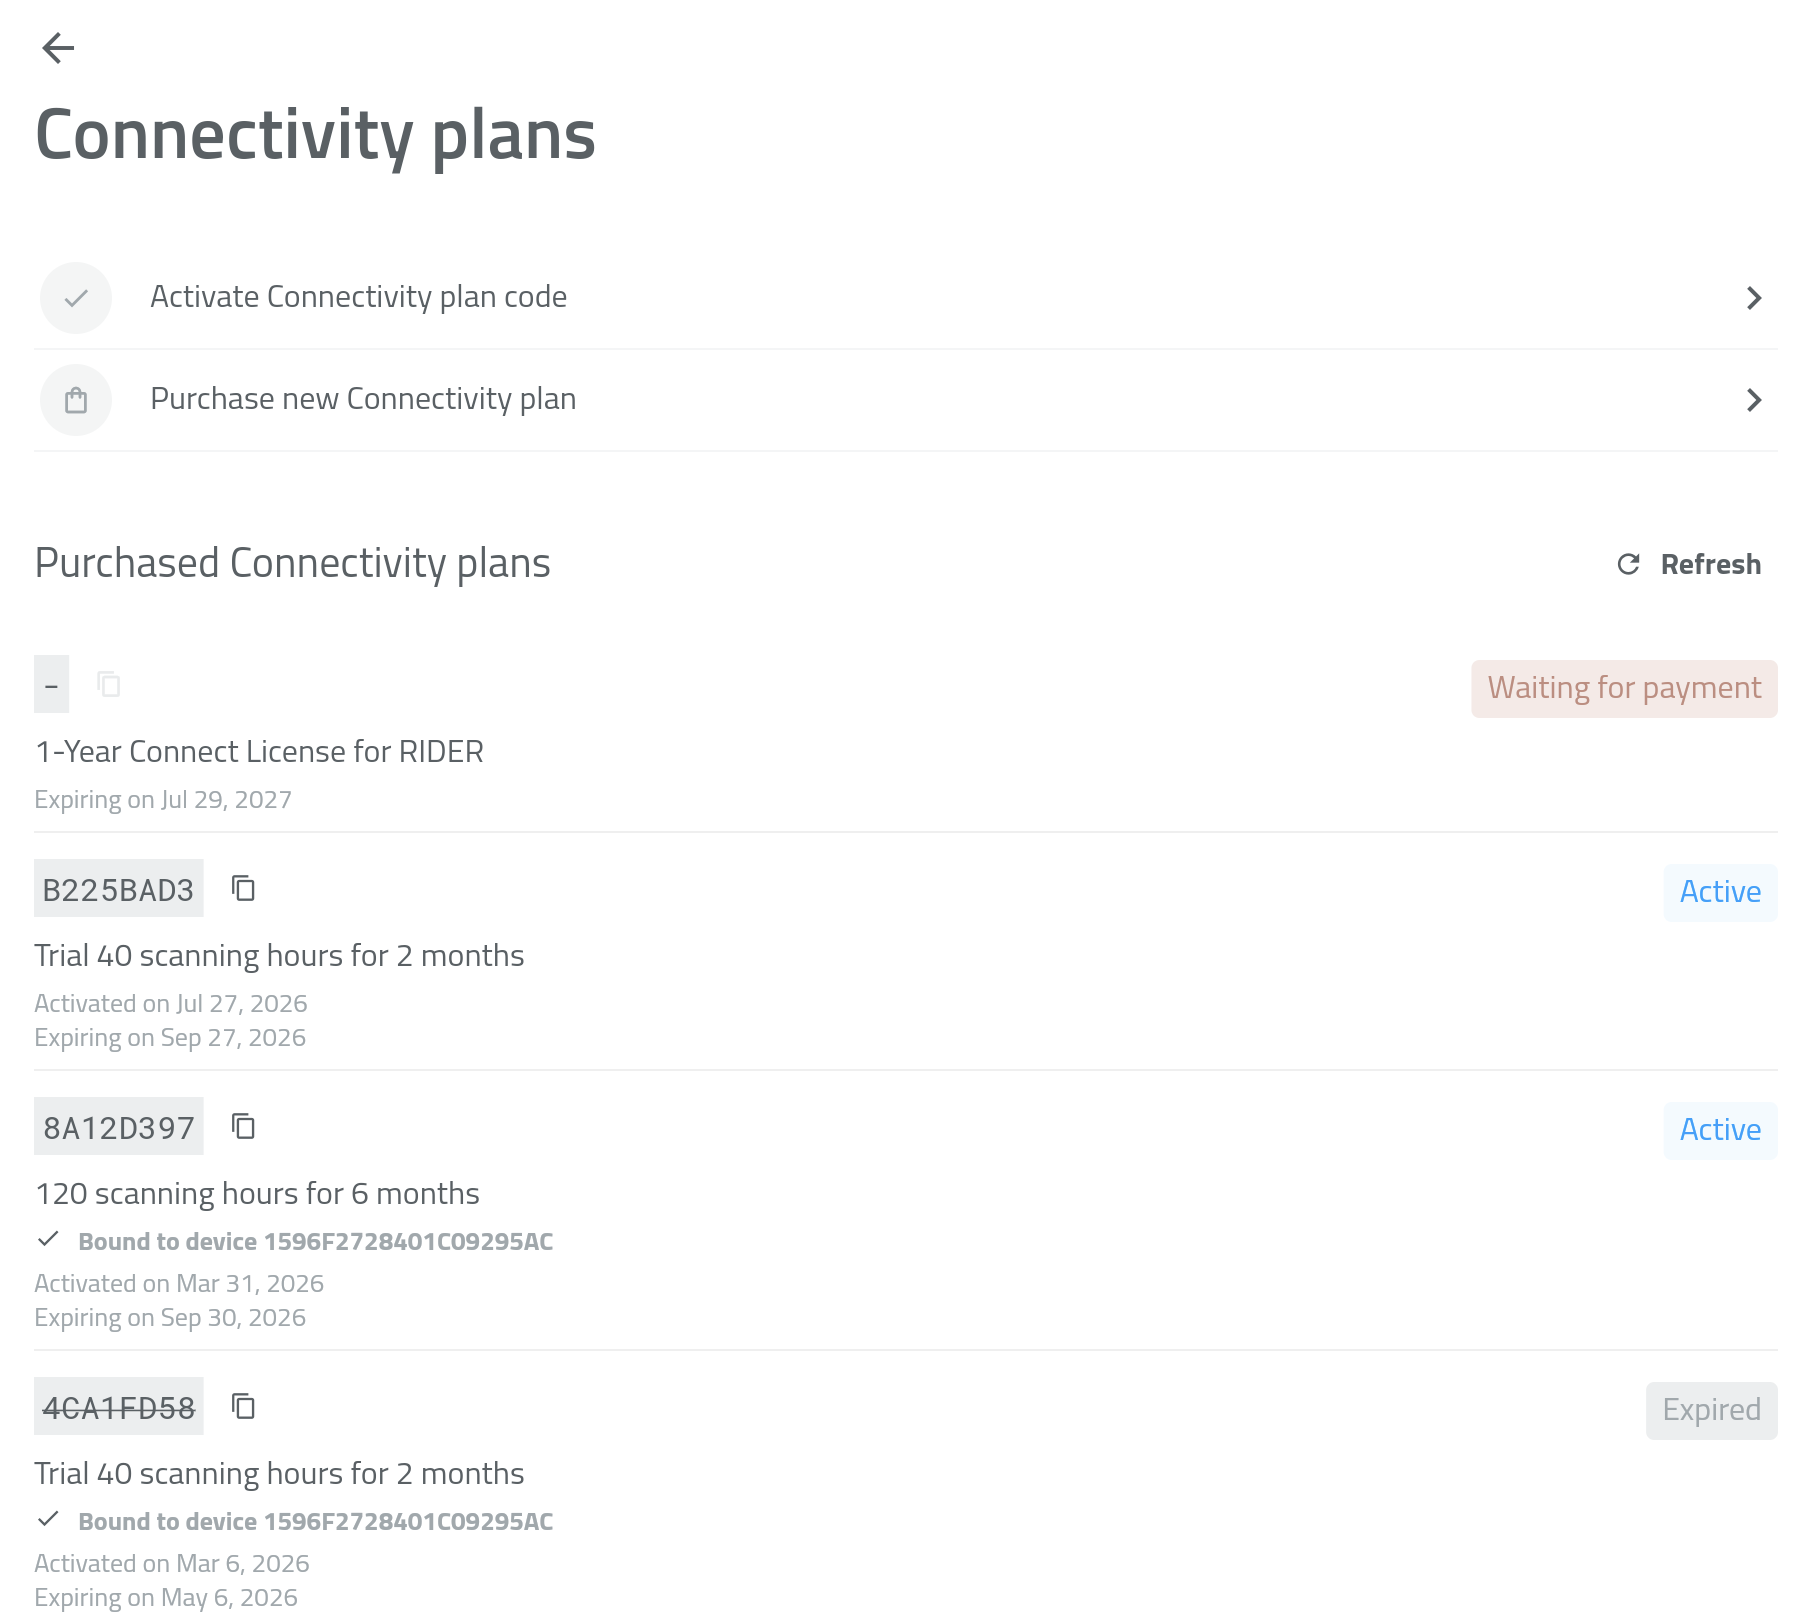
What Happens When Connectivity Plan Expires
Once your Connectivity Plan runs out or expires:
- Cloud data storage is paused
- RIDER switches to Offline Mode
You can still scan drones via Bluetooth with the Drone Scanner (Gen. 2) app. Just don't forget to turn the LTE feature off in your RIDER's Configuration page in the Dronetag app.
To continue detecting in Online Mode, activate a new Connectivity Plan.
Learn how in the Purchasing a Connectivity Plan chapter.
Questions & Support
If you have any questions about your Connectivity Plan or account, we’re happy to help.
Contact our support team or email us directly at support@dronetag.com.
We’re here to make your Dronetag experience seamless.
Purchasing a Connectivity Plan
A Connectivity Plan lets your RIDER stay connected to the Dronetag Cloud via its built-in LTE SIM.
It enables:
- Real-time data sync
- Detection storage and history
- Remote monitoring
- API and third-party integrations
You can purchase and activate a Connectivity Plan directly in the Dronetag App (mobile or web).
A Dronetag account is required for activation.
Before purchasing, make sure you’ve used your 2-month free trial that comes with every new RIDER.
How to Purchase a Connectivity Plan
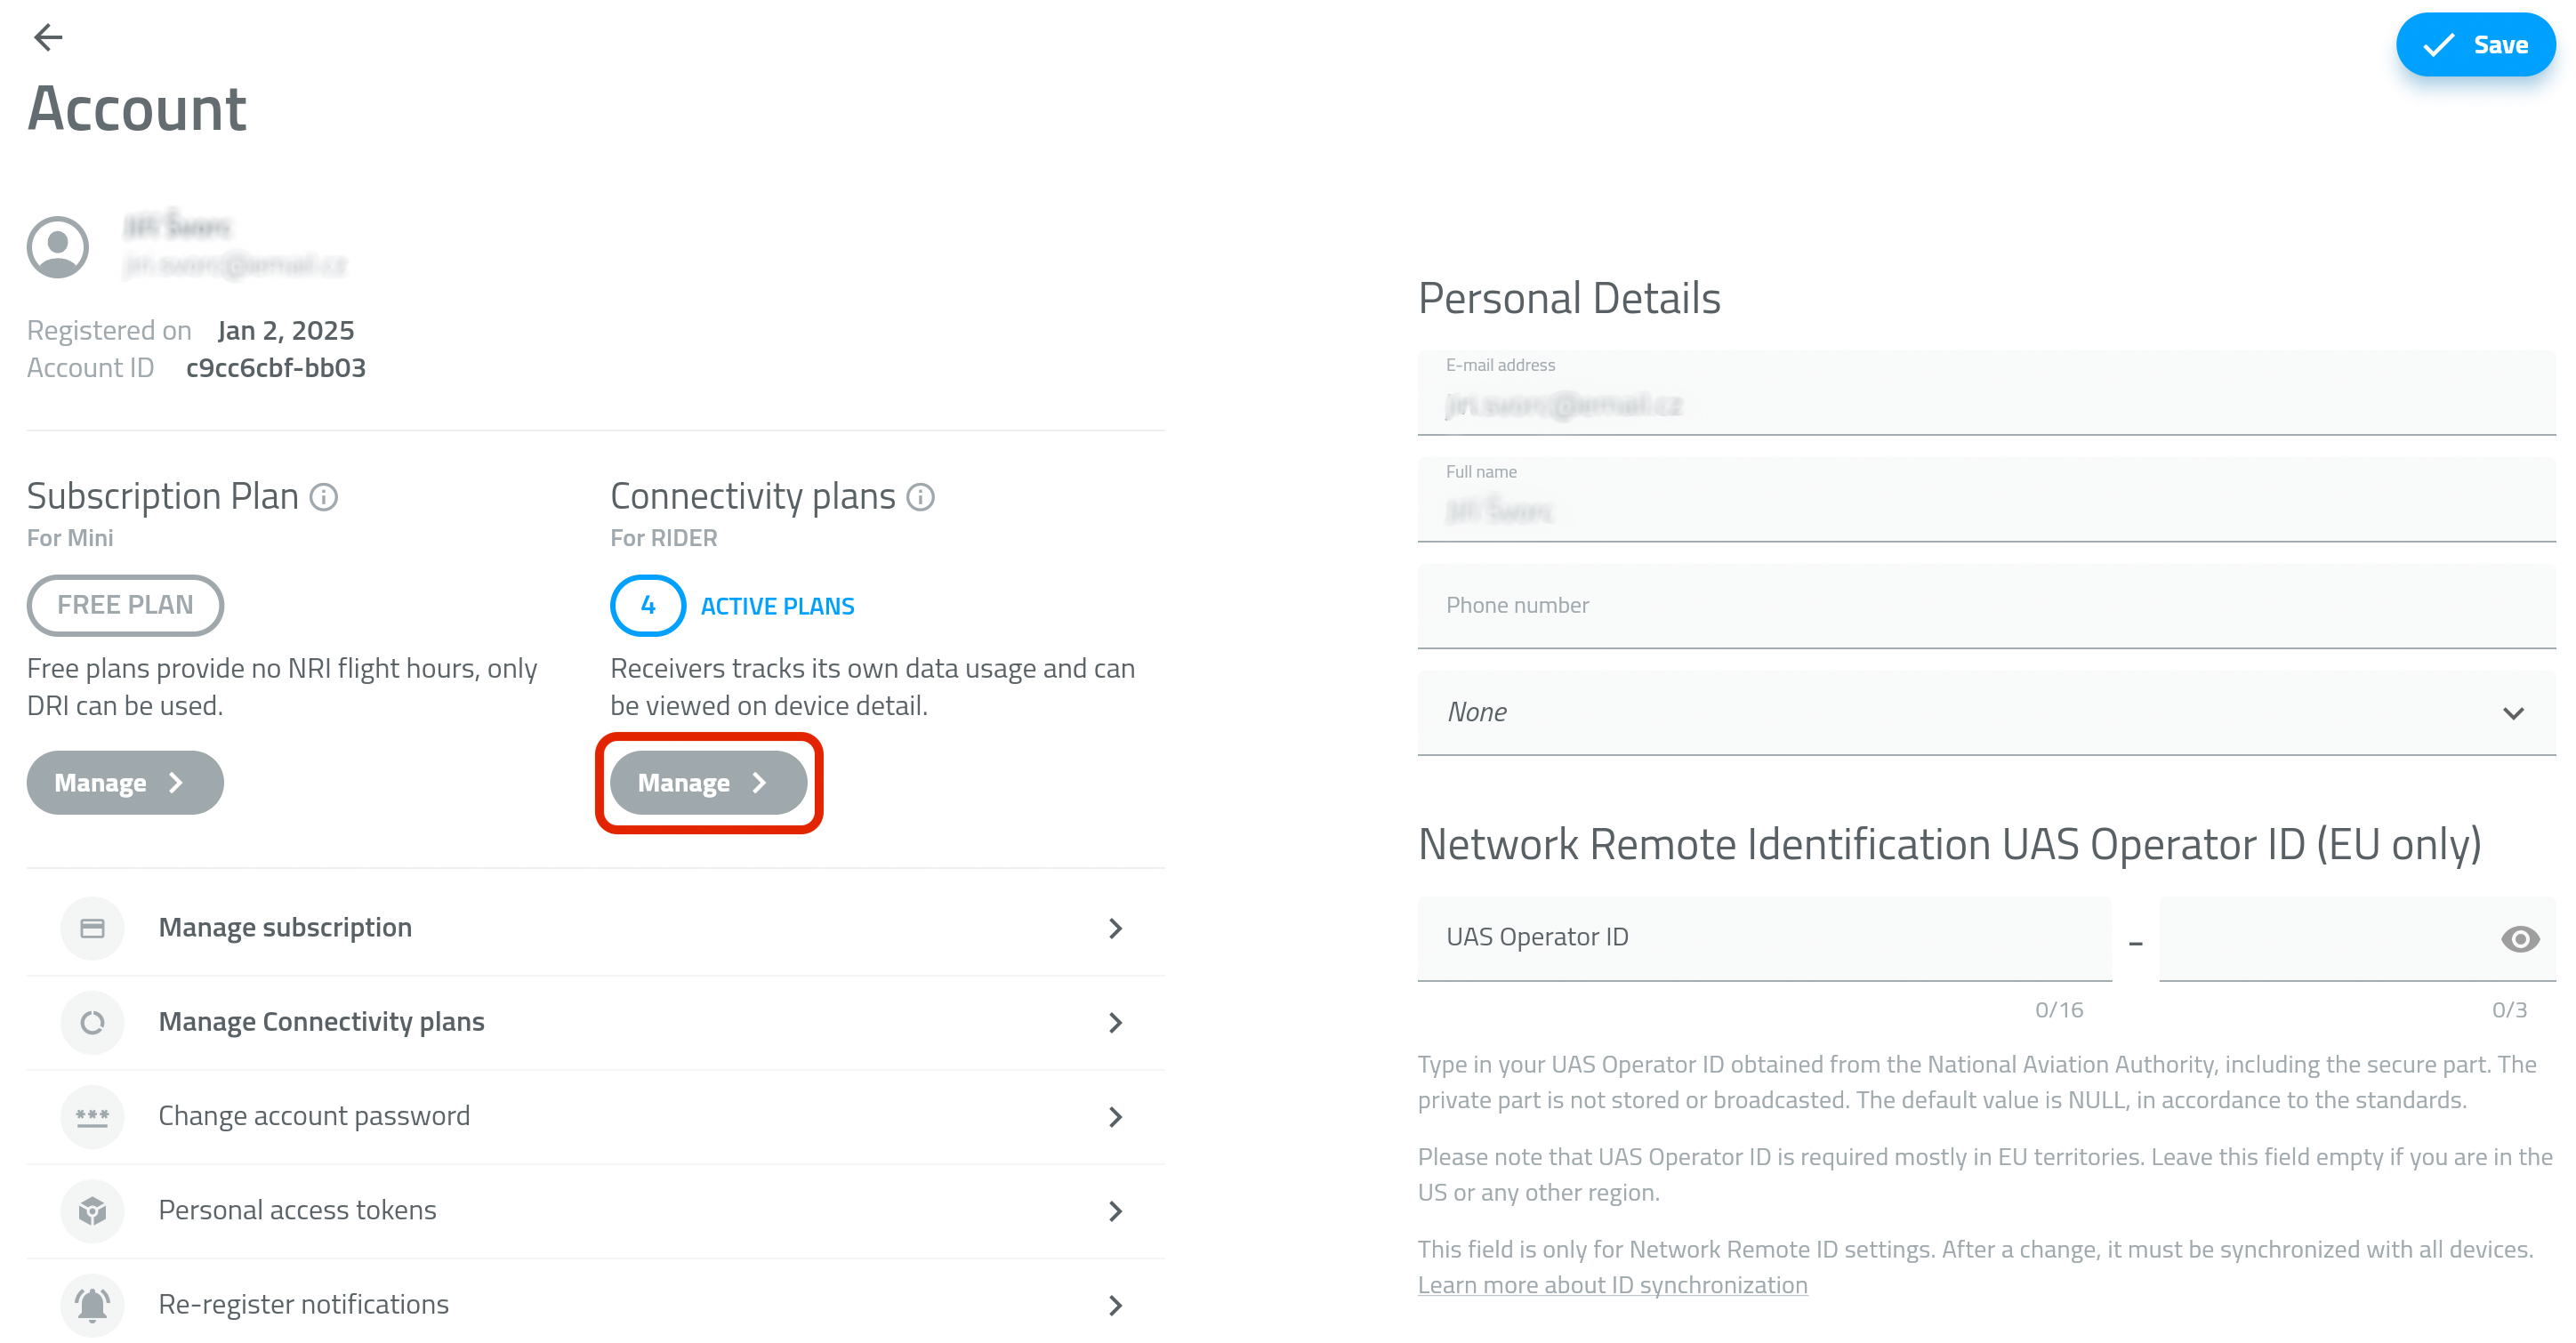
- Open the Profile tab and go to Account details.
- In the Connectivity plans section, tap Manage - PICTURE 1
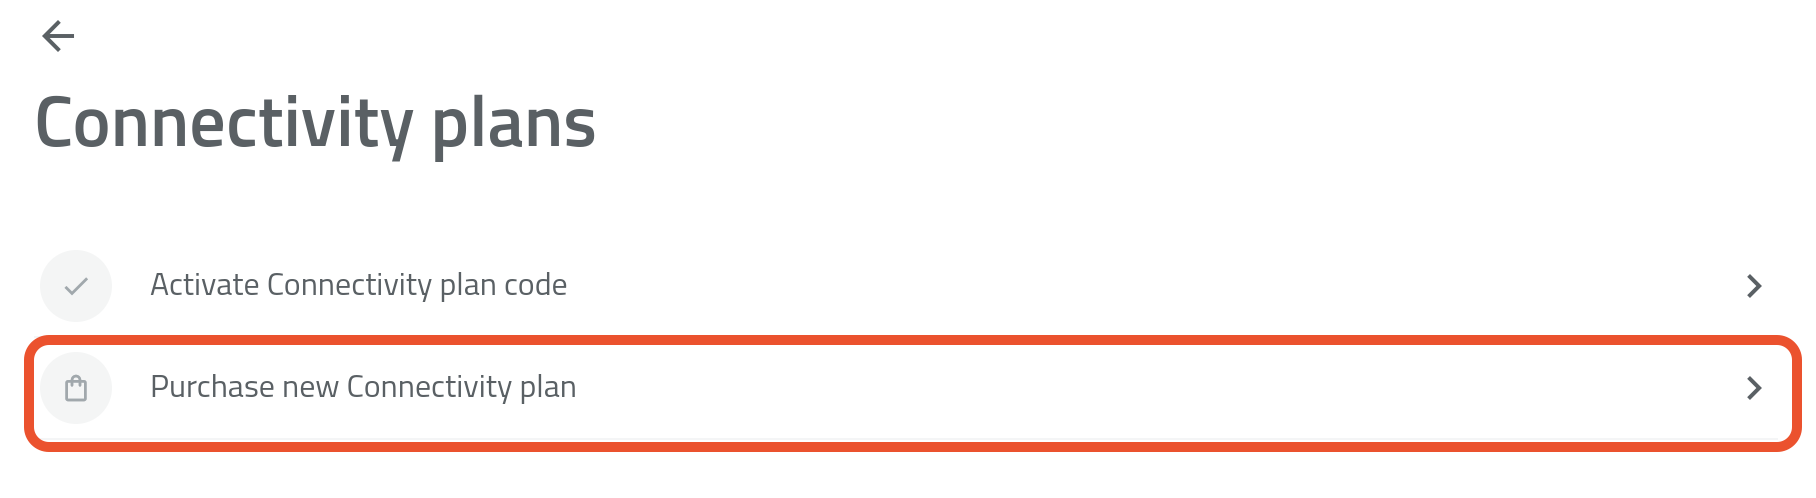
- Tap Purchase a New Connectivity Plan - PICTURE 2
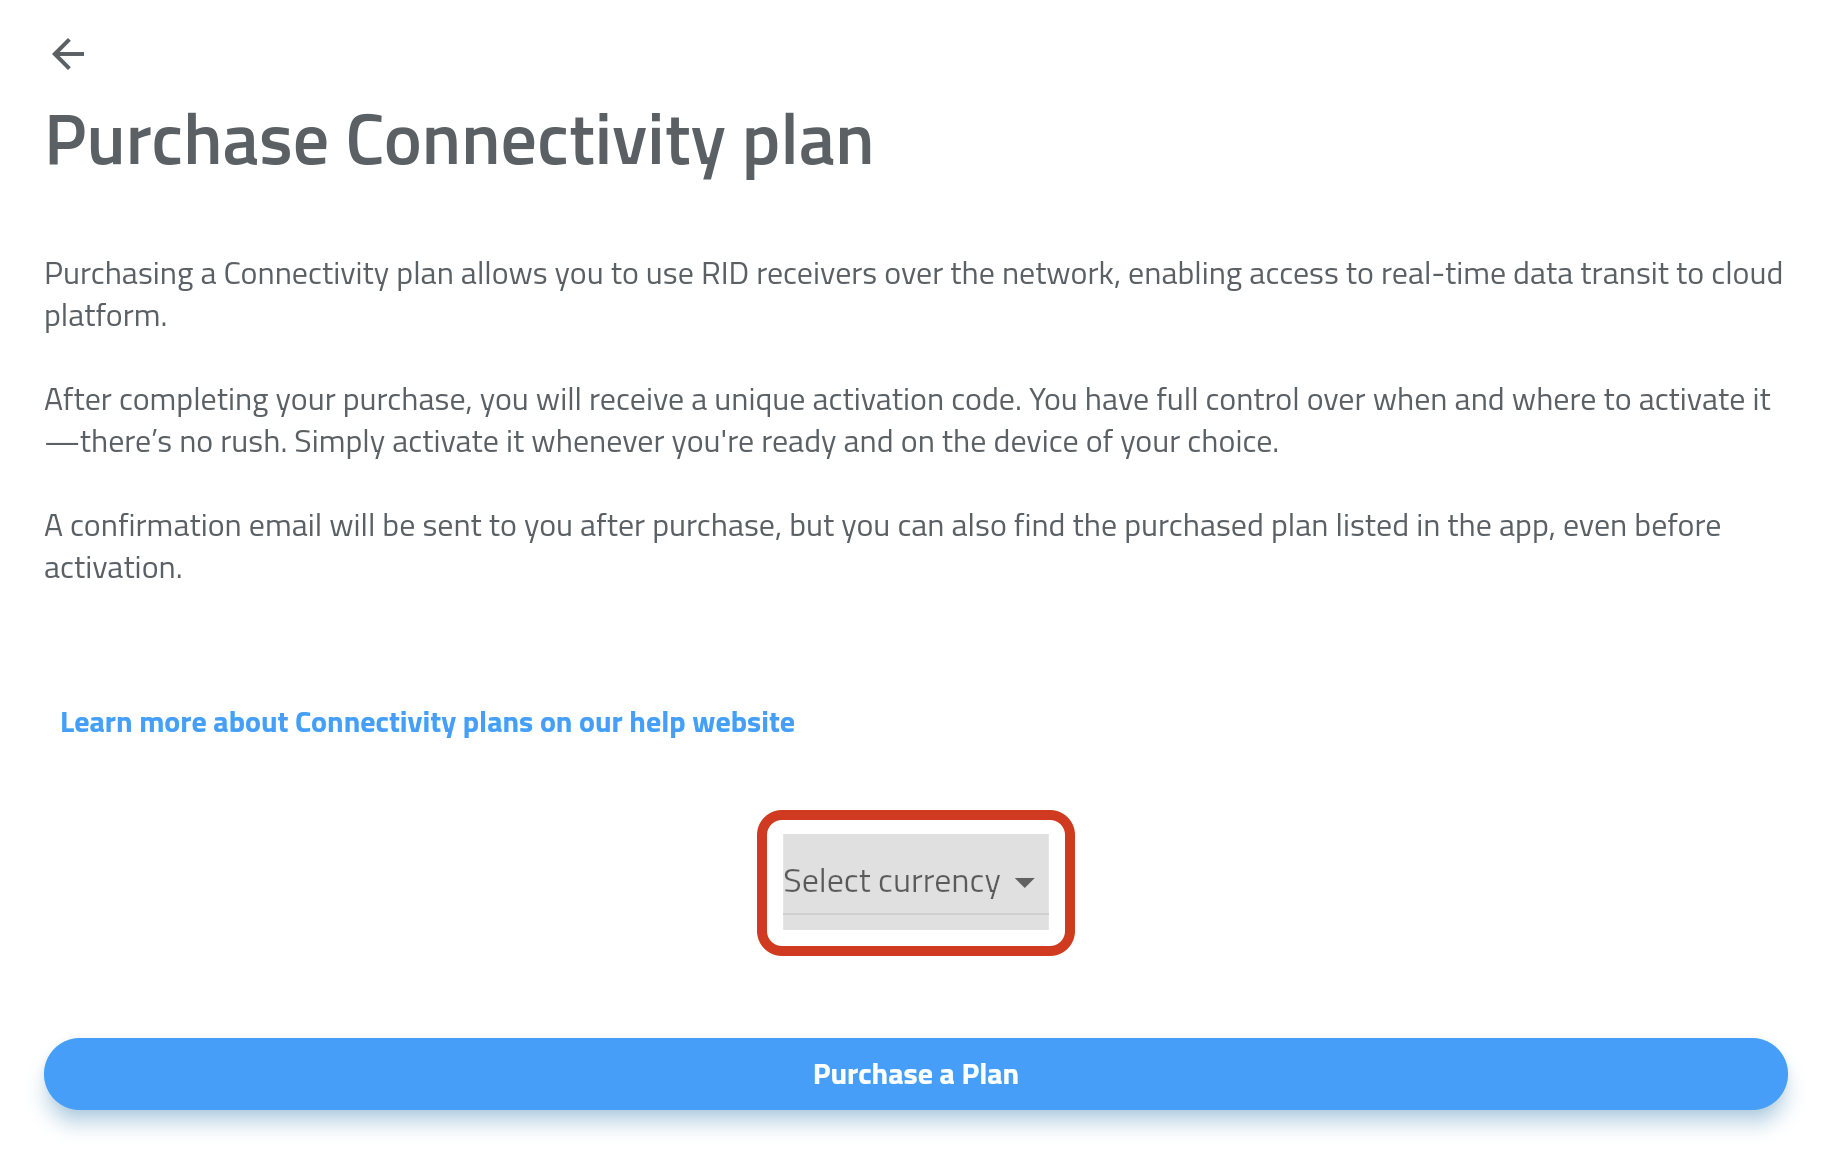
- If prompted, select your country and choose your preferred currency (EUR or USD) - PICTURE 3
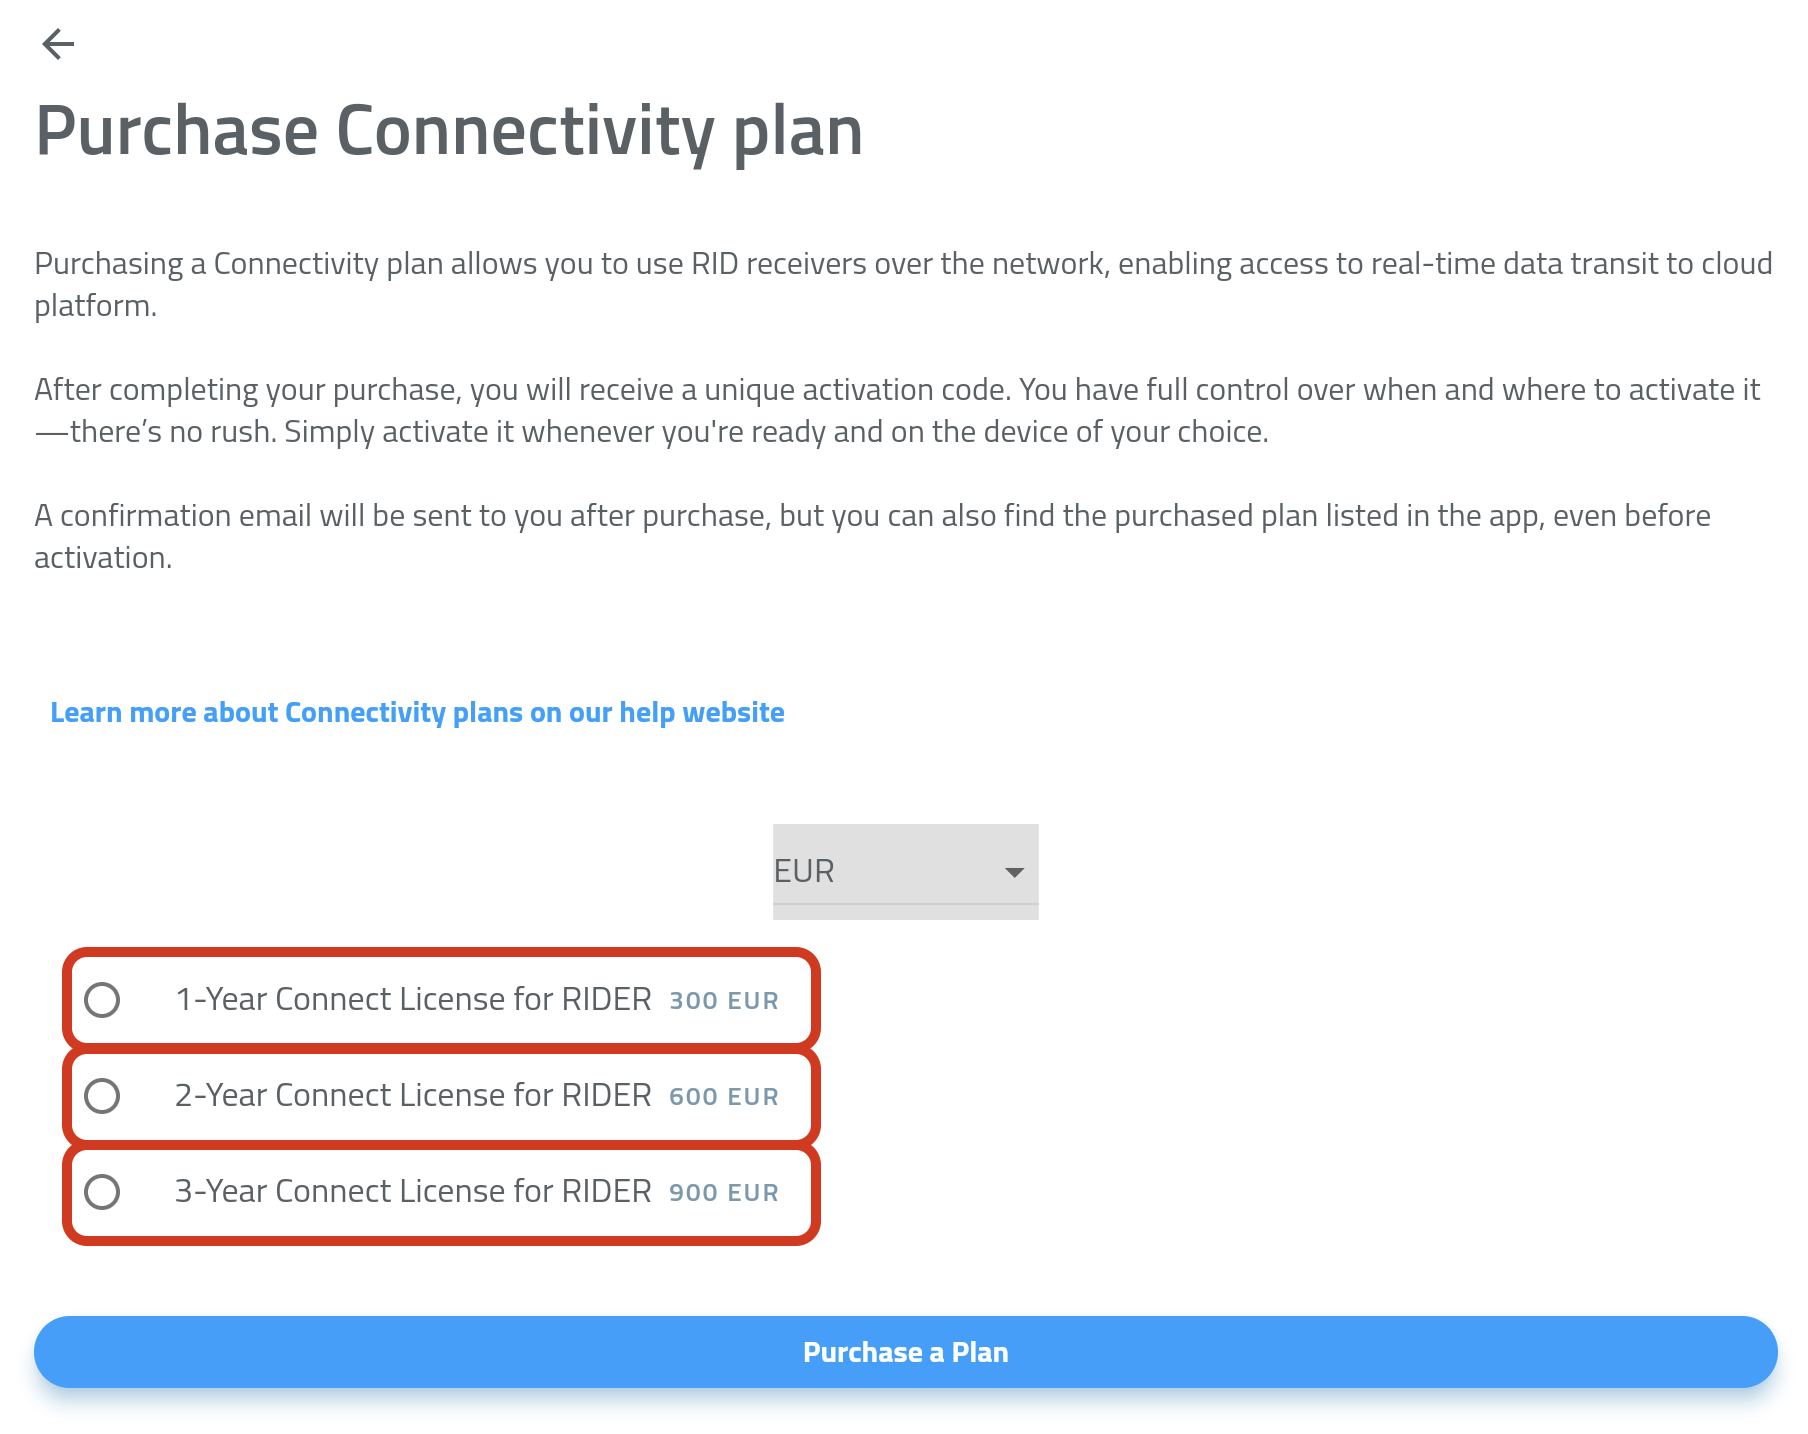
- Select the Connectivity Plan you'd like to purchase (1, 2, or 3 years) - PICTURE 4
- Tap Purchase Plan.
- Complete the payment by following the instructions in the payment gateway.
Payment Methods
We accept the following payment methods:
- Credit Card
- Apple Pay
- Google Pay
All payments are securely processed via Stripe - we never store your payment information.
Every RIDER includes a free trial Connectivity Plan (valid for 2 months).
Once it expires, you can buy a new Connectivity Plan anytime to continue using Online Mode.
If you don’t purchase a Connectivity Plan, simply switch to Offline Mode via Drone Scanner (Gen. 2).
Troubleshooting Payments
If your payment doesn’t go through, check the following:
- Your card supports online/international payments
- Your billing details are correct
- Your bank has authorized the transaction (some cards require in-app confirmation)
- Apple Pay / Google Pay are linked to valid cards
If issues persist, try another payment method.
Still having trouble?
Contact support@dronetag.com and include a brief description or screenshot of the issue - we’ll help you fix it quickly.
Activating a Connectivity Plan:
- Open the Profile tab and go to Account details.
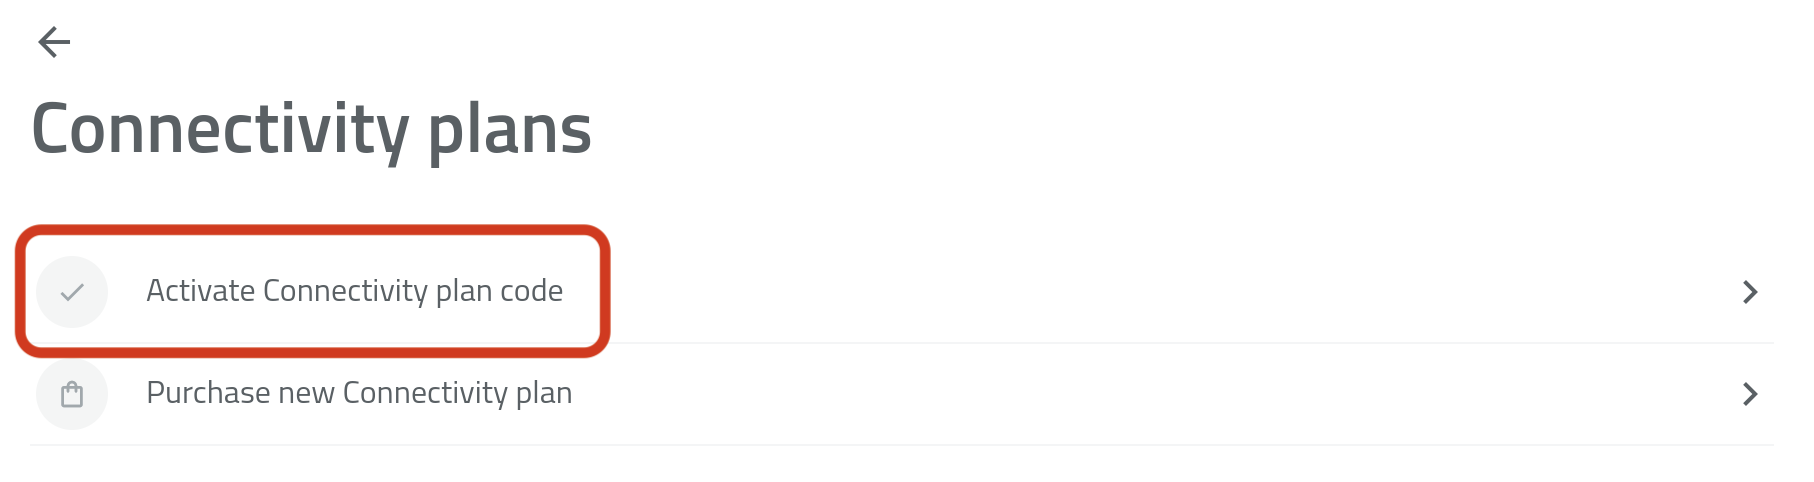
- In the Connectivity plans section, tap Manage - PICTURE 1
- Tap Activate Connectivity Plan Code - PICTURE 2
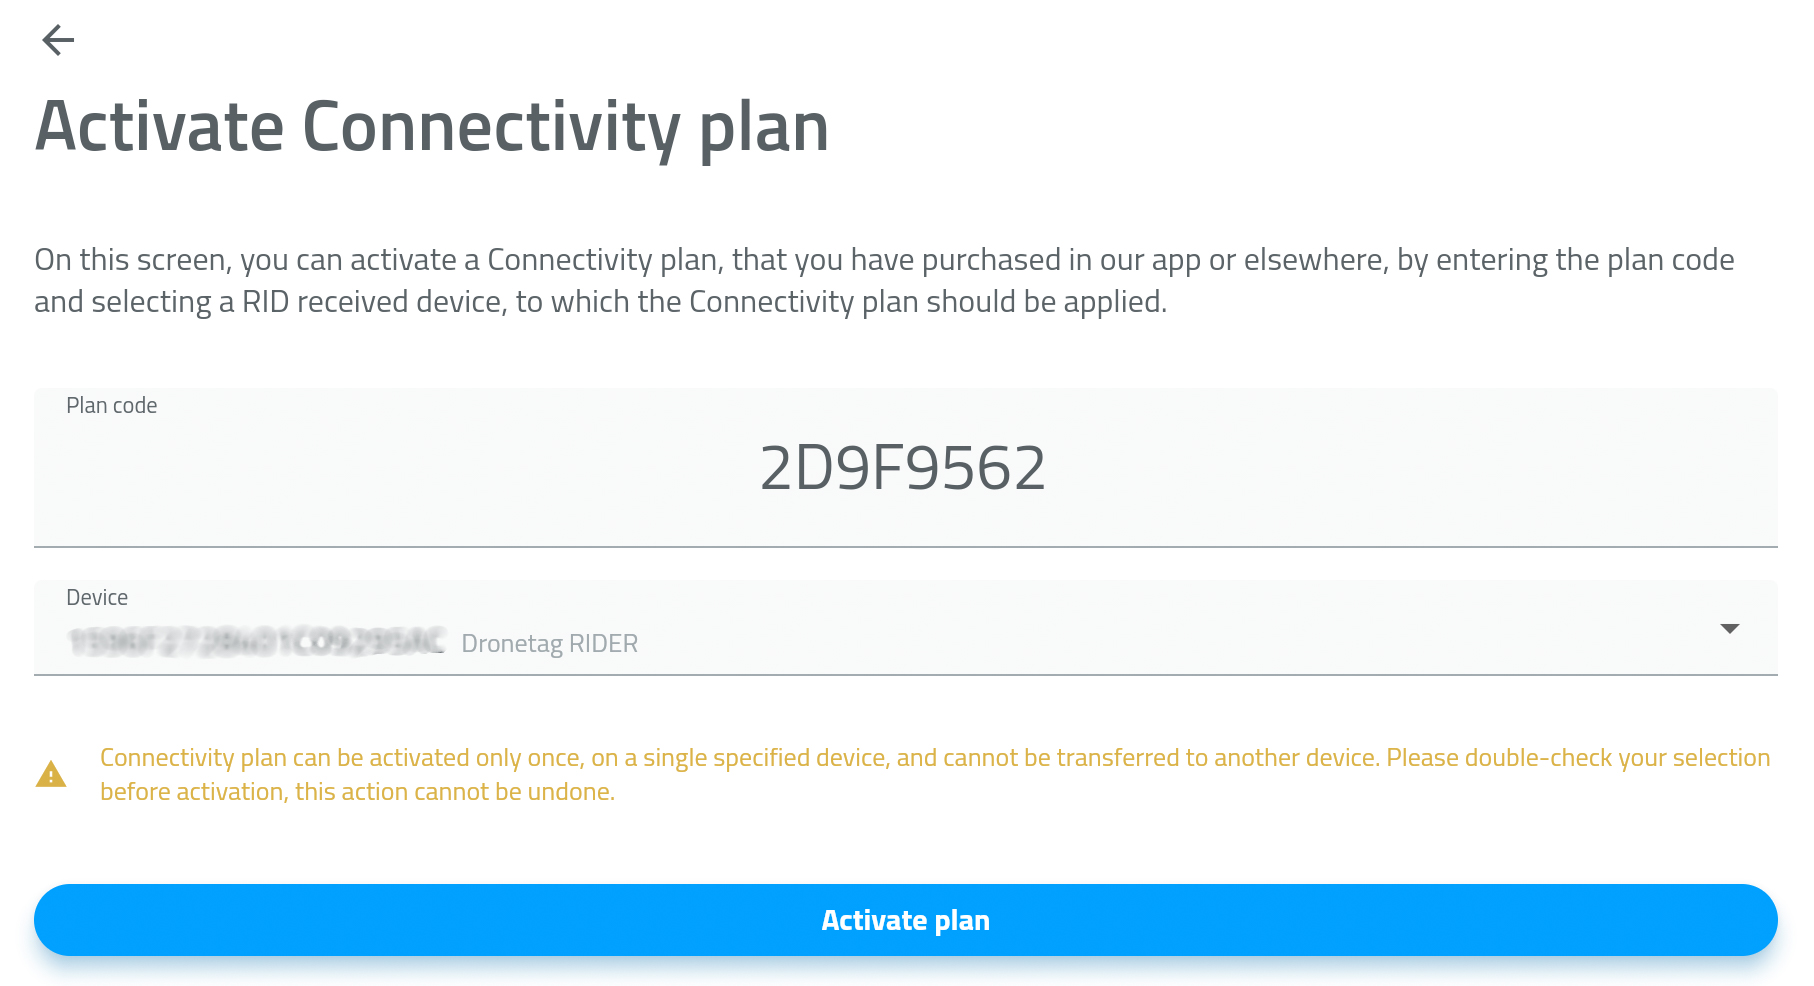
- Enter or paste the activation code from the previous screen.
- Select the RIDER device you want to activate the plan for - PICTURE 3
- Tap Activate Plan.
Your Connectivity Plan is active now.
Activating a subscription plan
Our subscription plans can be activated in our mobile & web app. To activate a subscription plan, you will need to have registered a Dronetag account.
Before you go purchase a subscription, check if you don't have an available trial. You can check this by navigating to the Profile and then My devices. Select the device for which you might have the trial available. On the device detail you will see the option to activate the trial. If you have multiple devices, you can check the trial eligibility in Profile → Account → Manage subscription.
Purchasing a new plan
Navigate to the Profile screen, tap on the account card, which will get you to the Account screen. On this screen, select Manage subscription. You will see a list of available subscription plans. Tap on the plan you want to purchase and follow the instructions.
You will be redirected to the payment page. Enter your credit card details. Be aware that unless you cancel the subscription, this credit card will be charged automatically monthly or yearly, depending on the plan you have chosen.
After you complete the payment, you will be redirected back to the app. Your subscription will be activated immediately, check your profile to see that the subscription is active.
If not, please give it a few minutes and try again. If you still cannot see the subscription active after a few minutes, check if the payment went through and was not denied. In either case, you can contact us at support@dronetag.cz.
Payment methods
You can pay for your subscription using a credit card, PayPal, Apple Pay or Google Pay. We use Stripe to process credit card payments. We do not store any credit card information on our servers.
Changing or renewing your plan
You can change your subscription plan at any time. See the ‘Changing the plan’ section for more information on how to do that.
If you previously canceled your subscription, you can renew it at any time. See the ‘Renewing the plan’ section for more.
Cancelling your subscription
At Dronetag, we understand that your needs may evolve, and circumstances can change. Therefore, we've made the process of unsubscribing straightforward, ensuring you have the flexibility to manage your subscription at any time.
How to cancel your subscription
You can cancel your subscription at any time. Cancelling your subscription will prevent any future charges to your credit card.
Don't worry, you will still have access to your subscription until the end of your current billing period.
Follow these steps to cancel your subscription:
- Login to your Dronetag account
- Access your account via our web or mobile app
- Navigate to the Subscription page
- First, open the Profile page by tapping the button in the top-right corner on the app's main screen
- Then, tap the profile card with your name to get to the Account page
- Finally, tap the Manage subscription button
- Select “Cancel your current plan”
You will be redirected to the Stripe portal. Follow the instructions to cancel your subscription.
If you do not have any overdue invoices, you can cancel the plan by tapping the Cancel plan button. After you confirm the cancellation, you can return back to the Dronetag app. You will still see the same plan active until the end of the current billing period.
Renewing the plan
If you change your mind, you can renew your subscription at any time. You can do so by tapping the Renew plan button on the Subscription page. In some cases, you might be redirected to the Stripe portal to confirm the renewal. Follow the instructions to renew your subscription.
Checking the status and usage
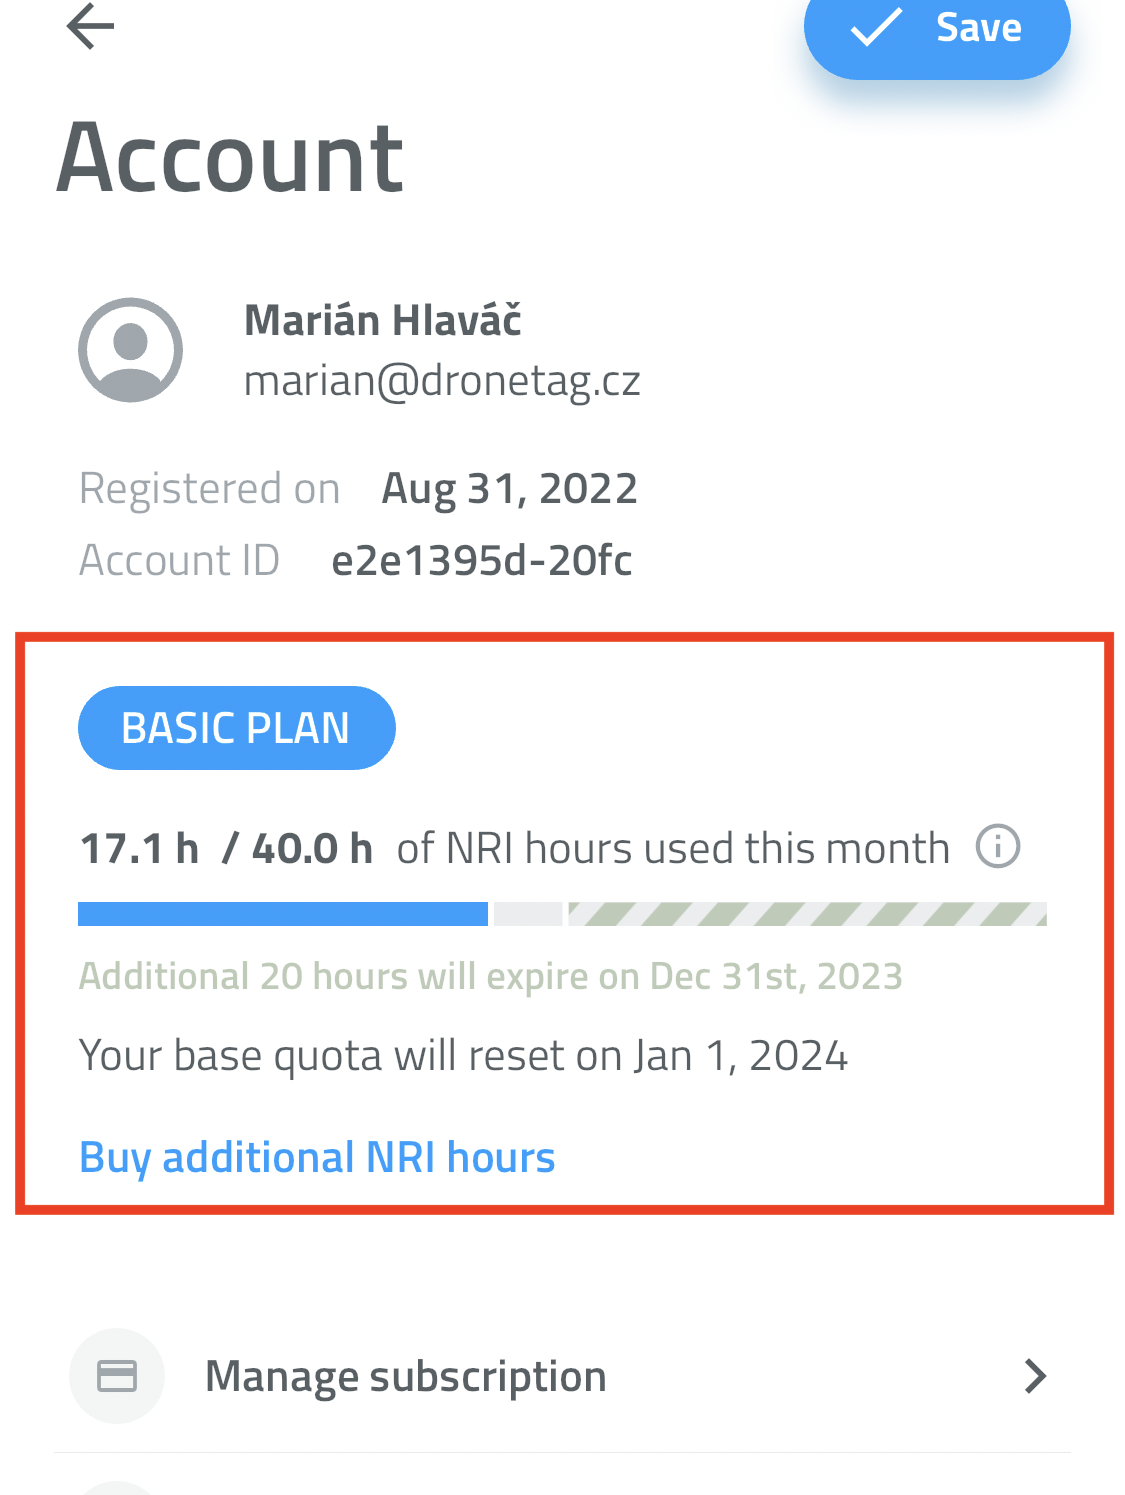
The current state of your subscription and flight hours usage can be checked in our mobile & web app.
Open the Profile screen and tap on the profile card with your name to get to the Account screen. There you can see the current state of your subscription and flight hours usage for the current billing period.
The simple chart visualizes the usage of your flight hours. The blue part represents the flight hours that you have used up, the grey part represents the flight hours that you have not used up yet, and the green part represents the additional flight hours that you have purchased and not used up yet.
What are NRI hours?
NRI stands for Network Remote ID, and "NRI hours" is the monthly limit of the number of hours that you can use your Dronetag over the network. However, this limit does not apply to the usage of your Dronetag over Bluetooth. You can use your Dronetag over Bluetooth as much as you want.
What happens when flight hours are used up
When you have used up all your flight hours, you will not be able to fly your drone until the quota gets renewed at the beginning of the next billing period.
If you need to continue flying this month, you'll need to upgrade your plan or buy additional NRI hours.
Buying additional flight hours
You can purchase additional flight hours by tapping the Buy additional NRI hours button on the Account screen. You will be redirected to the Stripe portal to complete the purchase. After you complete the purchase, you can return back to the Dronetag app. You will see the additional flight hours added to your account.
Notice that the additional flight hours have a separate expiry date. They do not expire at the end of the current billing period, but at their own expiry date.
Example: On January 15th you exhausted all your 20 flight hours. You purchased an additional 20 hours. Your billing period ends on January 31st, but the additional 20 hours expire on February 15th.
Changing the plan
Changing the plan can get complicated, but we're trying to make it as easy as possible. You can switch the subscription right away and use the features from the new plan immediately.
You can change your subscription plan anytime. If you change your plan, the next billing period you will be charged for the new plan together with a prorated amount for the remainder of the current month based on the new plan's pricing.
Questions & support
If you have any questions or concerns regarding the subscription, please don't hesitate to contact us. We're here to ensure your Dronetag experience is as seamless as possible.
Visit our contact page if you wish to get in touch with us.
Integrating DJI AeroScope with Dronetag
DJI AeroScope detects nearby DJI drones and their operators. By pointing your AeroScope at Dronetag, its detections appear in the Dronetag App alongside your other data — no extra hardware required.
This integration is available to existing customers and is set up individually for each unit.
If you have a DJI AeroScope (Mobile or Stationary) and would like to connect it to Dronetag, contact us at support@dronetag.com and we will enable it for your unit.
This is an early integration and will be improved over time. For now:
- Detected drones are shown as Remote ID (Wi‑Fi Beacon) signals.
- The AeroScope itself appears in the Dronetag App as a Dronetag Scout device.
- The location of the AeroScope is not shown on the map — reporting the receiver's own position is not supported yet, for technical reasons.
What you need
- A DJI AeroScope unit — Mobile or Stationary (AS-F1800).
- The serial number of your AeroScope. You send this to us so we can add your unit. You can find it in DJI Assistant 2 → Device Status, or on the label on the unit itself.
How to integrate
Contact Dronetag support
Email support@dronetag.com with the serial number of your AeroScope. Once we confirm the serial and add it on our side, your AeroScope can be registered in the Dronetag App like any other Dronetag device.
Open the Server Network Settings
Connect your AeroScope to DJI Assistant 2 (via the same router, or a direct Ethernet connection) and open Network Settings → Server Network Settings.

Point the AeroScope at Dronetag
In Server Network Settings, enter the following, then click Settings to save and Refresh to confirm:
Field Value IP Address aeroscope.dronetag.appPort Number 9090Confirm the connection
Once configured, your AeroScope connects to Dronetag. Any DJI drone it detects appears in the Dronetag App as a Remote ID (Wi‑Fi Beacon) signal.
Manuals
For the full setup of the unit itself (antennas, power, and network mode), follow the DJI manual for your model:
Integrating Dronetag with Aloft
Aloft Air Control is a platform designed for managing drone operations, providing real-time airspace authorizations (LAANC), flight logging, and situational awareness to help ensure safe and compliant drone flights. By integrating Dronetag with Aloft, you can automatically share your Remote ID data, streamlining airspace management without needing any technical expertise.
This integration enables Dronetag users to send both public and private flight data to Aloft, making it easier to manage airspace authorizations and track drone activities. All you need are active Dronetag and Aloft accounts to set up the connection.
How to Integrate
Sign in to your Aloft account and obtain your API key
- Sign in to the Aloft Air Control web dashboard.
- Go to Manage > Connections, then select Add Connection > Dronetag.
- Choose the relevant pilot.
- Copy the generated Dronetag token.
For more detailed steps, visit the Aloft guide.
Log into your Dronetag account using the Dronetag App
Open the Dronetag App on iOS, Android, or through the web interface. Sign in to your account and navigate to the Profile section, where you’ll find the Integrations screen.
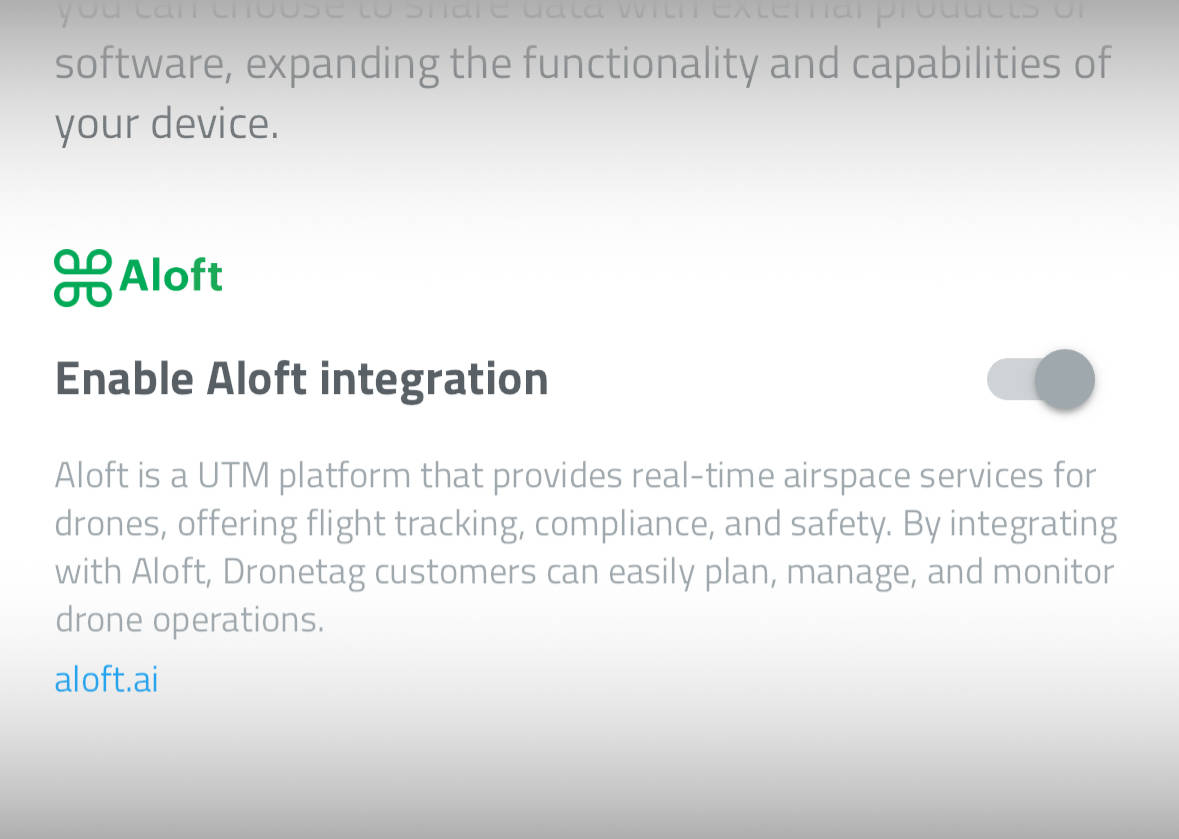
Enable the Aloft integration
Within the Integrations screen, locate and activate the Aloft integration option. When prompted, input the API key you obtained from Aloft in Step 1.
Once these steps are completed, your flight data will be automatically shared with Aloft. Both public and private flight information will be accessible on Aloft’s Air Control platform, allowing you to manage your operations more efficiently.
Integrating Dronetag with SafeSky
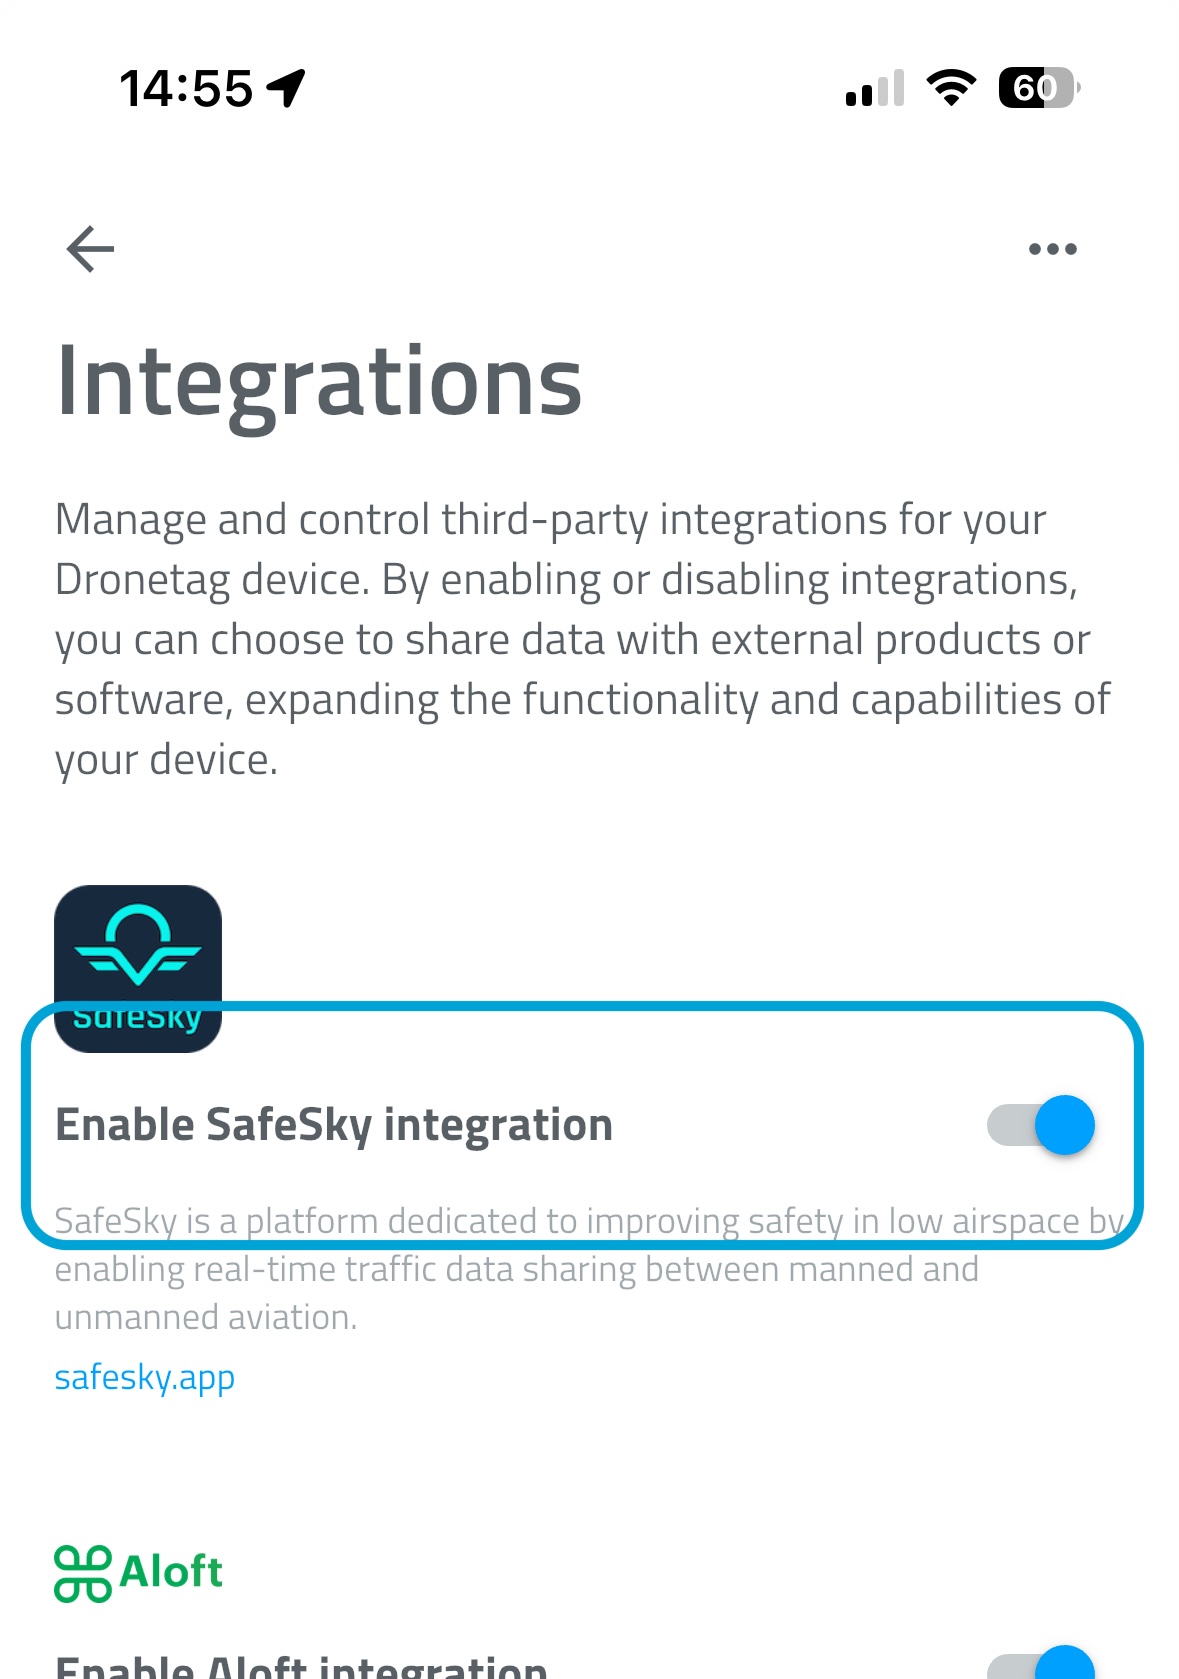
SafeSky is a platform dedicated to improving safety in low airspace by enabling real-time traffic data sharing between manned and unmanned aviation. By integrating with SafeSky, Dronetag users can broadcast their drone’s position and become visible to over 30 traffic sources, including general aviation pilots, ultralights, paramotors, paragliders, gliders, and more.
As a Dronetag pilot, you can also download the SafeSky app to view nearby manned traffic during your flight, enhancing your flight situational awareness.
How to Integrate
Log into your Dronetag account using the Dronetag App
Open the Dronetag App on iOS, Android, or through the web interface. Sign in to your account and navigate to the Profile section, where you’ll find the Integrations screen.
Enable the SafeSky integration
Within the Integrations screen, locate and activate the SafeSky integration option.
Turn on your Dronetag Mini device
After you enabled the integration, you can now see your Dronetag devices in the SafeSky app. You may need to create a new flight before it appears in SafeSky. If you enabled the integration while your Dronetag Mini was already in-flight, stop the flight with a short press and press it again to start a new flight.
Troubleshooting
App permissions
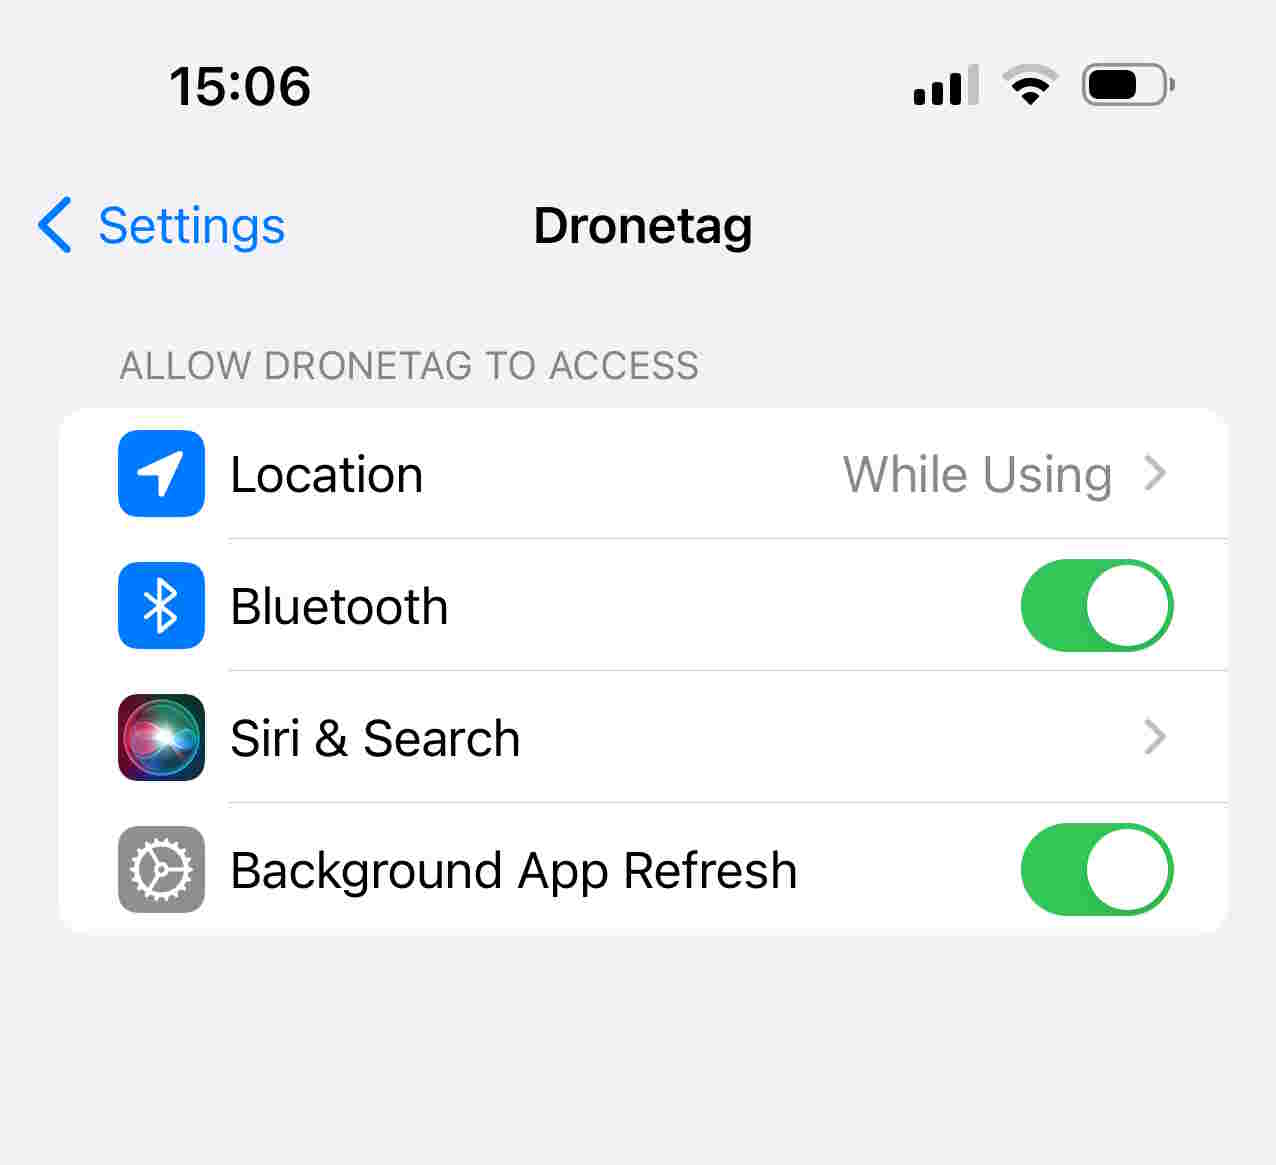
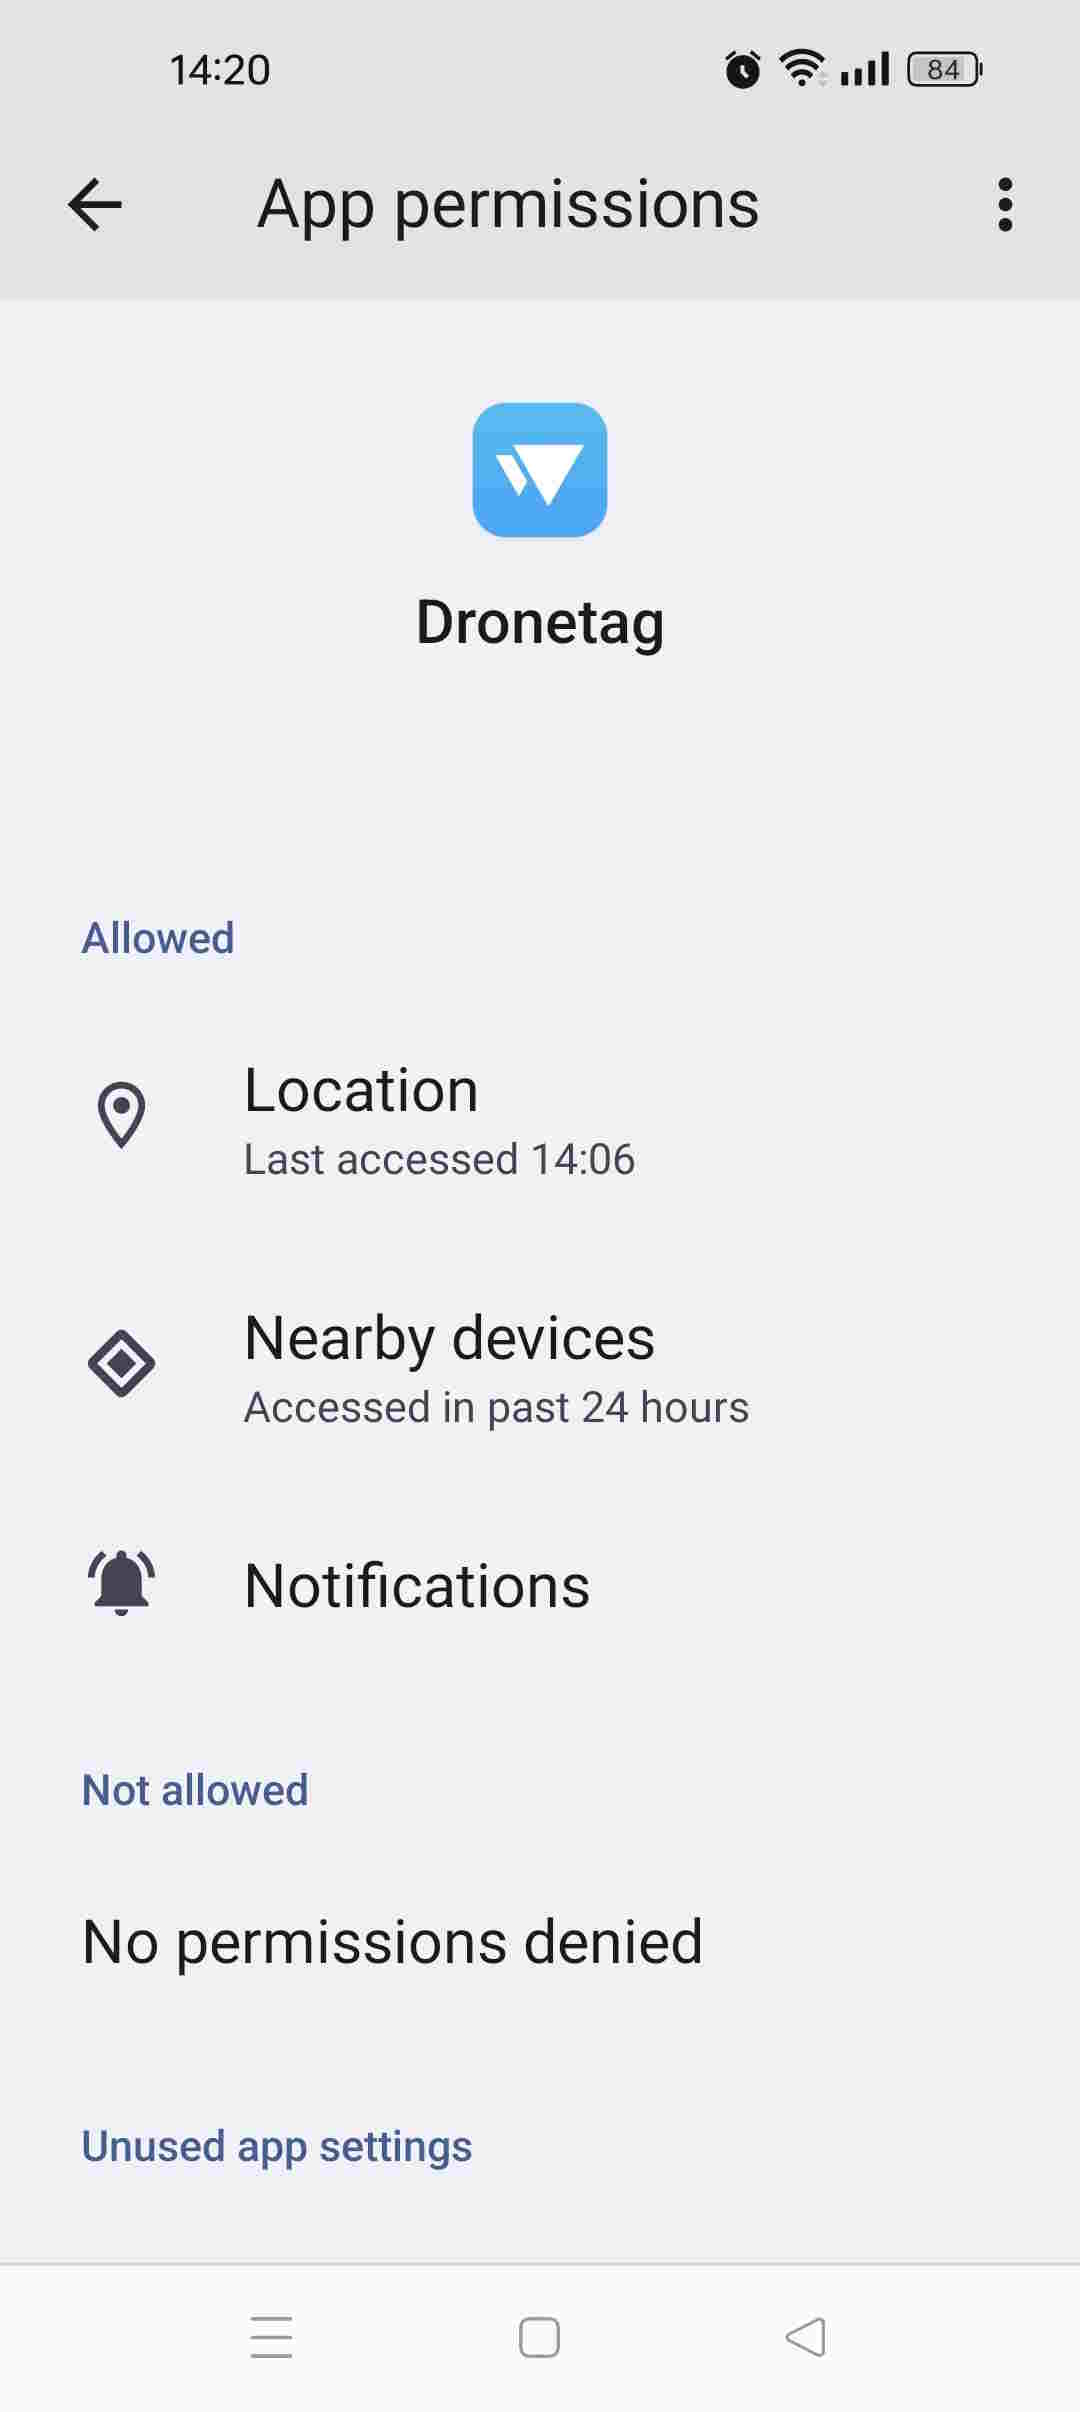
For optimal functionality of the Dronetag App, please grant all requested permissions.
Failure to do so may result in improper operation and potential issues.
iOS
- Location - while using
- Bluetooth
- Background App Refresh
Android
- Location - while using
- Nearby devices (Bluetooth)
- Notifications
Source pages
Every chapter of this document is a page of the Dronetag help site. Use these addresses to reach the latest version.
- 1Introductionhelp.dronetag.cz/dronetag-app
- 2Receivershelp.dronetag.cz/dronetag-app/different-devices/receivers
- 3Transmittershelp.dronetag.cz/dronetag-app/different-devices/transmitters
- 4Detection Detail & Search Improvementshelp.dronetag.cz/dronetag-app/functions/detection-detail
- 5How to Export and Visualize Detectionshelp.dronetag.cz/dronetag-app/functions/visualise-detections
- 6Push Notificationshelp.dronetag.cz/dronetag-app/functions/notifications
- 7Device Data Sharinghelp.dronetag.cz/dronetag-app/functions/sharing-data
- 8Map Features & Performance Updateshelp.dronetag.cz/dronetag-app/functions/map-features
- 9Known Aircrafthelp.dronetag.cz/dronetag-app/functions/known-aircraft
- 10Label and Color for Detectionshelp.dronetag.cz/dronetag-app/functions/label-and-color-detection
- 11Flight Synchronizationhelp.dronetag.cz/dronetag-app/functions/flight-sync
- 12Alert zoneshelp.dronetag.cz/dronetag-app/functions/alert-zones
- 13Fly Nowhelp.dronetag.cz/dronetag-app/functions/fly-now
- 14Registering your Dronetag with MLIT (Japanese CAA)help.dronetag.cz/dronetag-app/registering-with-mlit
- 15国土交通省(日本のCAAに相当)へのDronetag製品の登録についてhelp.dronetag.cz/dronetag-app/registering-with-mlit-jp
- 16Full Flight Detailhelp.dronetag.cz/dronetag-app/full-flight-detail
- 17Dashboardhelp.dronetag.cz/dronetag-app/dashboard
- 18In-flight Overviewhelp.dronetag.cz/dronetag-app/in-flight-overview
- 19Subscriptionshelp.dronetag.cz/dronetag-app/subscriptions/
- 20Checking Connectivity Plan Statushelp.dronetag.cz/dronetag-app/subscriptions/RIDER/checking
- 21Purchasing a Connectivity Planhelp.dronetag.cz/dronetag-app/subscriptions/RIDER/purchasing
- 22Activating a Connectivity Plan:help.dronetag.cz/dronetag-app/subscriptions/RIDER/activating
- 23Activating a subscription planhelp.dronetag.cz/dronetag-app/subscriptions/transmitters/activating
- 24Cancelling your subscriptionhelp.dronetag.cz/dronetag-app/subscriptions/transmitters/cancelling
- 25Checking the status and usagehelp.dronetag.cz/dronetag-app/subscriptions/transmitters/usage
- 26Integrating DJI AeroScope with Dronetaghelp.dronetag.cz/dronetag-app/integrations/aeroscope
- 27Integrating Dronetag with Alofthelp.dronetag.cz/dronetag-app/integrations/aloft
- 28Integrating Dronetag with SafeSkyhelp.dronetag.cz/dronetag-app/integrations/safesky
- 29Troubleshootinghelp.dronetag.cz/dronetag-app-troubleshooting