
Scout EVK
- Document
- Dronetag Scout — Scout EVK
- Chapters
- 2
- Source
- help.dronetag.cz/print/dronetag-scout/scout-evk
🔧 Scout EVK Upgrade Process
The Dronetag Scout EVK is an earlier evaluation kit model that will continue to receive essential updates and limited support. However, we strongly encourage all users to upgrade their units to the production-ready Dronetag Scout system.
The upgraded Scout offers a more robust system, improved long-term stability, and full access to all available features. Some important capabilities—such as factory reset, secure credential management, and cloud-based provisioning—are not available on the original Scout EVK.
This guide walks you through the upgrade process in detail, including:
- How to request the upgrade
- Flashing and using the required SD card images
- Performing the physical upgrade
- Registering the upgraded Scout with your account
After upgrading, your unit will receive a new serial number, and the old Scout EVK will need to be removed from your Dronetag Cloud account. You will register the new Scout using the provided serial number for continued access and management.
You may choose to flash the SD cards yourself or request pre-flashed cards from us. Instructions for both options are included below.
1. Submit a Scout EVK Upgrade Request
Please send an email to support@dronetag.com with the following information:
- Original order number or name of your sales contact.
- Company name (if applicable).
- If using the Scout EVK with Dronetag Cloud, include the email address associated with the registered account.
- Serial number of your Scout EVK unit:
- Located on the bottom of the unit, or
- Found in the Dronetag mobile app under your account.
2. Choose Your Flashing Option
Let us know how you want to handle the SD cards required for the upgrade. There are two SD cards involved:
- Preparation SD Card – used to prepare the device
- Scout System SD Card – contains your custom-provisioned system
Option A: I will flash the SD cards myself
We will send you both SD card images and you can flash them manually.
- Follow the instructions here to learn how to flash
.imgfiles onto SD cards.
Option B: I prefer to receive pre-flashed SD cards
If you would like to receive ready-to-use SD cards, include the following shipping details in your request email:
- Shipping address
- Contact person
- Email address
- Phone number
Option C: Full Scout Unit Replacement
If you're not comfortable performing any technical work, we can offer a full replacement of the Scout unit. The upgrade will be handled at our facility, and you would be responsible for shipping costs.
3. Performing the Upgrade
Once you have received or prepared the required SD cards, follow the steps below to upgrade your Scout EVK.
There are two SD cards involved in the upgrade process:
If you are flashing the SD cards yourself, you can reuse a single SD card.
In this case, first flash it with the Preparation image, perform the preparation steps, then re-flash the same card with the Scout System image and continue with the remaining steps.
Whether you use one or two physical SD cards, the upgrade steps remain the same.
We recommend performing the upgrade on a tabletop setup rather than attempting it on an already installed Scout EVK in elevated or hard-to-reach locations.
Accessing the SD card slot can be difficult, and working at height introduces a risk of device damage or personal injury due to falls.
Step 2: Insert the Preparation SD Card
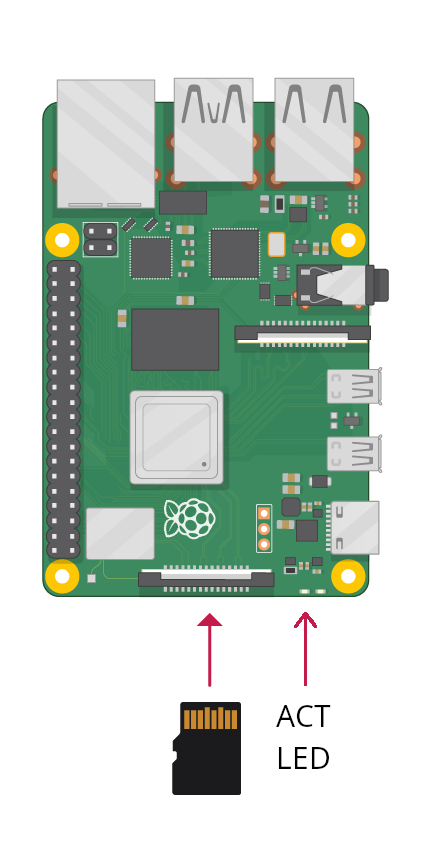
- Insert the Preparation SD Card into the mini computer inside the Scout.
- Power up the unit using the PoE connector.
- Wait approximately 1 minute. The mini computer will start blinking with a green ACT LED.
- Power down the device by unplugging the PoE cable.
Step 3: Insert the Scout System SD Card
- Replace the Preparation SD Card with the Scout System SD Card.
- Power on the unit again.
- Leave the system running for at least 30 minutes.
- During this time, the system formats and initializes itself.
- Do not interrupt power during this process.
4. Post-Upgrade: Access and Configuration
Once the upgrade is complete:
- The Scout EVK will be accessible on your local network via DHCP using default settings. For more details refer to the configuration page
- You can proceed with further configuration as needed.
Registering the Upgraded Scout
With the SD cards, you will also receive a new serial number, which replaces the original Scout EVK identity.
- Remove the old Scout EVK from your Dronetag Cloud account.
- Register the upgraded Scout using the new serial number provided.
Accessing the Management UI
The upgraded Scout includes a login-protected management interface.
- The default username and password will be provided by Dronetag Support together with your SD cards or download package.
- Upon first login, please change the credentials immediately to something known only to you.
Be sure to store your new login credentials safely.
If the device is factory reset, it will revert to the original default username and password provided by Dronetag. If you lose both the new and default credentials, you may be locked out of the management interface.
If you need help accessing the UI or updating credentials, reach out to support@dronetag.com.
✈️ SD Migration Card Preparation
💾 SD Card Preparation
You are expected to already have the correct SD card images by applying to Scout EVK Upgrade Process
This page guides you through flashing new firmware onto a microSD card and upgrading your Scout to a newer generation.
Use a microSD card with at least 8 GB of capacity. This SD card is used during the Scout EVK upgrade process. All former data on the card will be permanently erased.
We recommend using a different SD card than the one currently used in your Scout EVK. This allows you to keep your original setup as a backup.
You can use either Windows or Linux to prepare the SD card.
If you are confident and understand the risks, you may reuse the existing card — but make sure to back up your current setup first.
- Windows
- Linux
🪟 Flashing the Image on Windows
We recommend using balenaEtcher, a free and user-friendly tool for flashing SD cards.
Instructions:
- Download and install balenaEtcher from https://etcher.balena.io.
- Insert the microSD card into your computer using an SD card reader.
- Open balenaEtcher.
- Click “Flash from file” and select the
scoutsdimg.imgfile. - Select the microSD card as the target device.
- Click “Flash!” to begin writing the image.
- Wait for the flashing and verification to complete. This may take several minutes.
Once done, you can safely eject the SD card.
🐧 Flashing the Image on Linux
You can use the dd command from the terminal to flash the image on Linux.
Instructions:
-
Insert the microSD card into your system.
-
Open a terminal and run:
lsblk
Identify your SD card device (e.g. /dev/sdb). Double-check this—flashing to the wrong device can erase critical data.
- Flash the image using the dd command:
sudo dd if=~/Downloads/scoutsdimg.img of=/dev/sdX bs=4M status=progress conv=fsync
Using the dd command incorrectly can permanently damage your system by overwriting the wrong disk.
Be very careful to identify the correct device path of your SD card (e.g. /dev/sdb) before running any command.
Flashing to your main system drive (e.g. /dev/sda) will result in data loss and an unbootable computer.
Always double-check the target device name using lsblk or fdisk -l before proceeding.
- Wait for the process to complete. Once the prompt returns, remove the SD card safely:
sudo eject /dev/sdX
Source pages
Every chapter of this document is a page of the Dronetag help site. Use these addresses to reach the latest version.
- 1Scout EVK Upgrade Processhelp.dronetag.cz/dronetag-scout/scout-evk/scout-evk-upgrade
- 2SD Card Preparationhelp.dronetag.cz/dronetag-scout/scout-evk/sdcard-preparation