
Knowledge Base
- Document
- Knowledge Base
- Chapters
- 9
- Source
- help.dronetag.cz/print/knowledge-base
Knowledge Base
Learn the terminology, abbreviations and concepts related to drone identification, or Dronetag hardware and software.
Dronetag usage in the US
FAA DroneZone tutorial video
Watch a tutorial video by the Pilot Institute demonstrating the utilization of Dronetag Remote ID modules within the FAA DroneZone.
Part 107
Part 107 pilots must register each Remote ID broadcast module device individually in their inventory, and each device will be assigned a distinct registration number.
How to Add and Register a Dronetag Remote ID Module
- Log in to FAADroneZone.
- Click on the button labeled "Launch Drone Owners and Pilots Dashboard."
- Ensure that you are on the Part 107 Dashboard.
- Click on "Manage Device Inventory."
- Select "Add Device."
- When prompted to answer the Remote ID question, choose "Yes."
- From the drop-down menu, select the device type - "Remote ID broadcast module"
- List the make/model of the drone while adding the broadcast module's Remote ID serial number in the provided field.
- Enter the Dronetag Remote ID serial number. Where can I find the Remote ID SN?
- Click on "Add Device."
- Continue with the registration process.
How to transfer a Dronetag Remote ID Module between your drones
- Log in to FAADroneZone.
- Click on the button labeled "Launch Drone Owners and Pilots Dashboard."
- Ensure that you are on the Part 107 Dashboard.
- Click on "Manage Device Inventory."
- Find the drone you want to edit in the list and click on the three vertical dots associated with it in the "Actions" column.
- Select "Edit" from the drop-down menu.
- Modify the answer to the Remote ID question to "Yes."
- Enter the Remote ID serial number from your Dronetag module. Where can I find the Remote ID SN?
- Click on "Save" to apply the changes.
Recreational drone pilots
Recreational drone pilots have the convenience of registering once and using the same registration number for all the drones listed in their inventory. During the registration process, you must provide the serial number(s) of each Dronetag Remote ID broadcast module. The unique serial number associated with the module must be listed for each non-Standard Remote ID drone added to your inventory. This allows you to transfer the module between your drones, as long as each drone's make and model are included in the same inventory listing.
How to Add and Register a Dronetag Remote ID Module
- Log in to FAADroneZone.
- Click on the button labeled "Launch Drone Owners and Pilots Dashboard."
- Make sure you are on the Recreational Flyer Dashboard.
- Click on "Manage Device Inventory."
- Select "Add Device."
- Answer the Remote ID question with a "Yes."
- Choose the “Remote ID broadcast module” type from the drop-down menu.
- If you're using one Dronetag Remote ID module on multiple drones, choose the broadcast module option for each and input the make/model of the specific drone(s). Use the same Dronetag Remote ID serial number from the module in the following step.
- Enter the Remote ID serial number. Where can I find the Remote ID SN?
- Click on "Add Device."
- Return to "Your Inventory."
- If you wish to cancel a previously registered non-Standard Remote ID drone, locate the drone in your inventory. Click on the three vertical dots associated with the drone under the "Actions" column and select "Cancel" from the drop-down menu. Note: A canceled device will still appear in your inventory as "cancelled."
Dronetag usage in EU
UAS Operator ID (EU region only)
While most features and information on our platform are applicable to both US and EU regions, we want to draw your attention to a specific functionality known as the UAS Operator ID. This feature is exclusively relevant to our EU customers, as it complies with regulations specific to the European Union. If you are located within the EU, we invite you to continue reading to gain a better understanding of the UAS Operator ID and its significance for you.
The UAS operator ID is issued by the National authorities in each particular EU member state and is composed of two parts. The first is a sequence of 16 alphanumeric characters (known as a public part), the second contains randomly generated secure characters (known as a private part). The public part starts with three characters that define where the operator is registered (e.g. CZE for the Czech Republic) and ends up with one checksum character. Authorities who have access to the database of UAS Operator IDs can check if the public part is valid by accessing the private part and calculating the checksum.
The main purpose of the UAS Operator ID is to upload it to the Remote ID system. However, only the public part is stored and is broadcasted. The private part is not stored and is only used for Remote ID system validation. You shouldn’t tell the private part to anyone as they may misuse your identity to commit crimes. The example UAS Operator ID is “FIN87astrdge12k8” as public part and “xyz” as the private one. If the UAS Operator ID is not configured in the Dronetag Remote ID module, it will broadcast the “NULL” string.
How to Fill & Upload your UAS Operator ID
Where do I find my UAS Operator ID?
The UAS operator ID is issued by the National authorities in each particular EU member state. To obtain a UAS Operator ID, you must directly contact your local authority. We at Dronetag do not possess access to this information, and we are unable to assist you in acquiring it. Check the list and links to the National Aviation Authorities here: https://www.easa.europa.eu/en/domains/civil-drones/naa
The 3-character private part of the assigned Operator ID is usually distributed and accessible to Drone Operators in a separate way from the Operator ID certificate which contains the public part of the UAS Operator ID
How do I fill and upload the UAS Operator ID into the app?
UAS Operator ID can be filled into your Dronetag Account in the User profile section.
-
Open the Dronetag app
-
Fill in your UAS Operator ID in the User profile section. After filling it in the profile, turn on your Dronetag device and open its device detail in the Mobile app. You will see a warning message that UAS Operator ID in your device is inconsistent with the one you have in profile. With Synchronize button, your Operator ID will be saved to the device’s memory. Then your UAS Operator ID is broadcasted from the device during the flight. Please note that uploading UAS Operator ID is only available in Mobile app.
-
Start the flight with the device and check Dronetag App or Drone Scanner on your phone that information is broadcasted correctly.
Difference between Drone Operator and Drone Pilot
A Drone Operator is any person or organization who owns or rents one or more registered drones.
The Drone Operators need to be registered with their National Aviation Authority in their country of residence or main place of business and receive a Drone Operator ID number - UAS Operator ID.
A Drone Pilot is the person actually flying the drone, without necessarily owning or renting the drone and therefore doesn't have to be a Drone Operator.
Drone Pilot receives a Pilot License with an identification number, which is not an Operator ID.
For more details about Drone Operators and Drone Pilots and their responsibilities visit EASA Drone operators & pilots
How do detections work?
Ever wondered why the Dronetag app sometimes shows the same drone more than once, or why you see just one detection even though you landed in between flights? This article explains what detections are, how they work, and why they might not always match your expectations.
What is a detection?
A detection is a record of a drone’s telemetry that our system receives without a long interruption. If there’s a break in the signal for about 15 minutes, we consider that detection closed. Remote ID messages tell us the drone’s location, altitude, speed, and other data, but they don’t say when a flight starts or ends. That’s why we call it a detection—not a flight. We only know where the drone was when we received its signal.
Why do you call it a detection and not a flight?
We use the term "detection" on purpose, because we can’t always tell when a flight begins or ends. In the app, you’ll notice “Flights” and “Detections” are listed separately. That’s intentional: a flight is a different concept from a detection. Flights are always recorded by Dronetag equipment, while detections can come from any Remote ID device.
Why can’t you tell when a drone takes off or lands?
If you’re using a Network Remote ID (NRI) device like the Dronetag Mini, it can report the exact start and end of a flight. But with Direct Remote ID (DRI) devices—or when you’re just picking up signals from a drone with Remote ID—it’s not possible to know the takeoff or landing times. DRI only broadcasts the drone’s ID and location, not when the flight starts or ends. So, with DRI, we can’t pinpoint those moments—only when the drone was detected.
Why do I see multiple detections for the same drone?
If you see the same drone listed more than once, it’s usually because there was a long enough break in detection—maybe the drone went out of range or the signal was lost. When the system picks up the drone again after about 15 minutes, it creates a new detection record.
Why do I see just one detection even though I landed in between?
If you landed and took off again but only see one detection, it’s likely because the break in the Remote ID signal wasn’t long enough. The system only closes a detection after about 15 minutes without a signal. So, if you swapped batteries quickly or restarted the drone in less than 15 minutes, it will still count as a single detection. Fast hands!
What if I detect a drone with multiple receivers? Will I see multiple detections?
Behind the scenes, our system tracks detections from each receiver separately. But to keep things simple for you, we merge them in the app and APIs. You’ll see just one detection, even if several receivers picked up the same drone. If you want to dig deeper and see each detection individually, you can access them through our APIs—check out our developer documentation for details.
Remote ID Explained
Since the operation of drones can often pose risks to people’s safety and security, new EU regulation 2019/947 requires drone operators to affix their UAS Operator ID (issued by the National authority) to the drone. By doing this, drone operators are accountable for damages they cause if their drone is physically found.
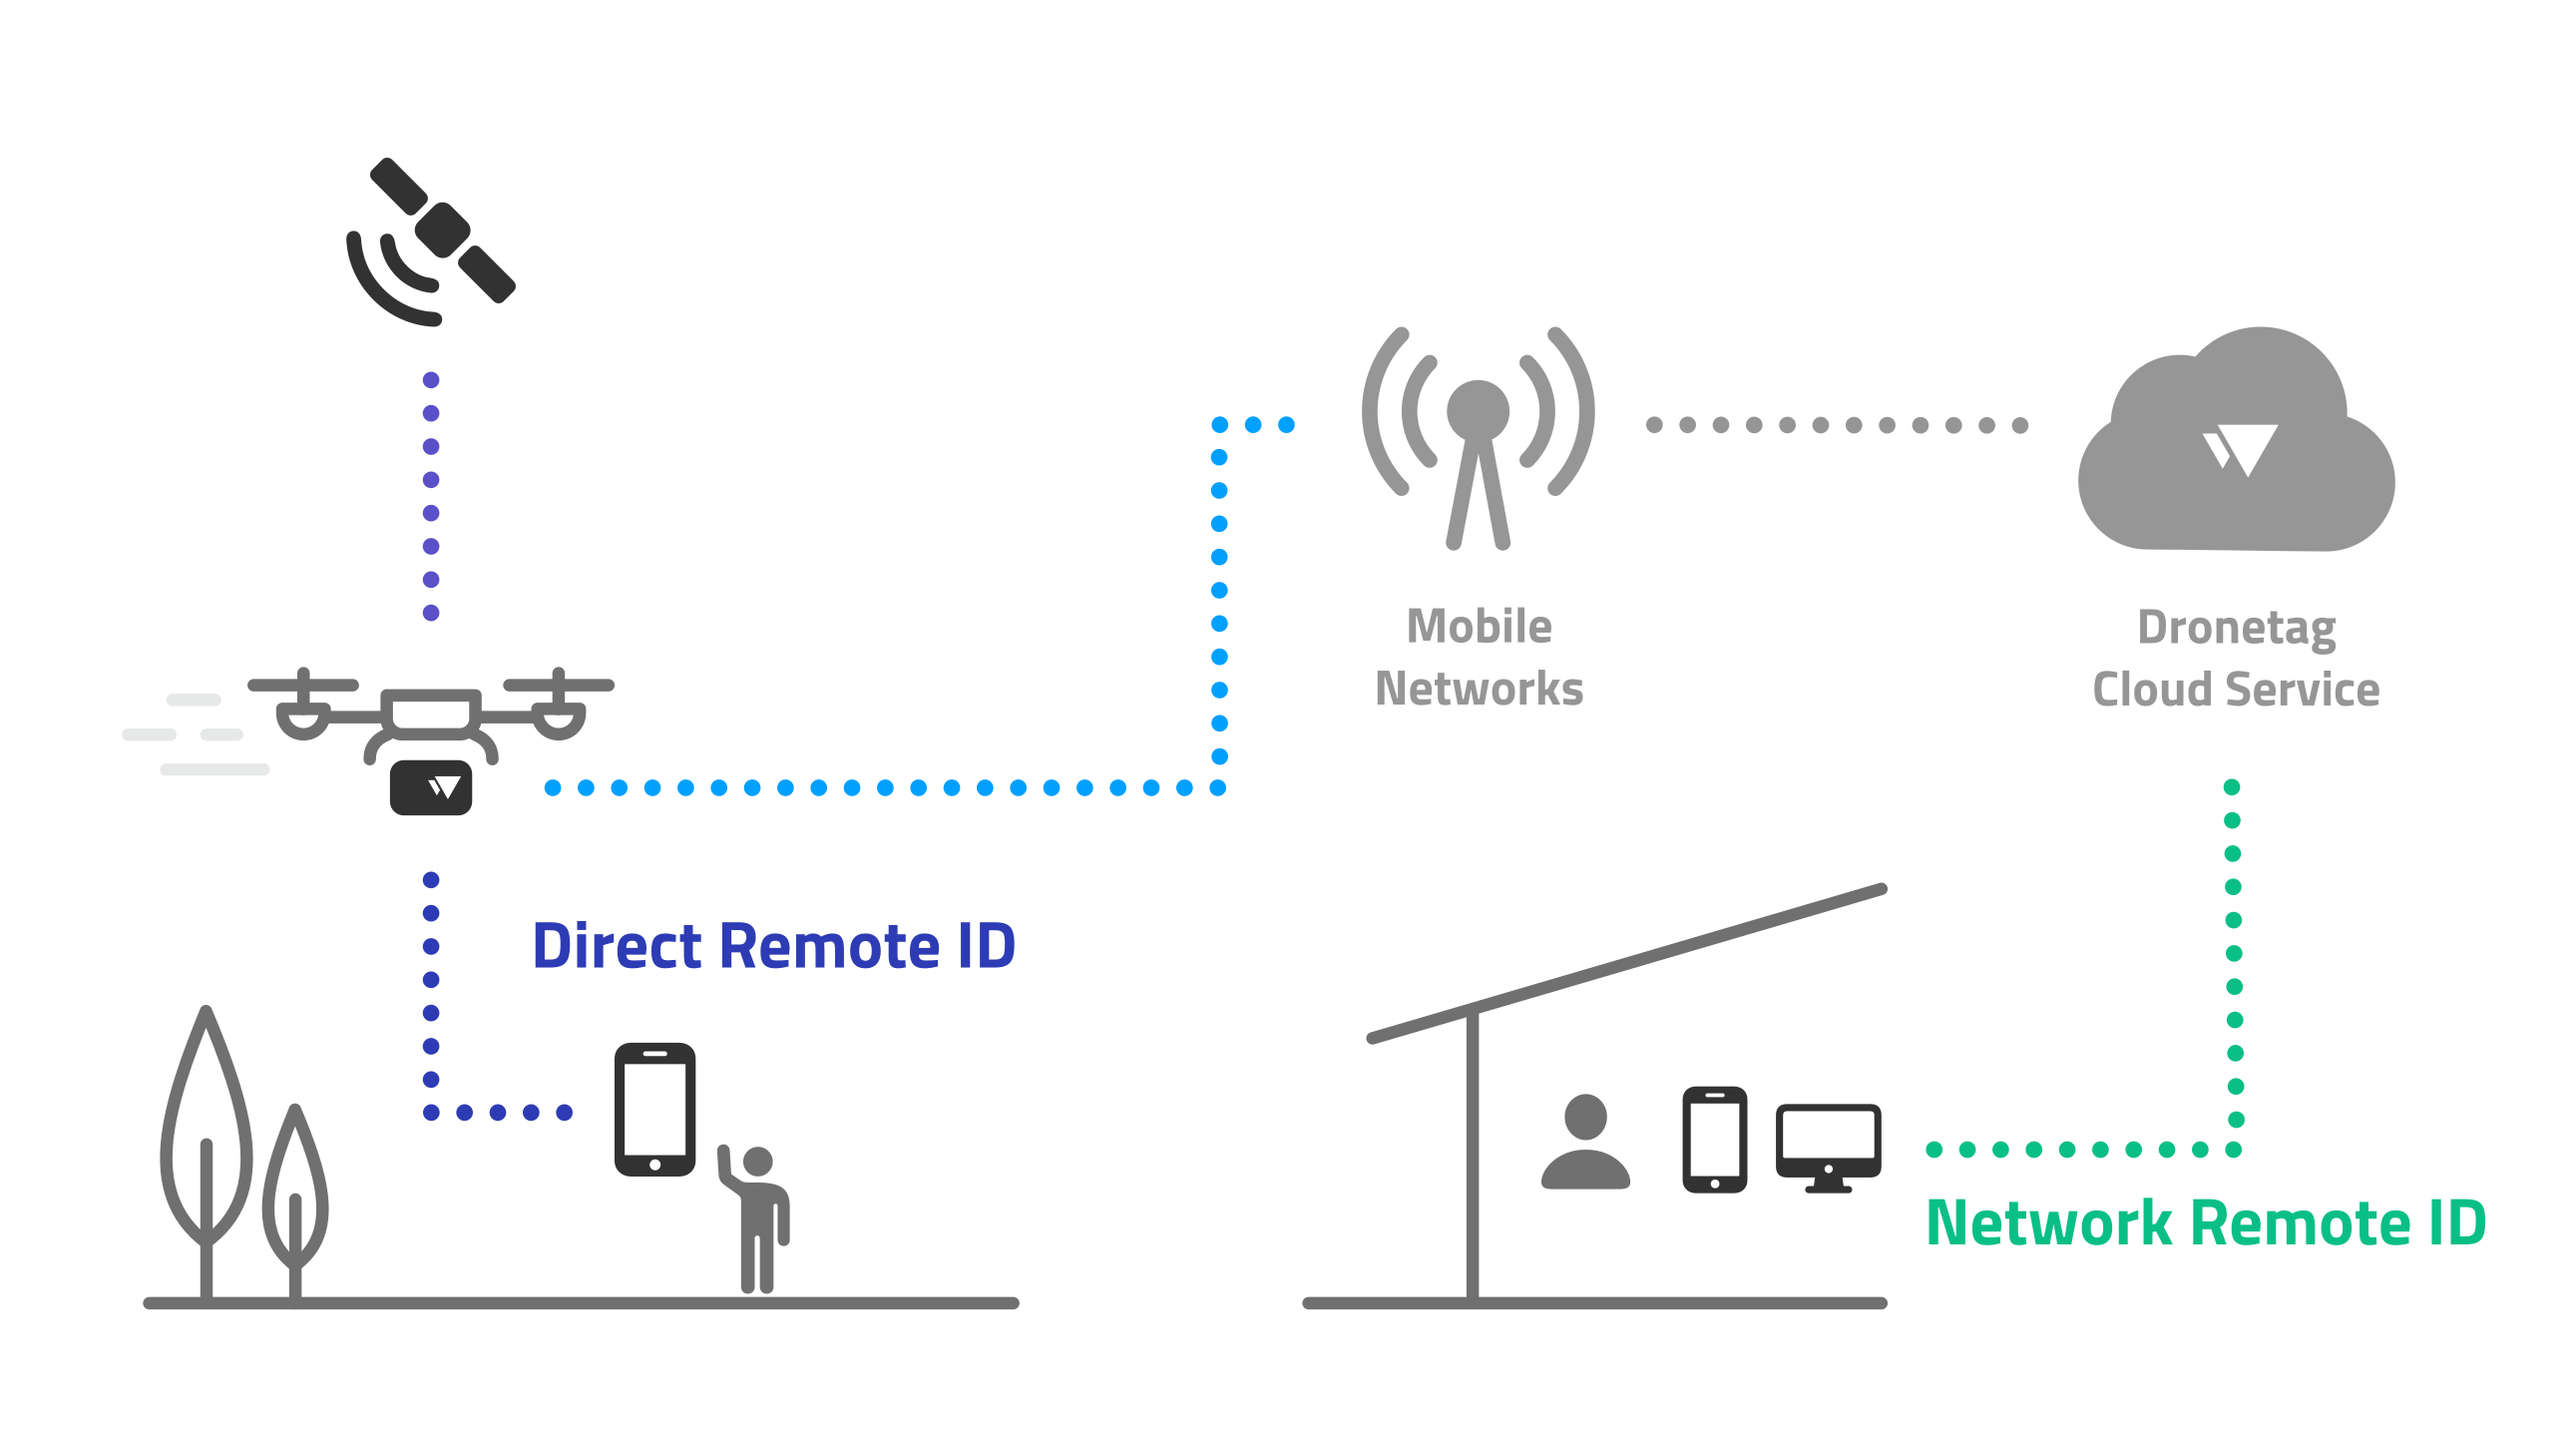
However, affixing the label with Operator ID doesn’t solve privacy & security issues of people on the ground – enforcement authorities will not be able to read it remotely on airborne drones because of their small size. For this reason, EU regulation 2019/945 enforces that all drones above 250 grams flying below 120 meters in the Open or Specific category must be equipped with Remote ID systems that allow wireless access to the UAS Operator ID. Currently, this requirement is applicable from 1st July 2022 and can be satisfied either with Direct Remote ID (DRI) or Network Remote ID (NRI). The reason for the two different solutions is to answer different needs (see explanation below).
UAS Operator ID (EU region only)
While most features and information on our platform are applicable to both US and EU regions, we want to draw your attention to a specific functionality known as the UAS Operator ID. This feature is exclusively relevant to our EU customers, as it complies with regulations specific to the European Union. If you are located within the EU, we invite you to continue reading to gain a better understanding of the UAS Operator ID and its significance for you. The UAS operator ID is issued by the National authorities in each particular EU member state and is composed of two parts. The first is a sequence of 16 alphanumeric characters (known as a public part), the second contains randomly generated secure characters (known as a private part). The public part starts with three characters that define where the operator is registered (e.g. CZE for Czechia) and ends up with one checksum character. Authorities who have access to the database of UAS Operator IDs can check if the public part is valid by accessing the private part and calculating the checksum.
The main purpose of the UAS Operator ID is to upload it to the DRI system. However, only the public part is stored in the drone and is broadcasted. The private part is not stored and is only used for DRI system validation. You shouldn’t tell the private part to anyone as they may misuse your identity to commit crimes.
The example UAS Operator ID is “FIN87astrdge12k8” as public part and “xyz” as the private one. If the UAS Operator ID is not configured in the drone, it must broadcast the “NULL” string.
DRI fundamentals
The simpler approach that protects general public privacy and security is DRI. Its main advantage is it doesn’t need to establish any connection with the counterparty because the data are simply broadcasted to everyone directly from the drone (similar to the idea of ADS-B in manned aviation).
The EU 2019/945 requires that DRI data needs to be able to be received by commonly available smartphones. Therefore, only Wi-Fi or Bluetooth are left as technology options and only one type is required onboard the drone.
The important fact is that pilot’s privacy is also maintained because the drone doesn’t broadcast any sensitive personal data. Only the UAS Operator ID, drone’s and pilot’s location are accessible by the public. However, authorities can associate the UAS Operator ID with the personal details of the operator to verify his eligibility. The DRI range is somewhere from hundreds of meters to a few kilometres, so it shouldn’t be easy to harvest and misuse the sensitive flight data of commercial operations.
The practical implementation of DRI on existing drones is possible in two manners. First is a firmware update from drone manufacturers when technically feasible. If this support from drone manufacturers is not possible, DRI add-on solutions such as Dronetag Mini could be used to retrofit the drones. New drones introduced on the EU market after 1st January 2023 must already have a class identification label (C marking) and must be equipped with DRI systems.
NRI Fundamentals
Contrary to the DRI, NRI is considered a technically more complicated approach. Its main purpose is to establish a reliable and secure connection between drones and operators in the upcoming U-space airspaces. It is fundamental to advanced operations such as BVLOS flights, drone deliveries, and a combination of manned and unmanned traffic in the same airspace.
All drones above 250g operating in U-space airspace will be required to connect to a U-space Service Provider which will assure the operator’s safety in accordance with his flight plan. To make it possible, all drone operations in the U-space airspace shall be subject to at least four mandatory U-space services where NRI is one of them. To learn more about particular requirements, check out the EU 2021/664.
DRI and NRI standardization
The DRI standardization process in the EU is held by the ASD-STAN organization as requested by the European Commission to CEN. The current phase of the standardization process is a draft of prEN 4709-002 standard that specifies the transport protocols and encoding of the DRI messages.
The EU’s prEN 4709-002 specification is vice-versa compliant with the US’s F3411 managed by ASTM. However, the prEN 4709-002 defines optional and recommended fields that bring some additional benefits in the EU environment. There are ongoing discussions in the ISO organization to harmonize DRI globally. For more information about the standardization process, a study of ASD-STAN’s Remote ID whitepaper is recommended.
DRI Implementation
The prEN 4709-002 standard defines three mandatory and one optional communication protocol.
- Bluetooth 4 Legacy (optional)
- Bluetooth 5 Long Range (mandatory)
- Wi-Fi Beacon (mandatory)
- Wi-Fi NAN (mandatory)
Technologies could be combined together, but broadcasting DRI with only one of the mandatory ones is sufficient. Generally speaking, Wi-Fi solutions have a greater range due to the higher transmission power compared to the Bluetooth ones (100mW vs 10mW). The possible range for the Wi-Fi is a few kilometres whereas Bluetooth is somewhere around hundreds of meters. Our device Dronetag Mini uses Bluetooth 5 with complementary Bluetooth 4 and we measured a 1.5km range in unobstructed outdoor conditions.
DRI Support on Smartphone Devices
For information about supported devices, please visit the OpenDroneID receiver application repository.
Remote ID Serial Number
Every Remote ID device must possess a distinct Serial Number. The SN is constructed using three fundamental components: the Manufacturer Code, the Length Code, and the Manufacturer’s Serial Number.
Manufacturer Code
The Manufacturer Code (MFR Code) is a combination of four characters, comprising digits and potentially a mix of uppercase letters, excluding the letters O and I. The International Civil Aviation Organization (ICAO) is responsible for designating a unique MFR Code to UAS manufacturers worldwide.
Length Code
The Length Code is a single character representing the character count in the Manufacturer’s Serial Number. The Length Code characters range from 1 to 15, following this pattern: 1, 2, ..., 9, A=10, B=11, ..., F=15.
Manufacturer’s Serial Number
The Manufacturer’s Serial Number is directly managed by the manufacturer assigned the Manufacturer Code. This alphanumeric code can have up to 15 characters. It can encompass a combination of uppercase letters and digits, excluding O and I, yet may incorporate any digits. The actual character count designated by the manufacturer is indicated by the preceding Length Code.
Example: SN = MFR1C123456789ABC
MFR Code = MFR1 Length Code = C, representing 12 characters in the ensuing Manufacturer’s Serial Number Manufacturer’s Serial Number = 123456789ABC
How to get Dronetag Serial Number
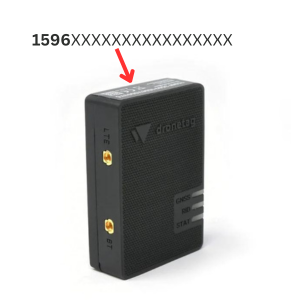
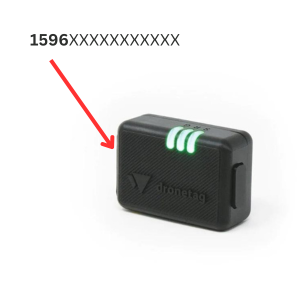
Dronetag Remote ID devices use the SN starting with 1596 (MFR Code of Dronetag). To get the serial number of your Dronetag device, you need to select which device you purchased. Below you will find examples of SN placement on individual Dronetag devices.
The serial number is:
- On the device itself as a sticker (Dronetag Mini & Beacon)
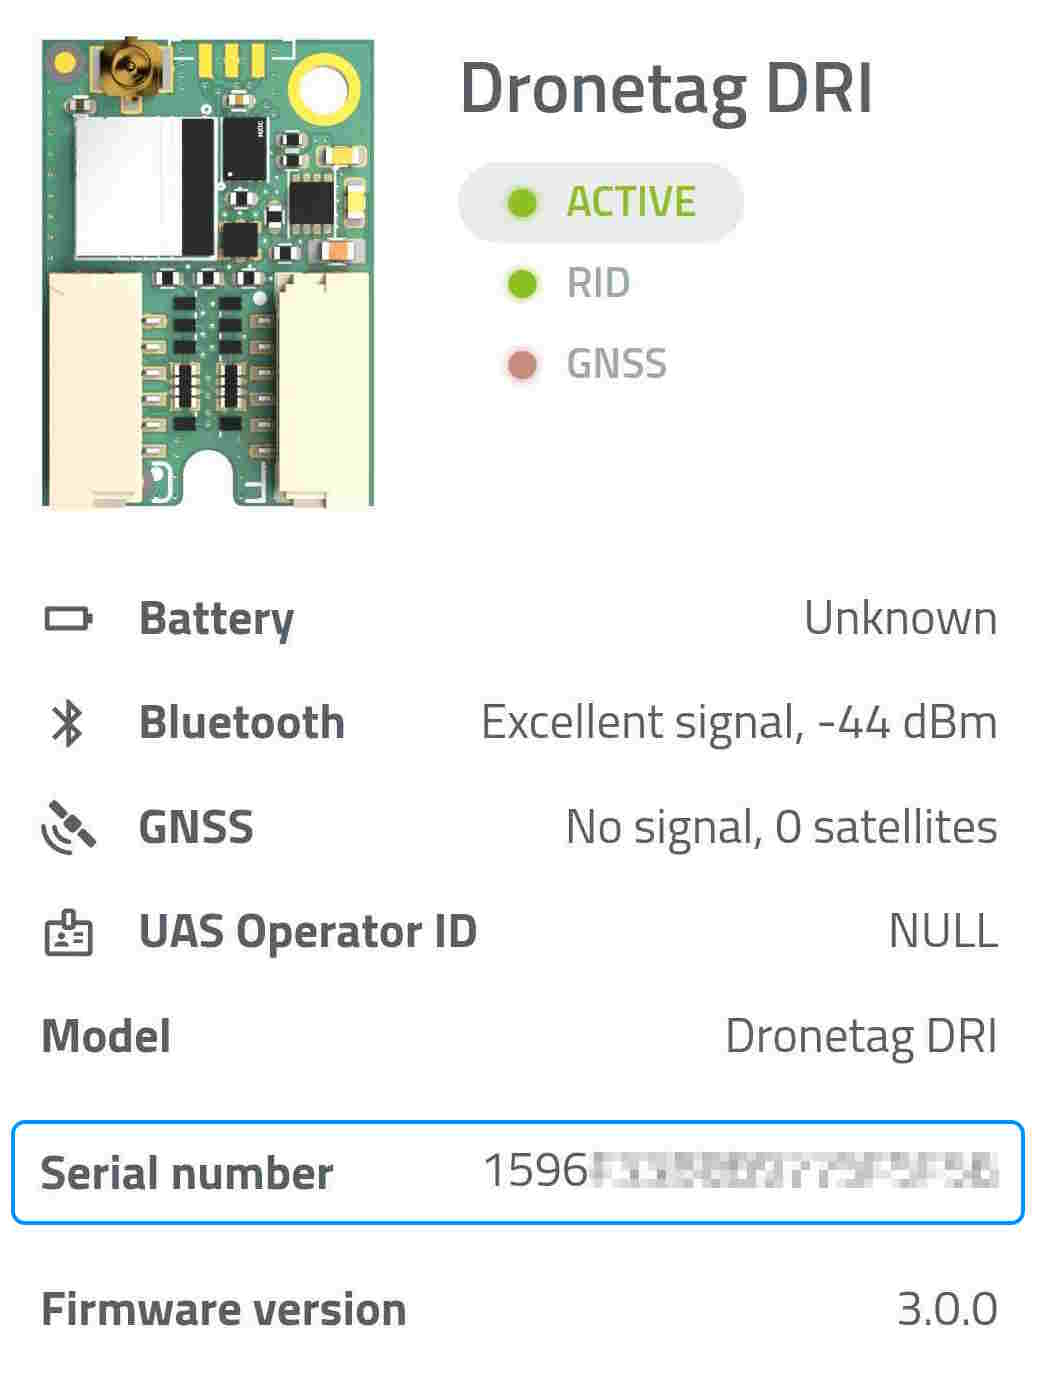
- Readable through our app only (Dronetag BS & DRI)
Dronetag Mini
 |
Dronetag Beacon
 |
Dronetag DRI
To get the SN from your Dronetag DRI, you need to use our Dronetag App or the Toolbox App. After plugging the DRI into the power source and its registration in the app, you can manually write down the serial number of your Dronetag DRI.
 |
Dronetag BS
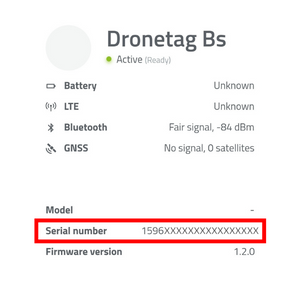
To get the SN from your Dronetag BS, you need to use our Dronetag App or the Toolbox App. After plugging the BS into the power source and its registration in the app, you can manually write down the serial number of your Dronetag BS.
 |
Dronetag Cellular Coverage
The common question we get from our users is "In which country can I use Dronetag?". Well, the short answer is: almost anywhere in the world. Unlike others, we don't impose any roaming restrictions or limitations. However, you still need to have the right device and keep in mind the list of our supported cellular carriers in the table below.
If you don't find your country in the list, don't worry! We are expanding our network partners cooperation rapidly and we aim to have most of the countries covered over time.
Which Dronetag devices use this technology?
There are multiple devices in the Dronetag portfolio which actually use cellular technology:
Dronetag Mini
Our Dronetag Mini uses cellular networks specialized for the Internet of Things (IoT). Two of those representatives known as NB-IoT and LTE-M are well suited for affordable and small tracking devices, thus we decided to use those technologies for Dronetag Mini. Furthermore, we have 3 different SIM chip variants of Dronetag Mini. These 3 variants are marked with letters A, K, V and WL-E and you can find which one you own under the CE symbol on your device sticker. Each variant is compatible with multiple cellular networks in the countries where we operate, but during the order, you don't have to worry about choosing the right one as we will handle this for you.
Dronetag Mini 4G
For geographies without NB-IoT and LTE-M, we offer our Dronetag Mini 4G, which uses standard cellular networks used for smartphones (specifically LTE CAT-1). Besides the cellular technology used, Mini 4G has additional hardware differences namely in the physical design. But cellular connectivity should be your primary concern and you should refer to the coverage table below to choose the right device. Mini 4G comes in two different SIM chip variants: EU-E and EU-V.
Dronetag RIDER
The best way to use your RIDER is in online mode (using its own cellular connection). In this mode, RIDER transmits data over the cellular network to the cloud. You use the Dronetag App to view and work with the real-time or recorded data. Your RIDER will store all the recorded data in the cloud via LTE. Online usage will allow you to keep your RIDER in a protected location and get notifications from Dronetag App anywhere. For online mode you need to use Dronetag App and mobile phone data.
You can also use your RIDER in offline mode (not using its own cellular connection). In offline mode, RIDER is not connected to LTE and sends data by Bluetooth, so you need to have your RIDER with you and scan the current area. In order to view and work with the real-time or recorded data, you need to use our Drone Scanner 2 app for offline access. The Drone Scanner 2 mobile app will provide immediate access to view nearby drones through your smartphone. It will allow you to view data in “Offline mode” without sending data to the Dronetag cloud. Data remains local and is displayed only on the connected device. This option is ideal for areas with limited or no cellular coverage.
What is cellular technology used for
We use cellular technology to enable users to see flight data in real-time without any dependence on their location. The data are stored in real-time on the cloud.
What are benefits of cellular technology used in Dronetag products?
Cellular technology enables users to be aware of the current situation in the airspace no matter where they actually are, fleet managers to orchestrate their fleets remotely or to update their flight trajectory when another drone is detected.
Do you need to pay for this?
There is a 2-month free trial when you purchase a Dronetag device with cellular technology. Then you can see if it makes sense to you to purchase a subscription. If you decide not to use a subscription, you can use a device without any cellular features.
Coverage Table
Select a device to see all the countries where it can connect to the internet (colored blue). Click a country to view information about local carriers.
Choosing between Mini and Mini 4G?
Start by selecting the Mini. If the countries you want to use it in are highlighted in blue, choose the Mini. If not, select the Mini 4G and check again. If the countries turn blue, then the Mini 4G is the right choice.
Verifying coverage of a purchased product?
Select your product type above the map. Check your product’s sticker; right by the CE symbol should be the SIM variant mark. Select it in the SIM variants dropdown. All the blue countries are covered.
We are glad to answer any of your coverage-related questions at support@dronetag.cz.
Support and Troubleshooting Guide
We understand that sometimes issues may arise, and we are here to help you every step of the way. Before contacting our support team, we encourage you to explore the following steps, which might help you resolve the problem quickly and independently.
Browse Troubleshooting Section
Our website's Troubleshooting Section is designed to address common issues and provide step-by-step solutions. We recommend starting here to find answers to your questions. To access the Troubleshooting Section, simply navigate to the product page and choose the "Troubleshooting" tab on the menu.
- Dronetag Mini troubleshooting
- Dronetag Beacon troubleshooting
- Dronetag DRI troubleshooting
- Dronetag BS troubleshooting
Unable to Find a Solution?
No luck in the Troubleshooting section and the issue persists? Don't worry - we are here to assist you. Please reach out to our dedicated support team by sending an email to help@dronetag.cz
Remember to follow the instructions outlined below to ensure we can best assist you.
1. Compose an Email
To report a problem, please send an email to our support team at help@dronetag.cz. Make sure to use the subject line: "Problem Report - [Insert Your Product Name]". This will help us identify your request promptly.
2. Provide a Detailed Description
In the body of the email, include a clear and comprehensive description of the problem you are facing. The more details you provide, the better we can understand the issue and offer you a tailored solution. Include information such as:
- Email Address: Share the email address linked to your account. This will enable us to locate your account in our system and assist you more effectively.
- Product Name: Specify the name of the product you are facing a problem with.
- Serial Number: The serial number helps us to verify the device's authenticity and ensure that we are addressing the correct hardware-related problems. Where can I find the Remote ID SN?
- Operating System: Let us know the operating system (e.g., Windows & its version, macOS, iOS 15...) you are using to help us identify any potential compatibility issues.
- Problem definition: Explain the issue you're encountering, provide context about the situation in which the problem has arisen, and elaborate extensively on the specific behaviors you're observing. Additionally, outline your anticipated or desired outcomes in detail.
- Steps to Reproduce: If applicable, provide a step-by-step guide on how we can replicate the problem. This will allow us to investigate and find the root cause quickly.
- Video Recording of the Screen: For certain issues, a video recording of the app's screen can significantly aid our understanding of the problem. If possible, create a short screen recording that demonstrates the problem you are facing and attach the record to the email.
- Additional Information: Feel free to attach any relevant screenshots or error messages you have encountered during the problem. These additional details can help us analyze the situation better and provide accurate solutions.
3. Send the Email
Double-check that you have provided all the necessary information and attached any relevant files. Once you are satisfied, hit the send button to forward your email to our support team.
Our dedicated support team will review your problem report promptly and work to provide you with a solution as soon as possible. We appreciate your patience and cooperation in helping us serve you better.
Abbreviations
D
- DRI — Direct Remote ID (Broadcast Remote ID)
G
- GDPR — General Data Protection Regulation
- GNSS — Global Navigation Satellite System
N
- NRI — Network Remote ID (over an internet connection)
O
- OPRN — Operator Registration Number
R
- RID — Remote ID
U
- UA — Unmanned Aircraft
- UAS — Unmanned Aircraft System
- USSP — U-space Service Provider
W
- WGS84 — The World Geodetic System 1984
Source pages
Every chapter of this document is a page of the Dronetag help site. Use these addresses to reach the latest version.
- 1Introductionhelp.dronetag.cz/knowledge-base
- 2Dronetag usage in the UShelp.dronetag.cz/knowledge-base/dronetag-usage-in-us
- 3Dronetag usage in EUhelp.dronetag.cz/knowledge-base/dronetag-usage-in-eu
- 4How do detections work?help.dronetag.cz/knowledge-base/how-detections-work
- 5Remote ID Explainedhelp.dronetag.cz/knowledge-base/remote-id-explained
- 6Remote ID Serial Numberhelp.dronetag.cz/knowledge-base/how-to-find-sn
- 7Dronetag Cellular Coveragehelp.dronetag.cz/knowledge-base/dronetag-cellular-coverage
- 8Support and Troubleshooting Guidehelp.dronetag.cz/knowledge-base/how-to-report-problem
- 9Abbreviationshelp.dronetag.cz/knowledge-base/abbrevs