
Knowledge Base
- Document
- Knowledge Base
- Chapters
- 9
- Source
- help.dronetag.cz/cs/print/knowledge-base
Knowledge Base
Learn the terminology, abbreviations and concepts related to drone identification, or Dronetag hardware and software.
Dronetag pokrytí mobilní sítě
Častá otázka, kterou dostáváme od našich uživatelů, zní: "Ve které zemi mohu používat Dronetag?". Stručná odpověď zní; téměř kdekoliv v Evropě a USA. Na rozdíl od ostatních nemáme žádná roamingová omezení. Stále však musíte mít na paměti seznam našich podporovaných mobilních operátorů v tabulce níže. Pokud v seznamu nenajdete svou zemi, nezoufejte! Neustále rozšiřujeme spolupráci s našimi síťovými partnery s cílem co nejrychleji pokrýt většinu zemí.
Proč ještě nemáme pokrytý celý svět?
Běžné chytré telefony, které jsou nyní k dispozici, používají mobilní sítě 3G/4G/5G. Navzdory globálnímu pokrytí, které nabízejí, s sebou nesou i některé nevýhody – jejich hardwarové moduly jsou poměrně drahé, velké a energeticky náročné.
Na druhou stranu se objevují nové mobilní sítě specializované na internet věcí (IoT). Dva z těchto zástupců, známí jako NB-IoT a LTE-M, se dobře hodí pro cenově dostupná a malá zařízení. Proto jsme se rozhodli tyto technologie použít pro Dronetag. Přestože cílem těchto sítí je globální pokrytí, celosvětové roamingové dohody zatím nebyly uzavřeny.
Tabulka pokrytí
Abychom pokryli většinu trhu EU a USA, rozhodli jsme se vytvořit 3 hardwarové varianty našich zařízení Dronetag s různými integrovanými SIM čipy. Tyto 3 varianty jsou označeny písmeny A, K a V a pod symbolem CE na nálepce zařízení najdete, kterou z nich vlastníte. Každá varianta je kompatibilní s více mobilními sítěmi v zemi, kde působíme, ale během objednávky se nemusíte starat o výběr té správné, protože to na základě vaší země dodání vyřešíme za vás.
Možnosti pokrytí vaší země naleznete v tabulce níže. Pro některé země je zde více řádků, protože v nich podporujeme více operátorů – konfigurace jejich sítí se může lišit (např. používají různé radiové technologie a pásma LTE). Varianty A a V mají ale vždy stejné pokrytí, takže mají stejný sloupec. V případě dalších dotazů nás kontaktujte na adrese support@dronetag.cz.
| Země | A, V | K | Lokální Operátor (PLMN) | Technologie | LTE pásma | Poznámka |
|---|---|---|---|---|---|---|
| Australie | ✅ | ❌ | Vodafone(50503) | NB-IoT | 8 | |
| Belgie | ✅ | ✅ | Orange (20610) | LTE-M | 20 | |
| Belgie | ✅ | ❌ | Base (20620) | NB-IoT | 20 | |
| Belgie | ✅ | ❌ | Proximus (20601) | NB-IoT | 20 | |
| Česko | ✅ | ❌ | T-Mobile (23001) | NB-IoT | 20 | Pokrytí v blízkosti Prahy |
| Česko | ✅ | ❌ | Vodafone (23003) | NB-IoT | 20 | >99% pokrytí |
| Dánsko | ✅ | ❌ | Telenor (23802) | NB-IoT | 20 | |
| Dánsko | ✅ | ✅ | Telenor (23802) | LTE-M | 20 | |
| Dánsko | ✅ | ❌ | TDC (23801) | NB-IoT | 20 | |
| Estonsko | ✅ | ❌ | Elisa (24802) | NB-IoT | 20 | |
| Finsko | ✅ | ❌ | DNA (24403) | NB-IoT | 3, 20 | |
| Finsko | ✅ | ✅ | DNA (24403) | LTE-M | 3, 20 | |
| Francie | ✅ | ✅ | Orange (20801) | LTE-M | 20 | |
| Irsko | ✅ | ❌ | Vodafone (27201) | NB-IoT | 20 | >90% pokrytí |
| Itálie | ✅ | ❌ | Vodafone (22210) | NB-IoT | 20 | >95% pokrytí |
| Itálie | ✅ | ✅ | Vodafone (22210) | LTE-M | 3 | |
| Japonsko | ❌ | ✅ | Softbank (44000) | LTE-M | 8 | |
| JAR | ✅ | ❌ | Vodacom (65501) | NB-IoT | 8 | |
| Lotyšsko | ❌ | ✅ | LMT (24701) | LTE-M | 20 | |
| Lichtenštejnsko | ✅ | ❌ | Swisscom (22801) | LTE-M | 20 | |
| Lucembursko | ✅ | ❌ | Post (27001) | LTE-M | 20 | |
| Maďarsko | ✅ | ❌ | Vodafone (21670) | NB-IoT | 20 | >99% pokrytí |
| Malajsie | ✅ | ❌ | Maxis (50212) | NB-IoT | TBD | |
| Německo | ✅ | ❌ | Vodafone (26202) | LTE-M | 20 | |
| Německo | ✅ | ❌ | Vodafone (26202) | NB-IoT | 20 | >99% pokrytí |
| Německo | ✅ | ✅ | Deutsche Telekom (26201) | LTE-M | 3, 20 | >99% pokrytí |
| Německo | ✅ | ❌ | Deutsche Telekom (26201) | NB-IoT | 8 | >99% pokrytí |
| Německo | ❌ | ✅ | Telefonica (26203) | LTE-M | 20 | |
| Nizozemsko | ✅ | ❌ | Vodafone (20404) | LTE-M | 20 | >99% pokrytí |
| Nizozemsko | ✅ | ❌ | Vodafone (20404) | NB-IoT | 20 | >99% pokrytí |
| Nizozemsko | ✅ | ❌ | Deutsche Telecom (20416) | NB-IoT | 8 | |
| Nizozemsko | ❌ | ✅ | KPN (20408) | LTE-M | 20 | |
| Nový Zéland | ✅ | ❌ | Vodafone (53001) | LTE-M | 3, 28 | |
| Nový Zéland | ✅ | ❌ | Vodafone (53001) | NB-IoT | 28 | |
| Nový Zéland | ❌ | ✅ | Spark (53005) | LTE-M | 1, 3, 28 | |
| Norsko | ✅ | ❌ | Telenor (24201) | NB-IoT | 20 | |
| Norsko | ✅ | ✅ | Telenor (24201) | LTE-M | 20 | |
| Portugalsko | ✅ | ❌ | Vodafone (26801) | NB-IoT | 20 | Pokrytí pouze v okolí měst |
| Rakousko | ✅ | ✅ | Magenta Telekom (23203) | LTE-M | 3, 8, 20 | >80% pokrytí |
| Rakousko | ✅ | ❌ | Magenta Telekom (23203) | NB-IoT | 8 | >90% pokrytí |
| Rakousko | ✅ | ❌ | A1 Telekom (23202) | NB-IoT | 20 | |
| Rumunsko | ✅ | ❌ | Vodafone (22601) | NB-IoT | 20 | >95% pokrytí |
| Rusko | ✅ | ❌ | MTS (25001) | NB-IoT | 3 | |
| Řecko | ✅ | ❌ | Vodafone (20205) | NB-IoT | 20 | >70% pokrytí |
| Srí Lanka | ✅ | ❌ | Dialog (41302) | NB-IoT | 8 | |
| Španělsko | ✅ | ✅ | Orange (21403) | LTE-M | 20 | |
| Španělsko | ❌ | ✅ | Telefonica (21407) | LTE-M | 3, 20 | |
| Španělsko | ✅ | ❌ | Vodafone (21401) | NB-IoT | 20 | >90% pokrytí |
| Švédsko | ✅ | ✅ | Tele2 (24007) | LTE-M | 20 | |
| Švédsko | ✅ | ✅ | Telenor (24006) | LTE-M | 20 | |
| Švýcarsko | ✅ | ✅ | Swisscom (22801) | LTE-M | 20 | |
| Švýcarsko | ✅ | ❌ | Sunrise (22802) | LTE-M | 20 | |
| Taiwan | ❌ | ✅ | Chunghwa Telecom (46692) | LTE-M | TBD | |
| Taiwan | ✅ | ❌ | Far EasTone (46601) | NB-IoT | 28 | |
| USA | ❌ | ✅ | AT&T | LTE-M | 2, 4, 12 | |
| Velká Británie | ✅ | ❌ | Vodafone (23415) | NB-IoT | 20 | >80% pokrytí |
| Vietnam | ✅ | ❌ | Viettel (45204) | NB-IoT | TBD |
Dálková identifikace dronu
Vzhledem k tomu, že provoz dronů může představovat bezpečnostní riziko, vyžaduje nové nařízení EU 2019/947, aby provozovatelé dronů umístili na dron štítek obsahující registrační číslo jeho provozovatele (v ČR vydávaný Úřadem pro civilní letectví). Tímto způsobem jsou provozovatelé dronů odpovědni za případné škody, které způsobí (když je jejich dron fyzicky nalezen).
Umístění štítku s identifikačním číslem provozovatele však neřeší situaci, když je dron ve vzduchu – a s tím ani otázky soukromí a bezpečnosti lidí na zemi. Autority nejsou schopny letící dron na dálku identifikovat. Z tohoto důvodu nařízení EU 2019/945 přikazuje, aby všechny drony nad 250 gramů létající ve výšce do 120 metrů v kategorii Open nebo Specific byly vybaveny systémy dálkové identifikace (Remote ID), které umožňují bezdrátový přístup k registračnímu číslu provozovatele (UAS Operator ID). Tento požadavek platí od 1. července 2022 a může být splněn buď pomocí přímé dálkové identifikace (DRI), nebo síťové dálkové identifikace (NRI). Důvodem těchto dvou různých řešení jsou různé potřeby (viz vysvětlení níže).
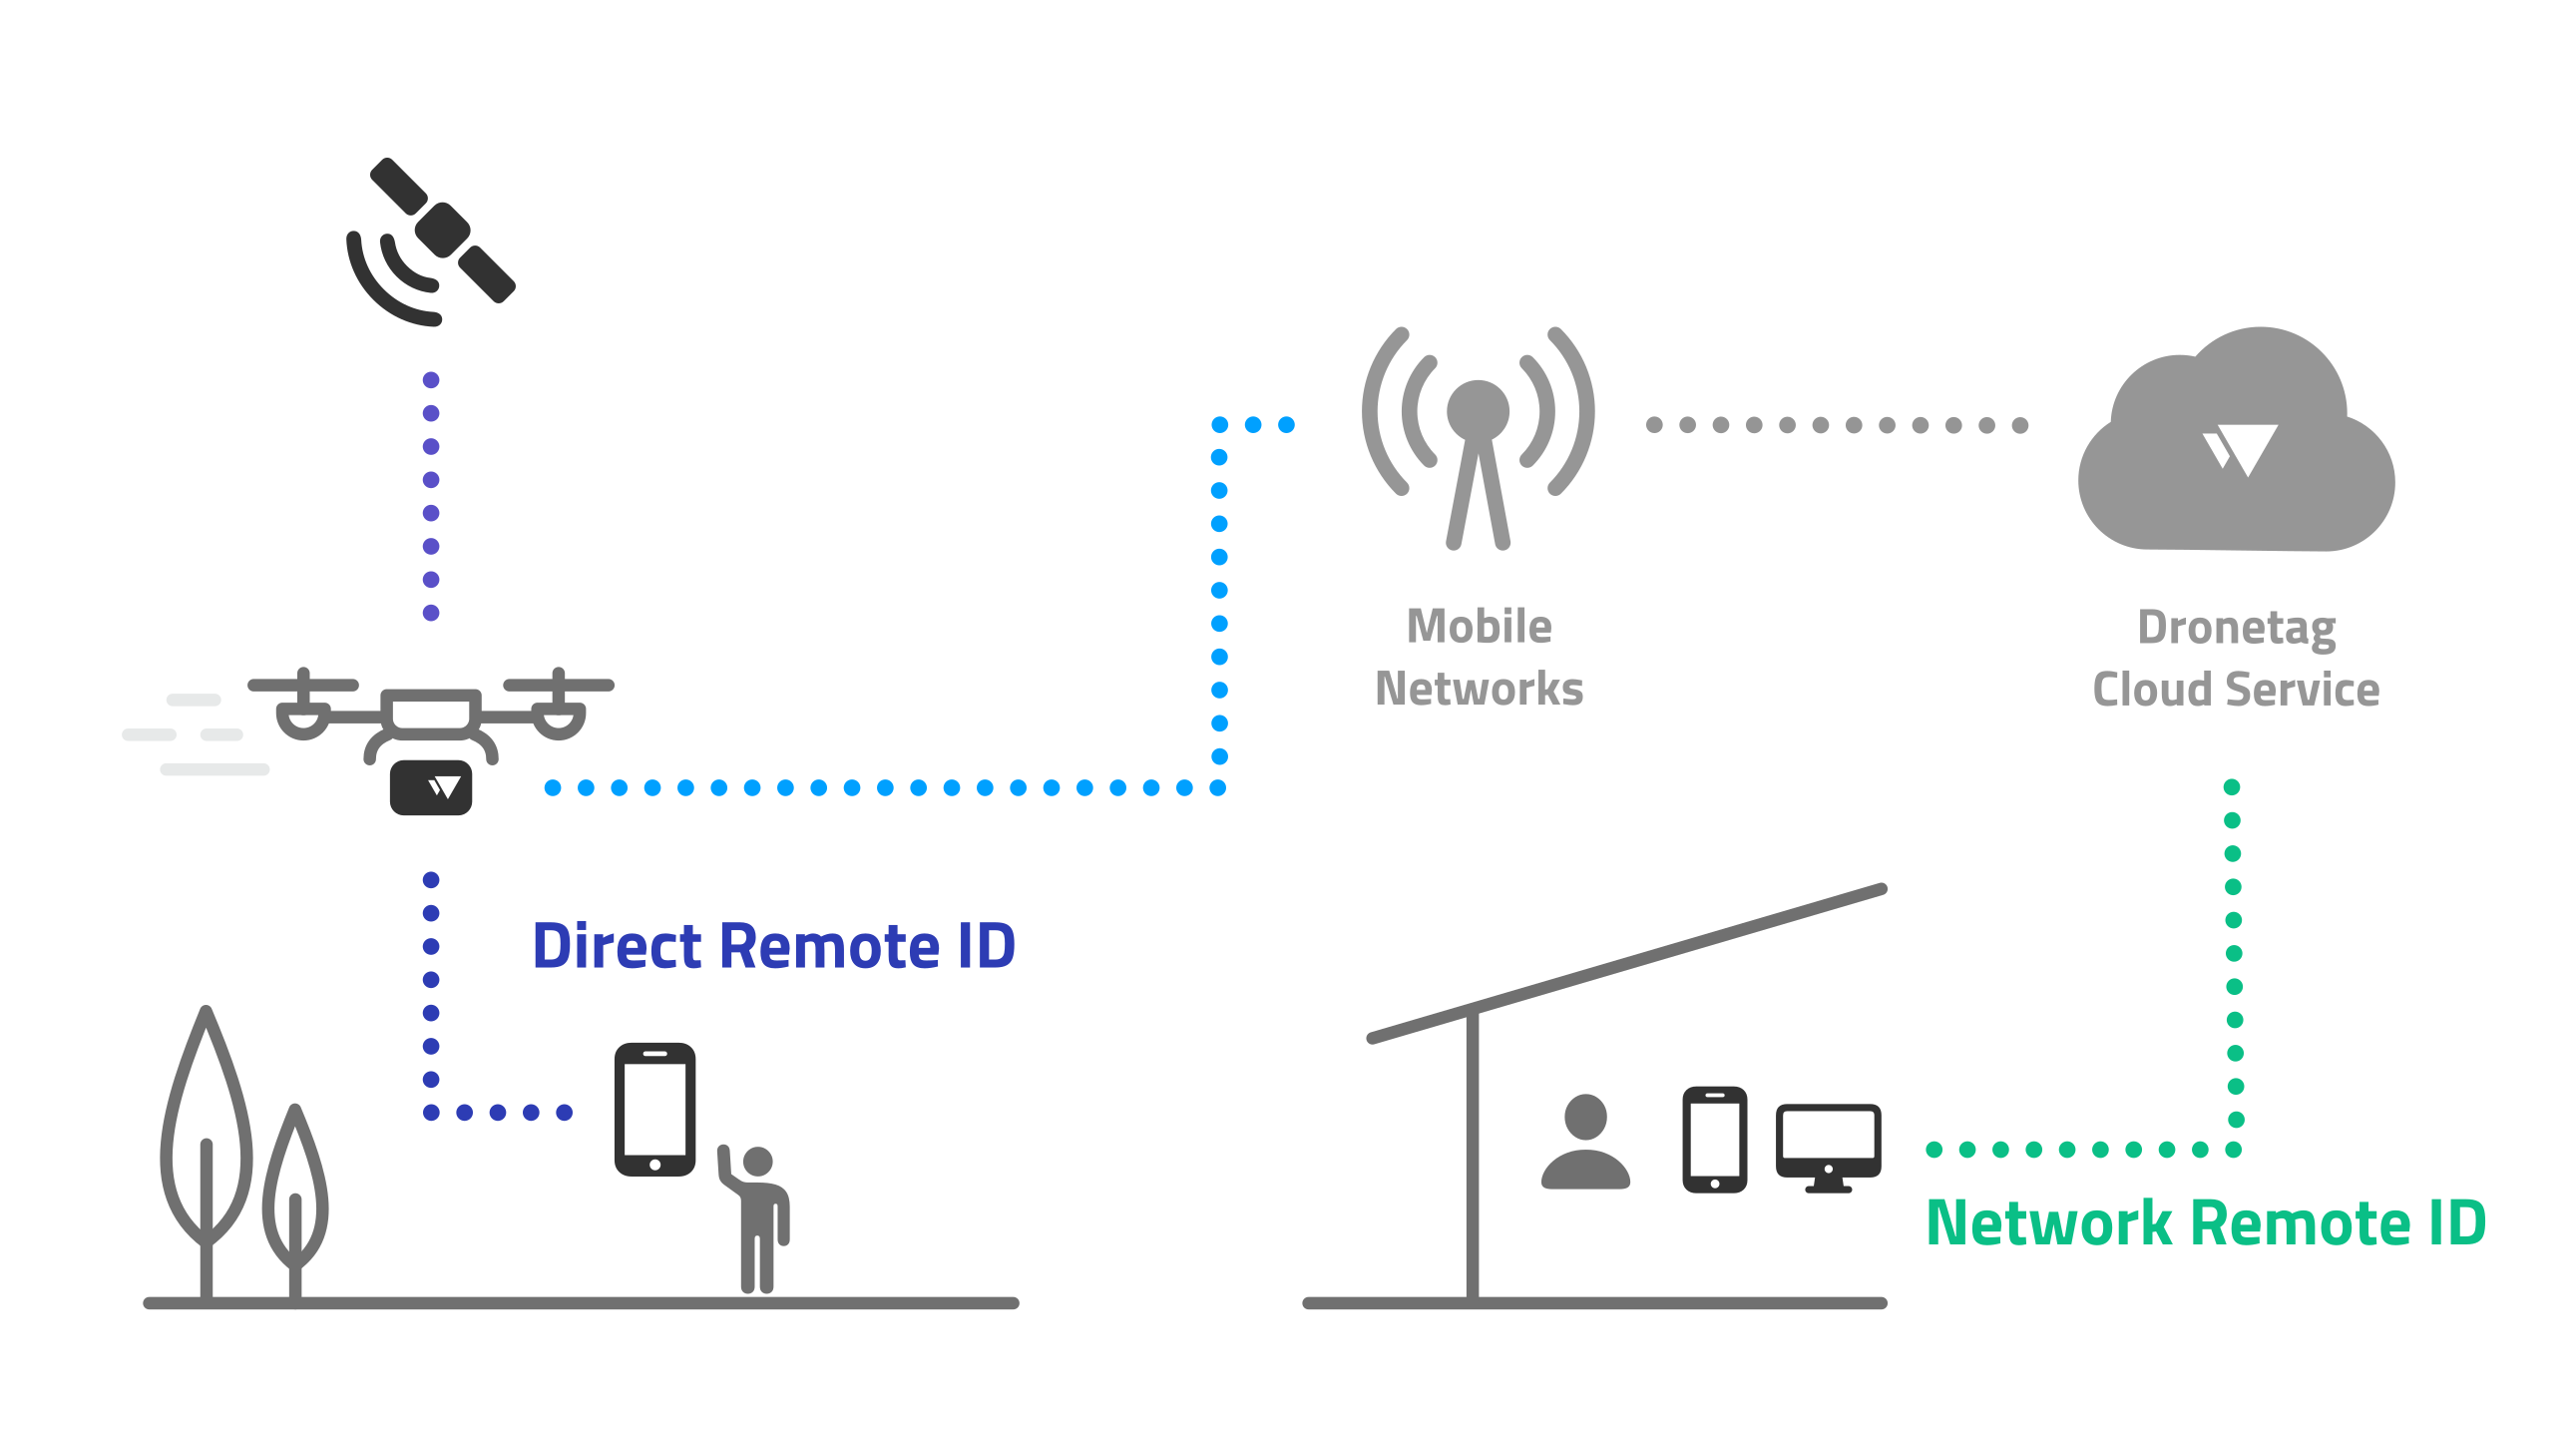
Registrační číslo provozovatele UAS
Rregistrační číslo (ID) provozovatele UAS vydávají vnitrostátní orgány v jednotlivých členských státech EU (v ČR se jedná o Ústav pro civilní letectví). Skládá se ze dvou částí. První je sekvence 16 alfanumerických znaků (tzv. veřejná část), druhá obsahuje náhodně generované bezpečnostní znaky (tzv. soukromá část). Veřejná část začíná třemi znaky, které určují, kde je provozovatel registrován (např. CZE pro Česko), a končí jedním znakem kontrolního součtu. Orgány, které mají přístup k databázi registračních čísel provozovatelů, mohou pomocí kontrolního součtu zkontrolovat, zda je veřejná část platná.
Hlavním účelem registračního čísla provozovatele je jeho nahrání do systému DRI. V dronu je však uložena pouze veřejná část, která je vysílána všem v okolí. Soukromá část se neukládá a používá se pouze pro ověření systému DRI. Soukromou část byste neměli nikomu sdělovat, protože by mohl zneužít vaši identitu k páchání trestné činnosti.
ID provozovatele může vypadat například takto: "FIN87astrdge12k8" jako veřejná část a "xyz" jako soukromá. Pokud ID provozovatele není v dronu nastaveno, musí systém DRI vysílat řetězec "NULL" (znamená prázdný/nedefinovaný).
Základy DRI
DRI (přímá dálková identifikace) je jednoduchý přístup, který chrání soukromí a bezpečnost široké veřejnosti. Hlavní výhodou je, že nepotřebuje navazovat žádné spojení s protistranou, protože data jsou jednoduše vysílána všem přímo z dronu (podobně jako myšlenka ADS-B v pilotovaném letectví).
Nařízení EU 2019/945 vyžaduje, aby údaje DRI bylo možné přijímat běžně dostupnými smartphony, což určuje technologické možnosti vysílacích protokolů přímé identifikace. Jsou jimi tedy pouze protokoly Wi-Fi a Bluetooth – a na palubě dronu je vyžadován pouze jeden typ.
Důležitým faktem je, že v případě DRI je zachováno soukromí pilota, protože dron nevysílá žádné citlivé osobní údaje. Veřejnosti je přístupné pouze ID provozovatele, poloha dronu a poloha pilota. Úřady však mohou ID provozovatele spojit s osobními údaji provozovatele a ověřit jeho způsobilost. Dosah DRI se pohybuje v rozmezí stovek metrů až několika kilometrů, takže je obtížné tato data sbírat globálně po celém území.
Praktická implementace DRI na stávajících bezpilotních letounech je možná dvěma způsoby. Prvním je aktualizace firmwaru od výrobců dronů, pokud je to technicky proveditelné. Pokud tato podpora ze strany výrobců dronů není možná, lze k dovybavení dronů použít přídavná řešení DRI, například Dronetag Mini. Nové drony uvedené na trh EU po 1. lednu 2023 již musí mít identifikační štítek třídy (označení C) a musí být vybaveny systémy DRI.
Základy NRI
Na rozdíl od DRI je NRI (síťová dálková identifikace) považována za technicky složitější přístup. Jejím hlavním účelem je vytvořit spolehlivé a bezpečné spojení mezi drony a provozovateli v připravovaných vzdušných prostorech U-space. Je zásadní pro pokročilé operace, jako jsou lety BVLOS, doručování drony a kombinace pilotovaného a bezpilotního provozu ve stejném vzdušném prostoru.
Všechny drony nad 250 g provozované ve vzdušném prostoru U-space budou muset být připojeny k poskytovateli služeb
U-space, který zajistí bezpečnost provozovatele v souladu s jeho letovým plánem. Aby to bylo možné, budou všechny operace dronů ve vzdušném prostoru U-space podléhat alespoň čtyřem povinným službách U-space, kde NRI je jednou z nich.
Chcete-li se dozvědět více o konkrétních požadavcích, podívejte se na EU 2021/664.
Standardizace DRI a NRI
Standardizační proces DRI v EU probíhá v organizaci ASD-STAN na žádost Evropské komise u CEN (Evropský výbor pro normalizaci). V současné fázi standardizačního procesu je návrh normy prEN 4709-002, která specifikuje transportní protokoly a kódování zpráv DRI.
Specifikace prEN 4709-002 EU je v souladu s americkou normou F3411, kterou spravuje ASTM (Americká společnost pro zkušebnictví a materiály). PrEN 4709-002 však definuje volitelná a doporučená pole, která v prostředí EU přinášejí některé další výhody. V organizaci ISO (Mezinárodní organizace pro normalizaci) probíhají diskuse o celosvětové harmonizaci DRI. Pro více informací o procesu standardizace doporučujeme prostudovat ASD-STAN's Remote ID whitepaper.
Implementace DRI
Norma prEN 4709-002 definuje tři povinné a jeden volitelný komunikační protokol.
- Bluetooth 4 Legacy (volitelný)
- Bluetooth 5 Long Range (povinný)
- Wi-Fi Beacon (povinný)
- Wi-Fi NAN (povinný)
Technologie lze kombinovat dohromady, ale vysílání DRI pomocí jedné z výše jmenovaných technologií je dostačující. Obecně lze říci, že řešení Wi-Fi mají větší dosah díky vyššímu vysílacímu výkonu ve srovnání s řešeními Bluetooth (100 mW oproti 10 mW). Možný dosah Wi-Fi je několik kilometrů, zatímco dosah Bluetooth se pohybuje někde kolem stovek metrů. Naše zařízení Dronetag Mini používá Bluetooth 5 s doplňkovým Bluetooth 4 a naměřili jsme dosah 1,5 km v nerušených venkovních podmínkách.
Podpora DRI v mobilních zařízeních
Informace o podporovaných zařízeních naleznete v repozitáři OpenDroneID receiver application repository.
Dronetag usage in the US
FAA DroneZone tutorial video
Watch a tutorial video by the Pilot Institute demonstrating the utilization of Dronetag Remote ID modules within the FAA DroneZone.
Part 107
Part 107 pilots must register each Remote ID broadcast module device individually in their inventory, and each device will be assigned a distinct registration number.
How to Add and Register a Dronetag Remote ID Module
- Log in to FAADroneZone.
- Click on the button labeled "Launch Drone Owners and Pilots Dashboard."
- Ensure that you are on the Part 107 Dashboard.
- Click on "Manage Device Inventory."
- Select "Add Device."
- When prompted to answer the Remote ID question, choose "Yes."
- From the drop-down menu, select the device type - "Remote ID broadcast module"
- List the make/model of the drone while adding the broadcast module's Remote ID serial number in the provided field.
- Enter the Dronetag Remote ID serial number. Where can I find the Remote ID SN?
- Click on "Add Device."
- Continue with the registration process.
How to transfer a Dronetag Remote ID Module between your drones
- Log in to FAADroneZone.
- Click on the button labeled "Launch Drone Owners and Pilots Dashboard."
- Ensure that you are on the Part 107 Dashboard.
- Click on "Manage Device Inventory."
- Find the drone you want to edit in the list and click on the three vertical dots associated with it in the "Actions" column.
- Select "Edit" from the drop-down menu.
- Modify the answer to the Remote ID question to "Yes."
- Enter the Remote ID serial number from your Dronetag module. Where can I find the Remote ID SN?
- Click on "Save" to apply the changes.
Recreational drone pilots
Recreational drone pilots have the convenience of registering once and using the same registration number for all the drones listed in their inventory. During the registration process, you must provide the serial number(s) of each Dronetag Remote ID broadcast module. The unique serial number associated with the module must be listed for each non-Standard Remote ID drone added to your inventory. This allows you to transfer the module between your drones, as long as each drone's make and model are included in the same inventory listing.
How to Add and Register a Dronetag Remote ID Module
- Log in to FAADroneZone.
- Click on the button labeled "Launch Drone Owners and Pilots Dashboard."
- Make sure you are on the Recreational Flyer Dashboard.
- Click on "Manage Device Inventory."
- Select "Add Device."
- Answer the Remote ID question with a "Yes."
- Choose the “Remote ID broadcast module” type from the drop-down menu.
- If you're using one Dronetag Remote ID module on multiple drones, choose the broadcast module option for each and input the make/model of the specific drone(s). Use the same Dronetag Remote ID serial number from the module in the following step.
- Enter the Remote ID serial number. Where can I find the Remote ID SN?
- Click on "Add Device."
- Return to "Your Inventory."
- If you wish to cancel a previously registered non-Standard Remote ID drone, locate the drone in your inventory. Click on the three vertical dots associated with the drone under the "Actions" column and select "Cancel" from the drop-down menu. Note: A canceled device will still appear in your inventory as "cancelled."
Dronetag usage in EU
UAS Operator ID (EU region only)
While most features and information on our platform are applicable to both US and EU regions, we want to draw your attention to a specific functionality known as the UAS Operator ID. This feature is exclusively relevant to our EU customers, as it complies with regulations specific to the European Union. If you are located within the EU, we invite you to continue reading to gain a better understanding of the UAS Operator ID and its significance for you.
The UAS operator ID is issued by the National authorities in each particular EU member state and is composed of two parts. The first is a sequence of 16 alphanumeric characters (known as a public part), the second contains randomly generated secure characters (known as a private part). The public part starts with three characters that define where the operator is registered (e.g. CZE for the Czech Republic) and ends up with one checksum character. Authorities who have access to the database of UAS Operator IDs can check if the public part is valid by accessing the private part and calculating the checksum.
The main purpose of the UAS Operator ID is to upload it to the Remote ID system. However, only the public part is stored and is broadcasted. The private part is not stored and is only used for Remote ID system validation. You shouldn’t tell the private part to anyone as they may misuse your identity to commit crimes. The example UAS Operator ID is “FIN87astrdge12k8” as public part and “xyz” as the private one. If the UAS Operator ID is not configured in the Dronetag Remote ID module, it will broadcast the “NULL” string.
How to Fill & Upload your UAS Operator ID
Where do I find my UAS Operator ID?
The UAS operator ID is issued by the National authorities in each particular EU member state. To obtain a UAS Operator ID, you must directly contact your local authority. We at Dronetag do not possess access to this information, and we are unable to assist you in acquiring it. Check the list and links to the National Aviation Authorities here: https://www.easa.europa.eu/en/domains/civil-drones/naa
The 3-character private part of the assigned Operator ID is usually distributed and accessible to Drone Operators in a separate way from the Operator ID certificate which contains the public part of the UAS Operator ID
How do I fill and upload the UAS Operator ID into the app?
UAS Operator ID can be filled into your Dronetag Account in the User profile section.
-
Open the Dronetag app
-
Fill in your UAS Operator ID in the User profile section. After filling it in the profile, turn on your Dronetag device and open its device detail in the Mobile app. You will see a warning message that UAS Operator ID in your device is inconsistent with the one you have in profile. With Synchronize button, your Operator ID will be saved to the device’s memory. Then your UAS Operator ID is broadcasted from the device during the flight. Please note that uploading UAS Operator ID is only available in Mobile app.
-
Start the flight with the device and check Dronetag App or Drone Scanner on your phone that information is broadcasted correctly.
Difference between Drone Operator and Drone Pilot
A Drone Operator is any person or organization who owns or rents one or more registered drones.
The Drone Operators need to be registered with their National Aviation Authority in their country of residence or main place of business and receive a Drone Operator ID number - UAS Operator ID.
A Drone Pilot is the person actually flying the drone, without necessarily owning or renting the drone and therefore doesn't have to be a Drone Operator.
Drone Pilot receives a Pilot License with an identification number, which is not an Operator ID.
For more details about Drone Operators and Drone Pilots and their responsibilities visit EASA Drone operators & pilots
How do detections work?
Ever wondered why the Dronetag app sometimes shows the same drone more than once, or why you see just one detection even though you landed in between flights? This article explains what detections are, how they work, and why they might not always match your expectations.
What is a detection?
A detection is a record of a drone’s telemetry that our system receives without a long interruption. If there’s a break in the signal for about 15 minutes, we consider that detection closed. Remote ID messages tell us the drone’s location, altitude, speed, and other data, but they don’t say when a flight starts or ends. That’s why we call it a detection—not a flight. We only know where the drone was when we received its signal.
Why do you call it a detection and not a flight?
We use the term "detection" on purpose, because we can’t always tell when a flight begins or ends. In the app, you’ll notice “Flights” and “Detections” are listed separately. That’s intentional: a flight is a different concept from a detection. Flights are always recorded by Dronetag equipment, while detections can come from any Remote ID device.
Why can’t you tell when a drone takes off or lands?
If you’re using a Network Remote ID (NRI) device like the Dronetag Mini, it can report the exact start and end of a flight. But with Direct Remote ID (DRI) devices—or when you’re just picking up signals from a drone with Remote ID—it’s not possible to know the takeoff or landing times. DRI only broadcasts the drone’s ID and location, not when the flight starts or ends. So, with DRI, we can’t pinpoint those moments—only when the drone was detected.
Why do I see multiple detections for the same drone?
If you see the same drone listed more than once, it’s usually because there was a long enough break in detection—maybe the drone went out of range or the signal was lost. When the system picks up the drone again after about 15 minutes, it creates a new detection record.
Why do I see just one detection even though I landed in between?
If you landed and took off again but only see one detection, it’s likely because the break in the Remote ID signal wasn’t long enough. The system only closes a detection after about 15 minutes without a signal. So, if you swapped batteries quickly or restarted the drone in less than 15 minutes, it will still count as a single detection. Fast hands!
What if I detect a drone with multiple receivers? Will I see multiple detections?
Behind the scenes, our system tracks detections from each receiver separately. But to keep things simple for you, we merge them in the app and APIs. You’ll see just one detection, even if several receivers picked up the same drone. If you want to dig deeper and see each detection individually, you can access them through our APIs—check out our developer documentation for details.
Remote ID Serial Number
Every Remote ID device must possess a distinct Serial Number. The SN is constructed using three fundamental components: the Manufacturer Code, the Length Code, and the Manufacturer’s Serial Number.
Manufacturer Code
The Manufacturer Code (MFR Code) is a combination of four characters, comprising digits and potentially a mix of uppercase letters, excluding the letters O and I. The International Civil Aviation Organization (ICAO) is responsible for designating a unique MFR Code to UAS manufacturers worldwide.
Length Code
The Length Code is a single character representing the character count in the Manufacturer’s Serial Number. The Length Code characters range from 1 to 15, following this pattern: 1, 2, ..., 9, A=10, B=11, ..., F=15.
Manufacturer’s Serial Number
The Manufacturer’s Serial Number is directly managed by the manufacturer assigned the Manufacturer Code. This alphanumeric code can have up to 15 characters. It can encompass a combination of uppercase letters and digits, excluding O and I, yet may incorporate any digits. The actual character count designated by the manufacturer is indicated by the preceding Length Code.
Example: SN = MFR1C123456789ABC
MFR Code = MFR1 Length Code = C, representing 12 characters in the ensuing Manufacturer’s Serial Number Manufacturer’s Serial Number = 123456789ABC
How to get Dronetag Serial Number
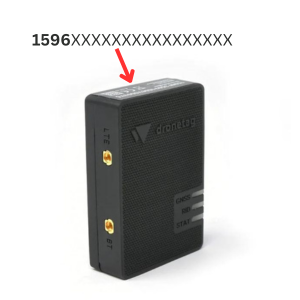
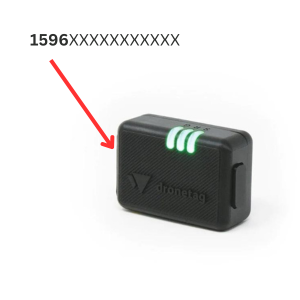
Dronetag Remote ID devices use the SN starting with 1596 (MFR Code of Dronetag). To get the serial number of your Dronetag device, you need to select which device you purchased. Below you will find examples of SN placement on individual Dronetag devices.
The serial number is:
- On the device itself as a sticker (Dronetag Mini & Beacon)
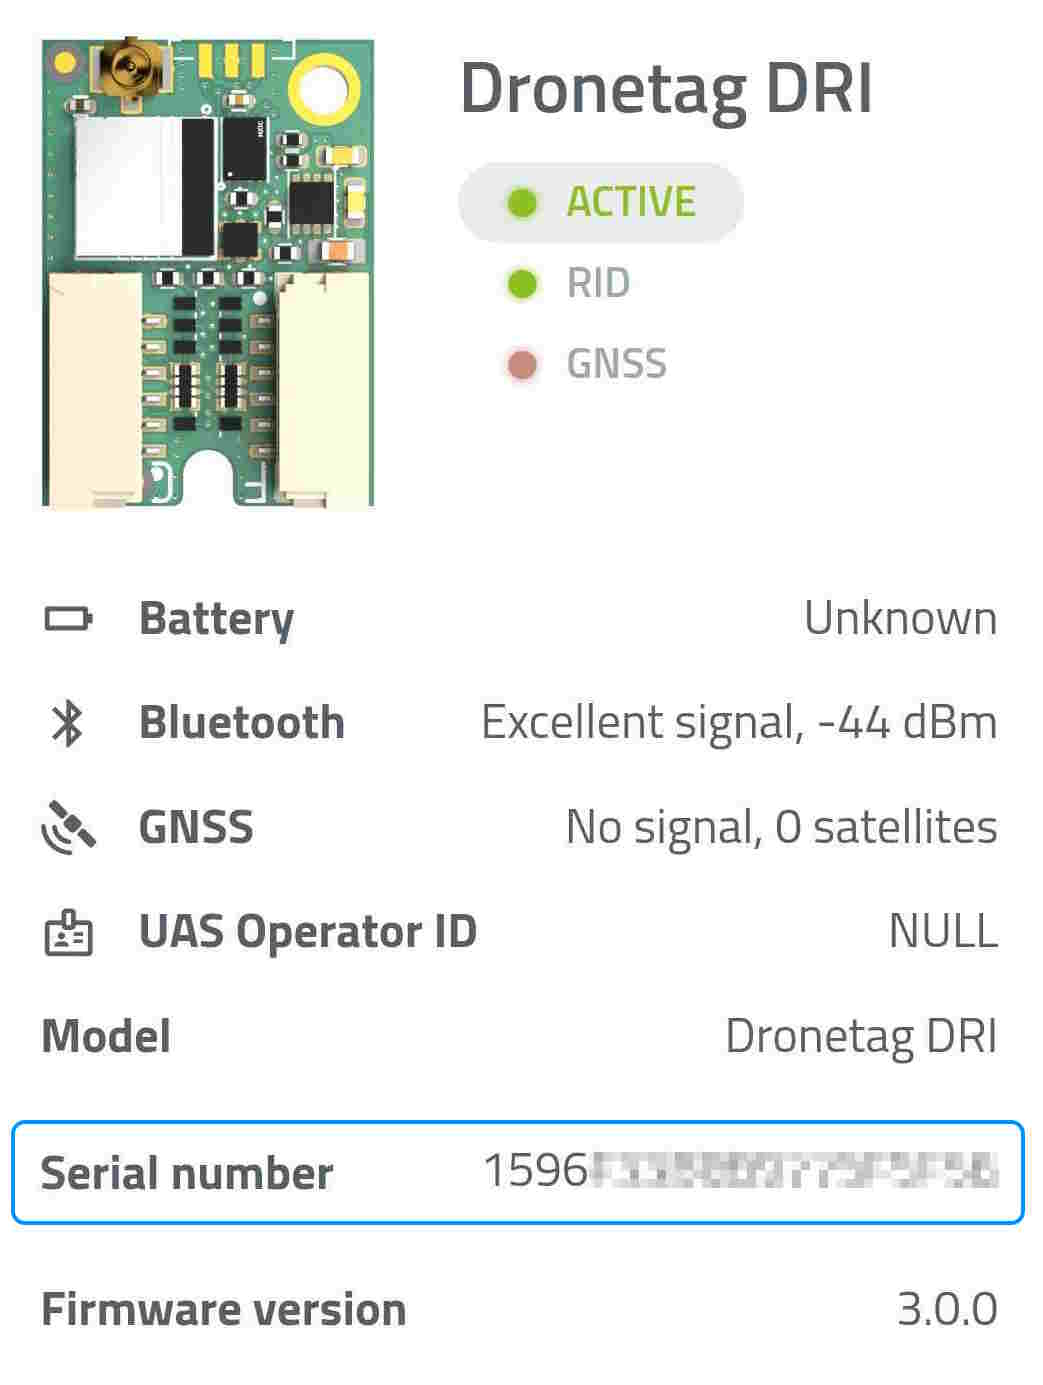
- Readable through our app only (Dronetag BS & DRI)
Dronetag Mini
 |
Dronetag Beacon
 |
Dronetag DRI
To get the SN from your Dronetag DRI, you need to use our Dronetag App or the Toolbox App. After plugging the DRI into the power source and its registration in the app, you can manually write down the serial number of your Dronetag DRI.
 |
Dronetag BS
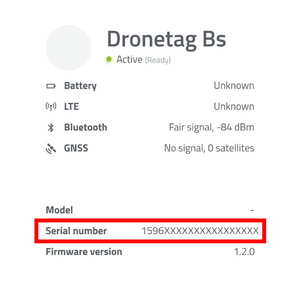
To get the SN from your Dronetag BS, you need to use our Dronetag App or the Toolbox App. After plugging the BS into the power source and its registration in the app, you can manually write down the serial number of your Dronetag BS.
 |
Support and Troubleshooting Guide
We understand that sometimes issues may arise, and we are here to help you every step of the way. Before contacting our support team, we encourage you to explore the following steps, which might help you resolve the problem quickly and independently.
Browse Troubleshooting Section
Our website's Troubleshooting Section is designed to address common issues and provide step-by-step solutions. We recommend starting here to find answers to your questions. To access the Troubleshooting Section, simply navigate to the product page and choose the "Troubleshooting" tab on the menu.
- Dronetag Mini troubleshooting
- Dronetag Beacon troubleshooting
- Dronetag DRI troubleshooting
- Dronetag BS troubleshooting
Unable to Find a Solution?
No luck in the Troubleshooting section and the issue persists? Don't worry - we are here to assist you. Please reach out to our dedicated support team by sending an email to help@dronetag.cz
Remember to follow the instructions outlined below to ensure we can best assist you.
1. Compose an Email
To report a problem, please send an email to our support team at help@dronetag.cz. Make sure to use the subject line: "Problem Report - [Insert Your Product Name]". This will help us identify your request promptly.
2. Provide a Detailed Description
In the body of the email, include a clear and comprehensive description of the problem you are facing. The more details you provide, the better we can understand the issue and offer you a tailored solution. Include information such as:
- Email Address: Share the email address linked to your account. This will enable us to locate your account in our system and assist you more effectively.
- Product Name: Specify the name of the product you are facing a problem with.
- Serial Number: The serial number helps us to verify the device's authenticity and ensure that we are addressing the correct hardware-related problems. Where can I find the Remote ID SN?
- Operating System: Let us know the operating system (e.g., Windows & its version, macOS, iOS 15...) you are using to help us identify any potential compatibility issues.
- Problem definition: Explain the issue you're encountering, provide context about the situation in which the problem has arisen, and elaborate extensively on the specific behaviors you're observing. Additionally, outline your anticipated or desired outcomes in detail.
- Steps to Reproduce: If applicable, provide a step-by-step guide on how we can replicate the problem. This will allow us to investigate and find the root cause quickly.
- Video Recording of the Screen: For certain issues, a video recording of the app's screen can significantly aid our understanding of the problem. If possible, create a short screen recording that demonstrates the problem you are facing and attach the record to the email.
- Additional Information: Feel free to attach any relevant screenshots or error messages you have encountered during the problem. These additional details can help us analyze the situation better and provide accurate solutions.
3. Send the Email
Double-check that you have provided all the necessary information and attached any relevant files. Once you are satisfied, hit the send button to forward your email to our support team.
Our dedicated support team will review your problem report promptly and work to provide you with a solution as soon as possible. We appreciate your patience and cooperation in helping us serve you better.
Zkratky
D
- DRI — Direct Remote ID (Přímá dálková identifikace)
G
- GDPR — General Data Protection Regulation (Obecné nařízení o ochraně osobních údajů)
- GNSS — Global Navigation Satellite System (Globální družicový polohový systém)
N
- NRI — Network Remote ID (Síťová dálková identifikace)
O
- OPRN — Operator Registration Number (Registrační číslo provozovatele)
R
- RID — Remote ID (Dálková identifikace)
U
- UA — Unmanned Aircraft (Bezpilotní letadlo)
- UAS — Unmanned Aircraft System (Bezpilotní systém)
- USSP — U-space Service Provider (Poskytovatel služeb prostoru U-space)
W
- WGS84 — The World Geodetic System 1984 (Světový geodetický systém 1984)
Source pages
Every chapter of this document is a page of the Dronetag help site. Use these addresses to reach the latest version.
- 1Introductionhelp.dronetag.cz/cs/knowledge-base
- 2Dronetag pokrytí mobilní sítěhelp.dronetag.cz/cs/knowledge-base/dronetag-cellular-coverage
- 3Dálková identifikace dronuhelp.dronetag.cz/cs/knowledge-base/remote-id-explained
- 4Dronetag usage in the UShelp.dronetag.cz/cs/knowledge-base/dronetag-usage-in-us
- 5Dronetag usage in EUhelp.dronetag.cz/cs/knowledge-base/dronetag-usage-in-eu
- 6How do detections work?help.dronetag.cz/cs/knowledge-base/how-detections-work
- 7Remote ID Serial Numberhelp.dronetag.cz/cs/knowledge-base/how-to-find-sn
- 8Support and Troubleshooting Guidehelp.dronetag.cz/cs/knowledge-base/how-to-report-problem
- 9Zkratkyhelp.dronetag.cz/cs/knowledge-base/abbrevs