
On Premise Dronetag Solution
- Document
- On Premise Dronetag Solution
- Chapters
- 16
- Source
- help.dronetag.cz/print/on-premise
Dronetag On-premise Platform
Welcome to the Dronetag On-premise Platform documentation. Running Dronetag Cloud Platform in on-premise mode allows you to deploy our services within your own infrastructure, providing enhanced privacy, security, and control over your drone operations.
Dronetag On-premise Platform is available in two variants: pre-installed node or self-install kit.
- The pre-installed node is a ready-to-use hardware solution (a mini PC server) that is ready to plug-and-play.
- The self-install kit provides the software and instructions to set up your own hardware.
What is Dronetag On-premise Platform?
Dronetag On-premise is a self-hosted solution designed for organizations that require a private and secure environment for their drone tracking and identification needs.
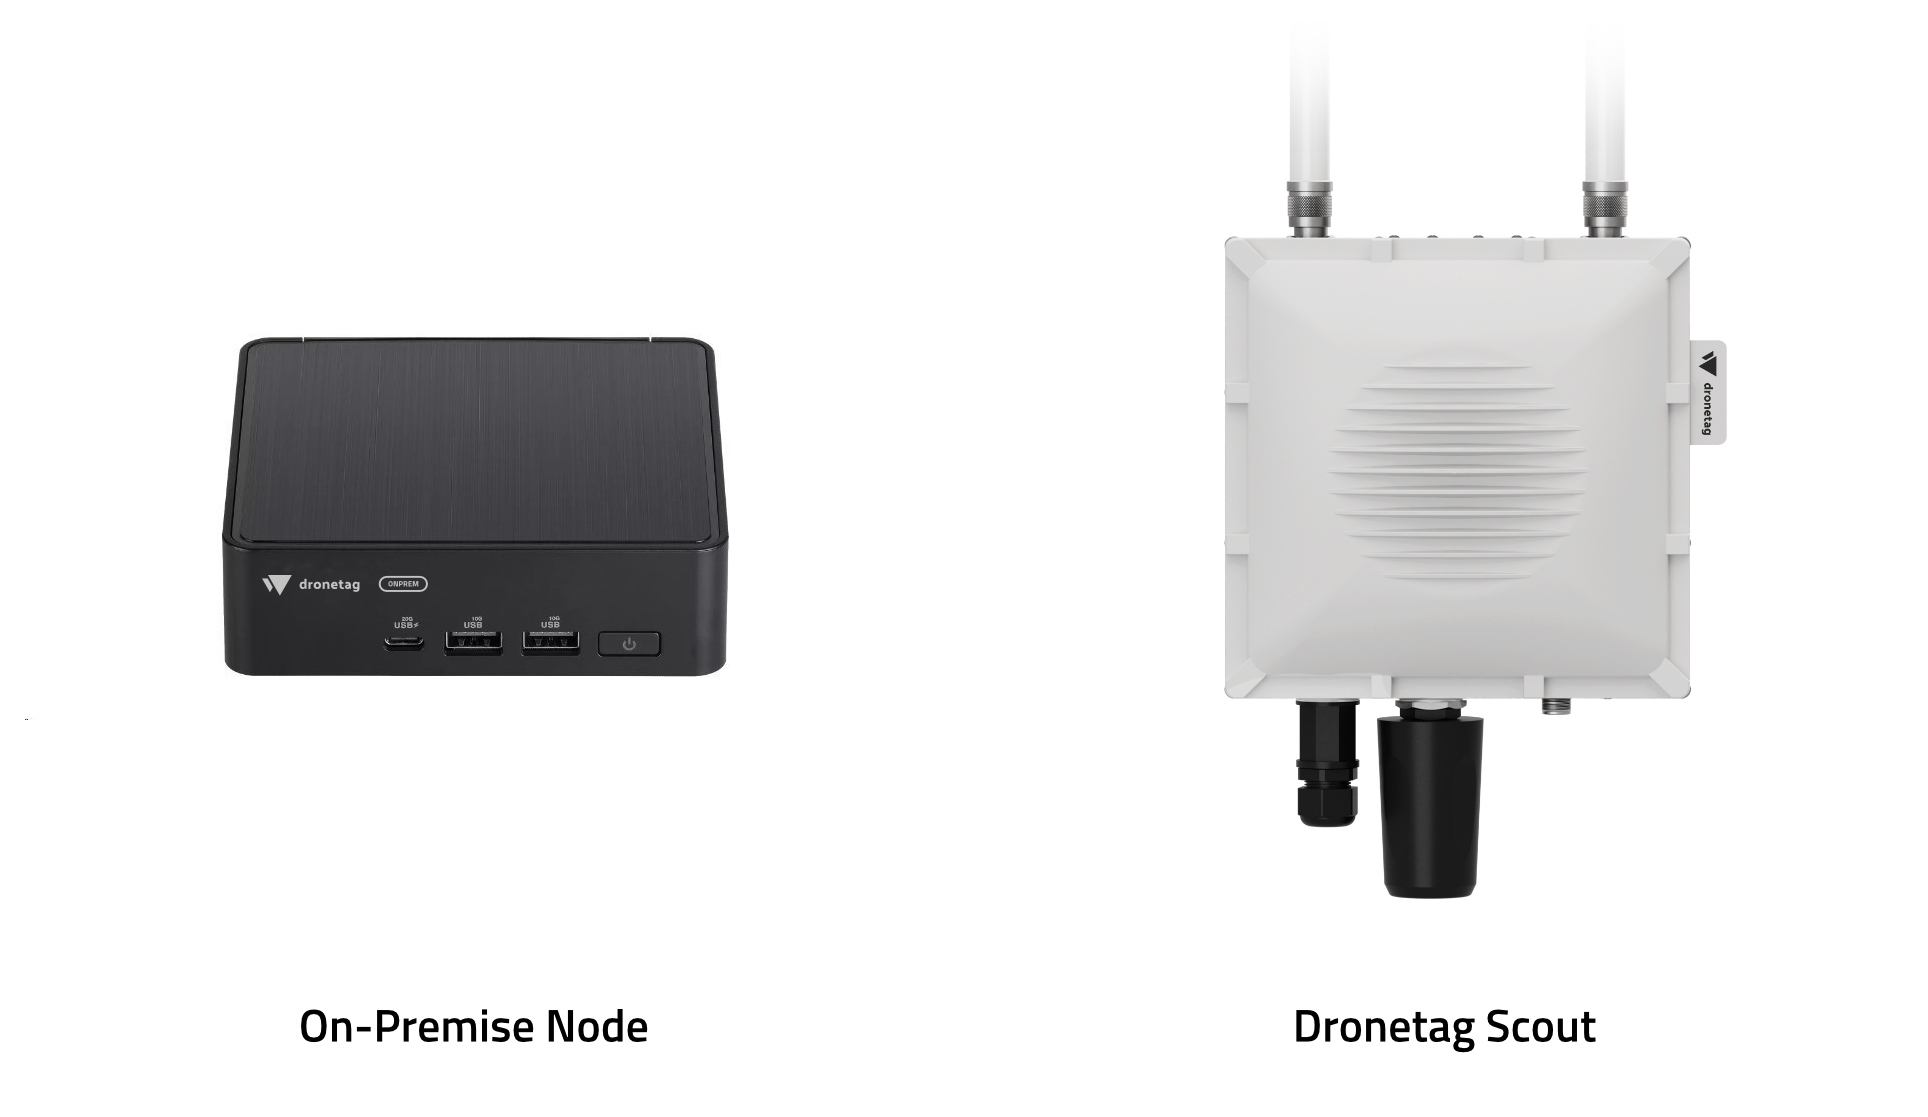
It is designed and usually paired with Dronetag Scout, which is a stationary Remote ID receiver, which can be configured to receive Remote ID messages and send them on the local network to the on-premise instance, instead of sending the data to our cloud platform instance.
On-premise Available Functions
The Dronetag On-Premise Platform can be set up to offer various levels of functionalities, depending on your needs. Many services are decoupled and can be run independently, allowing you to choose the ones that best suit your requirements.
| Functionality | Service Name | Description | Connections/Outputs | |
|---|---|---|---|---|
| Remote ID Ingestion Service | funnel | Service to ingest data and parse Remote ID messages | Kafka Topic / Another Node | Required |
| Data Storage Service | airspace | Service to store ingested data in PostgreSQL database and provide API on top of it. Requires Remote ID Ingestion Service. | HTTP API | Optional |
| Local Dronetag App for Web | app | Web application to visualize ingested data and manage Dronetag devices. Requires Data Storage Service to show both real-time and historical data. | Web App | Optional |
| Forwarding Service | relay | Service to forward ingested data to 3rd-party systems in various UTM formats and other services. Requires Remote ID Ingestion Service. | HTTP Webhooks / MQTT, Various UTM formats | Optional |
| User Account Management | N/A | Collection of features allowing you to have users with different sharing options and private data within your instance. Without this feature, the app is used without user accounts and all data are accessible to everyone in your network. | HTTP API | ⏳ Not available yet |
| Network Remote ID Ingestion Service | N/A | Service to receive data from Network Remote ID devices, such as Dronetag Mini or Mini 4G | Kafka Topic / HTTP API | ⏳ Not available yet |
Some features that are typically present in our cloud instance are not yet available in the on-premise version, but are planned for future releases. If you are interested in a specific feature, please do not hesitate to reach out to us.
Quick Start
In this section we will guide you through the process of setting up your Dronetag On-premise Platform using the self-install kit. You will need a distribution package provided by Dronetag, and a (virtual) machine supporting Docker Compose.
The platform is distributed as a set of Docker containers orchestrated using Docker Compose manifests. This makes it OS-agnostic. However, Linux is recommended as the preferred host operating system.
Installing Dronetag On-premise Platform
- Unpack the distribution package you got from Dronetag, preferably to
/opt/dronetag/folder. - Read the contents of the
INSTALL.mdfile contained in the package, and follow it.
Also, the INSTALL.md file contains other information on how to start and stop the services, and so on.
Open the Local Dronetag App
Open your web browser and open the URL http://<host-name-or-ip-address>. This should open the local Dronetag App, which allows you to visualize the data captured by your Dronetag Scout devices.
Next steps
Continue with the other guides on how to configure your Dronetag equipment to start sending data to your on-premise instance, and how to use the apps to access the visualization and data.
- 👉 Read the guide on configuring your Dronetag Scout to let Scout feed the data into your on-premise instance.
- 👉 Read further on accessing the web app to visualize the data you have captured.
- 👉 Lastly, read up on how to access the data via API or exports to get the data out of the system for further processing or storage.
Upgrading Guide
This section is not finished yet.
This guide will provide instructions on how to upgrade your Dronetag On-premise Platform installation on your own hardware. If you have a pre-installed node and wish to upgrade it, please contact us.
-
Backup your data. Before proceeding with the upgrade, make sure to back up your data. This includes any custom configurations, maps, or other important files you may have added to your installation.
-
Perform the upgrade. Follow the instructions that are part of the new version distribution package. Some details may depend on the exact previous version you used to have before.
Advanced Use & Quirks
This section contains information that is no longer valid.
This section covers some advanced topics and quirks that you may encounter when using the Dronetag On-premise Platform with virtual machines.
User accounts
The system is configured with two main UNIX user accounts:
core- the main user account for accessing the virtual machine over SSH and making changes, is a sudoer.- Can be used only over SSH.
- Does not have any password set, login is done using the SSH key.
viewer- a read-only user account for accessing the web interface and viewing the data.- Cannot be used over SSH.
- The default password is
onpremviewer. We recommend changing it after the first login.
Connecting to the VM over SSH
ssh -i core_key core@<IP_ADDRESS>
where <IP_ADDRESS> is the IP address of the virtual machine. If you used port forwarding and forwarded SSH to a different port, use the -p option to specify the port.
Replacing the offline maps
The Dronetag On-premise Platform uses offline maps for the map visualization in the app. You may wish to replace the default maps with your own.
The maps are stored in the /etc/onprem/data/maps directory.
The supported formats are .mbtiles or .pmfiles. You can use tools like MapTiler to create your own maps in these formats.
To replace the maps, follow these steps:
- Prepare your map files in
.mbtilesor.pmfilesformat. - Copy the files to the
/etc/onprem/data/mapsdirectory on your Dronetag On-premise node. - Edit the
/etc/onprem/data/maps/config.jsonfile path to reference the newly uploaded maps file.
Automatic updates
For the self-install kit distributions, we have disabled the automatic updates of the system, provided by the Fedora Core OS, to avoid unwanted automatic reboots of the machine. If you wish to enable automatic updates, you can do so by running the following command:
sudo systemctl unmask zincati.service
sudo systemctl unmask fwupd-refresh.service
Read more about Fedora's automatic updates.
Quirk: Using video output in VM environment
The current distribution is not configured to use the video output in a virtual machine environment — different virtual machine software has different requirements for video output, needs to use different drivers, and so on.
If you want to use the video output in a virtual machine, you will need to configure it manually. This may involve installing additional drivers or configuring the virtual machine settings.
To start X session after the VM boots up, you will need to create a special file. Read more in the Accessing the Local Dronetag App page.
Quirk: Serial TTY console
We expect the VM to run without a serial TTY console, so we disabled the TTY service on S0 to prevent failing service errors. If you encounter issues with the serial console, or you need/want to use it, you can enable the service back by running the following command:
sudo systemctl unmask serial-getty@ttyS0.service
Example: Install on VirtualBox
This section contains information that is no longer valid.
This guide provides an example of how to install the Dronetag On-Premise solution using Oracle VirtualBox. The steps are similar for other virtualization platforms, but the interface may vary slightly. We provide these steps as an example, as-is, and you may need to adapt them to your specific virtualization platform. This guide was written for Oracle VirtualBox version 7.1.10 (2025).
1. Import the OVF file
To import the OVF file into Oracle VirtualBox, follow these steps:
- Open Oracle VirtualBox.
- Go to
File>Import Appliance. - Select the
dronetag-onpremise*.ovffile from the distribution package. - Click
Nextand review the appliance settings. - Click
Importto start the import process.
or use this command:
VBoxManage import --vsys 0 --vmname "dronetag-onprem" dronetag-onpremise*.ovf
2. Configure the machine settings
After the OVF file is imported, you may want to review and adjust the machine settings.
You can use the default settings, but you will need to adjust the network settings to ensure the virtual machine can communicate with your host machine and the rest of your network.
- Select the imported virtual machine in VirtualBox.
- Click on
Settings. - Make sure you're in the "Expert" mode, not "Basic" mode.
- Go to the
Networktab.
Now choose one of the following options for networking:
2.1. Use NAT
- Ensure the network adapter is set to
NAT. - Click on
Port Forwarding. - Add the following port forwarding rules, set protocol to
TCP, host IP to127.0.0.1(or leave it empty for all interfaces), and host port to the desired port on your host machine:22- SSH port to access the virtual machine over SSH80- HTTP port for the web interface
- Click
OKto save the settings.
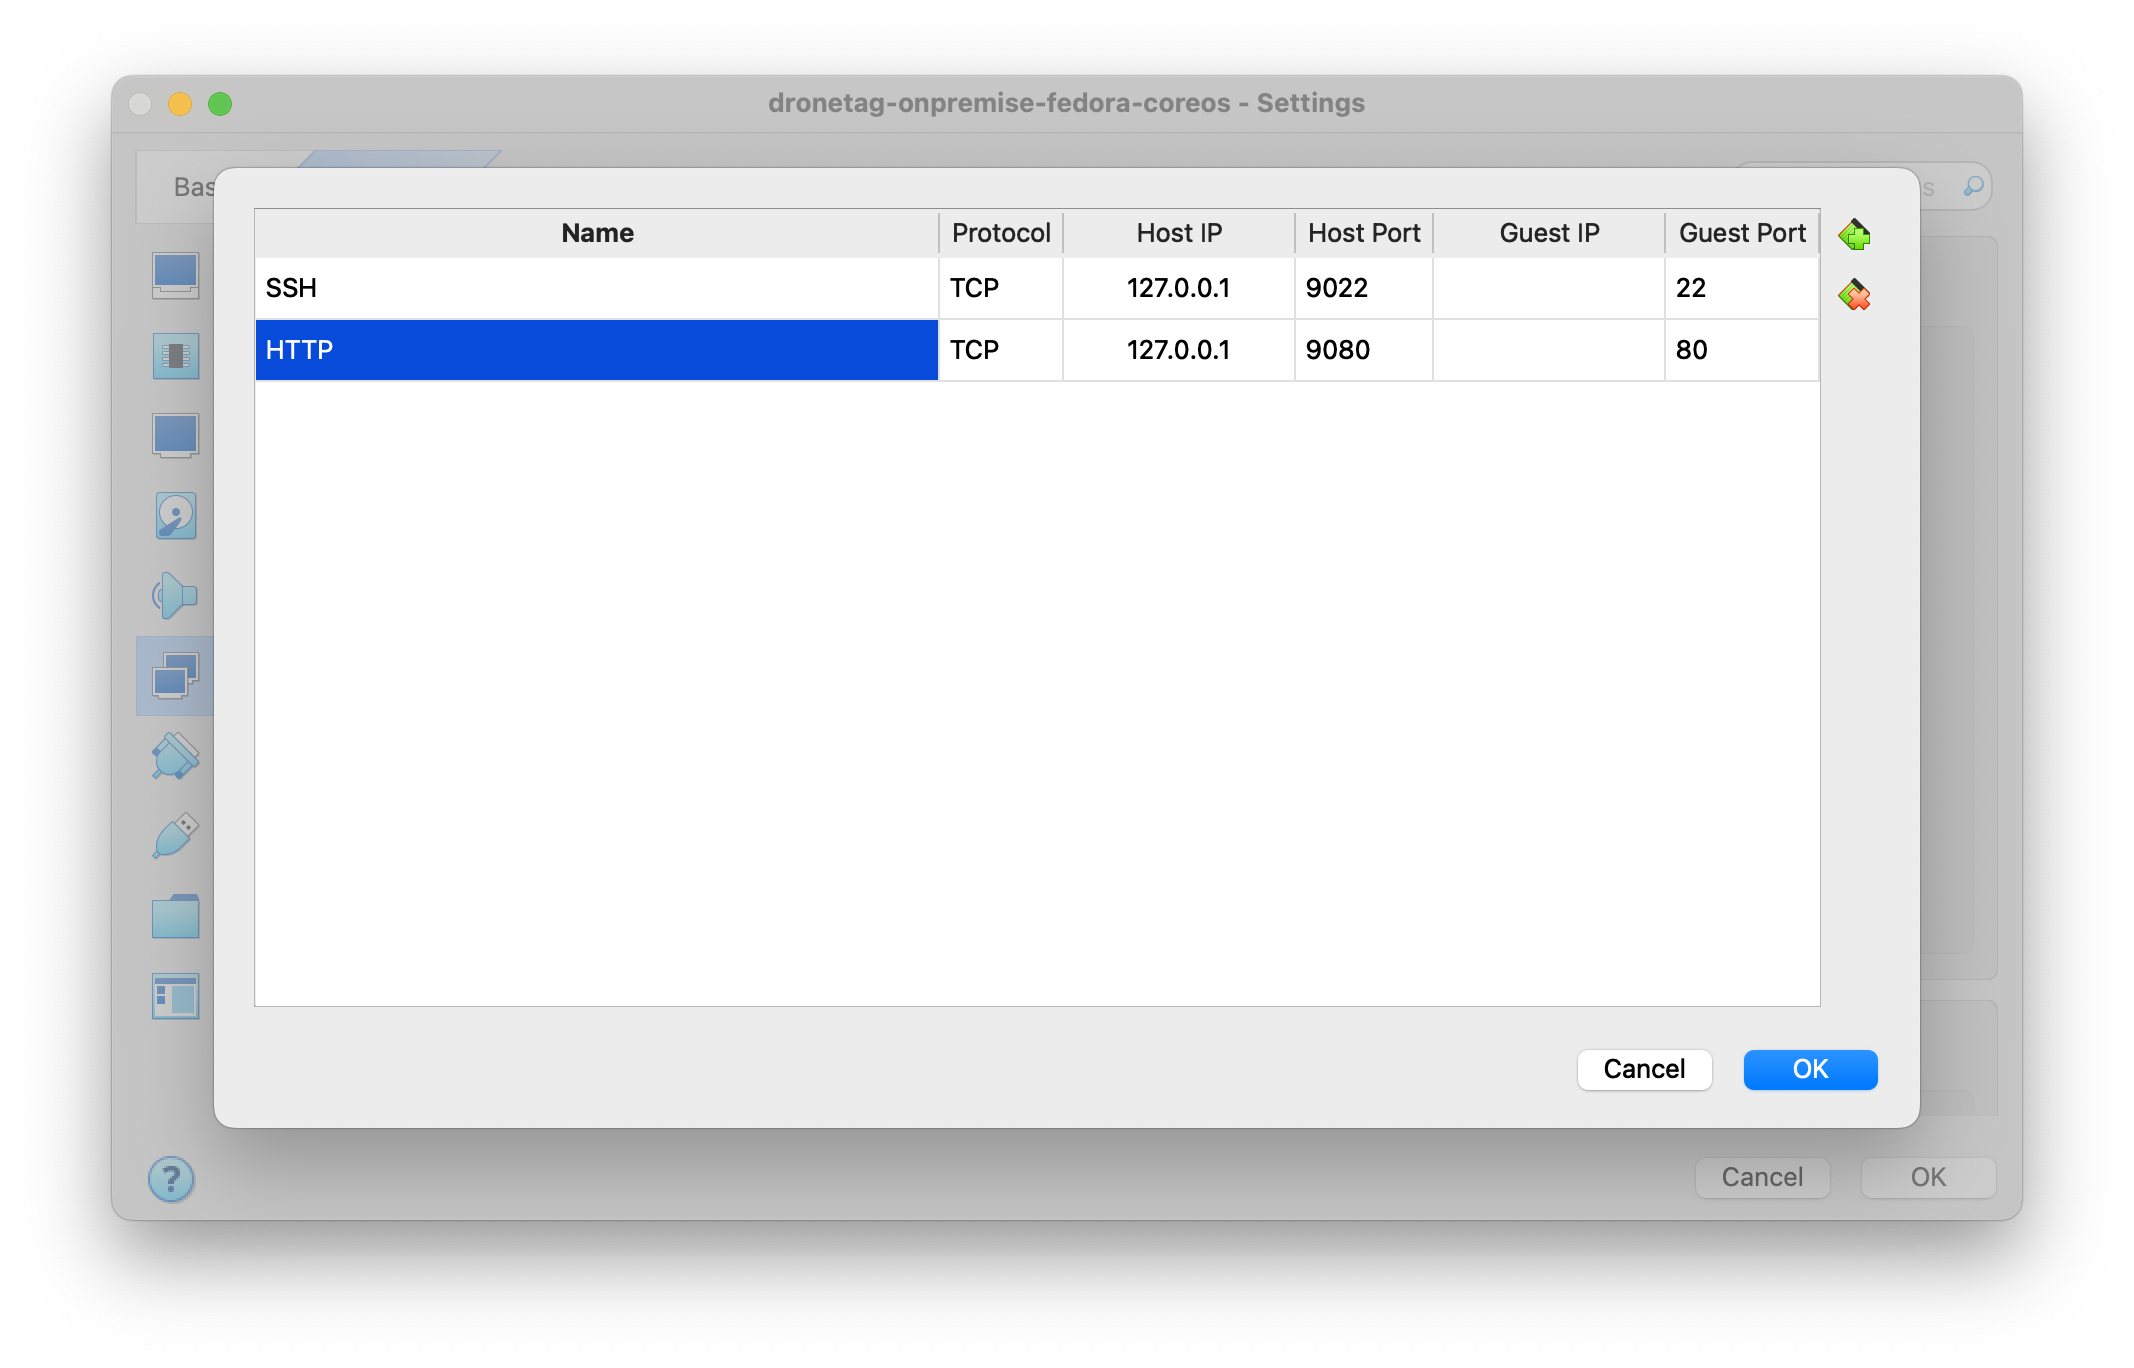
or configure using the command line:
VBoxManage modifyvm "dronetag-onprem" --natpf1 "guestssh,tcp,,9022,,22"
VBoxManage modifyvm "dronetag-onprem" --natpf1 "guesthttp,tcp,,9080,,80"
2.2 Use Bridged Adapter
- Ensure the network adapter is set to
Bridged Adapter. - Select the network interface of your host machine that is connected to your local network.
- Click
OKto save the settings.
or configure using the command line:
VBoxManage modifyvm "dronetag-onprem" --nic1 bridged --bridgedadapter1 "<your adapter>"
3. Start the virtual machine
- Select the imported virtual machine in VirtualBox.
- Click on
Startto boot the virtual machine.
or use this command:
VBoxManage startvm "dronetag-onprem"
Troubleshooting
If things go south, here are some common troubleshooting steps you can take, ordered from the least destructive/disruptive to the most.
Currently, all Dronetag On-premise Platform deployments are supplied with direct support by Dronetag, therefore this section is rather short. If you have any questions or need assistance, please reach out to us.
Run start.sh script to ensure all services are running
You can run the start.sh script to ensure all services are running.
cd /opt/dronetag
sudo ./dt-start.sh
Restart the VM
Restarting the virtual machine can help resolve some issues. You can do this from the virtualization platform you are using, or by running the following command in the terminal:
sudo reboot
Reinstall the VM
If you are still experiencing issues, you can try reinstalling the virtual machine. This will reset the system to its default state, so make sure to back up any important data before proceeding.
As for the Dronetag persistent data, they are stored by the PostgreSQL database under /var/opt/dronetag/. As long as you keep the contents of that directory, your data should be preserved.
You can follow the same instructions as in the Upgrading Guide to reinstall the platform.
Quick Start
The On-Premise Tablet is a ready-to-use hardware solution, typically used for evaluation purposes.
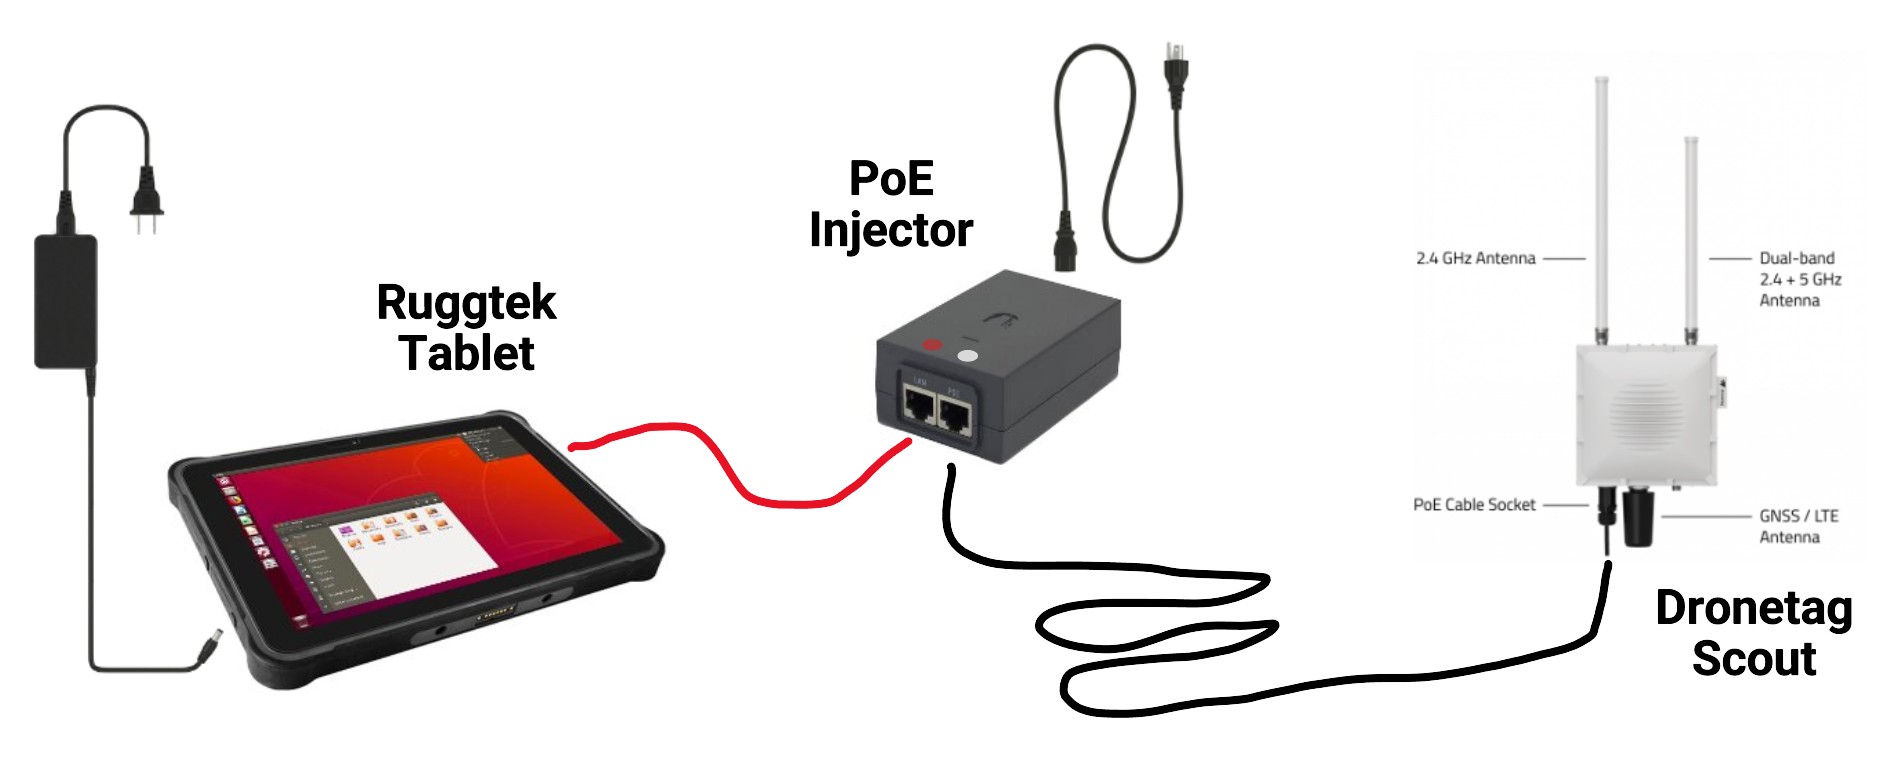
Note that the tablet is not just a graphical display. It is a Linux server with pre-installed Dronetag On-Premise Platform. If connected to a network, it provides an HTTP server to serve the application to web browsers.
1. Set Up the On-Premise Tablet
- Connect the power source and Ethernet cable to ports located at the left edge of the tablet.
- Connect Dronetag Scout with the tablet. As Dronetag Scout needs Power-over-Ethernet, it is necessary to plug a PoE injector (provided) between the two devices.
- Make sure that the tablet is connected to the slot marked "LAN", while Dronetag Scout is connected to the slot marked "PoE".
- Press the power button on the top.
- Wait for the system to boot up and show a graphical map.
2. Check that the setup is working
If the devices are connected correctly, you should see a small banner in the top-left corner of the screen, showing a green dot and 1 online.
References
- The guide on configuring your Dronetag Scout.
- The guide on accessing the web app to visualize the data you have captured.
- Please note that the On-Premise version of Dronetag App is limited and many functions described in the guide are missing there.
Advanced Tablet Configuration
Accessing the Settings
The tablet runs in so-called "kiosk" browser mode. To access advanced settings, you first need to exit this browser mode. This can be done by swiping three fingers from the bottom side of the tablet up. When you do it, you should be able to access the standard Gnome Desktop Manager.
Connect to Wi-Fi
When using the tablet setup for scanning, you should always have your Wi-Fi turned off completely, to avoid interference with Remote ID broadcast.
However, there are situations when you want to connect the tablet to a Wi-Fi network for maintenance purposes. In such a case, click on the icon in the upper-right corner of the screen. The Wi-Fi menu item can be used to turn Wi-Fi on, select a network, and enter access credentials.
When the tablet is connected to public Internet, it will allow Dronetag support to connect to the device and help you with troubleshooting.
Do not forget to switch the Wi-Fi off after you are done and before you want to start scanning again.
Configuring Dronetag Scout
Without data, the on-premise instance is not very useful. You need to change the forwarding target of your Dronetag Scout to point to your on-premise node. This guide will help you set that up.
1. Follow the Dronetag Scout User Manual
If you have not yet installed your Dronetag Scout, or if you are not sure it's fully ready, please follow all of the instructions in the Dronetag Scout User Manual to learn how to install Dronetag Scout, physically mount it and connect it to your network.
2. Configure the Scout to send data to your on-premise node
Dronetag Scout should be able to find the local services automatically (A), or you may need to configure the URLs manually (B).
a. Automatic set-up via zeroconf
As of July 2025, you may not yet be able to use the automatic setup via zeroconf. We're working on it.
Applies for: Only pre-installed nodes, or nodes with zeroconf support manually configured.
We use zeroconf to „auto-magically“ set-up everything for you. In ideal conditions, it should be enough to connect the equipment on the same local network. Before you start configuring manually, verify if the equipment is working.
b. Configure URLs manually
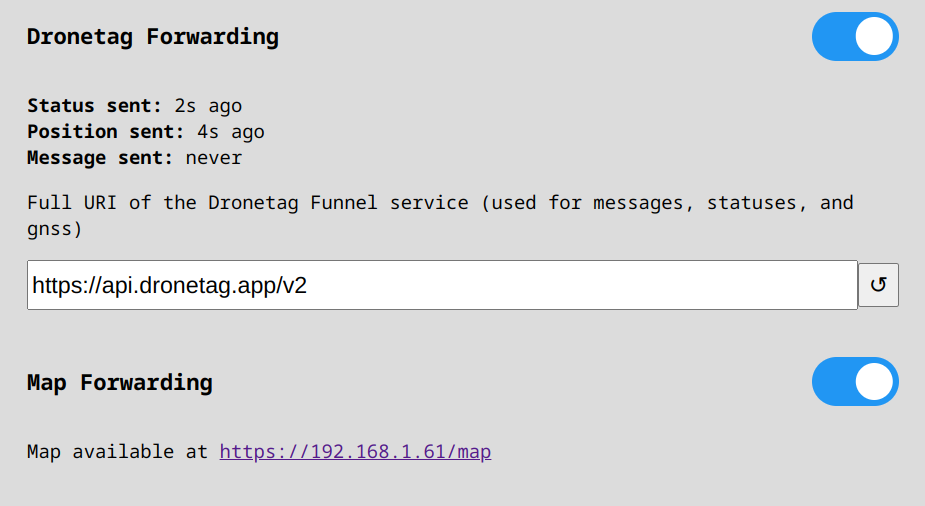
Applies for: Both pre-installed nodes and self-installed nodes.
After your Scout is installed, open the Scout admin panel and navigate to the forwarding configuration.
👉 Refer to the Sensor configuration page.
On this page, make sure you have the Dronetag Forwarding option enabled, and set to:
http://dt-onprem-<ID>.local
OR
http://<YOUR-INSTANCE-IP>
Press Update forwarding to save the changes.
Quick Start
The On-premise node is a ready-to-use hardware solution (a mini PC server) with already pre-installed Dronetag On-premise Platform.
1. Set-up the On-premise Node
- Connect the power source and Ethernet cable to the I/O ports situated at the rear
- Press the power button on the front
- Verify that the power LED is lit
If your network does not provide DHCP capability, you will need to use static IP configuration on your On-premise Node. For more information, refer to the Advanced Configuration section.
After a few minutes, the web services should be running and you should be able to verify the functionality. Please allow the system a few minutes to boot up and start the services (up to 5 minutes).
2. Verify On-premise Node is working
Check the label on the node with the hostname. If your client and your local network support mDNS, open your browser and enter the following address:
http://dt-onprem-<ID>.local
Where <ID> is the number on the label on your node. You should see the Dronetag App running in your browser.
Next steps
Continue with the other guides on how to configure your Dronetag equipment to start sending data to your on-premise instance, and how to use the apps to access the visualization and data.
- 👉 Read the guide on configuring your Dronetag Scout to let Scout feed the data into your on-premise instance.
- 👉 Read the guide on accessing the web app to visualize the data you have captured.
- 👉 Lastly, read up on how to access the data via API or exports to get the data out of the system for further processing or storage.
Advanced Configuration
Accessing the terminal
To access the terminal physically (using HDMI + keyboard), use TTY other than /dev/tty1 (which is dedicated for the app display).
To switch to a different TTY, press Ctrl + Alt + F2 (or F3, F4, etc.) on your keyboard.
Connect to SSH
To connect to the On-Premise Node via SSH, follow these steps:
ssh viewer@dt-onprem-<ID>.local
Alternatively, you can use the static IP address of your On-Premise Node.
The default password is on a label at the bottom of the device.
Configuring static IP address on the On-Premise Node
If your network does not provide DHCP capability, you can use static IP configuration on your On-Premise Node.
If you use the On-Premise Node provided by Dronetag, you can follow these steps. If you use your own hardware, you'll need to follow the instructions for your specific hardware and operating system.
Using DHCP is recommended for most users; it makes for easier configuration. We recommend leaving the static IP configuration to the network administrator.
On the Dronetag-provided On-Premise Node
On the Dronetag-provided nodes you can use the nmcli tool. Find out the name of the Ethernet network connection using nmcli con show.
To set static IP addresses using nmcli:
nmcli con mod [name] ipv4.method manualnmcli con mod [name] ipv4.addresses <IP_ADDRESS>/<SUBNET_MASK>nmcli con mod [name] ipv4.gateway <GATEWAY_IP>nmcli con mod [name] ipv4.dns <DNS_IP>nmcli con up [name]
To go back to DHCP, follow these:
nmcli con mod [name] ipv4.method autonmcli con up [name]
On the Dronetag Scout
Remember to set the static IP address in the Dronetag Scout admin panel as well, so that it can communicate with the On-Premise Node.
Troubleshooting
Here are a few suggestions for troubleshooting the Dronetag On-Premise Node and Dronetag Scout.
Currently, all On-Premise deployments are supplied with direct support by Dronetag, therefore this section is rather short. If you have any questions or need assistance, please reach out to us.
App doesn't display on HDMI
- Make sure the file
~/use_appis present on the node filesystem. - You can try to run it manually using the
startxcommand in the terminal.
App froze/stopped working on HDMI
- Try refreshing the page (
F5orCtrl + R) - If that doesn't work, try restarting the node by pressing the power button on the front of the device.
App not reachable over the network
- Make sure the node is connected to the same local network as your computer or mobile device.
- Try running the app over HDMI to see if everything is working correctly there.
Accessing the Local Dronetag App
This section describes how to use the Dronetag App that is running on your on-premise node, to visualize the data received by your Dronetag Scout devices.
Remember that the cloud hosted instance on https://dronetag.app, or the app downloaded from the App Store / Google Play cannot be used to access your on-premise node. You need to use the local instance of the Dronetag App that is running on your on-premise node.
Over HDMI / video output
For the pre-installed nodes, the main advantage is the ability to use the HDMI output to display the Dronetag App on a monitor or TV. This is useful for larger displays or when you want to use the app without a web browser.
- Connect a monitor or TV to the HDMI port on the back of the node.
- Ensure that the file etc/use_app is present on the node filesystem. You can create this file by running the
touch etc/use_appcommand in the terminal. This file is used to indicate that the Dronetag App should be launched on boot. - The Dronetag App will be displayed on the screen automatically after booting up.
We recommend connecting a USB mouse and keyboard to interact with the app.
Over the network
Use a computer or laptop, connected to the same local network as your on-premise instance. If you use a virtual machine, you may need to forward the ports.
Open your web browser and enter the following address:
http://dt-onprem-<ID>.local/
OR
http://<YOUR-INSTANCE-IP:PORT>/
Where <ID> is the number on the label on your node. Alternatively, you can use the static IP address of your on-premise instance.
On mobile devices
The app can be opened on mobile devices by entering the same address as above. Further recommendation is to pin it to the home screen of your mobile device for easier access.
Pinning the app to the home screen on iOS
- Open the Dronetag App in Safari
- Tap the "Share" button (the square with an arrow pointing up)
- Scroll down and select "Add to Home Screen"
Pinning the app to the home screen on Android
- Open the Dronetag App in Chrome or other web browser on your phone
- Tap the three dots in the top right corner (applies for Chrome, but other browsers have similar functionality)
- Select "Add to Home screen"
Now you can access the Dronetag App directly from your home screen in full screen.
The Dronetag App performance is best when running as a native app on the device (installed from app stores). However, this is not yet available for the on-premise environment. We're working on it. In case you experience a severely reduced performance in the web browser app, please let us know.
Downloading the Collected Data
After your successful drone detections, you might want to download the data in open formats to either store it for later or to process it in your own systems.
While the data is stored in a PostgreSQL database internally, the database is not designed to be accessed directly. We provide an HTTP REST API to access the data in a more user-friendly way.
Exporting data using the app
The app itself provides the easiest way to download the data. Access the app via the web browser on your computer and follow these steps:
- Open the detections list (icon in bottom right corner)
- Select a detection you wish to export
- Click on the "Export" button in the top right corner
Using the API
The API documentation is available at:
http://dt-onprem-<ID>.local/airspace/docs
OR
http://<YOUR-INSTANCE-IP:PORT>/airspace/docs
If you have previously used our cloud instance (https://api-docs.dronetag.com) you may be familiar with the API. The on-premise API provides virtually the same data, just on different URL addresses.
Understanding the DUMP
By exploring the API documentation, you will find that we use several separated data telemetry streams – TELE-UA, TELE-Operator and TELE-System. Learn the difference in the Understanding DUMP section.
Examples
- Retrieve a list of recent detections in the last 8 hours.
GET http://dt-onprem-<ID>.local/airspace/v1/operations?from=-8:00:00
- Retrieve UA telemetry of a specific place in the last 15 minutes.
GET http://dt-onprem-<ID>.local/airspace/v1/telemetry/ua?from=-15:00:00&bbox=14.0,50.0,14.1,50.1
- Retrieve all UA telemetry of a single detection (operation).
GET http://dt-onprem-<ID>.local/airspace/v1/telemetry/ua?operation_id=2db24d2b-e95a-451b-aa1e-5e39017f5eb2
Dronetag On-premise Platform on Azure
Dronetag offers Dronetag On-premise Platform, a self-hosted version of the Dronetag Cloud Platform deployable directly in your own Azure subscription. While the name suggests “on-premise,” this version runs in your cloud environment—giving you full control, isolated infrastructure, and compliance with data locality regulations, while still leveraging the convenience and scalability of Azure.
This setup is ideal for organizations that want to maintain ownership of their data and infrastructure, yet avoid managing physical hardware.
Licensing
To run Dronetag On-premise Platform on Azure, you must first obtain a license from us.
Contact our sales team:
sales@dronetag.com
Once licensed, you’ll receive access to our offer on the Microsoft Azure Marketplace where you can deploy the solution directly into your Azure environment.
Deploy Virtual Machine Image (available)
We offer two types of deployment options, one of them allows you to deploy it as VM.
This method lets you deploy Dronetag On-premise Platform using a preconfigured VM image published to the Azure Marketplace.
Step-by-step: Deploy the Virtual Machine
- Visit the Dronetag On-premise listing on Azure Marketplace.
- Click Get It Now and select your Azure subscription.
- Deploy the image as a new Gen 2 Virtual Machine, choosing your desired resource group and region.
- Choose an appropriately sized VM.
- Create or use an existing virtual network and subnet.
- Ensure network security rules do not expose the VM’s ports (see security warning below).
- Complete the deployment and verify the VM is running.
Test the Deployment
- Obtain the public IP address of the VM you have just created
- Access
http://<VM-IP-ADDR>using your browser.
If you see the UI of the Dronetag Web App, your instance is ready to be secured in the next step.
Secure the Deployment: Set Up Reverse Proxy or Azure Application Gateway
The virtual machine is unsecured in its default state and you need to ensure that you do not publish the SSH and HTTP ports to the public. It can be used only for testing purposes, however, for a production environment, please make sure to always put this VM behind a reverse proxy or application gateway.
You can secure the deployment using either:
- A self-managed NGINX reverse proxy with a TLS certificate
- Azure Application Gateway with HTTPS frontend and HTTP backend to the VM
Example: Set up Application Gateway
- Create a Public IP and Virtual Network (if not already created).
- Deploy Azure Application Gateway using Standard_v2 SKU.
- Add a Frontend listener on port 443 with an uploaded TLS certificate.
- Set up a Backend pool pointing to the private IP of your Dronetag VM.
- Create a Routing rule to forward HTTPS traffic to HTTP backend (port 80).
- Adjust health probes as needed.
Once deployed, your instance is securely accessible via a public domain.
2. Containerized Deployment (coming soon)
We are actively working on a fully containerized version of Dronetag On-premise Platform. This will support Docker and Kubernetes deployments, giving you maximum flexibility and integration with your CI/CD and cloud-native tools.
If you are interested in early access or want to help us test the container version, reach out to:
support@dronetag.com
Support and Maintenance
We provide full support for Dronetag On-premise Platform deployments:
- Product updates are delivered via Azure Compute Gallery for VM-based deployments.
- Security advisories will be emailed to all license holders.
- For help with operations, reach out to support@dronetag.com.
For additional questions or custom integration requests, contact us at support@dronetag.com
System Requirements & Sizing Guide
This document outlines the hardware and software prerequisites for deploying the Dronetag Cloud Platform on-premise.
Key Highlights:
- Resource Efficiency: The platform does not require specialized proprietary hardware. It runs efficiently on standard virtual machines (vCPUs) and commodity SSD storage.
- Flexible Deployment: We support several different configurations, to adjust to individual customer needs.
- Simplified Operations: The architecture prioritizes ease of maintenance. Data integrity is secured through standard database backup procedures, eliminating the need for complex High-Availability (HA) hardware configurations.
1. Overview
The platform utilizes a Service-Oriented Architecture (SOA) based on Docker containers. The installation typically involves deploying up to 10 services/containers, managed via Docker Compose.
Incoming traffic is routed through an Nginx gateway, which is deployed as one of the containers.
While containers can theoretically be distributed across multiple nodes in various ways, we recommend two basic setups:
- Single-Node: Consolidates all services onto a single machine. Suitable for lower traffic environments or pilot testing. Significantly easier to configure and maintain.
- Dual-Node: Separates the Frontend (Web/UI/Maps) from the Backend (API/Database/Processing) for better performance isolation and scalability.
2. Software Requirements
Before provisioning hardware, ensure the host environment meets the following software criteria:
- Operating System: Linux is highly recommended for native Docker performance. Other operating systems may be considered, as long as Docker is supported.
- Preferred: Debian 13 (Trixie) or Ubuntu 22.04/24.04 LTS.
- Supported: Any modern Linux distribution capable of running a supported Docker Engine.
- Container Runtime: Docker Engine (Server Version 23.0+), Docker Compose (Version 2.37+).
- Architecture: x86-64 (AMD64).
3. Hardware Specifications
Please note that there are no strict minimal requirements. The following specifications are estimated based on typical usage patterns.
In the tables below, "vCPU" refers to one virtual core in a hypervisor environment (e.g., VMWare, KVM, AWS). We recommend a base clock speed of 2.0 GHz or higher.
Option A: Single-Node Deployment
This setup is recommended for most on-premise instances, unless you expect an enormous amount of simultaneous flights and/or users.
| Resource | Recommended Minimum | Optimal |
|---|---|---|
| CPU | 2 vCPU | 4 vCPU |
| RAM | 8 GB | 16-32 GB |
| Storage | 60 GB SSD * | 100 GB SSD * |
For the disk storage, see Capacity Planning notes below.
Option B: Dual-Node Deployment
This deployment splits the services between a Frontend Server (serving the Web UI and map data) and a Backend Server (handling API logic, flight processing, and database storage).
| Role | Resource | Recommended Minimum | Optimal |
|---|---|---|---|
| Backend Node | CPU | 2 vCPU | 4 vCPU |
| (Database & API) | RAM | 8 GB | 16-32 GB |
| Storage | 40 GB SSD | 60-80 GB SSD | |
| Frontend Node | CPU | 2 vCPU | 4 vCPU |
| (Web UI & Maps) | RAM | 4 GB | 8-16 GB |
| Storage | 30 GB | 50 GB |
For the disk storage, see Capacity Planning notes below.
4. Storage Capacity Planning
While CPU and RAM requirements depend on the expected amount of concurrent traffic, storage requirements can vary based on the amount of data stored, especially in the long-term view. The guidelines below can be used to estimate the necessary disk space.
Backend Storage (Flight Data)
The flight database grows approximately linearly based on the number of flights, their duration, and the number of sensors (receivers) tracking them. On the other hand, the amount of data is also inversely proportional to the quality of detection, which may vary and is very difficult to predict. As a rough estimate of the storage required for flight telemetry data, count on approximately 2-3 MB per 1 Detection Hour.
A Detection Hour corresponds to one drone being detected for the duration of one hour by one receiver. To avoid any ambiguities, the last part means that if a drone is simultaneously detected by multiple receivers, the storage requirements need to be multiplied by the number of those receivers.
Frontend Storage (Map Data)
The frontend application provides map coverage of a selected area. Storage requirements are static but depend heavily on the geographic size of the region, number of map layers, and their level of detail.
As a rule of thumb, you may count on ~5-10 GB for base map layers. If you require high-resolution satellite imagery, or detailed tactical maps with high details for large regions, storage requirements can easily exceed tens of Gigabytes.
Backup Storage
If you plan to do database backups (which is of course highly recommended, see below), count on some space needed to store these backups. This may (and most typically will) be a storage space in some different environment and configuration - for instance, it may employ some slower technology than SSD.
Summary of Scaling Factors
| Factor | Impact Area | Sizing Guidance |
|---|---|---|
| Simultaneous Flights | Backend CPU and RAM | High volumes of concurrent operations increase CPU load. Increase backend vCPU count if processing many active flights simultaneously. |
| Flight History | Backend Disk | See the Backend Storage formula above. Long-term retention of raw flight data requires planned disk expansion. |
| Concurrent Users | Frontend & Backend RAM | A high number of operators browsing the UI simultaneously increases both CPU and memory usage not only on the frontend server, but also on the backend. |
5. Reliability & Disaster Recovery
System Availability
The platform is designed for resilience through simplicity. The platform services are containerized and stateless (except for the database), allowing for rapid restart and recovery in the event of a service interruption.
It is assumed that short service interruptions (for instance, when there is a maintenance window) are tolerable for on-premise instances, and high-availability (HA) clustering is therefore generally not required for standard operational parameters.
If your availability level requirements are strict, i.e. you need HA clustering, please contact us to discuss available options.
Backup Strategy
All persistent system state and flight telemetry are centralized within the PostgreSQL database. Therefore, a robust disaster recovery plan relies primarily on the integrity of the database backups.
The following are recommendations to be considered. Your final setup may vary depending on your requirements and tolerance of potential data loss.
- Periodic Dumps: We recommend configuring a scheduled task (cron job) to perform a full database dump at regular intervals.
- Off-Site Storage: Backup files should be eventually transferred to a separate physical location or cloud storage to ensure survivability in case of physical failure or file-system loss.
- Storage Requirements: Reserve storage capacity equivalent to 3-5x the size of your active database to retain a rotation of recent backups (e.g., last 7 days, compressed).
6. Staging Environment (Optional)
While not strictly required for the platform's operation, we recommend provisioning a Staging Environment to ensure operational stability during lifecycle events. Such an environment typically has the following purpose:
- Upgrade Validation: A safe environment to test version upgrades and database migrations before applying them to the production environment and data.
- Integration Testing: A dedicated space for testing API integrations with third-party tools without risking production data integrity.
- User Playground: A safe "sandbox" for some users to play with and try extended platform functionalities, which is typically inappropriate in the production environment.
As for the sizing, the staging environment does not need to match production performance. It can usually be a scaled-down Single-Node deployment. However, we highly recommend providing sufficient storage space to store a full copy of production data.
Source pages
Every chapter of this document is a page of the Dronetag help site. Use these addresses to reach the latest version.
- 1Introductionhelp.dronetag.cz/on-premise
- 2Quick Starthelp.dronetag.cz/on-premise/self-install/quick-start
- 3Upgrading Guidehelp.dronetag.cz/on-premise/self-install/upgrading
- 4Advanced Use & Quirkshelp.dronetag.cz/on-premise/self-install/advanced-use
- 5Example Install on VirtualBoxhelp.dronetag.cz/on-premise/self-install/example-virtualbox
- 6Troubleshootinghelp.dronetag.cz/on-premise/self-install/troubleshooting
- 7Dronetag On-premise Tablethelp.dronetag.cz/on-premise/tablet/quick-start
- 8Advanced Tablet Configurationhelp.dronetag.cz/on-premise/tablet/advanced-configuration
- 9Configuring Dronetag Scouthelp.dronetag.cz/on-premise/configuring-scout
- 10Quick Starthelp.dronetag.cz/on-premise/node/quick-start
- 11Advanced Configurationhelp.dronetag.cz/on-premise/node/advanced-configuration
- 12Troubleshootinghelp.dronetag.cz/on-premise/node/troubleshooting
- 13Accessing the Local Dronetag Apphelp.dronetag.cz/on-premise/using-app
- 14Downloading the Collected Datahelp.dronetag.cz/on-premise/downloading-data
- 15Dronetag On-premise Platform on Azurehelp.dronetag.cz/on-premise/azure/
- 16System Requirements & Sizing Guidehelp.dronetag.cz/on-premise/system-requirements