
Self-Installation Kit
- Document
- On Premise Dronetag Solution — Self-Installation Kit
- Chapters
- 5
- Source
- help.dronetag.cz/print/on-premise/self-install
Quick Start
In this section we will guide you through the process of setting up your Dronetag On-premise Platform using the self-install kit. You will need a distribution package provided by Dronetag, and a (virtual) machine supporting Docker Compose.
The platform is distributed as a set of Docker containers orchestrated using Docker Compose manifests. This makes it OS-agnostic. However, Linux is recommended as the preferred host operating system.
Installing Dronetag On-premise Platform
- Unpack the distribution package you got from Dronetag, preferably to
/opt/dronetag/folder. - Read the contents of the
INSTALL.mdfile contained in the package, and follow it.
Also, the INSTALL.md file contains other information on how to start and stop the services, and so on.
Open the Local Dronetag App
Open your web browser and open the URL http://<host-name-or-ip-address>. This should open the local Dronetag App, which allows you to visualize the data captured by your Dronetag Scout devices.
Next steps
Continue with the other guides on how to configure your Dronetag equipment to start sending data to your on-premise instance, and how to use the apps to access the visualization and data.
- 👉 Read the guide on configuring your Dronetag Scout to let Scout feed the data into your on-premise instance.
- 👉 Read further on accessing the web app to visualize the data you have captured.
- 👉 Lastly, read up on how to access the data via API or exports to get the data out of the system for further processing or storage.
Upgrading Guide
This section is not finished yet.
This guide will provide instructions on how to upgrade your Dronetag On-premise Platform installation on your own hardware. If you have a pre-installed node and wish to upgrade it, please contact us.
-
Backup your data. Before proceeding with the upgrade, make sure to back up your data. This includes any custom configurations, maps, or other important files you may have added to your installation.
-
Perform the upgrade. Follow the instructions that are part of the new version distribution package. Some details may depend on the exact previous version you used to have before.
Advanced Use & Quirks
This section contains information that is no longer valid.
This section covers some advanced topics and quirks that you may encounter when using the Dronetag On-premise Platform with virtual machines.
User accounts
The system is configured with two main UNIX user accounts:
core- the main user account for accessing the virtual machine over SSH and making changes, is a sudoer.- Can be used only over SSH.
- Does not have any password set, login is done using the SSH key.
viewer- a read-only user account for accessing the web interface and viewing the data.- Cannot be used over SSH.
- The default password is
onpremviewer. We recommend changing it after the first login.
Connecting to the VM over SSH
ssh -i core_key core@<IP_ADDRESS>
where <IP_ADDRESS> is the IP address of the virtual machine. If you used port forwarding and forwarded SSH to a different port, use the -p option to specify the port.
Replacing the offline maps
The Dronetag On-premise Platform uses offline maps for the map visualization in the app. You may wish to replace the default maps with your own.
The maps are stored in the /etc/onprem/data/maps directory.
The supported formats are .mbtiles or .pmfiles. You can use tools like MapTiler to create your own maps in these formats.
To replace the maps, follow these steps:
- Prepare your map files in
.mbtilesor.pmfilesformat. - Copy the files to the
/etc/onprem/data/mapsdirectory on your Dronetag On-premise node. - Edit the
/etc/onprem/data/maps/config.jsonfile path to reference the newly uploaded maps file.
Automatic updates
For the self-install kit distributions, we have disabled the automatic updates of the system, provided by the Fedora Core OS, to avoid unwanted automatic reboots of the machine. If you wish to enable automatic updates, you can do so by running the following command:
sudo systemctl unmask zincati.service
sudo systemctl unmask fwupd-refresh.service
Read more about Fedora's automatic updates.
Quirk: Using video output in VM environment
The current distribution is not configured to use the video output in a virtual machine environment — different virtual machine software has different requirements for video output, needs to use different drivers, and so on.
If you want to use the video output in a virtual machine, you will need to configure it manually. This may involve installing additional drivers or configuring the virtual machine settings.
To start X session after the VM boots up, you will need to create a special file. Read more in the Accessing the Local Dronetag App page.
Quirk: Serial TTY console
We expect the VM to run without a serial TTY console, so we disabled the TTY service on S0 to prevent failing service errors. If you encounter issues with the serial console, or you need/want to use it, you can enable the service back by running the following command:
sudo systemctl unmask serial-getty@ttyS0.service
Example: Install on VirtualBox
This section contains information that is no longer valid.
This guide provides an example of how to install the Dronetag On-Premise solution using Oracle VirtualBox. The steps are similar for other virtualization platforms, but the interface may vary slightly. We provide these steps as an example, as-is, and you may need to adapt them to your specific virtualization platform. This guide was written for Oracle VirtualBox version 7.1.10 (2025).
1. Import the OVF file
To import the OVF file into Oracle VirtualBox, follow these steps:
- Open Oracle VirtualBox.
- Go to
File>Import Appliance. - Select the
dronetag-onpremise*.ovffile from the distribution package. - Click
Nextand review the appliance settings. - Click
Importto start the import process.
or use this command:
VBoxManage import --vsys 0 --vmname "dronetag-onprem" dronetag-onpremise*.ovf
2. Configure the machine settings
After the OVF file is imported, you may want to review and adjust the machine settings.
You can use the default settings, but you will need to adjust the network settings to ensure the virtual machine can communicate with your host machine and the rest of your network.
- Select the imported virtual machine in VirtualBox.
- Click on
Settings. - Make sure you're in the "Expert" mode, not "Basic" mode.
- Go to the
Networktab.
Now choose one of the following options for networking:
2.1. Use NAT
- Ensure the network adapter is set to
NAT. - Click on
Port Forwarding. - Add the following port forwarding rules, set protocol to
TCP, host IP to127.0.0.1(or leave it empty for all interfaces), and host port to the desired port on your host machine:22- SSH port to access the virtual machine over SSH80- HTTP port for the web interface
- Click
OKto save the settings.
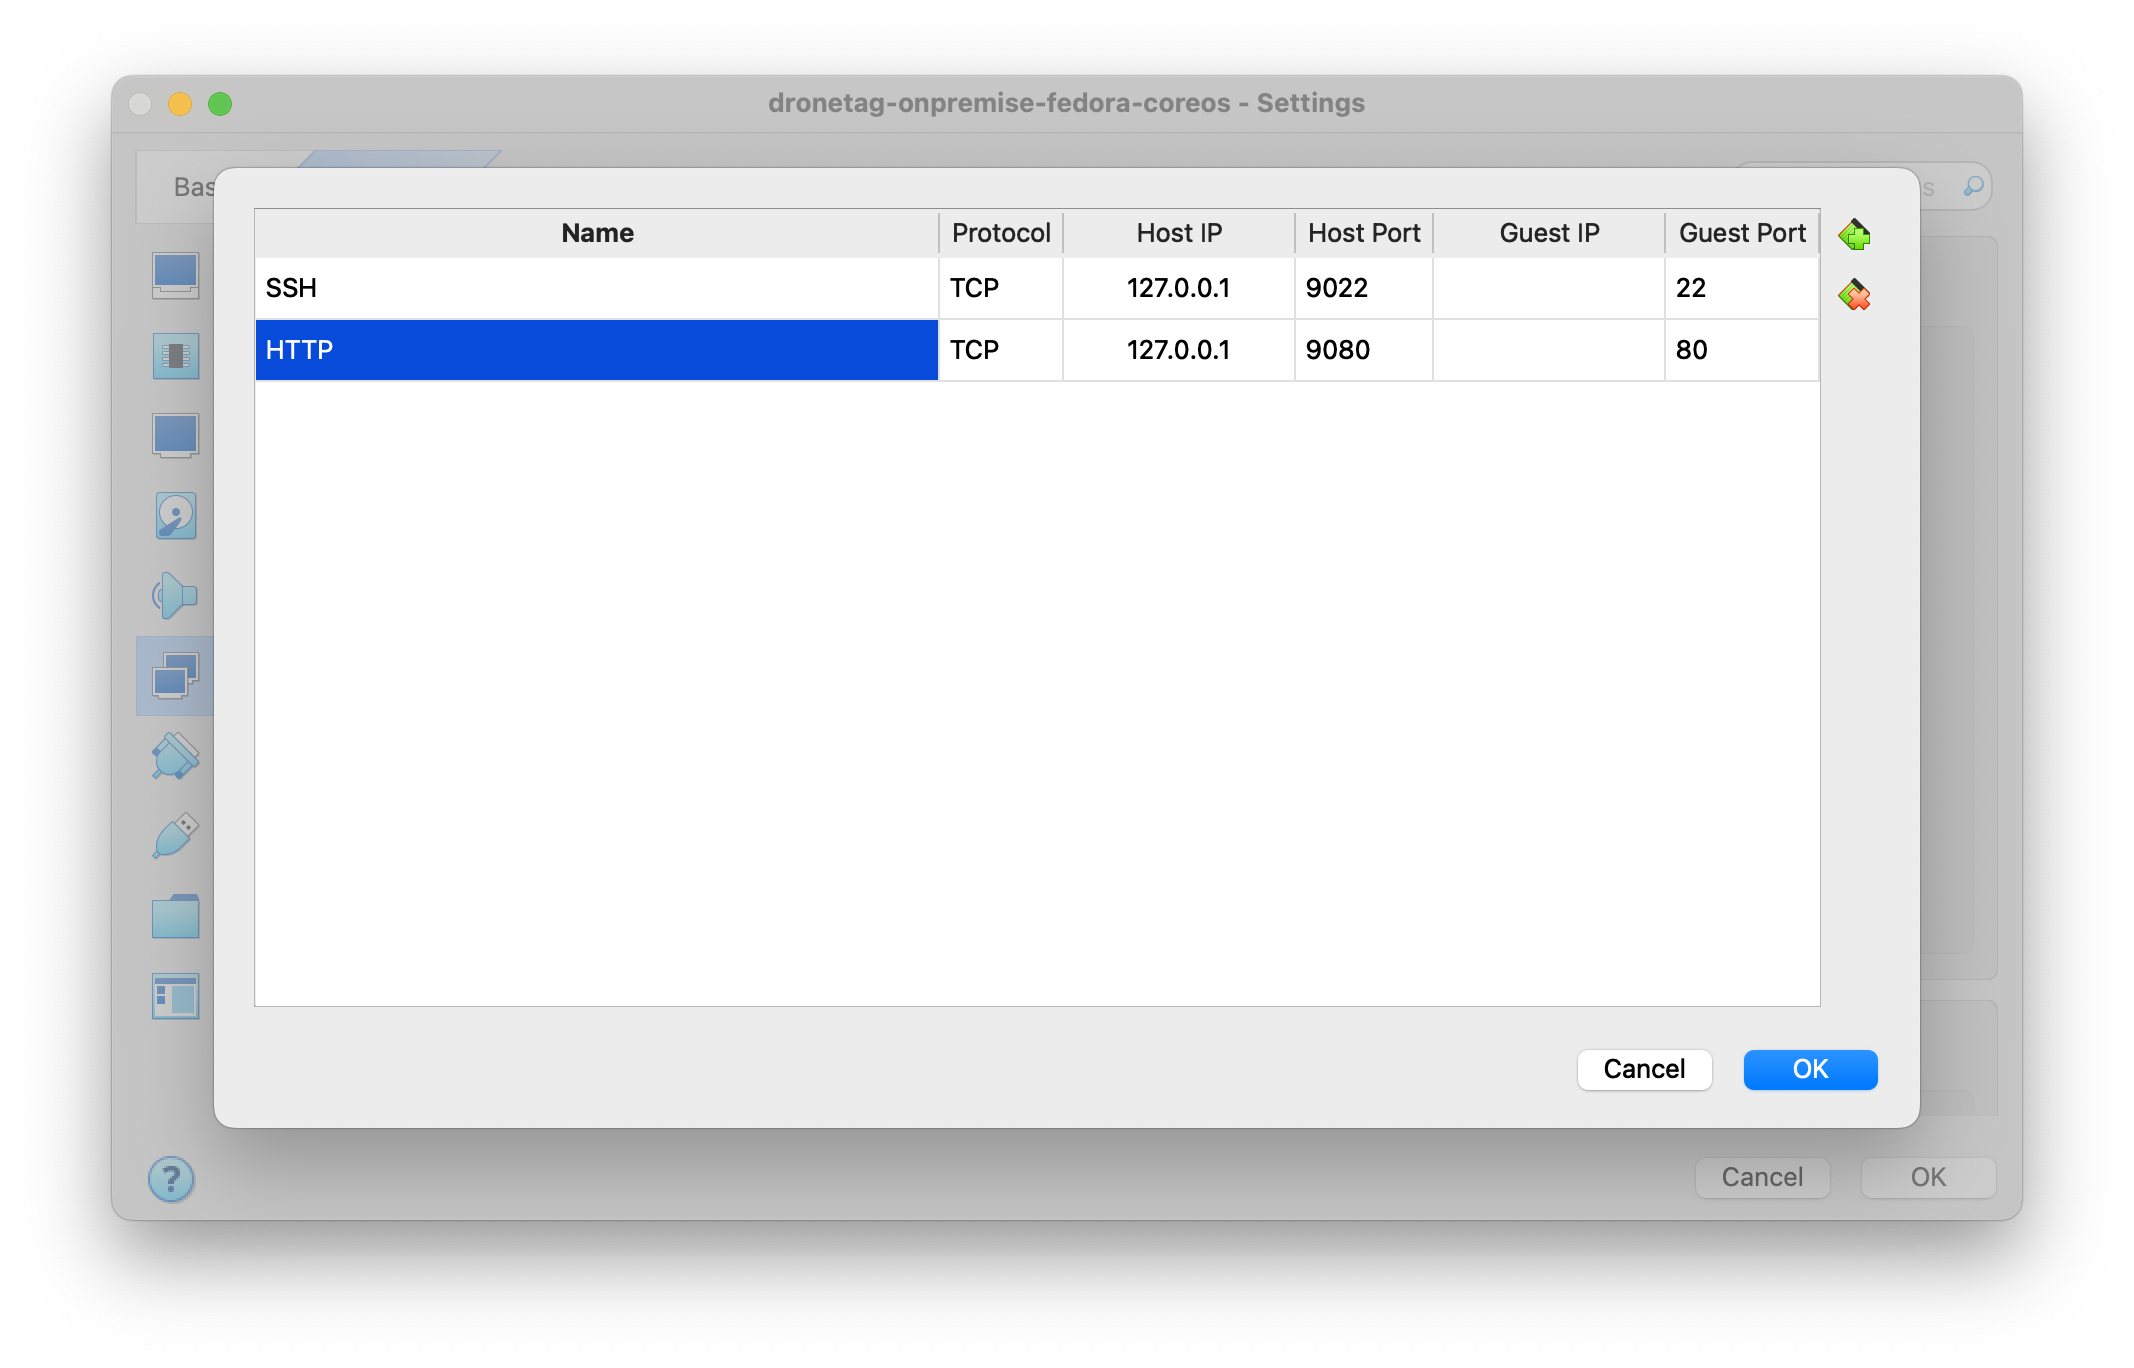
or configure using the command line:
VBoxManage modifyvm "dronetag-onprem" --natpf1 "guestssh,tcp,,9022,,22"
VBoxManage modifyvm "dronetag-onprem" --natpf1 "guesthttp,tcp,,9080,,80"
2.2 Use Bridged Adapter
- Ensure the network adapter is set to
Bridged Adapter. - Select the network interface of your host machine that is connected to your local network.
- Click
OKto save the settings.
or configure using the command line:
VBoxManage modifyvm "dronetag-onprem" --nic1 bridged --bridgedadapter1 "<your adapter>"
3. Start the virtual machine
- Select the imported virtual machine in VirtualBox.
- Click on
Startto boot the virtual machine.
or use this command:
VBoxManage startvm "dronetag-onprem"
Troubleshooting
If things go south, here are some common troubleshooting steps you can take, ordered from the least destructive/disruptive to the most.
Currently, all Dronetag On-premise Platform deployments are supplied with direct support by Dronetag, therefore this section is rather short. If you have any questions or need assistance, please reach out to us.
Run start.sh script to ensure all services are running
You can run the start.sh script to ensure all services are running.
cd /opt/dronetag
sudo ./dt-start.sh
Restart the VM
Restarting the virtual machine can help resolve some issues. You can do this from the virtualization platform you are using, or by running the following command in the terminal:
sudo reboot
Reinstall the VM
If you are still experiencing issues, you can try reinstalling the virtual machine. This will reset the system to its default state, so make sure to back up any important data before proceeding.
As for the Dronetag persistent data, they are stored by the PostgreSQL database under /var/opt/dronetag/. As long as you keep the contents of that directory, your data should be preserved.
You can follow the same instructions as in the Upgrading Guide to reinstall the platform.
Source pages
Every chapter of this document is a page of the Dronetag help site. Use these addresses to reach the latest version.
- 1Quick Starthelp.dronetag.cz/on-premise/self-install/quick-start
- 2Upgrading Guidehelp.dronetag.cz/on-premise/self-install/upgrading
- 3Advanced Use & Quirkshelp.dronetag.cz/on-premise/self-install/advanced-use
- 4Example Install on VirtualBoxhelp.dronetag.cz/on-premise/self-install/example-virtualbox
- 5Troubleshootinghelp.dronetag.cz/on-premise/self-install/troubleshooting