
Heat-shrink Tube Installation
Items Required
- Dronetag BS unit
- Heat-shrink tube
- Selected antennas
- Heat gun
- It's important to use a heat gun designed for this purpose, as uncontrolled heat sources can result in uneven shrinkage, physical damage, and insulation failure.
- Only use a heatgun to shrink the tube around the BS unit. Avoid using an open flame as a substitute for a heat gun, as this can lead to damage and safety hazards.
- Follow these instructions carefully to ensure a successful heat shrink tube installation. Any deviations may result in improper insulation, damage to the equipment, or safety hazards. Always prioritize safety when using heat tools and ensure proper ventilation while operating the heat gun.
Procedure
1. U.FL Antenna Installation
U.FL connectors are commonly used for antenna connections in space constrained products such as our Dronetag DRI and Dronetag BS. Due to their size, they are not designed with regular reconnection in mind, and they are only rated for a few dozen mating cycles (usually just 30). It is therefore crucial to select the proper antenna and ideally connect it once for the lifetime of the product. However, U.FL connectors are suitable for scenarios where you need to do the antenna replacement (e.g. when it is no longer working properly or you upgrade to a better antenna).
Before you try to connect or disconnect the U.FL antennas on our products, we recommend studying the U.FL tips from SparkFun and reading the instructions below.
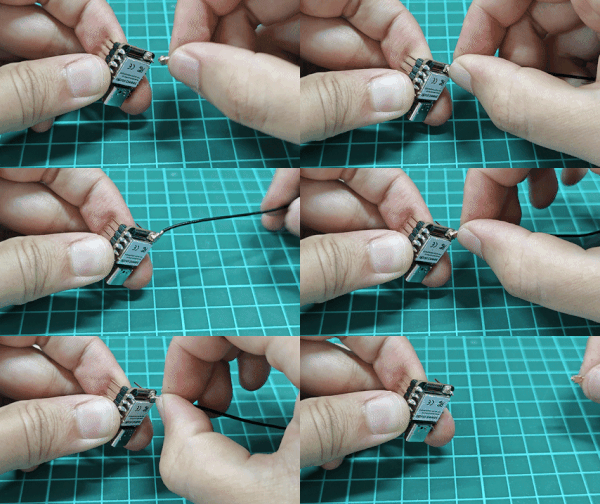
U.FL connector mating and unmating process (source Seeed Studio)
How to Connect U.FL
- Disconnect your device from any power supply and keep it turned off.
- Take the U.FL antenna and align it accurately over the U.FL female counterpart on the PCB board.
- Press down gently until you hear a satisfying click.
- Check whether you can rotate the antenna freely and if possible, protect the connector from external factors.
- If it takes too much force for the connection, you are probably misaligned.
How to Disconnect U.FL
Disconnecting the U.FL can be quite tricky as there is a possibility of damaging the PCB board counterpart or antenna. Be careful during the process. You shouldn't need any tool for the removal and we strongly discourage using a screwdriver or similar that might damage the PCB board.
- Hold the cable with your nails as close to the connector as possible (ideally try to hold the metal stiffener built into the connector)
- Gently rotate and tilt the cable from the connector all the way up until it pulls away.
- Inspect the connectors on both sides and examine them for possible damage.
- For the removal process, you shouldn't really need much force to do it.
You should hear a click when the antennas are securely attached.
- Ensure that you orient the antennas correctly, ensuring that the GNSS antenna and the Bluetooth antenna align with the appropriate connectors on the BS unit.
- If you are using wire antennas, the shorter one with black isolation is for Bluetooth Remote ID and the longer one with gray isolation is for GNSS positioning.
2. Insertion into Heat Shrink Tube Carefully slide the BS unit with the installed antennas into the heat-shrink tube. Position the BS unit in the center of the tube. Make sure the antennas protrude from one end of the tube, while the battery connectors are accessible from the other end. Heat-shrink tube must be positioned evenly around the BS unit.
3. Even Application of Heat Begin heating the tube by moving the heat gun back and forth along the length of the tube. This ensures even distribution of heat and prevents damage to the wire inside. Do not concentrate heat in one spot for too long, as this can cause overheating and wire damage.
5. Secure Attachment Continue applying heat until the heat shrink tube tightly conforms to the shape of the BS unit. The tube should be securely attached to the BS unit and covering the U.FL connectors.
6. Cooling Period Allow the assembly to cool down for a moment before handling it. This ensures that the tube is no longer extremely hot and can be safely touched.
7. Final Check Once the tube has cooled down, visually inspect the installation to ensure that the tube is securely attached, antennas are properly positioned, and battery connectors are accessible.
8. Usage After confirming the secure and proper installation of the heat shrink tube, the BS unit with antennas can be used as intended.
Where to Get Heat-shrink Tube Replacement?
If you for some reason need a new heat-shrink tube for Dronetag BS, please contact your local electronics/hobby store for replacement. You must ensure that the replacement is transparent with a length of 17mm, diameter before shrinkage approx. 12 mm, and diameter after shrinking: approx 7.5 mm.