
Configuration
- Document
- Dronetag Scout — Configuration
- Chapters
- 6
- Source
- help.dronetag.cz/print/dronetag-scout/configuration
🌐 Networking
The Dronetag Scout is equipped with a 100 Mbps Ethernet port that supports both DHCP and static IP address configurations. These settings can be modified through the device’s web-based management interface.
For instructions on accessing the interface, refer to the Connect to the Management Interface section.
🔌 Power over Ethernet (PoE)
The Scout’s Ethernet port is designed to be powered via PoE (Power over Ethernet) using the following standards:
- IEEE 802.3af Type 1 (also known as PoE)
- IEEE 802.3at Type 2 (also known as PoE+)
- Voltage: 48V DC
Do not use passive PoE injectors, such as those used by some Ubiquiti or Mikrotik devices, which often provide lower, non-standard voltages (e.g., 24V).
These will not power the Scout and may cause improper operation.
To power the Scout correctly:
- Use a compatible PoE switch that supports 802.3af Type 1 or 802.3at Type 2, or
- Use the included PoE injector supplied with your unit.
Refer to What’s in the Box for more details.
The Scout PoE injector supports both EU and US power outlets and can be used with input voltages of 120 V or 240 V.
📥 DHCP and the Static IP Fallback
By default the Scout's Ethernet is configured for DHCP, and it is designed to stay reachable even when no DHCP server is available:
- On start-up the Scout requests an address over DHCP and waits up to 60 seconds for a response.
- If a DHCP server answers, the Scout uses the address it is given — the normal case on a managed network.
- If no DHCP server answers within 60 seconds, the Scout falls back to a fixed static IP so it always stays reachable for a direct connection:
- IP Address:
192.168.100.100/24 - Default Gateway:
192.168.100.1
- IP Address:
Automatic return to DHCP
The static address is only a fallback, not a permanent setting — its job is to keep the Scout reachable while the network is unavailable. The Scout therefore keeps retrying DHCP in order to re-establish normal connectivity as soon as it returns: while on the fallback it checks in the background, roughly every couple of minutes, whether a DHCP server has become available.
As soon as DHCP works again, the Scout automatically switches back to a DHCP-assigned address — it does not stay on the static fallback once the network recovers. These background checks do not interrupt the fallback address, so the Scout remains reachable at 192.168.100.100 the whole time, right up until it obtains a DHCP lease.
The 192.168.100.100 fallback is temporary — the Scout leaves it again the moment DHCP is restored. If you want the Scout to keep a fixed address that never changes, set a static IP in the Networking tab (see Configuring a Static IP Address below). Configuring a static address there disables DHCP, so the Scout uses only the address you set and never falls back to — or returns to — DHCP. This is the recommended way to run the Scout on a fixed address, even if that address is in the same range as the default fallback.
🔧 Configuring a Static IP Address
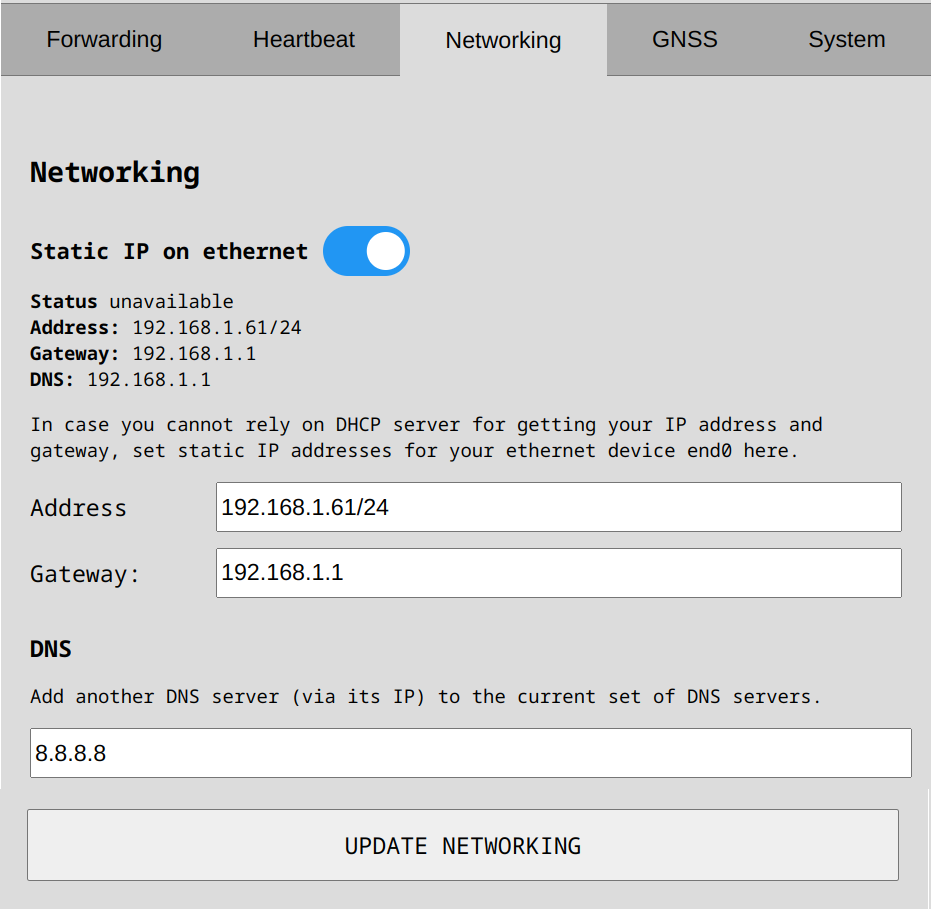
To assign a static IP:
- Navigate to the Networking tab within the web management interface.
- Enter the desired static IP address using CIDR notation, for example:
192.168.1.61/24- The
/24suffix corresponds to the subnet mask255.255.255.0.
- The
💡 Not sure what subnet mask to use? Try jodies.de IP Calculator to determine the correct value.
When you configure a static IP here, the Scout uses only this address: DHCP is disabled and the 192.168.100.100 fallback no longer applies. The Scout will not request a DHCP lease or switch back to DHCP while a static IP is set. To return to automatic addressing, disable the static IP option in this same tab.
🌍 Setting Gateway and DNS
If you need the Scout to send data to other networks or access internet services:
- Set the Default Gateway (usually your router's IP address).
- Optionally configure one or more DNS servers to enable domain name resolution instead of using raw IPs.
These settings are especially important if the Scout is connecting to cloud platforms or remote endpoints.
⏰ Time Synchronization (NTP)
The Scout normally keeps its clock accurate automatically — it takes the time from the LTE network, GNSS, or the internet. You can add your own NTP server (by IP or hostname) in the NTP IP/host field of the Networking tab; it is added to the pool of time sources the Scout uses.
On an isolated network with no internet access, the Scout cannot reach public time servers, so its clock can drift and the timestamps in your data may be wrong. On such networks we strongly recommend configuring a reachable NTP server (for example one running on your local network) so the Scout keeps accurate time and your data stays correctly timestamped.
📶 SIM Card Installation and LTE Setup
For LTE functionality, the Scout must be equipped with an LTE modem, which can be included when purchasing the unit.
You can also use your own SIM card—please refer to the SIM Card Installation Guide for detailed instructions.
We do not provide support for connectivity issues arising from third-party SIM cards.
If the LTE option does not appear in the Scout’s management UI, this means the device is not equipped with an LTE modem module.
APN (Access Point Name)
Each SIM card provider supplies an APN, usually listed on their website. Enter it in the Desired APN field so the Scout can establish a mobile data connection.
The APN you set is applied on every start-up. If you change it and the new value fails to connect while the previous one was working, the Scout automatically reverts to the last working APN, so a typo won’t leave the device offline. You can also enter the APN for a new SIM before swapping cards, so the Scout comes up correctly with the new one already configured.
SIM PIN
If the inserted SIM is protected by a PIN, the Networking tab shows a SIM PIN field. Enter the PIN and select Unlock SIM to bring the modem online. The Scout remembers a PIN that works and re-applies it automatically after a restart, so you only have to enter it once. PIN protection stays enabled on the card — it is only unlocked, never disabled.
Enter the correct PIN. Repeated wrong attempts can permanently lock the SIM (a PUK lock), after which it must be recovered with the PUK code from your provider.
We recommend using a SIM card with no PIN code to avoid accidentally locking the card. If the Scout tries a stored PIN and it turns out to be wrong, it discards that PIN and stops retrying so it cannot exhaust the attempts and PUK-lock the SIM.
When the Scout ships with a Dronetag-provided SIM, its APN and PIN are configured at the factory. While that SIM is inserted, these fields are hidden and cannot be changed — replace the SIM with your own if you want to set them yourself.
Verify Functionality and LTE
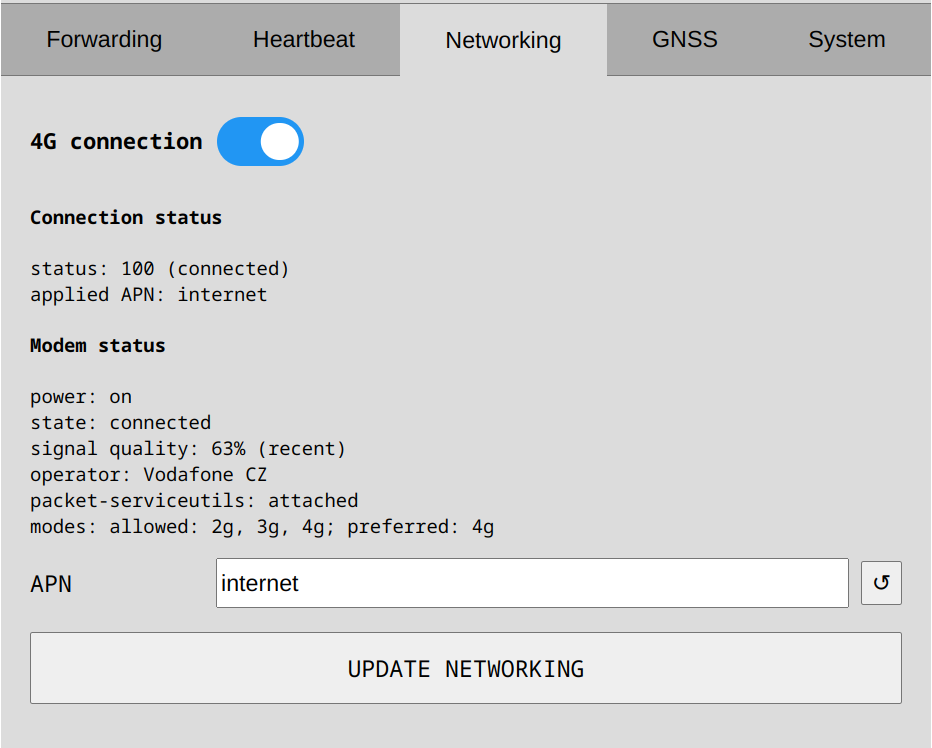
This section applies only to Scouts with LTE connectivity.
To verify LTE connectivity:
-
Connect to the Scout’s Management Interface
Follow the instructions in Connect to the Management Interface to access the Scout’s web UI. -
Open the Networking Tab
Once logged in, navigate to the Networking section in the management interface. -
Check the LTE (4G) Switch
Confirm that the 4G switch is set to ON to enable LTE functionality. -
Configure the APN
If your cellular provider requires specific APN settings, enter the APN value into the designated field in the networking tab. -
Save Changes
Click the Update 4G connection button to save and apply your changes.
If no data connection is established, double-check the APN settings and re-enter them if necessary. If the SIM is PIN-locked, make sure you have entered the correct SIM PIN and unlocked it (see SIM PIN above).
To further troubleshoot, test the SIM card in a mobile phone to confirm it has active service and good network coverage.
⚖️ Choosing between Ethernet and 4G
When the Scout has both an Ethernet connection and a working 4G connection, it normally sends its internet traffic — the Dronetag cloud, AWS instances and other remote integration servers — over Ethernet, keeping 4G as a backup. Traffic to devices on your local network always stays on Ethernet and is never sent over 4G.
Two switches in the 4G section of the Networking tab let you change this behaviour.
Prioritize 4G
Turn Prioritize 4G on to make the Scout prefer the 4G connection for all internet traffic, even while Ethernet is connected. This is useful when the Ethernet network is used only for local access and does not provide reliable internet. Traffic to your local network still goes out over Ethernet as usual. This switch is off by default.
Automatic 4G failover
Automatic 4G failover lets the Scout switch to 4G on its own, and is on by default. Roughly once a minute the Scout checks whether the remote servers your integrations rely on can still be reached over Ethernet:
- If they can be reached over Ethernet, the Scout keeps using Ethernet.
- If they cannot be reached over Ethernet but are reachable over 4G, the Scout automatically switches its internet traffic to 4G.
- As soon as the Ethernet connection can reach those servers again, the Scout switches back to Ethernet.
A few things to keep in mind:
- The check only runs while 4G is enabled and connected.
- Servers on your local network are ignored — failover reacts only to a loss of internet connectivity, not to local traffic.
- If Prioritize 4G is on, that manual choice always wins and the connection stays on 4G.
In a typical installation you can leave both switches at their defaults: the Scout uses Ethernet whenever it provides working internet access and falls back to 4G only when it doesn’t.
🔒 VPN Access
The Scout can be configured to use a VPN (Virtual Private Network) to provide access to the device even when you are not directly connected to its Ethernet port. This is useful when the Scout is deployed in a remote network and needs to be reached securely for maintenance, diagnostics, or integration with other services.
Using a VPN also helps securely transfer data by adding another layer of privacy between the Scout and the systems communicating with it.
VPN is available only in Sensor+ mode or Cloud mode. It is not part of the Sensor mode.
WireGuard
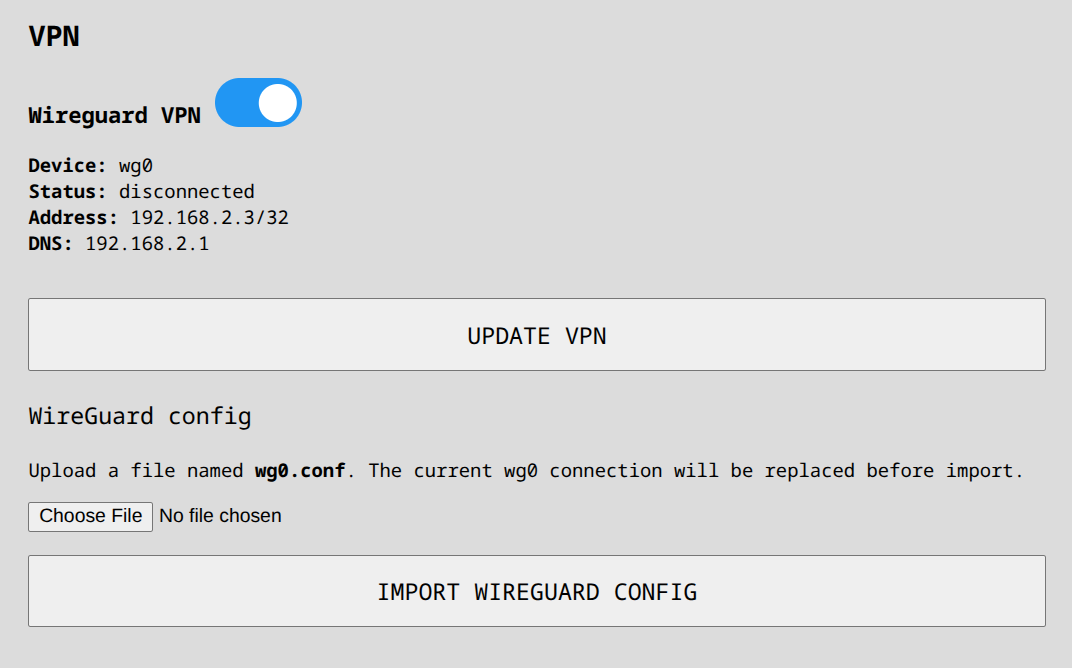
Scout currently supports WireGuard configuration from the management interface. A WireGuard configuration can be uploaded to the Scout and then enabled or disabled from the VPN section in the Networking page.
WireGuard can be used to:
- reach the Scout remotely without direct local Ethernet access
- route traffic securely to resources available inside the VPN network
- add an additional privacy layer for communication between the Scout and your remote infrastructure
When preparing a WireGuard configuration for Scout:
- configure the client tunnel address in the
[Interface]section - configure the reachable VPN subnet in
[Peer] AllowedIPs - do not use
0.0.0.0/0inAllowedIPs; this value is explicitly forbidden by Scout
Current implementation limitations:
AllowedIPsmust be present in the[Peer]section- only one IPv4 network in
AllowedIPsis currently supported, optionally together with the Scout address itself as/32 - the Scout currently expects the
[Interface] Addressto be inside theAllowedIPssubnet 0.0.0.0/0is explicitly blocked and full-tunnel VPN routing is not supported in the current implementation- if additional routes are needed beyond the main VPN subnet, they are not yet supported by the current UI flow
Example of a valid Scout WireGuard configuration:
# File must be named wg0.conf
[Interface]
# Private key assigned to this Scout client
PrivateKey = <scout-private-key>
# Tunnel address of this Scout inside the VPN subnet
Address = 192.168.205.85/32
# Optional DNS server reachable through the VPN
DNS = 192.168.205.1

[Peer]
# Public key of the remote WireGuard server or peer
PublicKey = <server-public-key>
# Scout supports one IPv4 VPN subnet here, optionally with the Scout address itself
AllowedIPs = 192.168.205.0/24, 192.168.205.85/32
# Remote server endpoint
Endpoint = 94.230.157.236:51821
In this example:
- the Scout tunnel address
192.168.205.85/32belongs to the allowed VPN subnet192.168.205.0/24 - the Scout address itself is also explicitly listed in
AllowedIPs, which is allowed - traffic for the VPN subnet is routed through WireGuard
- default routing for all device traffic is not used
🛠️ Troubleshooting Connectivity
If you're unable to access the Scout’s interface, try the following steps to identify and resolve common issues:
✅ Double-Check Network Settings
- Ensure your computer is on the same subnet as the Scout.
- If your network uses DHCP, confirm the DHCP server is running and has available IP addresses.
- If DHCP is not available, verify that your computer is manually configured to access the Scout’s fallback static IP (
192.168.100.100/24).- Example manual IP for your computer:
192.168.100.10
- Example manual IP for your computer:
🔌 Check Ethernet Link LEDs
Inspect the Ethernet port on your router/switch and if you have the device opened you can check these on the Scout mini computer:
- Green LED: Indicates a successful physical link.
- Amber/Yellow LED: Indicates network activity (blinks when data is being transferred).
- No lights: The cable may be faulty, the port may be disabled, or there may be no physical connection.
⚙️ Configure Ethernet Speed and Duplex
Some switches or routers may experience auto-negotiation issues with the Scout. To resolve this, manually set the Ethernet port configuration in your switch or router's management interface to:
- Speed: 100 Mbps
- Duplex: Full duplex
This setting can often be found under port settings or advanced configuration in your network equipment's UI.
🔄 Reset the Scout to Factory Defaults
If you've made changes to the network configuration and can no longer access the device:
- Perform a factory reset to restore default settings.
- After resetting, the Scout will attempt to obtain an IP address via DHCP and fall back to its static IP (
192.168.100.100) if no DHCP server is available.
Refer to the Factory Reset Instructions for detailed steps.
Sensor configuration
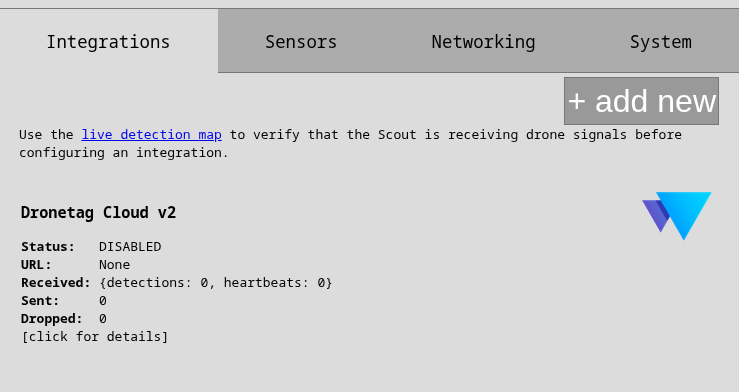
Integrations control where and how the Scout sends telemetries. Scout can run multiple Forwarders in parallel. If any instance is not processing the data fast enough, other instances are not affected.
There are two basic forwarders:
- Dronetag forwarders (one for Cloud and one for On-Premise) that can be only enabled/disabled and very basically configured
- JSON forwarders are versatile and intended for user's integration.
See the data format description at the bottom of this page.
Dronetag Forwarders
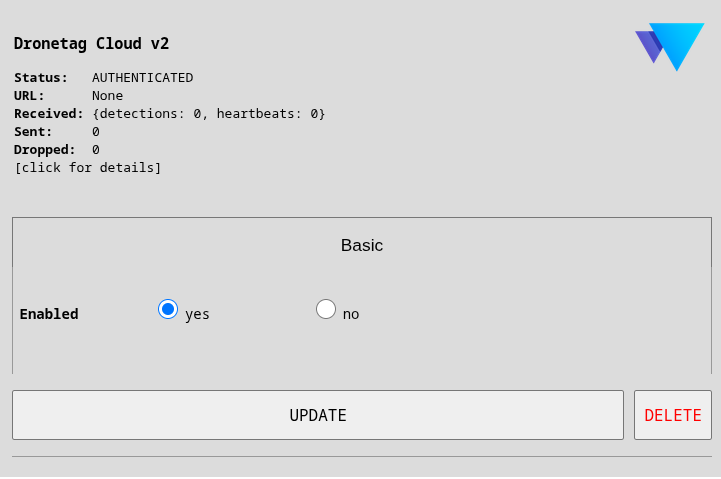
Dronetag Cloud is the only (user-visible) permanent forwarder. It cannot be deleted but can be disabled. By disabling the cloud forwarder, you will not be able to see the Scout nor its detections in Dronetag App.
You can add an On-Premise Dronetag integration to have full control of your data with all benefits of our cloud backend.
The Dronetag Forwarder can be used simultaneously with any other forwarders. For further details on how to operate the Scout in Cloud/On-Premise, please refer to this page.
JSON Forwarders
JSON forwarders are intended for user integration.
All custom forwarders can be secured and support compression and batching.
- MQTT
- HTTP/HTTPS
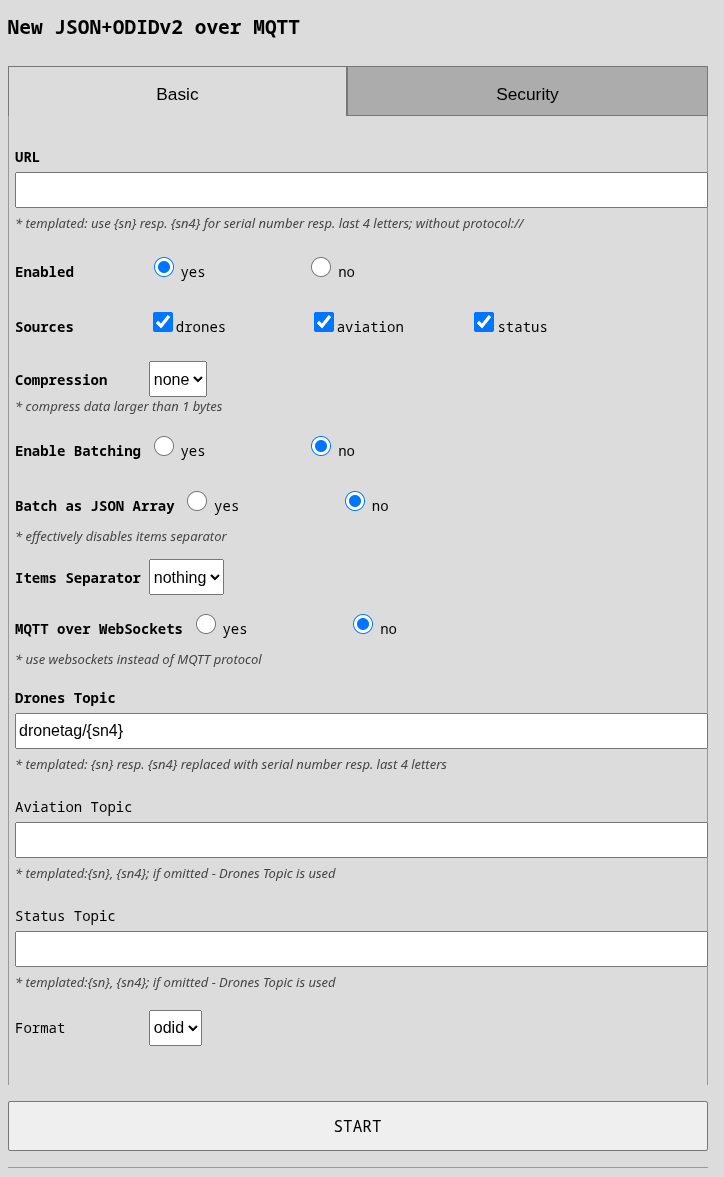
It is better to specify port into URL, otherwise 1883 is used. For plain MQTT(s) protocol, only host:port is necessary. If you are going to use WebSockets then you can specify path as well, otherwise / will be used.
- MQTT over WebSockets: Connect to MQTT broker using WebSockets instead of native MQTT protocol. Useful when you can only use HTTP/WebSocket connections (e.g., behind restrictive firewalls).
- Drones Topic: MQTT topic for drone detections. Topics are like directories in a filesystem. Template: use
{sn}for full serial or{sn4}for last 4 digits. Example:myorg/receivers/scout1/drones - Aviation Topic: Separate MQTT topic for aviation data. If empty, aviation data is sent to the Drones Topic.
- Status Topic: Separate MQTT topic for Scout status/heartbeat. If empty, status is sent to the Drones Topic.
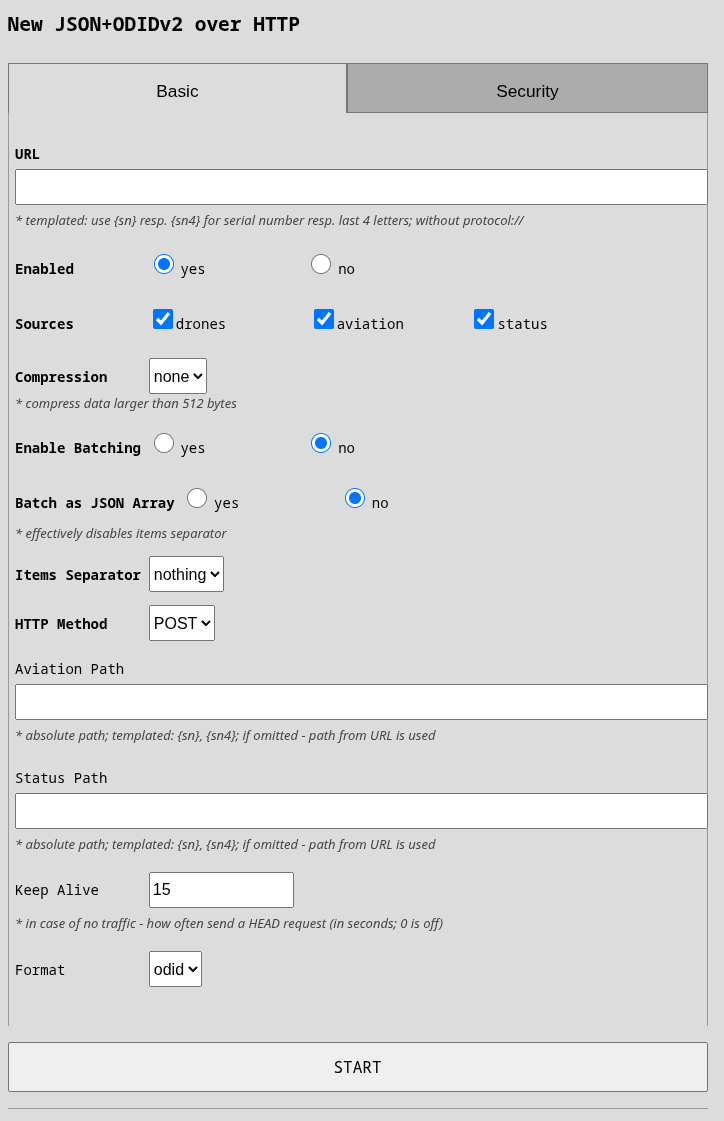
You can put a full path in the URL and all data will be sent to that path. Optionally, you can use different paths for aviation and status (see below). All paths must be absolute.
- Aviation Path: Override the URL path specifically for aviation data. If empty, uses the path from your URL. Allows sending drone and aviation data to different endpoints.
- Status Path: Override the URL path specifically for status/heartbeat data. If empty, uses the path from your URL. Useful for separating status updates to a different API endpoint.
- Keep Alive: Seconds between keep-alive ping requests when no data is being sent. Set to 0 to disable. Helps detect broken connections earlier.
- HTTP Method: HTTP method to use:
POST(standard, recommended) orPUT. Most APIs expect POST.
Here follow common options no matter the basic protocol (HTTP/MQTT).
Basic Settings
These are the fundamental options required for every forwarder:
- Enabled: Turn this forwarder on or off. When disabled, no data is sent through this forwarder.
- URL: The destination where to send the data. Please, do not try to guess protocol - use clickable options to enable secured connection, mTLS and/or change the protocol to web sockets.
- Sources: Select which types of data to forward: drones (detected drone telemetry), aviation (manned aircraft data from aviation module), status (Scout health and position updates). Please note that drones and aviation are restricted by a global filter on altitude and radius.
- Client Timeout: How long (in seconds) to wait for the server to respond before considering the connection broken. Default is 15 seconds. Increase this if your connection is not reliable or slow.
Batching
Batching groups multiple messages before sending them. This reduces network traffic and server load but adds slight delay. Here you control those delays and how the data are formatted.
- Enable Batching: Turn message batching on or off. Useful for high-volume scenarios.
- Batch as JSON Array: When enabled, messages are grouped as
[msg1, msg2, ...]. When disabled, messages are joined with a separator. - Items Separator: Character(s) between messages when batching is enabled:
nothing(no separator),\r\n(carriage return + newline), or\n(newline). - Batch Size: Maximum number of messages to group before sending. Leave at 0 to disable, or set to a number like 100.
- Batch Timeout: Maximum seconds to wait before sending a batch, even if it's not full. Example:
0.1sends batches every 100ms. Disabled if set to 0.
Example: With Batch Size = 100 and Timeout = 0.1 seconds, batches are sent when either 100 messages arrive OR 0.1 seconds pass, whichever happens first.
Compression
- Compression: Reduce bandwidth usage by compressing data before sending. Beware that for HTTP the data is optionally compressed only when it makes
sense. The compression is then noted in
Content-Encodingheader (with value "gzip"). If selected for MQTT, the data are compressed always because there is no way how to hint on data compression.
Security Settings
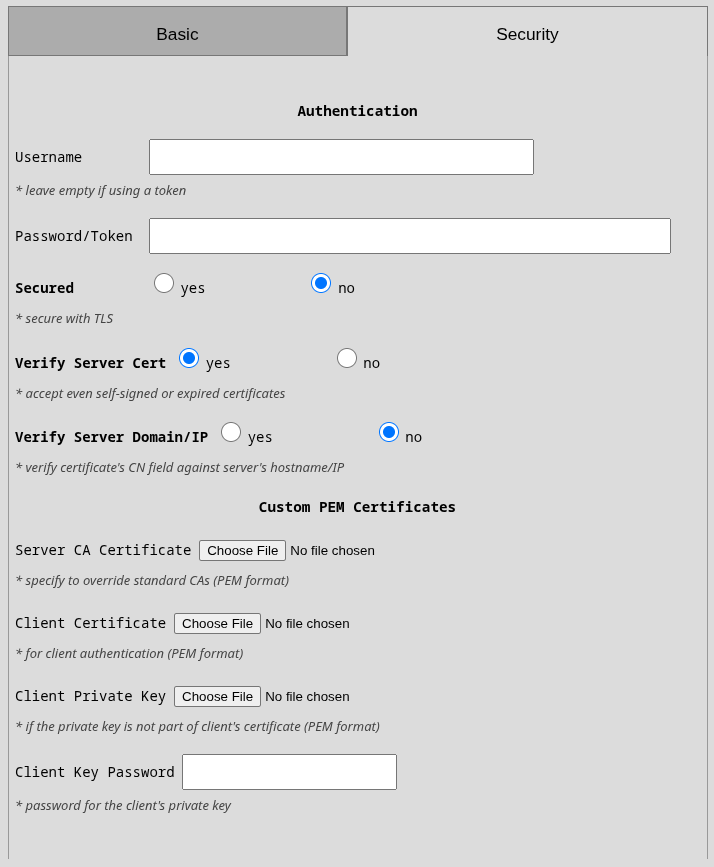
Configure how the Scout securely communicates with your server.
TLS/SSL Server Encryption
This section relates only to verification of the server certificate. This is the most common part of security and you most likely need to get this right.
- Secured: Enable TLS encryption for the connection. If your server uses HTTPS or MQTTs, enable this.
- Verify Server Cert: Check if the server's certificate is valid and not expired. Disable only for testing with self-signed certificates. Warning: Disabling this makes you vulnerable to man-in-the-middle attacks.
- Verify Server Domain/IP: Check if the certificate's hostname (CN field) matches the server you're connecting to. Enable this to prevent connection to impostor servers.
- Server CA Certificate: Your custom CA certificate in PEM format (
.pemor.crtfile). This tells the Scout which certificate authority to trust. Typically needed when your organization has its own internal CA. Beware that it has to be the top-level CA in the server's certificate. Not an intermediate one.
Client Certificates
This section allows you to specify your client certificates for mTLS. Quite usual in the MQTT world but more and more in HTTP also.
- Client Certificate: Upload a certificate to authenticate the Scout to your server. Required if your server checks client certificates (mutual TLS). File format: PEM.
- Client Private Key: The private key corresponding to your client certificate. Only needed if your key isn't embedded in the certificate file.
- Client Key Password: If your private key is encrypted, enter the password here.
Authentication Settings
For servers that require login credentials:
- Username: Username for HTTP Basic Auth or MQTT authentication. Leave empty if using token-based authentication.
- Password/Token: Password for Basic Auth or API token. Stored securely. For MQTT, this can be your password or token depending on your broker's configuration.
Sensors Range and Altitude Limiting
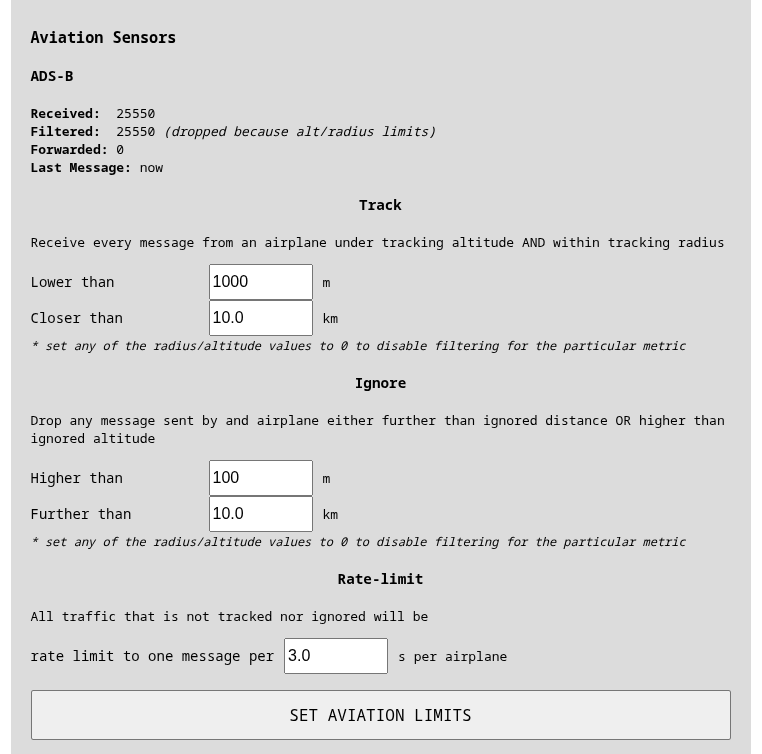
You can select thresholds for drones and aviation data:
- ignore thresholds (radius, altitude): object farther OR higher than the limits will be silently dropped
- tracking thresholds (radius, altitude): objects closer AND lower than the limits will be tracked
Tracking means that the messages will not be rate limited. Every message will be forwarded. Rate-limiting means that only one message per (configurable) X seconds per object will be sent. Good limits are especially useful for aviation where average data consumption near a mid-sized airport with no limits is around 150MB/day.
Default limits
By default, rate limiting and ignore is turned off for drones by setting all values to 0.
Aviation is limited by default because the air traffic visibility is on long distances that are not useful for normal operations. Hence the aviation traffic is ignored if further away than 100km regardless of altitude (ignore threshold). Aviation tracking (not rate-limited) happens by default for any traffic within 10km radius and bellow 1000m of altitude (landing objects).
The BEAST and ADSBExchange integrations are not affected by these limits. They relay the receiver's raw, undecoded BEAST stream, which carries no positions the Scout could filter on - everything the receiver hears is forwarded regardless of radius or altitude. Beast Reduction only limits the per-aircraft update rate, not the coverage.
Formats
All JSON-based forwarders support two formats: dri and odid. DRI format contains raw OpenDroneID message (as bytes) as it was received by the antenna.
ODID message is parsed and transformed OpenDroneID message so it is more pleasant to work with.
Each message is sent separately unless Batching is configured. See above details about batching messages.
- JSON+ODID Format
- JSON+Dri
JSON ODID Fields
| Key | Type | Example | Description |
|---|---|---|---|
sn | str | 1000033 | Serial number |
mac | str | MAC in format XX:YY:ZZ:AA:BB:CC; synthesized from the ICAO/device address for aviation traffic | |
counter | int | 13 | Counter of received messages (0 for aviation) |
rssi | int | -57 | Signal strength in dBm |
tech | str[2] | B5 | Receiving tech: B4, B5, WN, WB (drone Remote ID); AB, AL, UT, FL, OG (aviation) |
recv_id | int | Receiver ID | |
module_id | int | 2 | Antenna/module number |
module_type | int | 11 | Internal module type; the receiving frequency in MHz for aviation (1090, 978, 868) |
msg_type | int | 15 | ODID message type; aviation always arrives as 15 (Pack) |
noise_floor | int | null | -98 | Noise floor in dBm, when the receiving chip reports one |
registration | object | null | - | Drone maker/model resolved offline from the Remote ID serial. Only available on Scout Sensor+ with a valid license, null otherwise |
odid | dict | - | This contains a preprocessed payload of the protocol. Regarding the possible values and message structure refer to ODID Library. Also for more details see the full protocol description below |
Machine-readable schema
The authoritative, versioned description of the whole JSON+ODID message is published
as a JSON Schema (draft 2020-12) generated directly from
the sensor's typed data models — every field carries a description with its units,
valid ranges and null semantics, including how aviation traffic (ADS-B, ADS-L, UAT,
FLARM, OGN) is flattened into the ODID structure (aircraft identifier in BasicID,
flight number or callsign in SelfID, never a System message).
Download: scout-json-odid.schema-v1.0.json
The schema version (version and $id inside the file) is bumped whenever the wire
format changes, so your integration can pin against a specific schema revision. Use it
to generate typed client models or to validate received messages in CI.
Textual JSON format with raw fields parsed from ODID sources below is just a representation formatted for clear understanding; the format sent will additionally be:
- No indentation the object will be always a single line since it is sent in JSONL
- All Invalid fields are processed and converted to
null(Example: Lat,Lon0,0is converted tonull)
Example JSON ODID Messages
{
    "sn": "D11234567812345678",
    "mac": "ab:ab:bc:bc:de:de",
    "counter": 24,
    "rssi": -83,
    "tech": "B4",
    "recv_id": 0,
    "module_id": 0,
    "module_type": 10,
    "msg_type": 1,
    "noise_floor": null,
    "registration": {
        "maker": "Dronetag",
        "model": "Beacon gen.2",
        "type": "rid_module",
        "certain": true
    },
    "odid": {
        "BasicID": [
            {
                "UAType": 15,
                "IDType": 1,
                "UASID": "159112345678"
            }
        ],
        "Location": {
            "Status": 2,
            "Direction": 202.0,
            "SpeedHorizontal": 16.5,
            "SpeedVertical": 0.0,
            "Latitude": 50.0835017,
            "Longitude": 14.4328954,
            "AltitudeBaro": 95.0,
            "AltitudeGeo": 0.0,
            "HeightType": 1,
            "Height": 163.0,
            "HorizAccuracy": 0,
            "VertAccuracy": 0,
            "BaroAccuracy": 0,
            "SpeedAccuracy": 0,
            "TSAccuracy": 0,
            "Timestamp": "2026-06-01T09:49:11",
            "TimestampEstimated": false
        },
        "SelfID": null,
        "System": null,
        "OperatorID": {
            "OperatorIdType": 0,
            "OperatorId": "d6lE0m0Hi2iNx"
        }
    }
}
JSON DRI Fields
Internal protobuf‑derived JSON that allows you to process the RAW OpenDroneID frames by your application. The format has additional fields regarding the reception such as technology, channels, timestamp, location, etc.
| Key | Type / Value | Description |
|---|---|---|
receiver_data | object | Details about the module that captured the frame (see below). |
odid_payload | object | Encoded Open Drone ID information (see below). |
sn | string | Serial number of the Scout |
{
    "odid_payload": {
        "counter": 25,
        "standard": "ODID_STANDARD_ASTM",
        "bluetooth_legacy_info": {
            "mac": "q6u8vN7e",
            "rssi": -116
        },
        "encoded_message": "8hkDAh8xNTkxMTIzNDU2NzgAAAAAAAAAAAAAABImF0IAax3aHVxFmgguC28KsAcAAEyBAABSAEg1dFFzdEdNSFA5WTcAAAAAAAAAAAAA"
    },
    "receiver_data": {
        "timestamp": 1708485109
    },
    "sn": "D11234567812345678"
}
Subfield receiver_data
| Key | Type / Example | Notes |
|---|---|---|
location | object | null | Optional GNSS fix of the receiver. |
receiver_type | int (0 – 3) | Internal receiver type identifier. |
component_id | uint32 | Distinguishes multiple identical chips on one board. |
timestamp | uint32 | Custom epoch (2021-01-01 T00:00:00Z) in 0.1-s ticks. |
Subfield location
| Key | Type / Example | Notes |
|---|---|---|
latitude | float | Latitude in Degrees as a decimal number |
longitude | float | Longitude in Degrees as a decimal number |
Subfield odid_payload
| Key | Type / Example | Description |
|---|---|---|
counter | uint32 | Monotonic per-receiver message counter. |
standard | int | 0 = ASD-STAN, 1 = ASTM. |
encoded_message | string (base64) | Raw binary ODID message encoded in base64. Can be parsed by ODID Library |
wifi_beacon_info | object | null | If present identifies Wifi Beacon. Transmission-specific metadata (see below). |
wifi_nan_info | object | null | If present identifies Wifi NaN. Transmission-specific metadata (see below). |
bluetooth_legacy_info | object | null | If present identifies Bluetooth Legacy. Transmission-specific metadata (see below). |
bluetooth_long_range_info | object | null | If present identifies Bluetooth Long range. Transmission-specific metadata (see below). |
Subfield <TECH>_info
The fields are: wifi_beacon_info, wifi_nan_info, bluetooth_legacy_info, bluetooth_long_range_info
| Field | Wi-Fi Beacon / NAN | BT Legacy / Long-Range | Description |
|---|---|---|---|
mac | ✔ | ✔ | Transmitter MAC base64 encoded. |
rssi | ✔ | ✔ | Signal level in dBm (signed int). |
channel | ✔ (Wi-Fi only) | — | Wi-Fi channel (1-165). |
frequency | ✔ (Wi-Fi) | — | 0 = 2.4 GHz, 1 = 5 GHz. |
noise_floor | ✔ (optional) | ✔ (optional) | dBm value if reported. |
Bluetooth Legacy, e.g. tech=B4, sends each message type (System, Location...) separately. PACKED messages are not supported over B4. Aggregation may be introduced later. Aggregation was introduced in ScoutOS 2026.05.29.
Bluetooth Legacy messages are aggregated until a valid Location message arrives and then the whole aggregate is sent further as PACKED message. The aggregate is then dumped with every updated
Location message because other fields rarely change.
- Note: This behavior can be similar with the other technologies; it depends on the implementation of the transmitter. Generally Wifi Beacon, Wifi NaN and Bluetooth 5 Long range send all of the information in a single pack but it is not guaranteed. We do not know any transmitter that would do so but it is possible. So take into account that not all of the information has to be valid when processing to prevent unnecessary crashes.
Heartbeat/Status
If you select status source for your forwarder, you will receive a status message every 60 s These messages contain:
- Basic device information
- GNSS position (when GNSS is enabled)
- LTE network status (when an LTE modem is present)
- Sensors details
Example Heartbeat message:
{
    "sn": "D11234567812345678",
    "timestamp": 1780310741,
    "receivers": 2,
    "last_observation": 1780310741,
    "gnss_available": true,
    "gnss_position": [
        50.073992633,
        14.466609883
    ],
    "gnss_satellites": 6,
    "gnss_altitude": 262.5,
    "gsm": {
        "enabled": true,
        "state": "connected",
        "quality": 100,
        "tech": "lte"
    },
    "sensors": [
        {
            "id": "RW1",
            "uid": 2,
            "source": "wifi/dri_wlp1s0u1u2",
            "state": "ok",
            "timestamp": 1780310741.7995672,
            "tech": "RemoteID",
            "messages": 0,
            "filtered": 0,
            "last_message_at": 0,
            "last_status_at": 0,
            "extras": {
                "module_type": 10,
                "module_type_name": "RW1",
                "module_revision": 0
            }
        },
        {
            "id": "ADS-B",
            "uid": 18873,
            "source": "18873",
            "state": "ok",
            "timestamp": 1780310741.7998254,
            "tech": "ADS-B",
            "messages": 32588,
            "filtered": 32588,
            "last_message_at": 1780310741,
            "last_status_at": 0,
            "extras": {
                "export_running": false,
                "export_size": 0
            }
        }
    ]
}
Downloads
Scout Sensor Format Specification (v2.5)
SCOUT datasheet (v2.4, superseded by the Format Specification)
Sensor+ configuration
Sensor+ offers advanced integrations with third-party servers.
- TAK
- Sapient
- FlytBase
- SafeSky
- BEAST
- ADSBExchange
- OGN
- DJI O4 Ground Station
- Skydio
TAK (Tactical Awareness Kit)

TAK offers unsecured and secured communication. Secured communication uses certificates that come in three possible ways to the Scout client
- as separate PEM files (one for CA - the server certificate, one for client certificate, and one for client's private key);
- as P12 bundle - this file contains all three mentioned PEM files bundled together;
- from enrollment process (will be described later)
If your Scout runs in Cloud Mode, you don't need this integration to get drone tracks into TAK - the Dronetag cloud can stream them to your TAK server for you over the integration portal. Use that route whenever you don't need the direct data flow from the Scout itself; the Sensor+ integration described here is what you want when the Scout must reach the TAK server on its own, without any cloud in the path. See Using Scout with the Dronetag App for a video walkthrough of the cloud route.
Basic settings
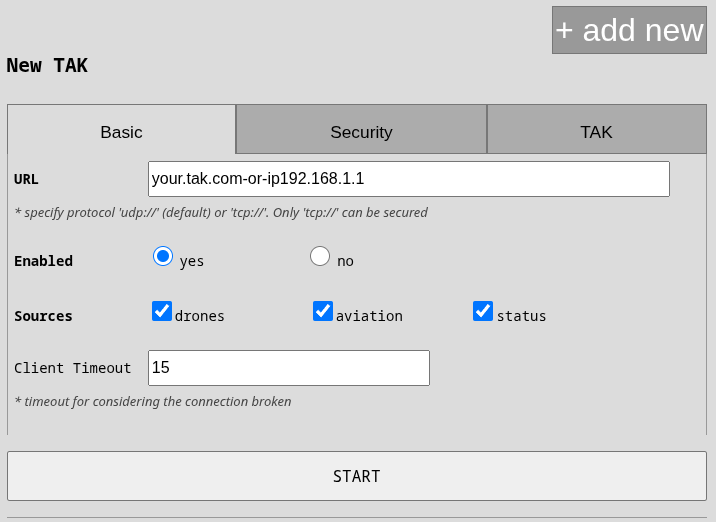
URL: specify host (e.g. tak.example.com) or IP (e.g. 10.1.1.25). If your server uses standard ports (8088 unsecured, 8089 secured) then you don't need to specify the port. If you want to use unsecured UDP version, use "Force UDP" switch.
SOURCES: you should keep drones and status messages. The only meaningful change is (un)checking aviation if
you don't want to see surrounding airplanes in your TAK.
Force UDP: if your server supports only UDP protocol then check this option. UDP cannot be secured nor verified ( connection failure will never be reported).
Security settings
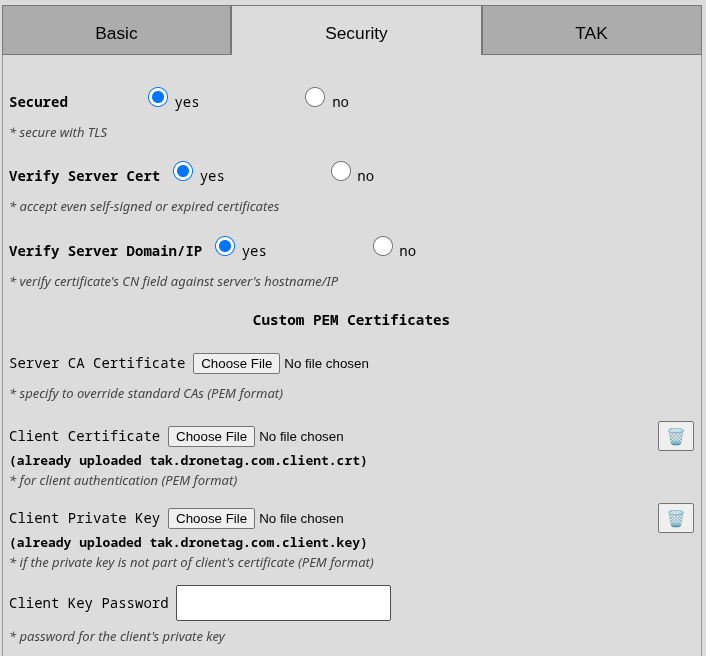
The suggested setup is to have all security features enabled (security, verify server cert, verify server domain). This will ensure server certificate is enforced and thoroughly checked. If the server certificate doesn't have its domain/IP correctly filled in, then you can disable the domain/IP check to accept even such certificate and keep your comms secured. In this case, either your server needs to use globally recognized CA such as Let's Encrypt or you need to supply your CA's certificate into the first field "Server CA Certificate" in PEM format. There is the option to use p12 bundle with "P12 Trust Bundled RootCA" that will take CA certificate from the last certificate from the bundle.
CERTIFICATE VERIFY FAILED
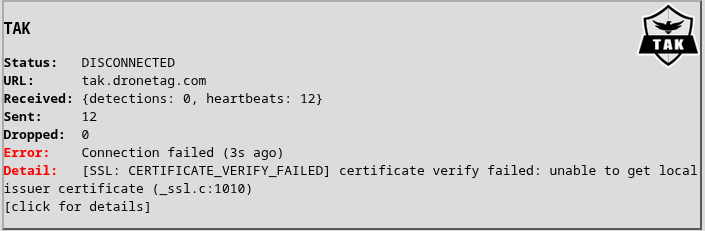
The image on the right shows the error when Scout cannot verify server's certificate. Please note that the CA certificate must be server's root CA. It cannot be an intermediate CA. You have a few solutions
- If you are using p12 bundle and the server's certificate has the same RootCA as the certificate in the bundle then use "P12 Trust Bundled RootCA". This will extract the top-level certificate from the p12 bundle and use it as trusted certificate for verifying the server.
- If you are using p12 bundle (and have "P12 Trust Bundled RootCA" to "No") or not using the p12 at all - in both cases the "Server CA Certificate" will be used if you have checked "Verify Server Cert". Make sure it is the top-level rootCA.
- As a temporary fix, you can uncheck "Verify Server Cert" and "Verify Server Domain/IP" in case of problems and the client will simply accept any certificate that the server gives you. This is not secure at all of course.
Client Certificates
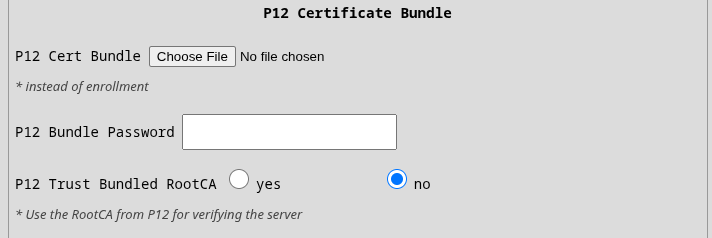
For secured communication from client to server, you must specify "Client Certificate" and "Client Key" either as separate PEM files or in a P12 bundle. If you upload both PEM and P12, only the P12 will be used. Optionally, PEM Key can be password protected. In this case use the "Client Key Password" field. Keys in P12 must not be password protected. Usually the bundle itself is protected hence the field "P12 Bundle Password".
If any of those displayed errors appear, that means your client certificates were rejected by the server or are outright invalid.
[SSL: TLSV1_ALERT_INTERNAL_ERROR] tlsv1 alert internal error[SSL: TLSV13_ALERT_CERTIFICATE_REQUIRED] tlsv13 alert certificate required
ENROLLMENT
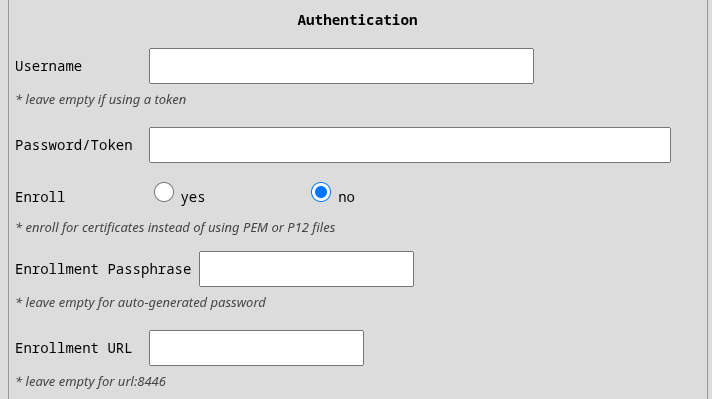
If you don't have certificates but you were given username, password and optionally a passphrase then you should use those in the authentication section together with setting Enroll to "yes". Those credentials are used in standard enrollment process using Marti API on port 8446. We currently do not support custom certificates for secured communication during enrollment but it will be part of the next release. If your enrollment server is running at a different port or even URL, then use the provided Enrollment URL.
TAK Settings
Friendlies: here you can define friendly drones one-per-line by their serial number or MAC address in standard colon-delimited format. You can optionally add callsign under which they will appear on the map. Separate the callsign by a comma. Example:
1596F319B877381F1BBF, blue1
1596F33DEC76E5C15FD3
TAK Data
Scout sends the following messages to the server:
Heartbeat
Scout is sending a heartbeat every 60s as a friendly ground sensor a-f-G-E-S instead of usual t-x-d-d. This
will place Scout on the map with callsign "SCOUT-<last-4-digits-of-serial-number>" while the uid of those messages is
"<serial-number>-sensor".
Drones
Scout by default marks drones as Unknown affiliation. If the drone's serial number or MAC address were specified in the friendly settings, then they will be marked as Friend. Scout also distinguishes between fixed-wing and rotary drones. So the possible COT types reaching the server are one of
a-u-A-C-F-qresp.a-f-A-C-F-qfor unknown fixed-wing drone resp. friendly onea-u-A-C-H-qresp.a-f-A-C-H-qfor unknown rotary drone resp. friendly one
Drone's callsign is [UA]snxxxx where snxxxx is the last 6 digits of the drone's serial number. If the serial number is
not available then drone's MAC address is used instead (will have ":" inside).
Drone Operator
Operator is visually linked to their drone by their callsign [OP]snxxxx that shares the drone's serial number.
Operator is also linked to their drone on COT level by the link_to element.
Operator's COT type is a simple ground unit a-u-G-U resp. a-f-G-U if the operator's drone is defined as friendly.
Example
A single Remote ID detection produces up to two CoT events: the UAV track (from the drone's broadcast
location) and a separate operator marker (from the drone's broadcast system message). The operator event
references the drone via its <link> element, so the two appear connected on the map. Below is a real event
pair emitted by a Scout with serial D19D2405DD799BF9B5 for a rotary drone broadcasting UAS ID
MJJE3G894BIQV0Z:
<event version="2.0" type="a-u-A-C-H-q" uid="D19D2405DD799BF9B5-UAS-MJJE3G894BIQV0Z" how="m-g" time="2026-07-23T05:10:57.263681Z" start="2026-07-23T05:10:57.263717Z" stale="2026-07-23T05:11:27.263725Z">
  <point lat="-48.8766700" lon="-123.3933300" le="3.0" hae="403.0" ce="10.0"/>
  <detail>
    <_flow-tags_ pytak-scout="2026-07-23T05:10:57.263739Z"/>
    <contact callsign="[UA]BIQV0Z"/>
    <track track="86.0" speed="0.0"/>
  </detail>
</event>
<event version="2.0" type="a-u-G-U" uid="D19D2405DD799BF9B5-OP-MJJE3G894BIQV0Z" how="m-g" time="2026-07-23T05:10:57.264431Z" start="2026-07-23T05:10:57.264448Z" stale="2026-07-23T05:12:57.264454Z">
  <point lat="-48.8766192" lon="-123.3933311" le="10.0" hae="405.5" ce="5.0"/>
  <detail>
    <_flow-tags_ pytak-scout="2026-07-23T05:10:57.264468Z"/>
    <contact callsign="[OP]BIQV0Z"/>
    <link relation="p-p" type="a-u-A-C-H-q" uid="D19D2405DD799BF9B5-UAS-MJJE3G894BIQV0Z"/>
  </detail>
</event>
Aviation
If your Scout has aviation modules and you enable aviation to be sent to the TAK integration the airplanes will
appear as civilian fixed-wings a-u-A-C-F resp. helicopters a-u-A-C-H. In the UI, you should see their reported
flight number (e.g. EJU39FN). If the flight number is not available then ICAO ID is used (which is a number).
Sapient

Scout uses strictly version "BSI Flex 335 v2.0". The connection is always over a TCP client and can be optionally encrypted using SSL as any other TCP connection.
Currently, Scout supports only Registration command. Future releases will support other commands such as start, stop
and changes in detections diameter.
Forwarding
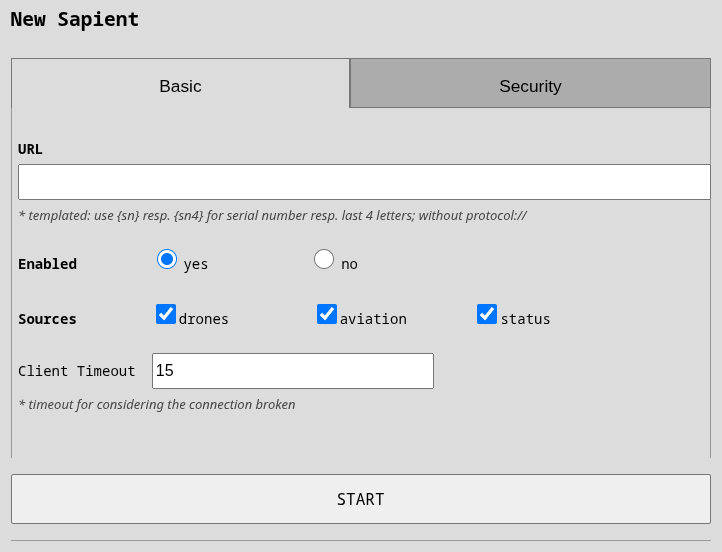
URL: fill in host or IP of your Sapient server. If you are using standard port 8080 then you don't need to specify it.
Sources: you can select which messages will be forwarded to the server. Please note that drones and aviation are restricted by a global filter on altitude and radius.
Drones
Scout reports two kinds of messages for RemoteID messages
- classification "Air vehicle", subtype "UAV rotary wing" or "UAV fixed wing" for the drone
- classification "EM transmitter", subtype "UAS control station" for the pilot/operator
The operator message is associated to the drone message via associated_detection as type SIBLING.
Both messages have the same object_info:
Technology: possible valuesWB(Wifi Beacon),WN(Wifi NaN),B4(Bluetooth 4),B5(Bluetooth LE)Operator ID: applicable in US and EU regions e.g.FIN87astrdge12k8UAS ID: serial number of the drone or attached RemoteID transmitter e.g.MFR1C123456789ABC
Drone messages contain the best available identity in the top-level id parameter.
Aviation
If your Scout has aviation modules and you enable aviation to be sent to Sapient server then
DetectionReport with classification "Air vehicle" -> "Manned fixed wing" or "Manned rotary wing"
will be used together with object_info:
Technology: possible valuesAL(ADS-L),AB(ADS-B),OG(OGN),UT(UAT),FL(FLARM)ICAO ID: 24bit number assigned by ICAO to every manned air vehicleFlight number: string assigned to the current flight of the airplane
Status
Heartbeat is reported every 60s by a standard StatusReport message and right after registration.
Security
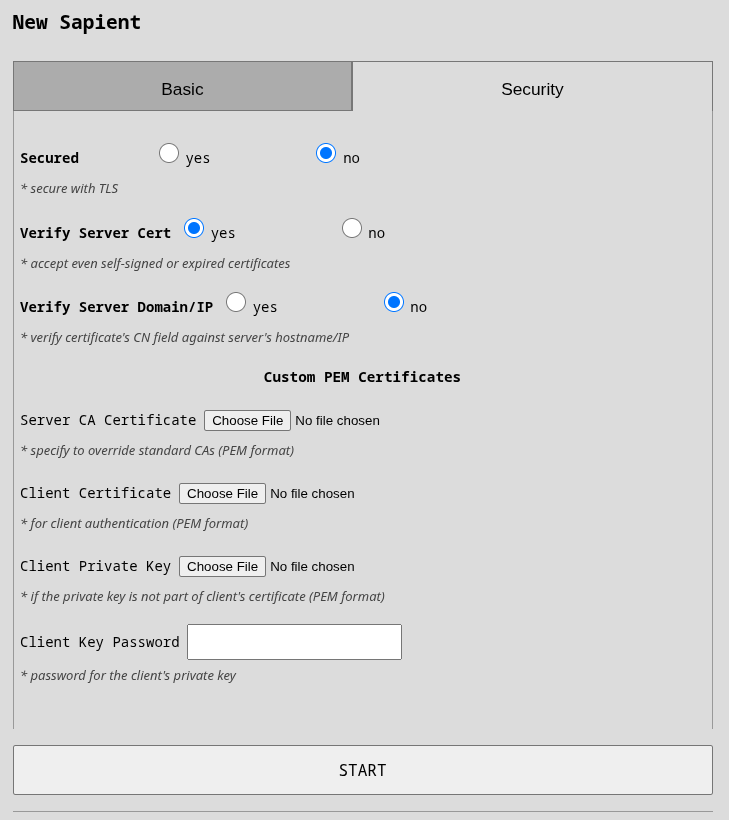
Sapient security depends on certificates and there are no user names and passwords. Our client supports custom server and client certificates.
Upon first connection, Sapient client generates a UUID that is deterministically derived from Scout's serial number so it doesn't change even with device restart or power loss.
For details about certificates, please take a look at security section.
FlytBase

FlytBase is an enterprise platform for autonomous, docked-drone fleet operations. Its third-party integrations are called Flinks (FlytBase Links). Through the Dronetag Flink, detections from your Scout appear in FlytBase as intruders inside pre-defined boundaries, giving remote operators live airspace awareness during autonomous and BVLOS missions.
Setting up the Dronetag Flink
-
First, you need to register your Scout at FlytBase. Navigate to the Flinks library and connect the Dronetag Flink.
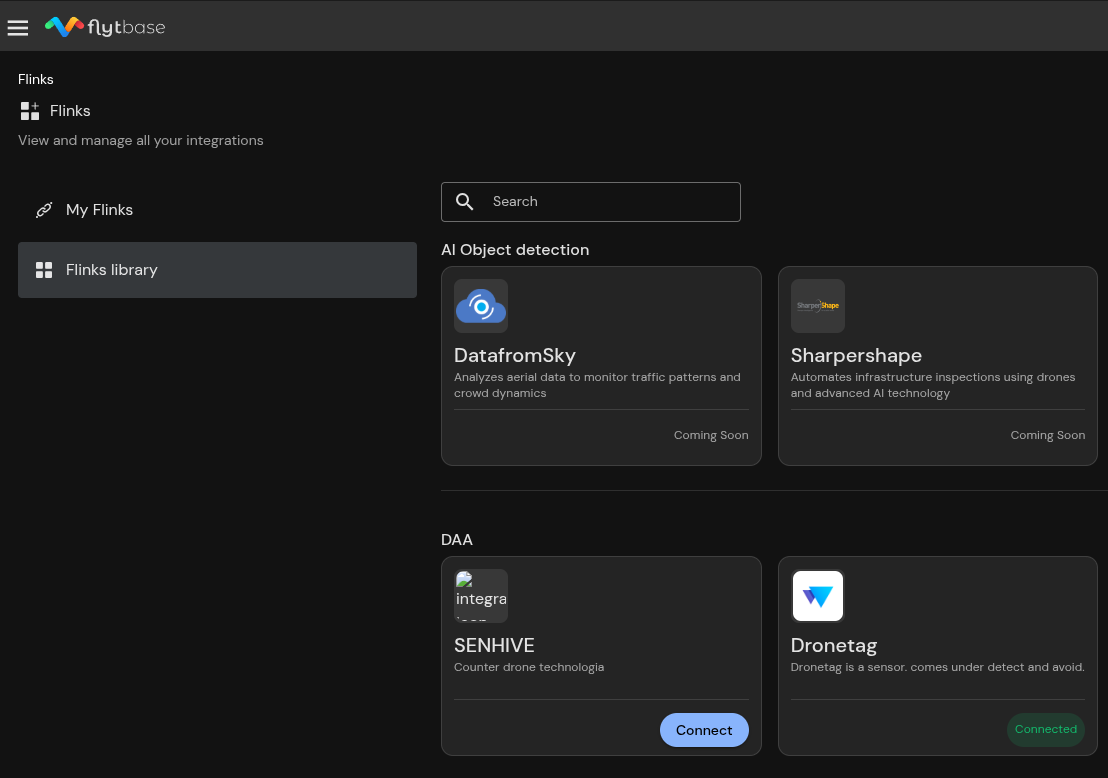
-
Head to the Dronetag Flink and add your Scout. The name is arbitrary; Hardware ID must be your Scout's serial number.
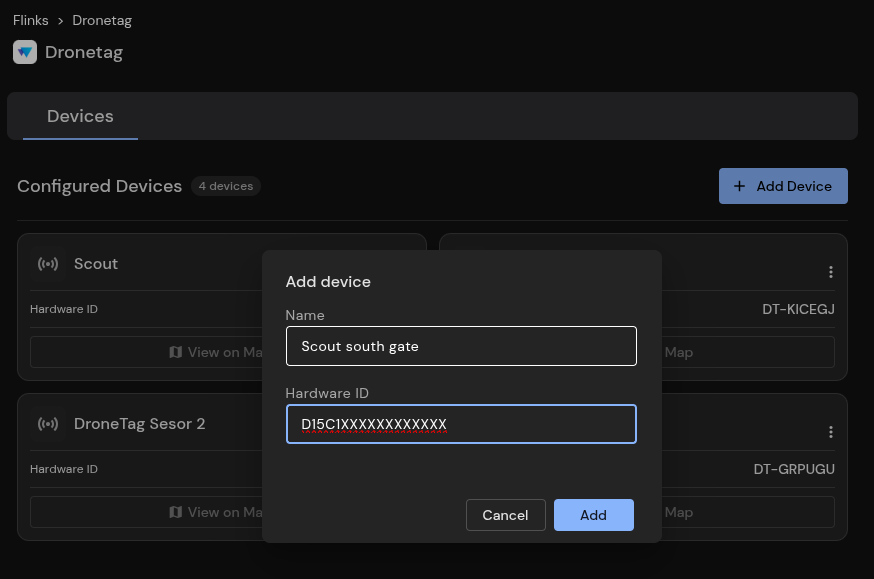
-
Once the device is added to the Flink, you can display the credentials needed on the Scout side.
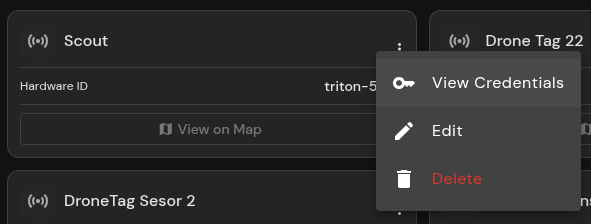
-
In Scout's UI, head to Forwarding and add the FlytBase integration. Copy each credential into the matching field of the Authentication tab and the URL into the Basic tab.
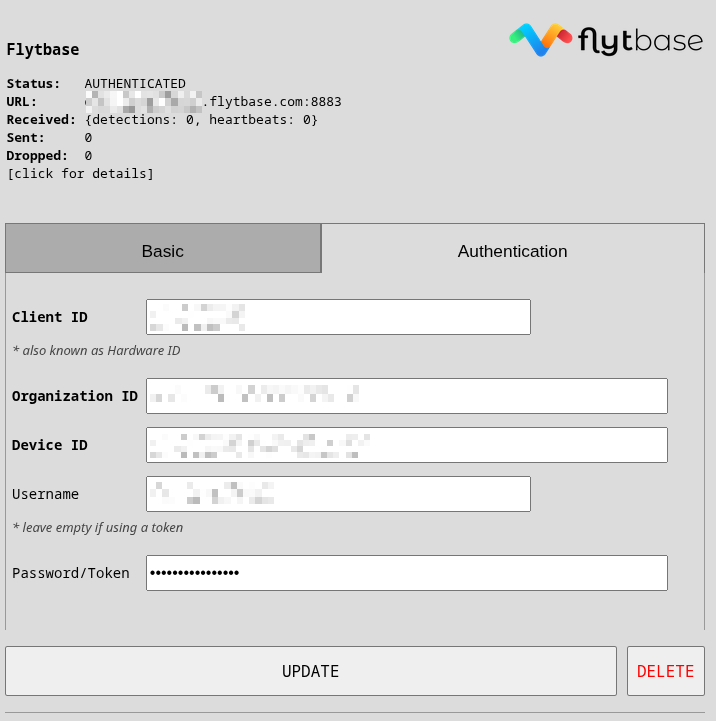
-
Upon saving, the integration verifies the credentials and switches to the "AUTHENTICATED" state. If all credentials and the URL were configured correctly, detections will start appearing in the FlytBase platform.
SafeSky

SafeSky is an airspace awareness network used by general aviation pilots and drone operators. With this integration, Scout publishes its detections directly into the SafeSky network, so drones and aircraft detected by your Scout appear as live traffic to all SafeSky users around you.
The integration is preconfigured to work with the production SafeSky environment out of the box - no API key or URL needs to be entered. Traffic published by the Scout is credited to Dronetag as the source.
Configuration
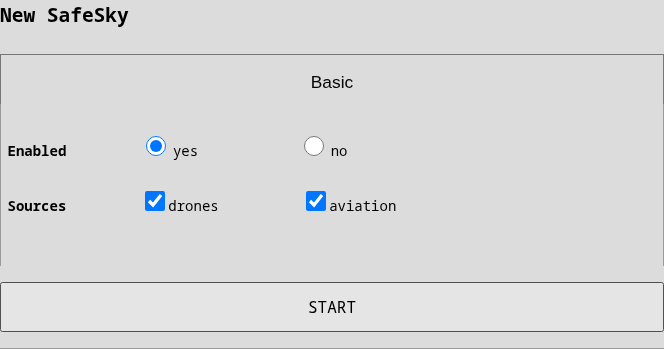
- In Scout's UI, head to Forwarding, add the SafeSky integration and press Start.
- In Sources, keep
dronesand (un)checkaviationdepending on whether you want the surrounding air traffic received by your Scout to be shared as well.
Expert mode additionally reveals the API Key and URL fields for using your own SafeSky key or a different environment; the stored key is only ever displayed masked.
Upon saving, the integration verifies the key by reading back the surrounding traffic and switches to the "AUTHENTICATED" state. Detections should then appear in the SafeSky app within seconds.
SafeSky Data
Every detection is published as a SafeSky beacon, batched once per second, and each aircraft is updated at most once per second.
Drones
A drone detected via RemoteID appears in SafeSky with the UAV beacon type, identified by its serial
number (CTA-2063-A) - or by the RemoteID transmitter address when no serial is broadcast.
The drone's position, altitude, speed, course, vertical rate and airborne/grounded status are forwarded when available. The call-sign is the drone's SelfID text (reduced to letters and digits, which is what SafeSky accepts); a drone that broadcasts no SelfID gets the tail of its serial number instead. The altitude is the drone's geodetic (GPS) altitude converted to metres above mean sea level with the onboard EGM96 geoid model, exactly as SafeSky expects; the barometric (pressure) altitude is only a fallback since it drifts with the weather.
Aviation
If your Scout has aviation modules, detected aircraft are published with their real classification - MOTORPLANE, HELICOPTER, GLIDER,
BALLOON and so on - and the receiving technology (ADS-B, OGN, FLARM) as the transponder type, so
they appear correctly on SafeSky maps instead of being shown as drones. The ICAO address identifies the
aircraft and the flight number is forwarded as the call-sign.
Limitations
The SafeSky API has no representation for the receiving sensor itself nor for the drone operator, so unlike TAK or Sapient, this integration sends no Scout heartbeat and no operator position - only the detected aircraft are shared.
BEAST (raw ADS-B stream)

BEAST forwards the raw binary ADS-B stream produced by the Scout's aviation receiver to your own server.
Unlike the other integrations, nothing is decoded or converted on the way - your server receives the exact BEAST
frames coming from the receiver, so you can feed any standard ADS-B consumer such as readsb, dump1090's
--net-ri-port, Virtual Radar Server, or a feeder of an aggregator network.
The BEAST integration is only offered on Scouts that have an aviation module installed. If you don't see it in the catalogue of integrations, your Scout has no aviation module provisioned.
Basic settings
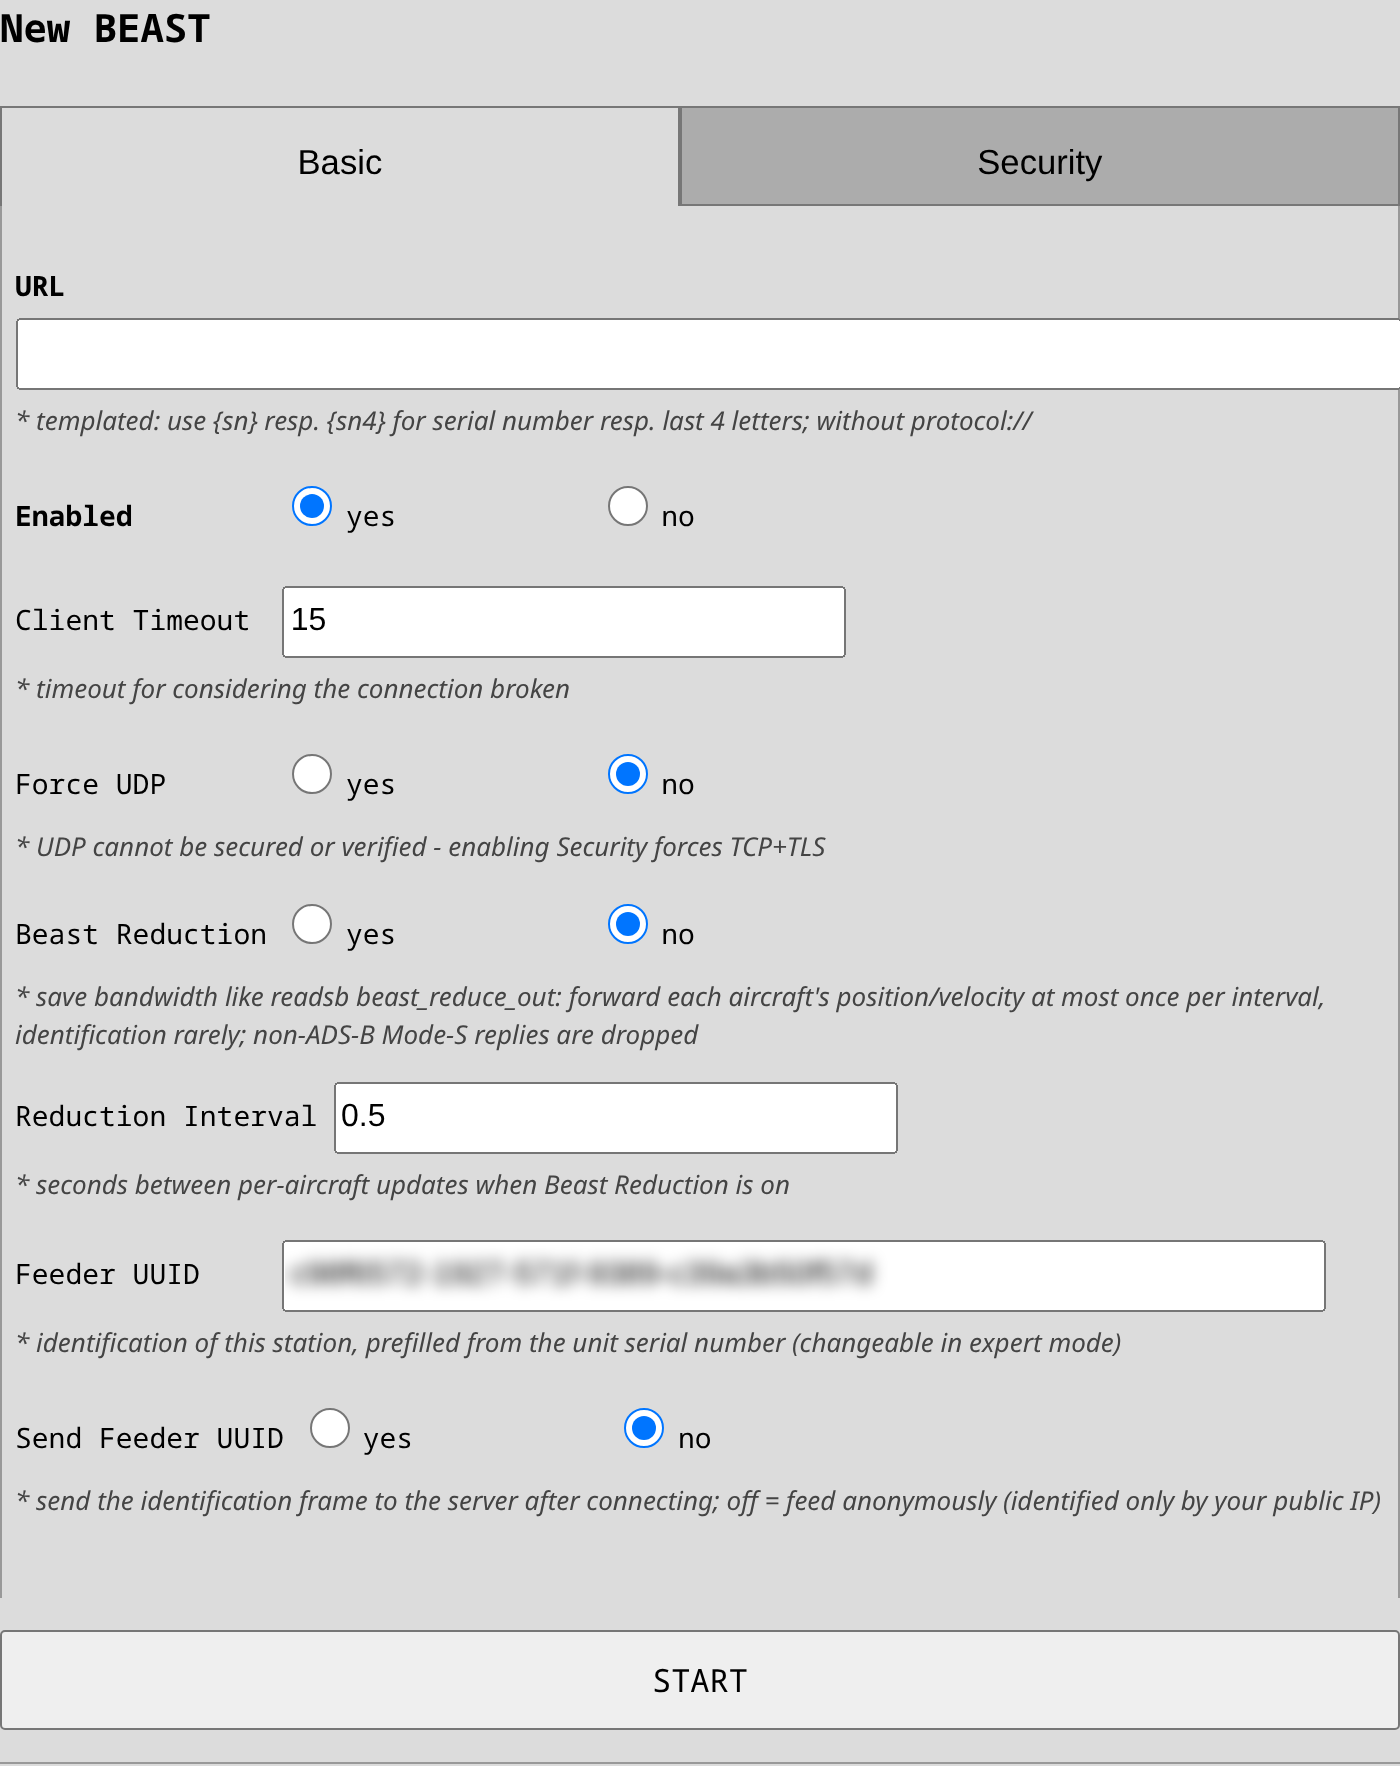
URL: host or IP of your server. If you don't specify a port, the ADS-B standard port 30005 is used.
Force UDP: sends the frames as UDP datagrams instead of a TCP connection. Every datagram carries only whole BEAST frames. UDP cannot be secured nor verified (connection failure will never be reported).
Beast Reduction: saves bandwidth the way readsb's beast_reduce_out does - each aircraft's position and
velocity are forwarded at most once per interval (0.5 s by default, changeable in expert mode via
Reduction Interval) and identification messages only rarely. Trade-off: because the relay does not fully
decode Mode-S, replies whose aircraft address is not in the clear (non-ADS-B surveillance and Comm-B replies)
are dropped entirely in reduced mode - leave the reduction off if your server should track Mode-S-only targets.
Feeder UUID: identification of this station, prefilled with a UUID deterministically derived from the unit's serial number (editable in expert mode). It is only transmitted when Send Feeder UUID is enabled - with the switch off you feed anonymously: data is identified only by your public IP.
Security settings
Enabling Security forces TCP and wraps the connection in TLS, overriding "Force UDP". Server verification and client certificates work exactly as described in the TAK security section - use "Server CA Certificate" for a private CA and "Client Certificate" + "Client Private Key" if your server requires mutual TLS.
Data
The relay is a live feed: when your server is unreachable or too slow, frames are dropped (always whole frames, so the stream stays decodable) and forwarding resumes automatically once the connection recovers. Nothing is buffered or replayed. The stream also pauses briefly whenever the receiver restarts, for example after a GNSS position change.
The global Aviation limits (tracking/ignore radius and altitude on the Sensors page) do not apply here: the relay forwards the raw, undecoded BEAST stream, which carries no positions to filter on. Every frame the receiver hears goes to your server regardless of distance or altitude.
ADSBExchange

This integration feeds ADS-B Exchange with the raw BEAST stream from your Scout's aviation module - no ADS-B Exchange feeder software is needed on the Scout. It is a preconfigured variant of the BEAST integration, so everything described in the BEAST tab (live feed, whole-frame delivery, automatic reconnects) applies here too.
Like BEAST, this integration is only offered on Scouts that have an aviation module installed.
Basic settings
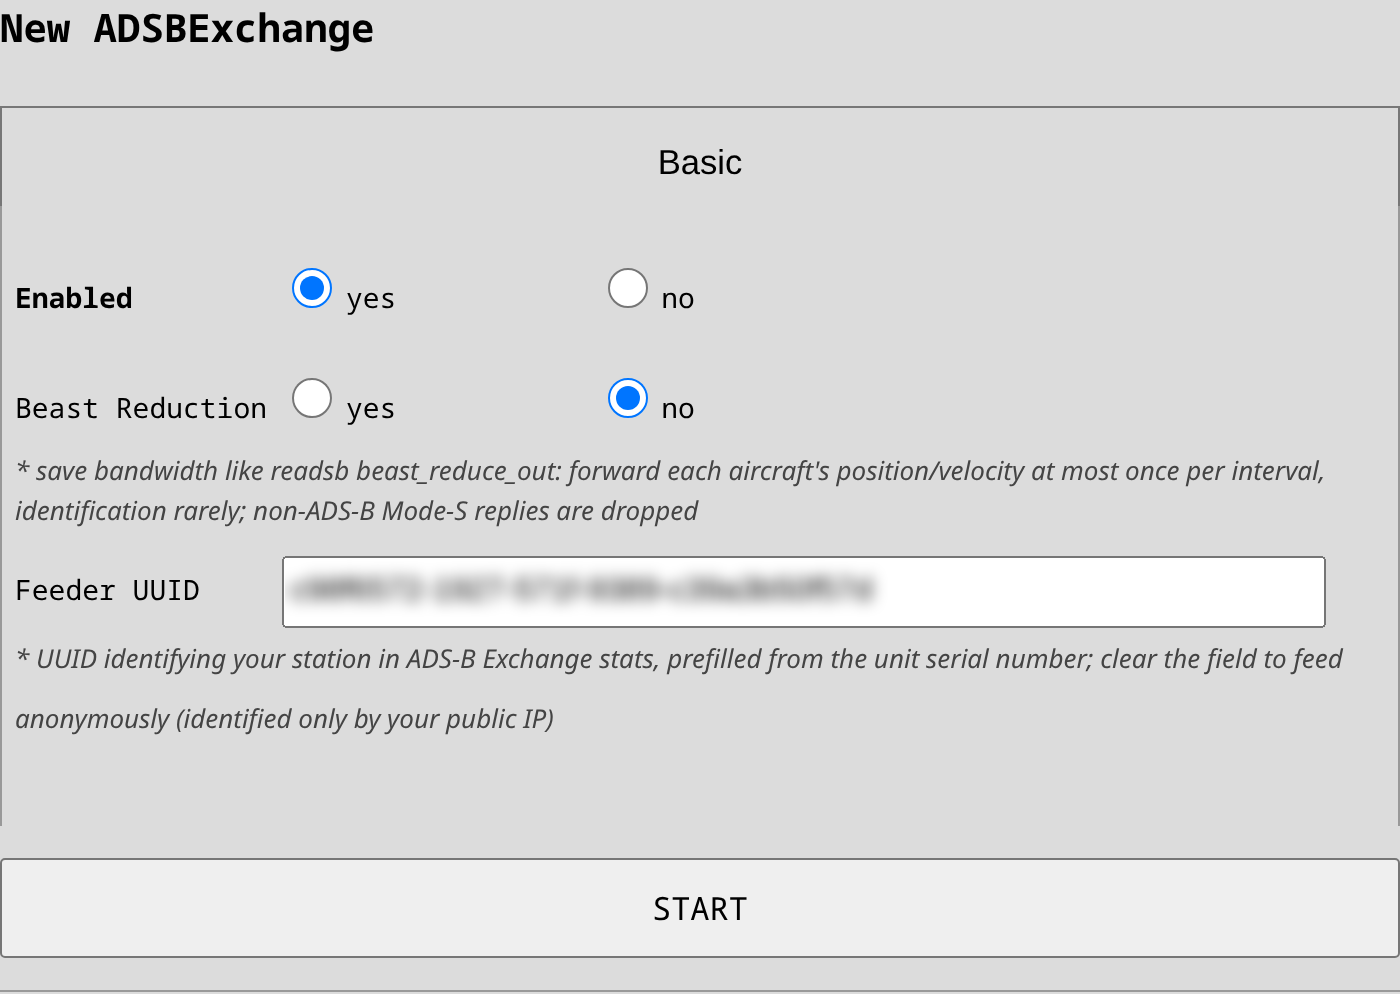
URL: prefilled with the ADS-B Exchange ingest server (feed1.adsbexchange.com:30004). It is only
changeable in expert mode and you should not need to touch it unless ADS-B Exchange announces a different
ingest host.
Beast Reduction: works here as well - ADS-B Exchange's own feed client reduces with the same 0.5 s interval by default, so enabling it is a safe way to save upstream bandwidth (see the BEAST tab for the Mode-S-only trade-off).
Feeder UUID: identifies your station at ADS-B Exchange and is always transmitted here. It comes prefilled with a UUID deterministically derived from the unit's serial number, so it stays stable across reinstalls; it is editable in expert mode. If you clear the field, you are feeding anonymously - the data is still contributed, but the station is identified only by its public IP address (you can check it at adsbexchange.com/myip).
Linking the feeder to your ADS-B Exchange account
Link your Scout by its Feeder UUID, not by IP: a Scout on an LTE uplink sits behind carrier-grade NAT,
so its public IP address is shared with other customers and changes over time - IP-based matching (the
/myip/ page) is unreliable there. The UUID travels inside the feed itself and identifies the station
regardless of the network.
- Copy the Feeder UUID from the integration settings.
- Sign in (or sign up) at account.adsbexchange.com and open the Receivers page.
- Paste the UUID into the Feed UID field of Link your receiver (optionally enable the "Device Down" notification) and press LINK RECEIVER.
- The receiver appears in Linked receivers and counts as active once it has been connected to their network within the past 24 hours; an active receiver also grants the account ad-free access to their map.
There is no registration step on the Scout itself - the UUID is the identity. The integration status
also shows the matching Feeder ShortID (ADS-B Exchange's short code derived from the UUID) together
with your personal map link globe.adsbexchange.com/?feed=<ShortID> where you can watch the traffic your
Scout contributes.
What is and isn't fed
The Scout relays the complete ADS-B BEAST stream (positions, identification, velocities including the
receiver timestamps) - like BEAST, unfiltered by the global Aviation limits, which cannot apply to the
raw undecoded stream and also uploads the decoder statistics the same way the official
adsbexchange-stats package does, so your per-UUID stats page and their map coverage work without any
ADS-B Exchange software on the Scout. MLAT is not supported - it requires ADS-B Exchange's own
mlat-client and a different protocol. ADS-B Exchange accepts ADS-B-only feeds without MLAT.
OGN (Open Glider Network)

The Open Glider Network (OGN) is a community network of ground receivers tracking gliders and other light aircraft equipped with OGN-compatible trackers. A Scout with an aviation module already receives this traffic for its own detections; with this integration enabled, the Scout additionally relays everything it receives up to the public OGN network (APRS-IS), acting as a regular OGN receiver station and contributing to the network's coverage in your area.
This integration is only shown on Scouts equipped with an aviation module - without one there is no OGN traffic to contribute. No additional license is needed.
Privacy
Unlike the other integrations, which push data to a server of your choice, OGN is a public network: everything your Scout relays becomes publicly visible, e.g. on live tracking sites such as OGN Live. The integration is therefore disabled by default and must be explicitly enabled per device.
Configuration
- In Scout's UI, head to Forwarding and add the OGN integration.
- Callsign: the station name under which your Scout appears in the OGN network (max 9 characters). It defaults to the first 9 characters of your Scout's serial number - only change it if you want a specific station name (e.g. an airfield ID).
- Keep URL at the default
aprs.glidernet.orgunless you run your own APRS-IS server.
The station position is taken automatically from the Scout's GNSS receiver - there is nothing to configure.
OGN Data
The relay is transparent: the aviation beacons received by the aviation module are forwarded to the OGN network verbatim, together with the receiver status and position beacons, so your Scout appears in OGN as a standard receiver station under your configured callsign. Drone detections (RemoteID) are never sent to OGN.
DJI O4 Ground Station
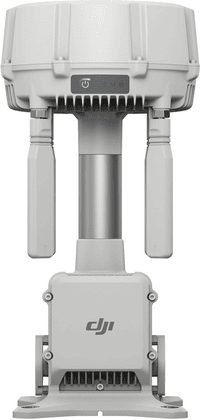
The DJI O4 Ground Station can show the drones your Scout detects. The Scout connects to the station over the DJI Edge SDK (ESDK V2), and the station forwards the detections to DJI FlightHub 2, where they appear as airspace alerts next to your own aircraft.
Before you start
You need three things:
- An Edge SDK application registered on the DJI Developer Center. The next section describes how to create it.
- The ground station activated and in Gateway Mode. Activate it over USB-C with the DJI Enterprise app. Press the power button three times to switch modes - the mode indicator is purple in Gateway Mode and blue in Relay Mode, which has no cloud connection.
- The station joined to a FlightHub 2 project. Airspace alerts live inside a project. A station that shows "No project joined" ingests the data but draws nothing on the map.
The station accepts third-party receivers only from a recent firmware. On an older firmware the broker is simply not there: nothing listens on port 1883, the station sends no discovery broadcast, and the Scout reports that it found no ground station. Update the station in the DJI Enterprise app before you start, and give it a moment to restart afterwards.
The ground station is the MQTT broker, not a client. The Scout connects to the station, so neither the Dronetag cloud nor the DJI cloud sits in this path. Detections travel from the Scout to the station on your own network, and only the station talks to FlightHub 2.
Registering the Edge SDK application
The Scout identifies itself to the ground station with the credentials of an Edge SDK application. Create the application once on the DJI Developer Center. One application can serve more than one Scout.
Open Developer Center -> Apps and press CREATE APP. Set App Type to Edge SDK first. The form then drops Software Platform and Package Name, which only a Mobile SDK application needs, and asks for three values:
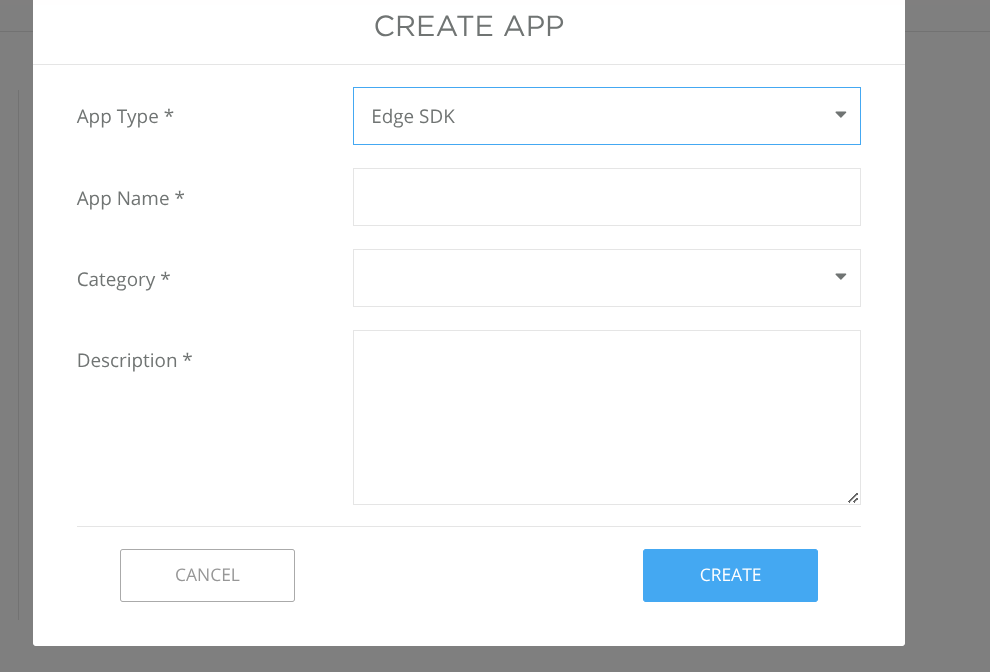
App Name: your own name for the application. It does not affect the connection.
Category: the closest match from the list. Remote ID describes this use.
Description: free text.
App Type must be Edge SDK. A Cloud API or Mobile SDK application issues a different kind of credential, and the ground station rejects it.
DJI then sends an activation e-mail. Confirm it before you go on, because the license stays empty until you do.
Open the application again to read its credentials. The App Information page holds the three values that the Scout needs:
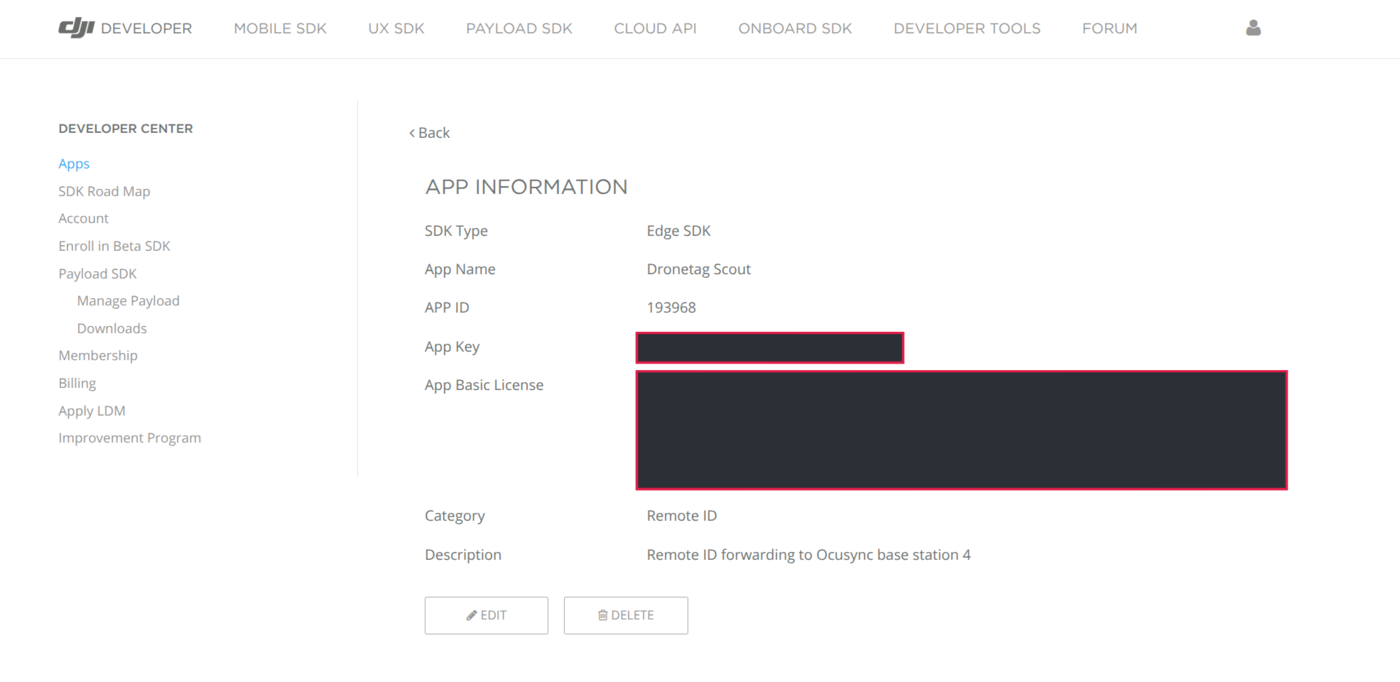
- APP ID - a short number.
- App Key - a hexadecimal string.
- App Basic License - a long block of base64 text. Copy all of it, up to the final
==.
Keep this page open. You paste the three values into the Scout form in the next section but one.
The App Key and the App Basic License are secrets, and this page is the only place that shows them. Anyone who holds them can act as your application. Do not paste them into a support ticket, and hide them in any screenshot you share. The two values are masked in the image above for that reason.
Connecting the Scout
Put the Scout on the same network as the ground station. Connect the station with its WAN port (the left network port), which is the port that also carries its connection to FlightHub 2, and give the Scout an address on that same network.
You do not need to look the station up. It announces itself on the network about every ten seconds, and the Scout listens for that announcement, so the broker address stays empty in the form. The Scout remembers the last address it heard, so it still reconnects after a restart while the station is switched off.
The station's LAN port is not used for this. It serves the station's own downstream equipment, and a Scout connected there sits on a separate network from the rest of your fleet.
Configuration
The Scout listens for the station's broadcast, so it knows when a ground station is on the network. When it finds one that is not configured yet, the Forwarding page offers it:

Until a station answers, the integration stays greyed out in the list of integrations, with the reason shown:

Press Configure, or add the integration by hand. The form has two tabs. The Basic tab holds the connection and what to send:
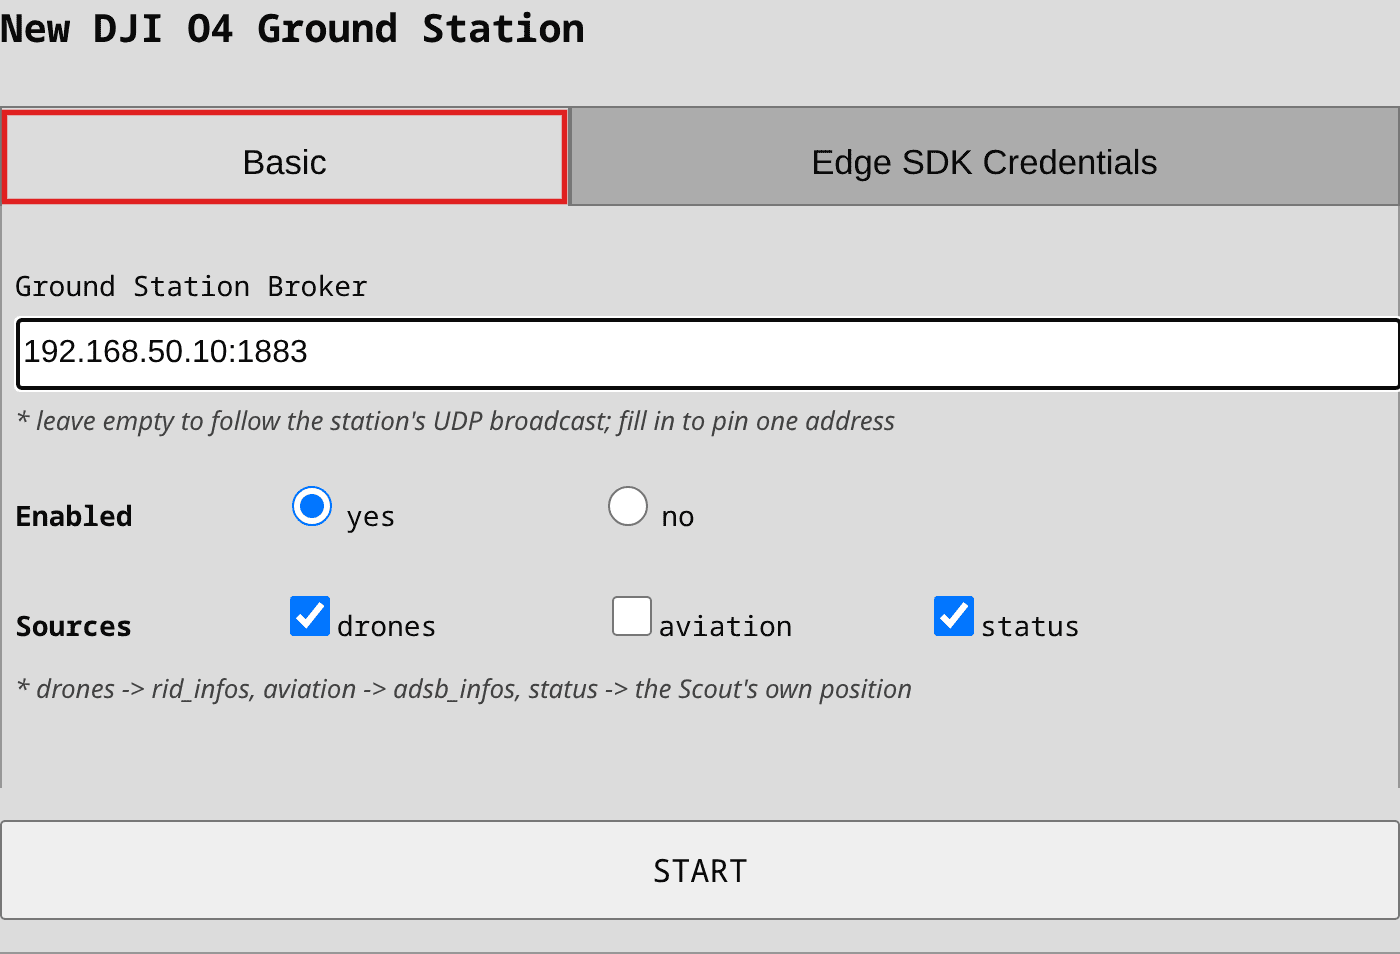
Ground Station Broker: leave it empty. The Scout then follows the station's announcement and
keeps working when the router gives the station a different address. Fill it in only to pin one
address, as host:1883, when the announcement cannot reach the Scout.
Sources: drones sends the Remote ID detections, aviation sends the surrounding air traffic
from the aviation modules, and status supplies the Scout's own position. Keep status - FlightHub
centres the alert circle on it. The aviation option only appears on a Scout with an aviation module.
The Edge SDK Credentials tab holds what identifies this Scout to the station:
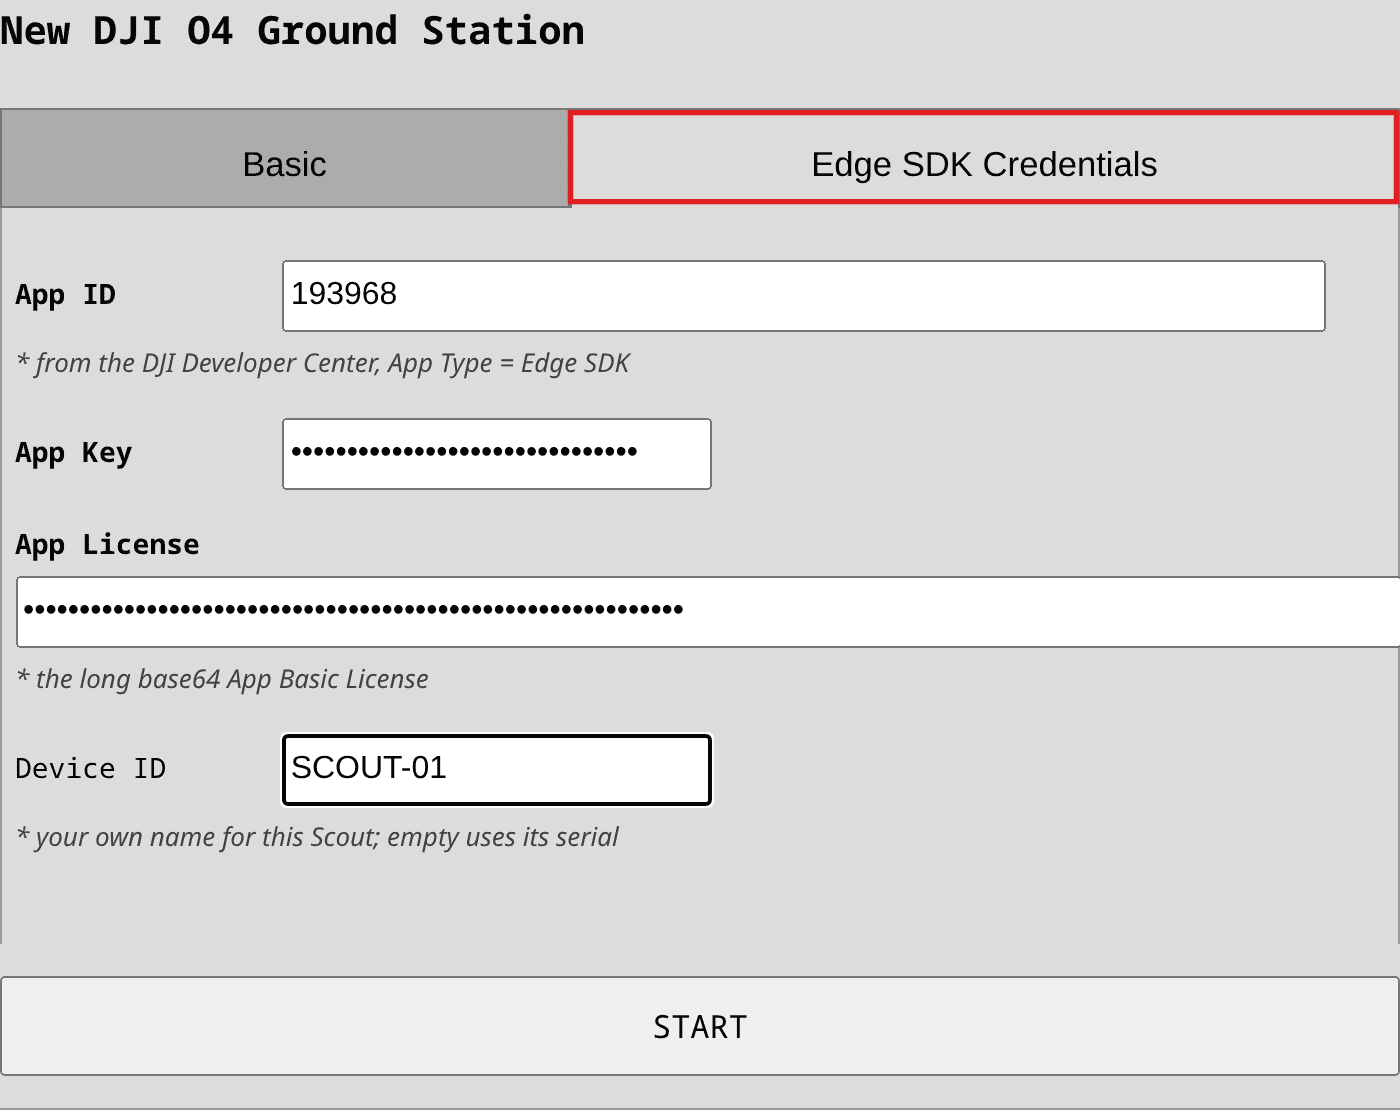
App ID, App Key, App License: copy them from the App Information page of your Edge SDK application. The key and the license are stored masked and never shown again.
Device ID: your own name for this Scout. Leave it empty to use the Scout's serial number. It becomes part of the identity the station authenticates, together with the App ID.
Press Start. The Scout declares what it can deliver and waits for the station to accept it. The tile switches to "AUTHENTICATED" once the station answers. A refusal is shown on the tile with the reason the station gave.
Enabling the alerts in FlightHub 2
Open your FlightHub 2 project and go to Airspace Safety -> Airspace Alert. Turn on DJI O4 Ground Station, then choose which Detection Types to show and set the Alert Distance Threshold:
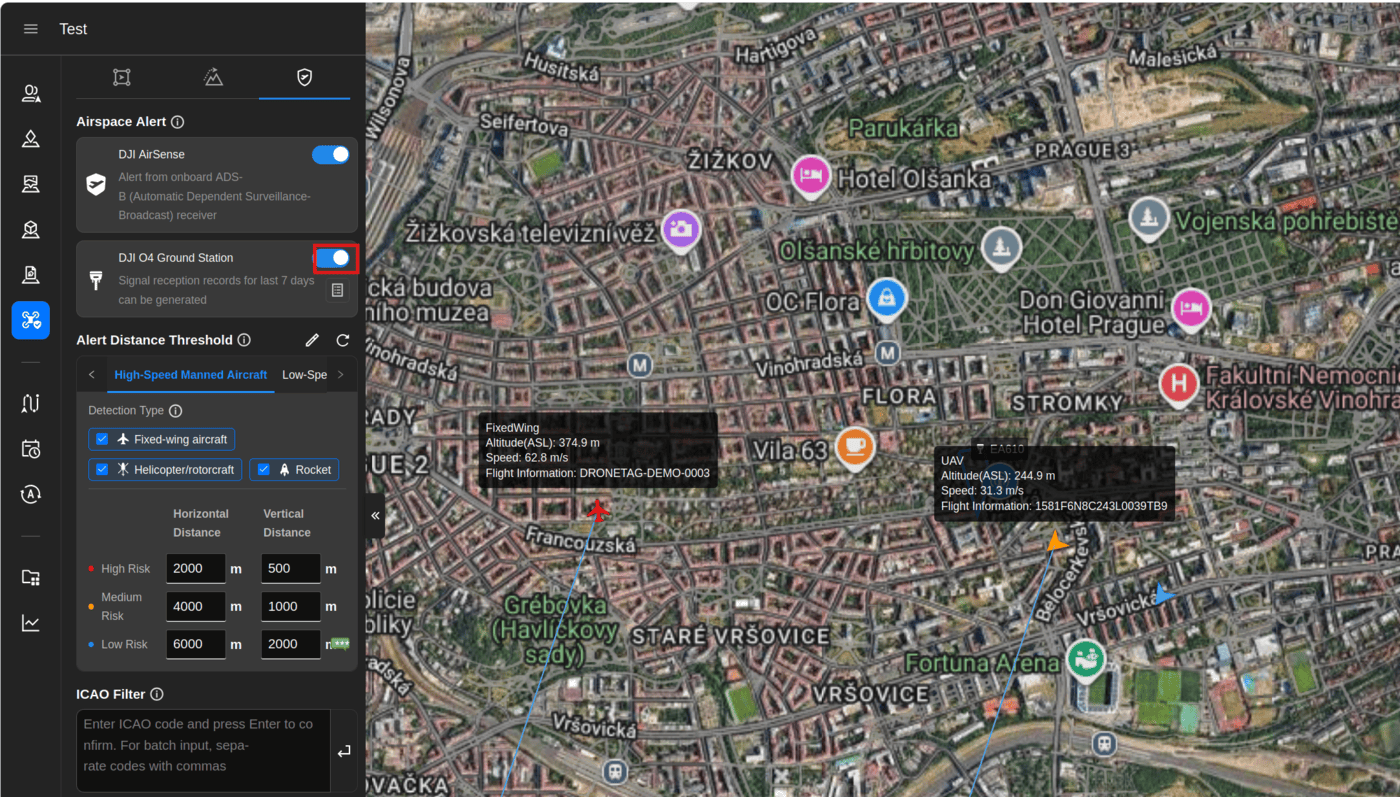
FlightHub draws a circle and shows every target inside it. The centre is the Scout's own position
(the status source), and the radius is the alert distance threshold. A detection outside the
threshold, either horizontally or vertically, is not drawn.
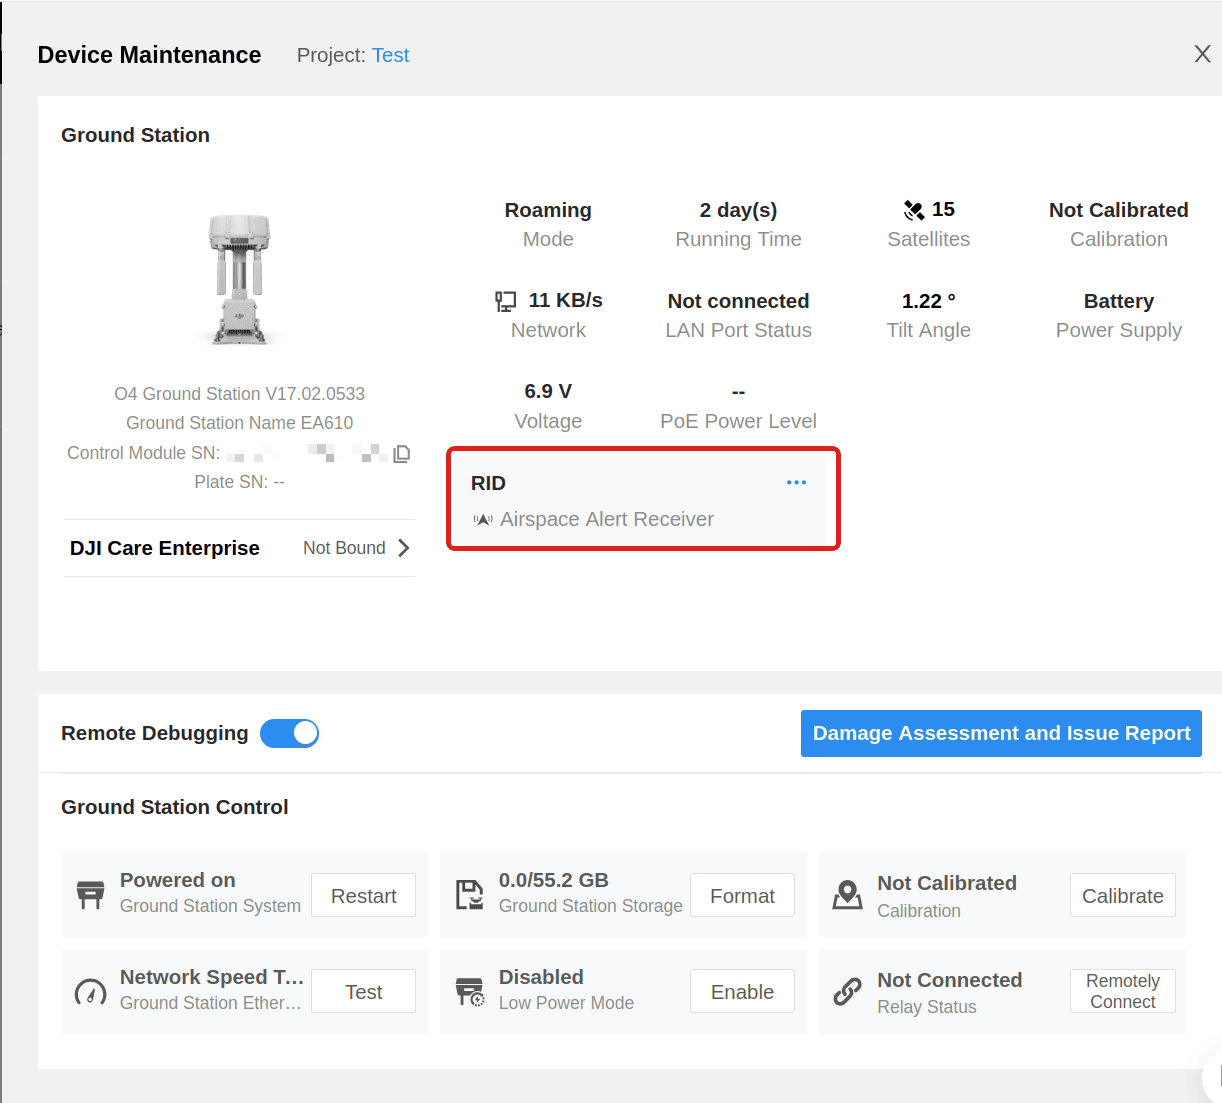
You can confirm the link on the Device Maintenance page, where the Scout appears under the ground station as an Airspace Alert Receiver:
DJI Data
The Scout collects the detections and reports them every two seconds, as DJI requires. Drones and aviation travel on separate reports, each on its own two-second cycle. A drone heard several times inside one cycle is reported once, with its newest position.
Drones
Each drone is reported with its Remote ID serial number, its position, its geodetic and barometric altitude, its height above the take-off point, its course, its horizontal and vertical speed, its flight status and the signal strength the Scout measured. The operator position is included when the drone broadcasts it. FlightHub shows the serial number as "Flight Information".
Aviation
With aviation enabled, aircraft received by the aviation modules are reported with their ICAO
address, call sign, altitude, position, ground speed, heading and vertical rate.
Every DJI drone already carries AirSense, which receives manned ADS-B traffic on its own. The aviation feed is therefore optional, and it is switched off by default. Remote ID is the part AirSense cannot deliver.
Troubleshooting
The integration stays greyed out. No ground station answered. Check that the Scout and the station are on the same network, that the station is activated and in Gateway Mode, and that its firmware is up to date. A switch that does not forward broadcasts also hides the station - in that case fill the station's address into Ground Station Broker by hand.
The tile shows a refusal. The station rejects a report it cannot read and names the field it objected to. The reason is shown on the tile.
FlightHub shows nothing although the tile says AUTHENTICATED. The data reaches the station but has nowhere to be drawn. Confirm in this order:
- The station is joined to a FlightHub 2 project.
- DJI O4 Ground Station is enabled under Airspace Safety -> Airspace Alert.
- The Detection Type includes the kind of aircraft you expect to see.
- The Alert Distance Threshold is large enough, vertically as well as horizontally.
Skydio

Skydio DFR Command is a Drone as First Responder platform. With this integration, Scout pushes its detections into Skydio Cloud as Markers, so drones and aircraft detected by your Scout appear live on the map view of Remote Flight Deck - the same way Skydio displays Axon Dedrone or gunshot-detection feeds.
Rich drone markers use Skydio's UAS detection marker type, which carries the drone's position, the pilot position and the manufacturer/model fields. That marker type is a Skydio feature that must be enabled for your organization by Skydio - contact Skydio support to turn it on. Until it is enabled, Scout automatically falls back to plain incident markers (the detection still appears on the map, with the details in the marker description), and the integration tile shows a note that UAS detection is not enabled.
Getting an API token
The integration authenticates with a Skydio Cloud API token. There are two ways to get one. The integration panel is the quicker way, and it sets the permissions for you. Create the token by hand only if your Skydio Cloud does not list the integration yet.
- Predefined integration
- Creating the token by hand
Skydio Cloud ships a ready-made Dronetag Scout integration. It fills in the name, the group and the permissions, so you only confirm it.
-
Open Skydio Cloud and select Integrations in the left menu. Only users with the Organization Admin cloud role can add an integration.
-
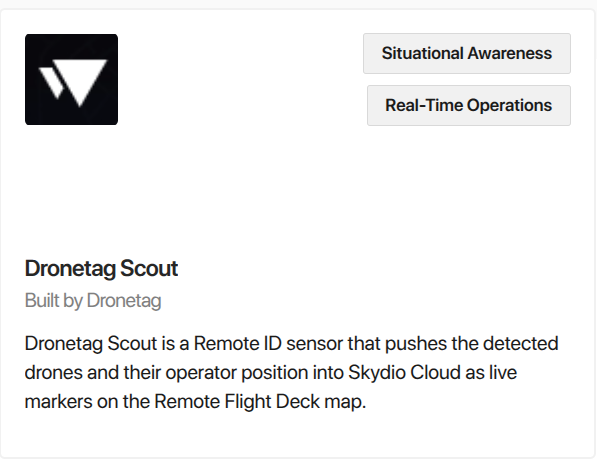
Stay on the Available tab and find the Dronetag Scout card, built by Dronetag. The cards are in alphabetical order, so it sits between DroneSense Live Streaming and Enforsys:
-
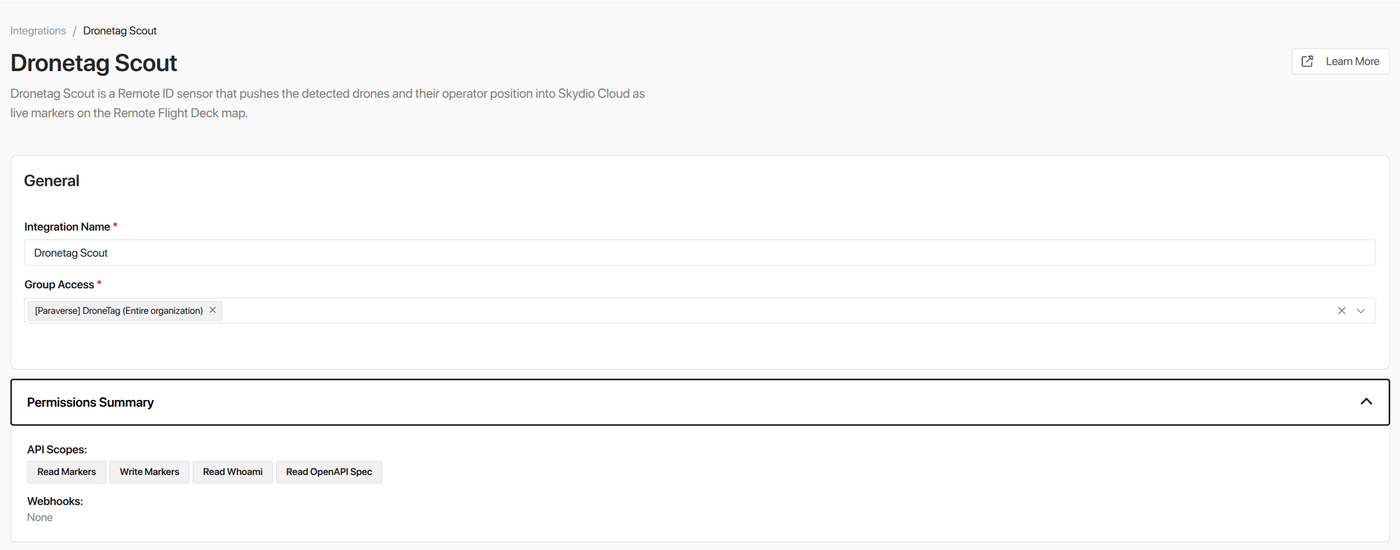
Select the card. The panel opens with Integration Name and Group Access already filled in:
-
Keep Group Access at your entire organization, unless you restrict Skydio access by group.
-
Expand Permissions Summary to see what the token will carry. The panel requests the API scopes
Read Markers,Write Markers,Read WhoamiandRead OpenAPI Spec, and no webhooks. These are the same rights as the manual token in the other tab, so you do not set them yourself. -
Select Configure. Skydio creates the integration and issues its API token. Copy the token into the Scout, as Configuration below describes.
The integration then moves to the Configured tab. Open it there at any time to read its Token ID, to change the group access, or to remove the integration again.
Use this route if your Skydio Cloud has no Dronetag Scout card. Follow the steps from Skydio's API Authentication guide:
-
Open Skydio Cloud and sign in. Note that only users with the Organization Admin cloud role can create API tokens.
-
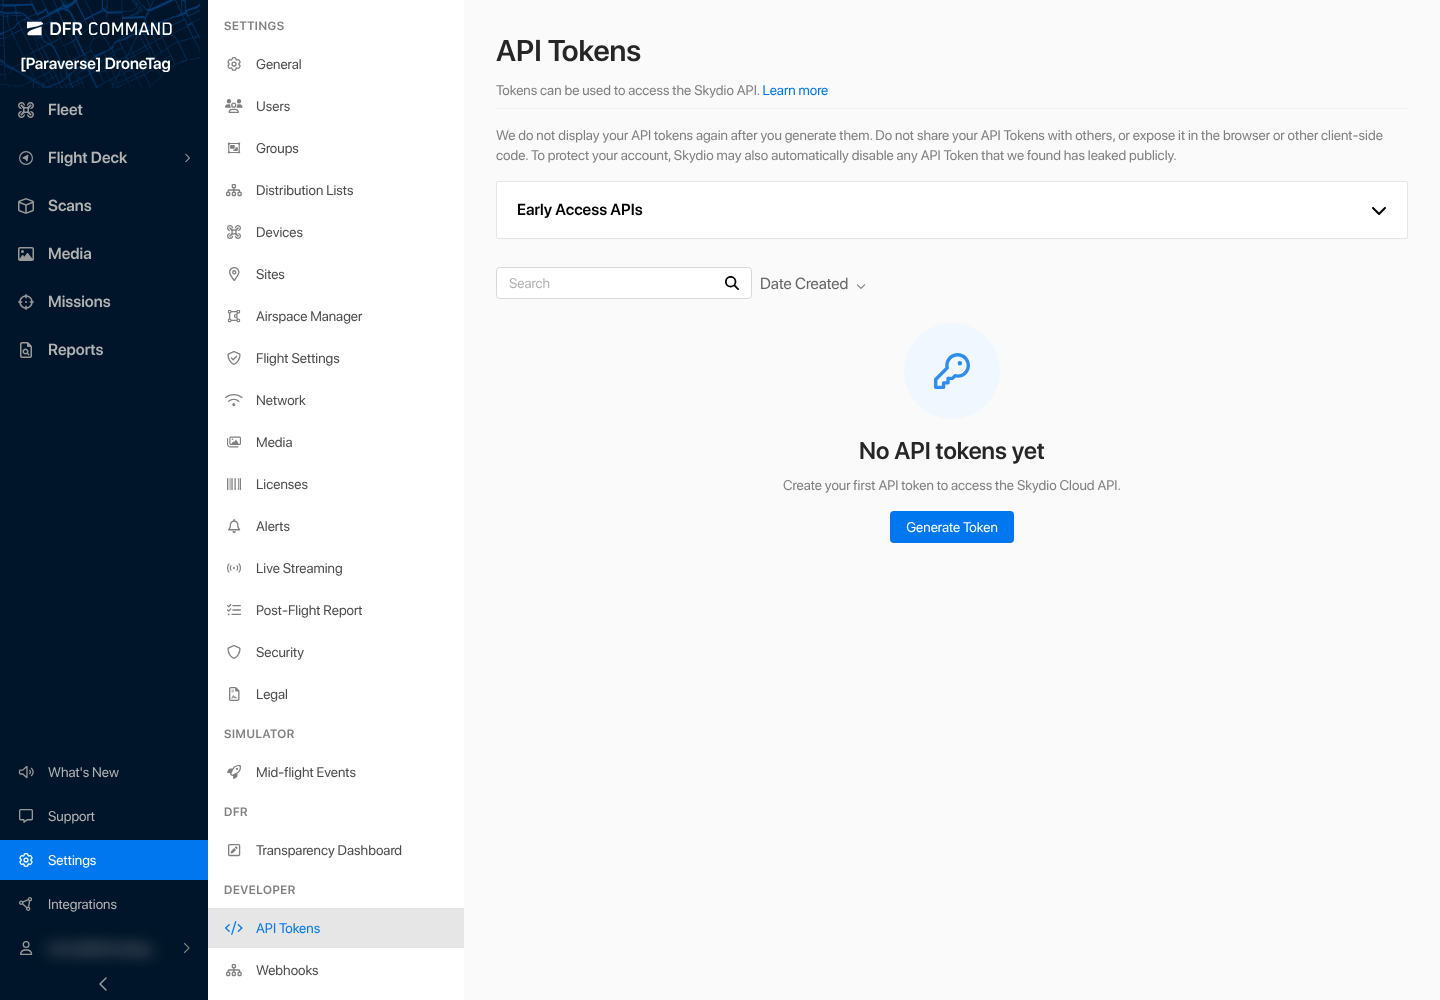
Go to Settings, then API Tokens under the Developer section, and select Generate Token.
-
Give the token a Token Name (e.g.
Dronetag Scout). Leave Groups at its default of your entire organization unless you restrict Skydio access by group. -
Under Permissions, set Markers to Read and write (this integration creates, moves and deletes markers) and Whoami to Read-only so the token can identify itself. Leave every other permission at No access.

-
Select Generate, then copy your token and store it in a safe place. Skydio hides it permanently after the page refreshes or your login session expires. Keep it secret - it grants access to your organization's data in Skydio Cloud - and per Skydio's guidance, do not reuse the same token for multiple integrations.
Configuration
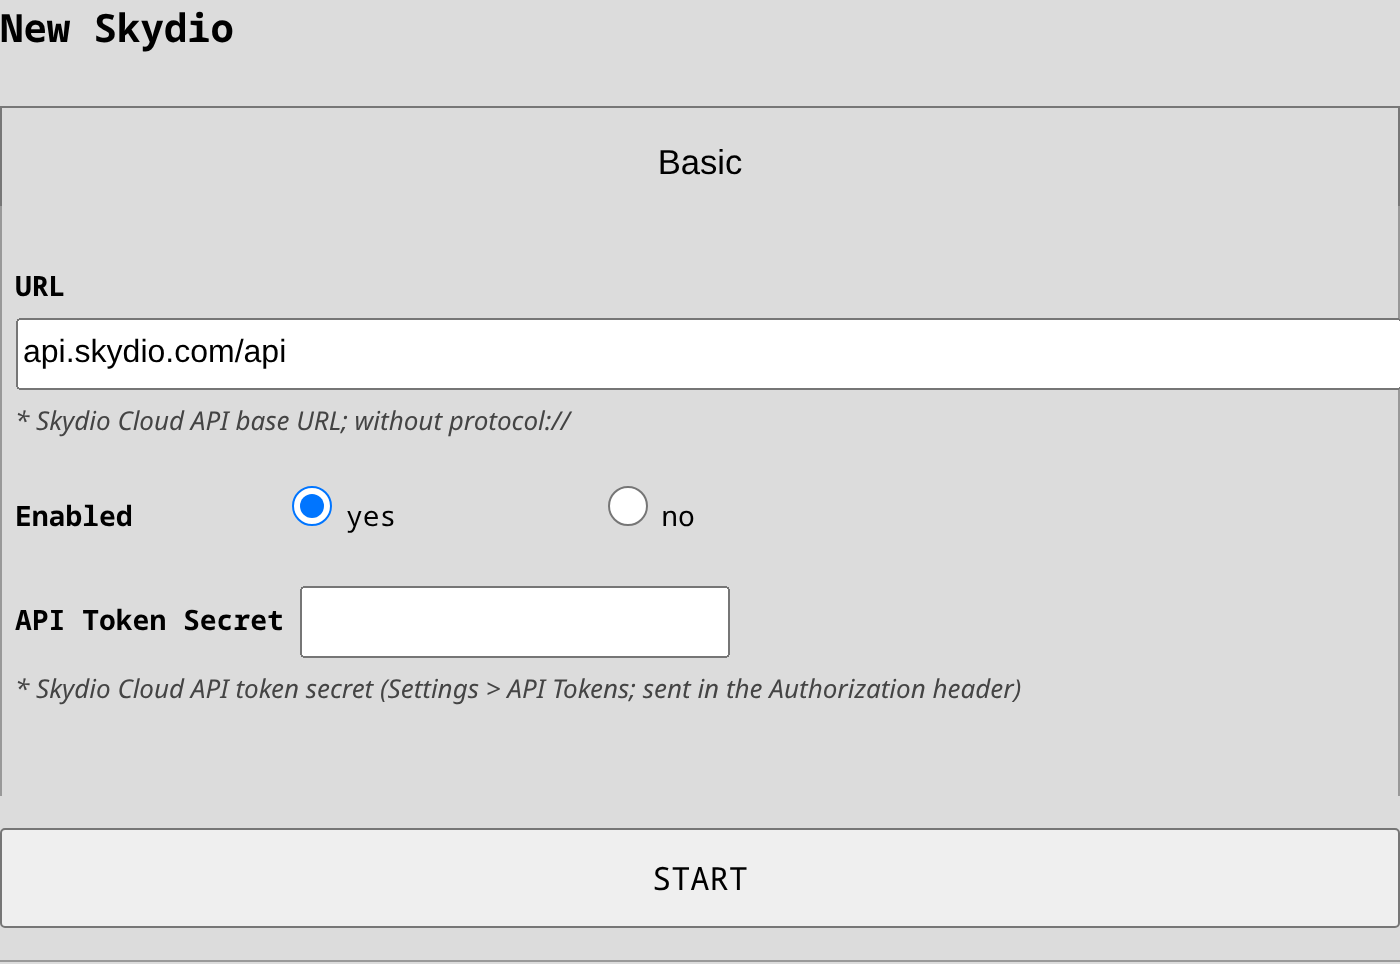
- In Scout's UI, head to Forwarding and add the Skydio integration.
- Paste the token into the API Token Secret field (Skydio Cloud shows the value under this name).
- Keep URL at the default
api.skydio.com/apiunless Skydio gave you a different environment (e.g. a trial/staging instance). - Drone detections are pushed by default; for most deployments there is nothing more to set. The options
below are advanced and appear only in expert mode:
- In Sources, check
aviationif surrounding air traffic should be pushed as well, and checkstatusif you want to use "Marker for this Scout". - Marker for this Scout (off by default): when enabled together with the
statussource, the Scout itself appears on the DFR map as a marker named "SCOUT-<last-4-digits-of-serial-number>" at its GNSS position.
- In Sources, check
Upon saving, the integration verifies the token with Skydio, shows the organization it is connected to, and switches to the "AUTHENTICATED" state. It then re-checks once a minute, so a later problem - a revoked token or a dropped connection - surfaces within a minute even when no detections are flowing. If the token is rejected, re-check that it was copied whole and that it carries the Markers permission.
Skydio Data
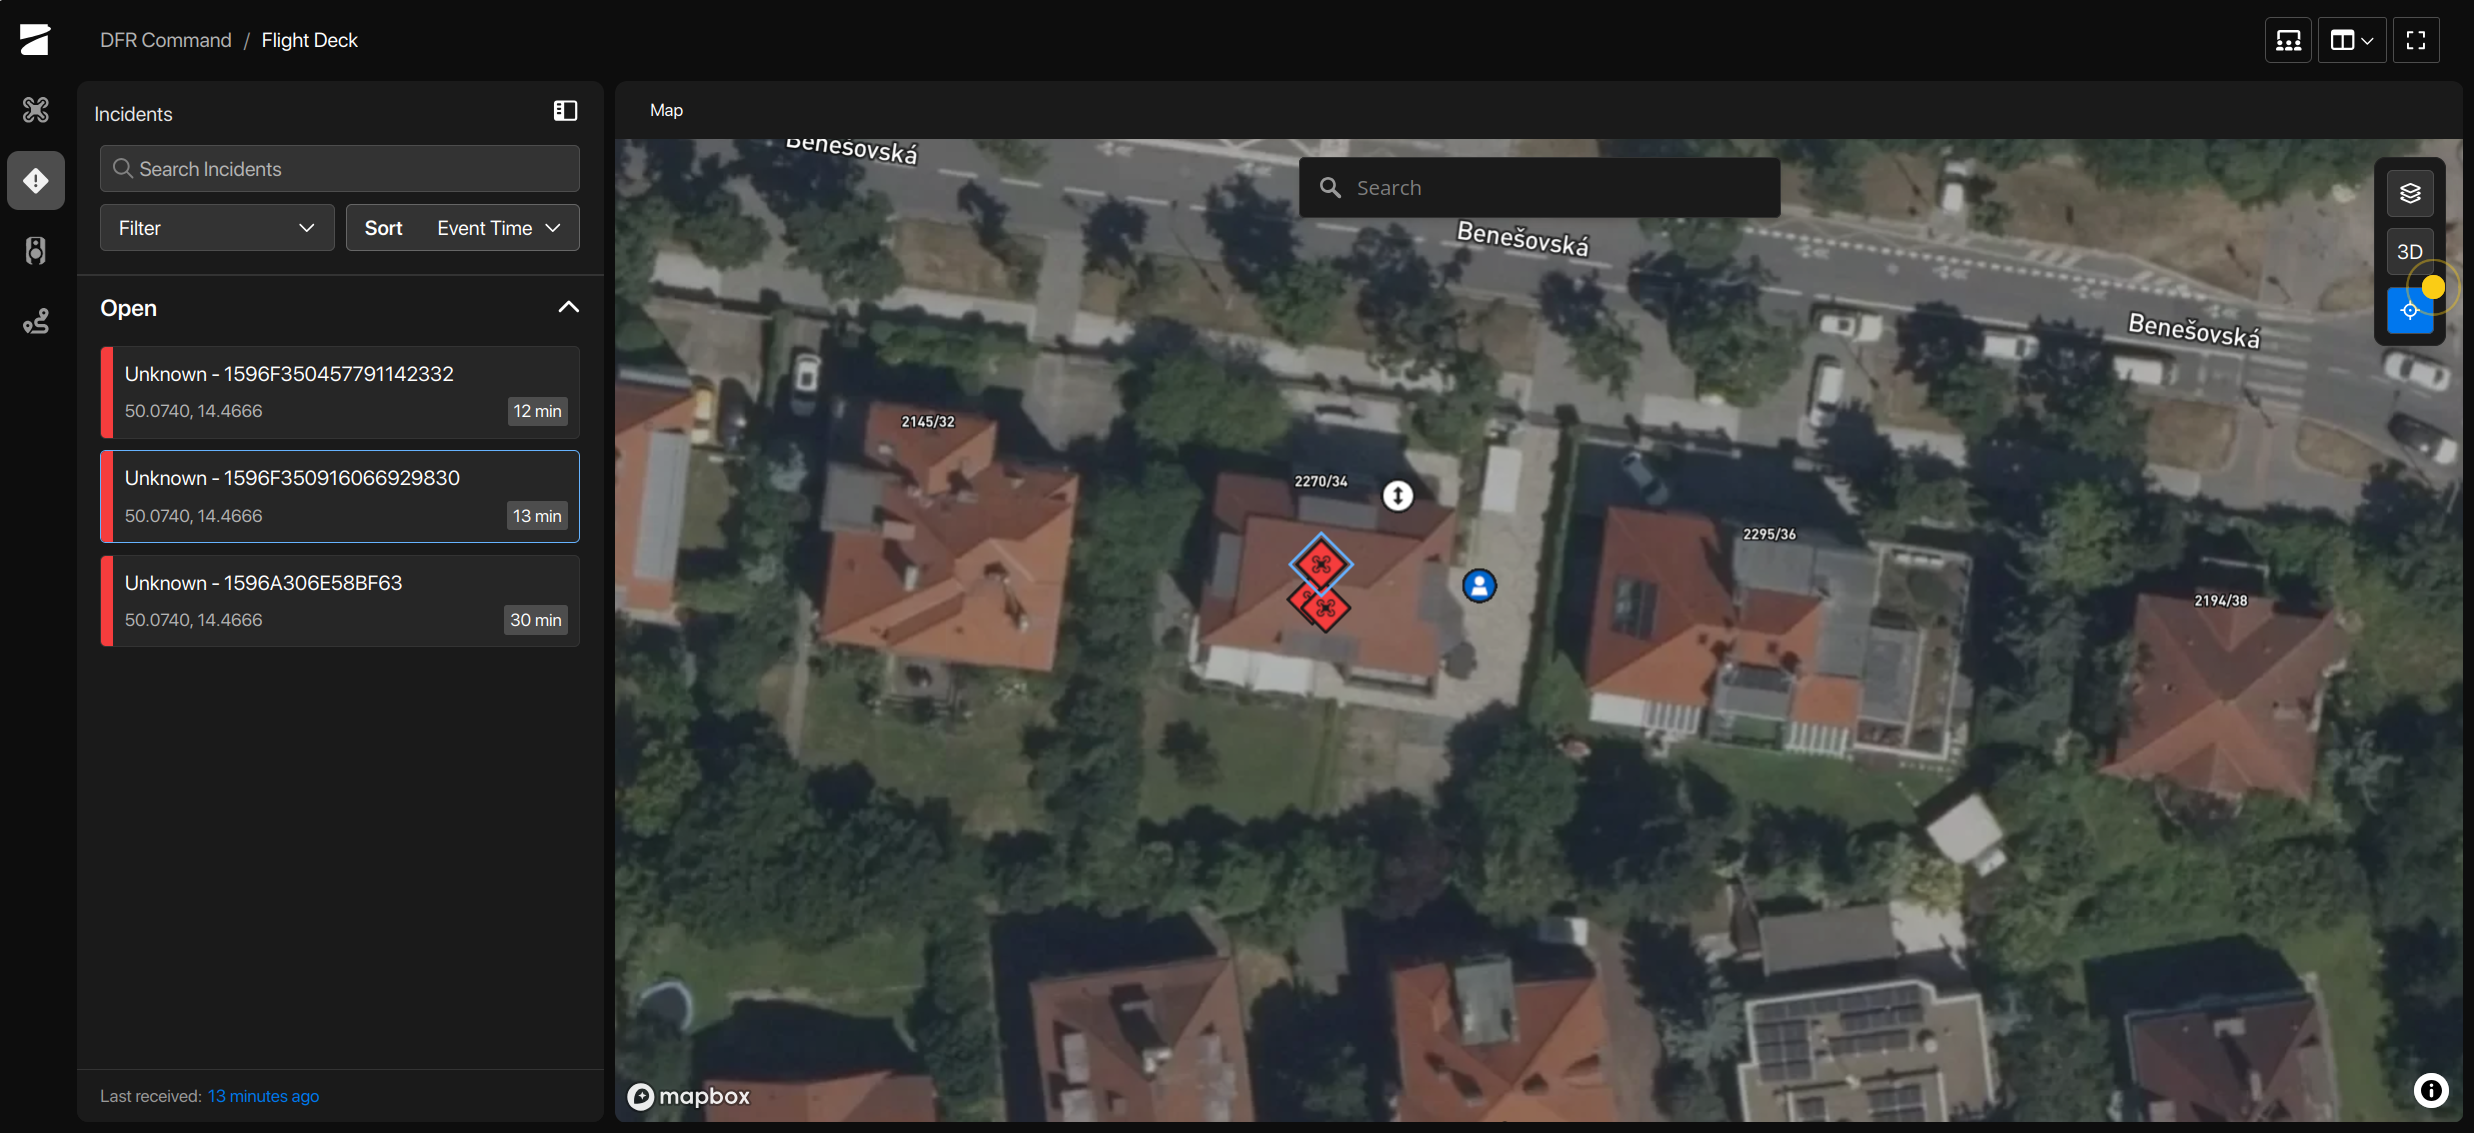
Skydio Markers are persistent objects. Scout creates one marker per detected object and moves it in place as new detections arrive (at most ~5x per second per object, so a spoofed track cannot flood your Skydio Cloud). A drone seen on a later day gets its own marker, so past days are kept rather than overwritten. Scout does not delete markers - they remain on the map and are re-used the next time the same object is seen.
Drones
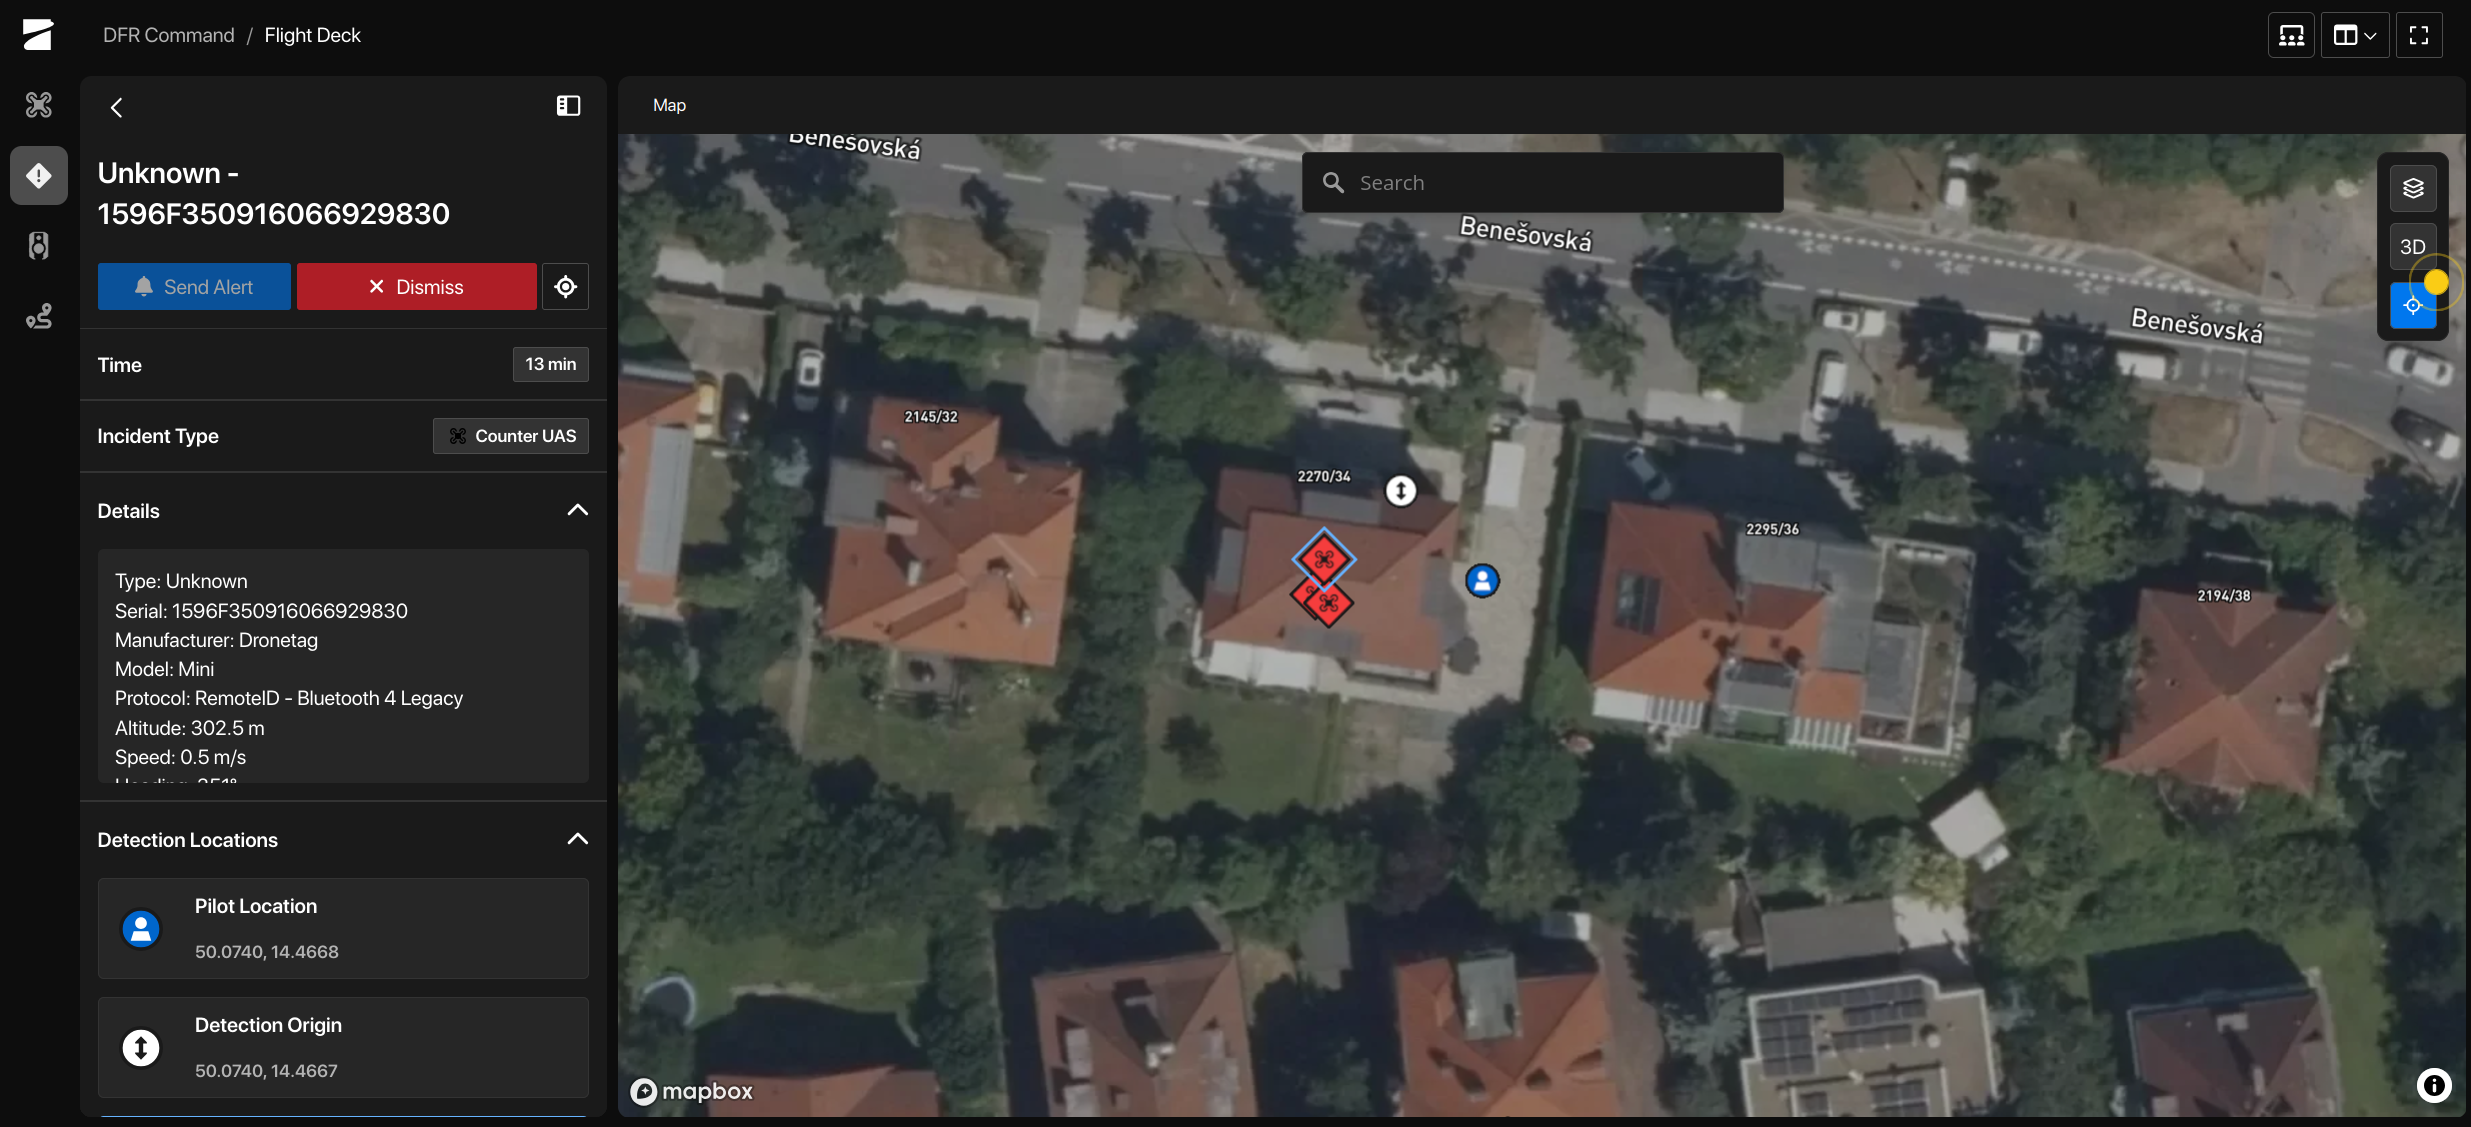
Each drone is pushed as a UAS detection marker titled <type> (Drone) - <serial>, e.g.
Multirotor (Drone) - 1596F319B877381F1BBF. The marker carries the drone's position, altitude, speed and
heading, the RF protocol it was detected on (Bluetooth 4/5, Wi-Fi Beacon/NaN), and the serial number. When
the drone broadcasts its operator's location, the pilot position is included on the same marker - Skydio
shows it as part of the UAS detection, there is no separate operator marker.
If your Scout carries the RID identification database, the manufacturer and model resolved from the serial number (e.g. "Autel Robotics EVO Nano+") are filled into the marker as well.
Status
With "Marker for this Scout" enabled, a single incident marker keyed to the Scout's serial number shows the sensor's own location, altitude and the list of its detection technologies on the DFR map.
GNSS Position of the Scout
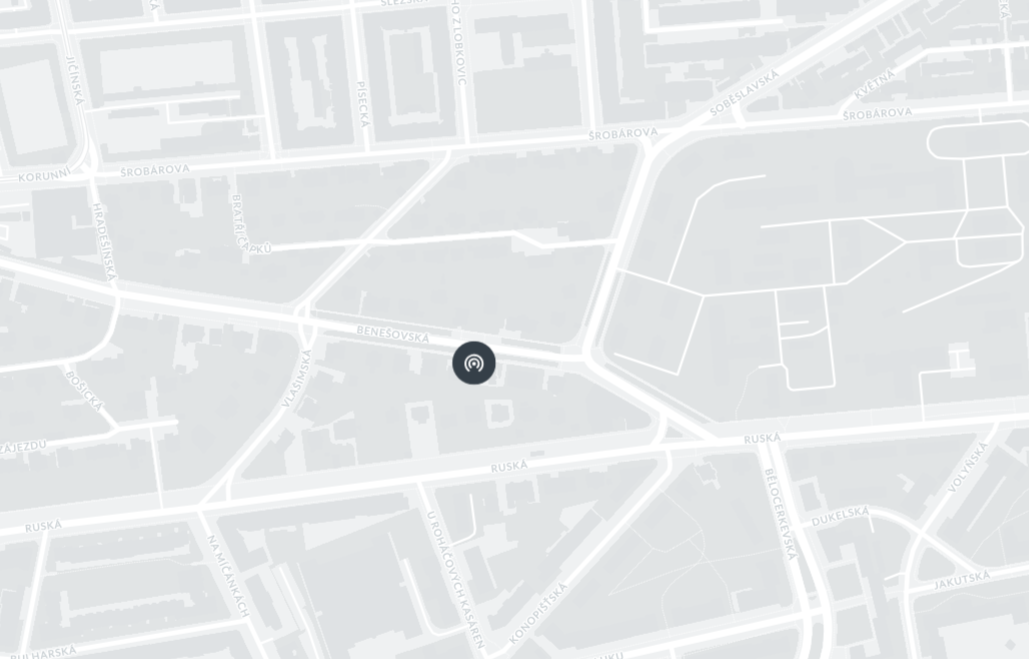
The Dronetag Scout is equipped with a GNSS receiver that enables:
- Visibility on the map within our application
- Time synchronization using the GNSS signal
- Transmission of position data to the server via the network
Privacy Control
All Scouts are delivered with GNSS location enabled by default. However, you can disable GNSS location or enter the location coordinates manually. Turning off GNSS will prevent leaking Scout's location over the network. It will not be visible in Heartbeat/Status messages nor in data. Disabling GNSS will not affect Scout's ability to correct its time using the embedded GNSS module.
Setting GNSS Location and Altitude Manually
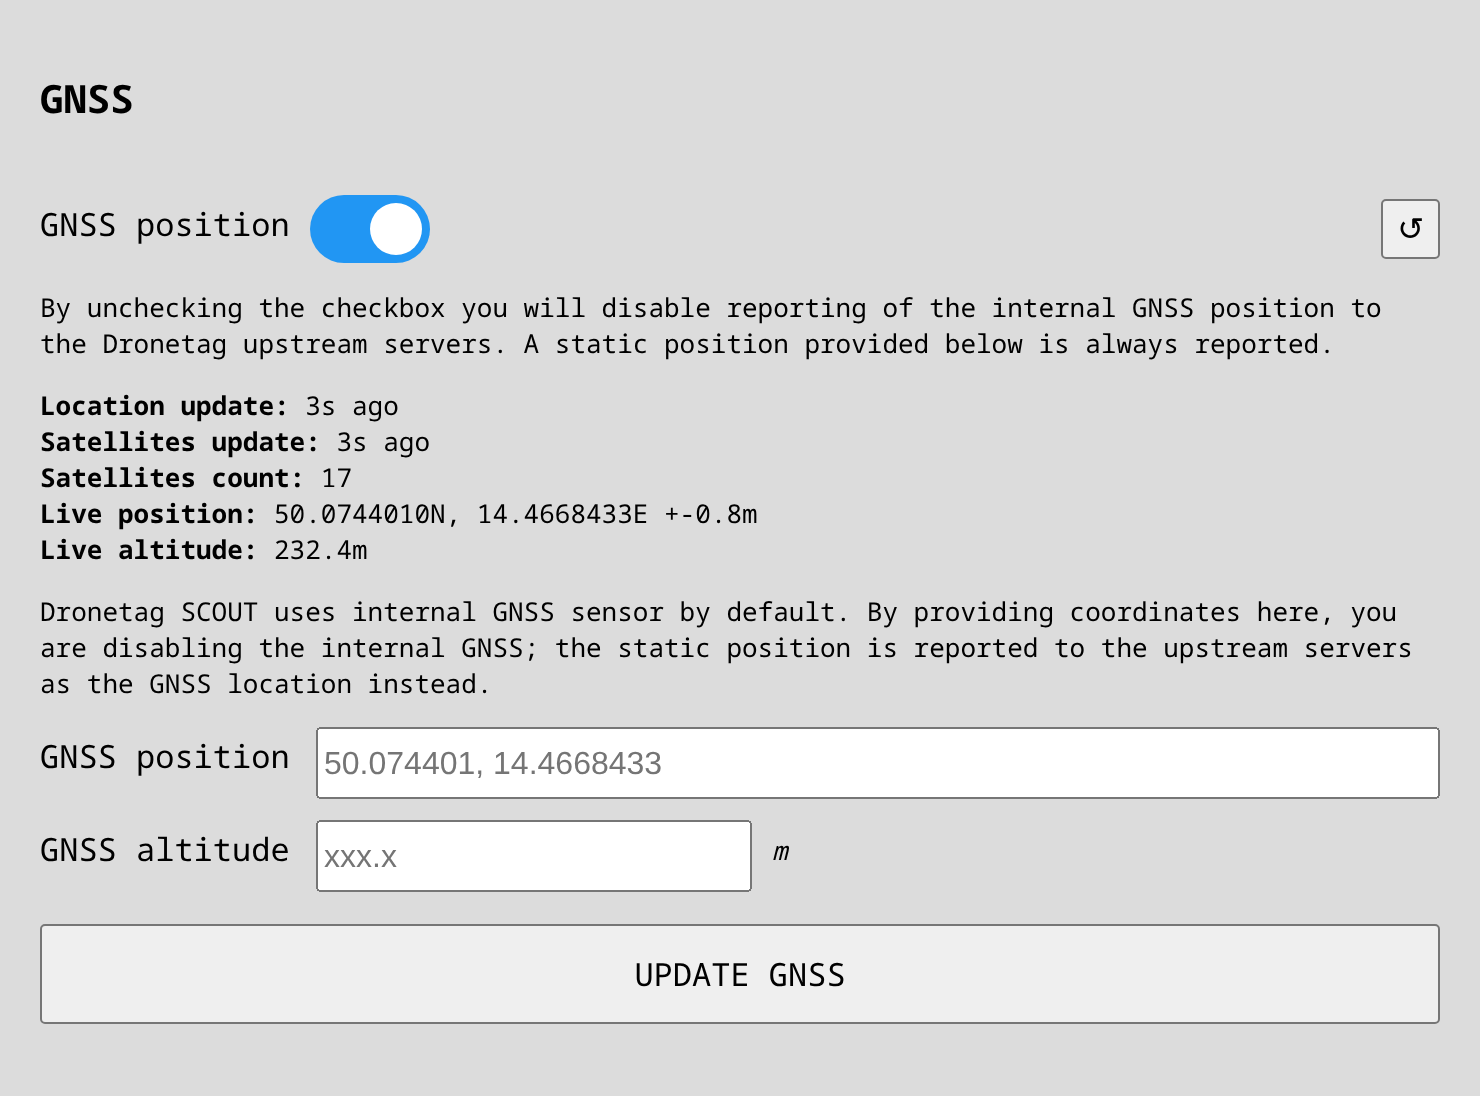
To set the GNSS position manually, follow these steps:
-
Connect to the Scout’s Management Interface Follow the instructions in Connect to the Management Interface to access the Scout’s web UI.
-
Navigate to the GNSS Section Go to the System tab and scroll down to the GNSS section. The GNSS position toggle controls sending the positioning information over the network.
-
Enter Coordinates Fill in the desired latitude and longitude coordinates into the GNSS position field. If empty, the receiver is using the internal GNSS Unit to determine its current position.
-
Enter Altitude (optional) Fill in the desired altitude in meters into the GNSS altitude field. If empty, the altitude measured by the internal GNSS Unit is used.
-
Save Your Changes Click the Update GNSS button to save the manual location.
⚙️ System Configuration
Changing the Username and Password
To enhance your Scout's security, it is highly recommended to change the default login credentials.
-
Access the Management Interface
Navigate to the Scout’s management UI and go to the System tab. -
Authenticate with Current Password
You will need to enter the current password to authorize changes.- The unit itself has a label with the default password on the bottom of the device's body, in case the packaging is lost.
- If necessary, you can perform the reset to factory defaults, which resets the password as well.
-
Set a New Password
Enter your new password twice to prevent typographical errors. -
Save the Changes
Click the Update Password button to apply the new credentials.
Don't forget to store your new username and password securely. If you perform a factory reset, the login credentials will revert to the default values.
🔧 Configuring a Trusted Certificate
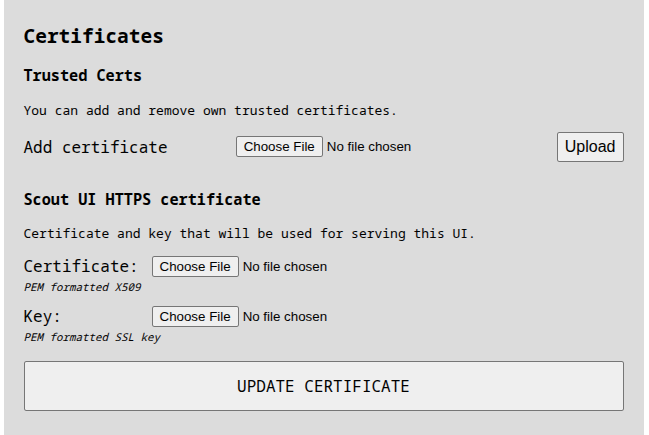
To avoid browser security warnings and enable a trusted HTTPS connection, you can configure the Scout with a certificate trusted by your system. You can manage certificates directly from the Configuration section of the Scout’s web interface. It provides the following options:
-
Add Certificate (CA Upload):
Upload a Certificate Authority (CA) certificate that will be added to the Scout’s internal trust store.
This is useful if your organization uses a private CA and you'd like to trust client certificates issued by it. -
Upload HTTPS Certificate and Private Key:
Use this to replace the default self-signed certificate with a certificate signed by your CA.
This will allow the Scout’s interface to be accessed via HTTPS without browser warnings, assuming the certificate is trusted by your local system.
🔄 Automatic Fallback to Self-Signed Certificate
If the uploaded HTTPS certificate becomes invalid or expires, the Scout will automatically regenerate a self-signed certificate.
This ensures that the device remains accessible via HTTPS, even if the trusted certificate can no longer be used.
Using trusted certificates is especially helpful when integrating the Scout into enterprise networks or accessing it from managed devices with strict security policies.
📡 Status Reporting (Heartbeat)
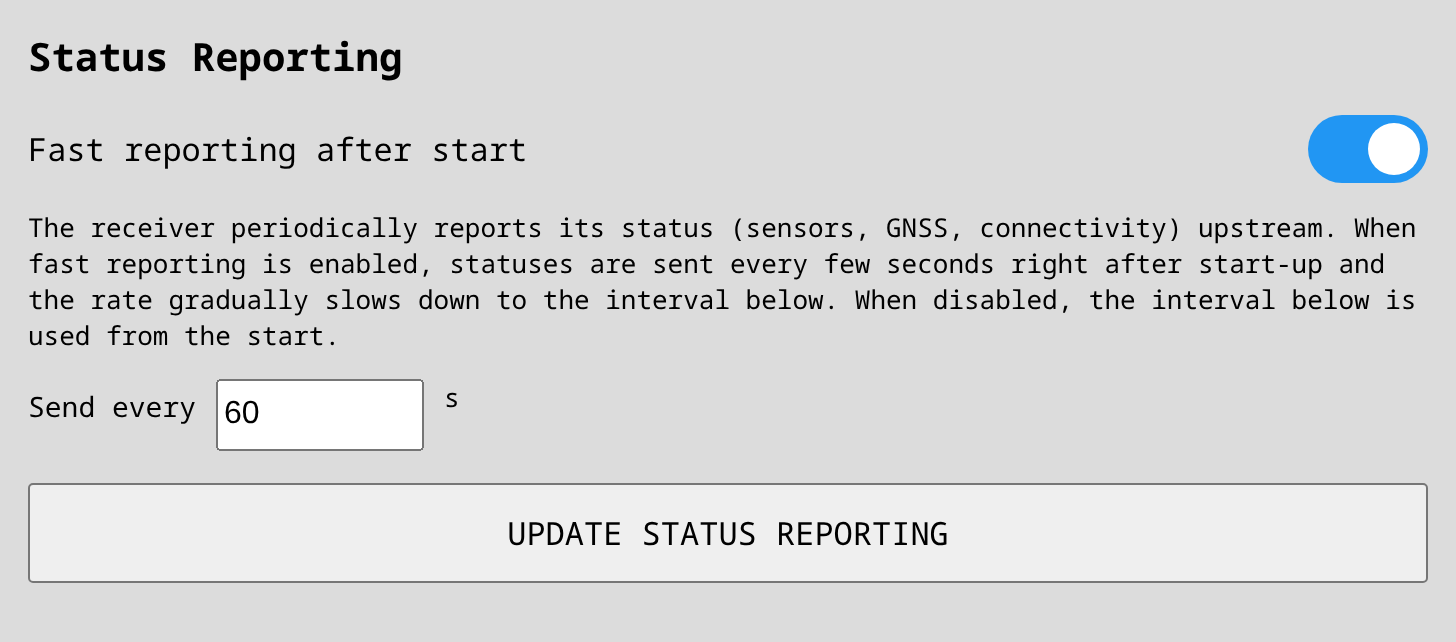
The Scout periodically sends a status message (heartbeat) describing its overall health: the number and state of its sensor modules, the time of the last detection, GNSS availability and position, and LTE modem state and signal quality.
The same status message feeds every connected service that subscribes to the status message source:
- Dronetag Cloud — keeps the sensor shown as online in the Drone Scanner app and the Dronetag Cloud.
- Advanced integrations that support status, such as TAK (the marker of the Scout itself), Sapient (sensor status reports), or Skydio (Marker for this Scout). See the Sensor+ configuration page for details on each integration.
⚙️ Configuring the Reporting Rate
You can adjust the reporting behavior in the System tab under Status Reporting:
- Fast reporting after start (enabled by default): right after start-up (or after a configuration change), status is first sent every 10 seconds and the rate gradually slows down until it reaches the interval below. This makes the Scout appear online promptly after installation or reboot while keeping the steady-state traffic low.
- Send every (default 60 s): the steady-state interval between status messages.
When Fast reporting after start is disabled, the configured interval is used from the very first message.
Keep the defaults unless you have a specific need. A shorter interval makes status changes (e.g. a sensor failure) visible sooner in all connected systems, at the cost of more traffic on a possibly metered LTE uplink. A longer interval saves data, but connected systems may consider the Scout offline if they expect more frequent status updates.
🛠️ System Maintenance Services
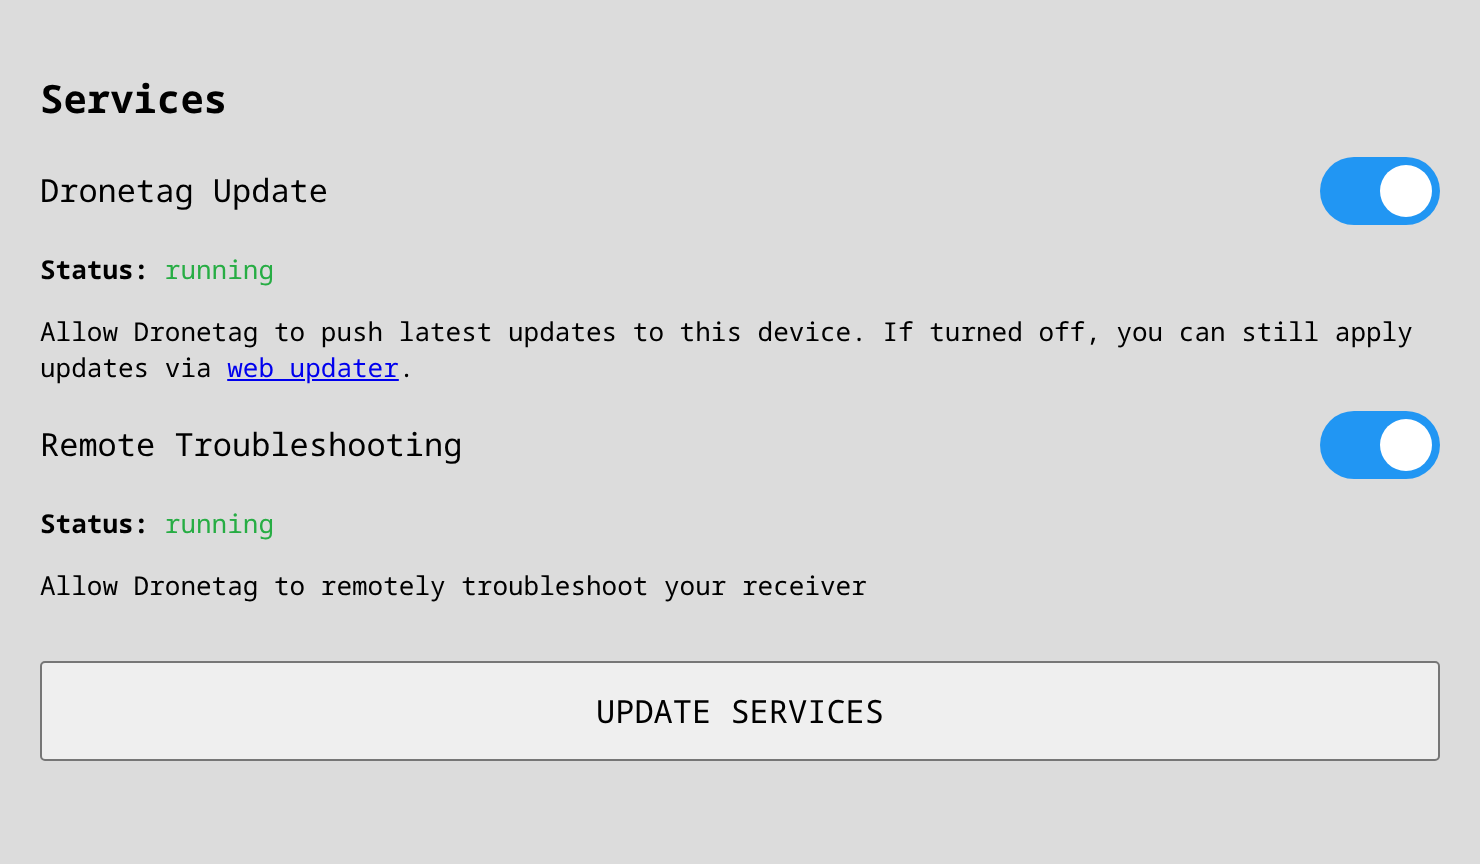
These services are not available on Scout EVK models.
Both of the following services operate only when the Scout is connected to our servers that handle these functions. They communicate securely via standard HTTPS connections, using asymmetric cryptography to ensure privacy and security. These services are accessible only by our team.
Dronetag Update Service
This service automatically updates the Scout whenever a new firmware release is available. It helps you to stay up to date with the latest features, improvements, and security patches we develop.
For more details about the automatic updates and how to perform manual firmware updates when the Dronetag Update service is off or no internet connection is available, please refer to the Firmware Update page.
Remote Troubleshooting Service
This service enables our support team to remotely connect to your Scout to help diagnose and resolve any issues you encounter. If users experience difficulty accessing the Scout's Ethernet port, remote troubleshooting via the 4G network connection can be utilized.
Control and Availability
Both services can be enabled or disabled according to your preference. We recommend disabling the Remote Troubleshooting Service once the Scout has been installed, since most of the troubleshooting requests come during the Scout installation period.
Currently, these services are available on all Dronetag Scout devices, but in the future, they will only be included in the Scout Sensor+ package and in the Cloud Mode, due to infrastructure costs associated with maintaining these connections.
Statistics
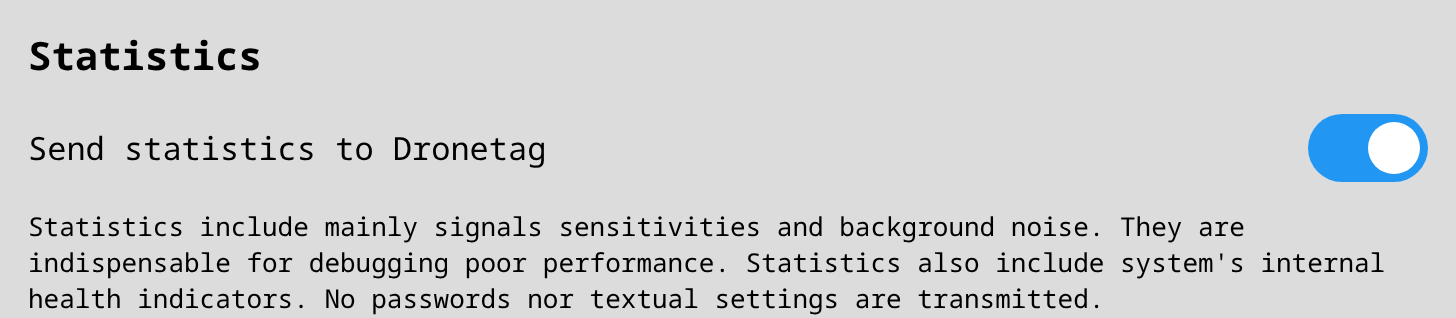
The Scout can send statistics to Dronetag. These are system statistics and reception-quality metrics — mainly signal sensitivities and background noise — together with the system's internal health indicators. They are indispensable for debugging poor reception performance.
Statistics contain no drone positions and not the sensor's own position, and no passwords or textual settings are transmitted.
Diagnostics
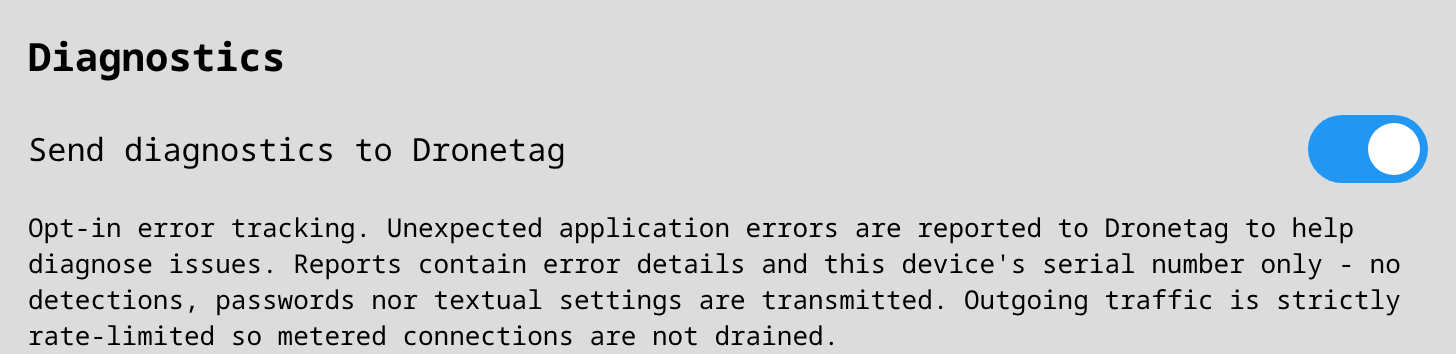
Send diagnostics to Dronetag is opt-in error tracking. When one of the services experiences an issue or error, the relevant information is sent to Dronetag to help diagnose it. A report includes the error details, partial logs, and this device's serial number.
Unlike Statistics, diagnostics reports include partial logs that may contain sensitive information, such as the position of the sensor or of detected drones. Outgoing traffic is strictly rate-limited so metered connections are not drained.
🔄 System Factory Reset
To restore your Scout device to its original factory settings, follow the instructions below.
This procedure will erase all local configuration, including network settings, APN, data privacy preferences, the password credentials (if updated), and custom changes.
ℹ️ Cloud registration is not erased — your Scout will remain linked to your Dronetag Cloud account.
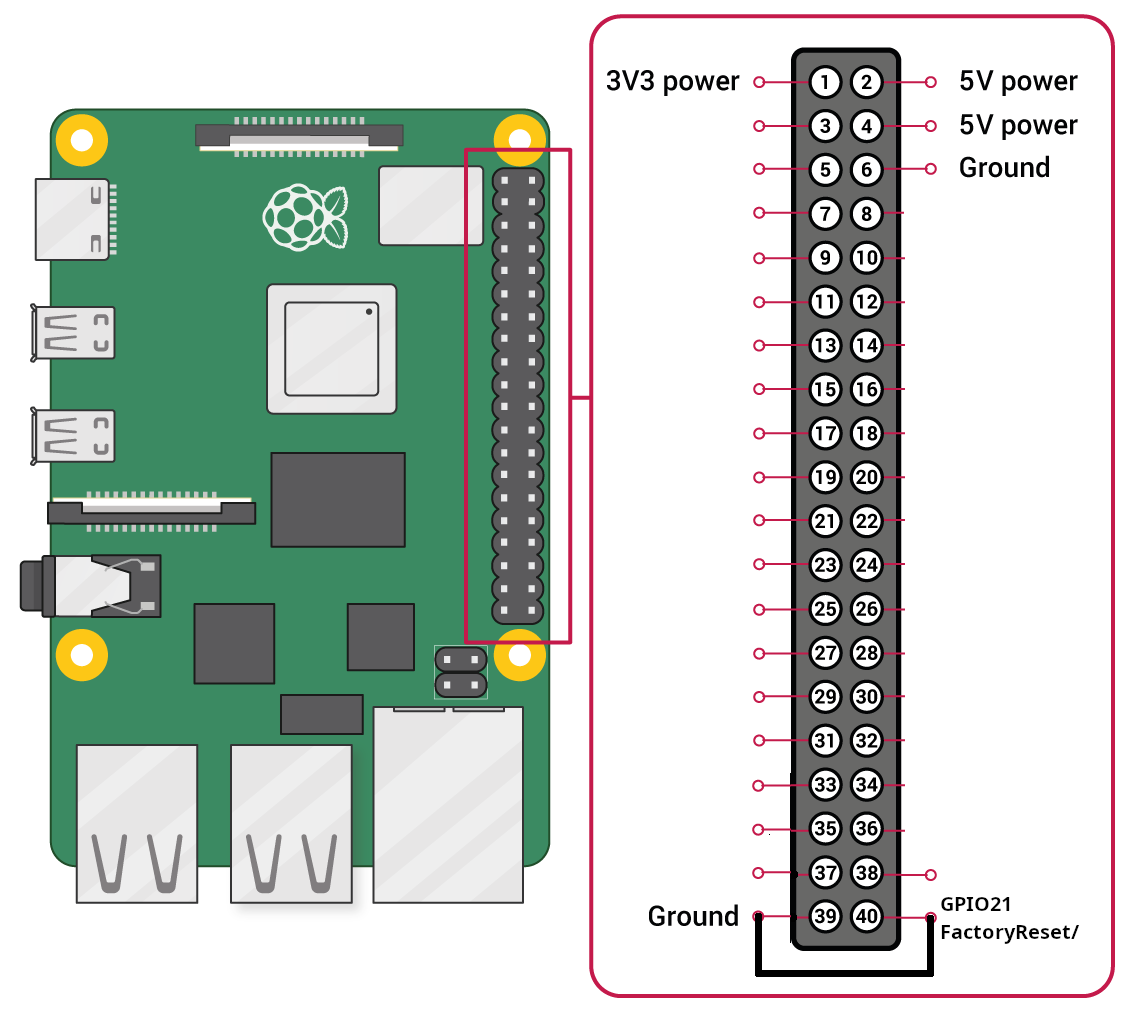
🛠️ Reset Instructions
-
Locate the GPIO pins labeled
Factory Reset (GPIO 21)andGNDon the Mini Computer board.
These two pins are directly next to each other. -
Connect the two pins using a jumper or a small conductive wire.
-
While the pins are connected, power on the Scout using the PoE injector.
-
Keep the pins connected and wait approximately 1 minute.
-
After the reset completes, remove the jumper and reboot the device if necessary.
-
To begin fresh setup after reset, see: 🔗 Scout Connection & Initial Configuration Guide
This factory reset procedure does not apply to the Scout EVK model.
License
Dronetag Scout devices require valid licensing to ensure compliance with software usage terms and to unlock specific features. Licensing helps us provide ongoing updates, support, and new functionalities while ensuring proper usage across different deployment modes.
Licensing Requirements
- Scout EVK: A license is always required to operate the device.
- Scout Sensor Mode: No license is required for basic Sensor Mode.
- Scout Sensor+ Mode: A license is required for Sensor+ mode, which provides additional features.
- Scout Cloud Mode: Requires a software license managed by our servers, not by the Scout device itself. This license is automatically handled and renewed on our side.
Checking Your License Status
Licenses for current Scout units are provisioned and renewed remotely by Dronetag — there is no License tab on the management page and no license file to upload. If your license is active on your account, cloud features work; you can verify by checking that your Scout appears in the Dronetag App. To purchase or renew, contact support@dronetag.com with your serial number. The steps below apply to older units (Scout EVK) that still manage the license locally.
-
Access the Scout’s Management Page.
For detailed instructions on accessing the Management Interface, please refer to the Connecting to the Scout page. -
Navigate to the License tab to view license details, including the expiration date.
Licenses for Scouts operated in Cloud Mode are automatically managed by our servers and typically do not require manual renewal.
Purchasing a License
To obtain a new license:
-
Contact our support team at support@dronetag.com.
-
Provide your Scout’s serial number and specify the desired license validity period to help expedite your request.
Uploading a New License
Once you have received your license file via email:
-
Download the license file to your computer.
-
Access the Scout’s Management Page.
For detailed instructions, see the Connecting to the Scout page. -
Navigate to the License tab.
-
Click Upload New License and select the license file.
-
Confirm to activate the new license.
Licensing Summary
| Device | License Required? |
|---|---|
| Scout EVK | Always required |
| Scout Sensor Mode | No license required for Sensor Mode |
| Scout Sensor+ Mode | License required |
| Scout Cloud Mode | Software license managed by our servers |
If you have any questions or need assistance with licensing, please contact support@dronetag.com.
Source pages
Every chapter of this document is a page of the Dronetag help site. Use these addresses to reach the latest version.
- 1Networkinghelp.dronetag.cz/dronetag-scout/configuration/networking
- 2Sensor configurationhelp.dronetag.cz/dronetag-scout/configuration/scout-heartbeat-forwarders
- 3Sensor+ configurationhelp.dronetag.cz/dronetag-scout/configuration/scout-integrations
- 4GNSS Position of the Scouthelp.dronetag.cz/dronetag-scout/configuration/gnss
- 5System Configurationhelp.dronetag.cz/dronetag-scout/configuration/system
- 6Licensehelp.dronetag.cz/dronetag-scout/configuration/licenses