Dronetag s.r.o. · The online version of this document is always the authoritative one.
Dronetag Scout
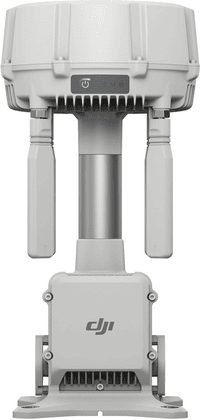
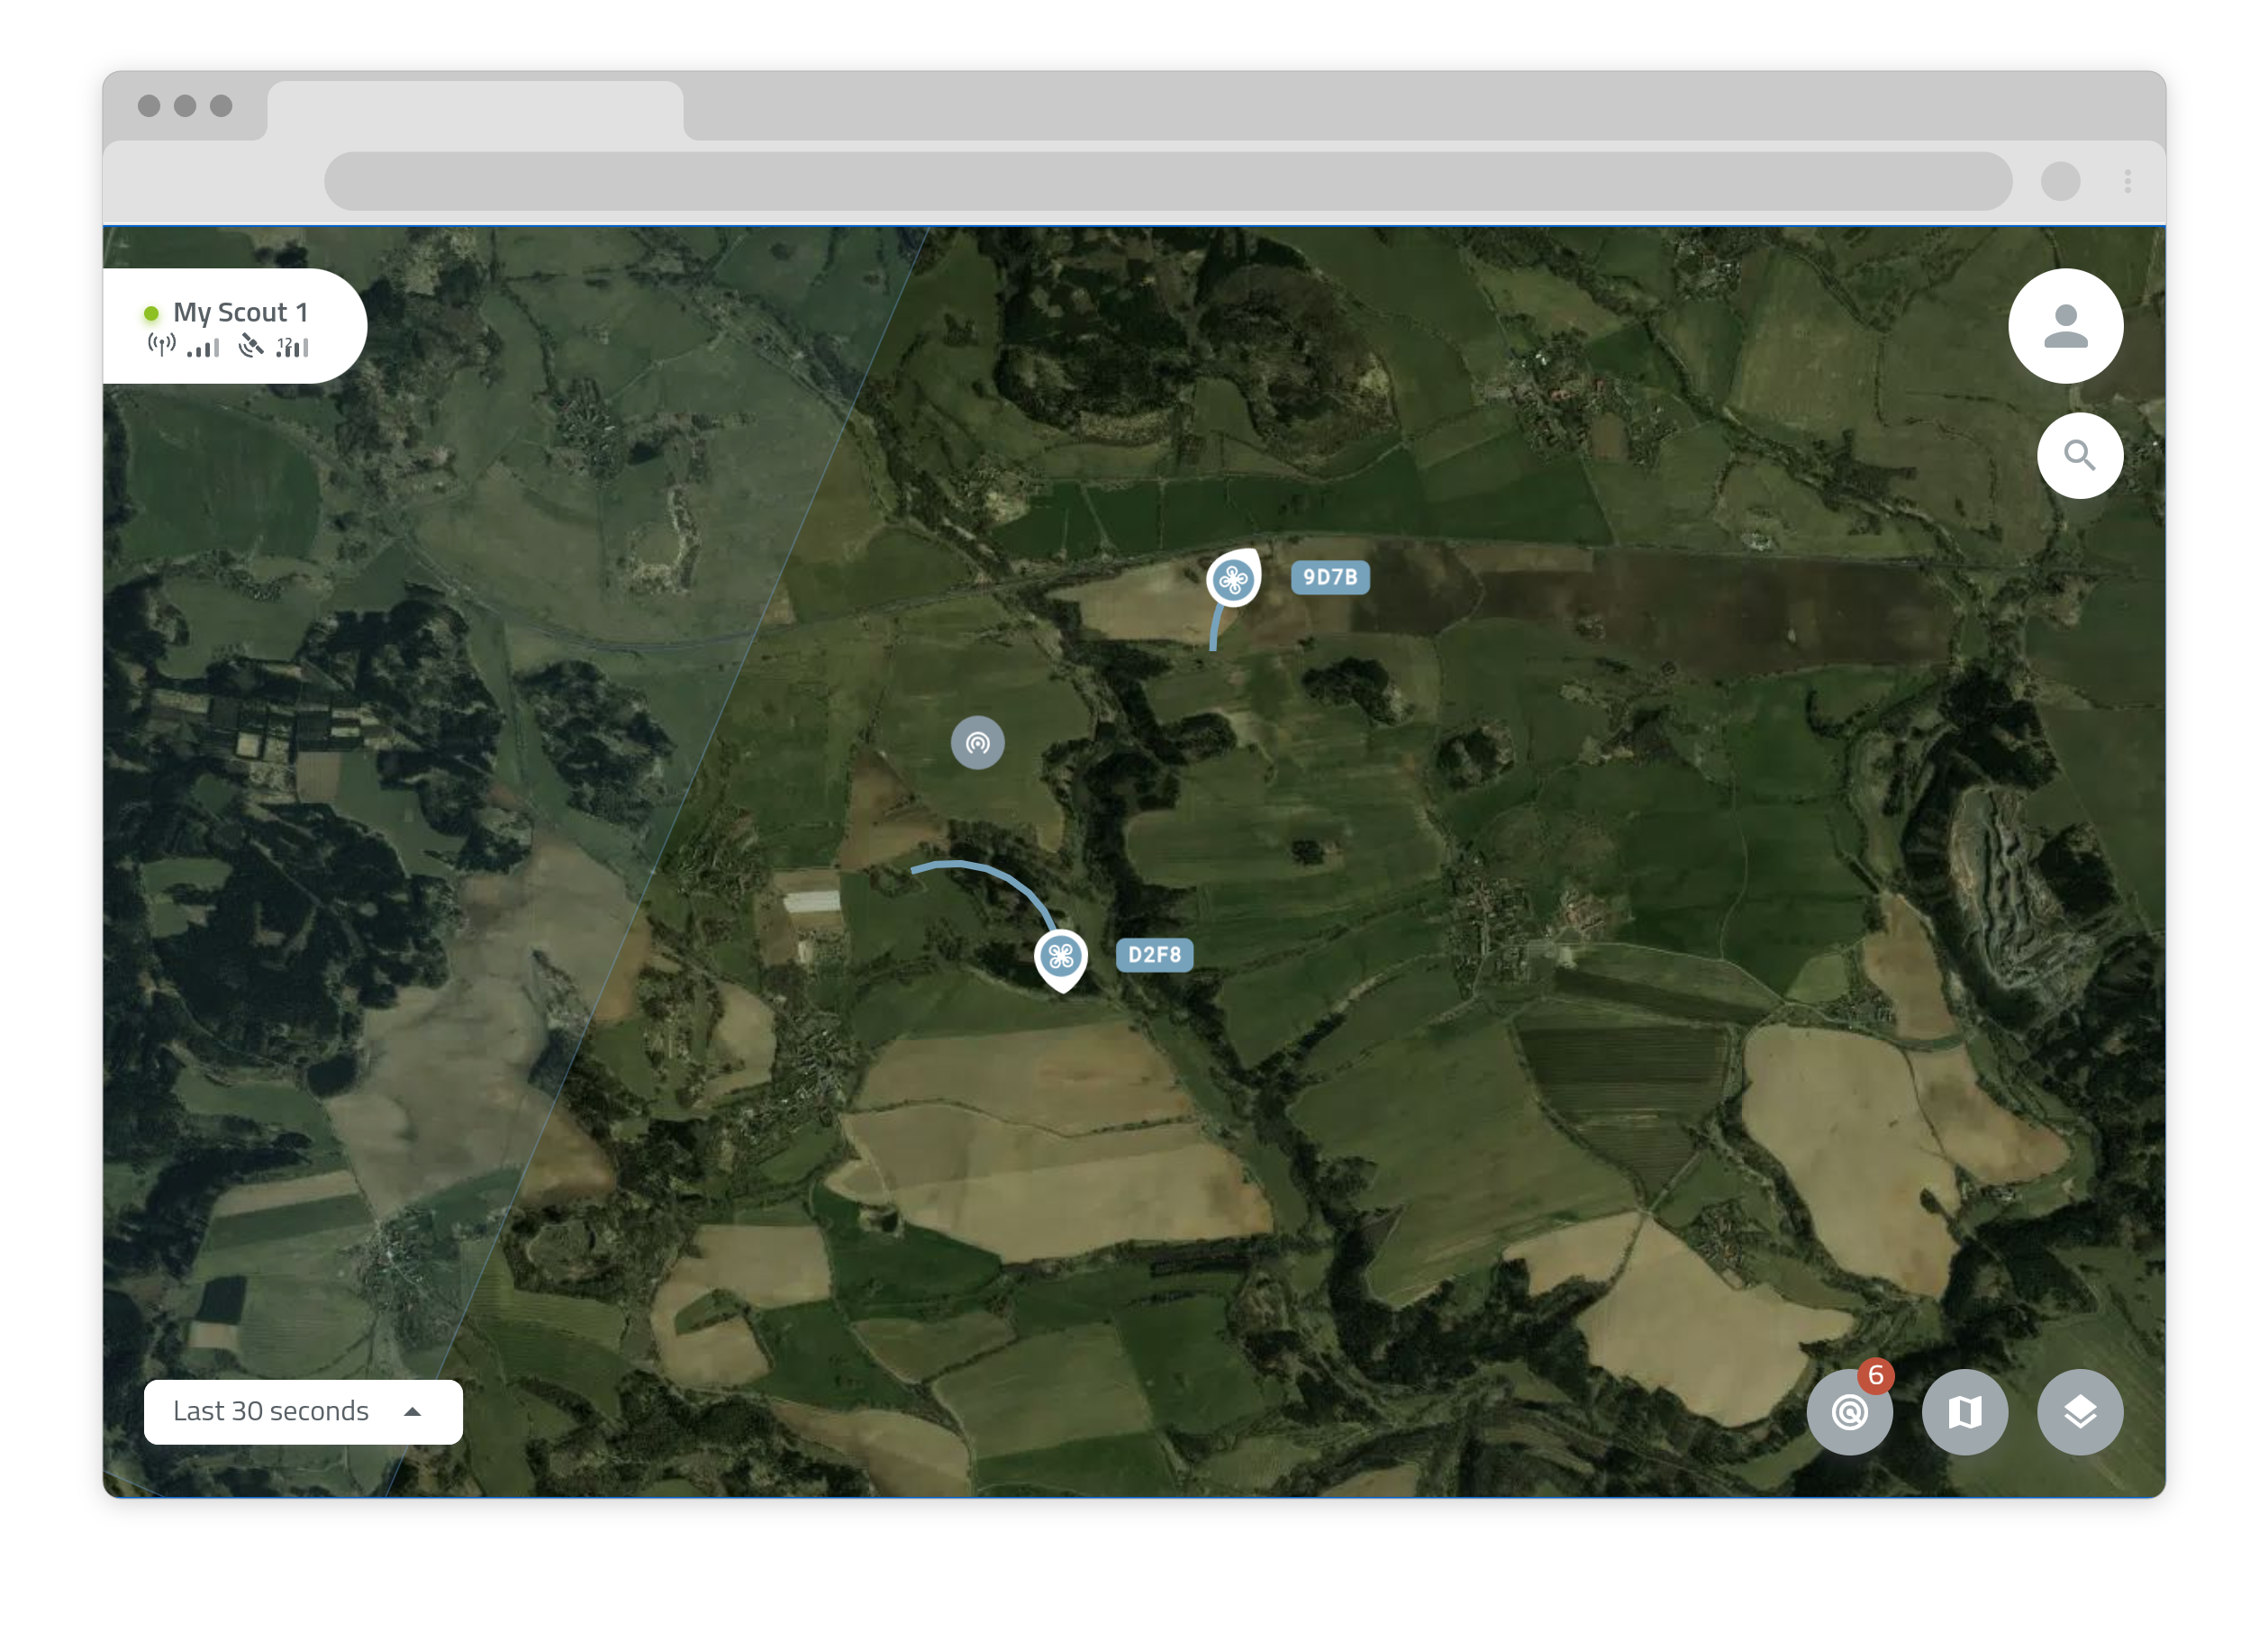
Dronetag Scout is a stationary Remote ID receiver, designed to detect compliant drones within its coverage area, providing robust operational awareness. Remote ID technology enables the identification and tracking of drones that meet regulatory standards, enhancing situational awareness and safety in shared airspace.
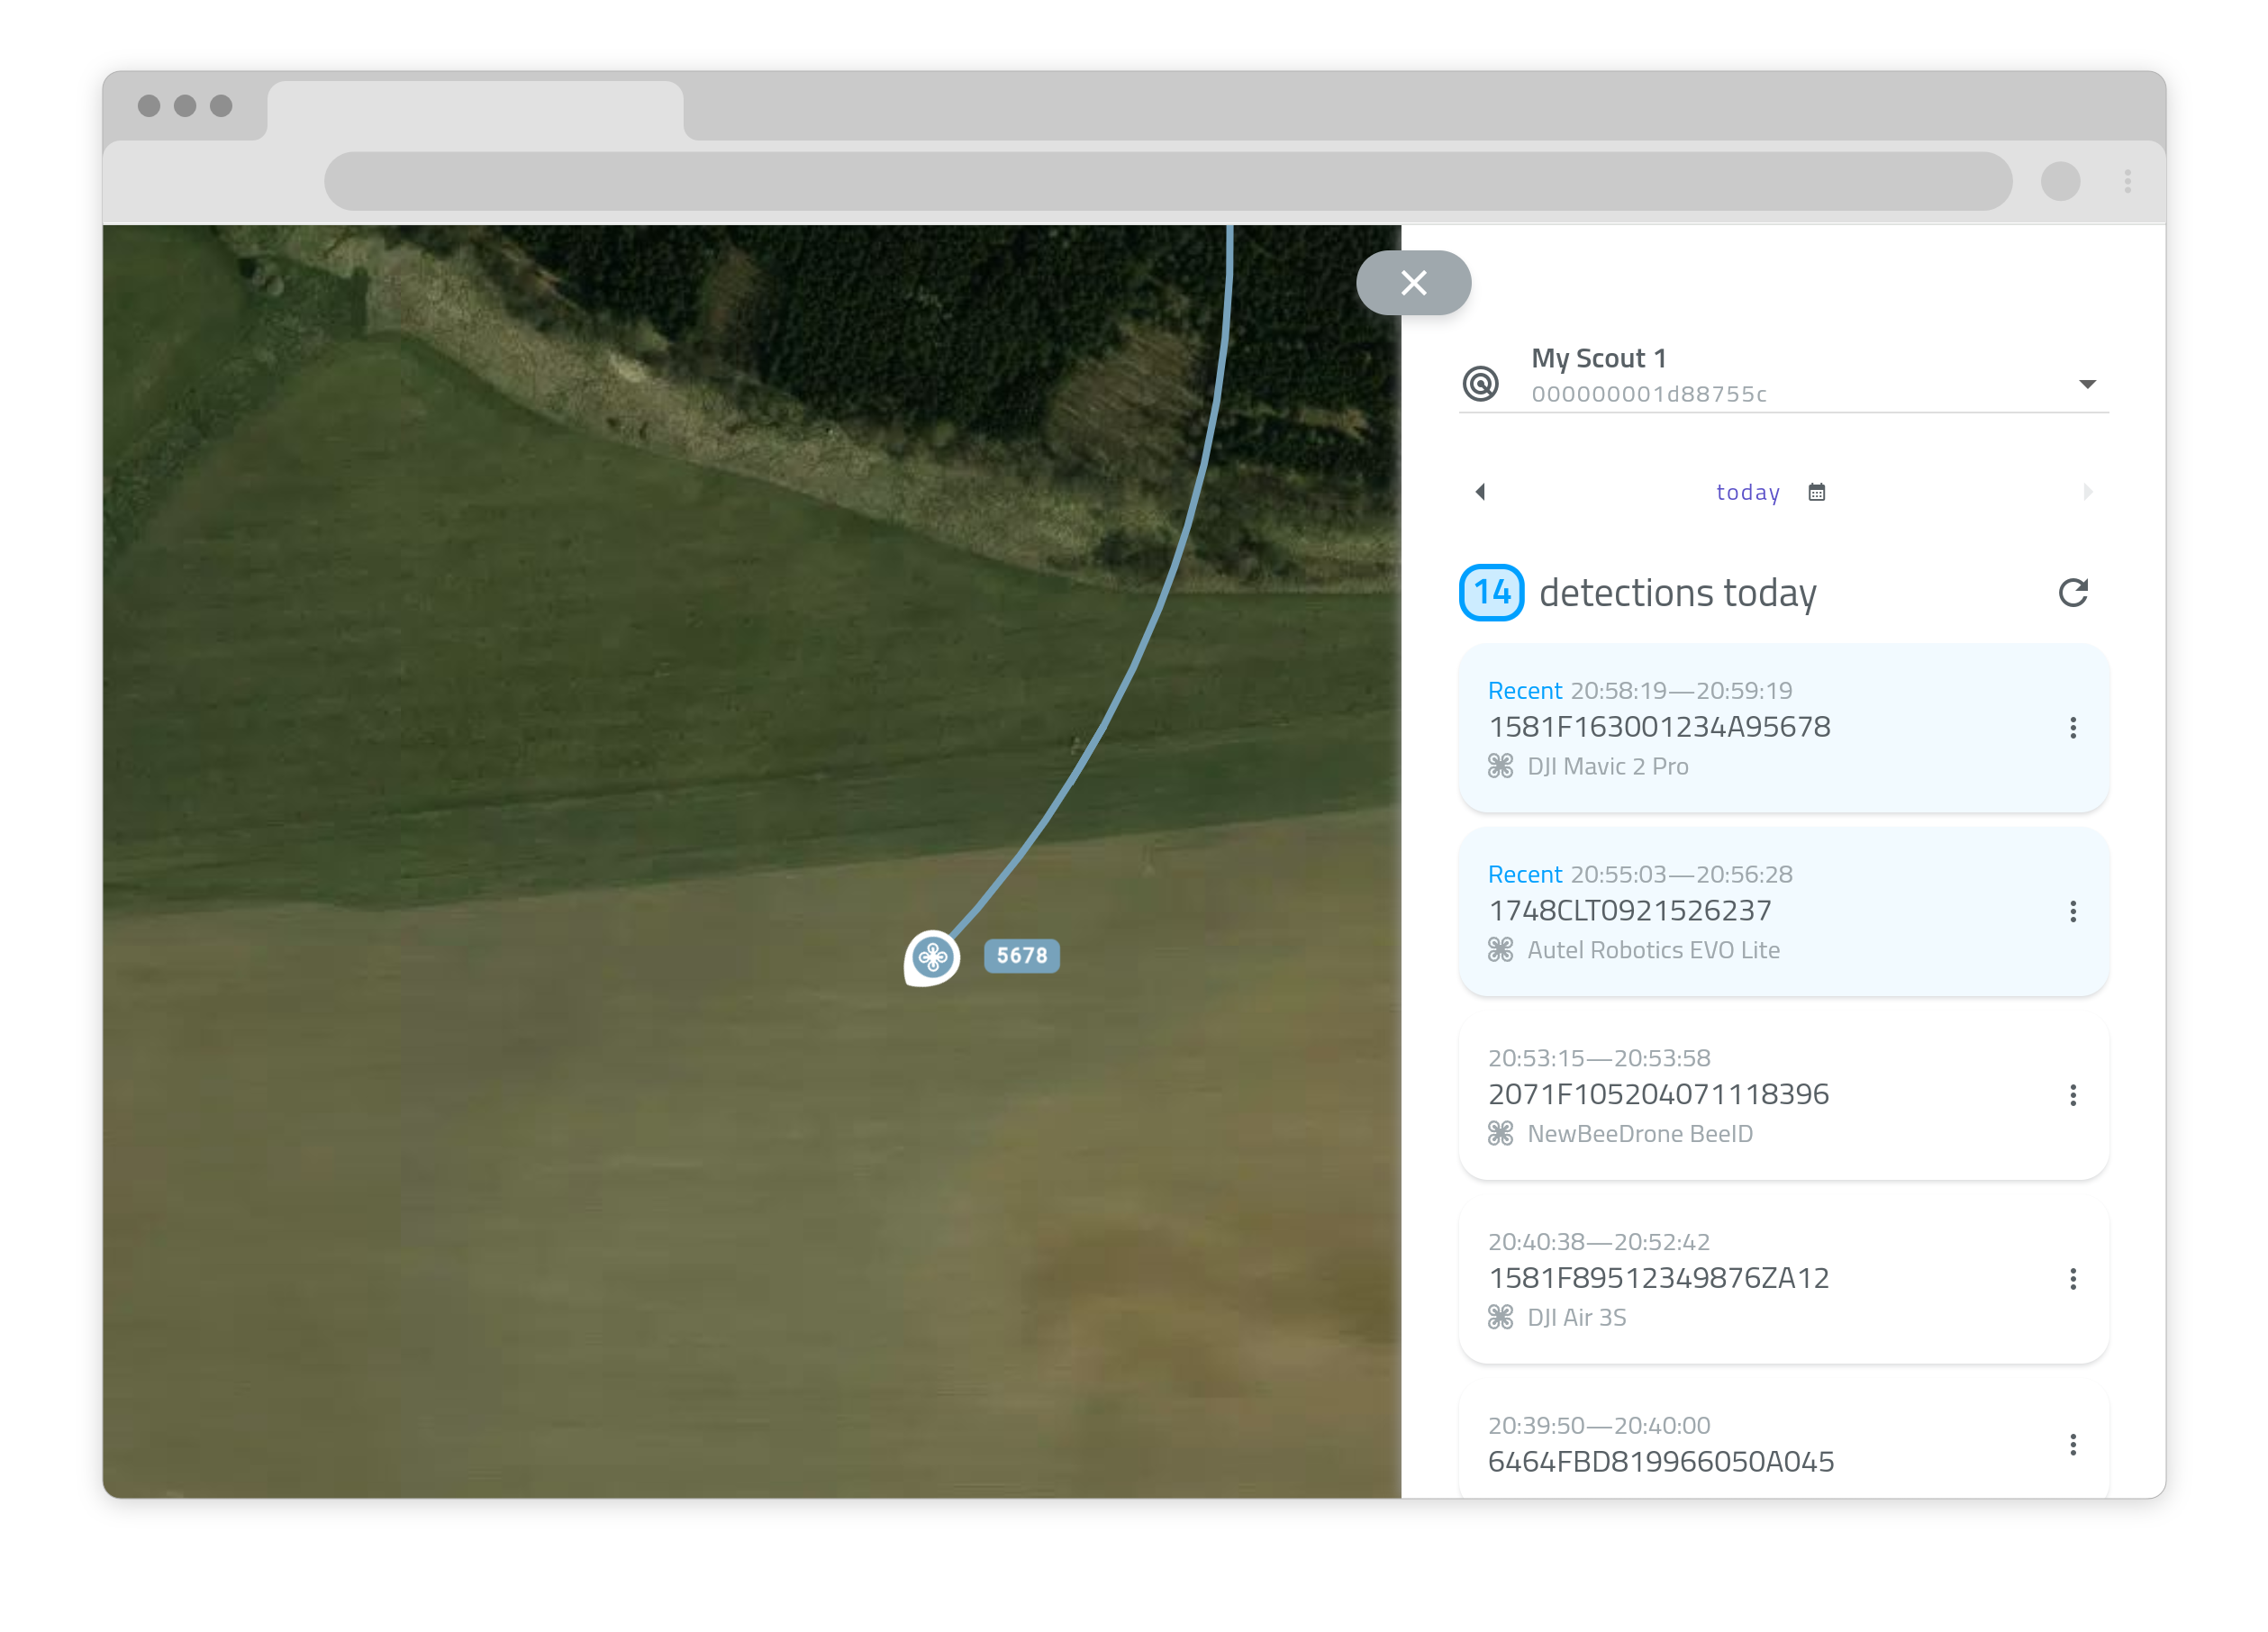
With Dronetag Scout, users can monitor drone activities, receive real-time data on drone identification, location, heading, speed, height (barometric and GNSS), status, take-off location, and operator location - helping ensure compliance with local airspace regulations. Its stationary design is ideal for fixed installations, offering a reliable solution for consistent, real-time insight into drone operations in the vicinity.
Dronetag Scout supports all Remote ID technologies Wi-Fi Beacon, Wi-Fi NaN, Bluetooth 4 Legacy and Bluetooth 5 Long Range (LE Coded PHY) for Remote ID detection.
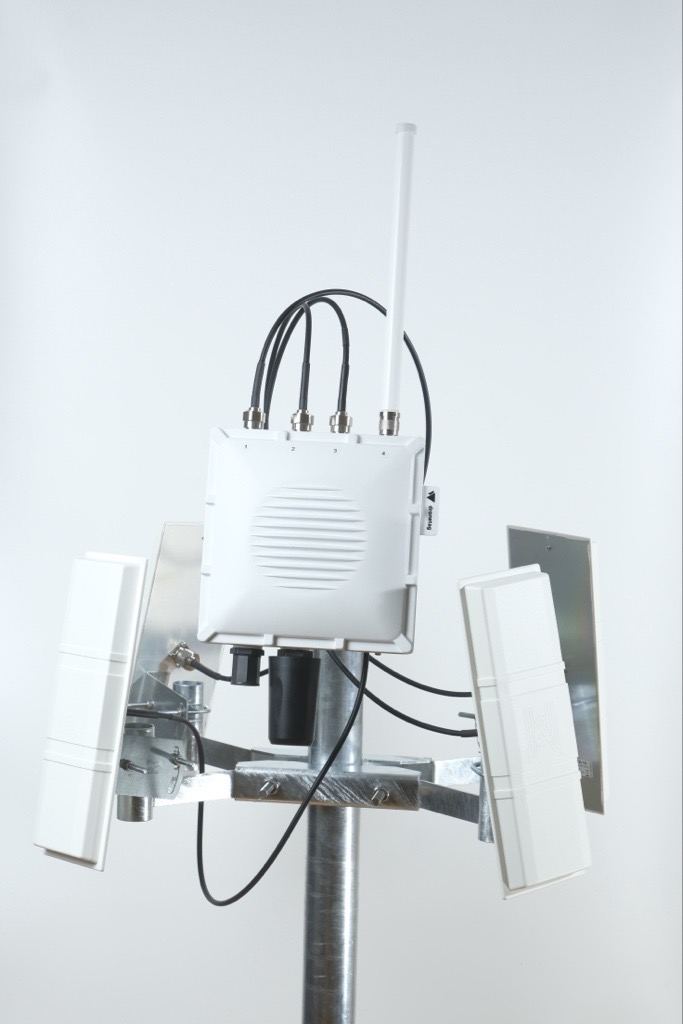
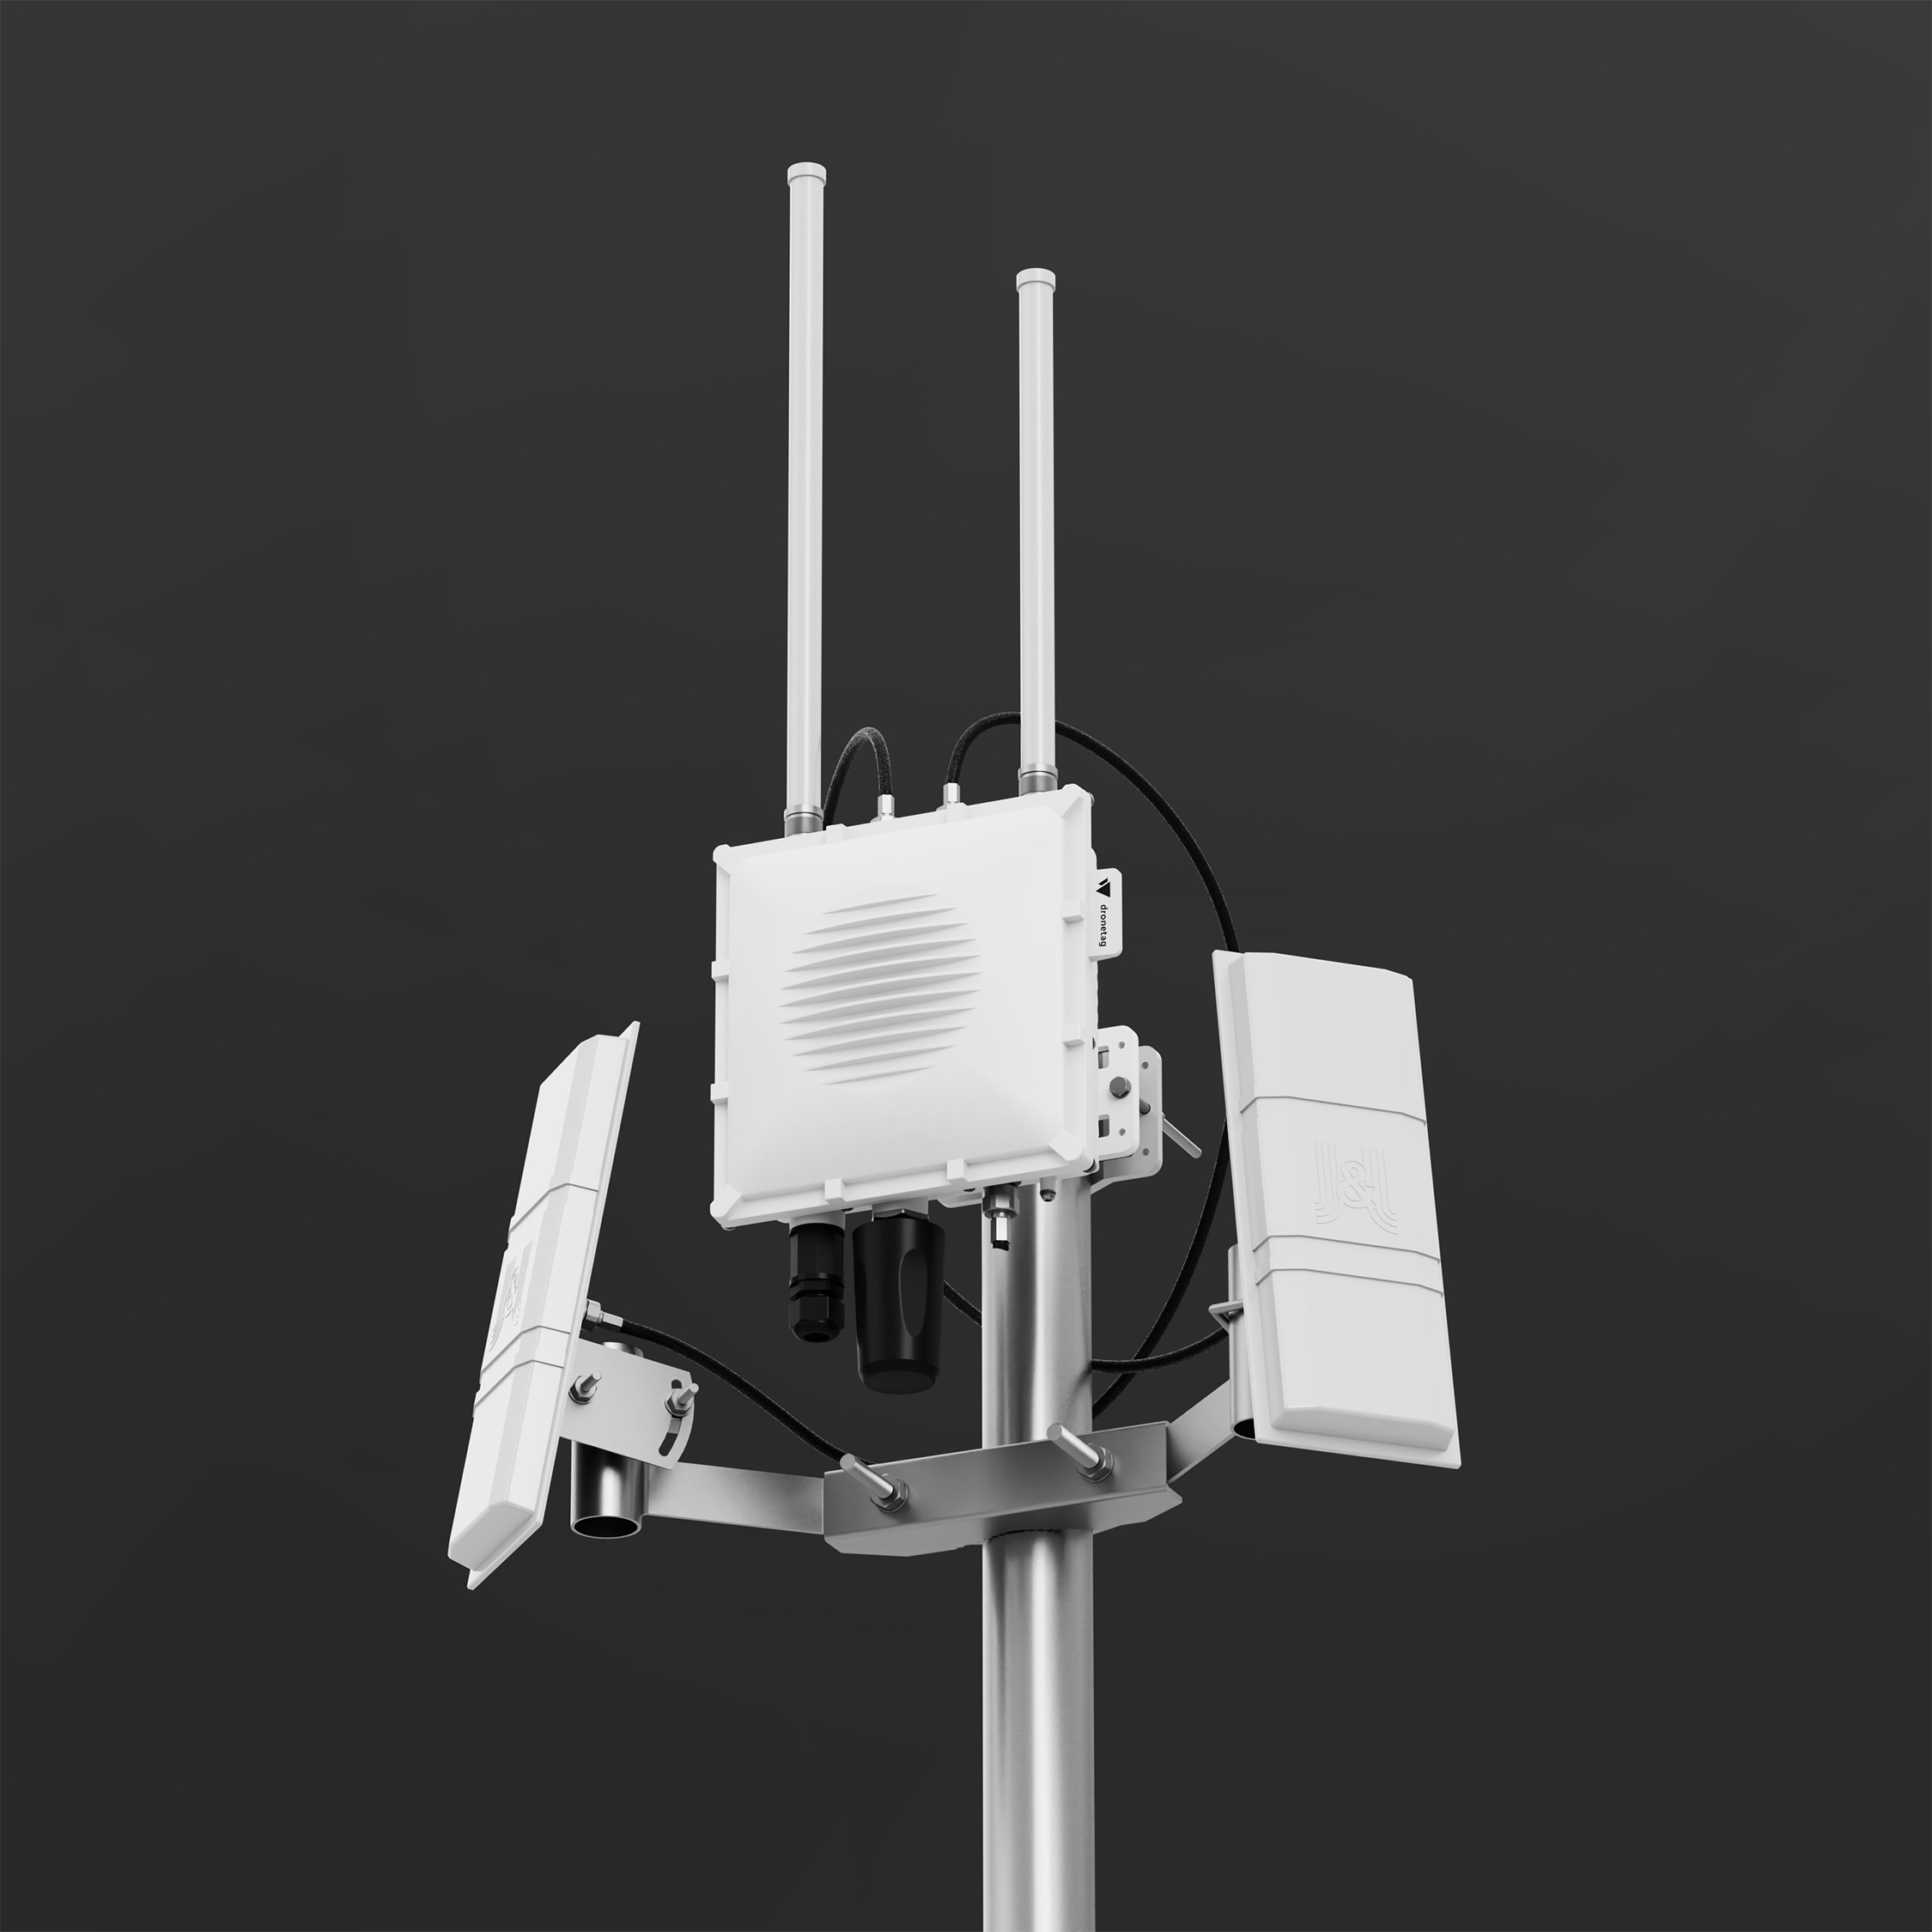
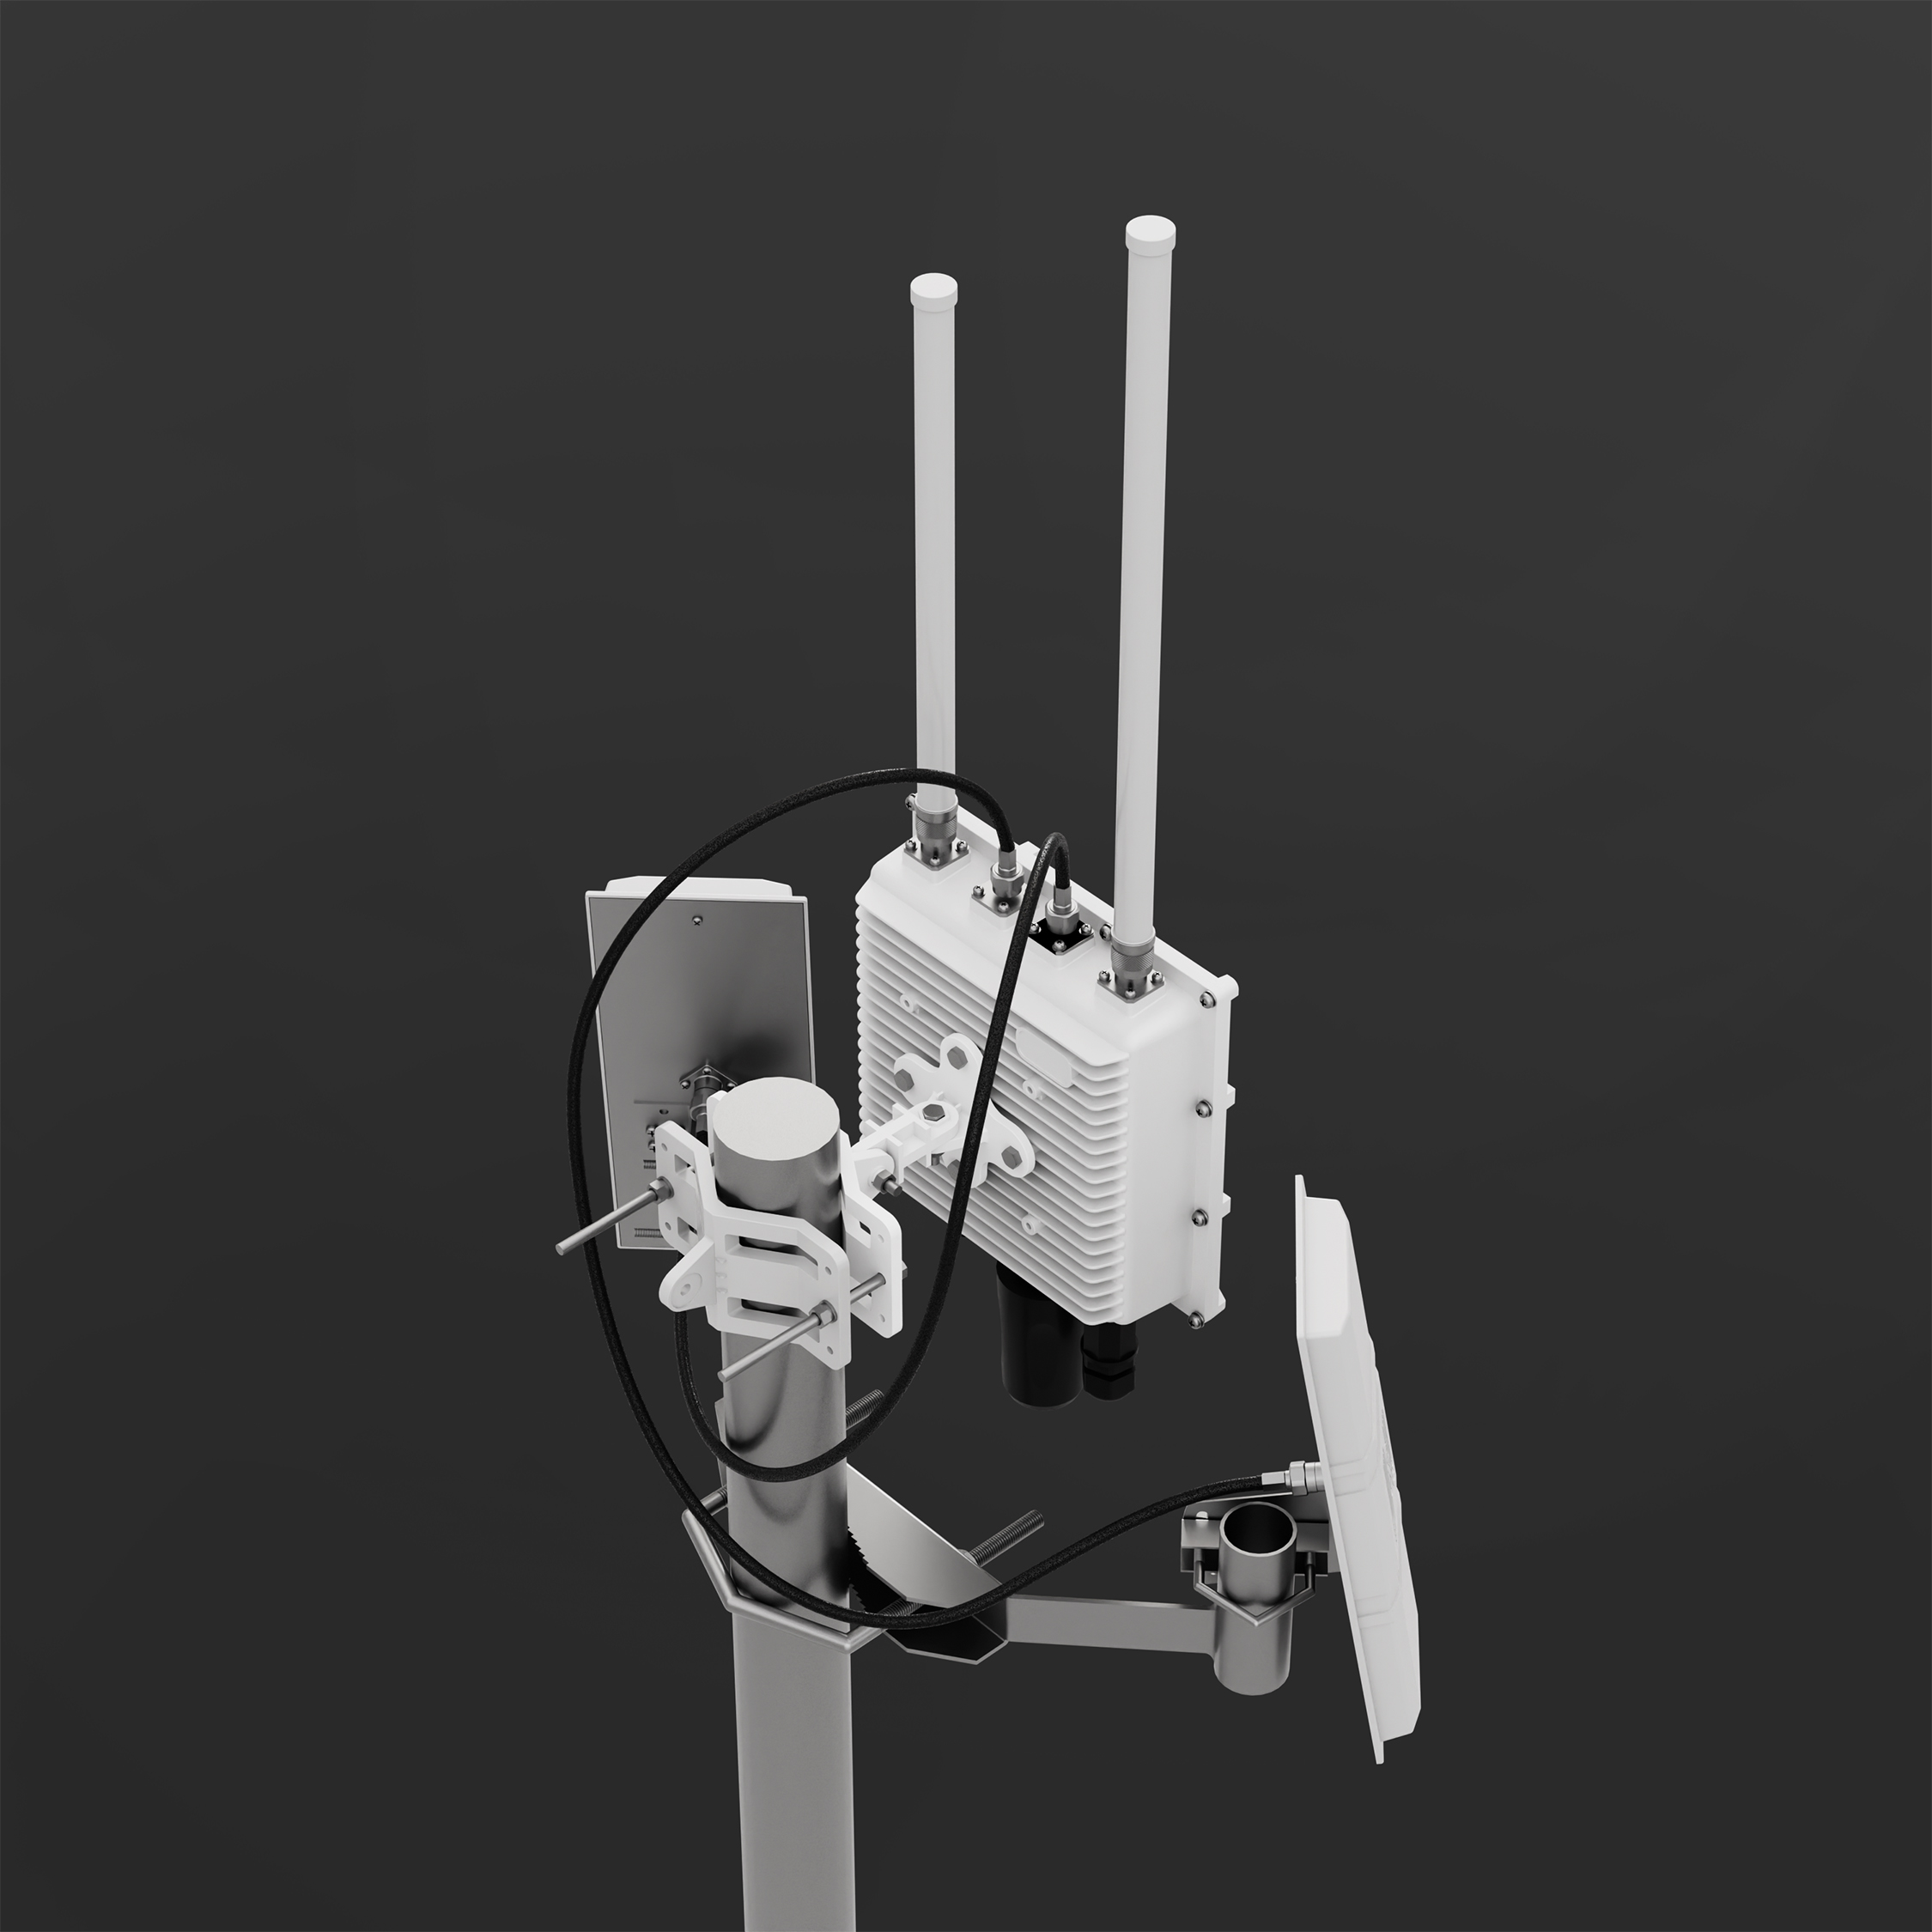
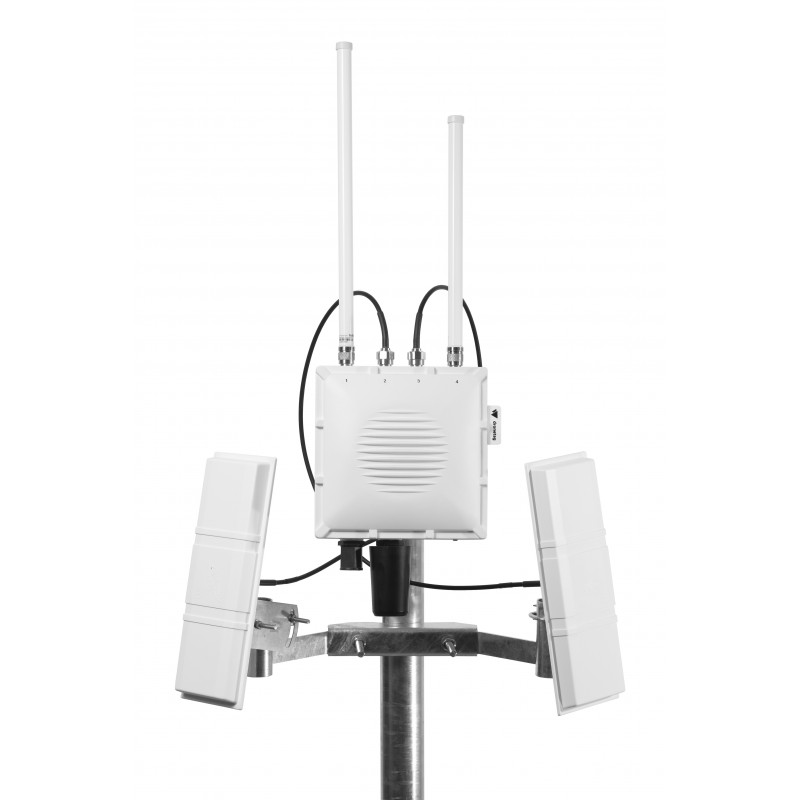
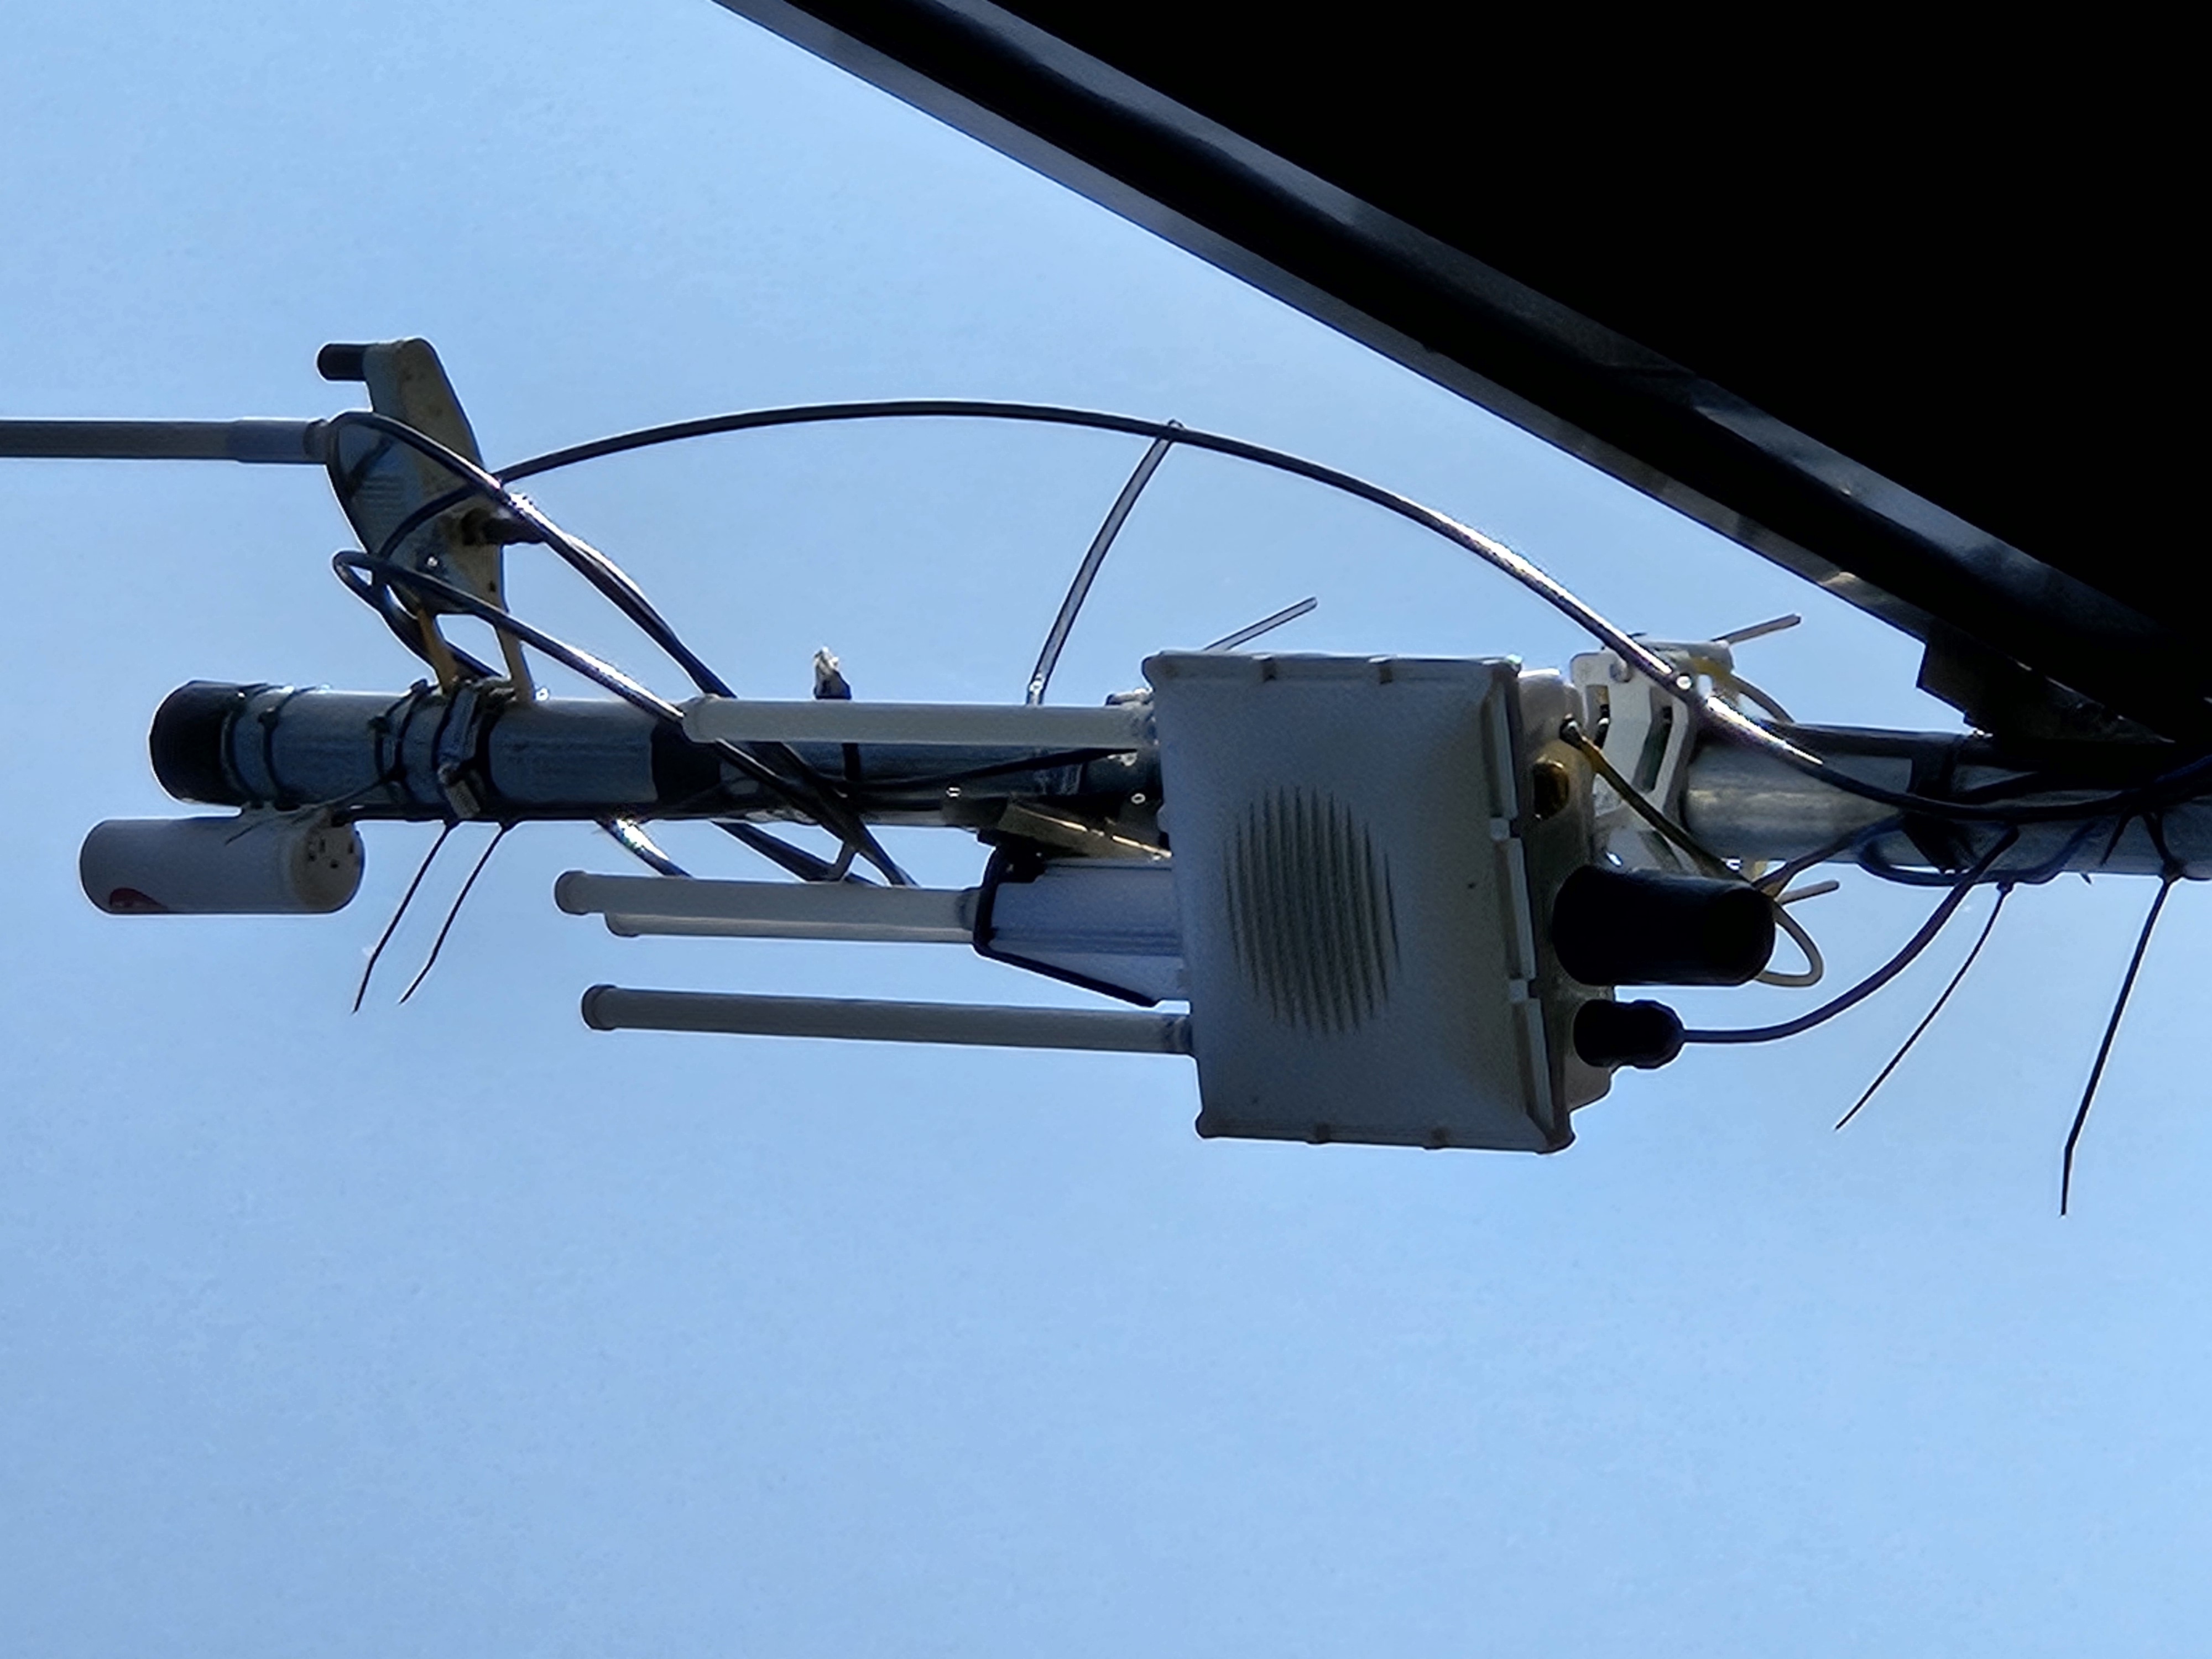
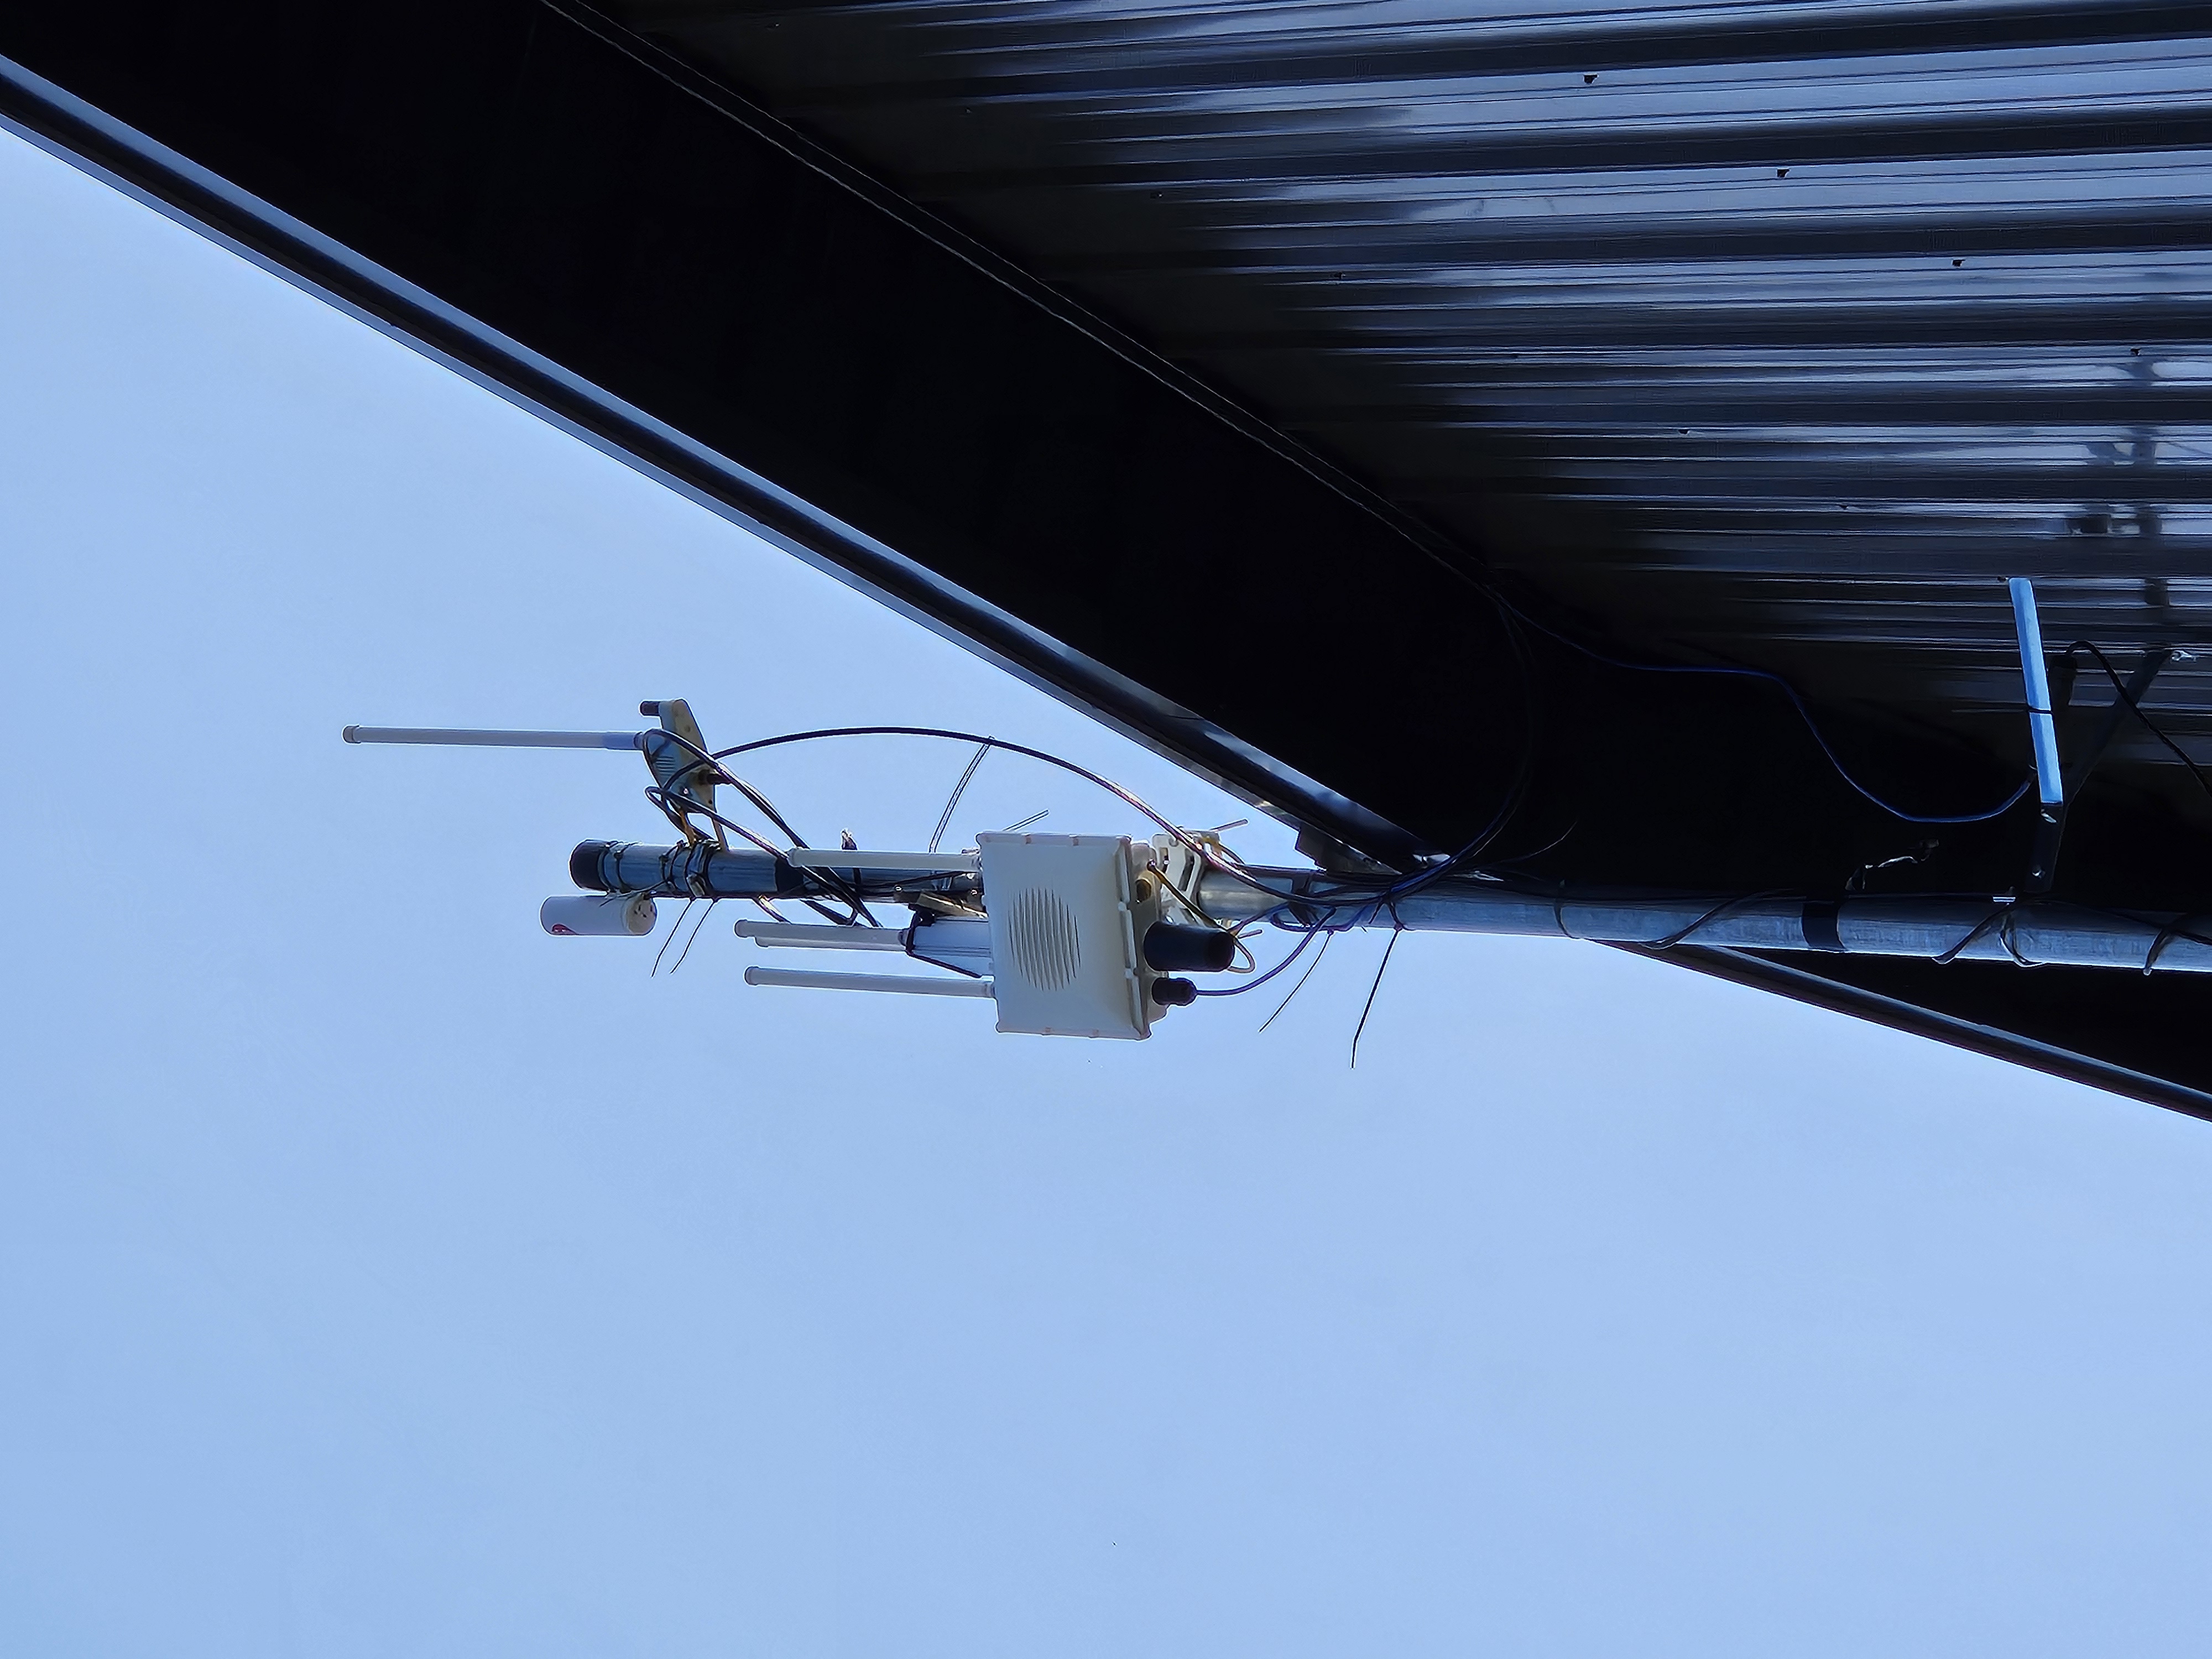
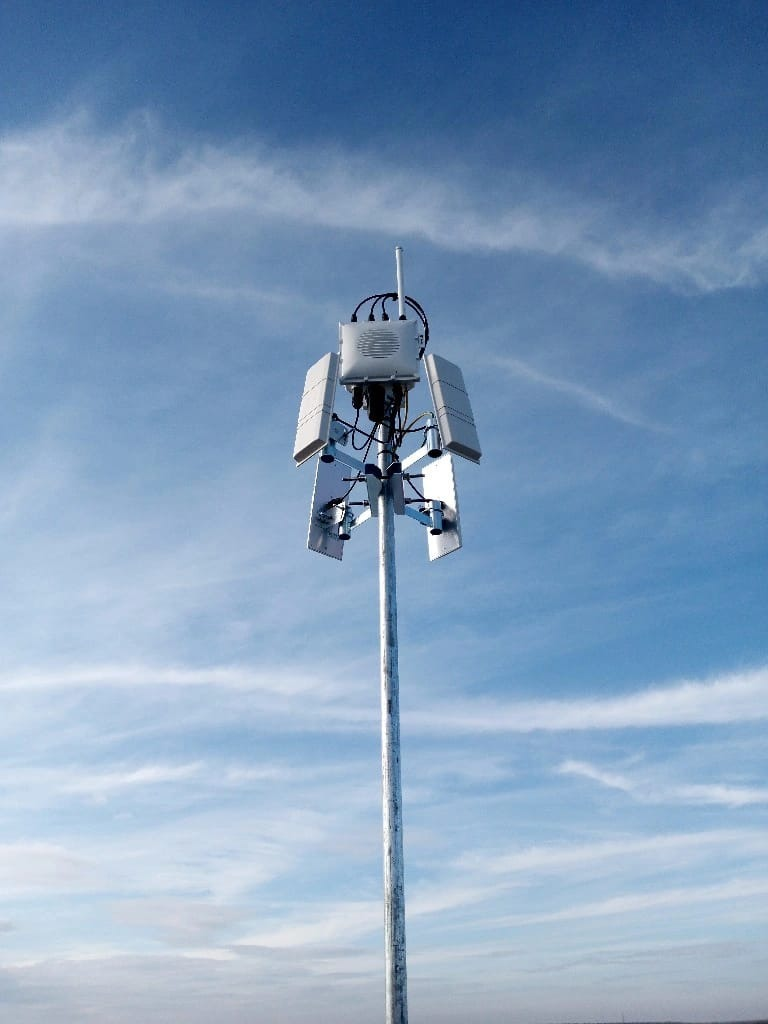
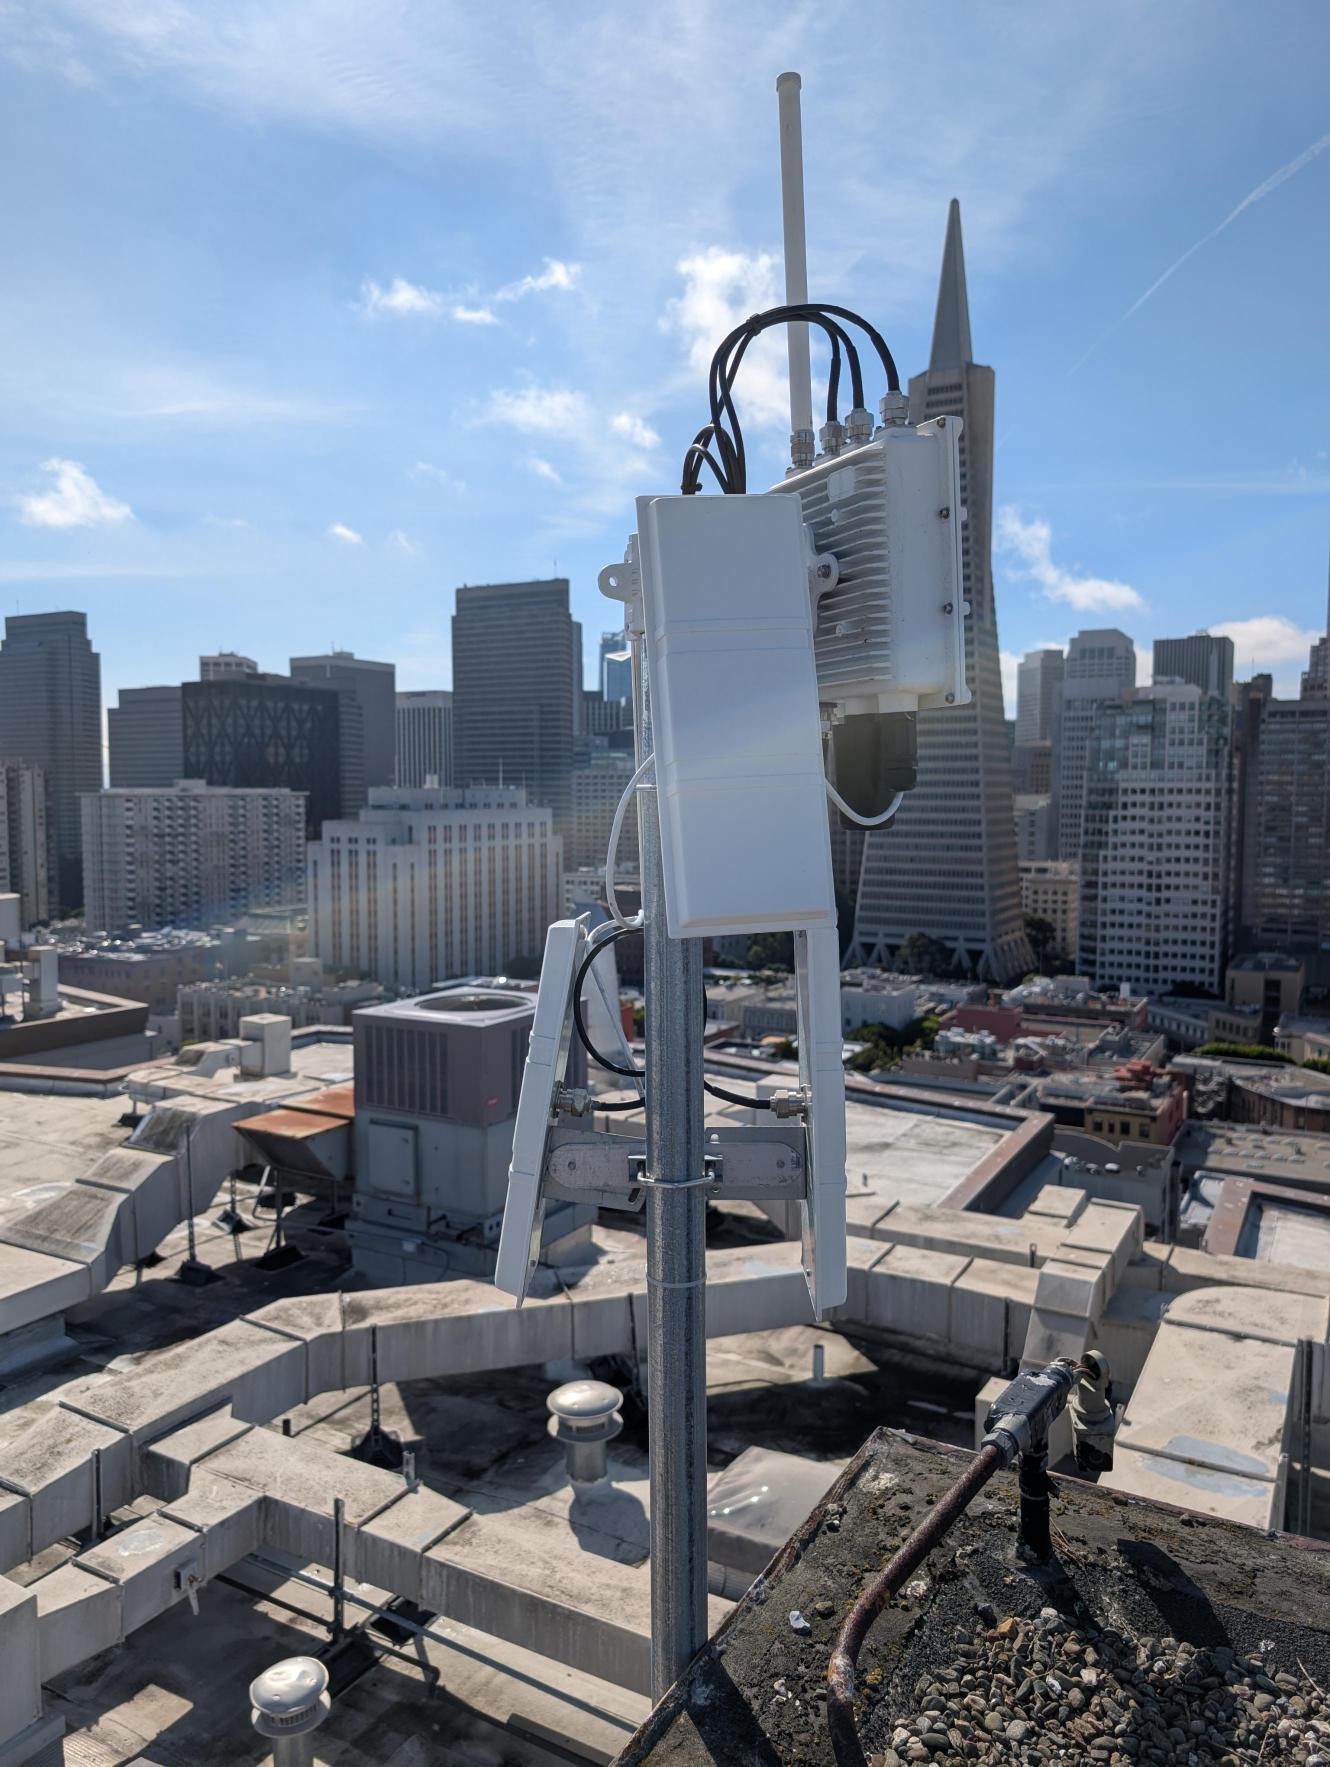
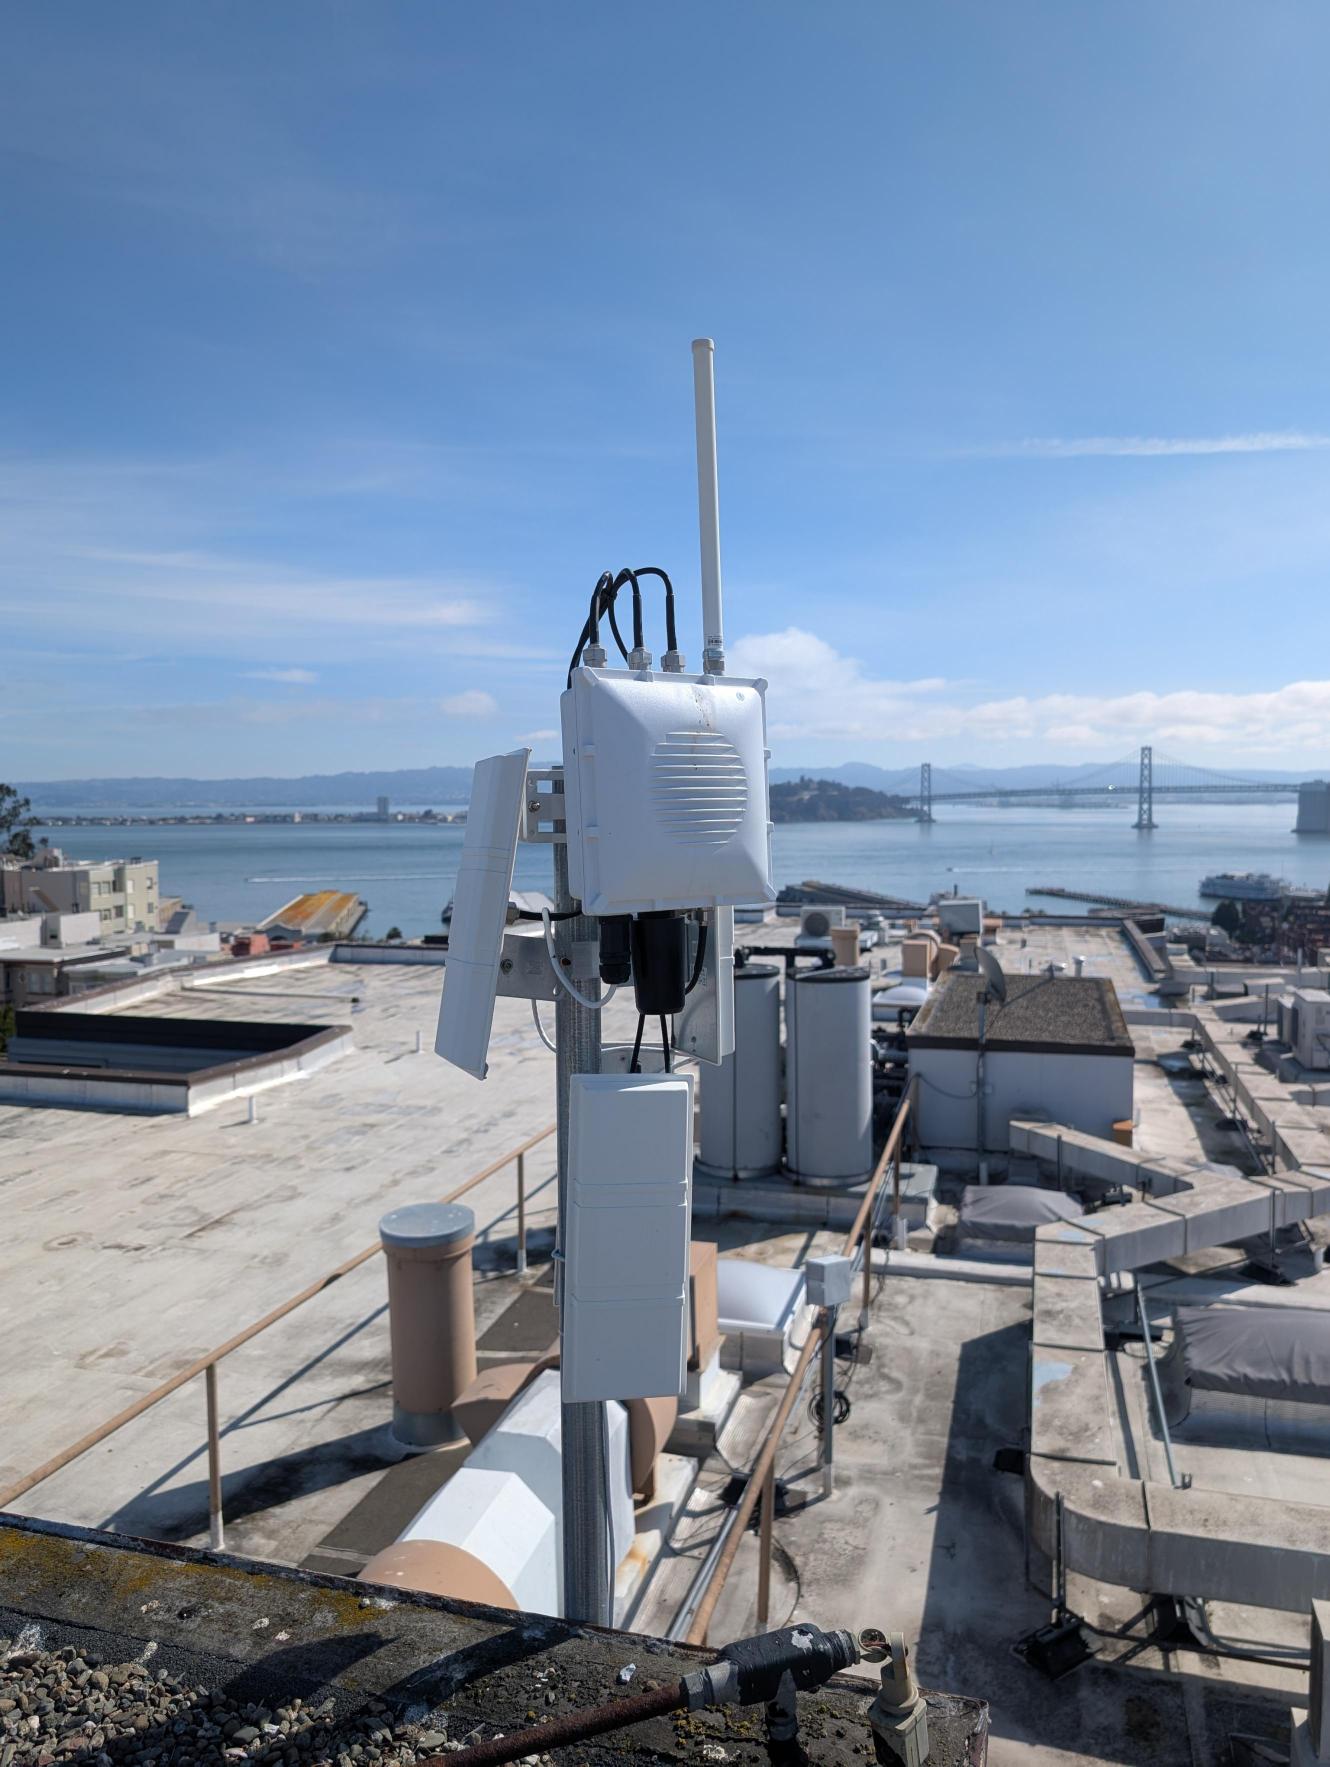
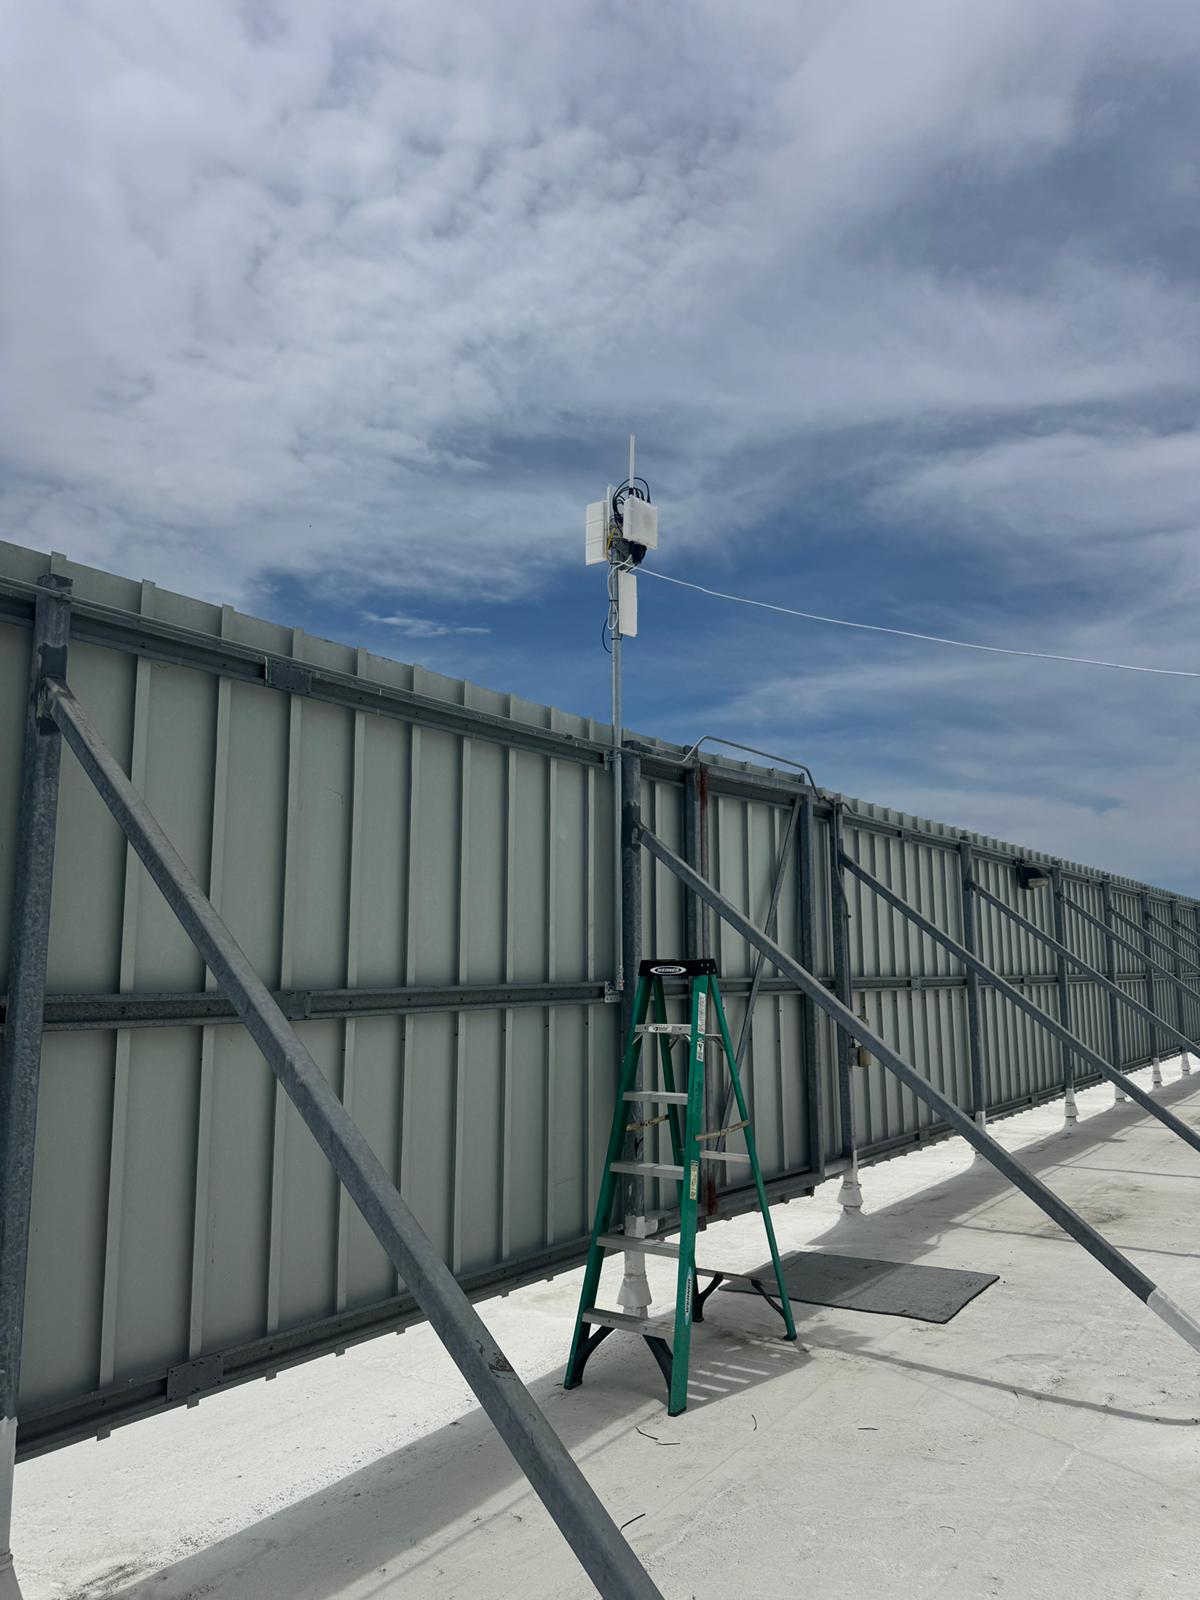
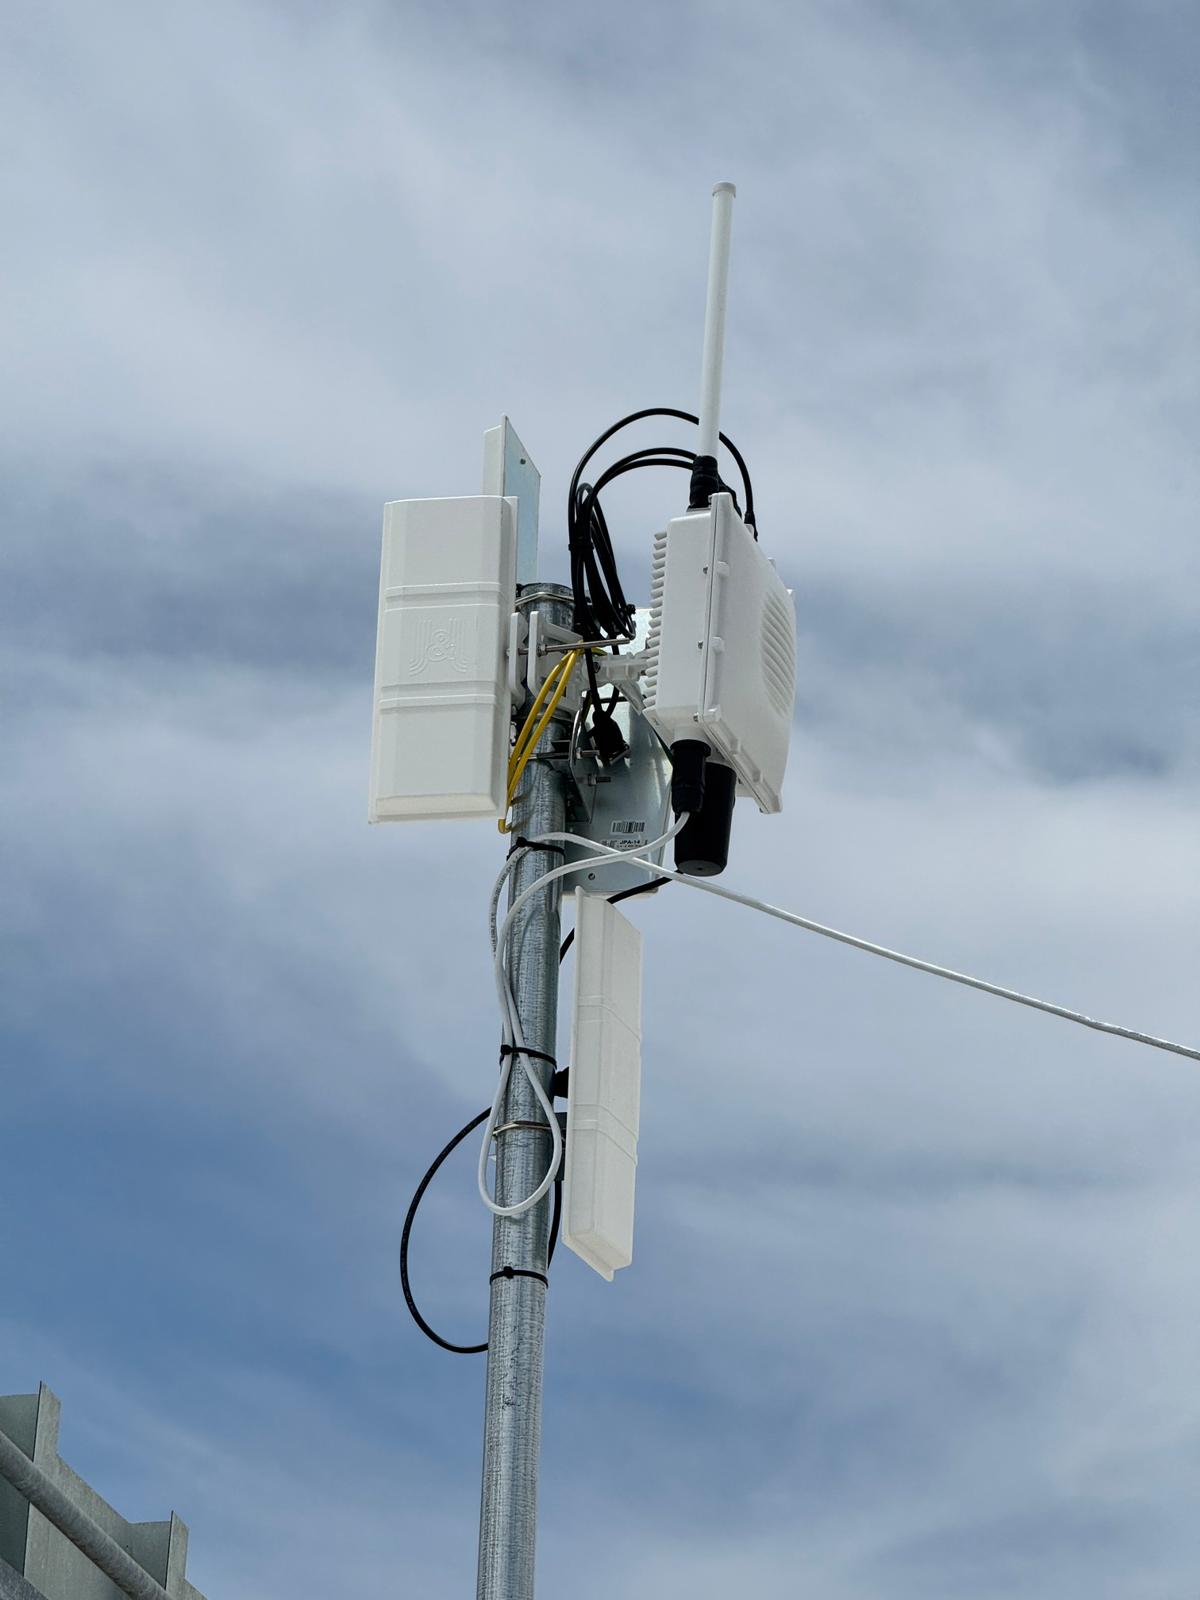
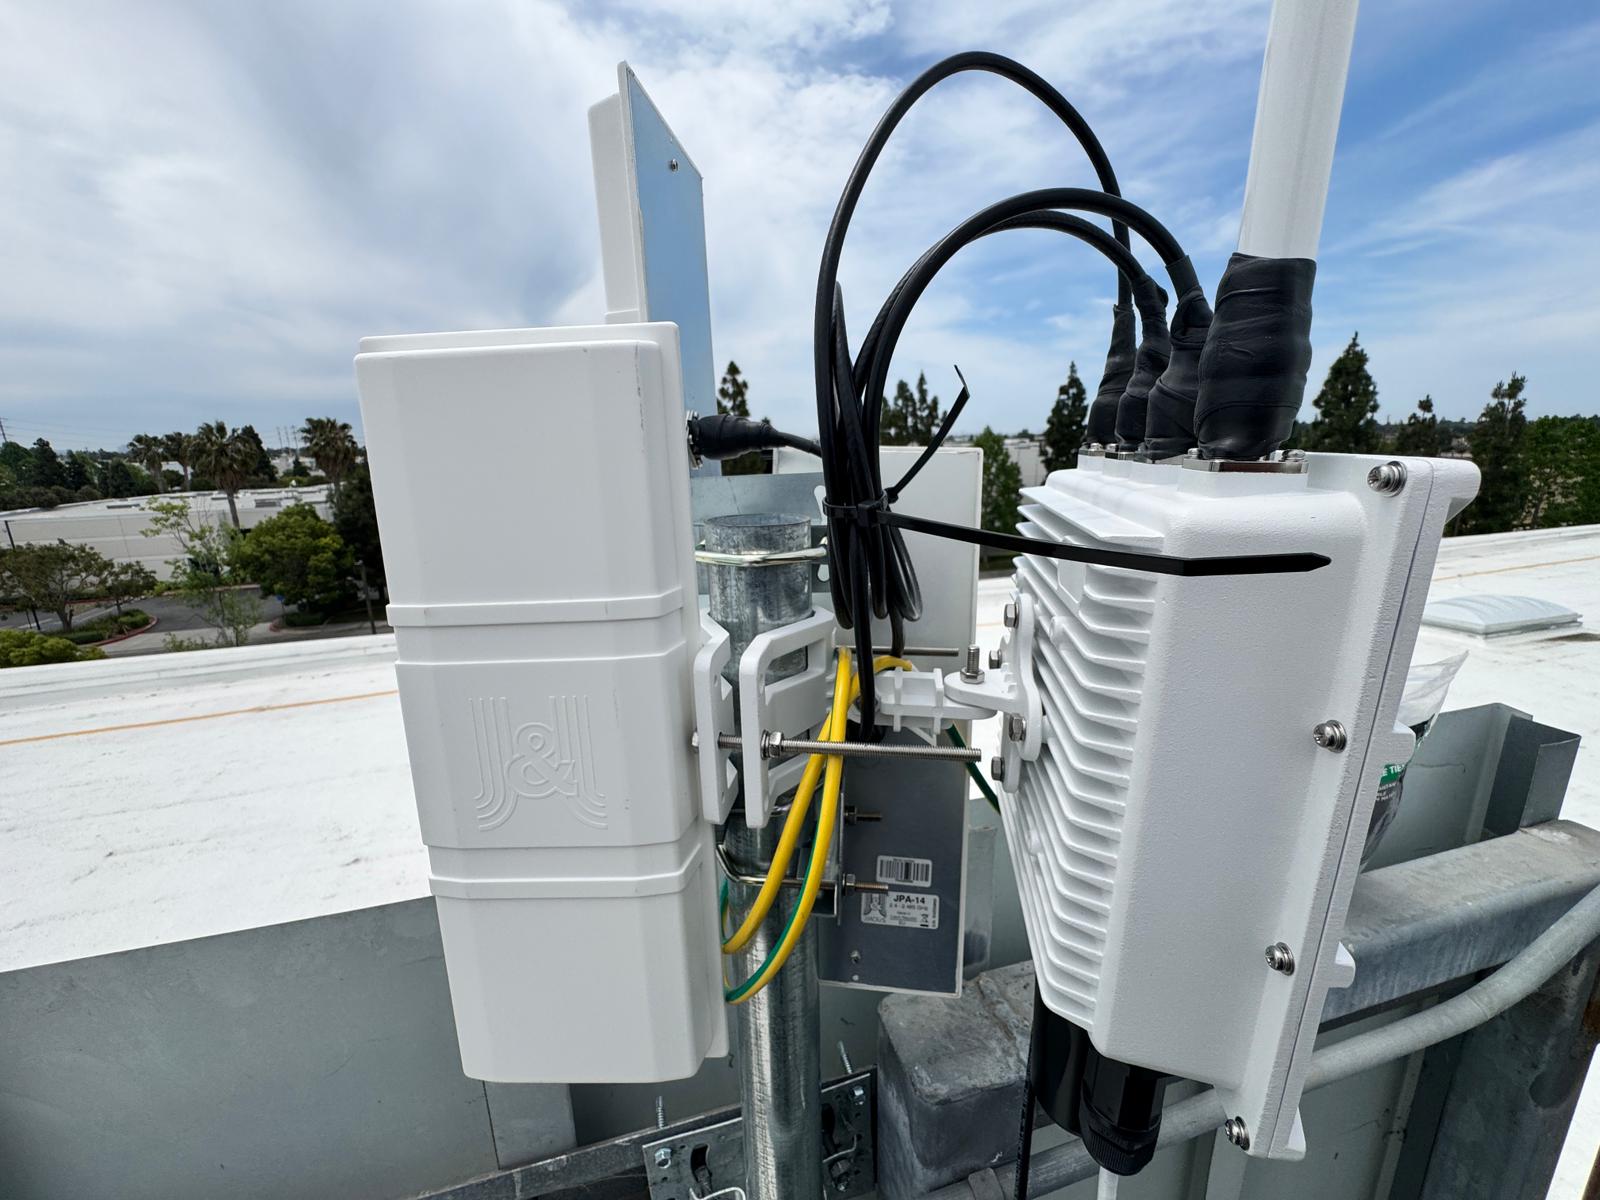
In this photo is Dronetag Scout with One Dual-Band Omnidirectional Antenna, Four Directional Antennas and Holder for Four Directional Antennas.
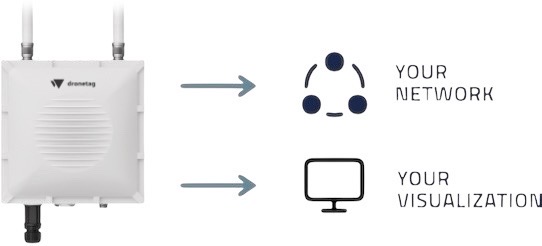
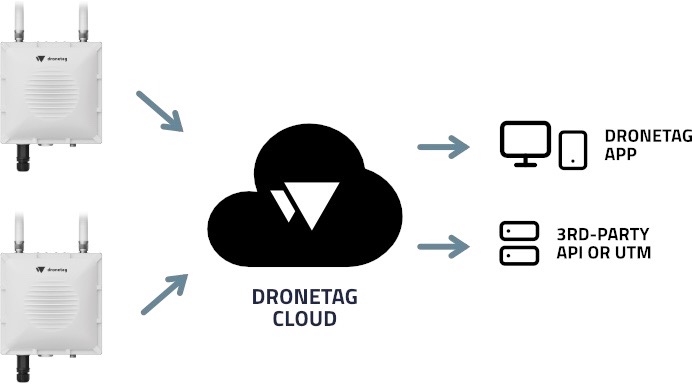
The Dronetag Scout is drone-agnostic and captures all Broadcast/Direct Remote ID data from drones that comply with Remote ID standards, such as DJI, Autel, and Skydio - up to 10 km in the EU, US, and Japan (with more regions expected to adopt these standards soon). The data can be sent in real-time to the Dronetag App for data visualization and airspace alerts or can be sent raw to third-party platforms without Dronetag apps being involved. It works regardless of whether the drone has built-in Remote ID capabilities or uses an external module.
Please note: the Scout device detects only Remote ID signals - if the drone does not broadcast any Remote ID, the Scout will not detect it.
In countries where Remote ID is not mandatory, Scout can only detect drones that have an active Remote ID transmission (for example: Canada, Australia, New Zealand, and others).
Keep in mind that Remote ID broadcasting behavior depends on each drone’s firmware version and location awareness.
Many drones use their built-in GNSS position and firmware rules to automatically enable or disable Remote ID transmission depending on the country they are currently flying in.
This means that the same drone may be detectable in one region but not visible in another, depending on whether its firmware recognizes that Remote ID regulations apply in that specific airspace.
For a detailed and up-to-date list of Remote ID compatible drones, please contact the official agencies:
Supports Bluetooth 2.4 GHz (4 Legacy and 5 Long Range) and Wi-Fi Beacon / NaN Remote ID technologies across both 2.4 GHz and 5 GHz bands - fully compliant with ASTM F3411-22A, ASD-STAN EN 4709-002, FAA, EASA, and MLIT standards.
Scout continuously scans all available Bluetooth and Wi-Fi channels, ensuring that no drone goes undetected - even those transmitting on non-standard or less-used frequencies.
Advanced Drone and Pilot Detection
Multiple independent radio modules operate in parallel, receiving and decoding all nearby Remote ID signals in real time.
Scout can identify:
Active drones, their pilots (take-off locations), and manufacturers/models
Every active Remote ID transmission in the area - with no upper limit on how many drones can be tracked simultaneously
💡 Scout can detect and visualize thousands (even millions) of drones at once, with zero false positives.
Intelligent Multi-Channel Scanning
Scout uses adaptive channel selection, automatically prioritizing the frequencies where active drones are broadcasting.
This approach ensures:
Higher positional accuracy for each detected drone
Continuous background scanning of other channels for new detections
Smarter bandwidth allocation, maximizing coverage and reliability in dense RF environments
The result: precise, real-time tracking with unmatched reliability - even in signal-heavy urban areas.
Modular Design and Custom Configurations
Scout’s architecture is fully modular and can be tailored to your specific operational needs.
Choose from:
Basic Omni Setup – compact dual-antenna system for standard operations
Directional Antennas – directional coverage for specific zones
360° Multi-Directional Setup – full perimeter protection for critical infrastructure or city-wide deployments
Expansion modules for ADS-B, ADS-L, FLARM, and others
→ enabling complete airspace awareness across both crewed and uncrewed aviation layers.
Real-Time View and Data Logging
If used in Cloud Mode, you can visualize detections instantly in the Dronetag App (Android, iOS, or Web), or integrate data into your C-UAS / UTM system via API, MQTT, webhooks and other options.
If used in Cloud Mode, all detections are automatically stored and timestamped for analysis, investigation, or evidence.
Features include:
Live airspace view with filters and history
Geofencing and alerts for unauthorized activity
Exportable logs for reporting or legal documentation
Seamless Cloud Integration
When connected to the internet, Scout transmits detections securely to the Dronetag Cloud (if used in Cloud Mode) for real-time synchronization, multi-sensor deduplication, and API access.
Cloud-connected Scouts receive automatic firmware and database updates for new drone models and protocol improvements - ensuring your system always performs at its peak.
Effortless Installation
Deploy Scout anywhere with pole or wall mounting options.
Power and data are combined through PoE / PoE+, minimizing cabling and simplifying setup.
An optional 4G module provides flexible online access when wired networks aren’t available.
As a passive receiver, Scout creates no radio interference and operates silently in any environment.
Built to Last
Constructed with an IP67-rated aluminum enclosure, internal heating, and industrial-grade components, Scout runs reliably in extreme conditions from –20 °C to +50 °C.
Supports multi-GNSS positioning (GPS, Galileo, GLONASS, BeiDou) for precise localization.
Multi-GNSS Positioning & Timing
Scout integrates a multi-constellation GNSS receiver (GPS, Galileo, GLONASS, BeiDou). This module is critical for:
🗺️ Precise Scout location on the map - shows exactly where each unit is deployed and where signals are captured.
⏱️ High-precision GNSS time reference - provides micro-second-grade timestamps for every received Remote ID message, enabling tight synchronization between multiple Scouts and accurate sequencing of fast events.
📏 Distance & bearing calculation to detected drones - by combining the Scout’s known position with the drone’s broadcasted GNSS data, the system can compute exact proximity and direction.
🔒 Anti-spoofing & data validation - GNSS position/time are used to verify the plausibility of received messages (e.g., matching timestamps, expected distances and movement), helping detect spoofed or falsified signals.
Result: multi-GNSS gives Scout the geographic accuracy, timing precision, and signal integrity needed for trustworthy, high-resolution airspace monitoring.
The range is defined by the Remote ID transmitter power on the drone and the environment in which the receiver is located. For this User Guide, we divided it into Detection Range and Tracking Range:
Real-time, continuous reception for reliable monitoring.
Antenna type
Urban Area
Rural Area
Omnidirectional
up to 2 km / 1.2 mi
up to 4 km / 2.5 mi
Directional (Sector)
up to 5 km / 3.1 mi
up to 20 km / 12.5 mi
Tests were based on real internal testing. Drones were flown at different altitudes and distances. A Dronetag Beacon (Bluetooth) and DJI Mavic 3 (Wi-Fi) were used as transmitters, and results comply with EU signal power regulations.
Directional Antennas
With directional antennas, both detection and tracking ranges may nearly double, depending on placement and environment. This is especially useful for installations covering a specific sector or overcoming interference.
NOTICE
Detection range can vary significantly based on environmental conditions, obstacles, and interference. Urban environments may cause range reductions. Learn more about factors influencing Remote ID detection.
We recommend using the Scout in Cloud Mode together with the Dronetag App — it's the easiest way to set up, manage, and monitor your system. It offers full feature access including real-time tracking, data storage, alerts and remote control.
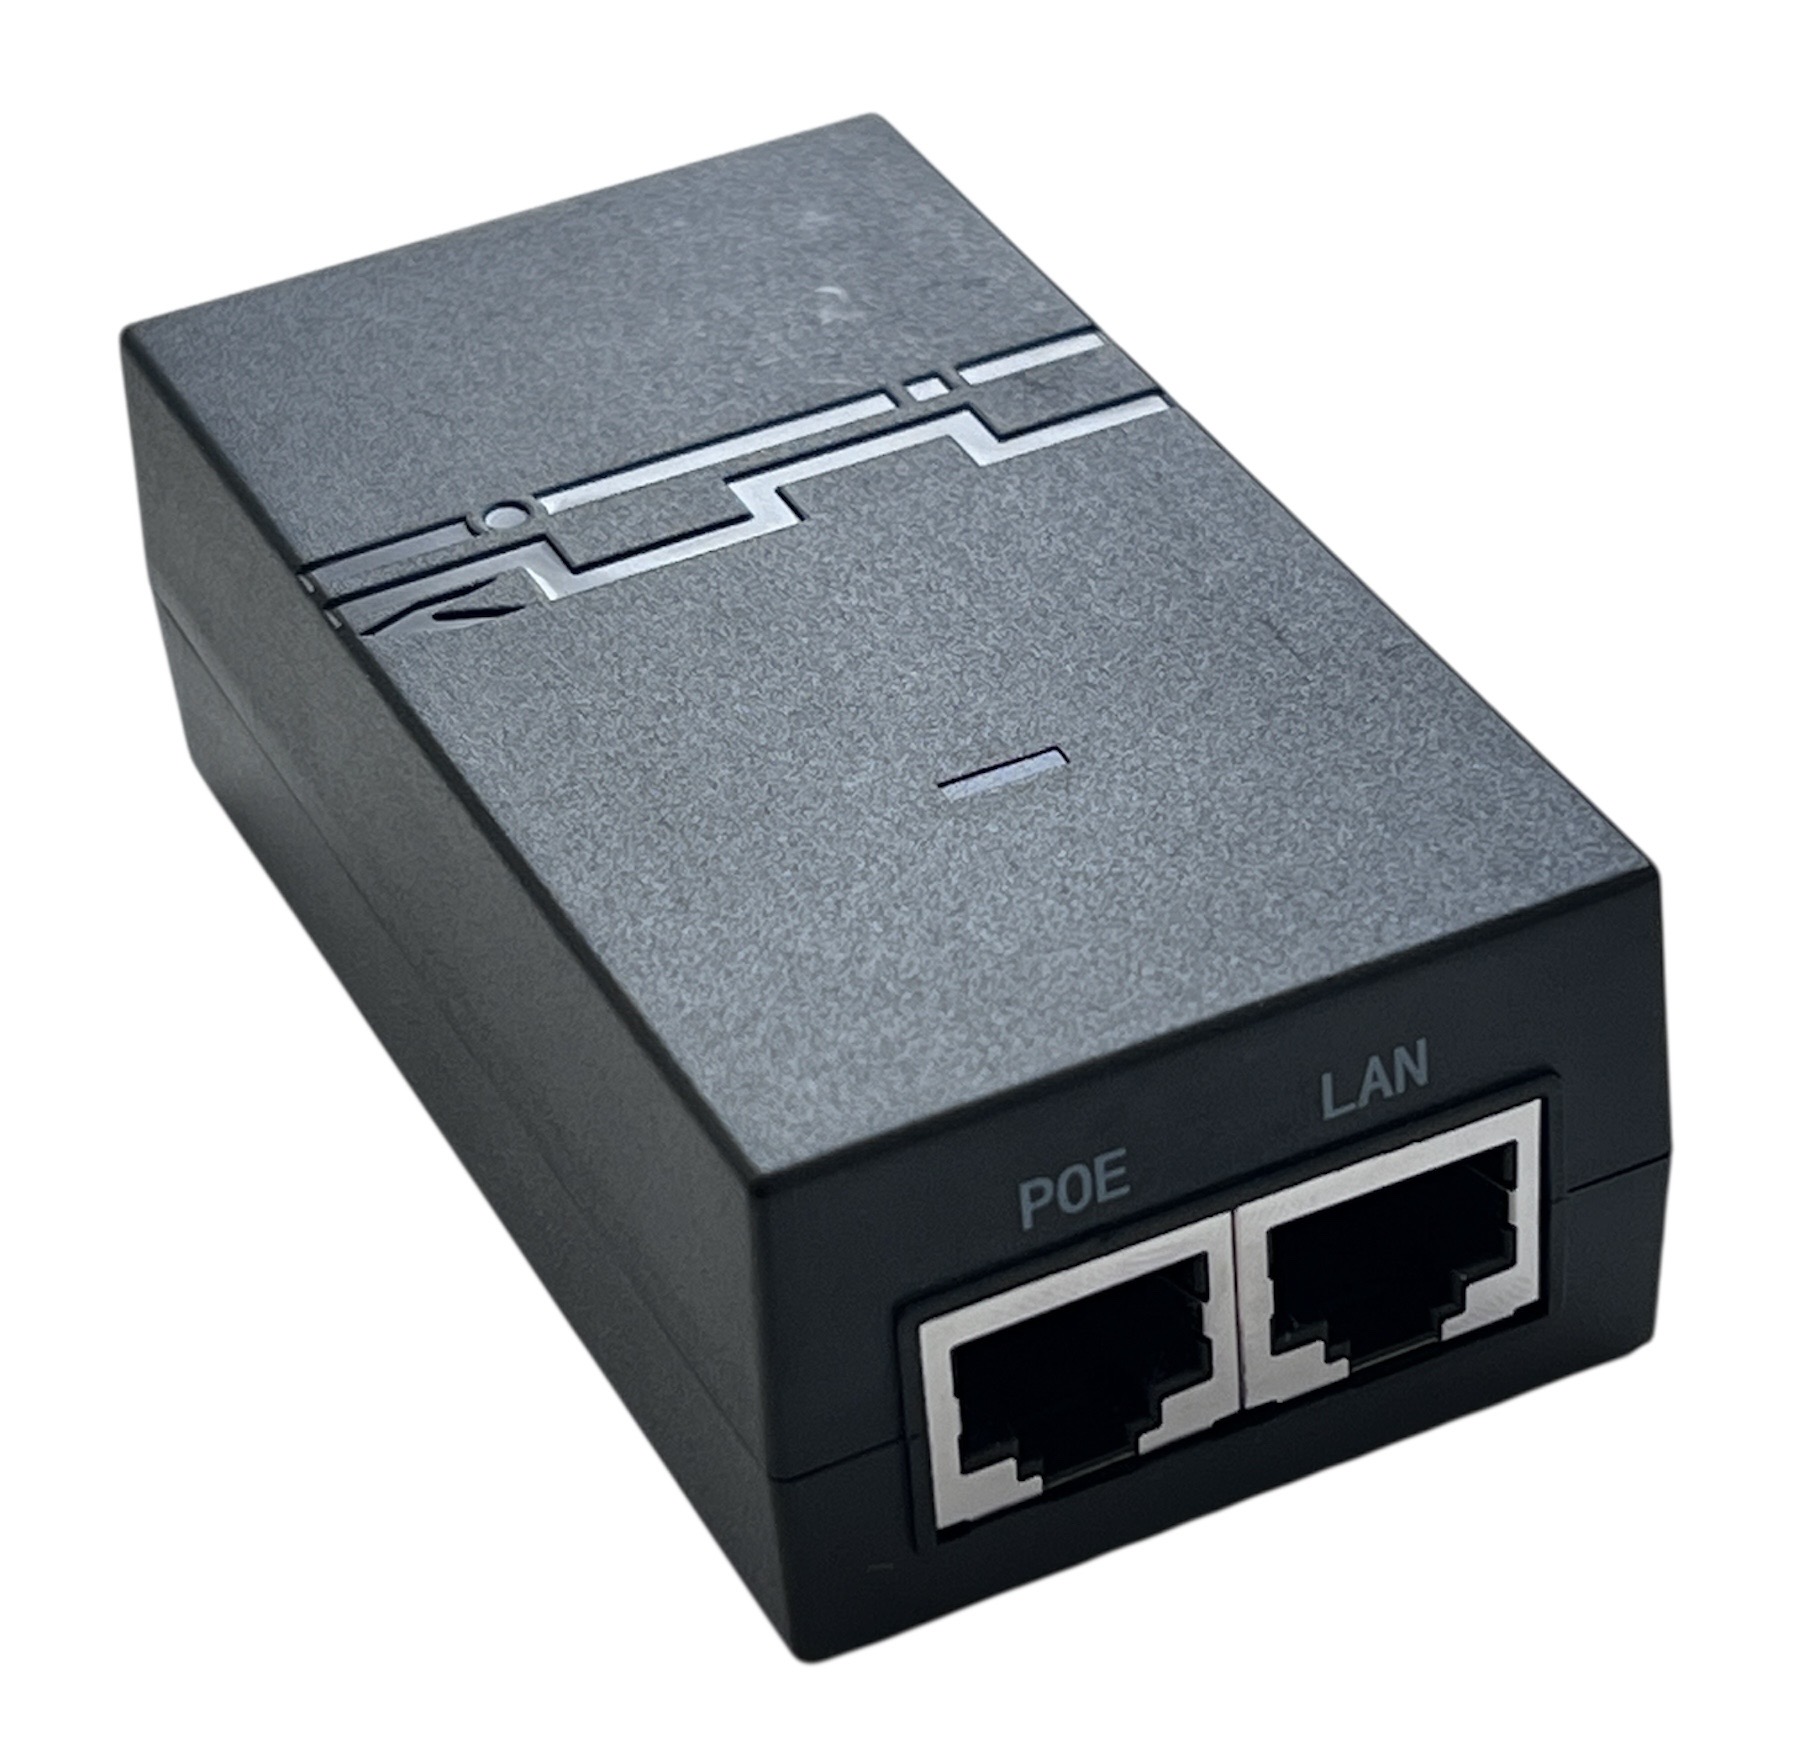
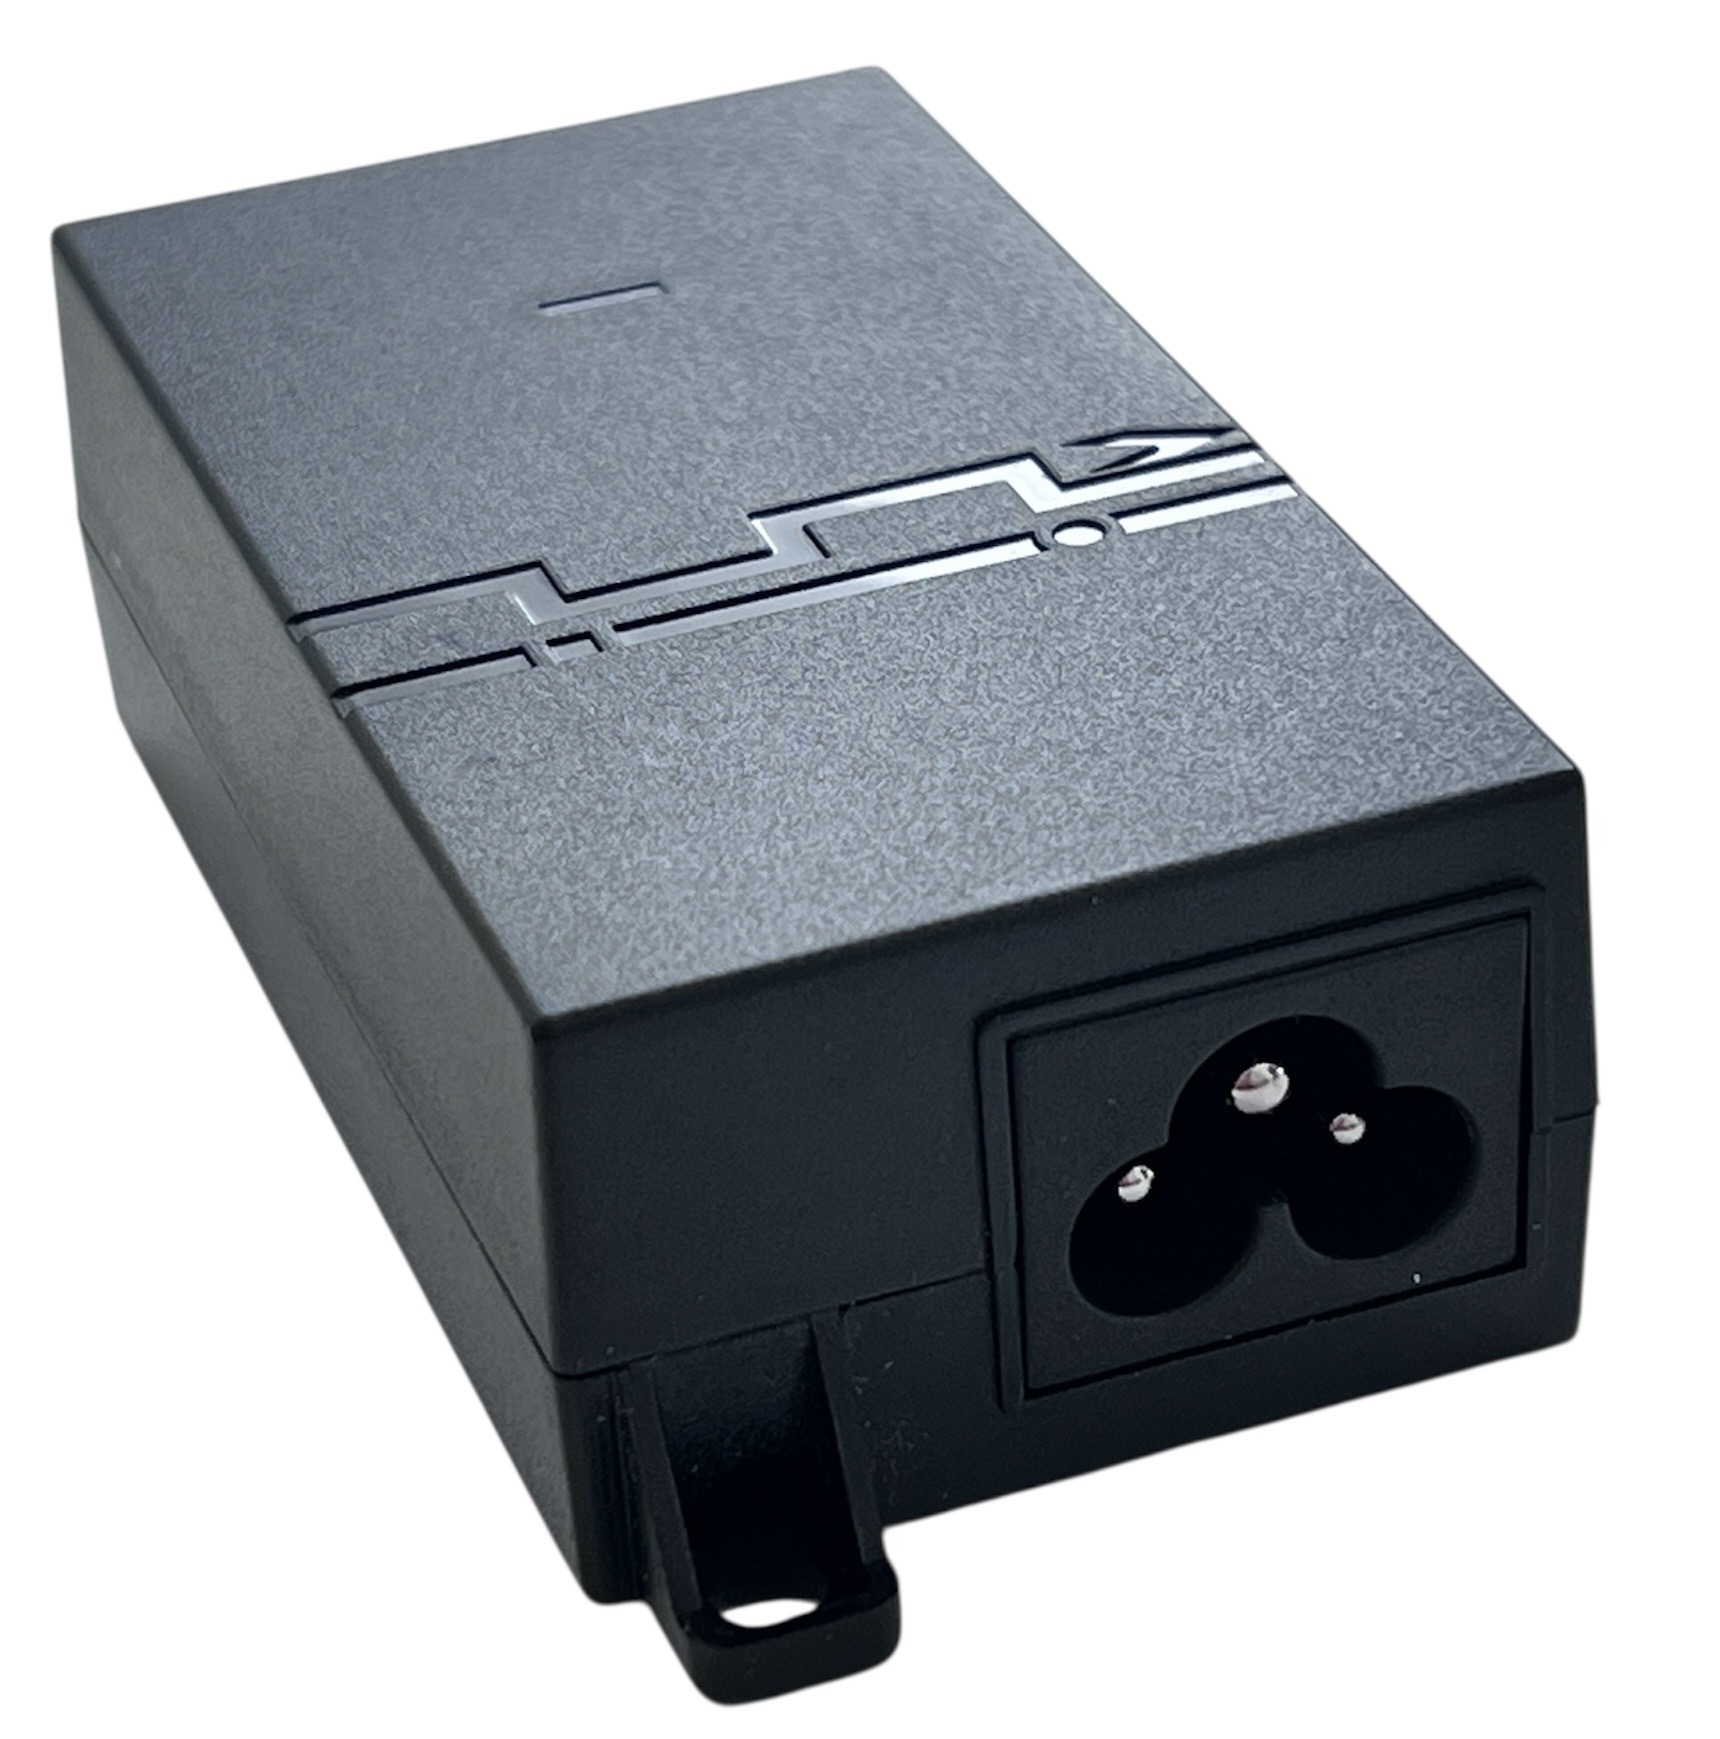
The PoE injector is a device that allows you to combine power and network connectivity to your PoE enabled devices using the same Cat5/5e or Cat6 twisted pair cable.
note
If you want to use your own PoE switch, it must conform to IEEE 802.3af/at and support at least 0.5A at 48V.
warning
The PoE injector should be placed indoors. It has to be placed in a dry area without extreme temperatures (intended for home temperatures only - 0 to 40˚C). The PoE injector is not waterproof.
PoE Features:
Input: 100-240 V AC (50~60 Hz)
Output: 48.0 V DC 0.5 A
Overcurrent protection
Supports 10/100 Mbps Ethernet
92.5x47x29.8 mm (±1 mm)
caution
Connection to Scout should be configured to 100Mbit Full Duplex.
Dronetag s.r.o. carries no responsibility for wrong usage or wrong installation.
LTE VERSION OF SCOUT
LTE version of Dronetag Scout, with ordered connectivity, includes micro-SIM card, which is already plugged in the device.
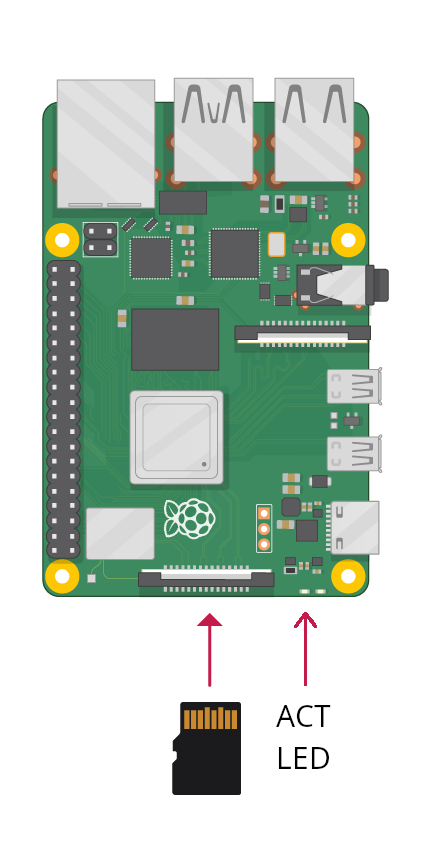
When there is no connectivity ordered, Scout comes with no micro-SIM card plugged in the device and the user needs to plug in their own micro-SIM card. Here is a Step-by-Step Guide on how to do it.
Variants of Scout
Dronetag Scout is available in several configurations tailored to your monitoring needs.
Each setup combines omnidirectional and directional antennas to achieve the ideal coverage pattern for your environment.
Dronetag Scout is available in multiple antenna configurations, allowing you to tailor the system to your specific monitoring needs.
Depending on your deployment — whether you need 360° situational awareness or extended range in one or more directions — you can choose from several combinations of omnidirectional and directional antennas for optimal airspace coverage.
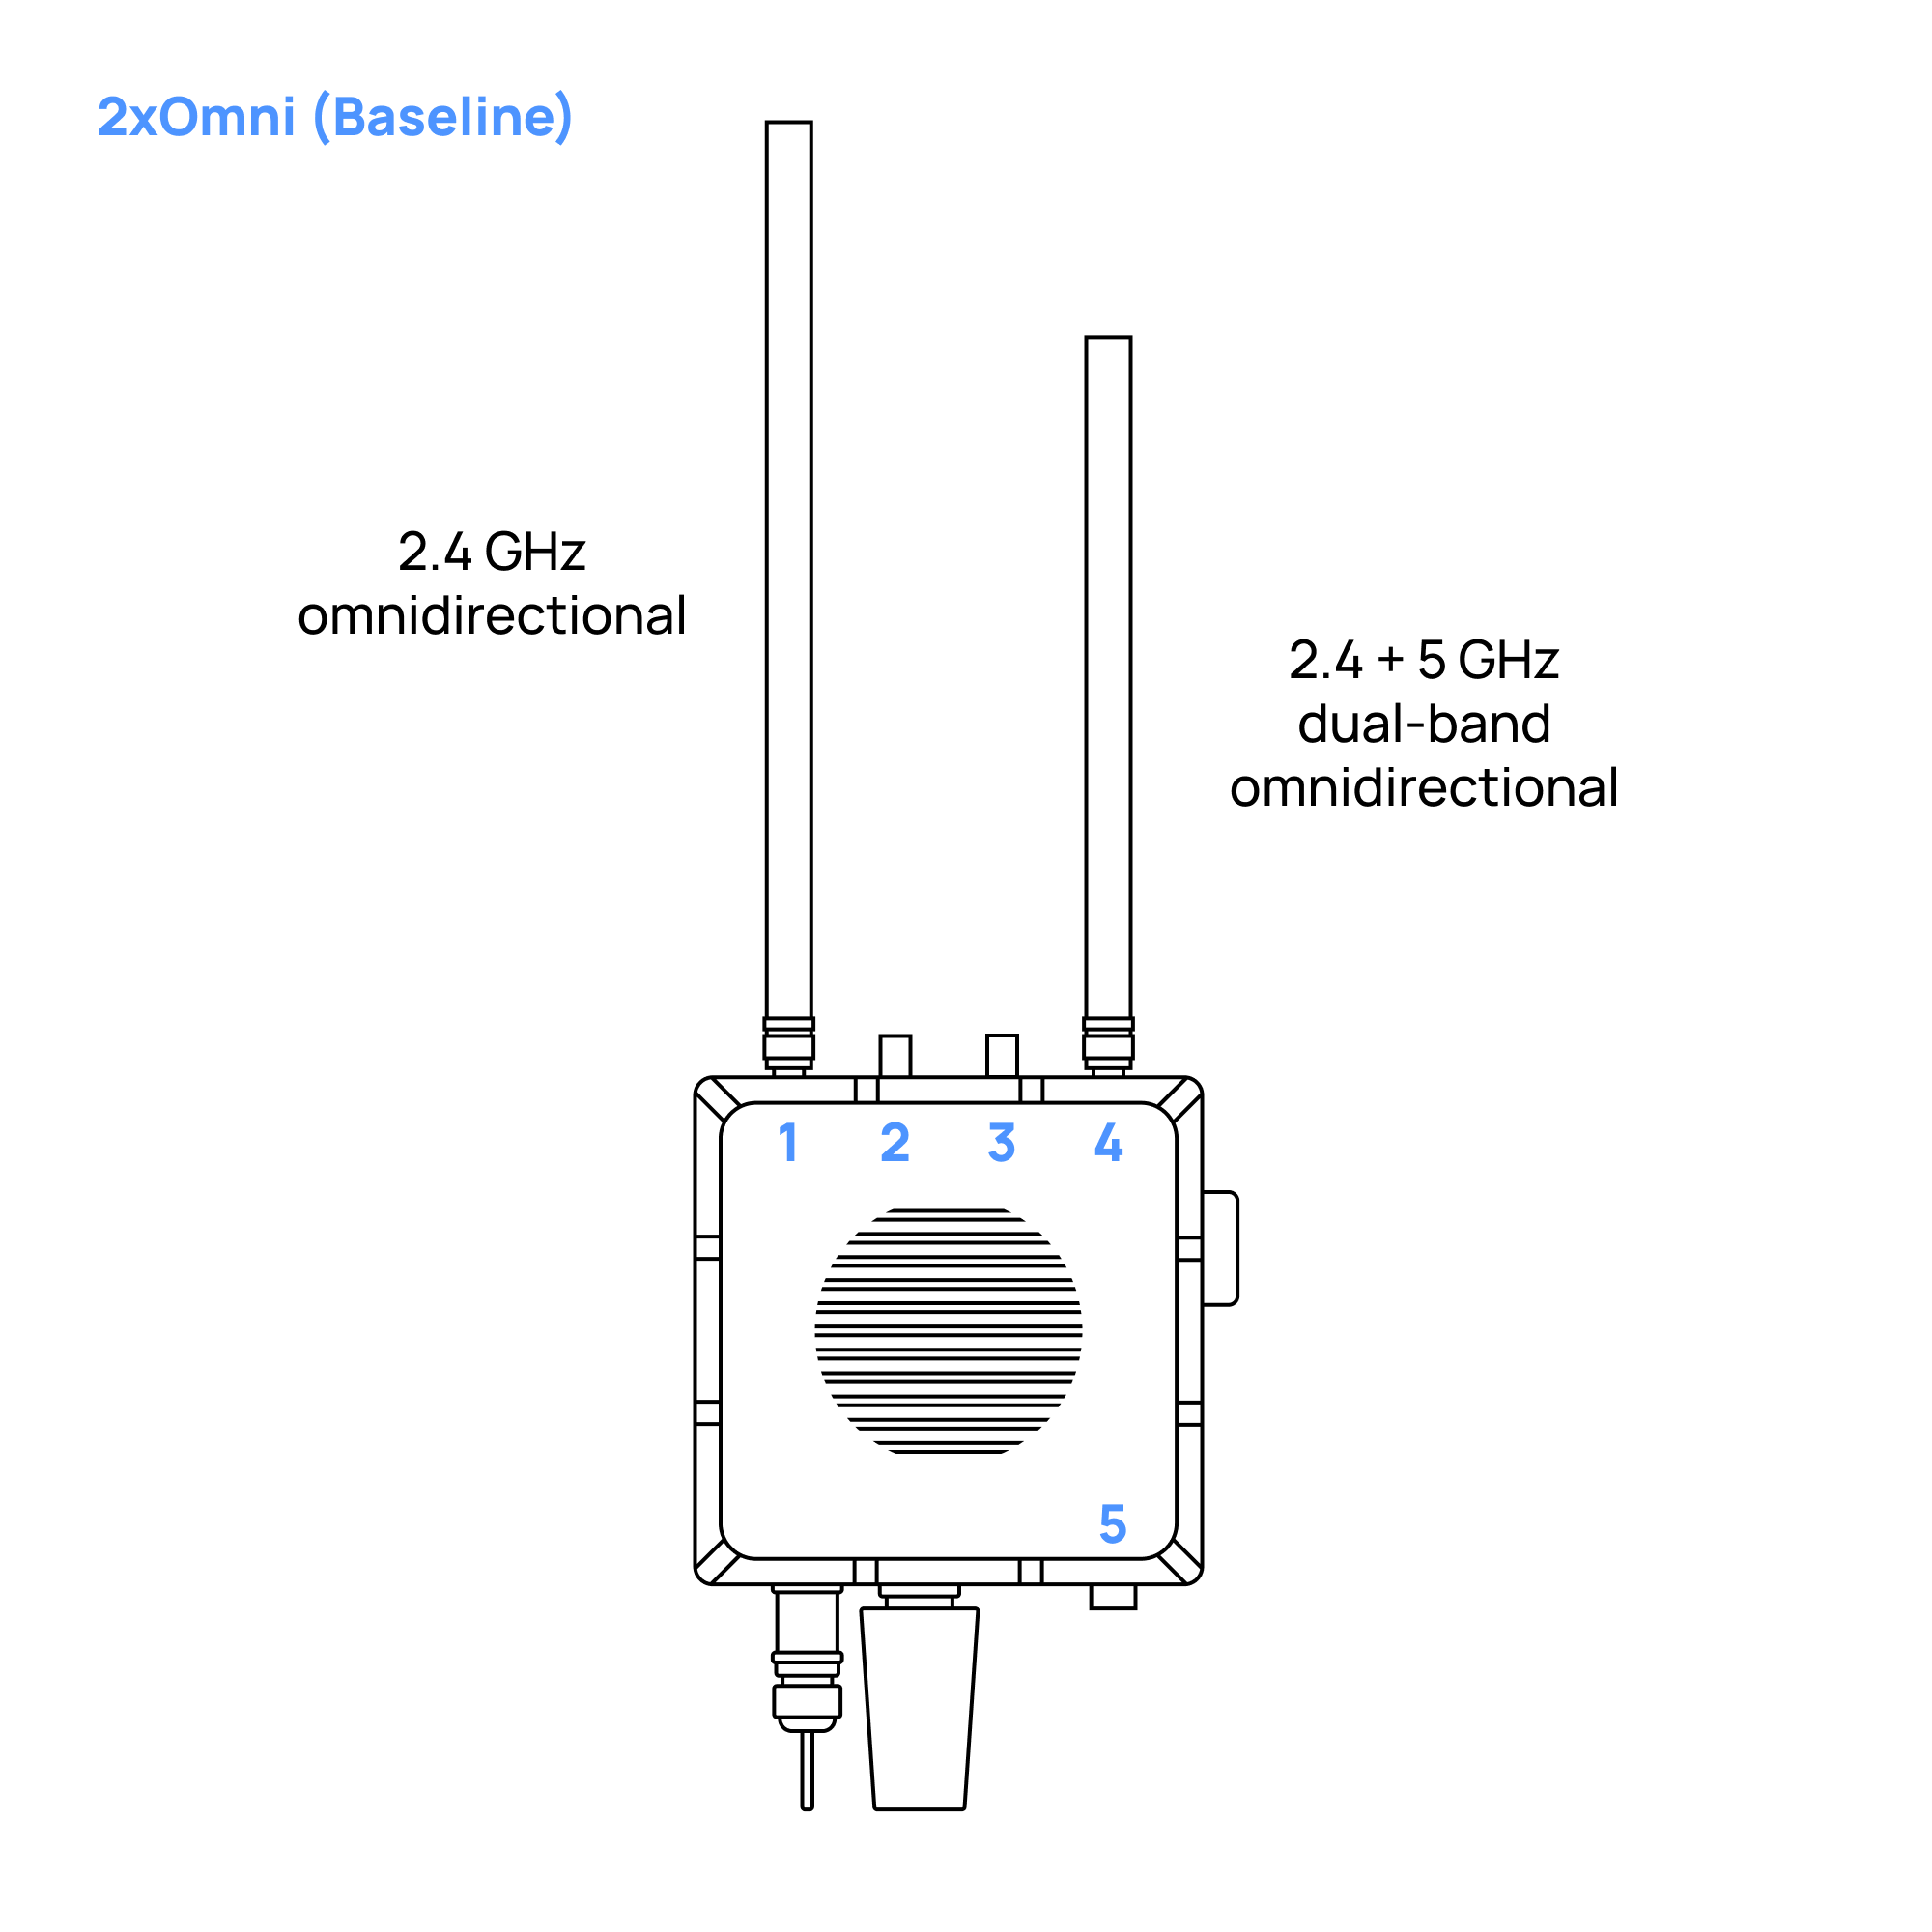
The Baseline model includes two omnidirectional antennas providing full 360° airspace coverage.
One antenna operates at 2.4 GHz, the other at 2.4 GHz + 5 GHz.
This configuration is fully sufficient for general airspace awareness and locations with clear line of sight — ideal when mounted on elevated or unobstructed positions.
Provides balanced detection performance for most deployments.
Four directional antennas provide full extended-range coverage (360°) on 2.4 GHz.
One omnidirectional antenna ensures complete 5 GHz visibility in all directions and also serves as a backup receiver for 2.4 GHz in case any directional antenna becomes jammed or experiences interference.
Designed for critical infrastructure, airports, or urban rooftops where maximum range and reliability are essential.
Below are approximate total installation weights of different Dronetag Scout antenna configurations, including mounting holders and antennas.
note
Weights are approximate and may slightly vary depending on mounting configuration and accessories used.
All listed weights represent complete assembled units, ready for installation, including antenna holders where applicable. The directional antenna holder can also be purchased separately as an optional accessory. It is included by default only in the 4-sector antenna configuration, while the baseline variant does not include sector antennas or the holder.
Beyond antenna configurations, customers can independently select additional modules and software options according to their operational needs.
Each Scout unit can be customized with connectivity and data-service features tailored to the deployment scenario.
Adds integrated LTE connectivity, enabling real-time data transmission without Ethernet connection.
Ideal for remote deployments or temporary installations where wired internet is unavailable.
The LTE module can be added to any Scout configuration, regardless of antenna setup.
Required to operate Scout in Cloud Mode, On-Premise Mode, or Sensor+ Mode.
Includes access to Dronetag Cloud, live visualization, data history, deduplication, and integrations.
Not required for Sensor Mode, where Scout is used for raw data collection and integration into your own system.
The license can be activated independently of hardware configuration.
Future versions of Scout will support optional modules such as ADS-B, ADS-L, FLARM and others, further extending detection capabilities beyond Remote ID to provide complete situational awareness across both crewed and uncrewed aviation.
💡 Need help choosing?
Baseline – ideal for standard airspace awareness.
Directional setups – increase range and precision for specific sectors.
LTE + Cloud License – unlock remote, real-time, and multi-sensor features for enterprise or security applications.
Operating Modes
Dronetag Scout supports multiple operational modes to suit different deployment scenarios and customer needs — from low-overhead standalone integrations to cloud-connected systems with advanced features and visualization tools.
This page provides a quick overview of the available modes to help you choose the best configuration for your use case.
Sensor Mode turns the Scout into a dependable, plug-and-play Remote ID receiver. It captures compliant drone broadcasts and outputs decoded data via MQTT or HTTP webhooks — no cloud, no registration, and no subscription required.
Sensor+ Mode builds on Sensor Mode by adding real-time drone classification and enterprise-grade support. It’s designed for users who need a more intelligent system with simplified integration and enhanced situational awareness.
warning
Sensor+ Mode is currently under development and will be available in a future firmware update.
Cloud Mode enables the full suite of Dronetag capabilities — from setup to data visualization — all managed through the Dronetag App. Designed for easy deployment with mobile and web control, Cloud Mode brings real-time insight anywhere you go.
On-Premise mode mirrors the Cloud Mode’s capabilities but runs entirely within your infrastructure. Ideal for sensitive or regulated deployments (e.g. defense, government, critical infrastructure), it offers complete control over data privacy and system access.
📩 For On-Premise deployments, please contact us at support@dronetag.com to discuss your requirements.
tip
Want a quick overview of Scout's operating modes? Check out our Scout Operating Modes Guide for a detailed breakdown.
For detailed setup instructions for each mode, see the relevant sections in the Getting Started Guide.
What is in the Box
At Dronetag, we strive to deliver the most functional and reliable solutions for your Remote ID needs.
Each Scout package is carefully assembled to ensure you have everything required for a smooth and efficient setup.
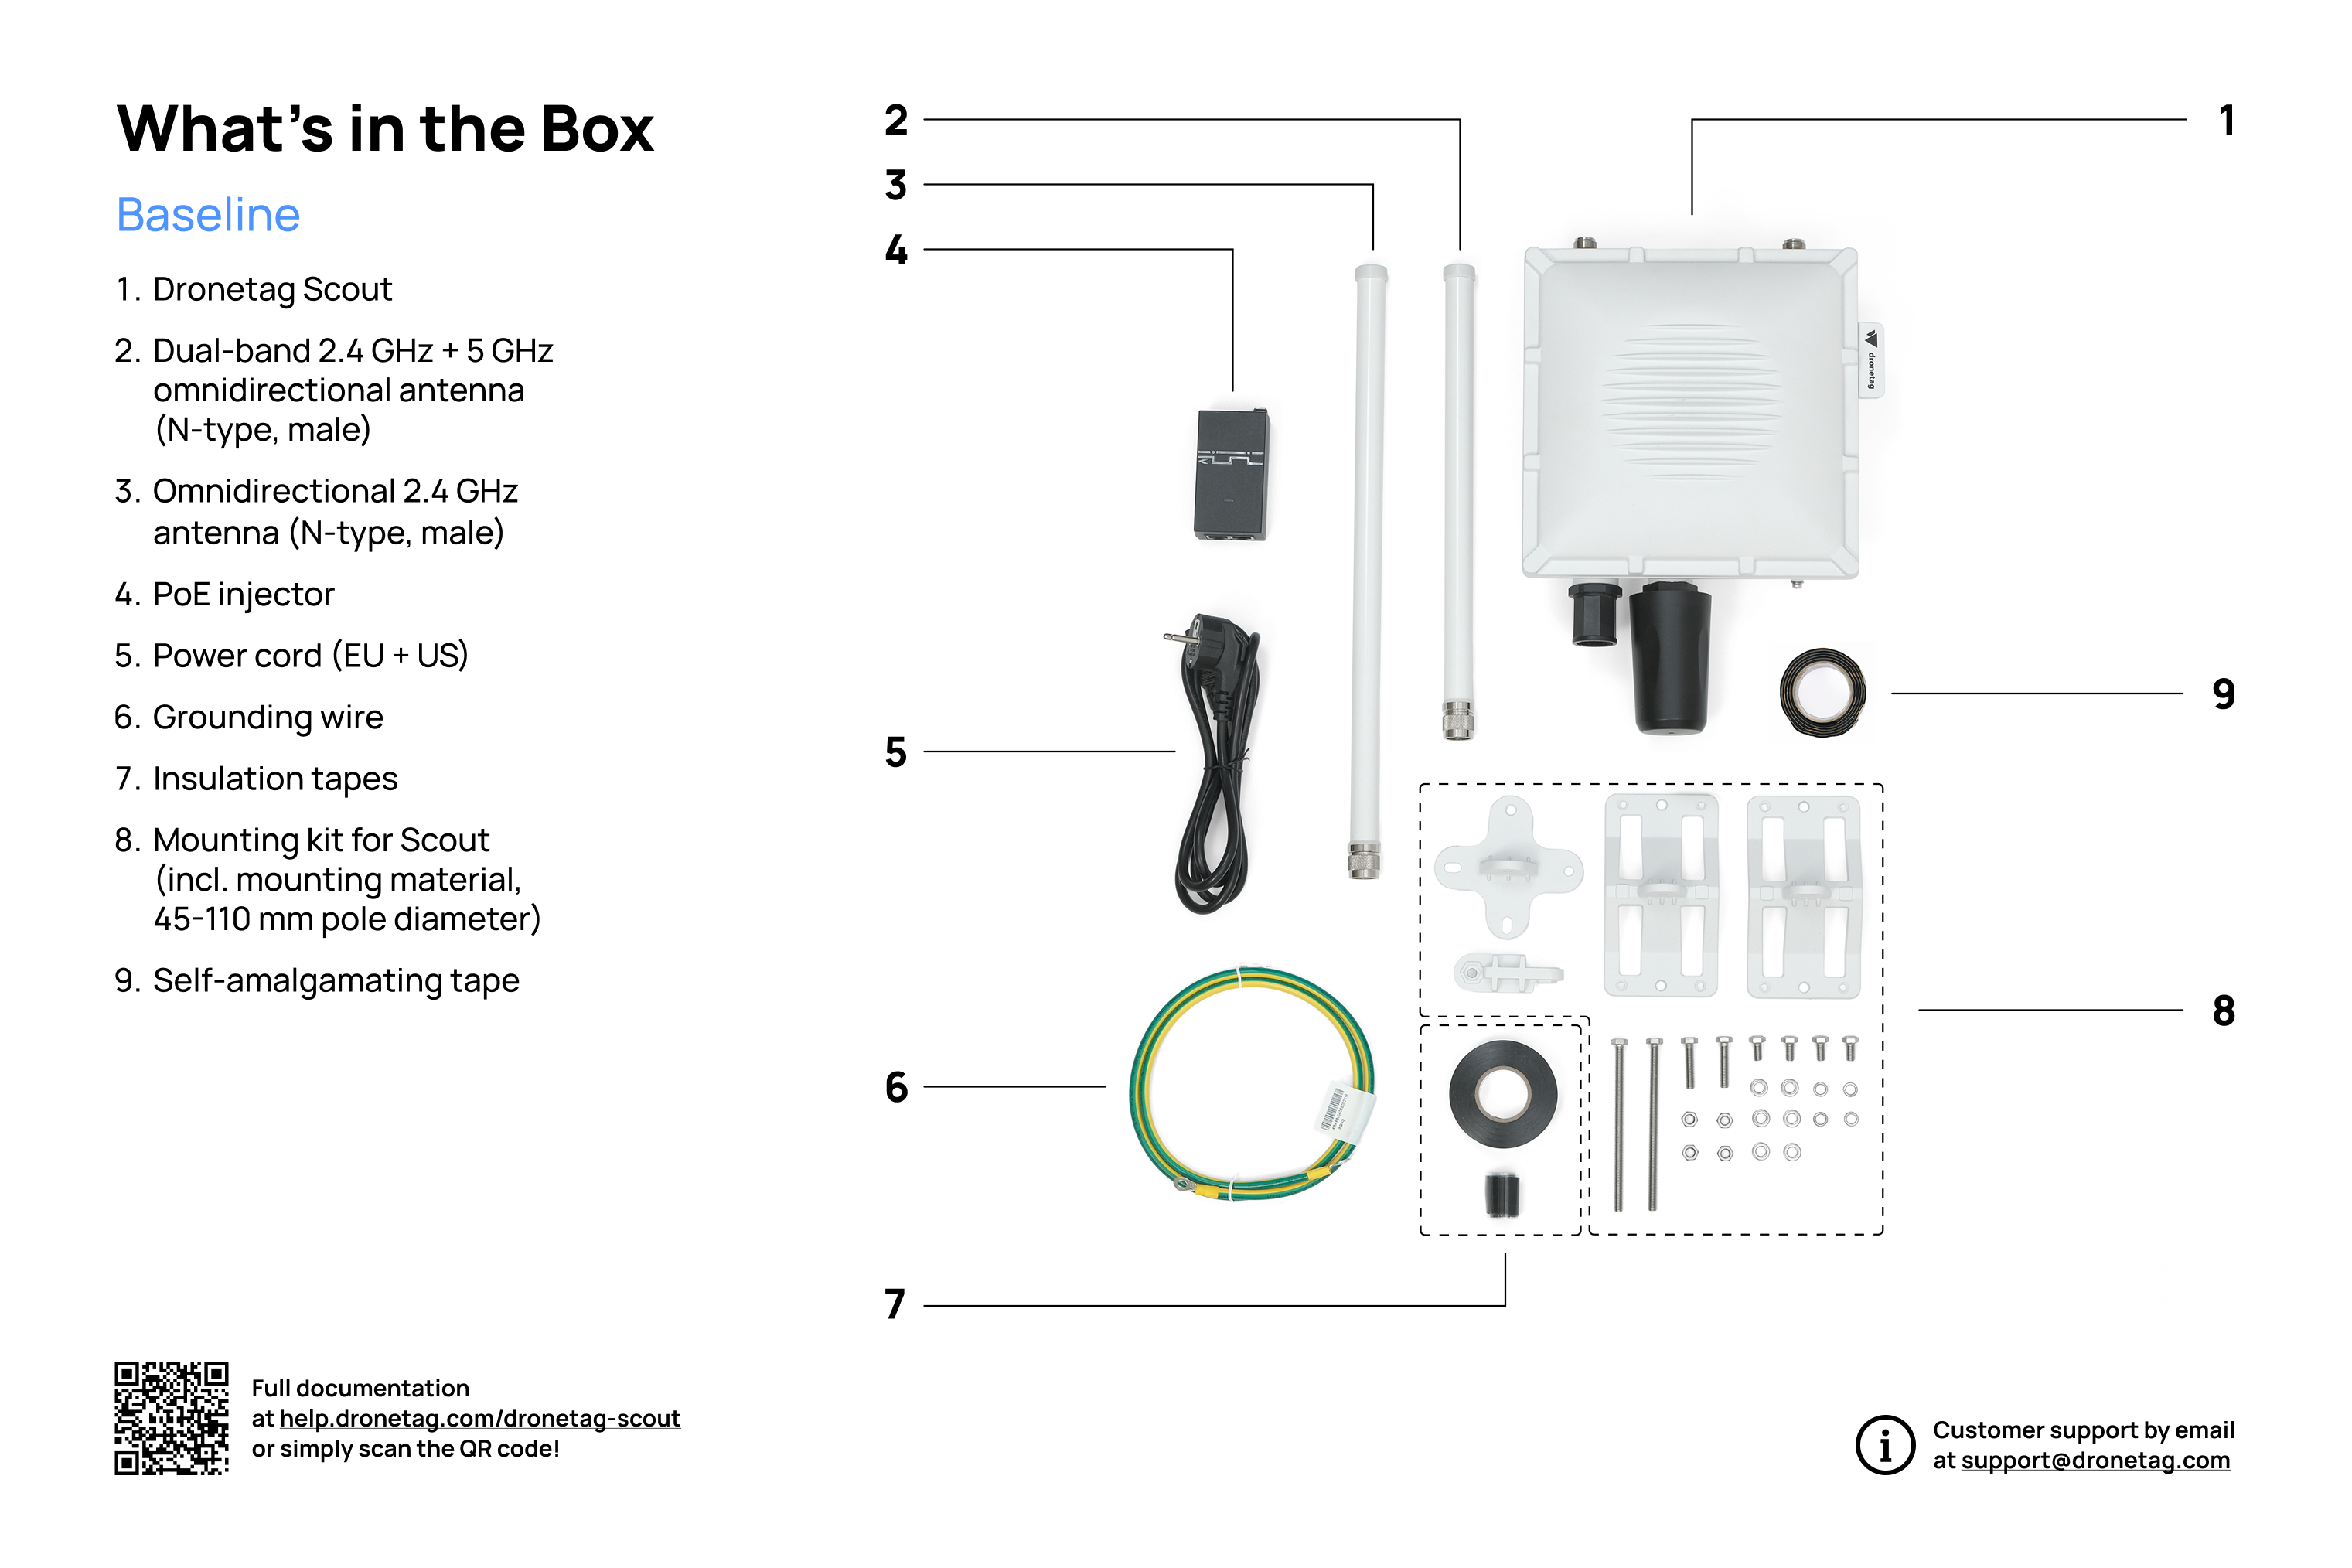
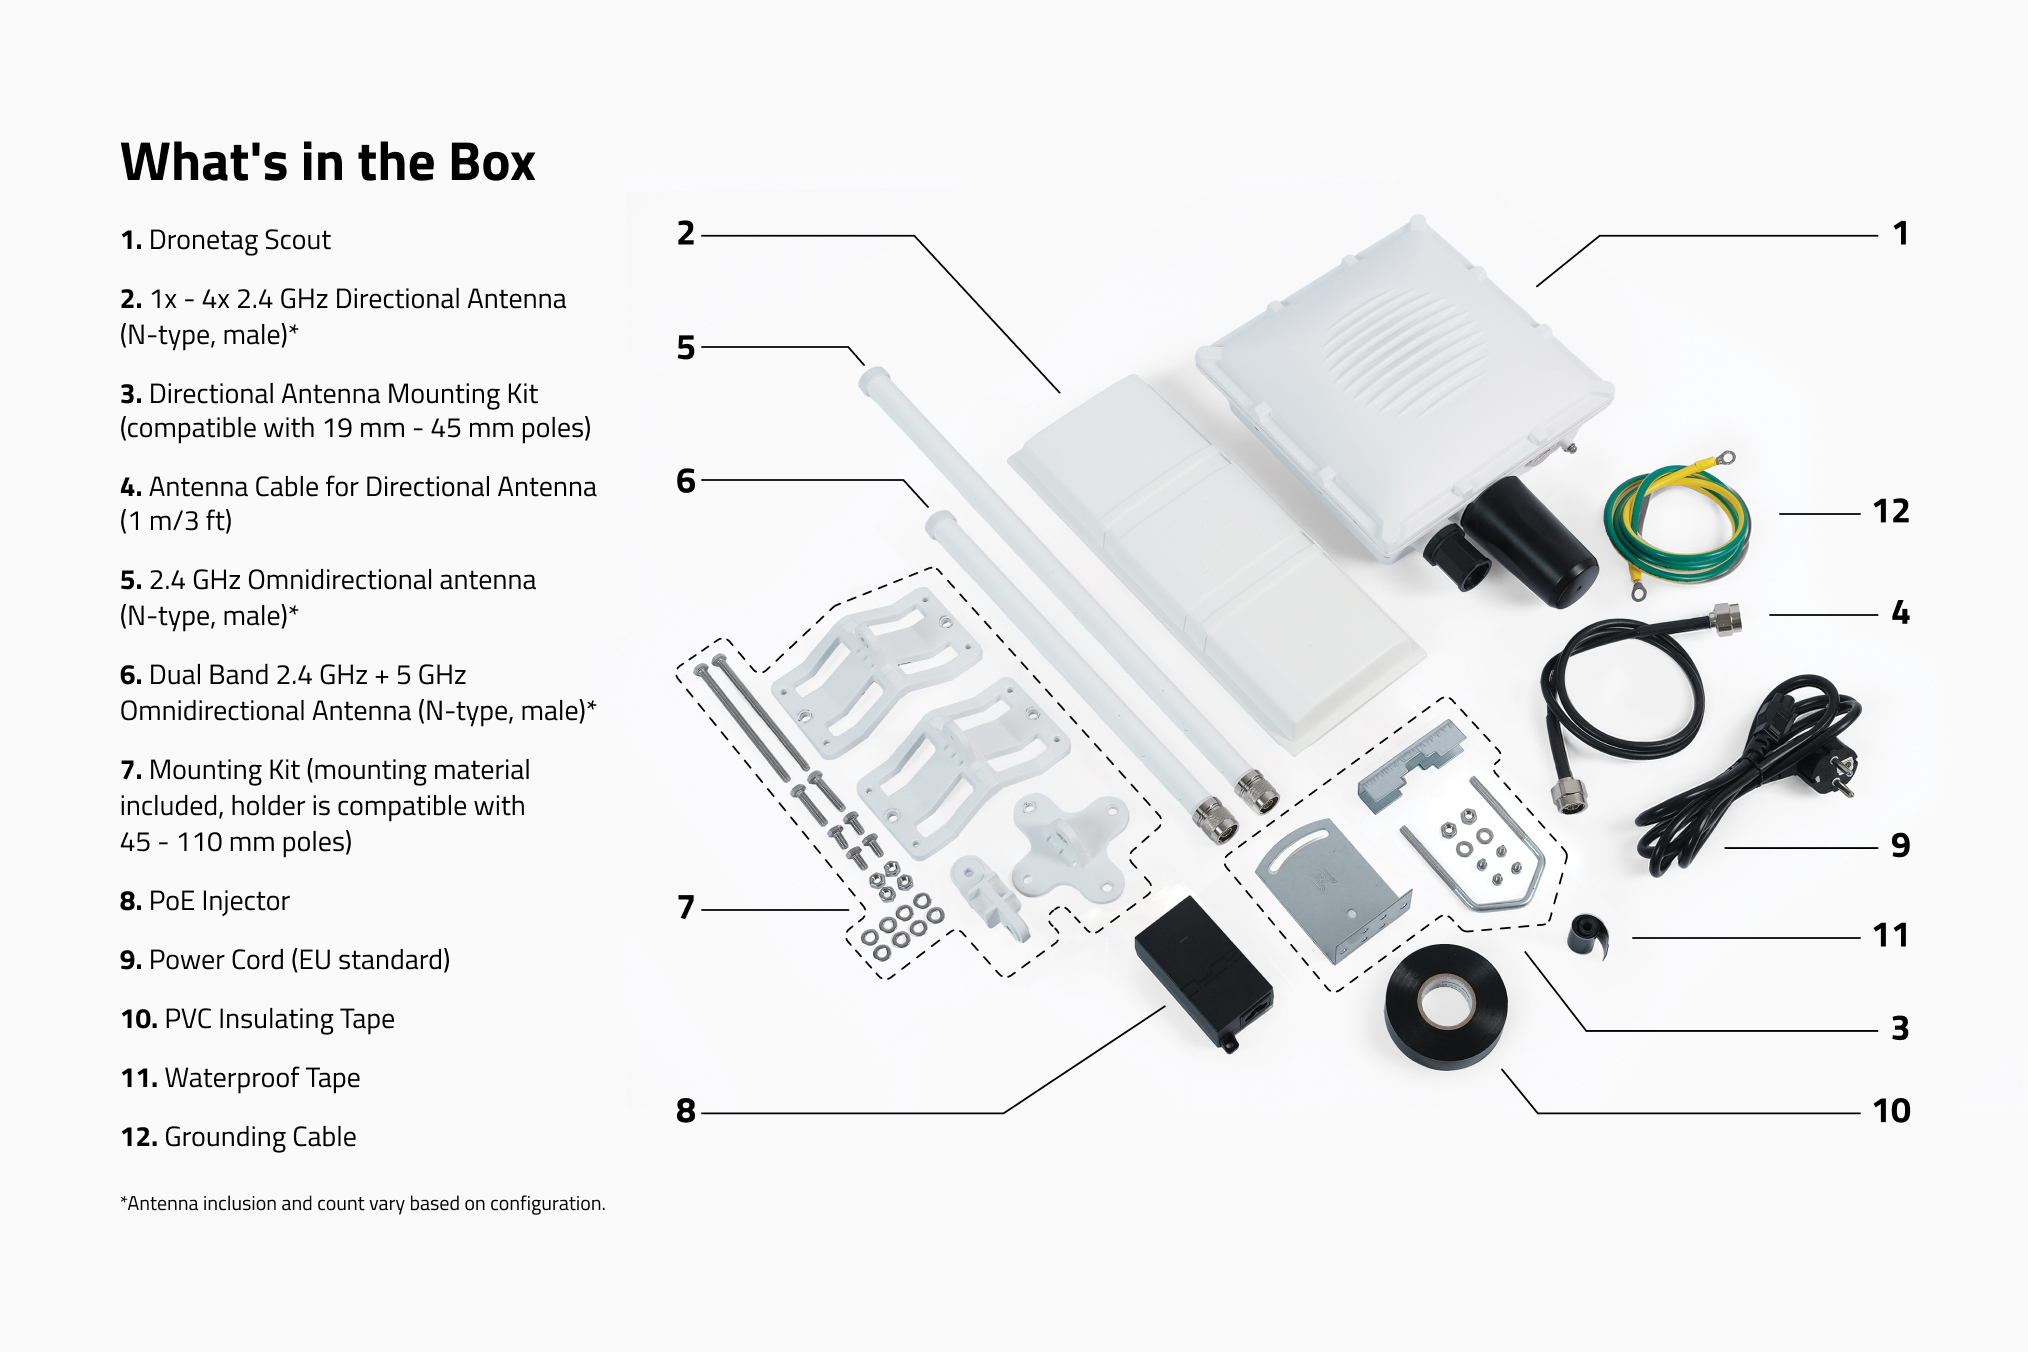
Once you receive your Scout device with its basic configuration, you should find everything neatly packed in the delivery box. Here’s what to expect when unboxing your new Scout system:
This image illustrates the standard contents included in the Scout baseline package.
Scout Baseline – compact, omnidirectional setup for general coverage
👉 View 3D model
PACKAGING SIZE INFO
The Scout package comes in a sturdy box with the following dimensions:
450 mm x 300 mm x 150 mm / 17.7" x 11.8" x 5.9"
This compact size ensures the contents are well-protected during transport while still being easy to handle.
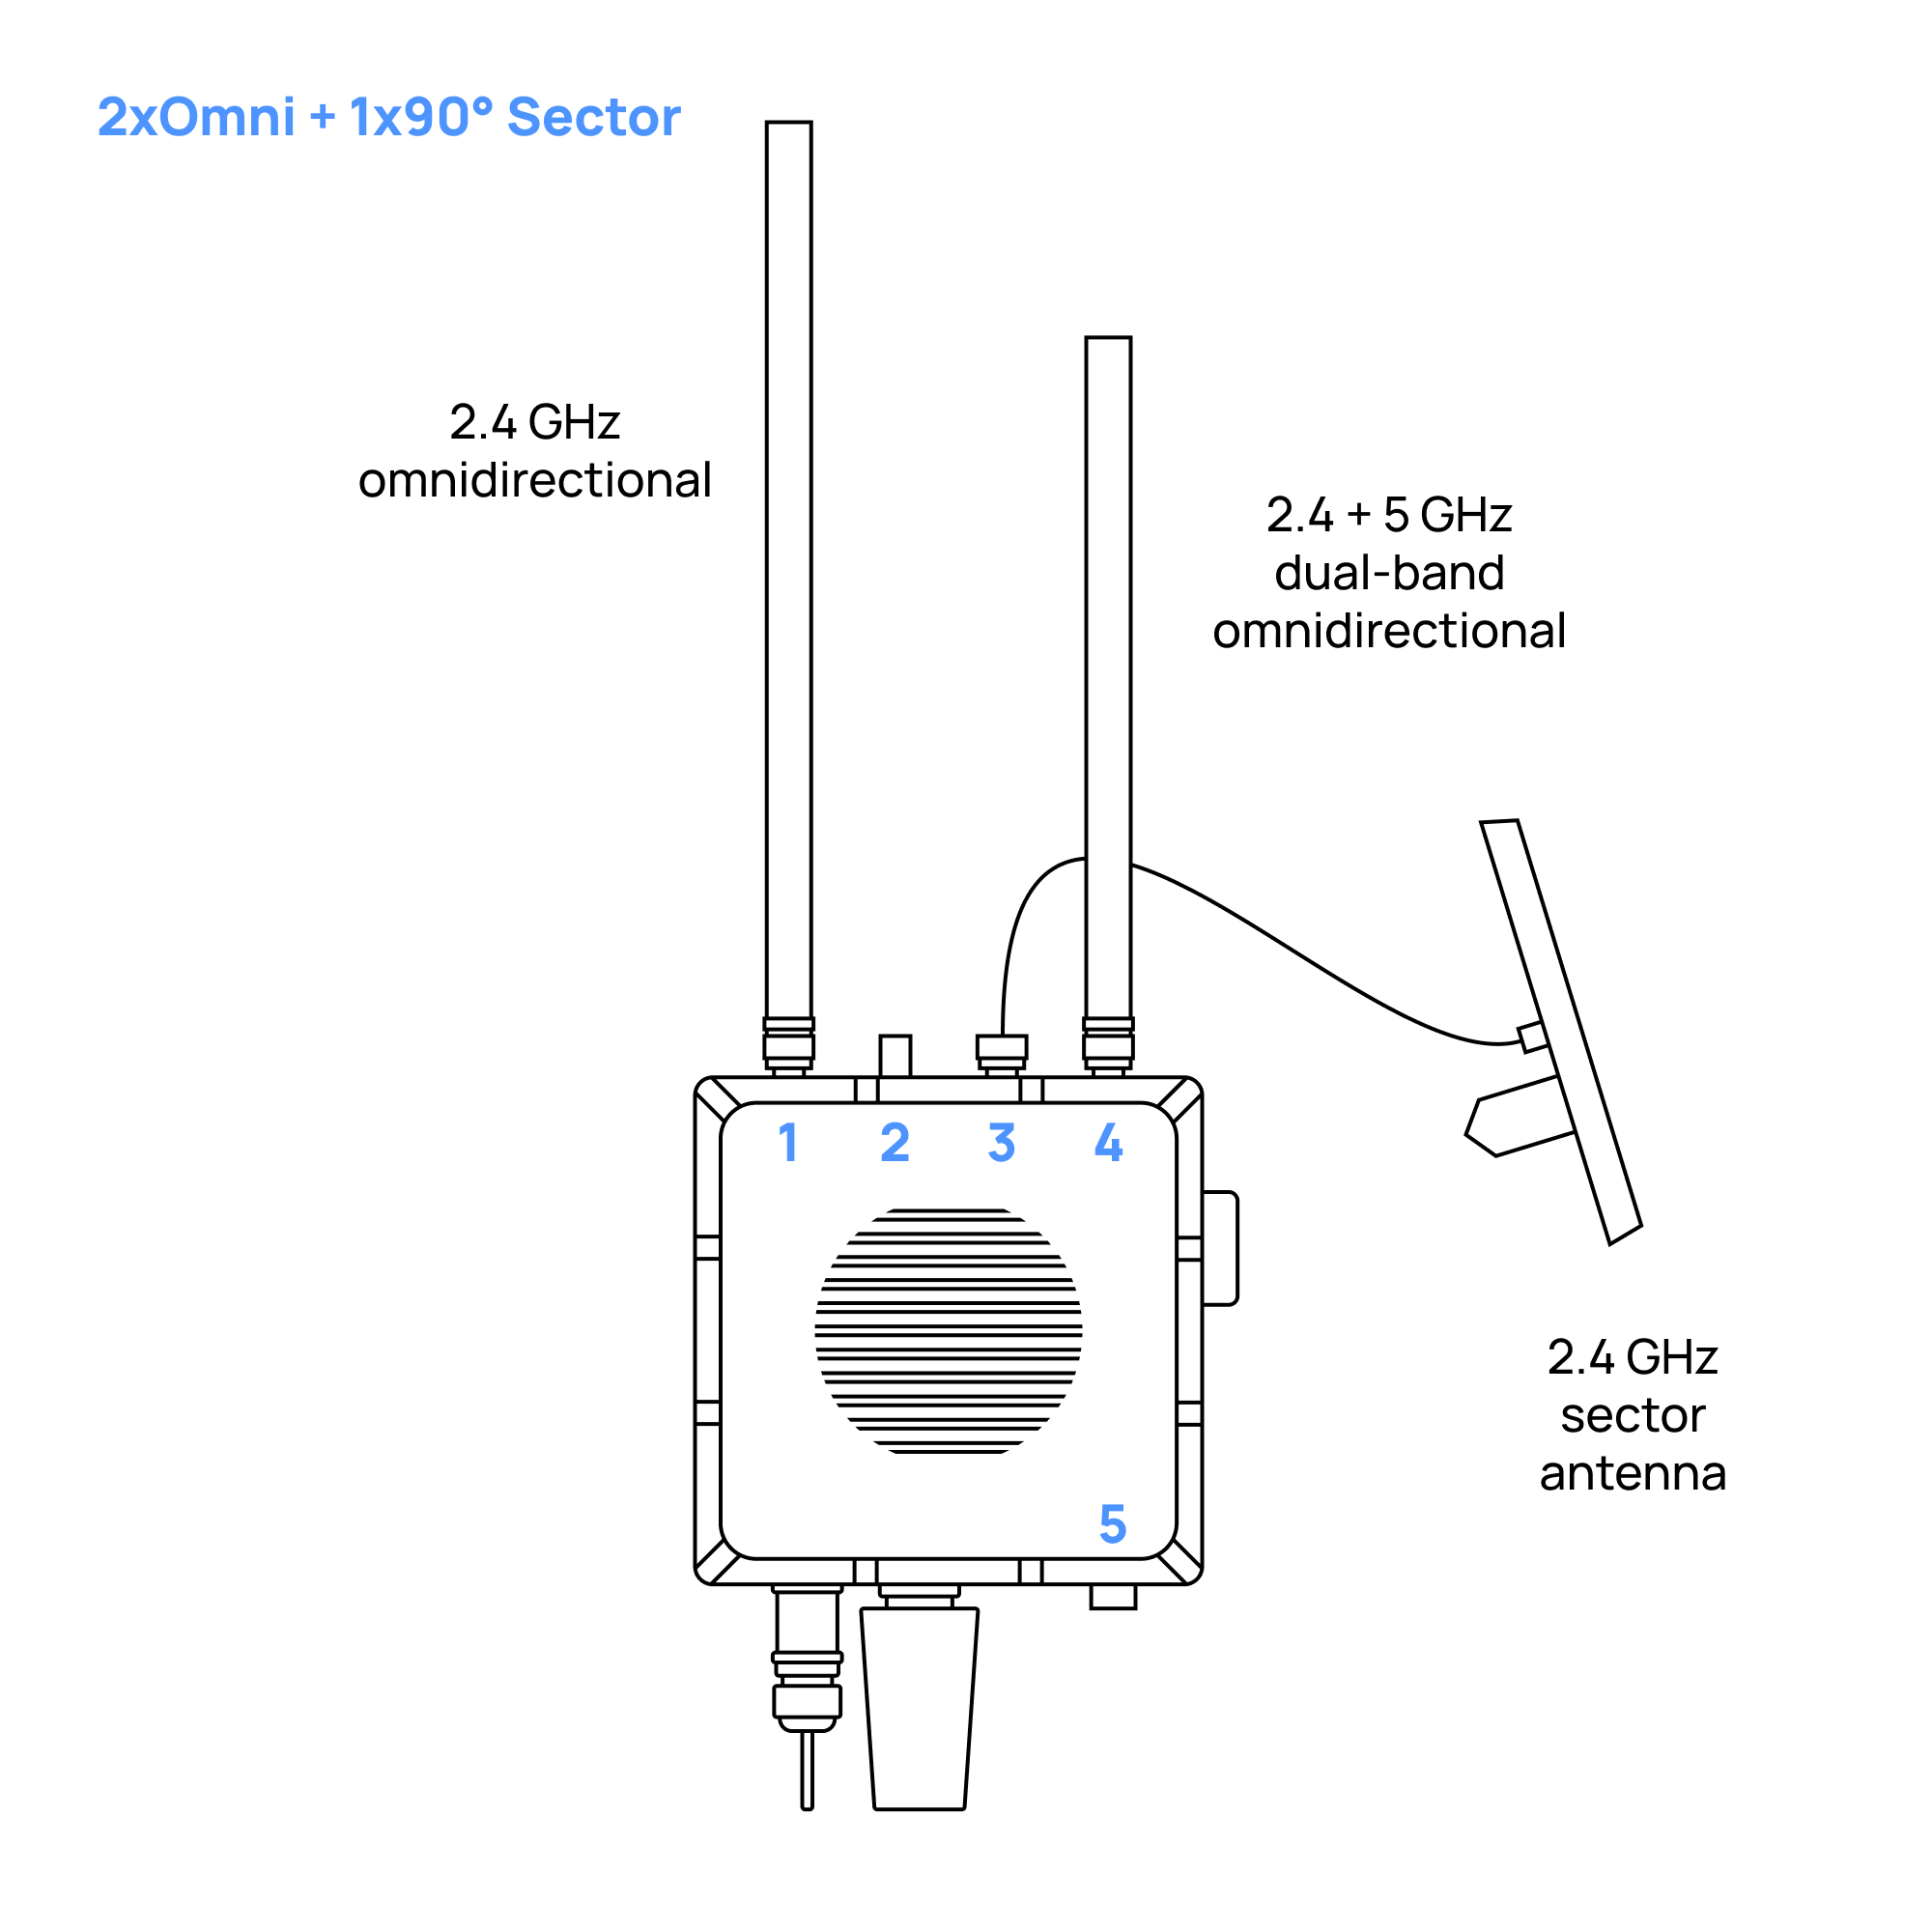
Scout with 2x Omnidirectional + 1x 90° Directional Antennas
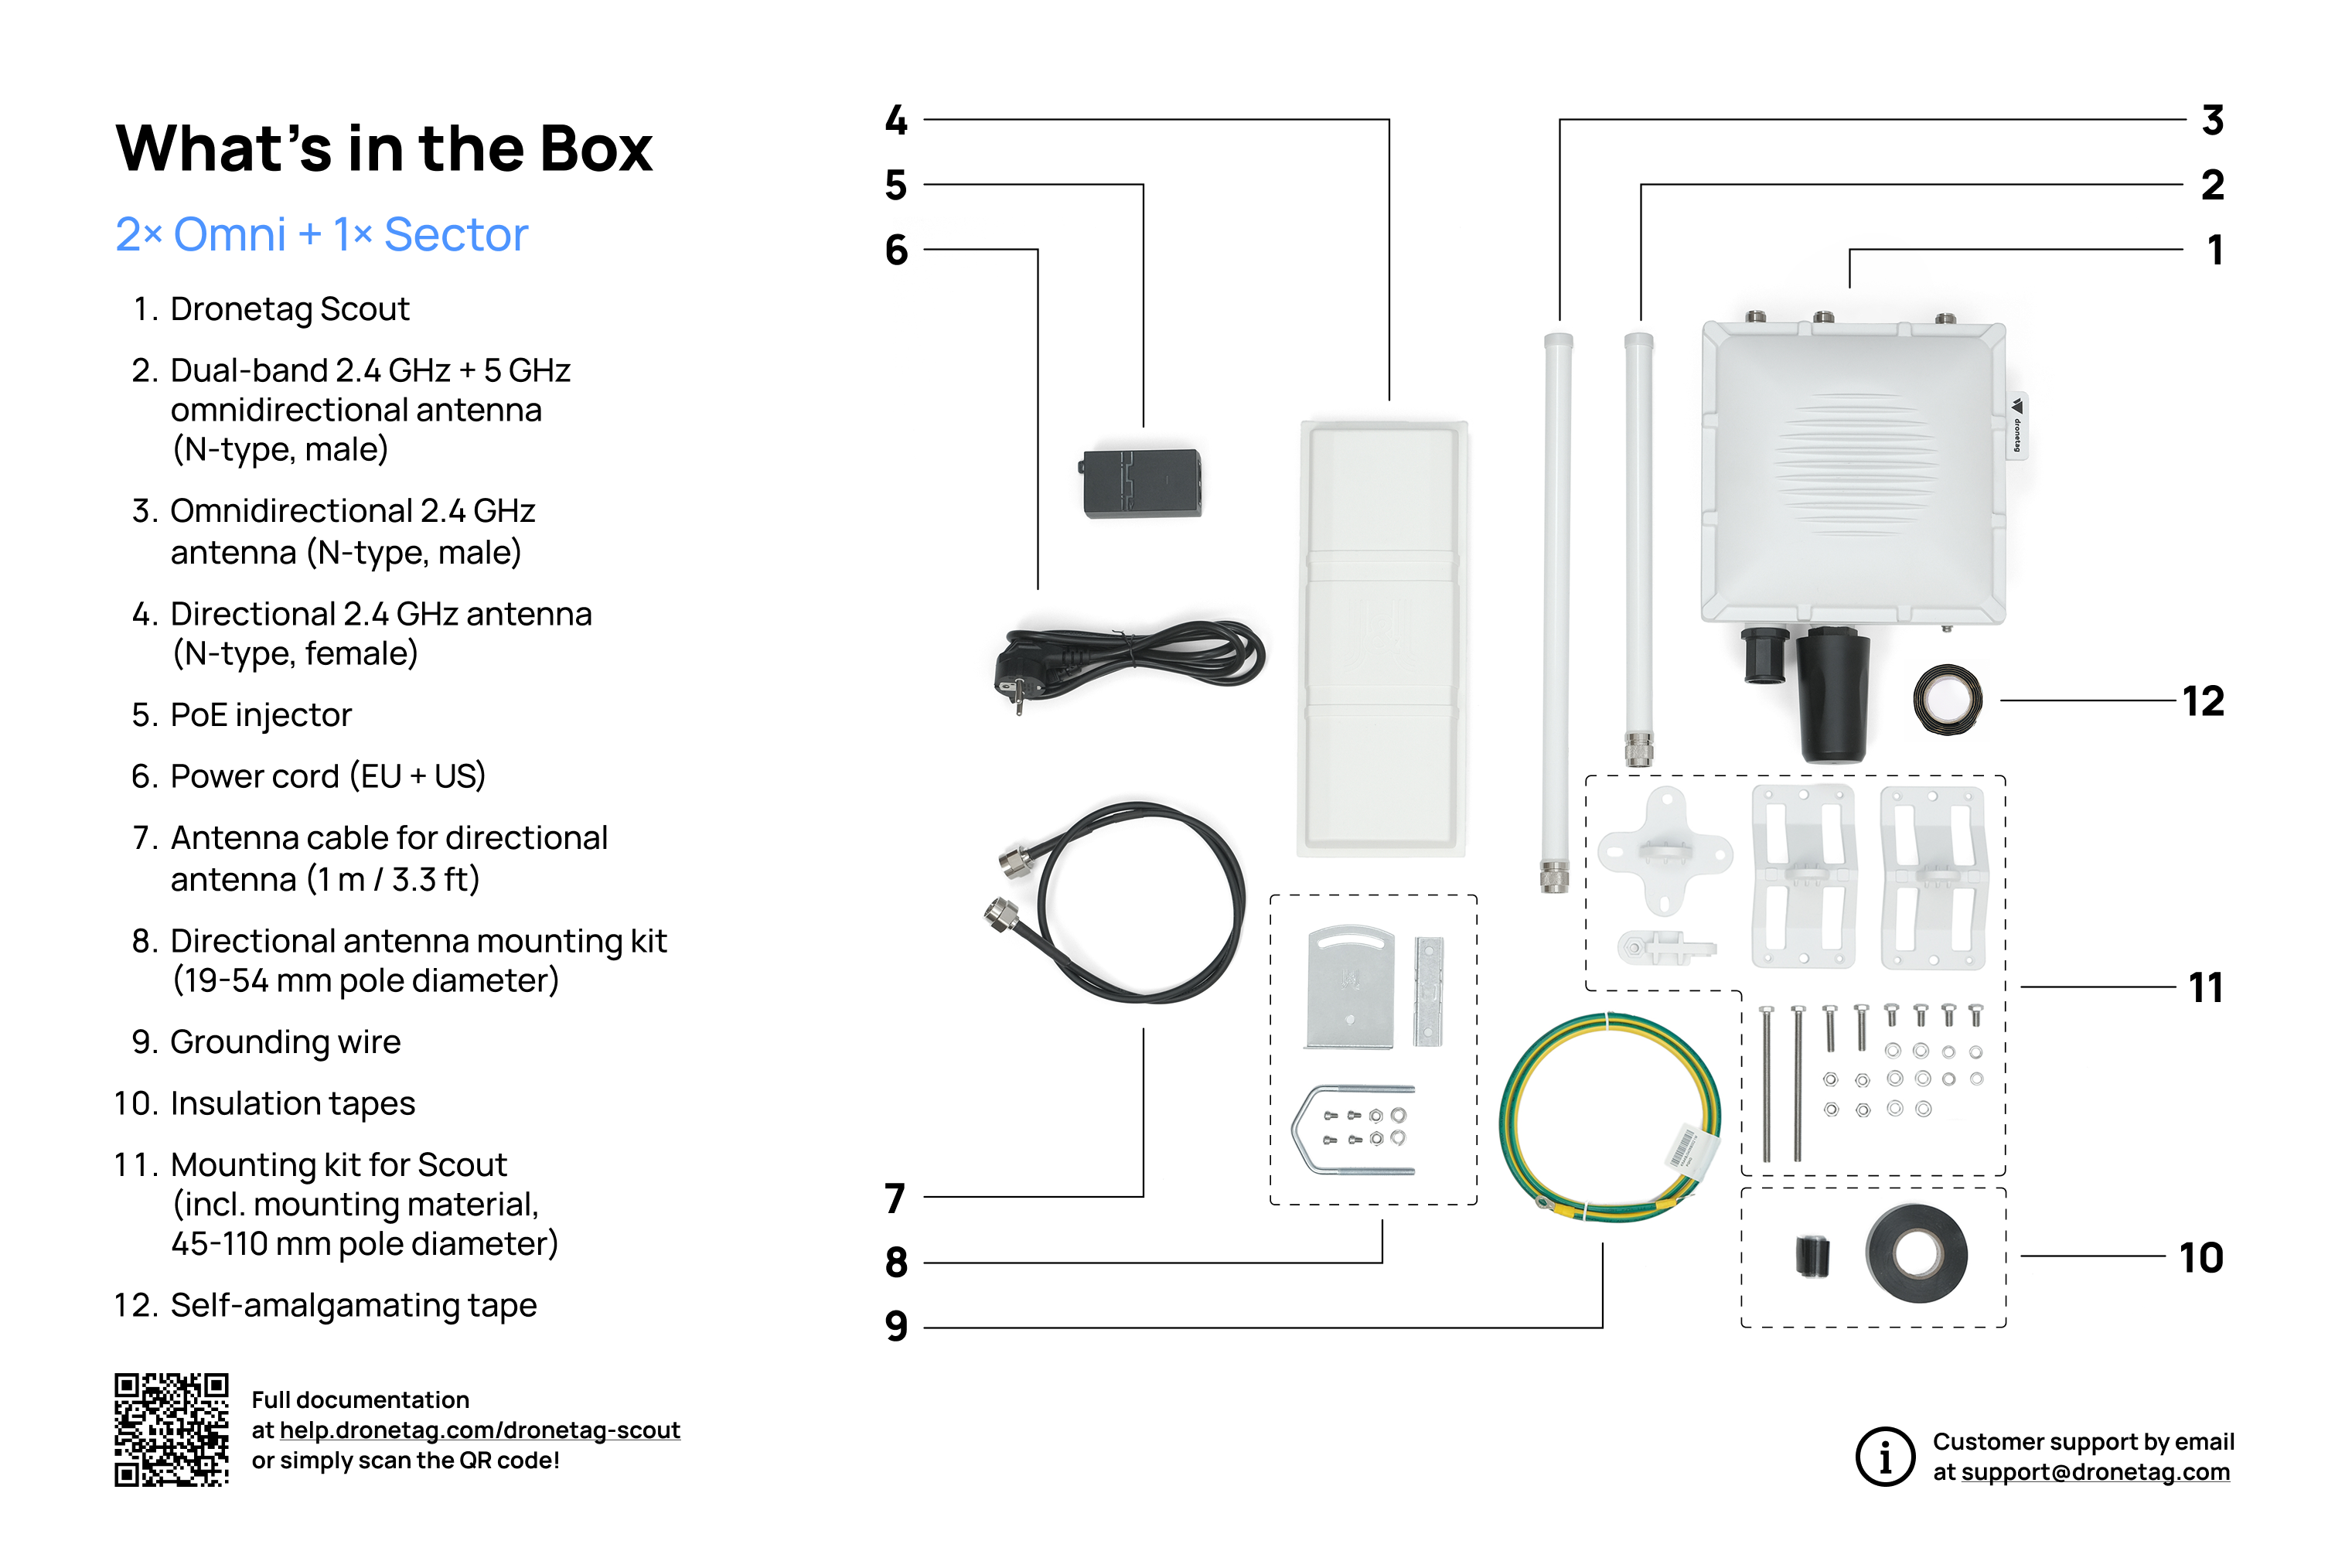
Once you receive your Scout device with the directional antennas configuration, you’ll find everything neatly packed in the delivery box.
Here’s what to expect when unboxing your new Scout system.
This image illustrates the standard contents included in the package of Scout with directional antennas.
PACKAGING SIZE INFO
The Scout with directional antennas package comes in a box with adjustable height and has the following maximal dimensions:
450 mm x 350 mm x 250 mm / 17.7" x 13.8" x 9.8"
The actual height depends on the specific Scout configuration. This size ensures the contents are well-protected during transport while still being easy to handle.
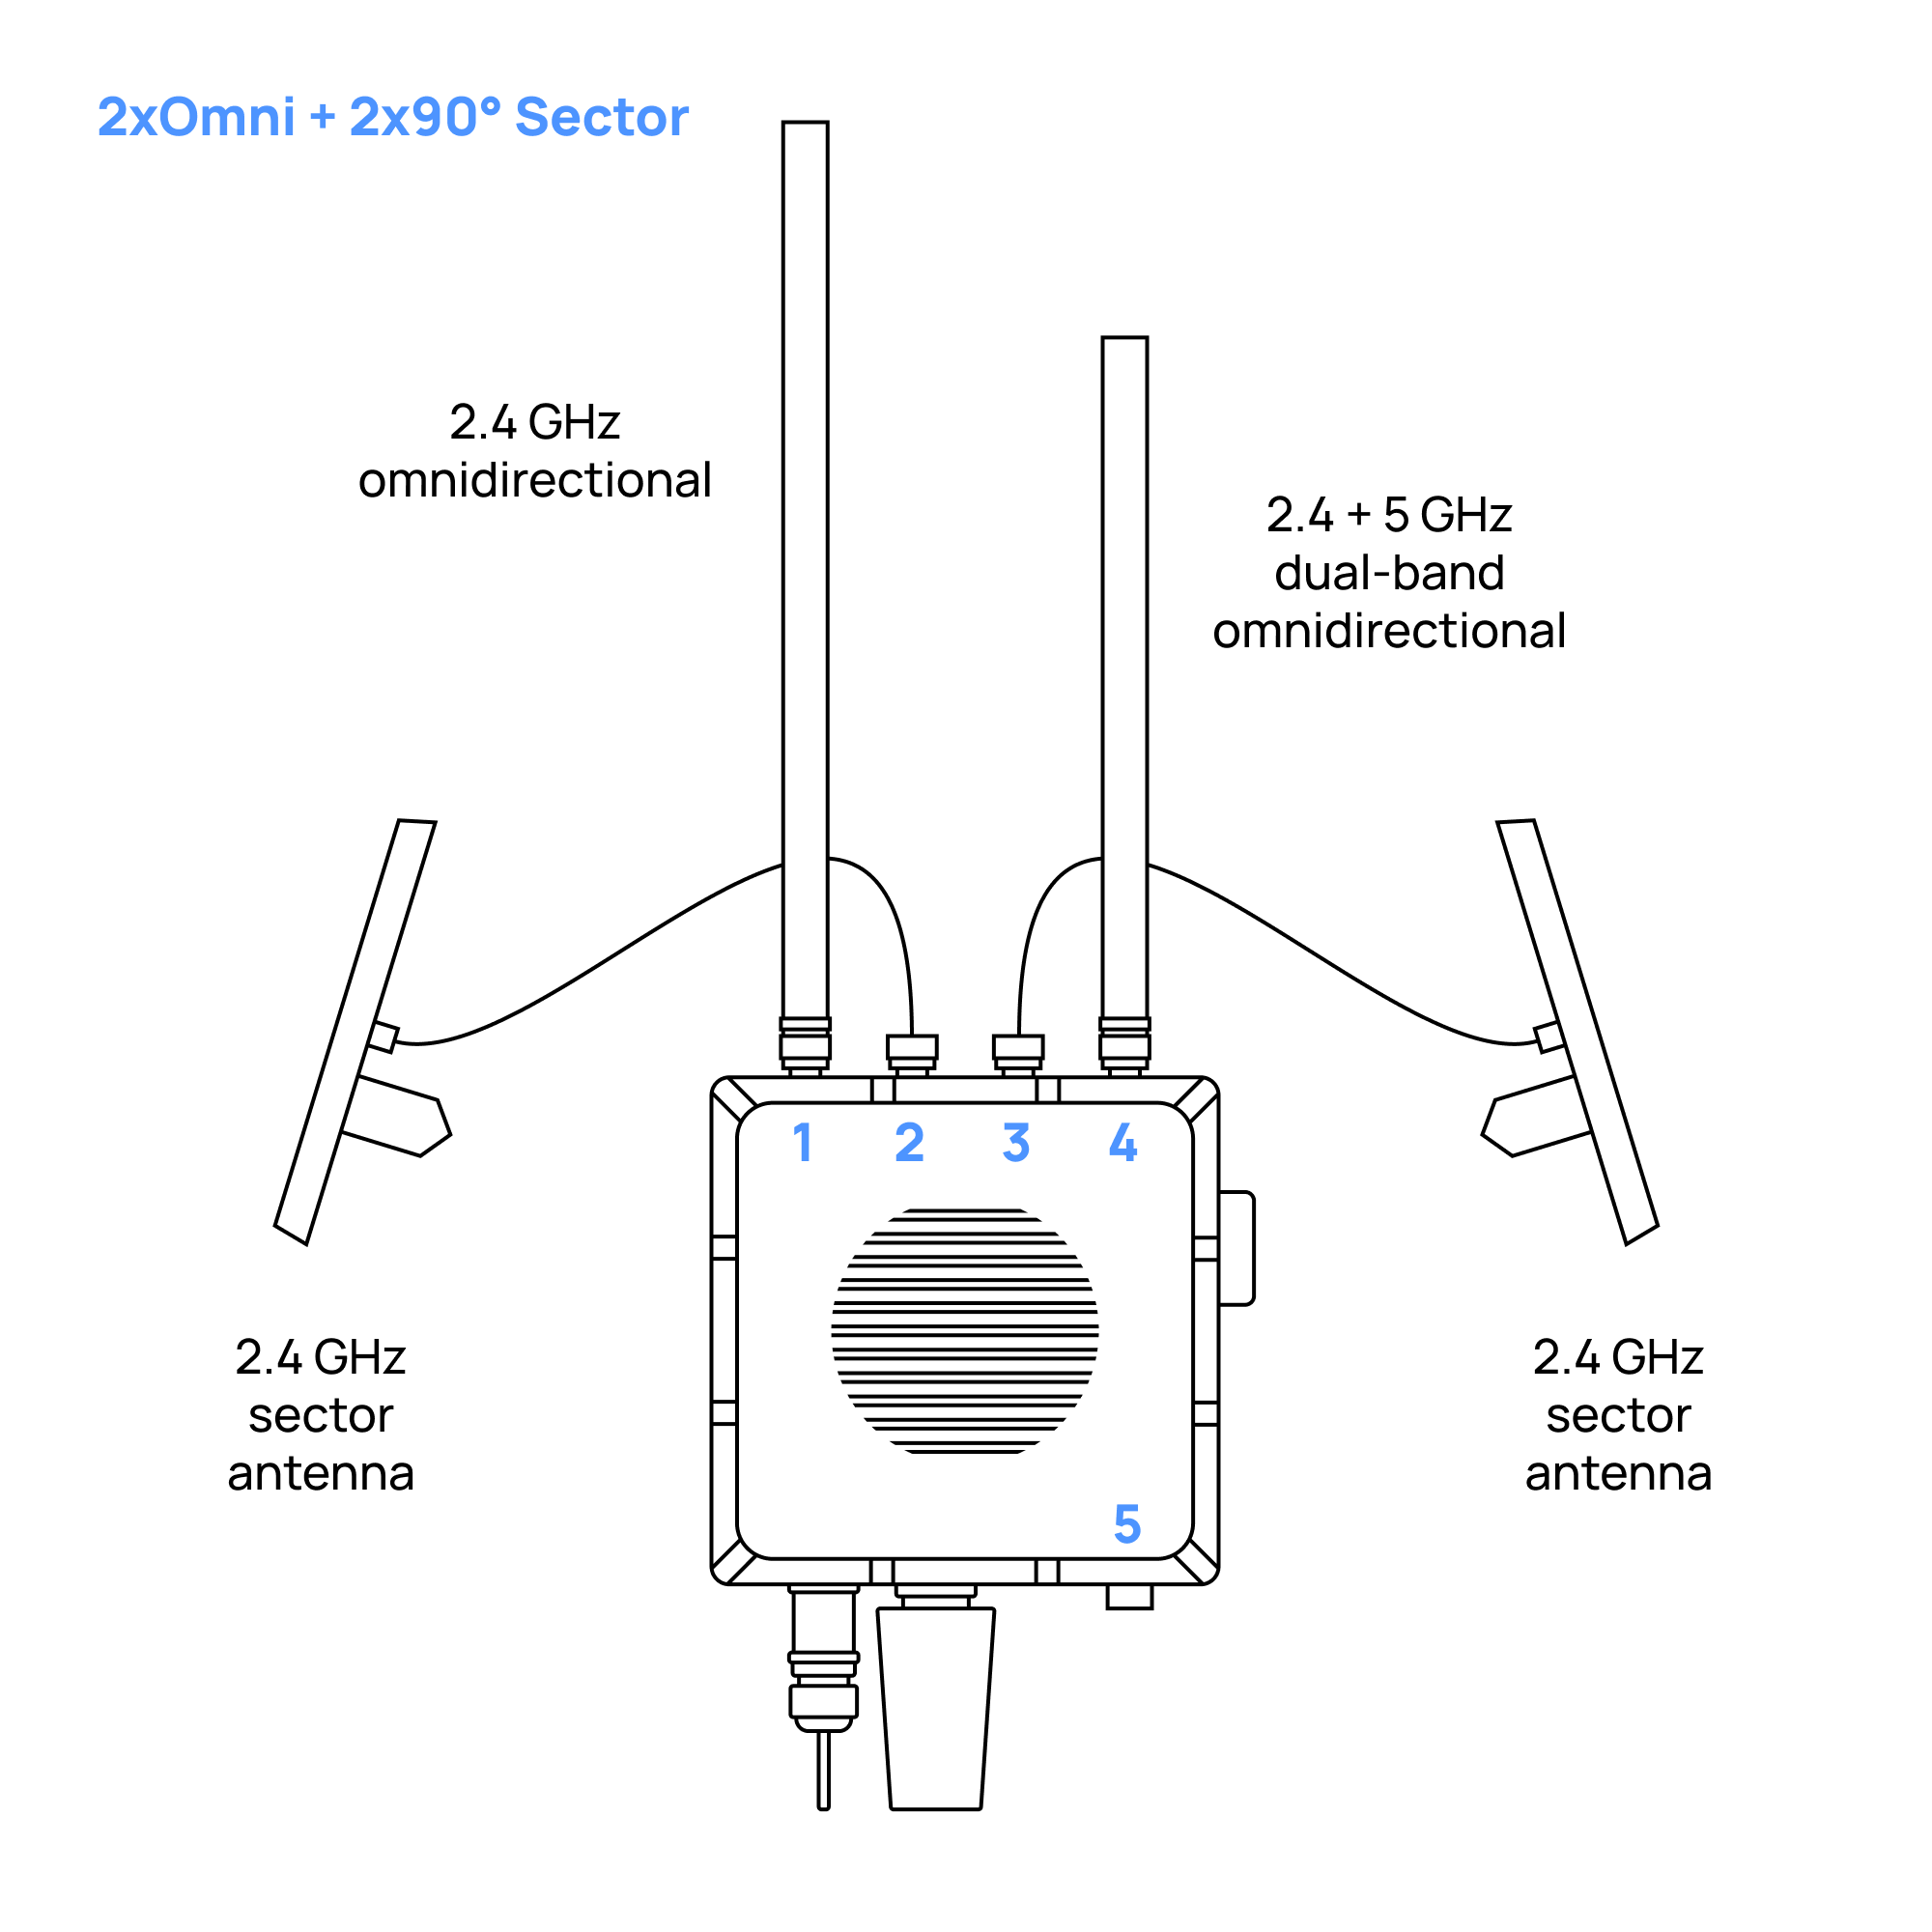
Scout with 2x Omnidirectional + 2x 90° Directional Antennas
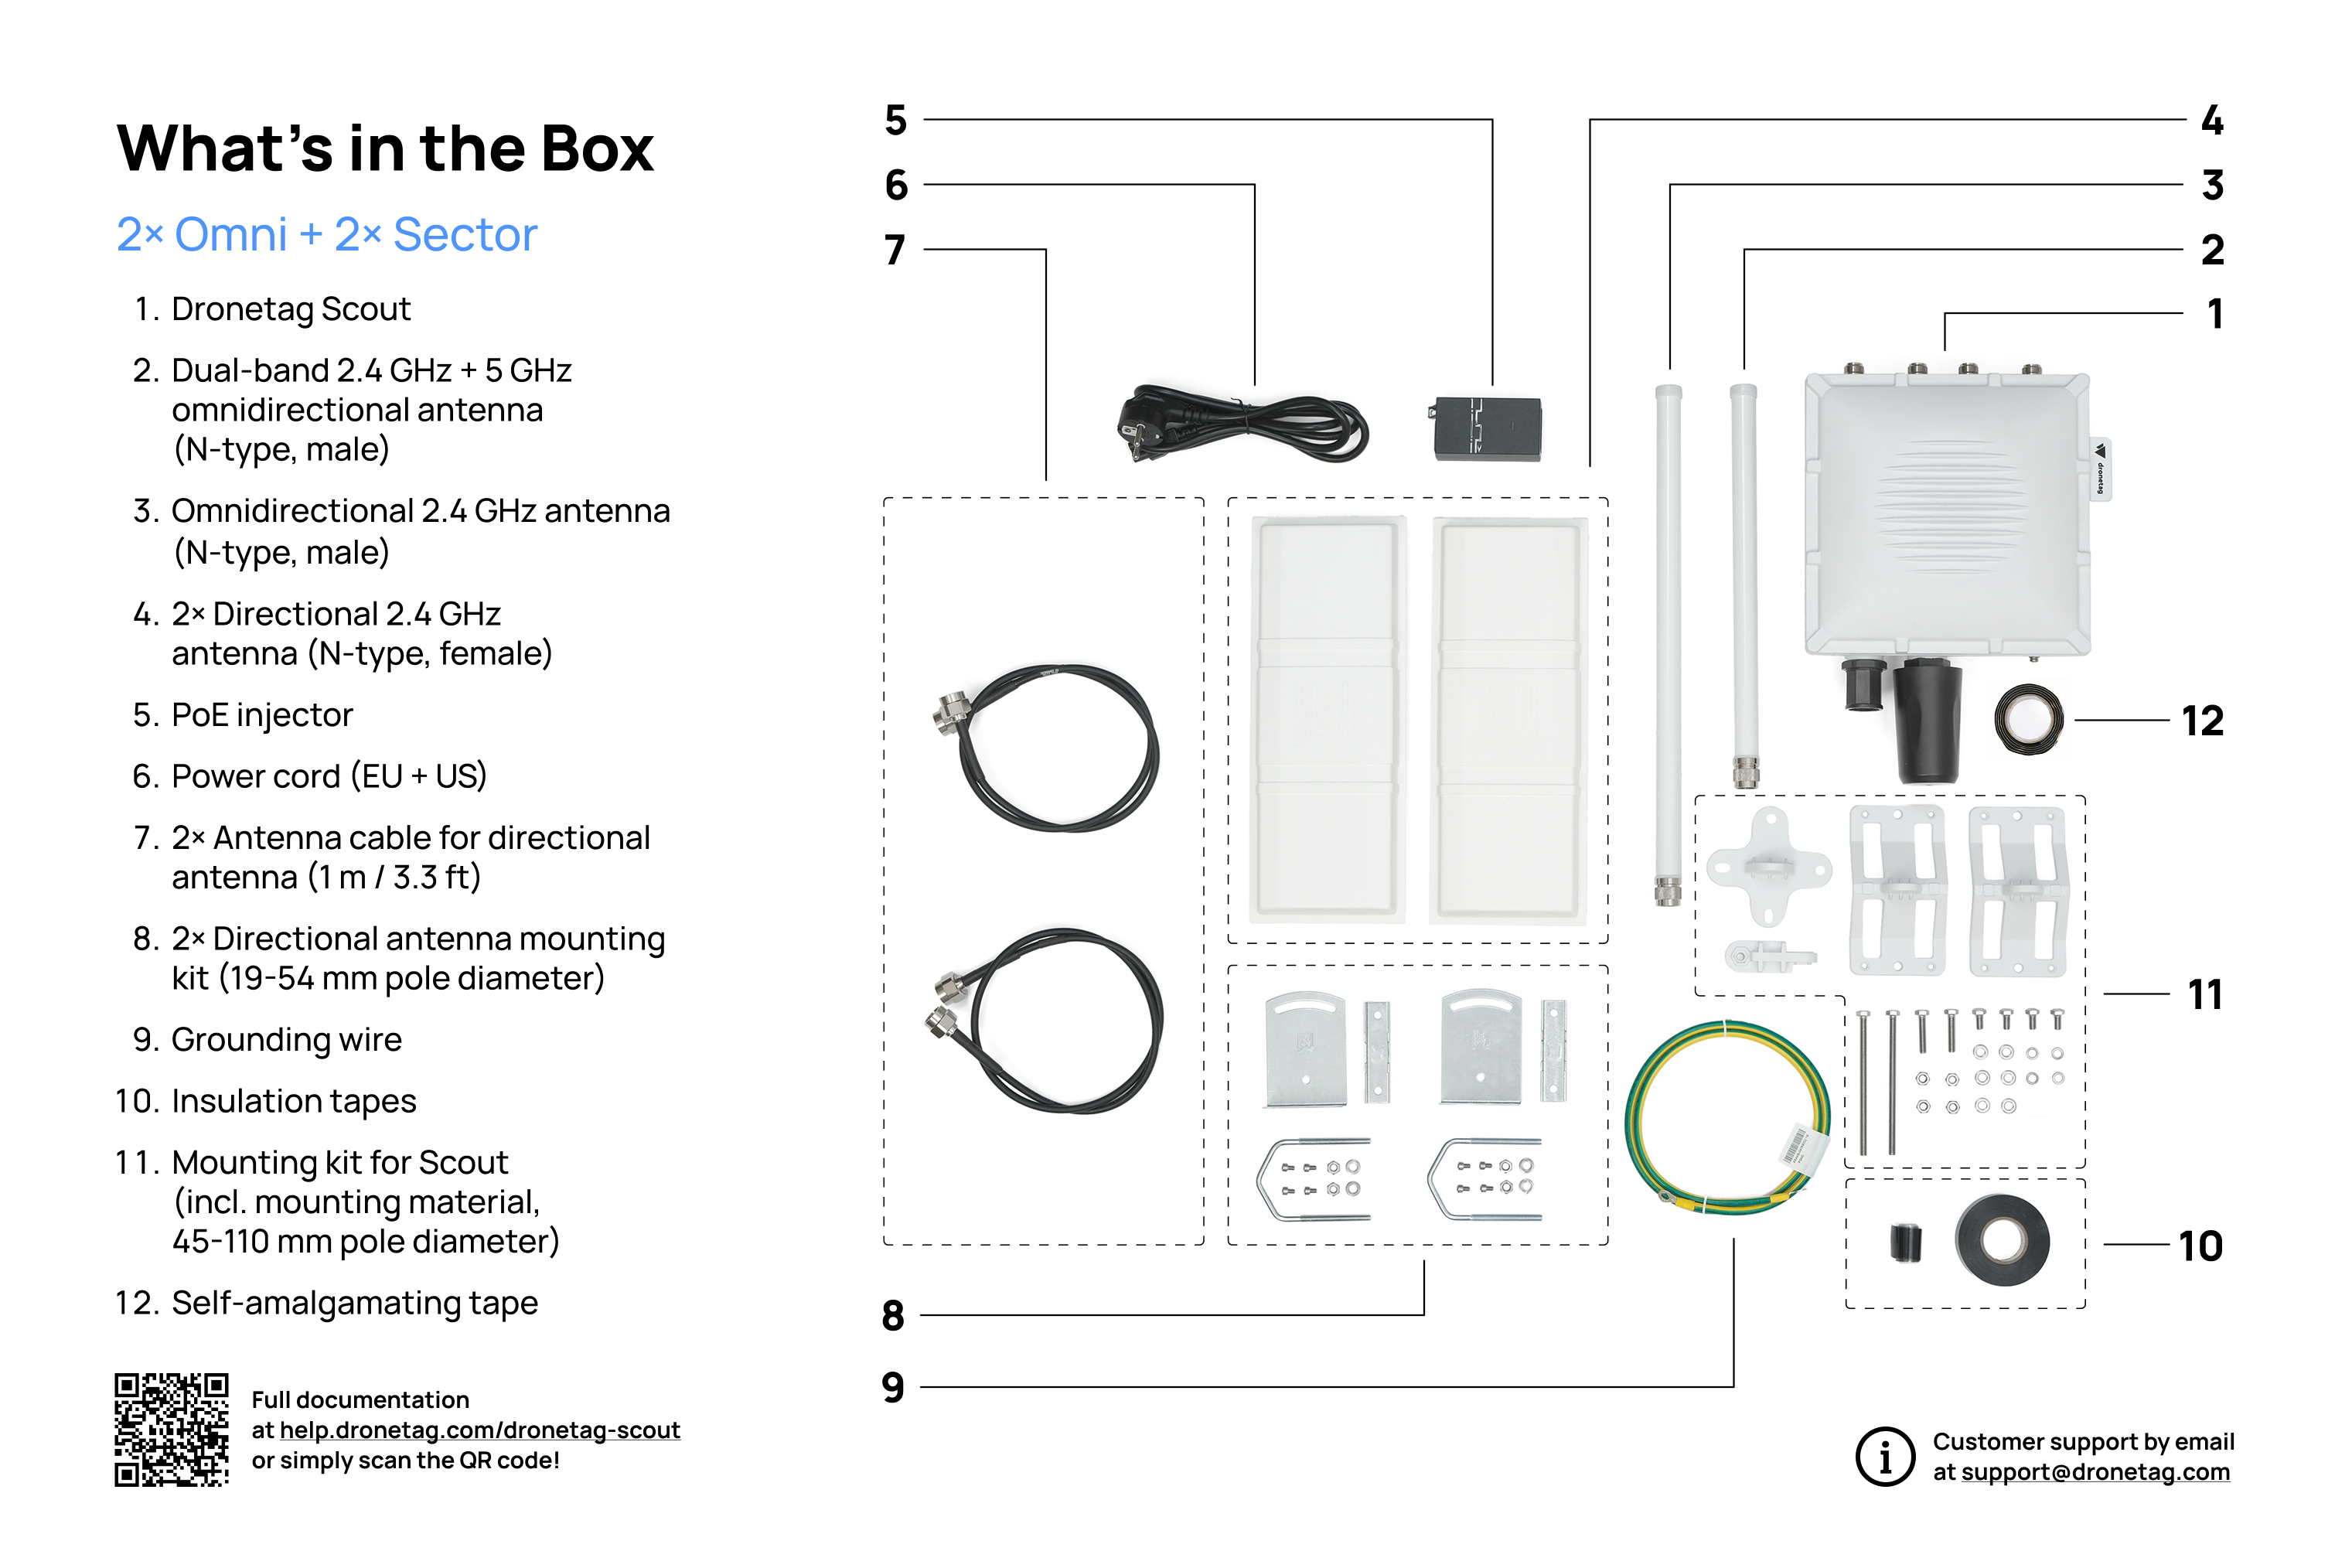
Once you receive your Scout device with the directional antennas configuration, you’ll find everything neatly packed in the delivery box.
Here’s what to expect when unboxing your new Scout system.
This image illustrates the standard contents included in the package of Scout with directional antennas.
The Scout with directional antennas package comes in a box with adjustable height and has the following maximal dimensions:
450 mm x 350 mm x 250 mm / 17.7" x 13.8" x 9.8"
The actual height depends on the specific Scout configuration. This size ensures the contents are well-protected during transport while still being easy to handle.
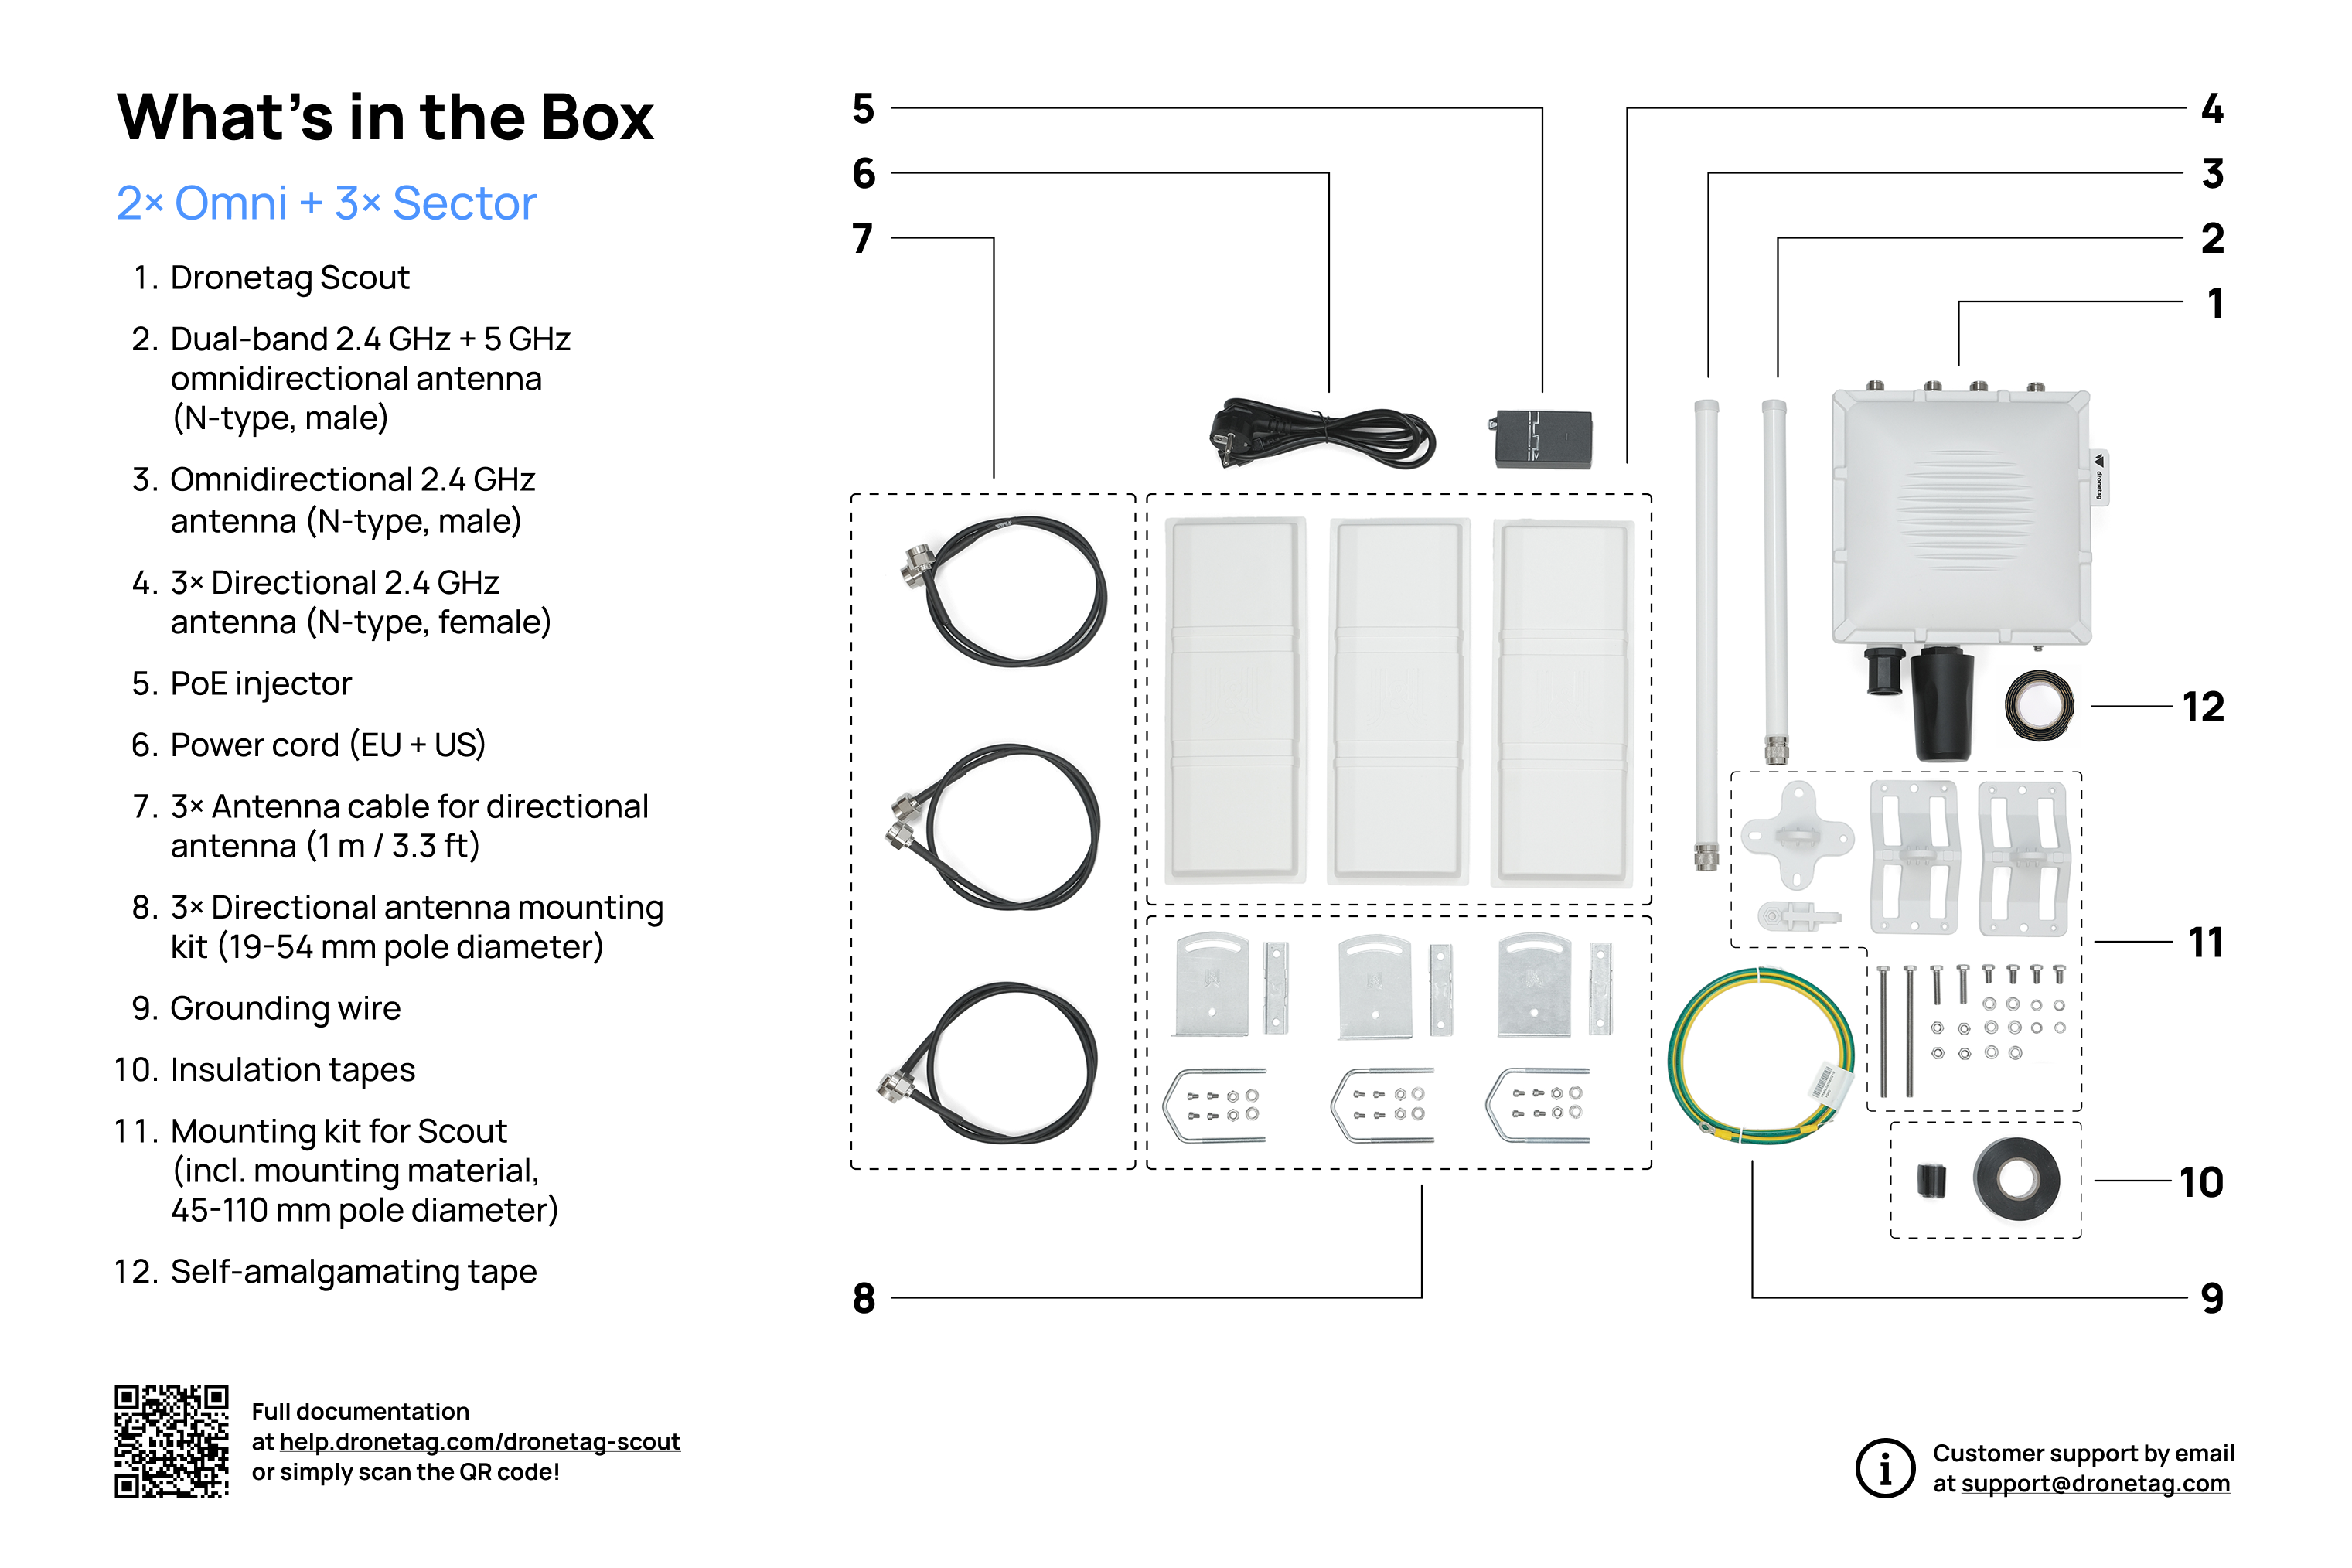
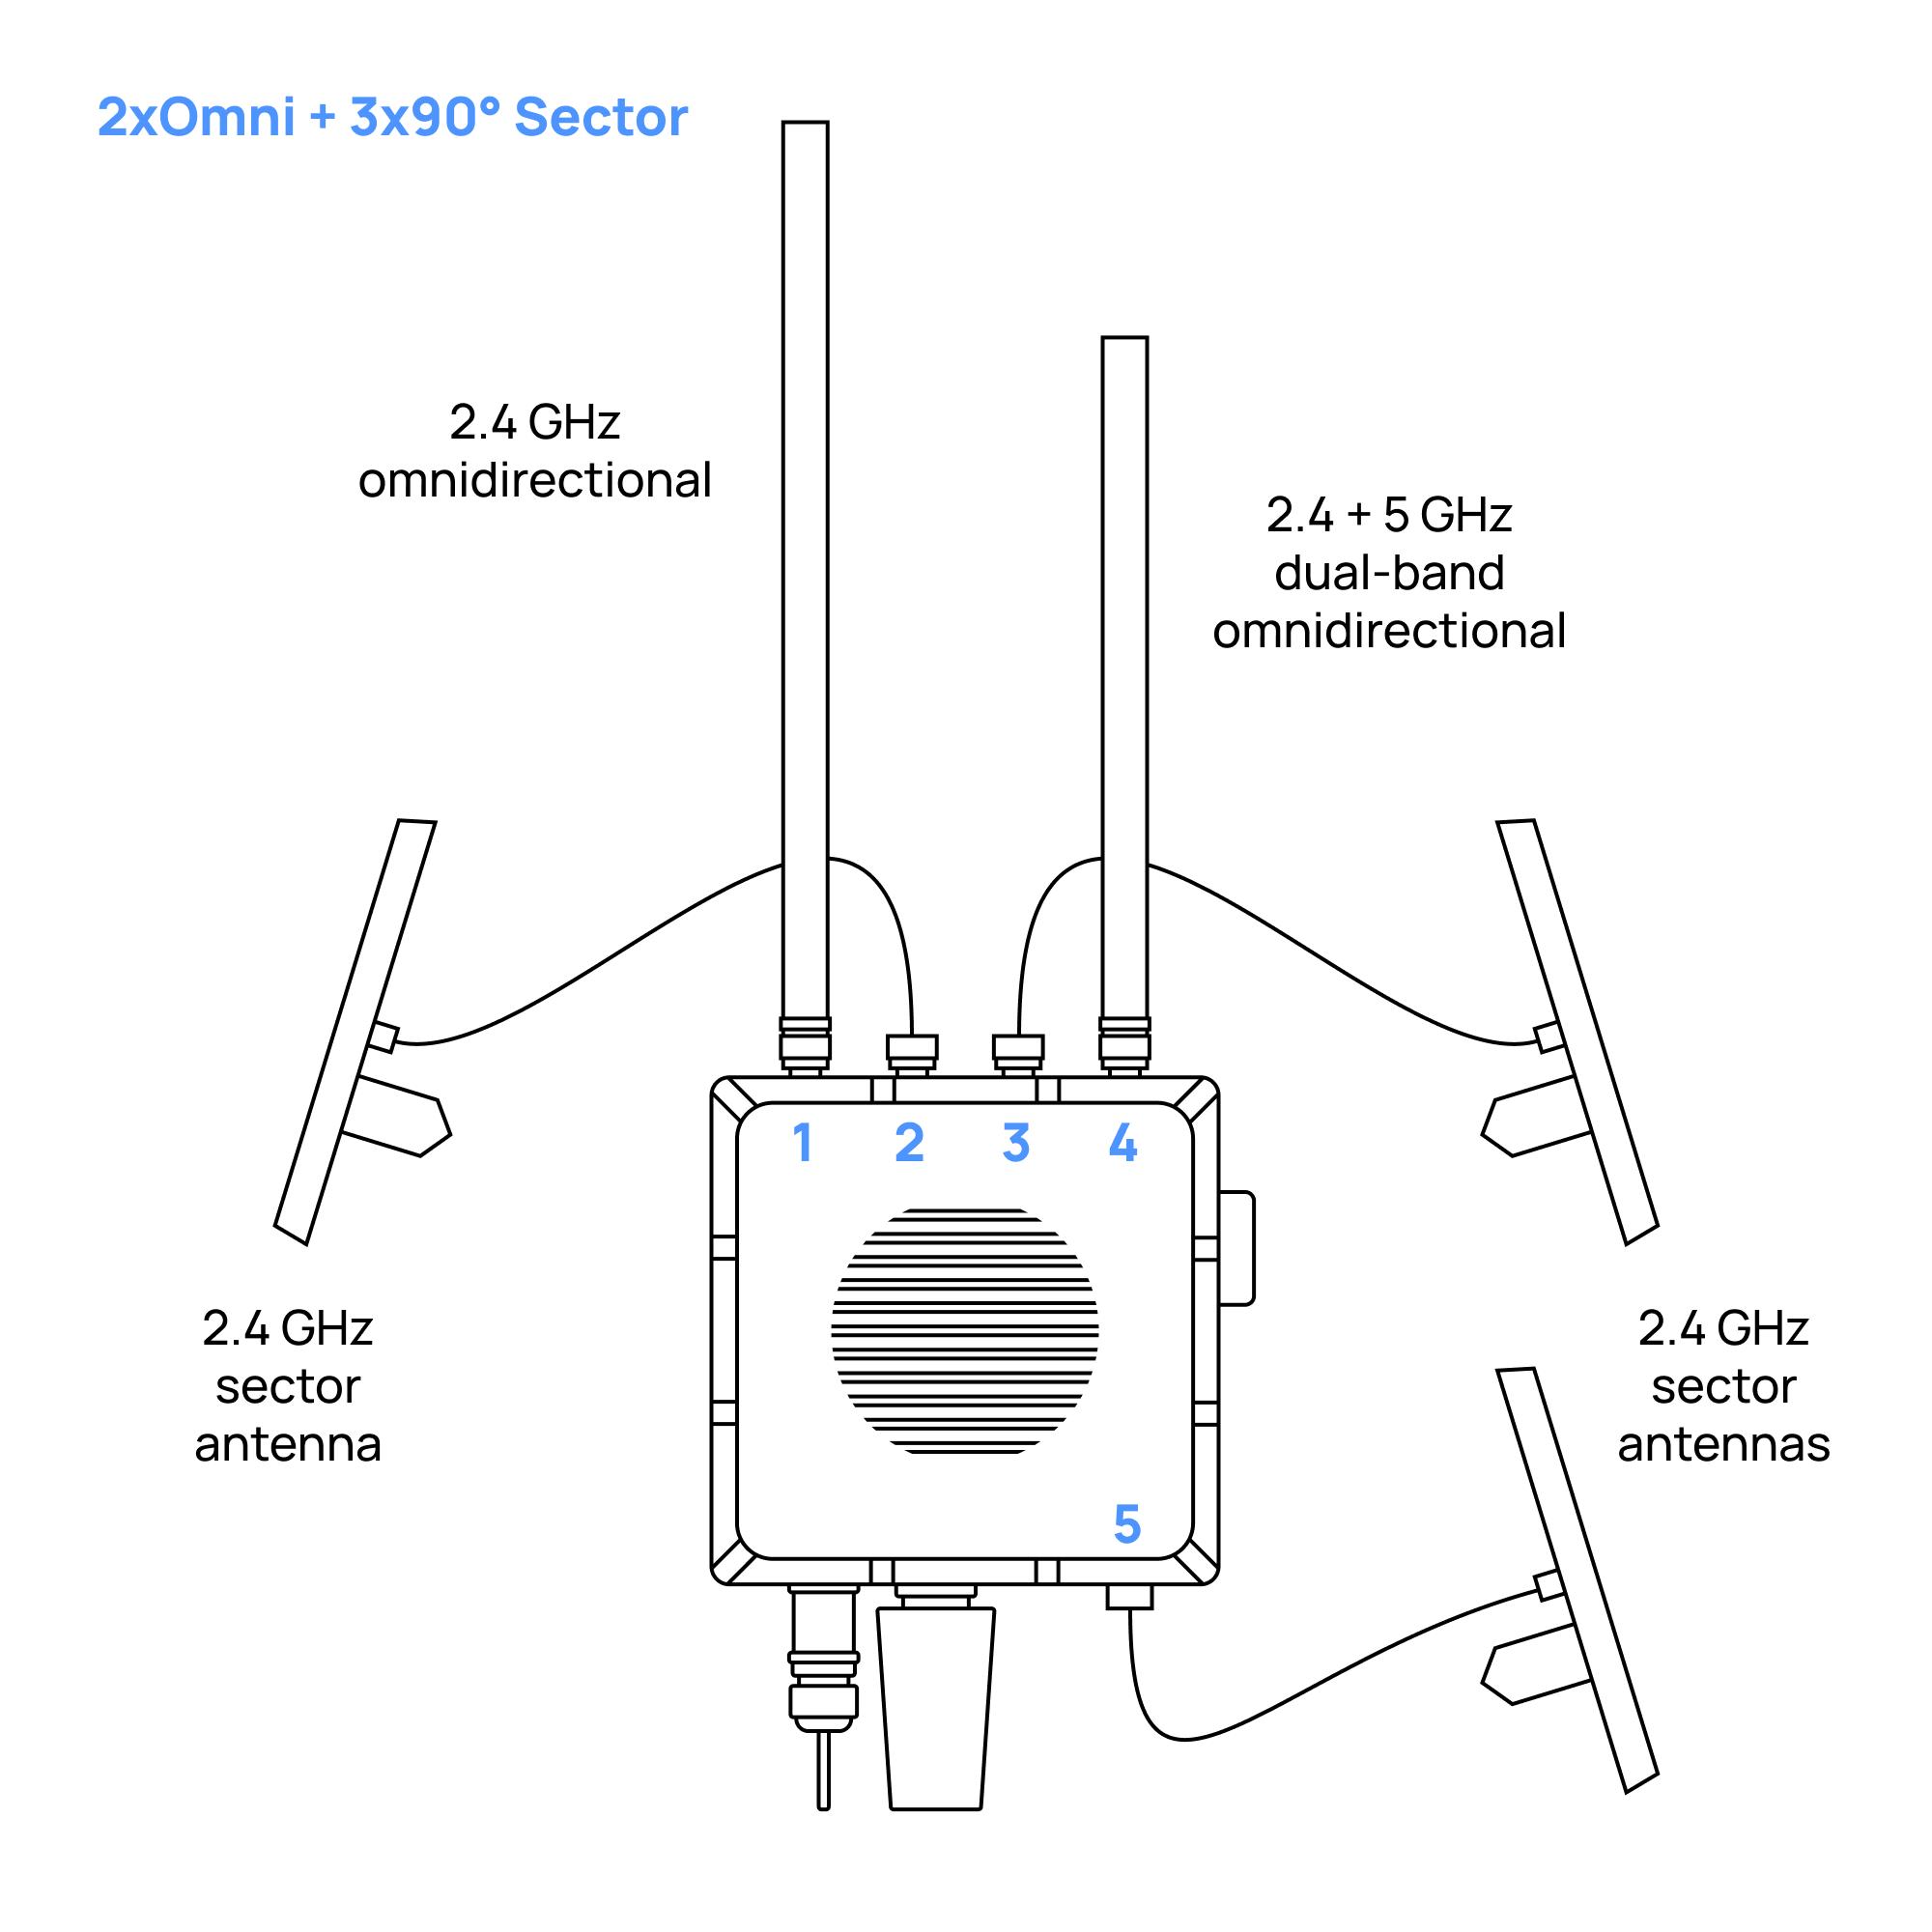
Scout with 2x Omnidirectional + 3x 90° Directional Antennas
Once you receive your Scout device with the directional antennas configuration, you’ll find everything neatly packed in the delivery box.
Here’s what to expect when unboxing your new Scout system.
This image illustrates the standard contents included in the package of Scout with directional antennas.
PACKAGING SIZE INFO
The Scout with directional antennas package comes in a box with adjustable height and has the following maximal dimensions:
450 mm x 350 mm x 250 mm / 17.7" x 13.8" x 9.8"
The actual height depends on the specific Scout configuration. This size ensures the contents are well-protected during transport while still being easy to handle.
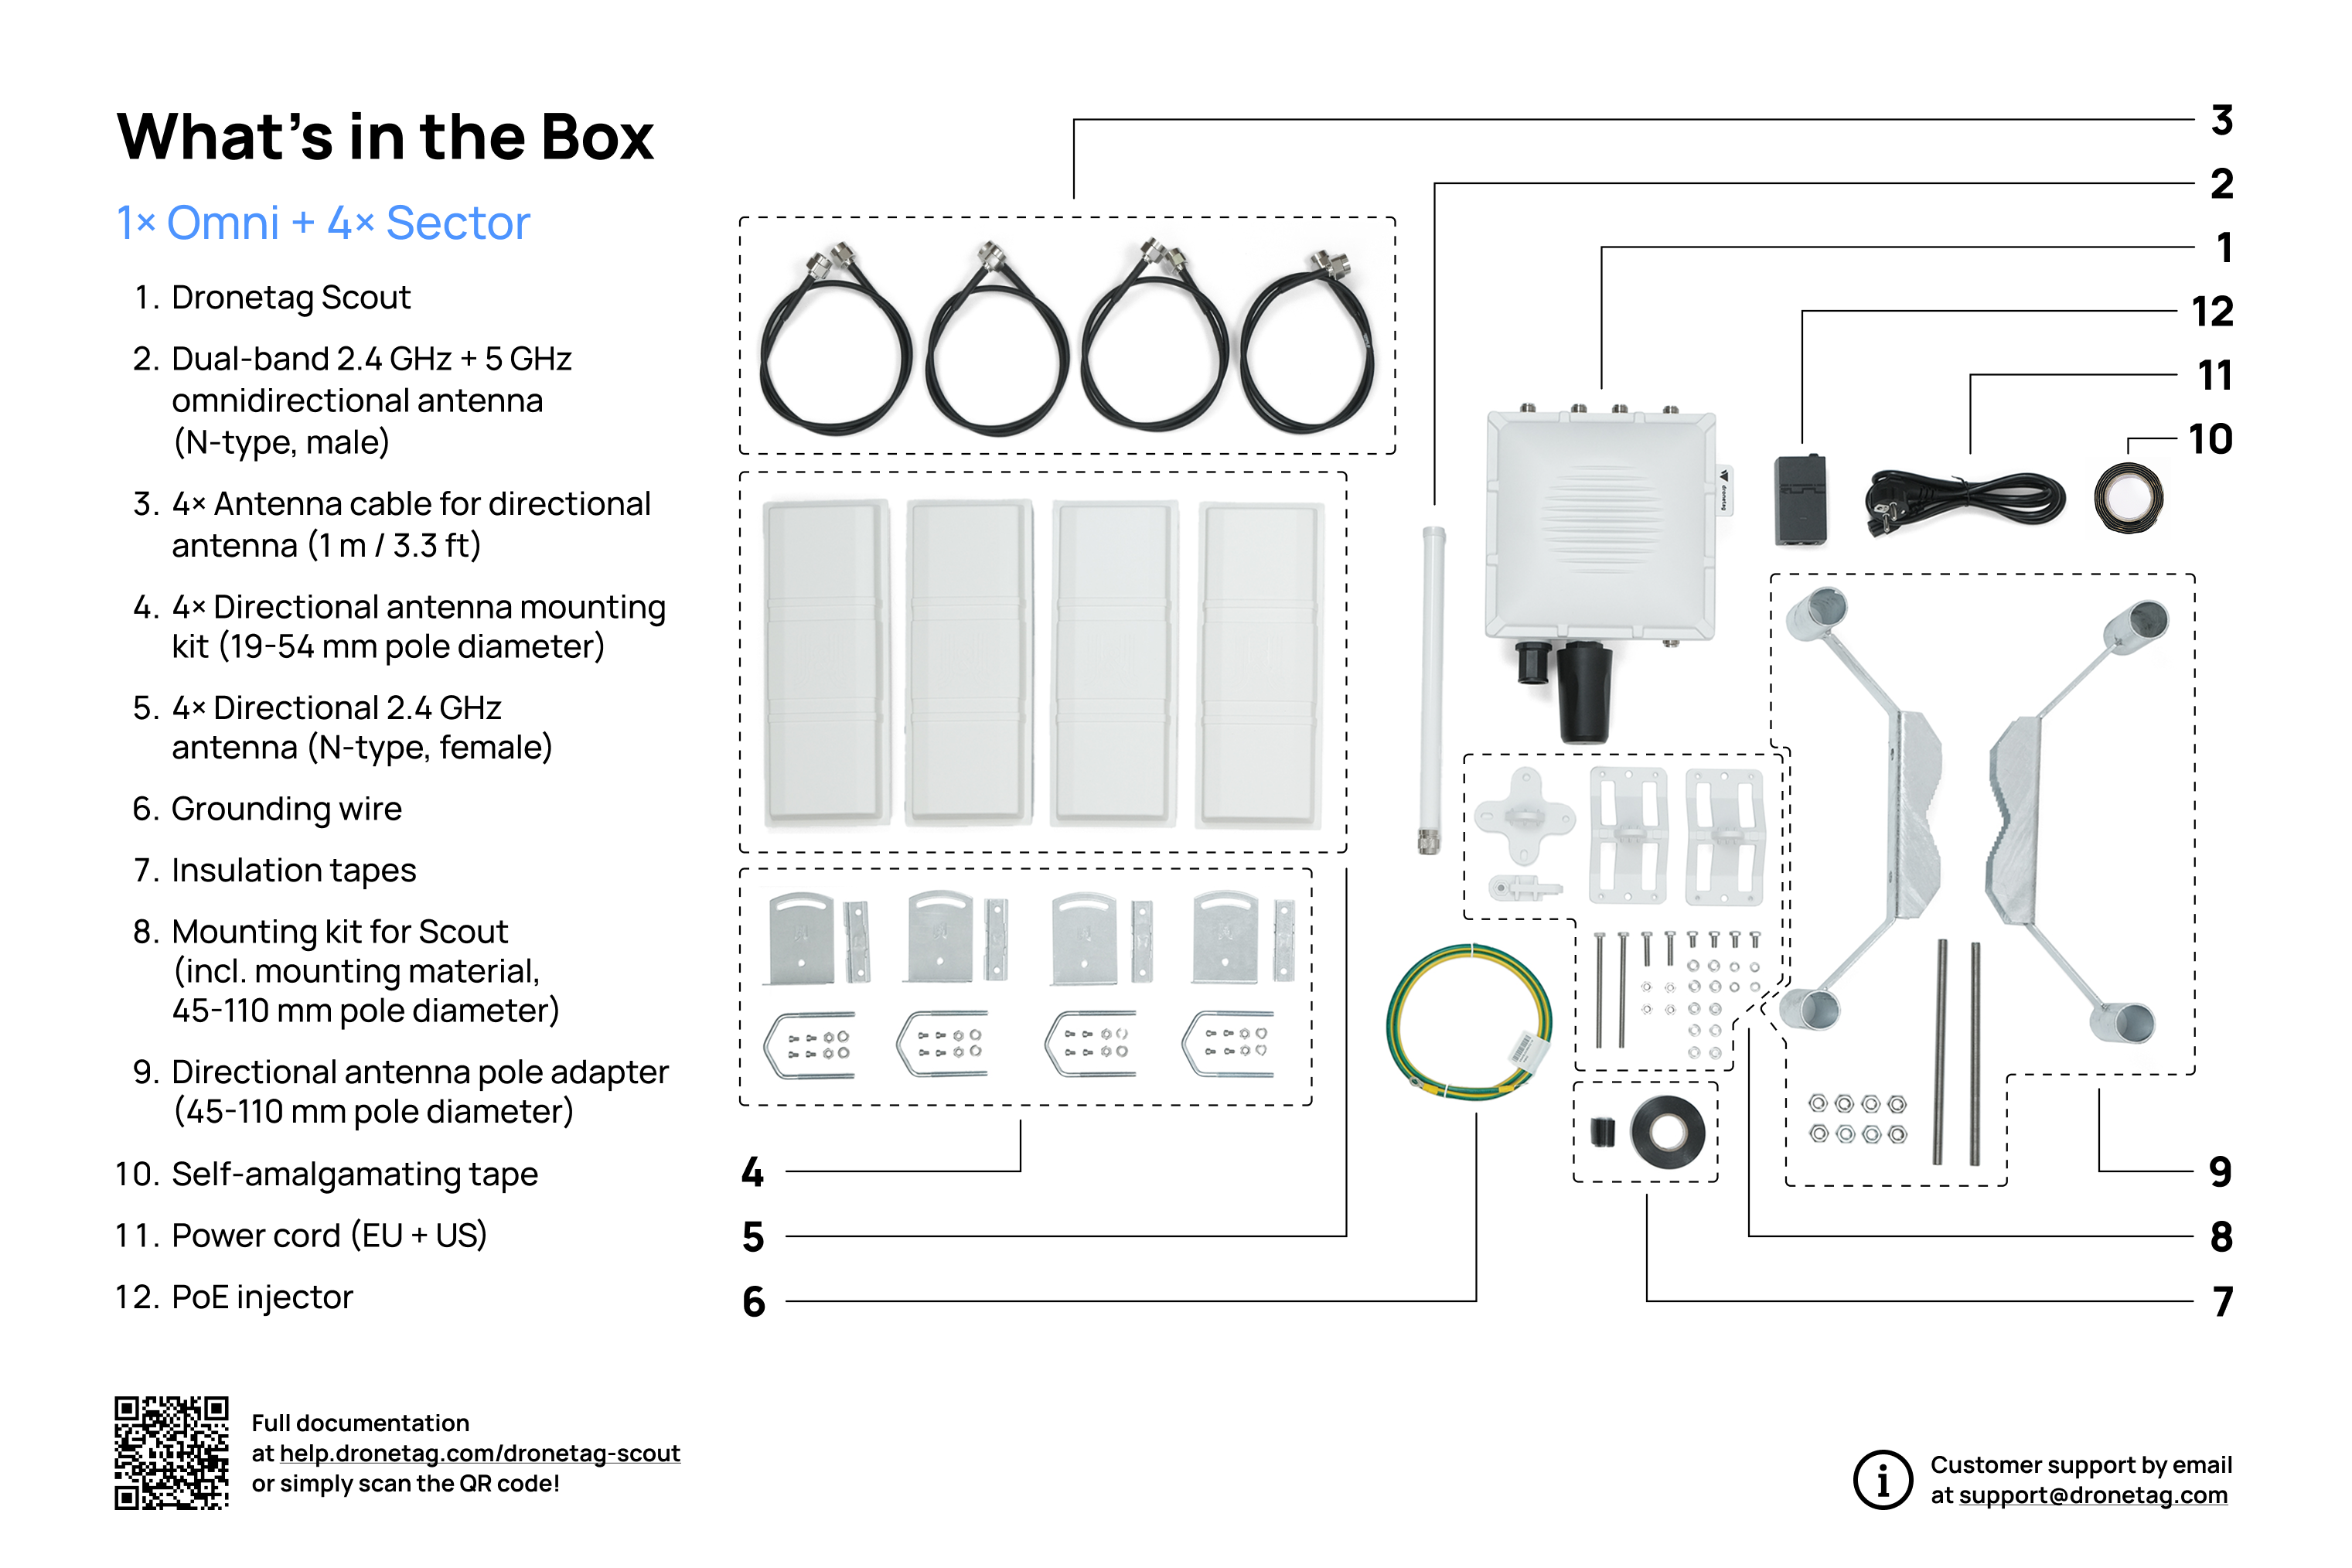
Scout with 1x Omnidirectional + 4x 90° Directional Antennas
Once you receive your Scout device with the directional antennas configuration, you’ll find everything neatly packed in the delivery box.
Here’s what to expect when unboxing your new Scout system.
This image illustrates the standard contents included in the package of Scout with directional antennas.
Scout (1× Omni + 4× 90° Sector) – extended configuration for maximum coverage and directional detection
👉 View 3D model
note
This Scout variant includes a holder for four directional antennas for free.
PACKAGING SIZE INFO
The Scout with directional antennas package comes in a box with adjustable height and has the following maximal dimensions:
450 mm x 350 mm x 250 mm / 17.7" x 13.8" x 9.8"
The actual height depends on the specific Scout configuration. This size ensures the contents are well-protected during transport while still being easy to handle.
note
Each package contains power cords with both EU and US plugs.
Installation Prerequisites
This section describes the requirements for successful deployment of the Scout.
What is required to install and operate the Scout?
Appropriate place to mount the Scout
Pole in the desired place with a diameter of 45 – 110 mm
Two 10 mm wrenches
Power outlet or Ethernet available with supported PoE
Ethernet cable dedicated for outdoor use (CAT5 and higher)
Ability and equipment to crimp your Ethernet cable
Safe and dry place for placing the PoE injector
Local network which will be used to operate the Scout
Ethernet port configured to 100 Mbit Full Duplex
Computer to connect to local network to configure Scout
Deployment Step-by-Step Guide
This guide walks you through the full process of deploying your Dronetag Scout device—from unboxing to live drone detection in the field. Each step includes helpful links to relevant documentation, so you can get started quickly and confidently.
Begin by unboxing your Dronetag Scout and verifying that all components are present. Before physical deployment, connect the device to your local network to verify functionality.
3. Plug in the Ethernet Cable and Connect to the Scout
Connect the Ethernet cable between the Scout and your network via the PoE injector. To access the management interface, you’ll need the device’s local IP address.
3 Plug in the Ethernet Cable and Connect to the Scout
Connect the Ethernet cable between the Scout and your network via the PoE injector. To access the management interface, you’ll need the device’s local IP address.
Before proceeding, ensure your SIM card is properly installed and configured for LTE connectivity. For detailed instructions on SIM card installation and LTE setup, please refer to our comprehensive guide here:
This step is crucial to enable LTE functionality and ensure your Scout connects reliably to the mobile network.
warning
Scout can be provided with connectivity by Dronetag; please check your ordering information before opening up the Scout. The unit comes pre-configured correctly and you don't need to do any configuration.
Open the Scout’s Management Page in your browser (e.g., https://[Scout-IP]).
Here, you can view diagnostics, network info, and configure operational parameters.
Before full deployment, verify that your Scout is able to detect drone Remote ID signals. Quickly check the Remote ID drones visible to your Scout at https://<SCOUTIP>/map
To get the most out of your Scout, location matters - a lot.
Choose a suitable and elevated spot for installation.
The receiver’s performance relies heavily on a clear, unobstructed view of its surroundings.
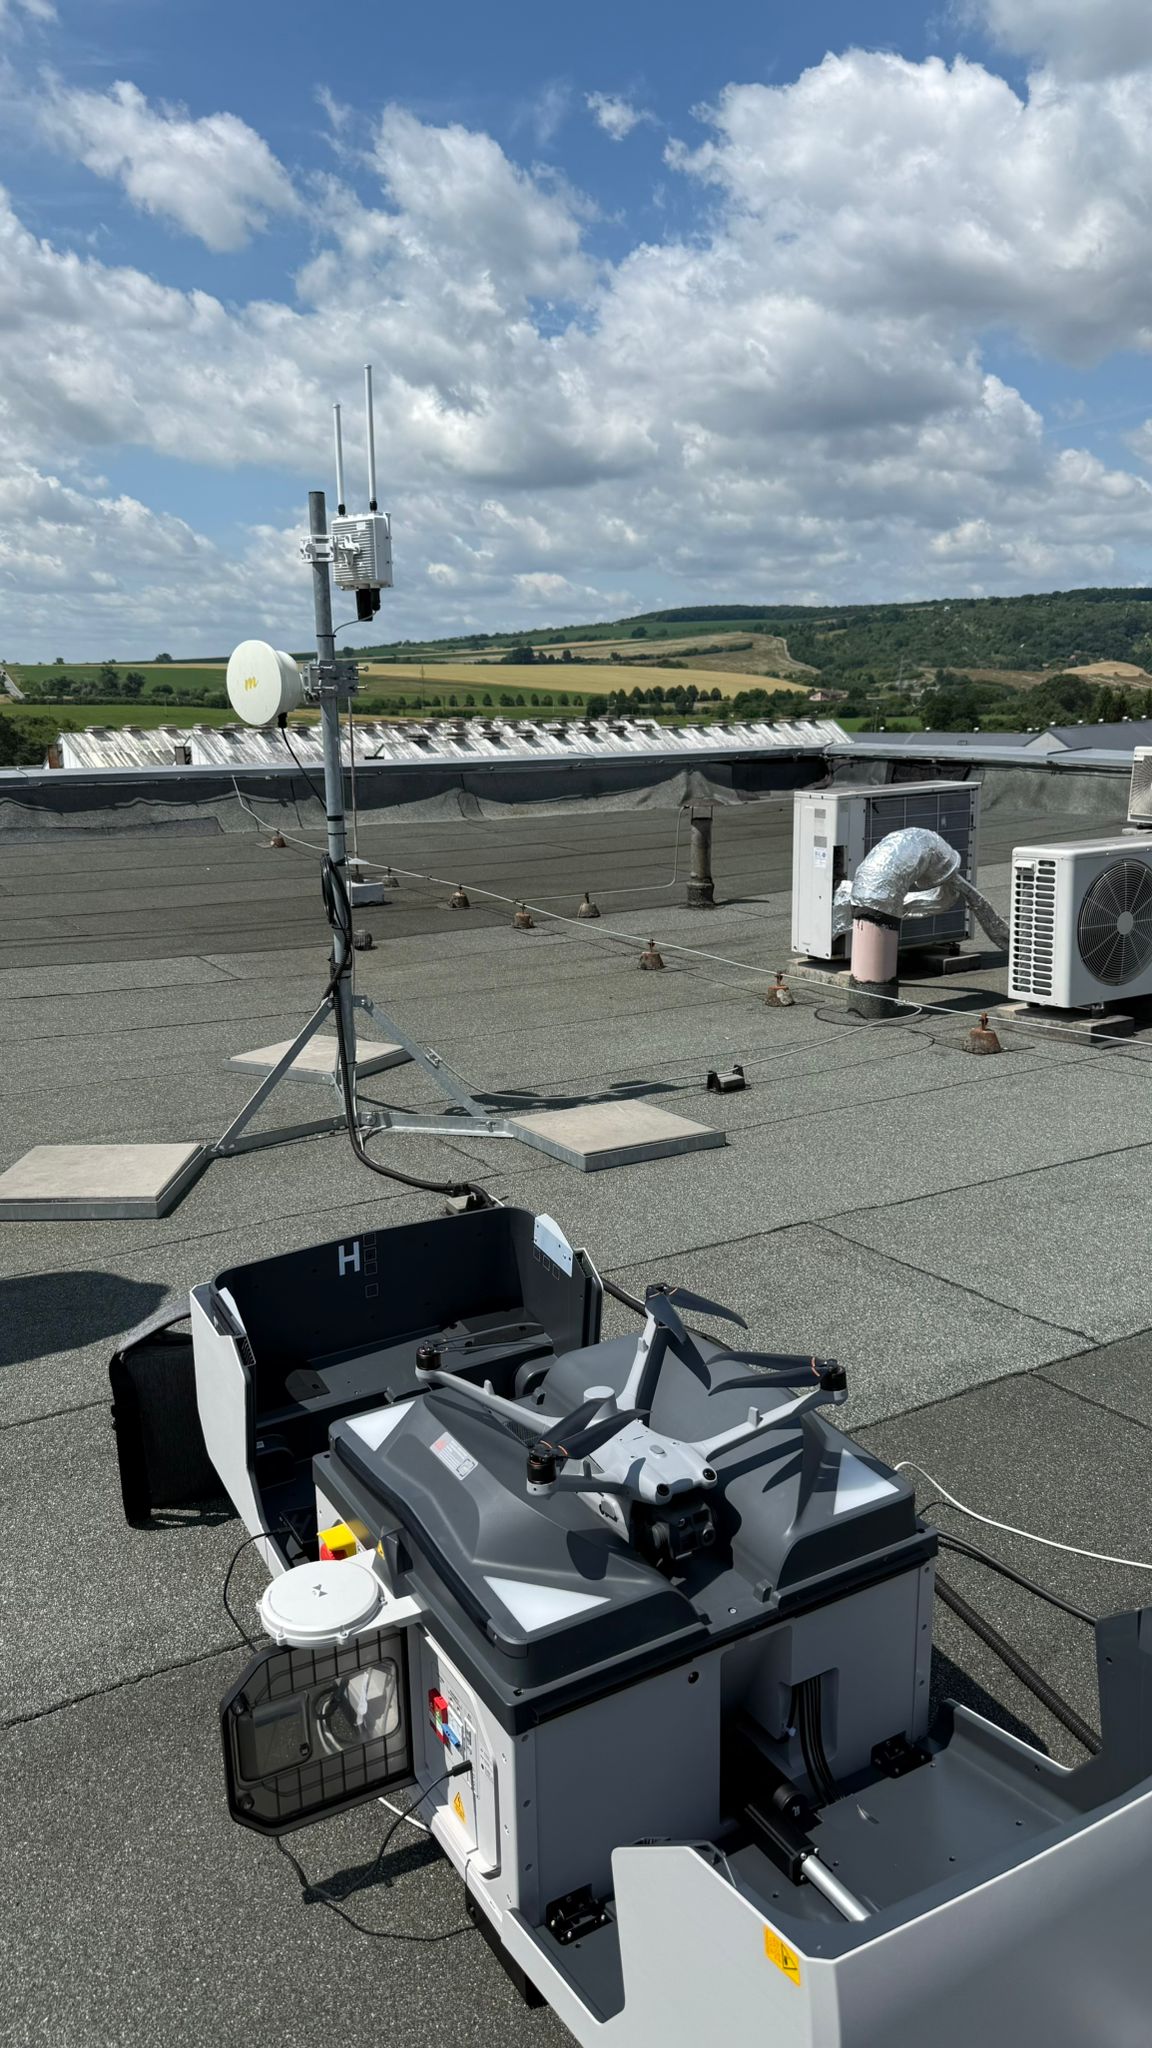
A rooftop, ideally the highest one in the area, often proves to be the perfect vantage point for maximum signal coverage.
tip
📡 For optimal range and accuracy, avoid mounting the Scout too close to any devices that transmit on 2.4 GHz or 5 GHz frequencies - such as Wi-Fi routers or other radio systems.
Signal reception isn’t just about hardware - it’s also about the environment. Several key factors can impact how well the Scout picks up Remote ID transmissions.
• Physical obstacles between the drone and the Scout - like buildings, trees, or terrain - can block or weaken signals.
• When possible, install the Scout in a spot with a clear view in the direction where drone activity is expected.
• The Scout operates in frequency bands that are commonly shared with other technologies.
• Devices such as Wi-Fi routers, Bluetooth speakers, or even smart home hubs can cause interference.
• Keep the Scout as far away as possible from these types of devices.
• All electronics generate a certain amount of background noise, which can interfere with sensitive receivers like the Scout.
• Avoid installing the Scout near AC units, inverters, solar power stations, or other large electrical systems.
Transmission Power of the Drone’s Remote ID Signal
• Not all drones are created equal - the power of the signal they transmit can vary greatly.
• This power level is defined by the drone manufacturer and local regulations, and while you can't control it, it's good to be aware that some drones may simply broadcast farther than others.
Before installing the Scout receiver, make sure you have the proper location and infrastructure ready. This will save you time and ensure optimal performance from the start.
To install the Scout, make sure you have the following:
A tall structure or mast/pole - the higher, the better.
Ideally on the highest rooftop in the area, with a clear line of sight in all directions.
The Scout cannot receive signals through buildings or large obstacles.
A stable power source:
Either a standard indoor power outlet near the Ethernet cable entry point, or
A PoE (Power over Ethernet) injector if direct power access is not available.
The Scout has a low power consumption (under 10 W), so both options are easy to accommodate.
An outdoor-rated Ethernet cable (CAT5 or higher) with the ability to crimp RJ-45 connectors.
Minimal radio interference: Avoid placing the Scout close to Wi-Fi transmitters or other antennas operating at 2.4 GHz or 5 GHz.
Examples of devices using 2.4 GHz or 5 GHz
Drone controllers, mobile hotspots, wearables, and modern in-car Wi-Fi systems such as Apple CarPlay and Android Auto. Basically it is every device using wireless communication.
Choose a high, unobstructed position — the higher, the larger the detection range.
Avoid areas with dense urban obstacles, metallic surfaces, or sources of RF noise.
Ensure the Scout has a clear line of sight toward open space — it will not detect signals behind walls or buildings.
If you are unsure about the right location, contact our support.
Send us the address of the intended installation site or photos from the rooftop view, and we’ll help you verify signal conditions using satellite data (e.g., Google Earth) and identify any potential interference sources.
Now that your location is ready, the power and network connection are prepared, and you’ve confirmed optimal conditions, follow these steps to mount and connect the Scout properly.
Carefully go through each step to ensure the best performance and long-term reliability of your installation.
To ensure optimal performance, the receiver should be mounted on an elevated structure like an existing pole, bracket, or mast.
If no such structure is available, a tripod can be used.
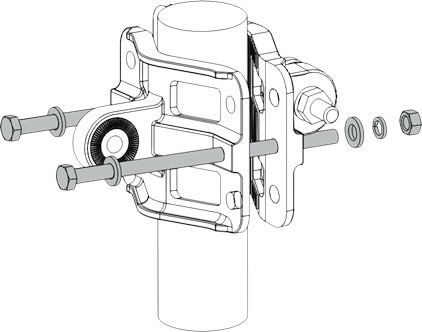
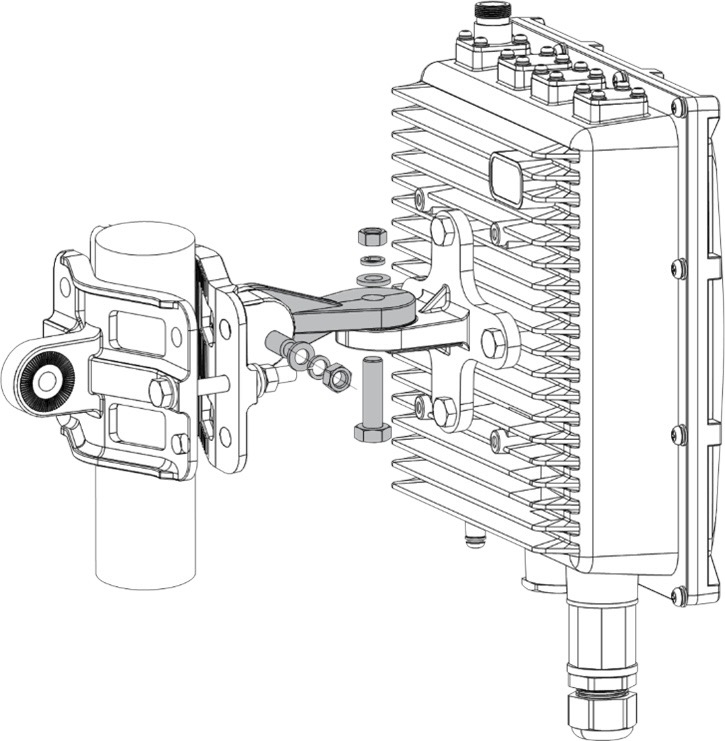
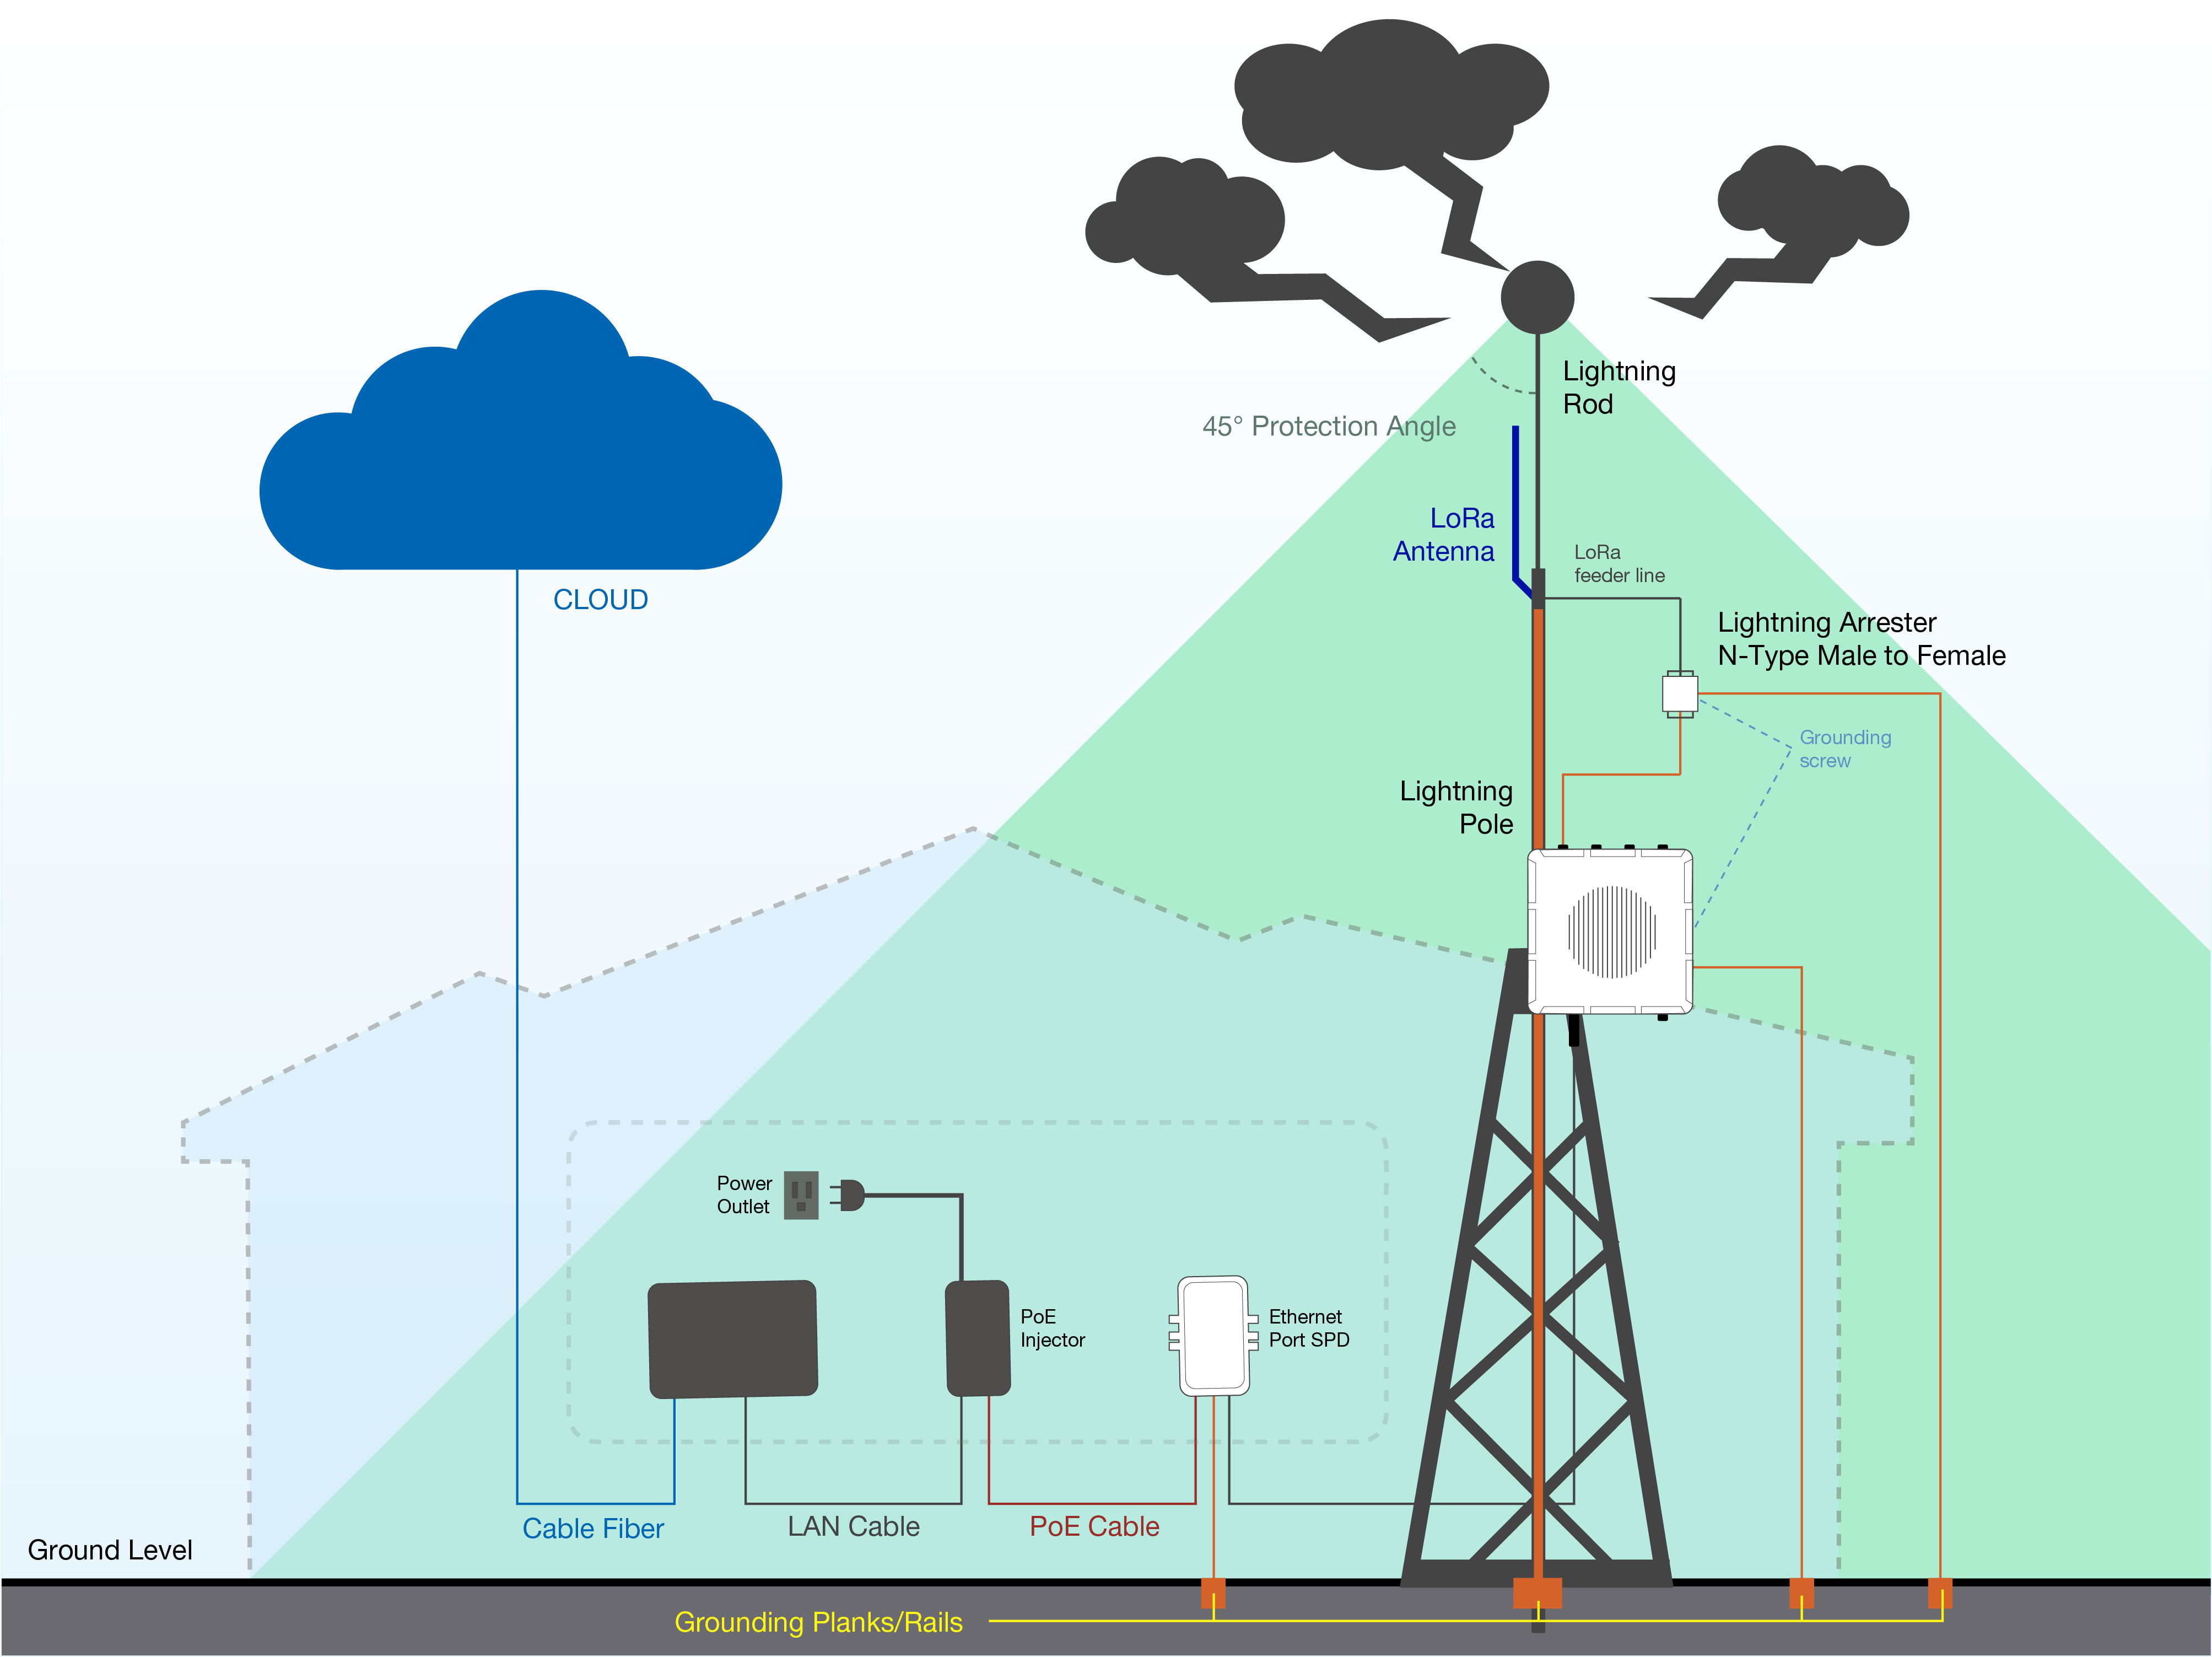
Mount the device to the desired place. Remember that the higher the place is, the better Scout will receive the Remote ID signal coming from the drones. While mounting the Scout, stick with the mounting manual and strictly follow the local regulations for electrical installation and surge and lightning protection.
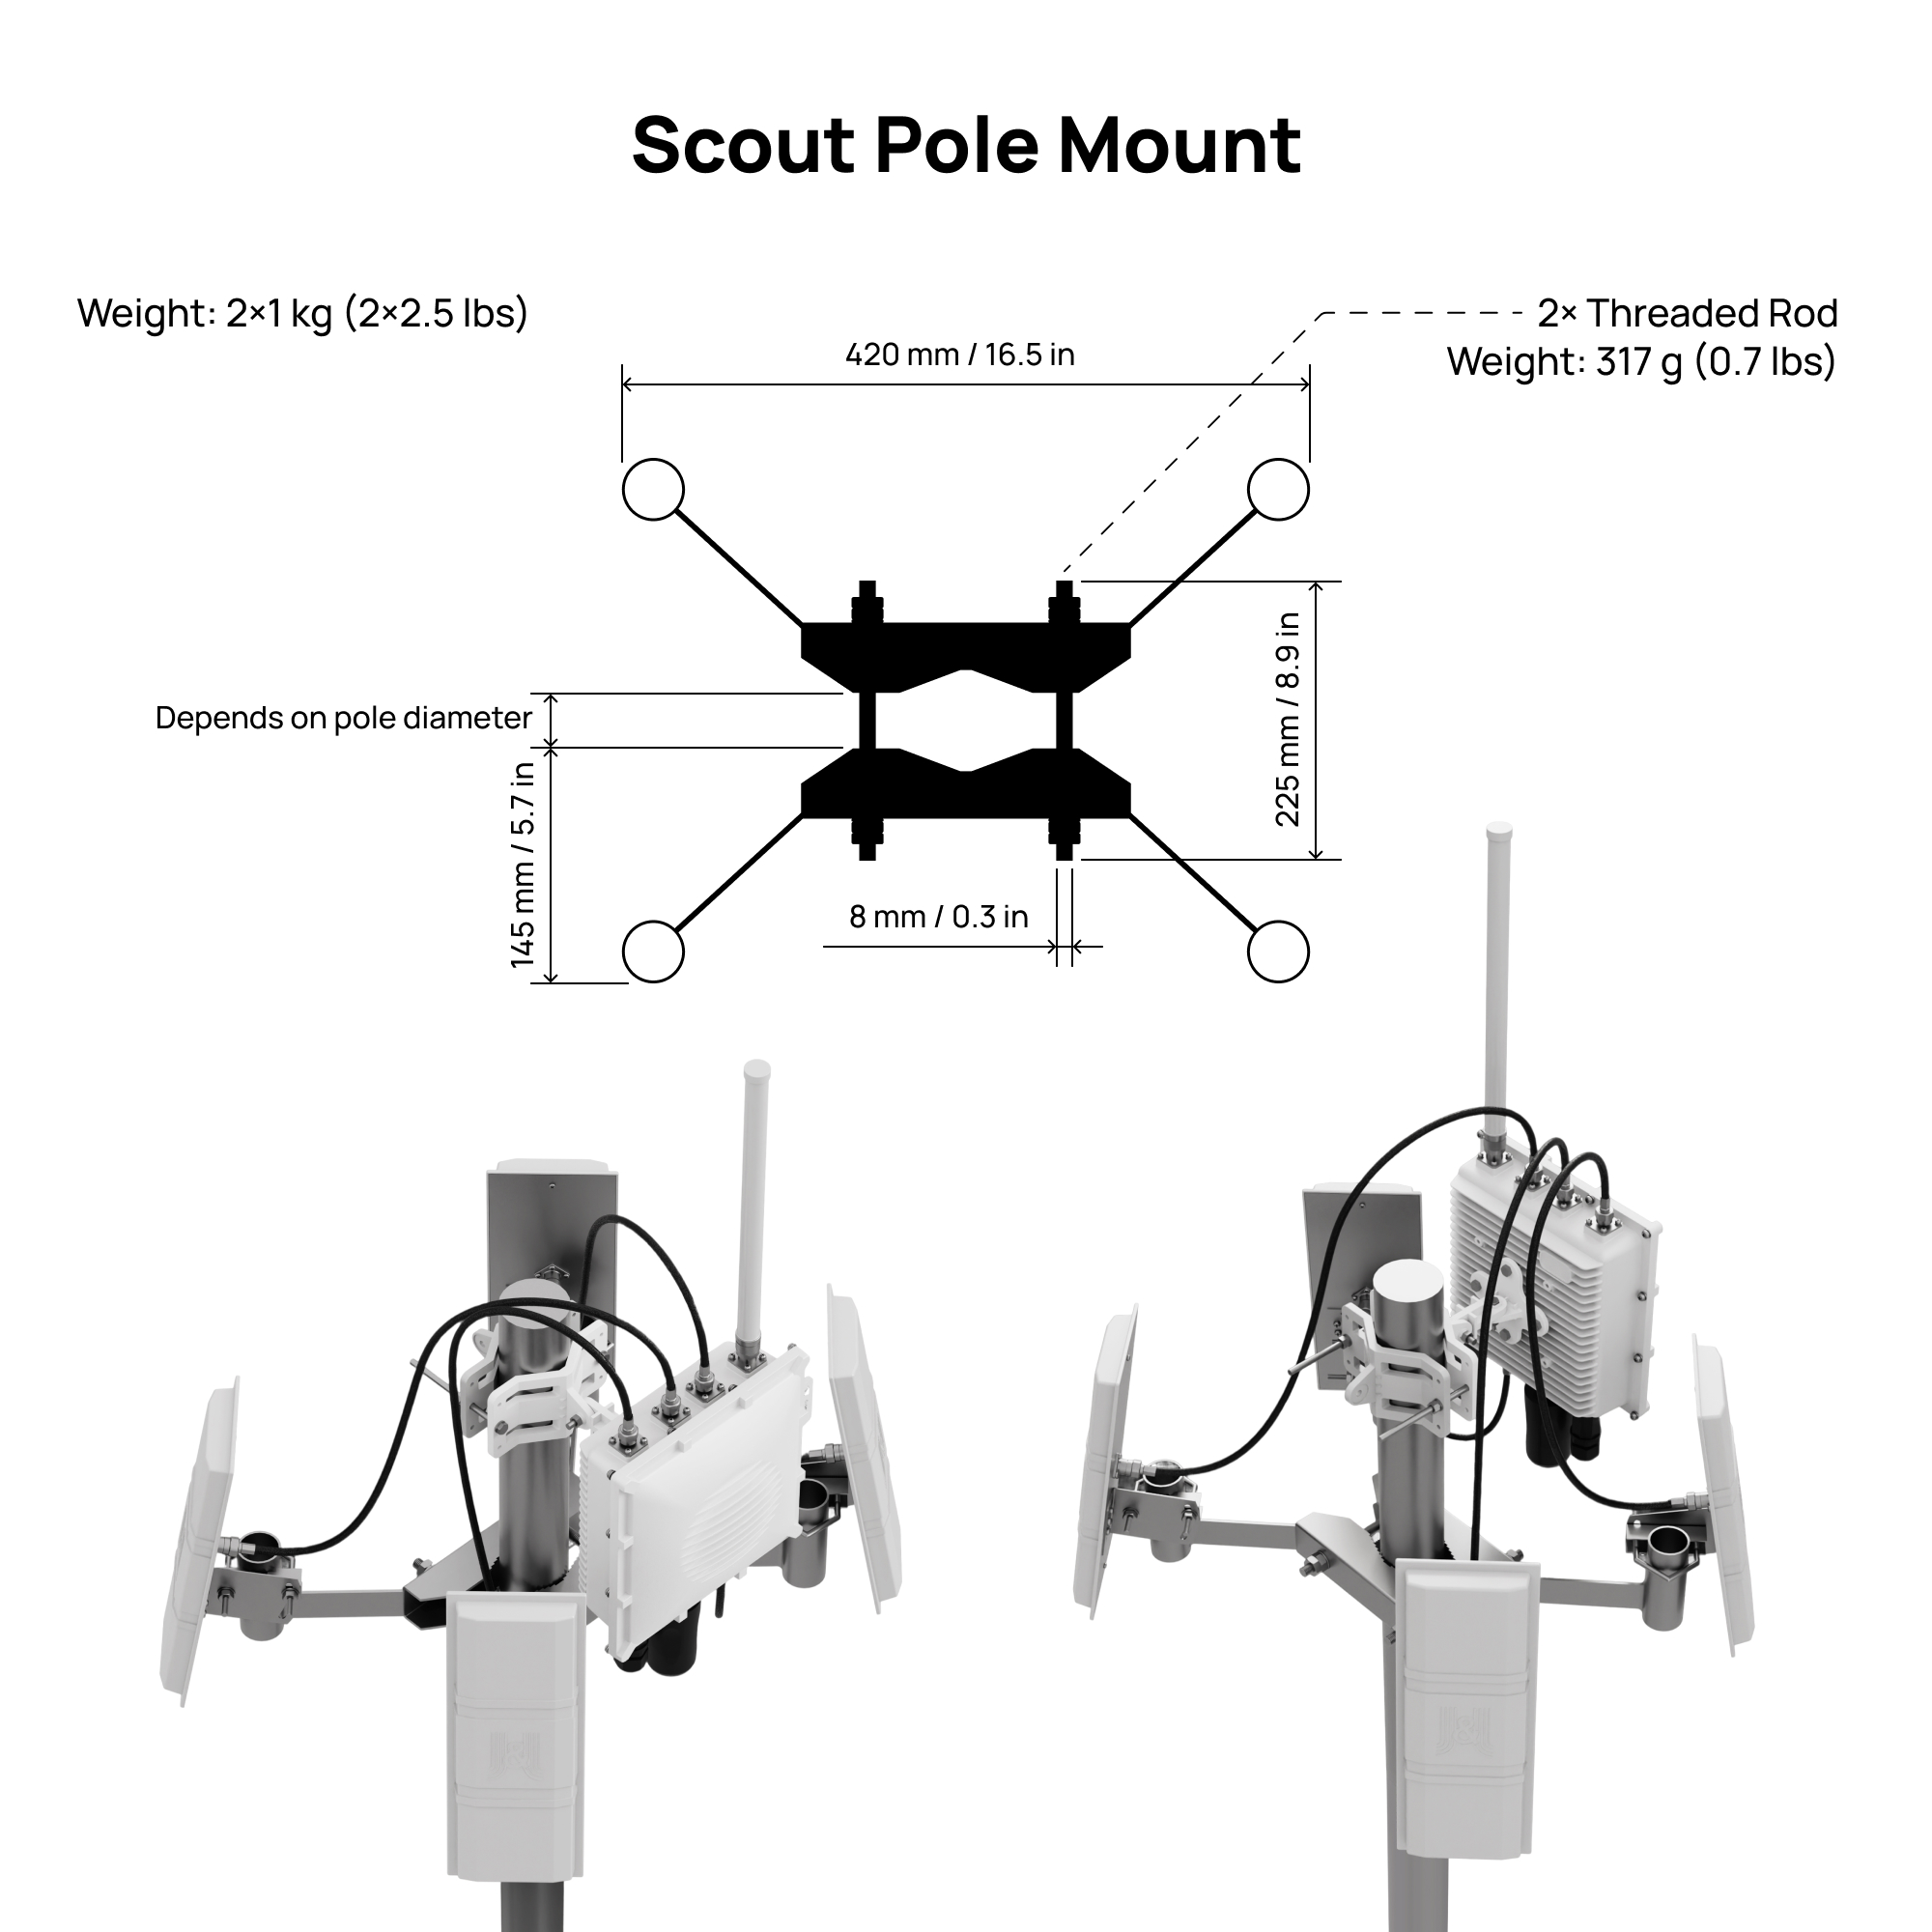
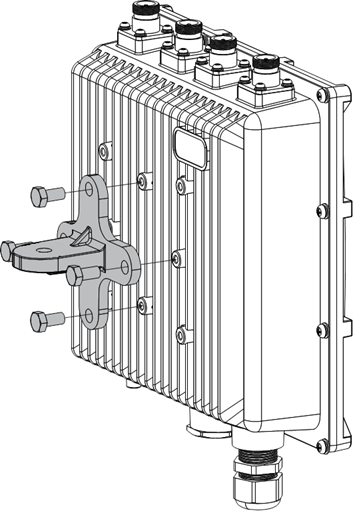
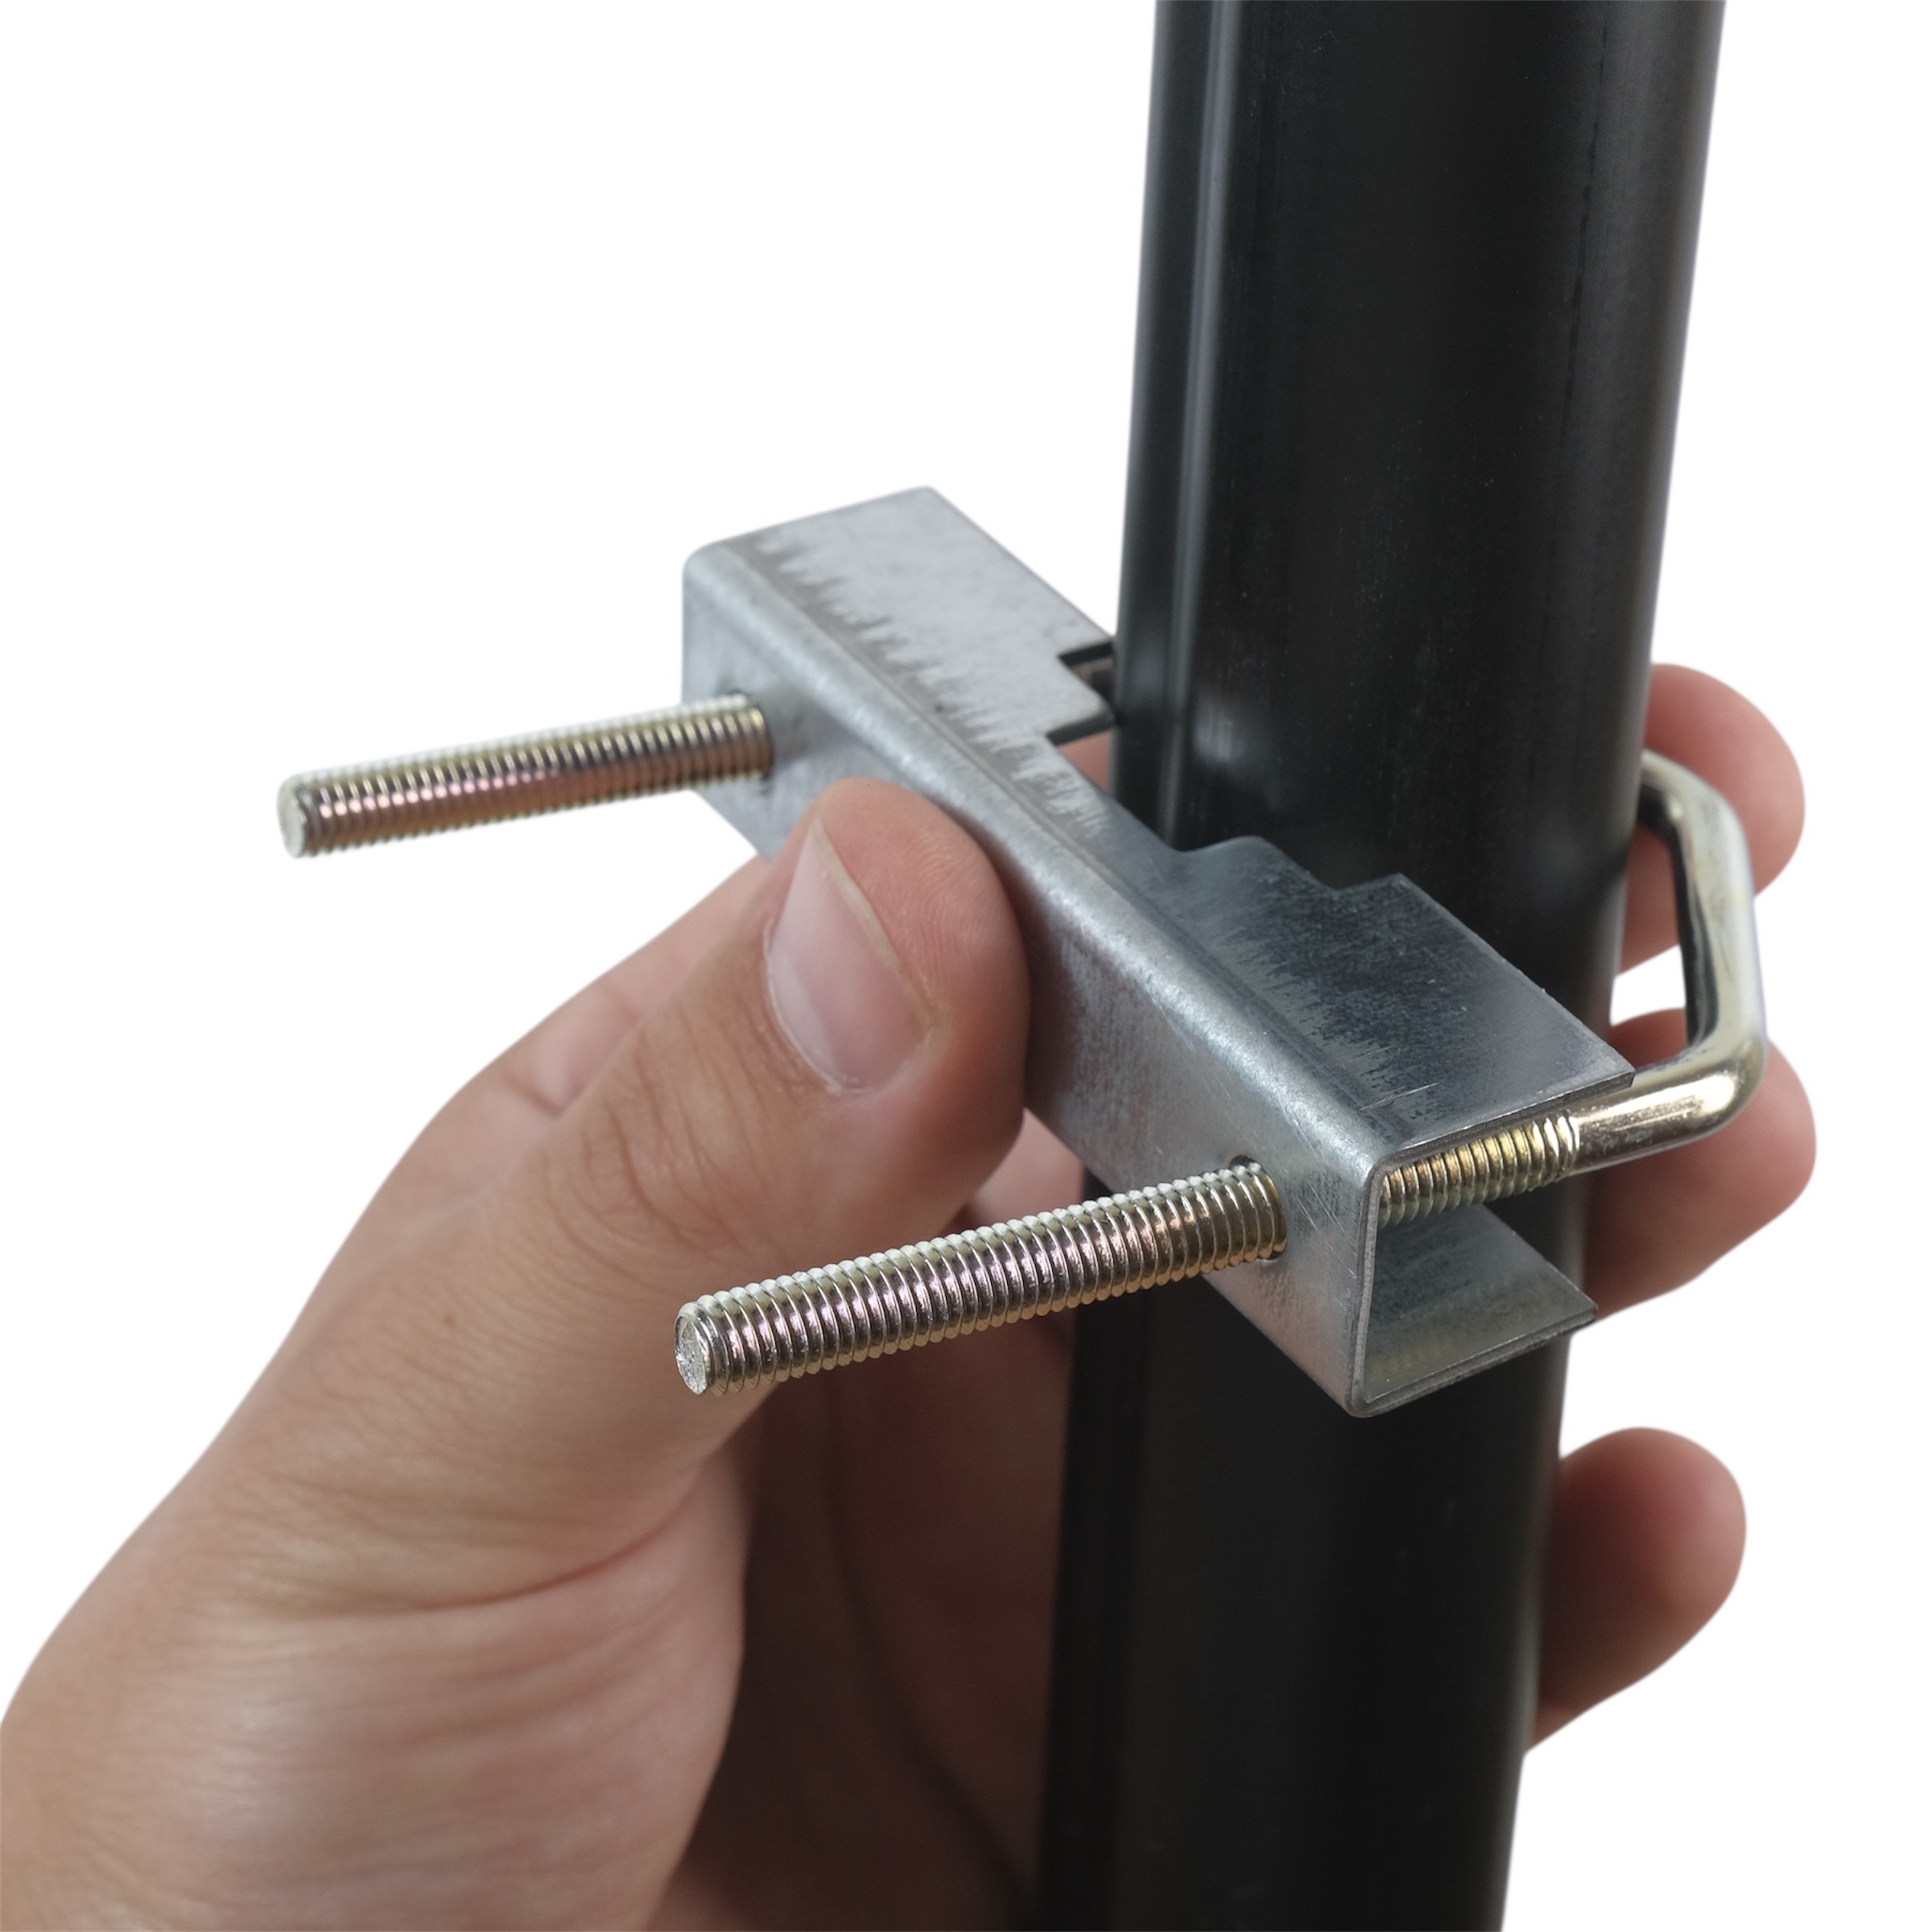
The pole clamp works for 45 – 110 mm diameter of pole and the cross bracket by securing the last piece of the mounting kit in place using M6*30 bolts, washers, and nuts.
caution
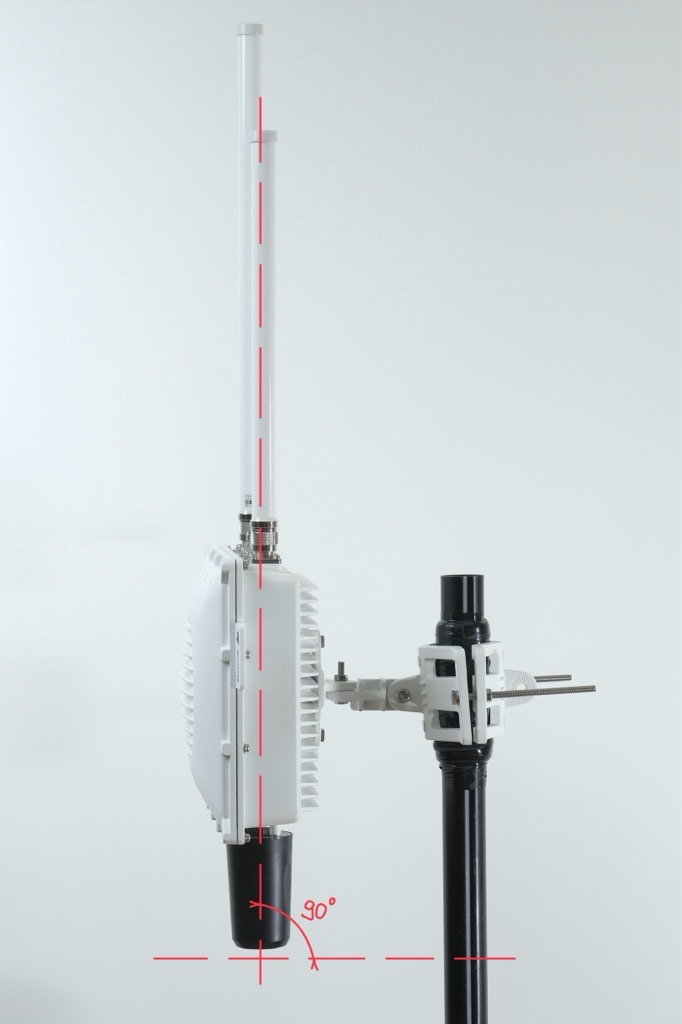
The Scout must be fixed so that antennas point perpendicular to the horizontal line.
Use only CAT5 (or above) cabling with outdoor rating.
note
The non-LTE version of Scout receiver must be constantly connected to an internet router for data transmission to the Dronetag Cloud when used in Cloud Mode.
The Scout must be connected to the same network as the computer used to perform the initial configuration.
KEEP IN MIND
The receiver is designed for outdoor use, housed in a weather-resistant case. The Ethernet cable must be threaded through a cable gland and crimped inside for a secure connection.
6. Connect the Ethernet cable using the PoE injector
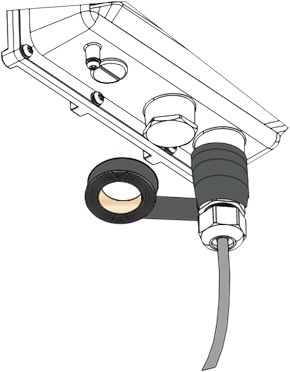
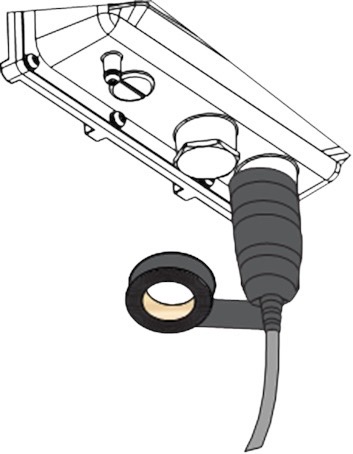
After the PoE cable is connected, insulate it with the included PVC tape:
Clean the surface area of the connector that will be wrapped. Wrap a layer of PVC tape with a 50% overlap according to the rotation direction of the connector. Continue wrapping the PVC tape to about 10 mm below the end of the connector.
Wrap three additional layers with PVC tape with natural uncoiling force and a 50% overlap. Make sure to cover the head and the tail of the connector.
Mounting the Antennas
This guide explains how to install the directional antenna mount for Dronetag Scout.
Follow the steps carefully to ensure a secure installation and reliable antenna performance.
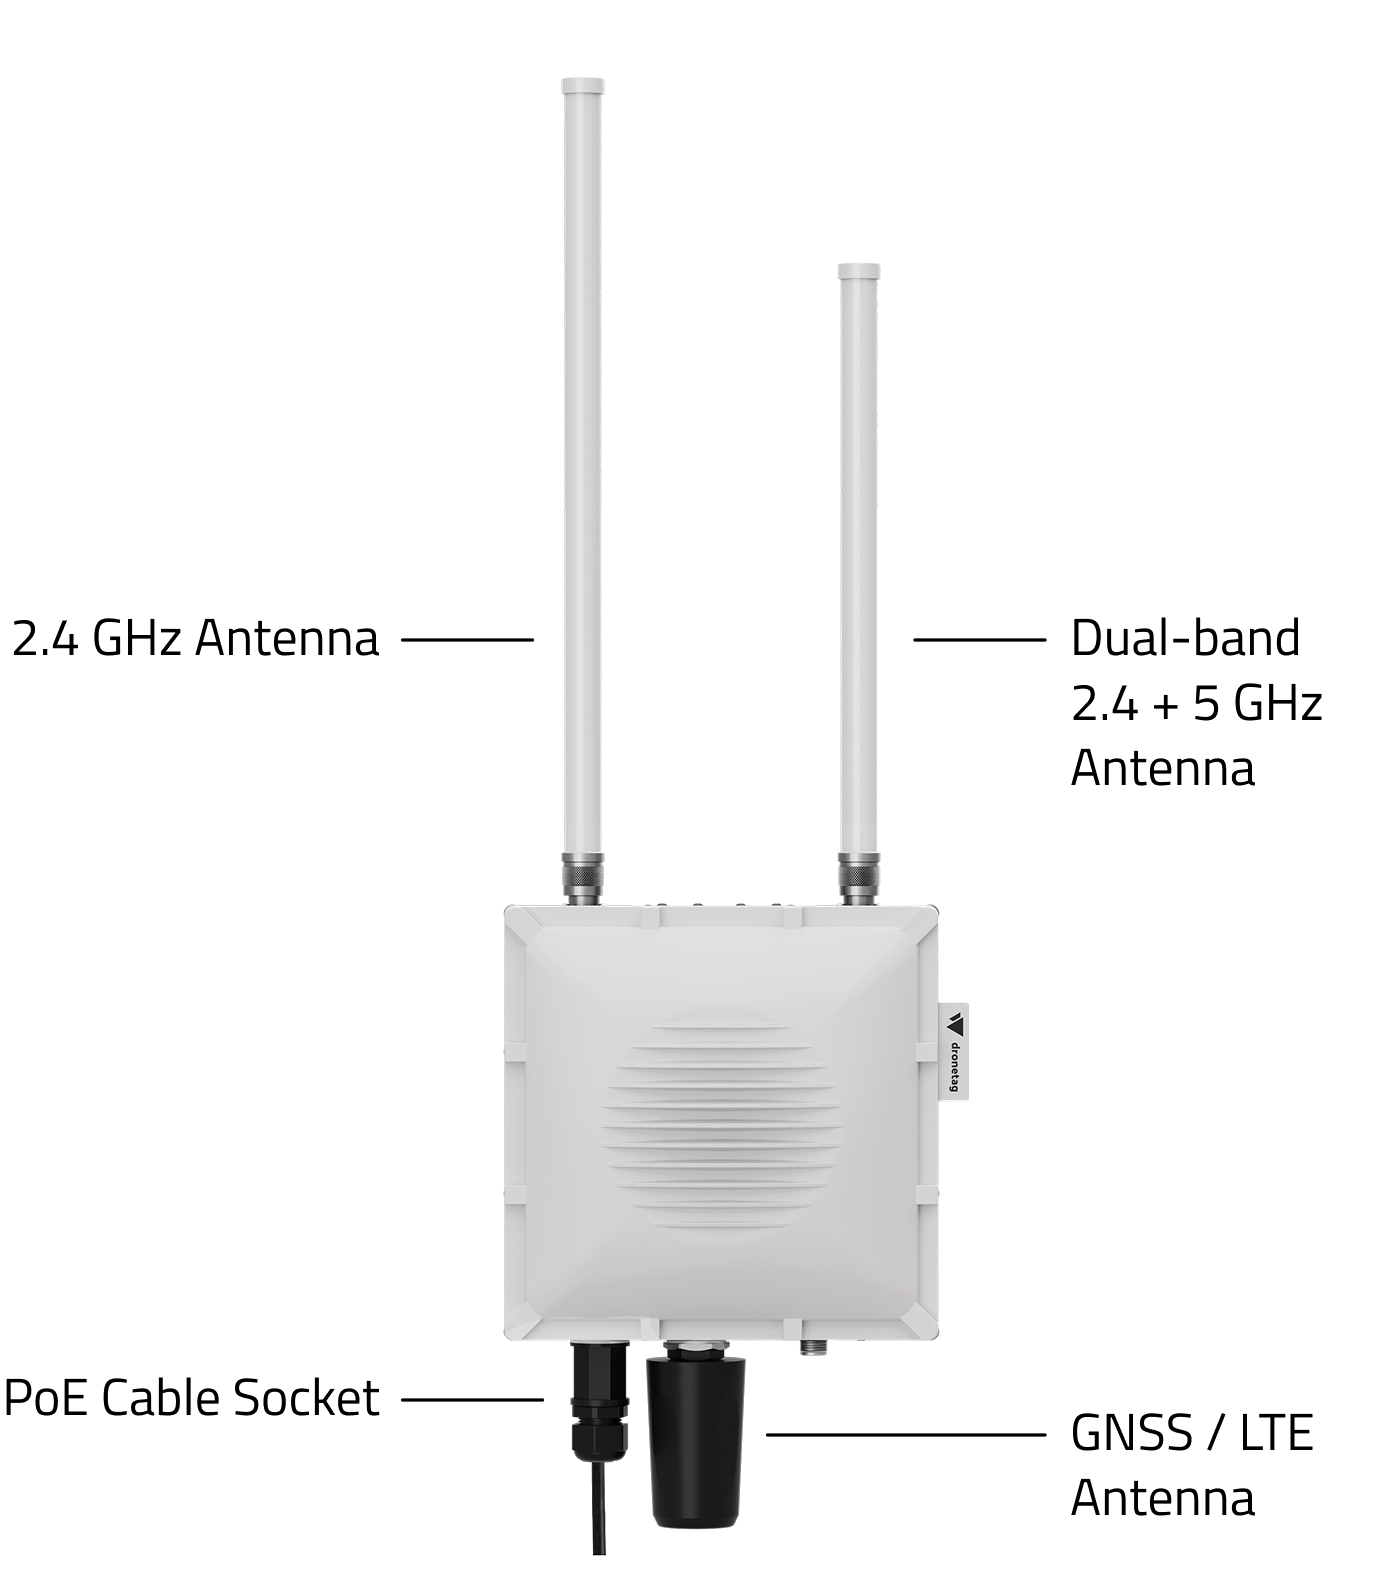
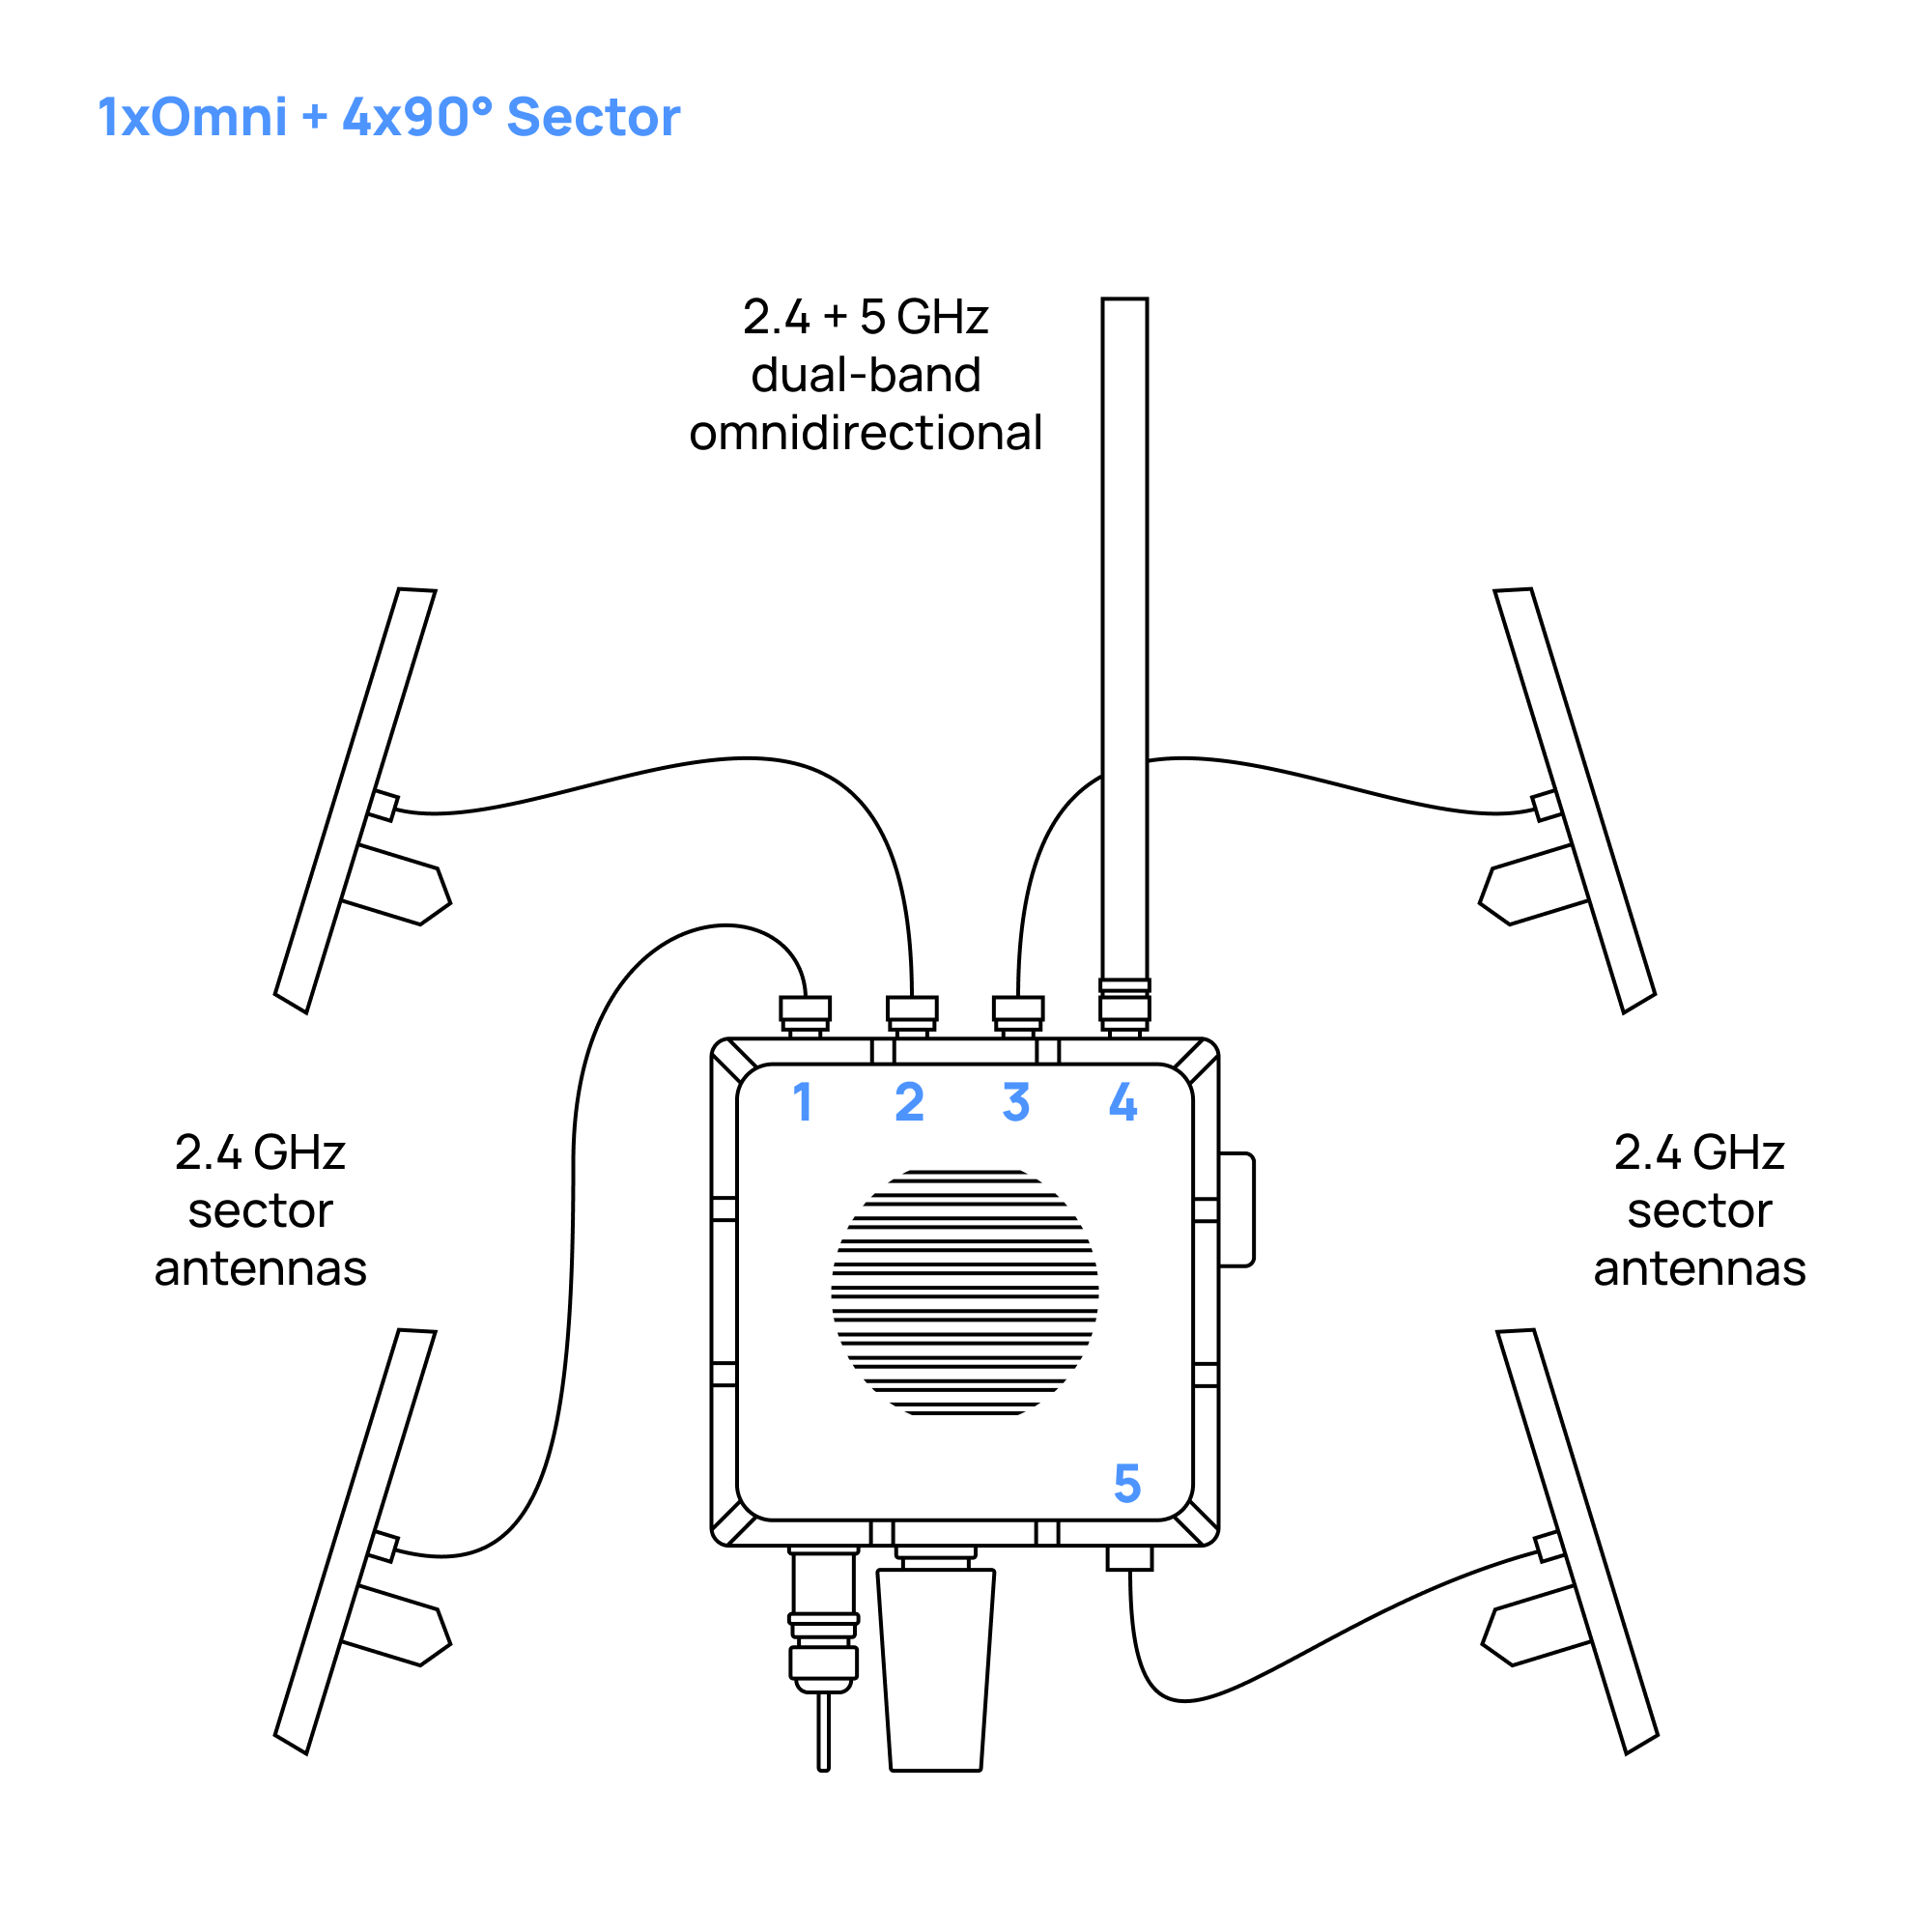
Screw the antenna marked with the "1" sticker on its box to the connector marked with the same sticker
tip
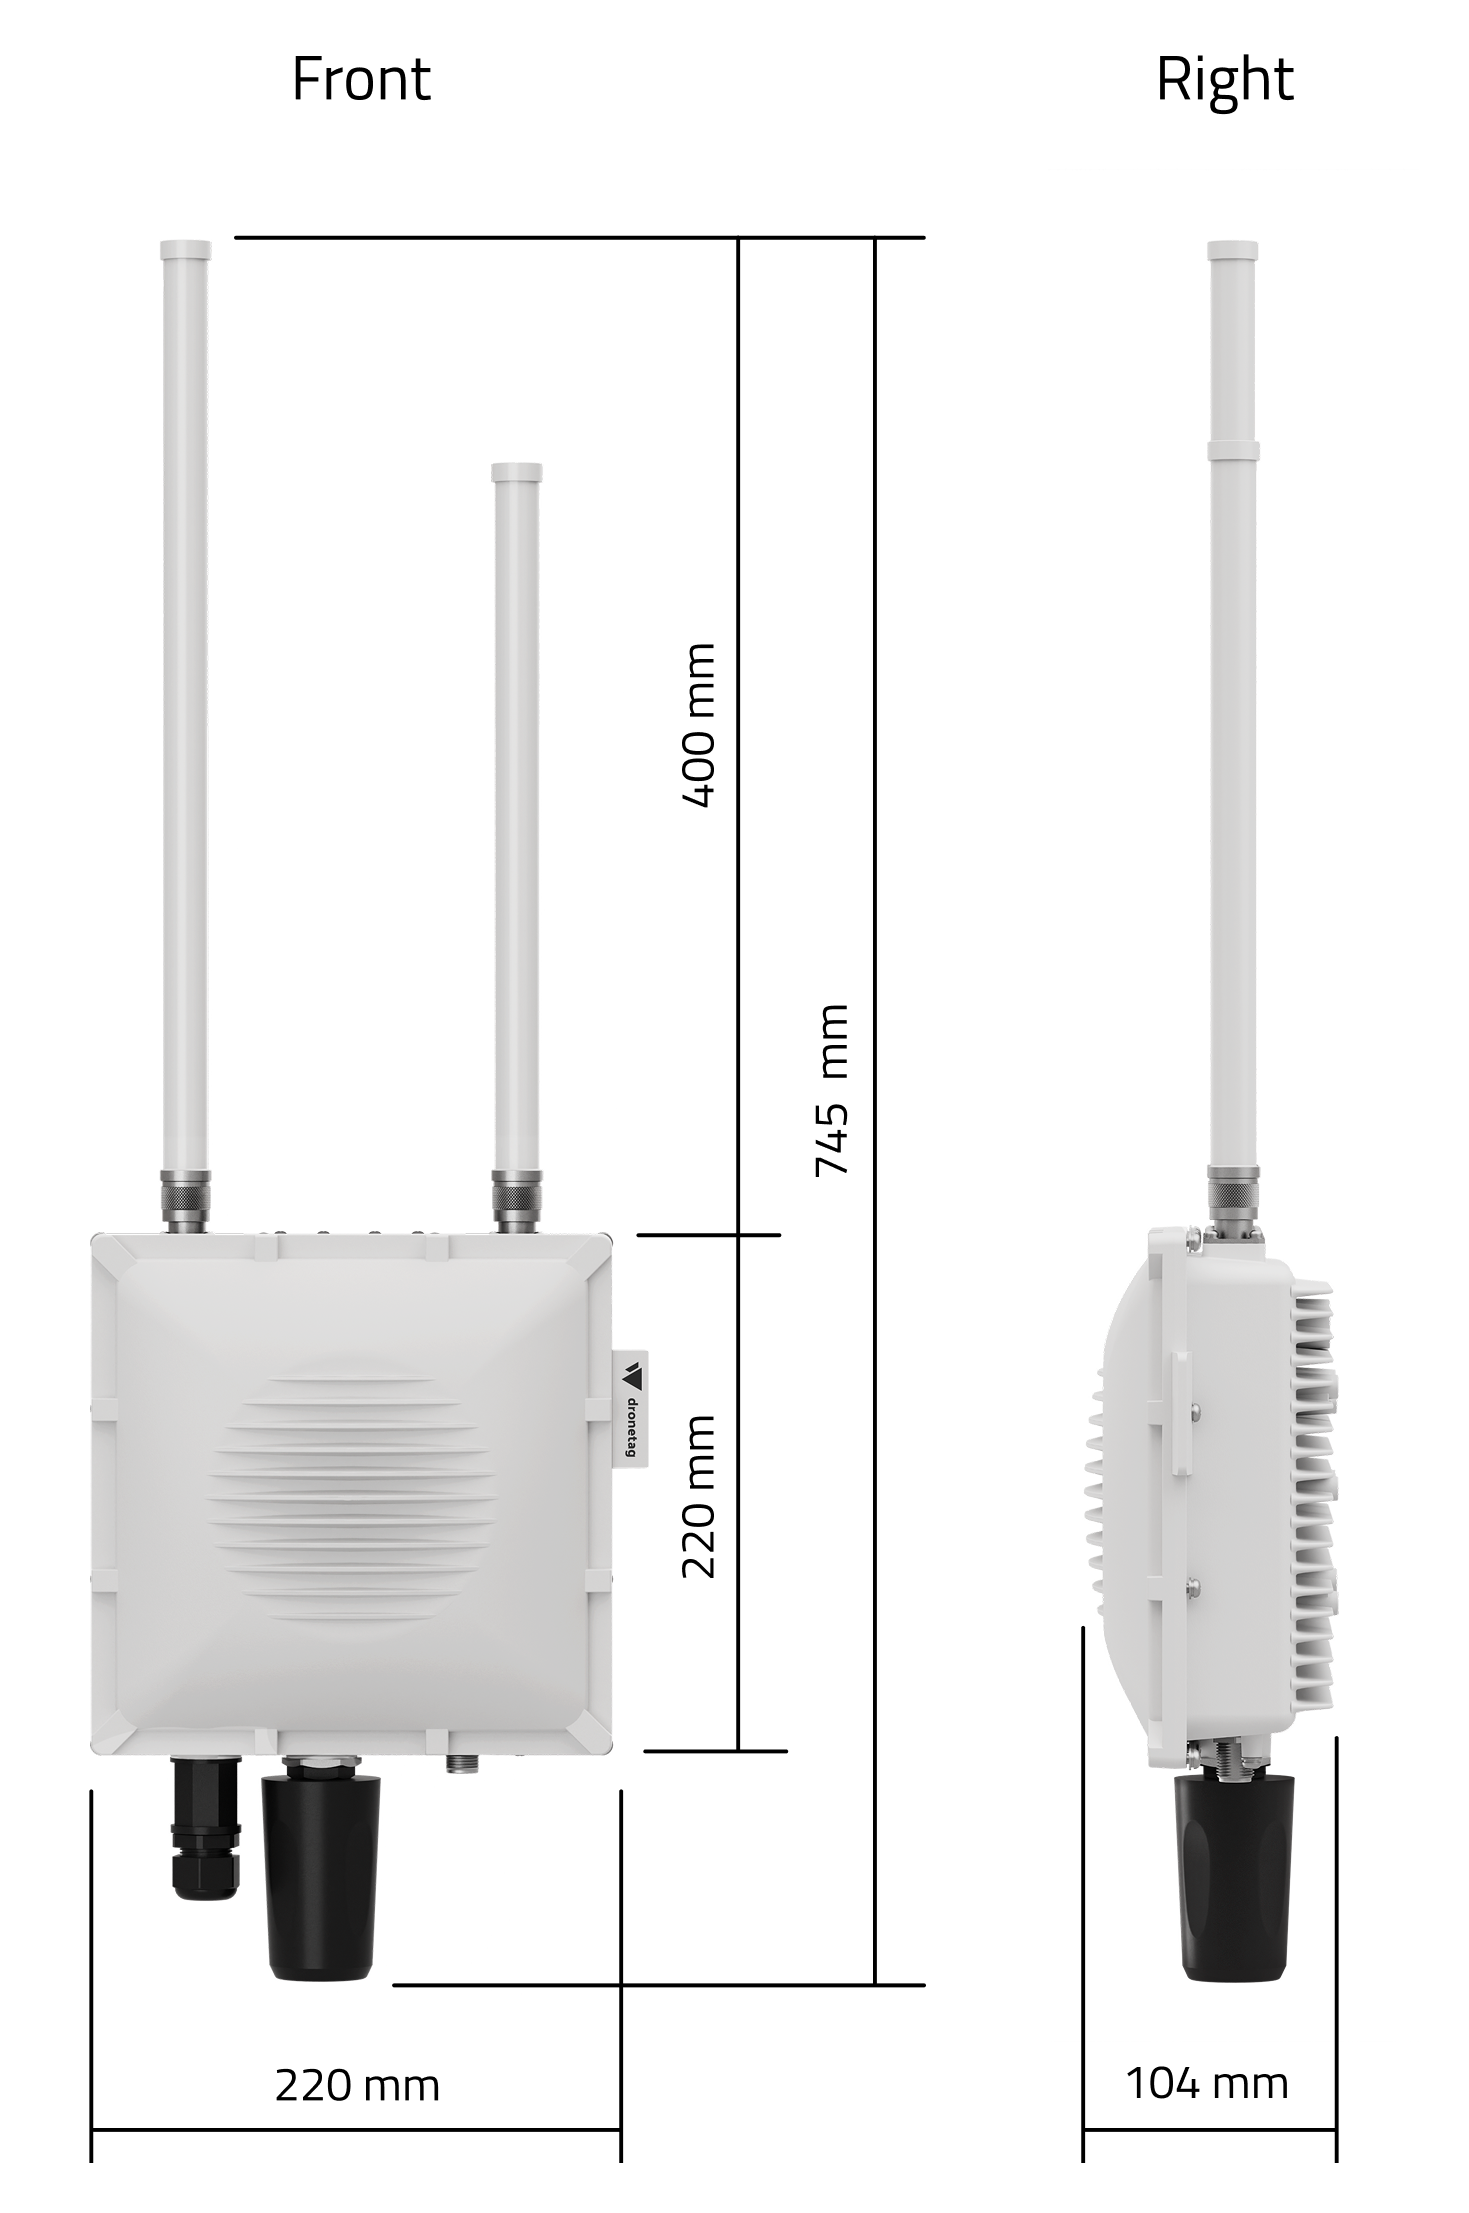
In case you lost the sticker with the number or forgot what the number of the antenna was: the longer antenna has to be mounted on the left side of the device from the front view.
Screw the antenna marked with the "4" sticker on its box to the connector marked with the same sticker (the shorter antenna has to be mounted on the right side of the device from the front view)
tip
In case you lost the sticker with the number or forgot what the number of the antenna was: the shorter antenna has to be mounted on the right side of the device from the front view.
The Scout must be mounted perpendicular to the ground.
This ensures the omnidirectional antennas have a clean and even field of view.
If the unit is tilted, one side of the antennas points into the sky and the other into the ground, which reduces performance.
Cut off about 50 cm of waterproof tape. Stretch it to double the length. Wrap three layers around the connector with a 50% overlap. Hold the tape in place with your hand for a few seconds.
Wrap three additional layers with PVC tape with natural uncoiling force and a 50% overlap. Make sure to cover the head and the tail of the connector.
Four Directional Antennas and One Omnidirectional Antenna on Scout
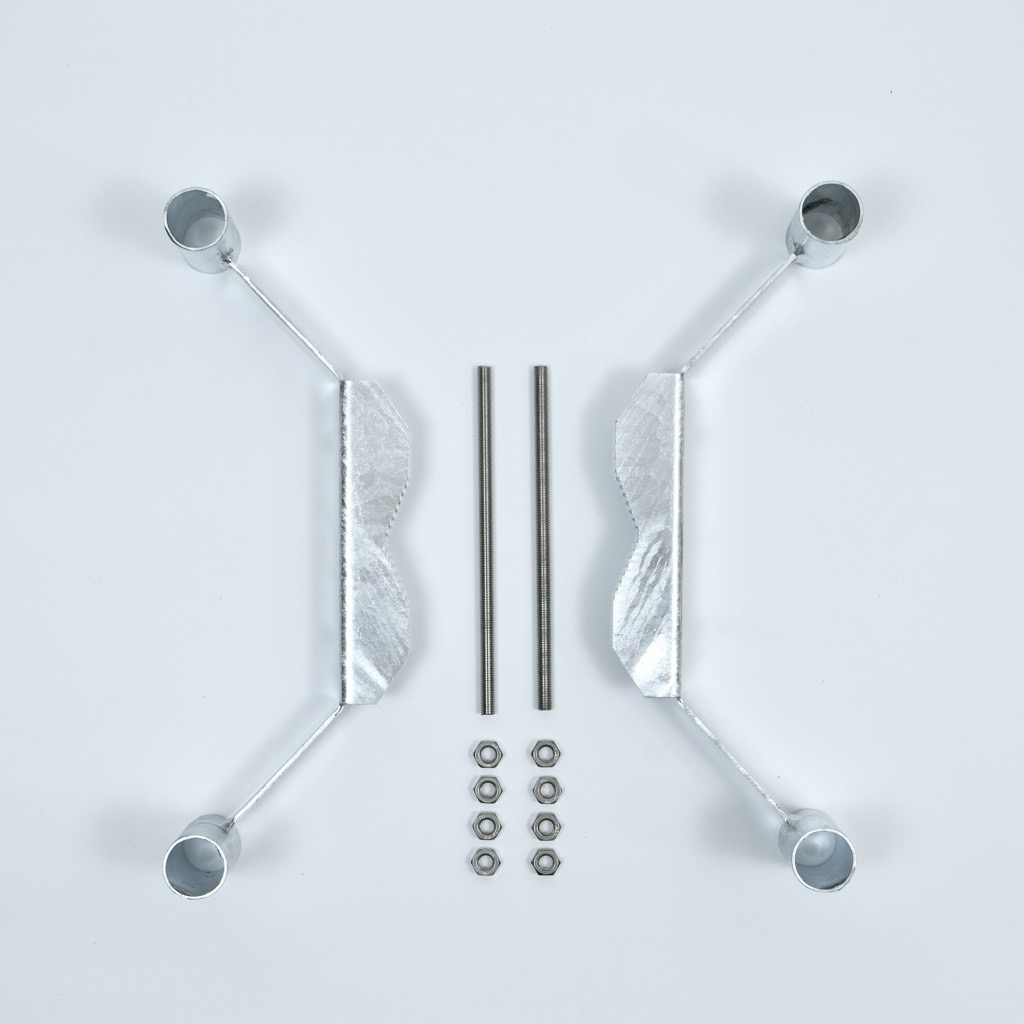
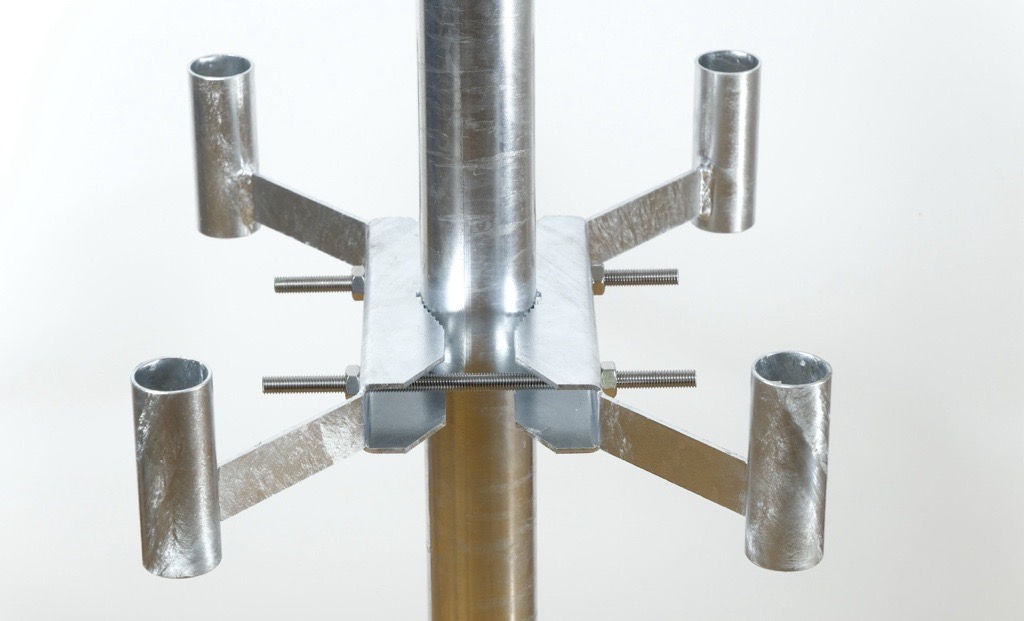
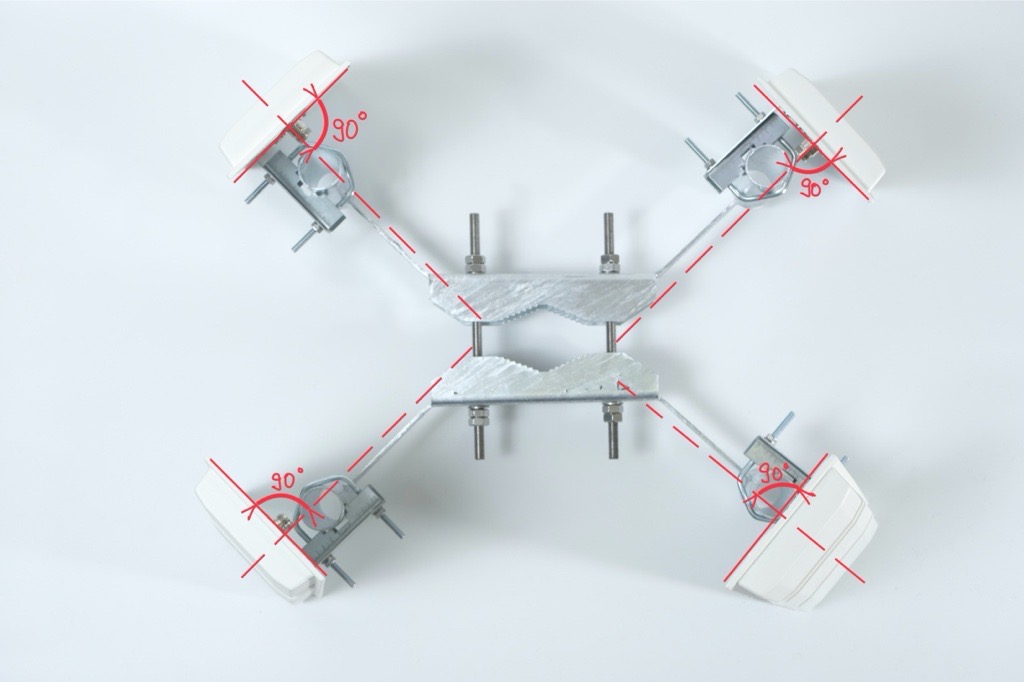
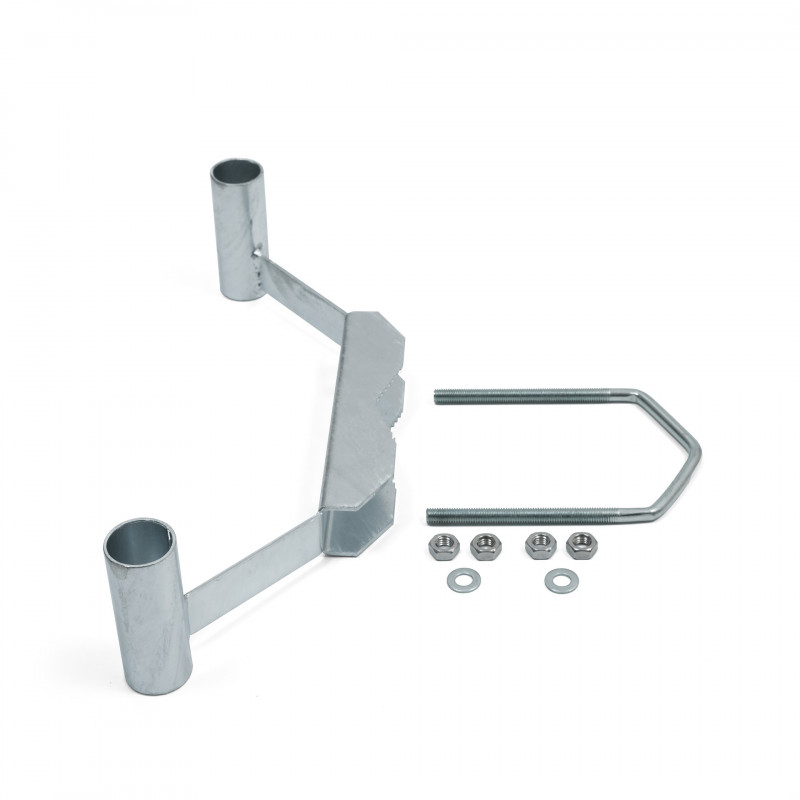
In case you ordered Scout with four directional antennas, you automatically received a holder for these antennas, tailor-made to be used with Scout.
Each directional antenna covers a 90° sector horizontal and 30° sector vertical with 14 dBi gain, so by combining multiple panels you can shape coverage according to your needs.
This setup can significantly improve detection range and reliability in your target sector.
In the guide below, you’ll find step-by-step instructions on how to properly mount, align, and connect a directional antenna to your Scout device:
warning
Each antenna box includes a number label. Make sure you know each antenna’s number so you can connect it to the correct connector later.
Optimal Antenna Placement
Directional antennas work best when there are no large obstacles nearby.
Avoid placing them close to satellite dishes, metal plates, masts, railings or any other surfaces that can block the signal and create blind spots.
For the best performance, the Scout and antennas should be mounted at the top of the pole, with a clear view in all directions.
Two 17 mm wrenches for attaching the mount to the pole
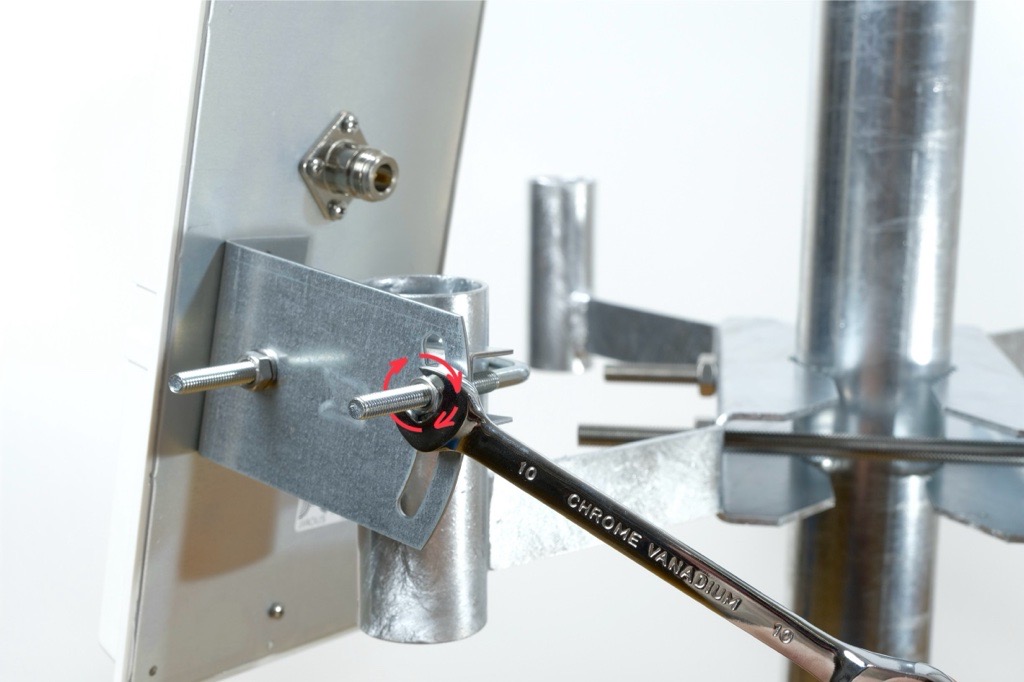
Two 10 mm wrenches for attaching antennas to the mount
Important Notes
Antenna cables are 1 meter long. Plan the position so cables are not stretched or under tension.
The directional antenna mount must be installed below the Scout, so the directional antennas don't block or shadow the omnidirectional antennas on the Scout.
2. Installing the Mount for Four Directional Antennas
Follow these steps after the Scout is already mounted on the pole:
The Scout must be mounted perpendicular to the ground.
This ensures the omnidirectional antennas have a clean and even field of view.
If the unit is tilted, one side of the antennas points into the sky and the other into the ground, which reduces performance.
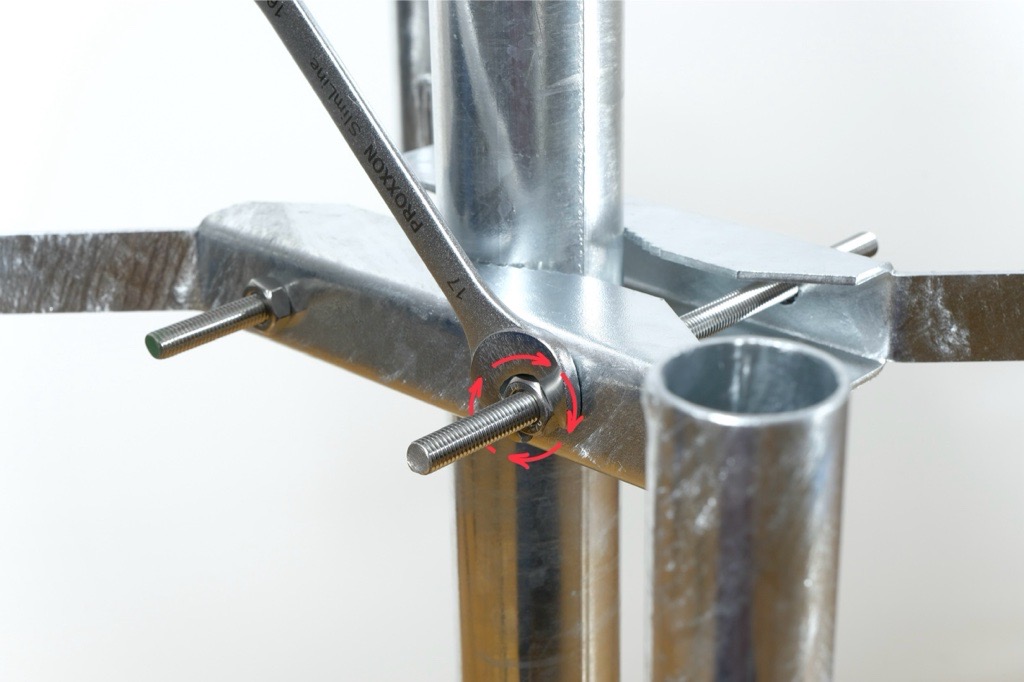
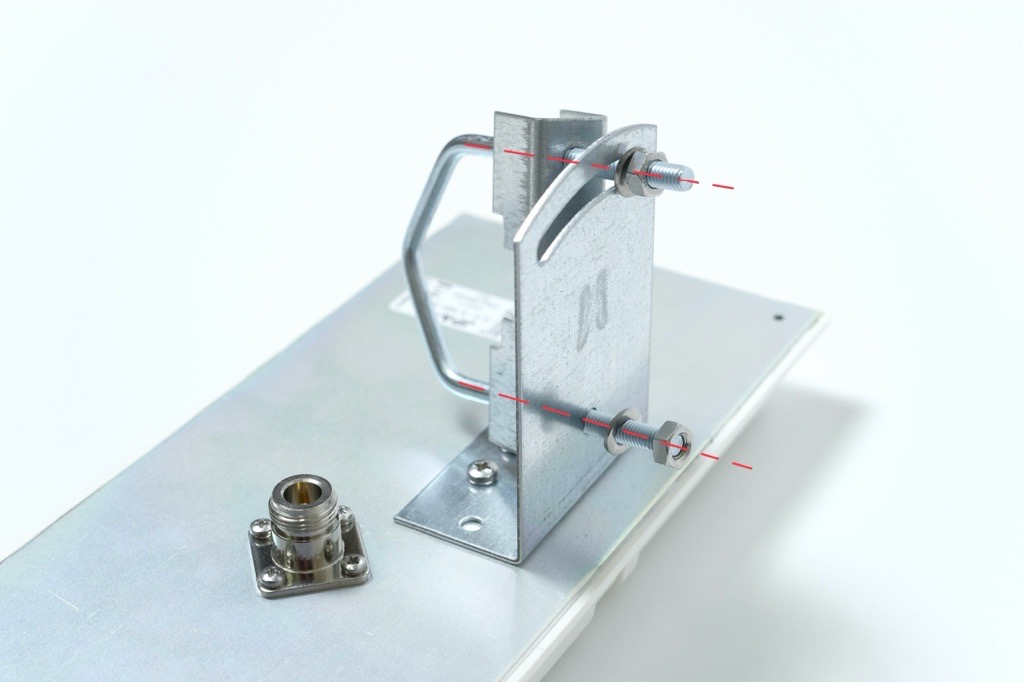
Insert the first threaded rod through the prepared holes and screw a nut onto each side.
Do not tighten the nuts fully yet.
tip
Installing this part can be difficult for one person.
An extra pair of hands helps a lot, and this is the only step in the entire installation where having two people is recommended.
If you need to install it alone, you can make the process easier by pre-assembling the counter-pieces:
Insert one threaded rod through the holes of both counter-pieces and screw the nuts on tightly.
This creates a stable assembly that can be placed onto the pole more easily.
Once the pre-assembled counter-pieces are on the pole, insert the second threaded rod through the aligned holes and screw on the nuts.
note
Tighten the nuts on both threaded rods so that the gap between the counter-pieces is even on both sides.
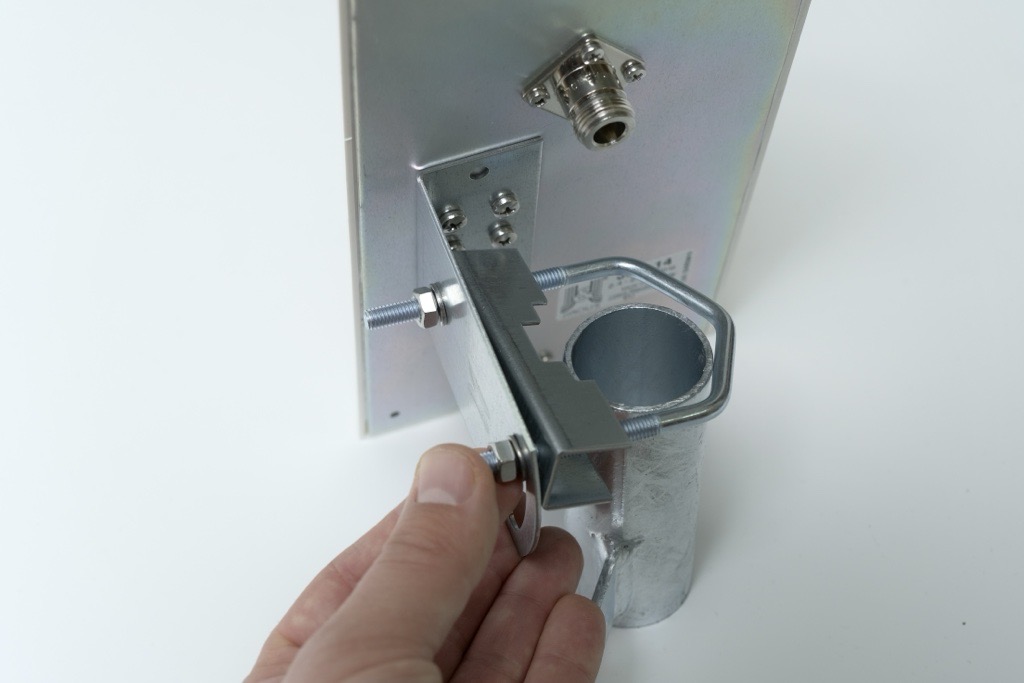
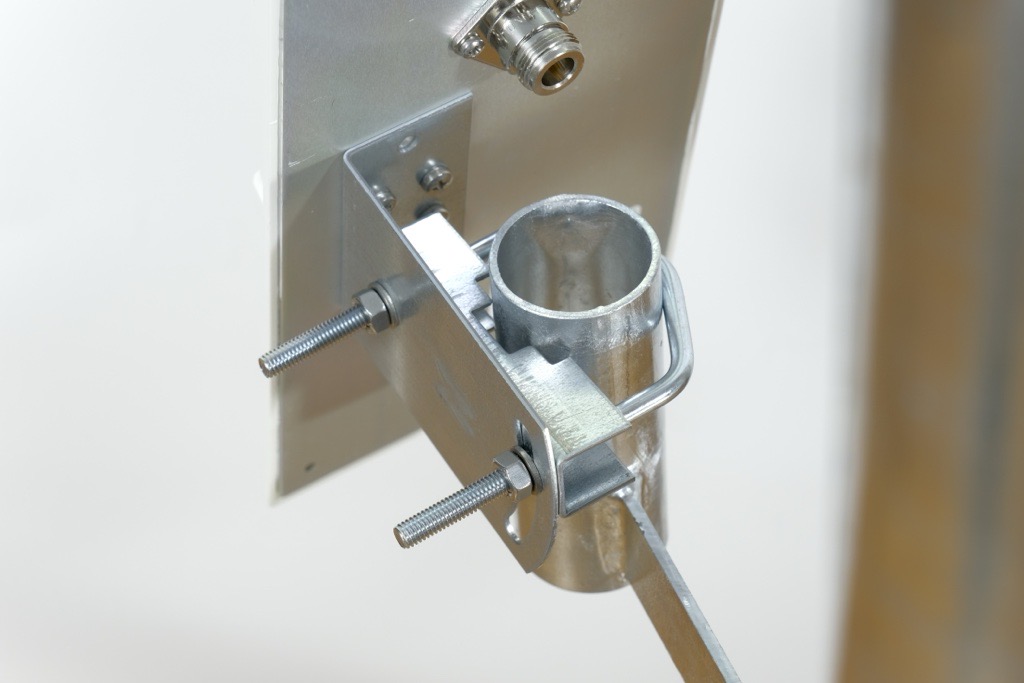
Take the antenna assembly and place it onto the directional antenna holder mounted on the pole.
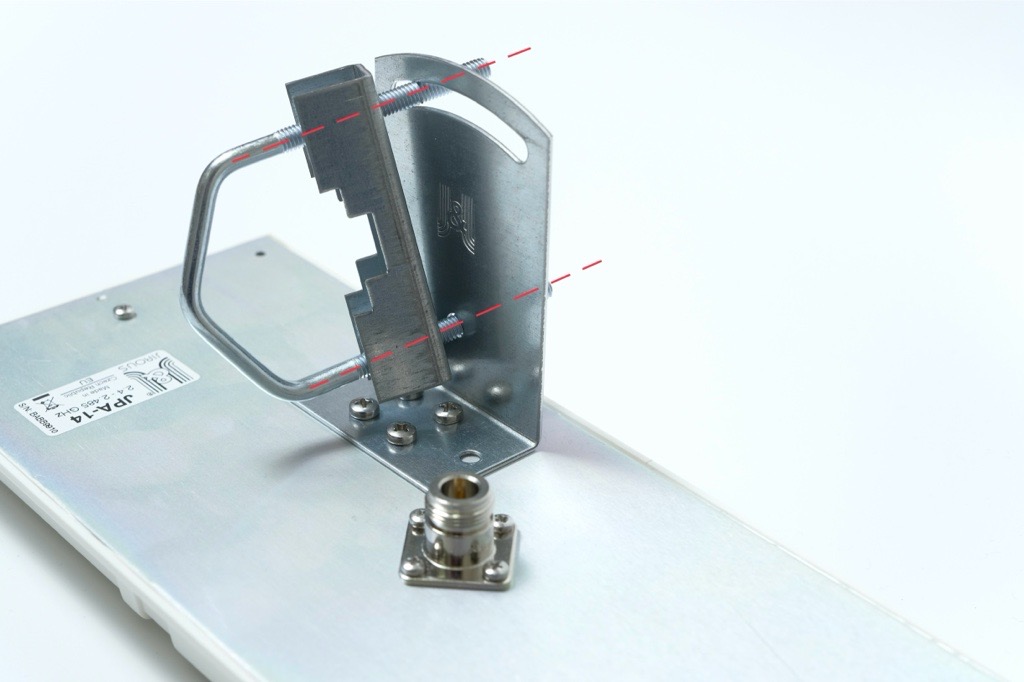
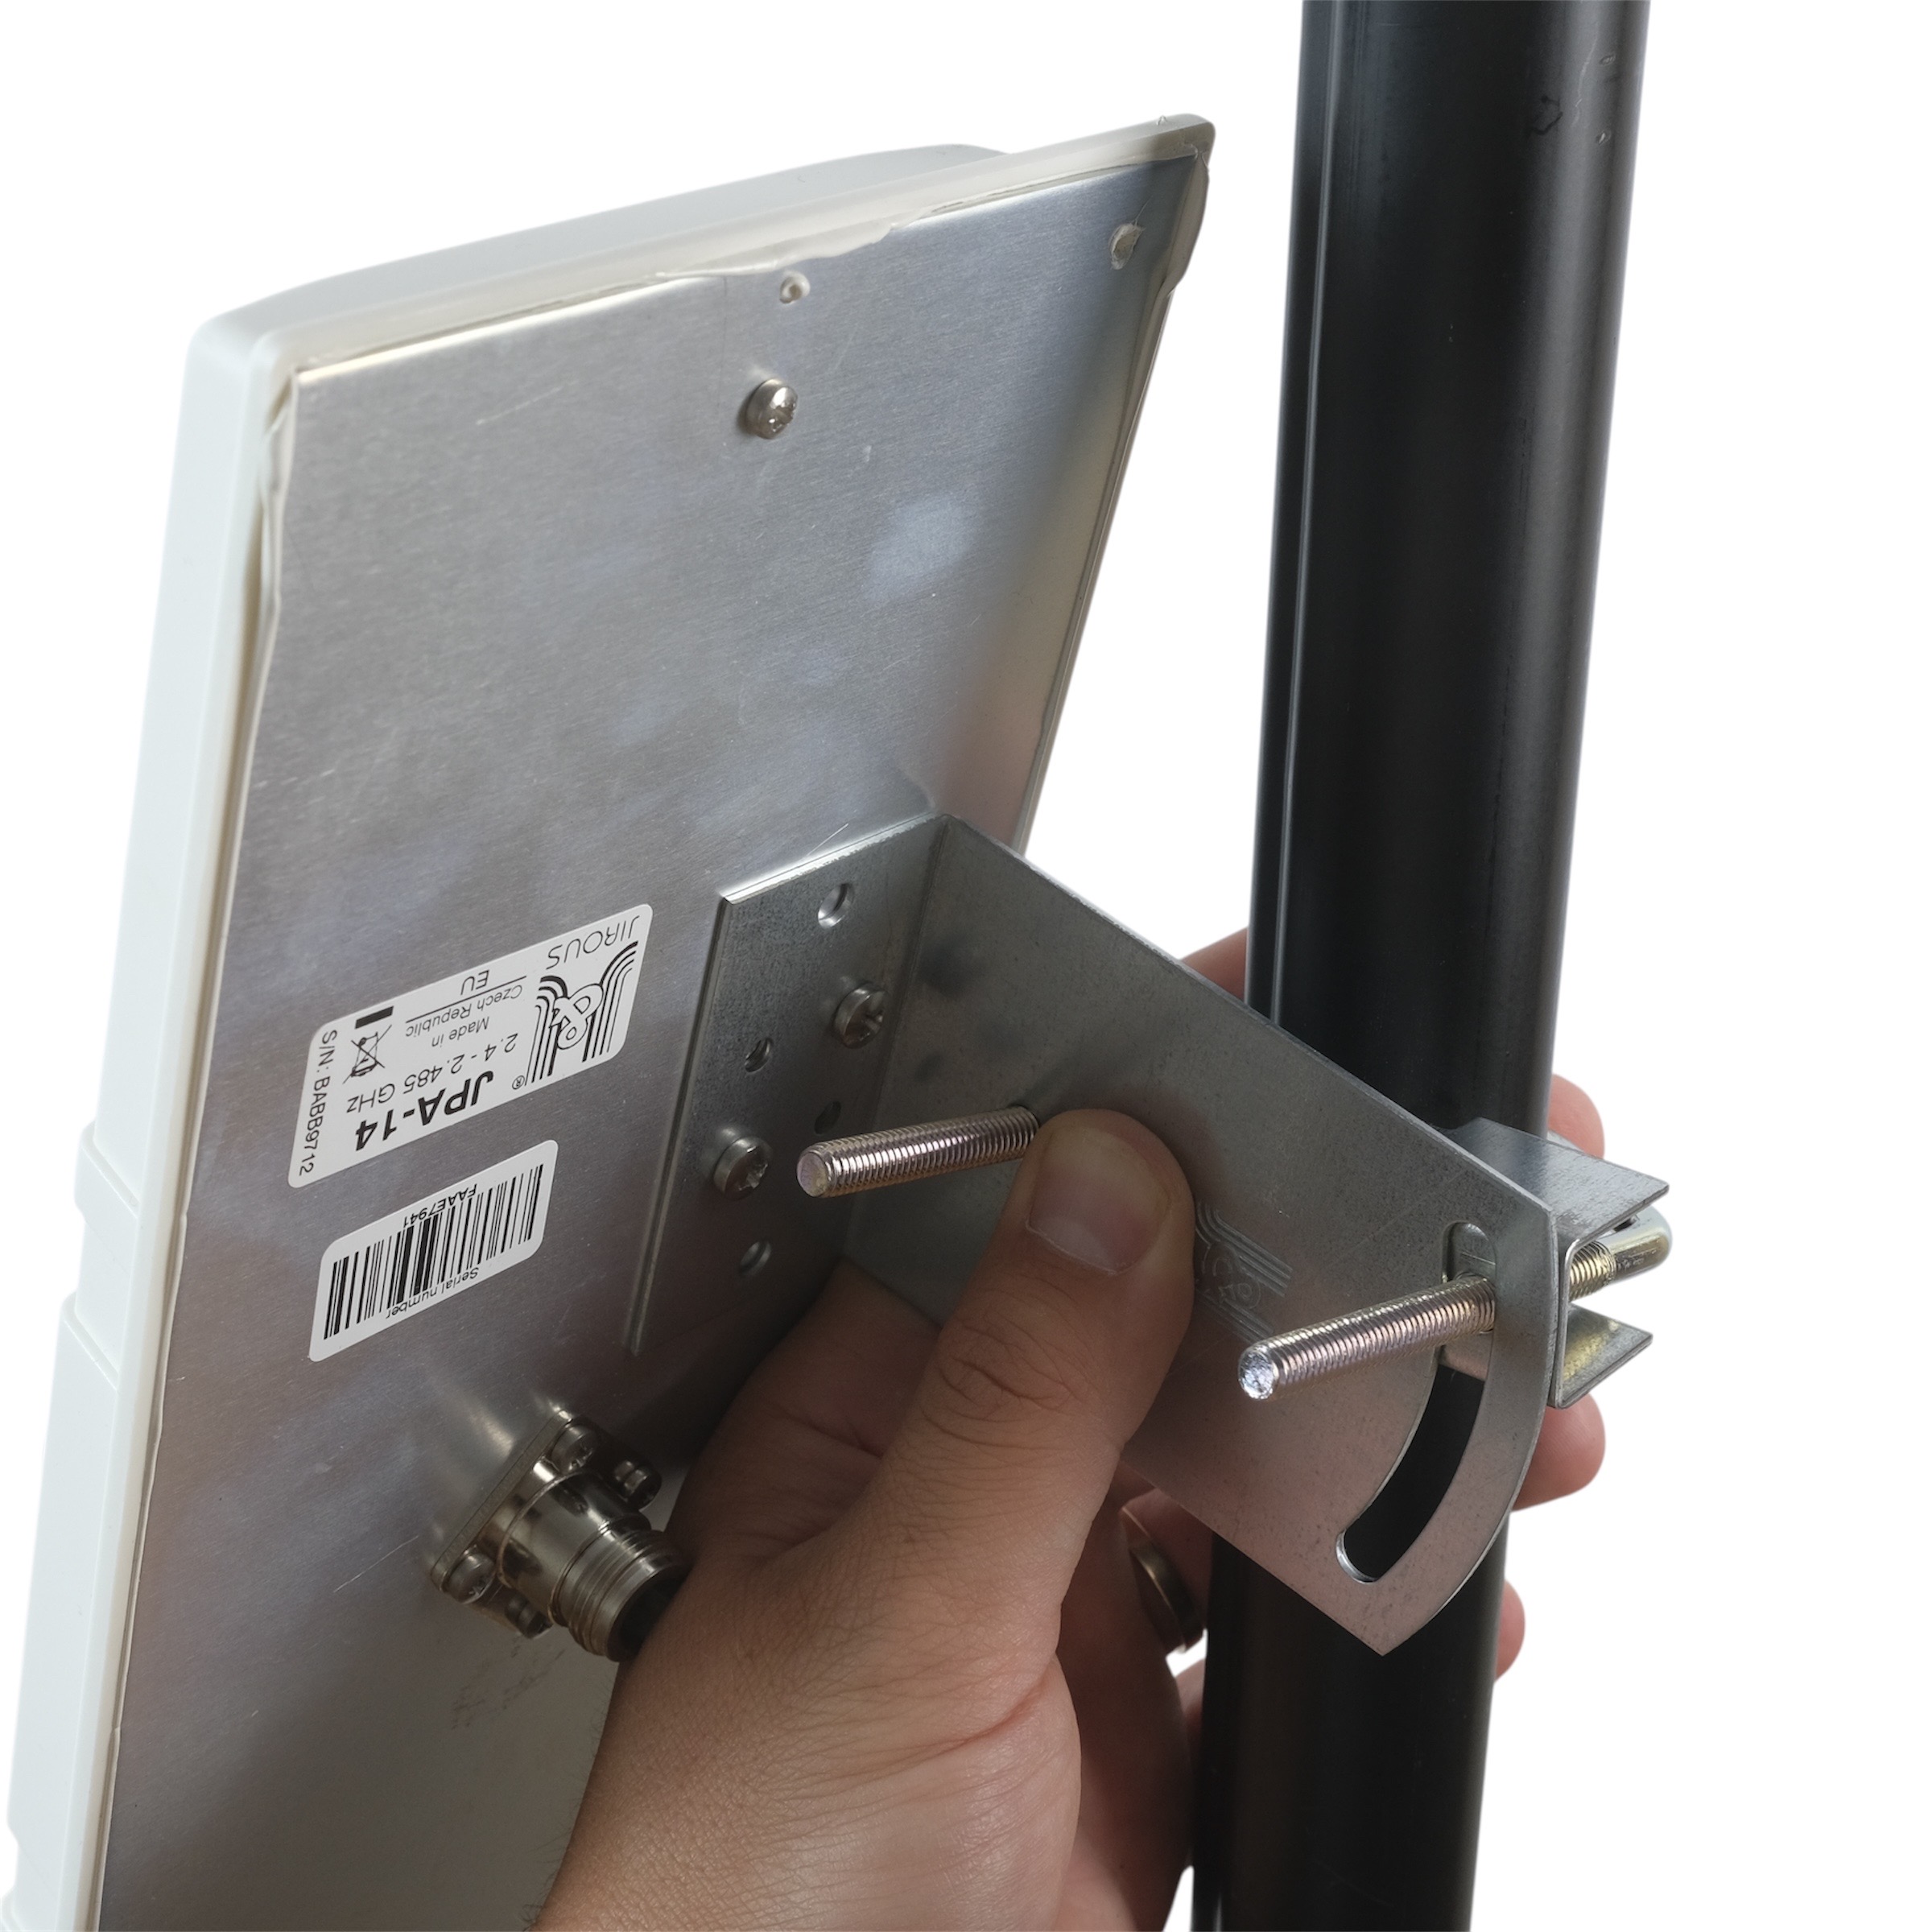
Slide the U-shaped threaded rod into the corresponding openings on the holder.
Optimal Antenna Position on the Holder
Do not mount the antenna too far down the holder.
The farther it is from the edge of the pole, the harder it becomes to access and tighten the mounting hardware.
For best installation comfort and stability, place the antenna approximately 1 cm (about ½ inch) below the top edge of the tube.
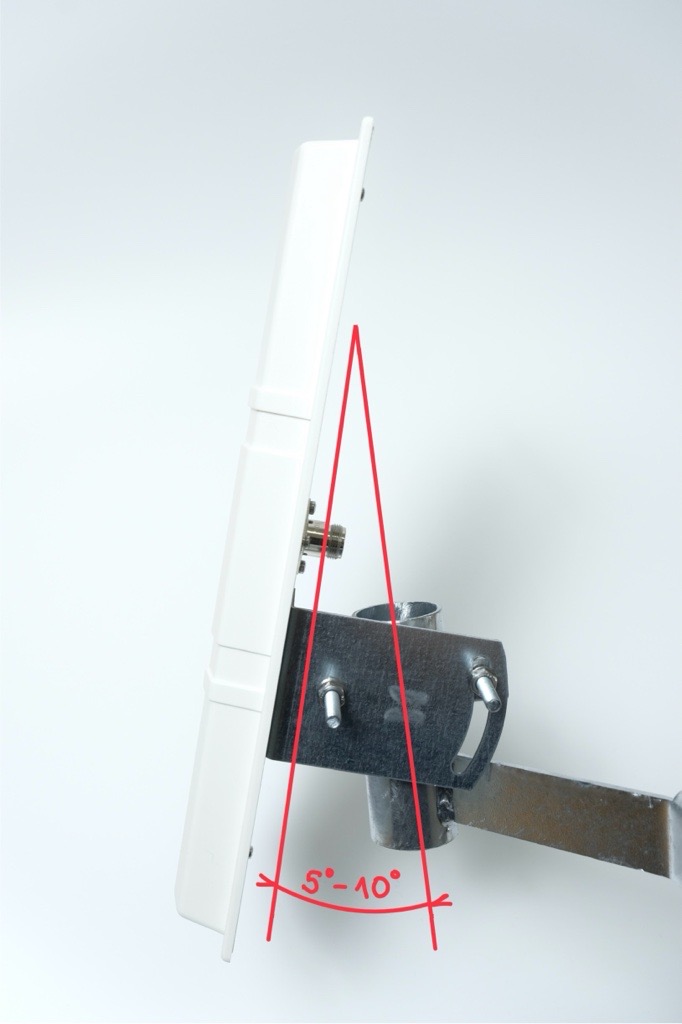
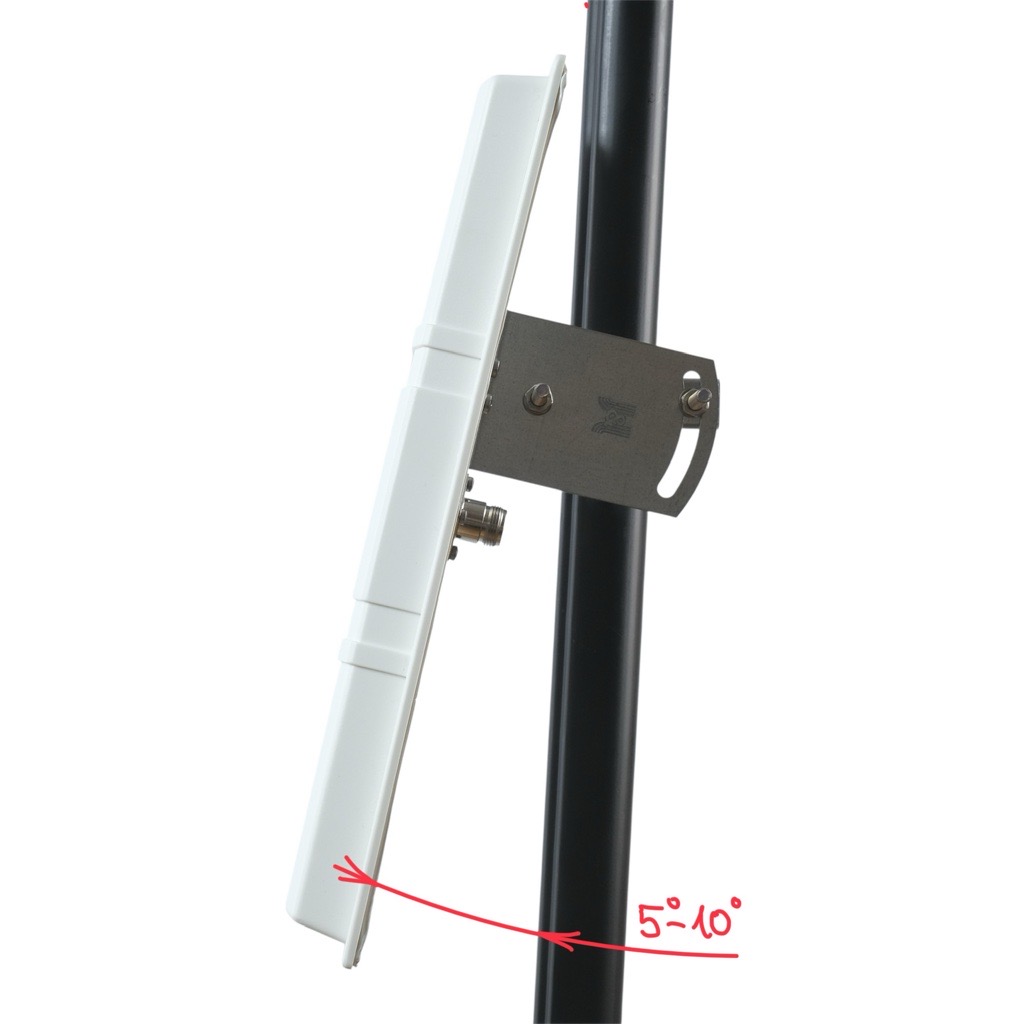
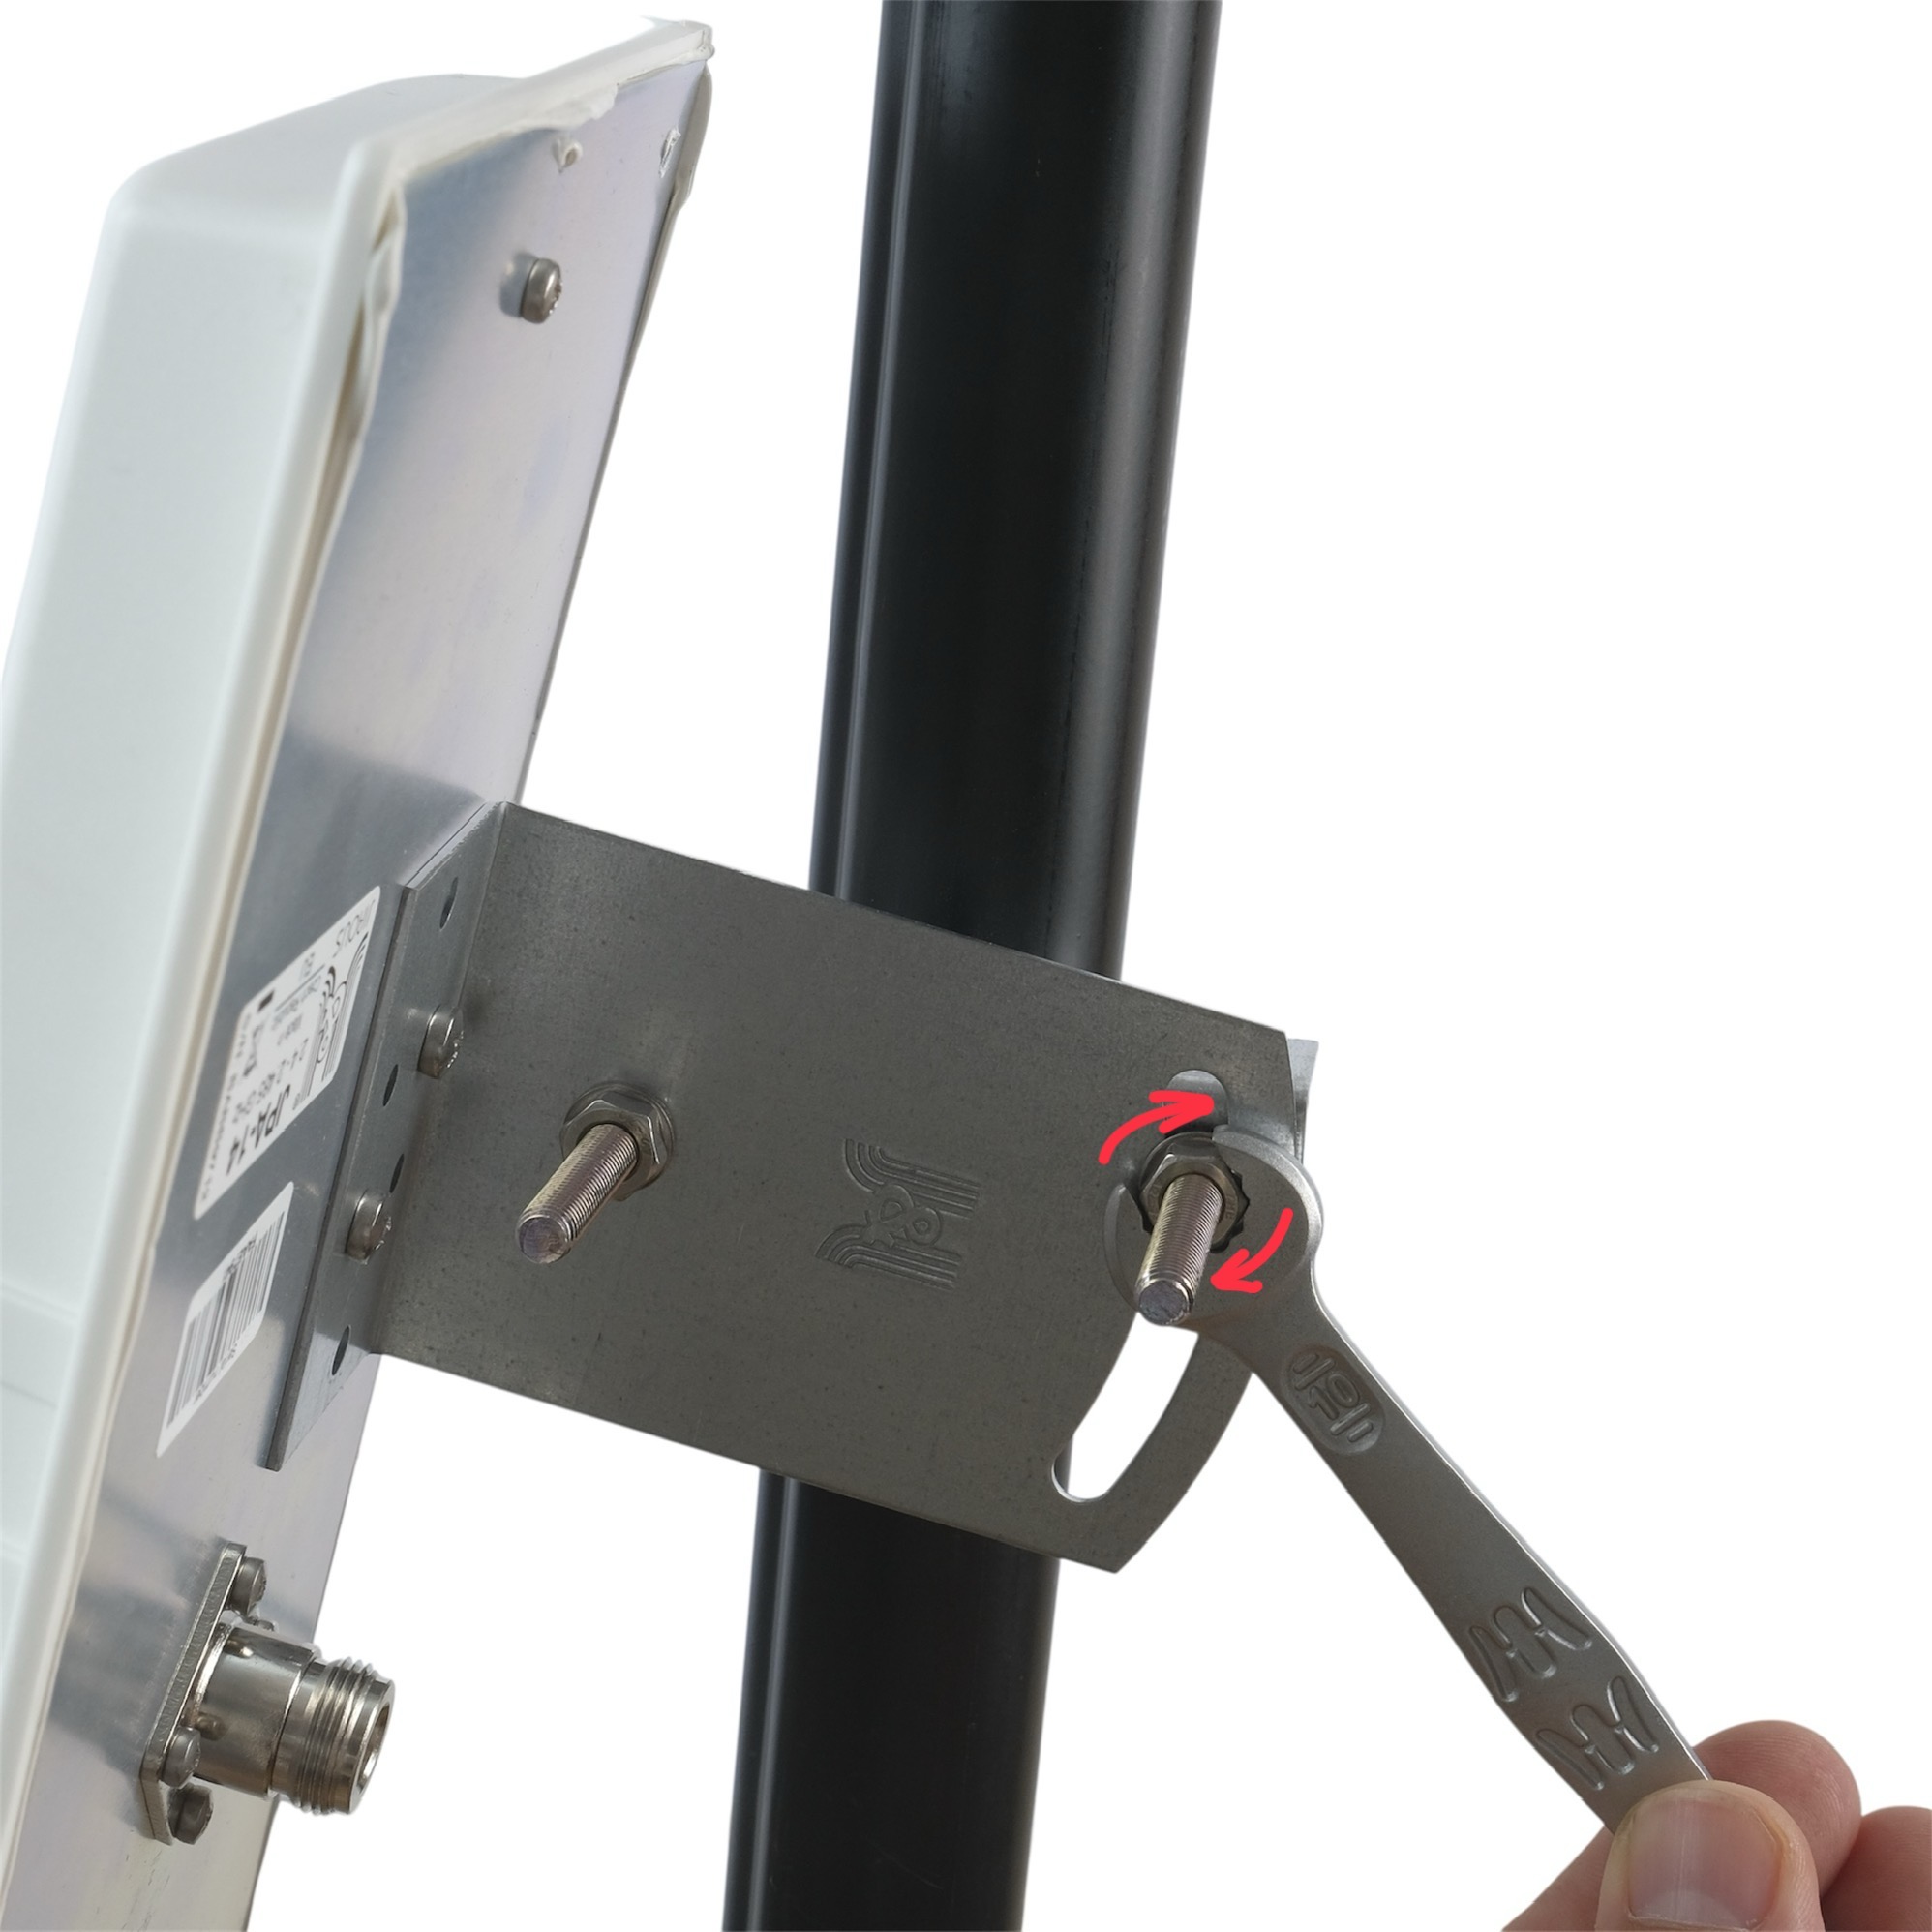
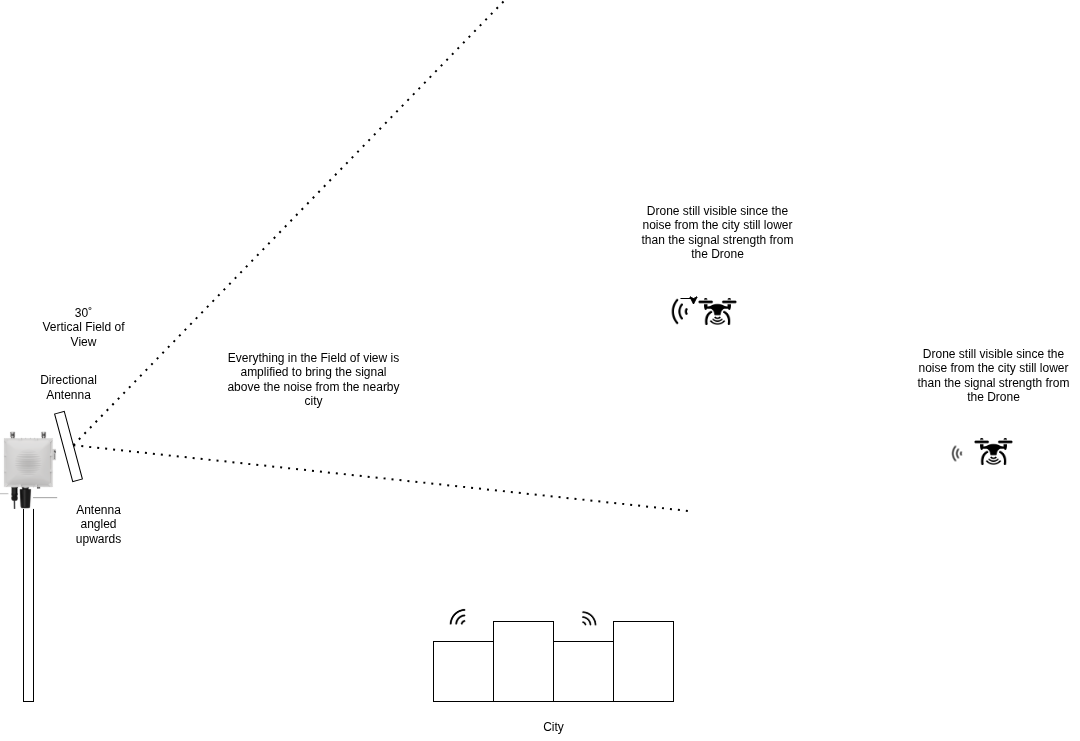
Adjust the tilt of the antenna to between plus 5° and plus 10° above the horizon.
important
If the environment includes higher obstacles such as buildings, hills or trees, select a steeper angle within this range.
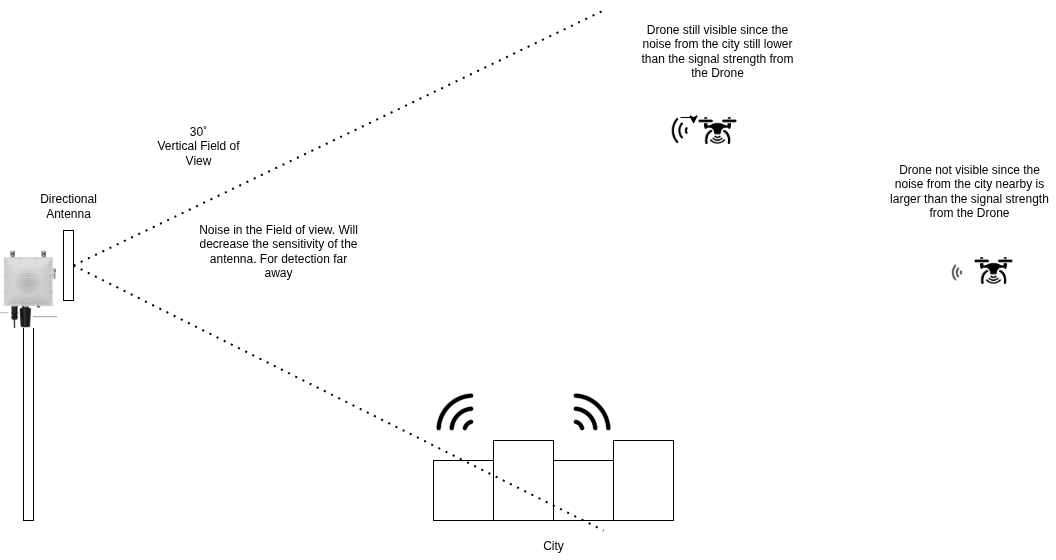
This is super-important when these antennas are installed in a city environment, where using this antenna angle can prevent interference with other signals.
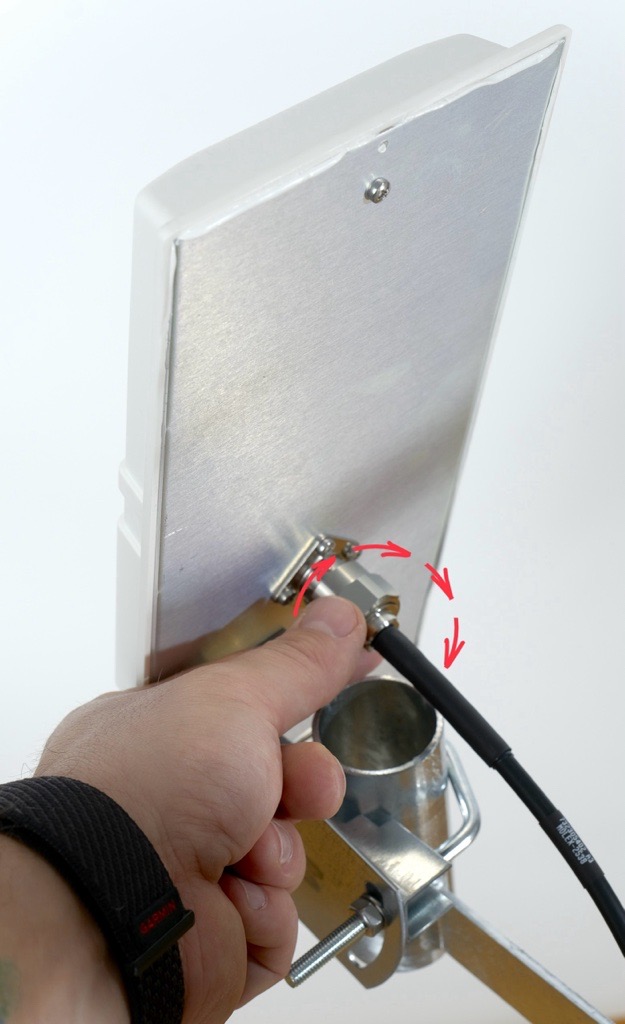
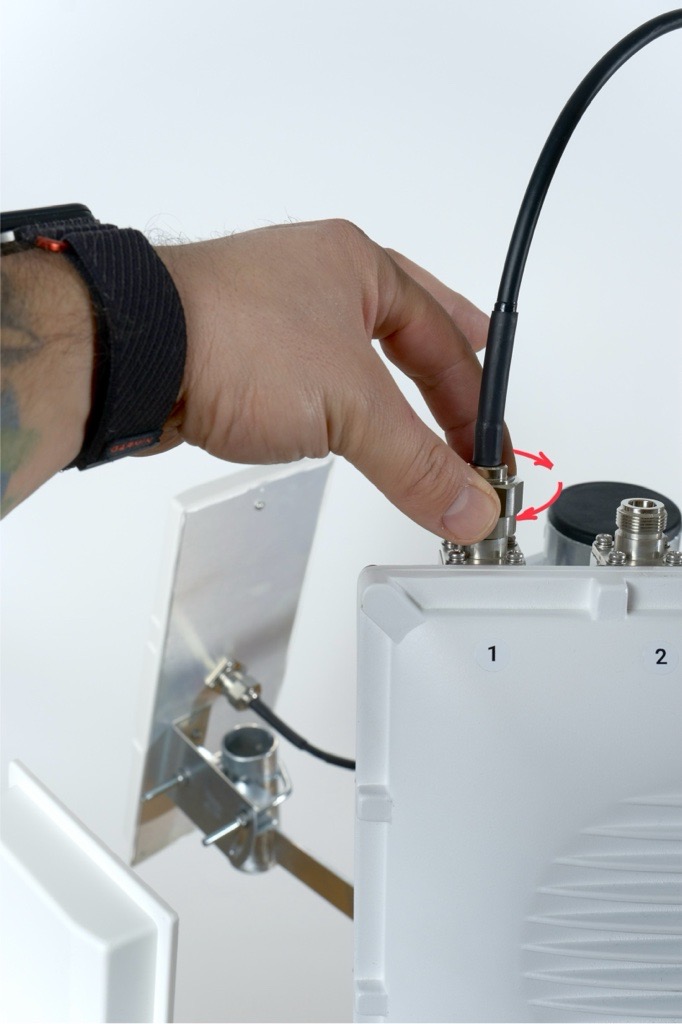
Each antenna box includes a number label.
Connect the antenna cable to the RF port with the matching number on the Scout.
The numbers must match.
Cable Management Matters
Route the antenna cables carefully so they are not stretched, pinched or rubbing against sharp edges.
Remember that the installation will be exposed to real weather. Rain, ice, snow, falling branches or even birds landing on the pole can put extra stress on the cables.
Keep the cables loose enough to move slightly, avoid tight bends and always guide them along the pole or the mount in a way that prevents tension. Good cable management helps prevent damage, signal loss, and long-term wear.
Pro tip: Plan the cable paths before tightening anything. A clean layout now saves a lot of pain later.
Antenna nuts are made to be tightened by hand. In case you want to tighten them with a wrench, don't tighten them more than 1.5 Nm (13 inch pounds).
After all antennas are mounted and tested, seal each RF connector with the supplied PVC tape.
Wrap the tape tightly around the connector three times.
The tape should overlap itself by at least fifty percent of its width and extend beyond the connector to prevent moisture from entering.
Two Directional Antennas and Two Omnidirectional Antennas on Scout
The holder for two directional antennas is tailor-made to be used with Scout.
Each directional antenna covers a 90° sector horizontal and 30° sector vertical with 14 dBi gain, so by combining multiple panels you can shape coverage according to your needs.
This setup can significantly improve detection range and reliability in your target sector.
In the guide below, you’ll find step-by-step instructions on how to properly mount, align, and connect a directional antenna to your Scout device.
warning
Each antenna box includes a number label. Make sure you know each antenna’s number so you can connect it to the correct connector later.
Optimal Antenna Placement
Directional antennas work best when there are no large obstacles nearby.
Avoid placing them close to satellite dishes, metal plates, masts, railings or any other surfaces that can block the signal and create blind spots.
For the best performance, the Scout and antennas should be mounted at the top of the pole, with a clear view in all directions.
Two 10 mm wrenches for attaching antennas to the mount
Important Notes
Antenna cables are 1 meter long. Plan the position so cables are not stretched or under tension.
The directional antenna mount must be installed below the Scout, so the directional antennas don't block or shadow the omnidirectional antennas on the Scout.
2. Installing the Mount for Four Directional Antennas
The Scout must be mounted perpendicular to the ground.
This ensures the omnidirectional antennas have a clean and even field of view.
If the unit is tilted, one side of the antennas points into the sky and the other into the ground, which reduces performance.
Take the antenna assembly and place it onto the directional antenna holder mounted on the pole.
Slide the U-shaped threaded rod into the corresponding openings on the holder.
Optimal Antenna Position on the Holder
Do not mount the antenna too far down the holder.
The farther it is from the edge of the pole, the harder it becomes to access and tighten the mounting hardware.
For best installation comfort and stability, place the antenna approximately 1 cm (about ½ inch) below the top edge of the tube.
Adjust the tilt of the antenna to between plus 5° and plus 10° above the horizon.
important
If the environment includes higher obstacles such as buildings, hills or trees, select a steeper angle within this range.
This is super-important when these antennas are installed in a city environment, where using this antenna angle can prevent interference with other signals.
Each antenna box includes a number label.
Connect the antenna cable to the RF port with the matching number on the Scout.
The numbers must match.
Cable Management Matters
Route the antenna cables carefully so they are not stretched, pinched or rubbing against sharp edges.
Remember that the installation will be exposed to real weather. Rain, ice, snow, falling branches or even birds landing on the pole can put extra stress on the cables.
Keep the cables loose enough to move slightly, avoid tight bends and always guide them along the pole or the mount in a way that prevents tension. Good cable management helps prevent damage, signal loss, and long-term wear.
Pro tip: Plan the cable paths before tightening anything. A clean layout now saves a lot of pain later.
Antenna nuts are made to be tightened by hand. In case you want to tighten them with a wrench, don't tighten them more than 1.5 Nm (13 inch pounds).
While Scout comes with omnidirectional antennas by default, you can also equip it with directional antennas for focused monitoring in a specific area.
Each directional antenna covers a 90° sector horizontal and 30° sector vertical with 14 dBi gain, so by combining multiple panels you can shape coverage according to your needs.
This setup can significantly improve detection range and reliability in your target sector.
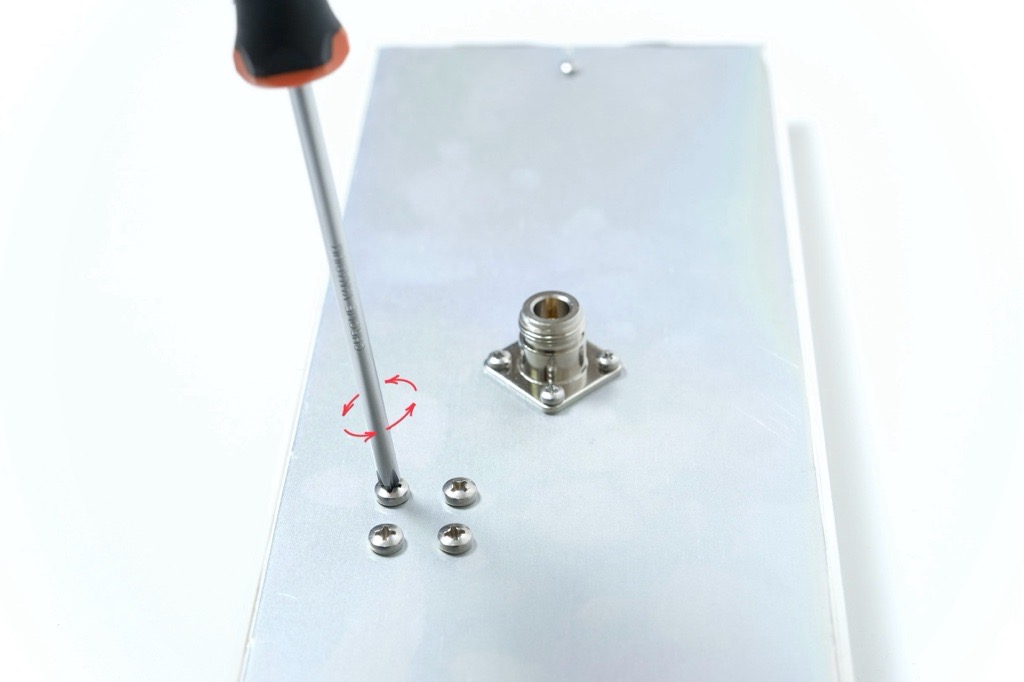
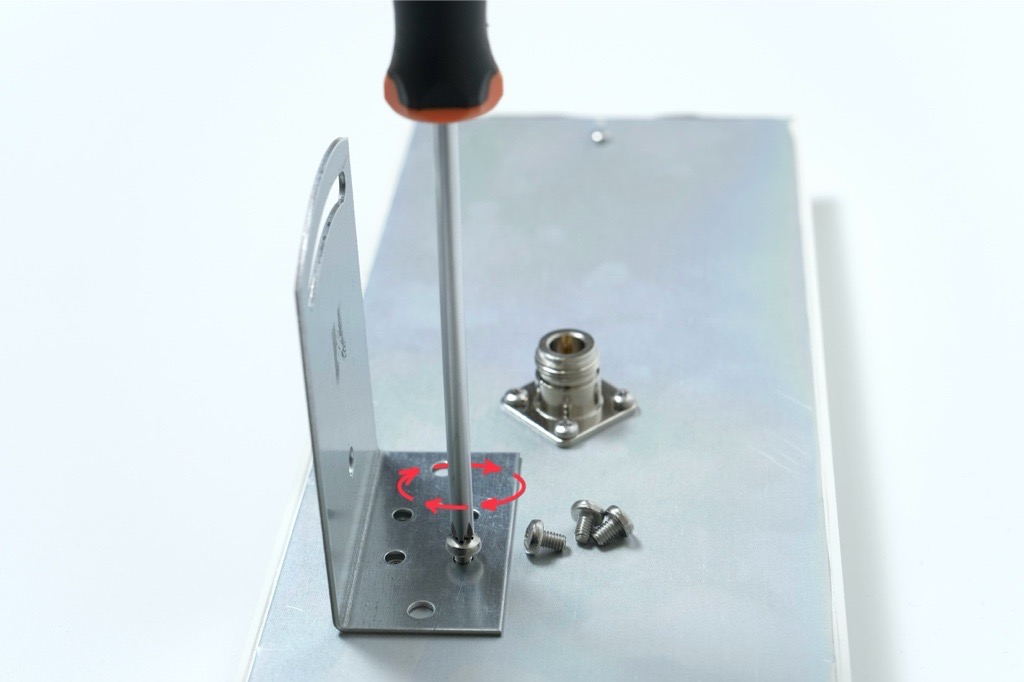
In the guide below, you’ll find step-by-step instructions on how to properly mount, align, and connect a directional antenna to your Scout device.
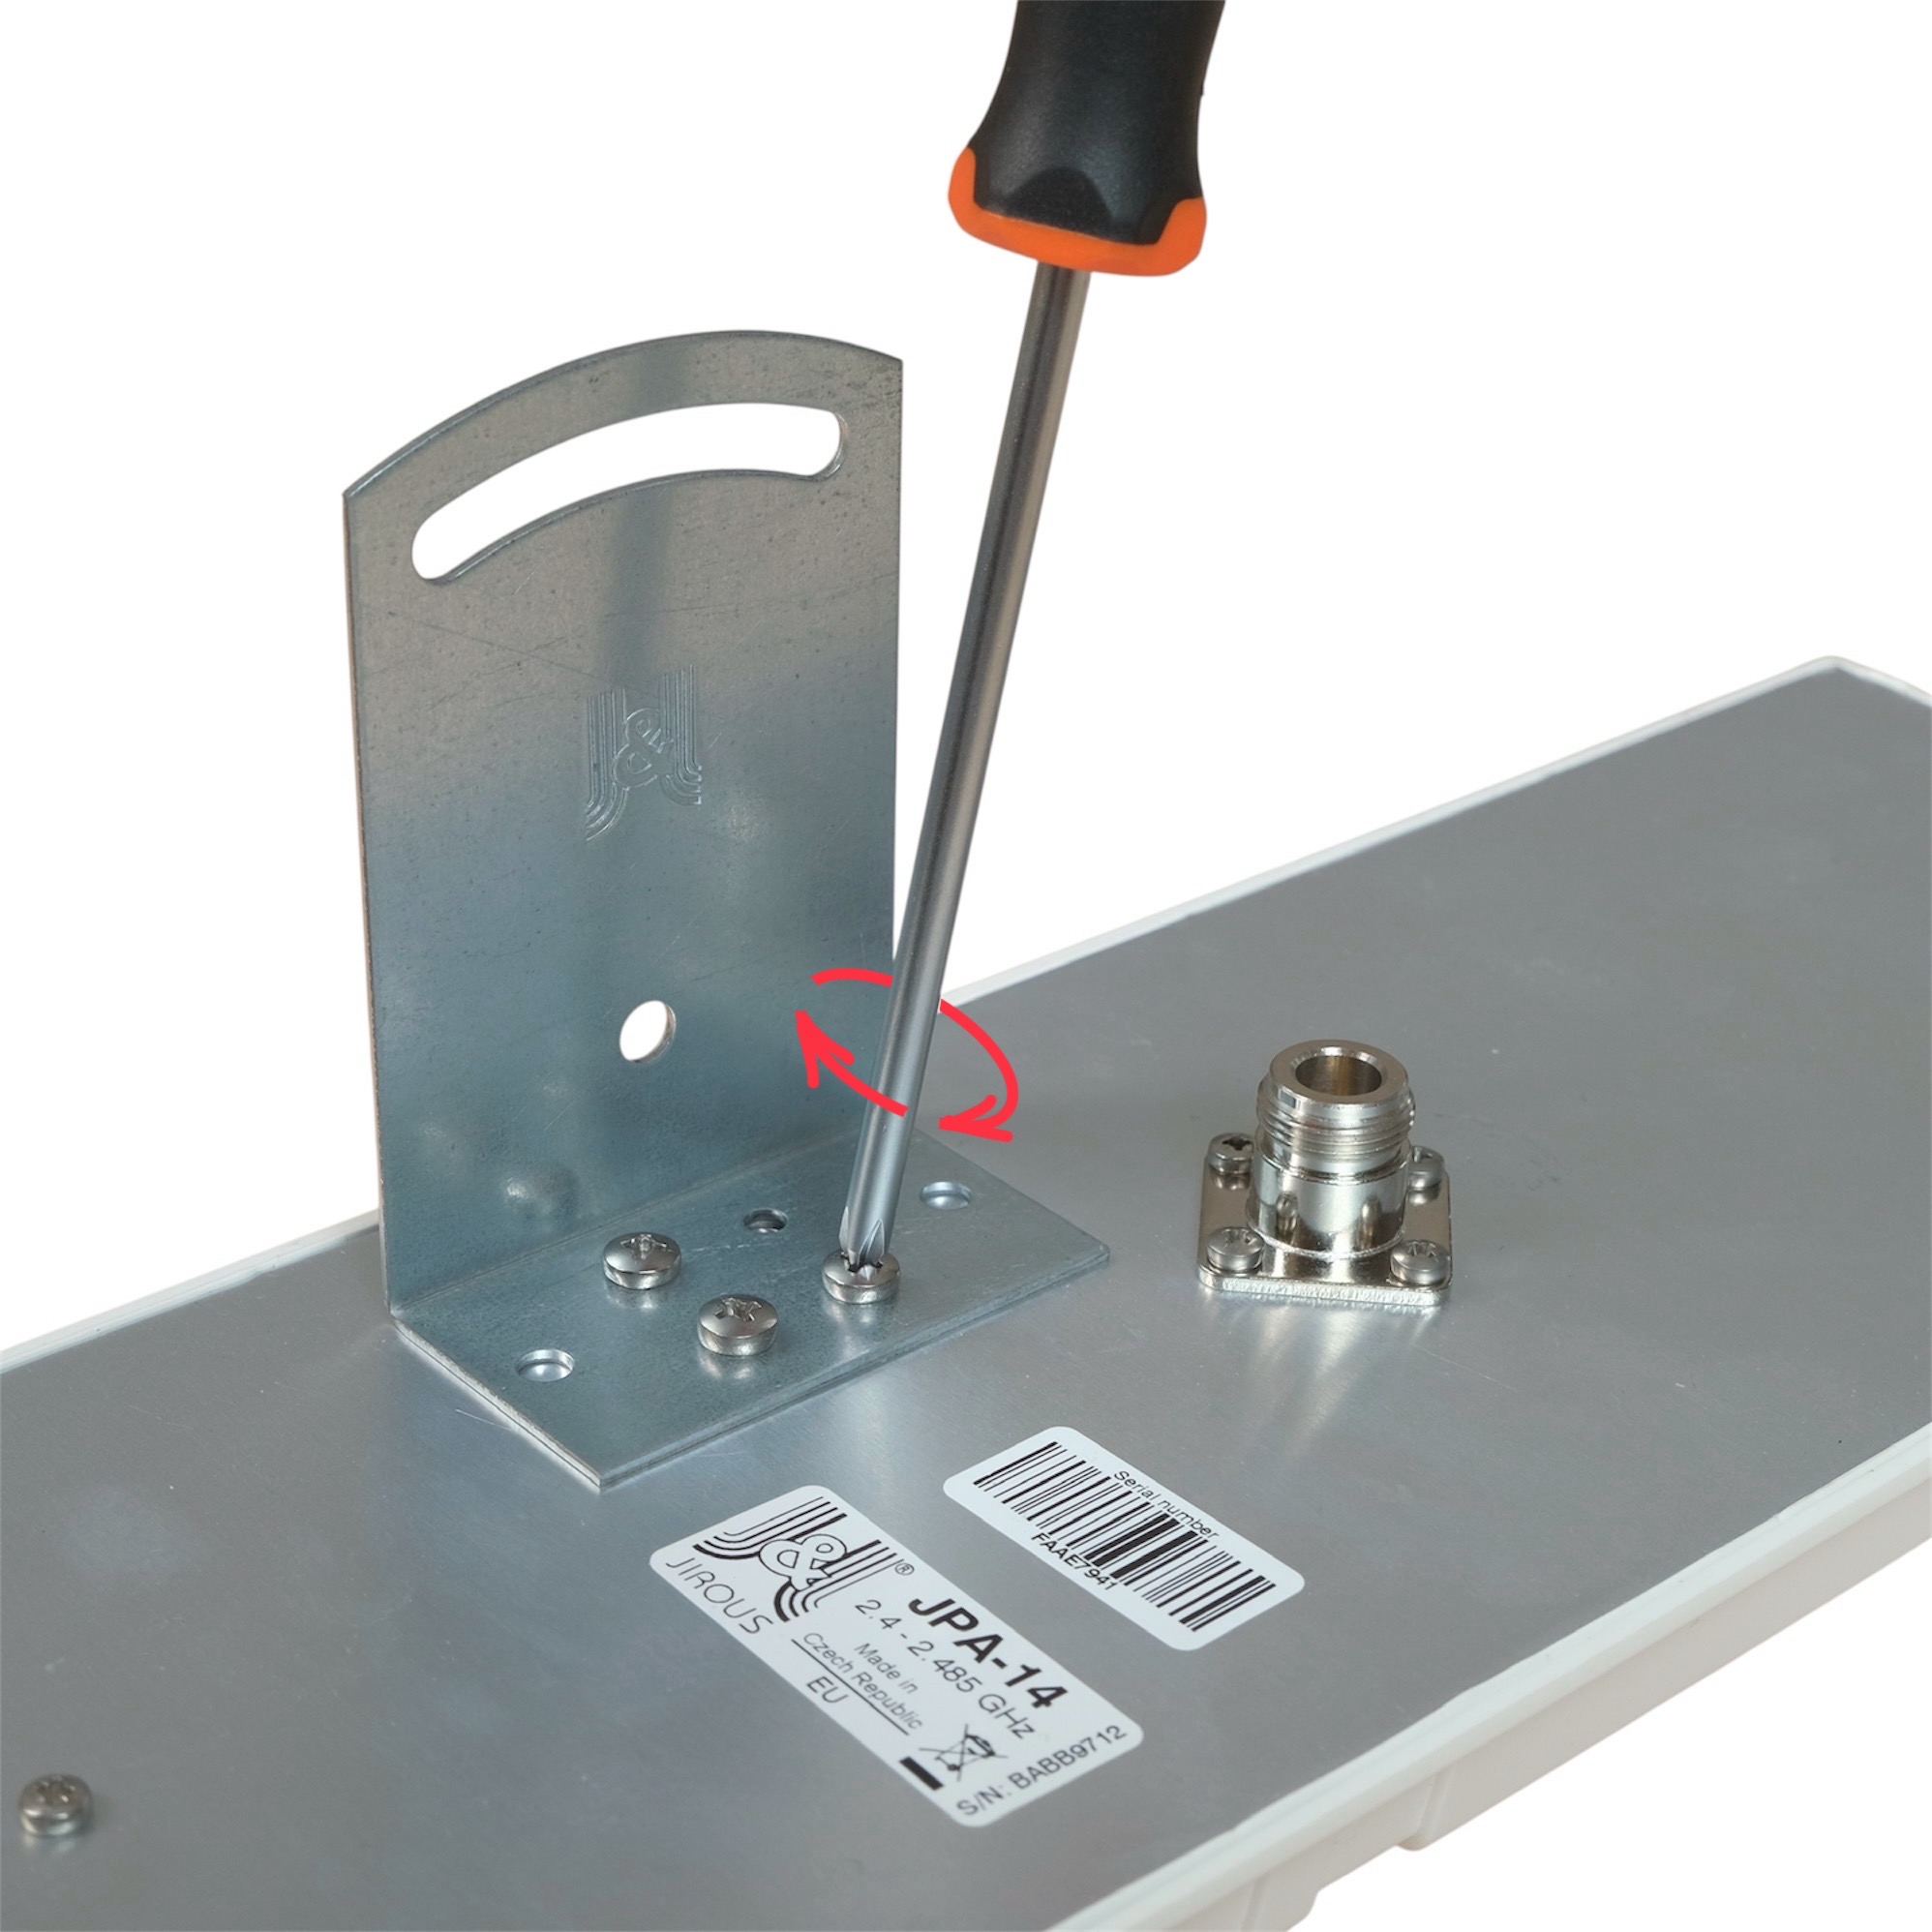
The package includes a mounting bracket for poles with a diameter of 19–54 mm.
Ideally, install the antenna outdoors with a clear line of sight to the monitored sector.
note
Items 2, 3 and 4 in the picture are needed to install the directional antenna.
The front (flat) side of the panel must face the monitored sector.
Fine-tune the direction after connecting and checking signal levels in the app.
Important:
Make sure to align the directional antenna correctly. Avoid pointing it toward strong interference sources or other antennas.
Do not aim it at buildings or dense obstacles such as trees or skyscrapers — keep a clear line of sight to the monitored area for the best performance.
Tip:
Better placement = better signal. Avoid obstacles such as walls, trees, or metal structures.
Note:
In the following images, you can find an explanation of why it is important to set directional antennas at an angle of 5°–10° above the horizon.
The antenna comes with a 1 m cable included.
Ensure the cable is not bent, especially near the connectors, and that it has enough slack to move freely — avoid sharp bends.
caution
Sharp bends or excessive tension on the cable may damage the connectors and reduce signal quality.
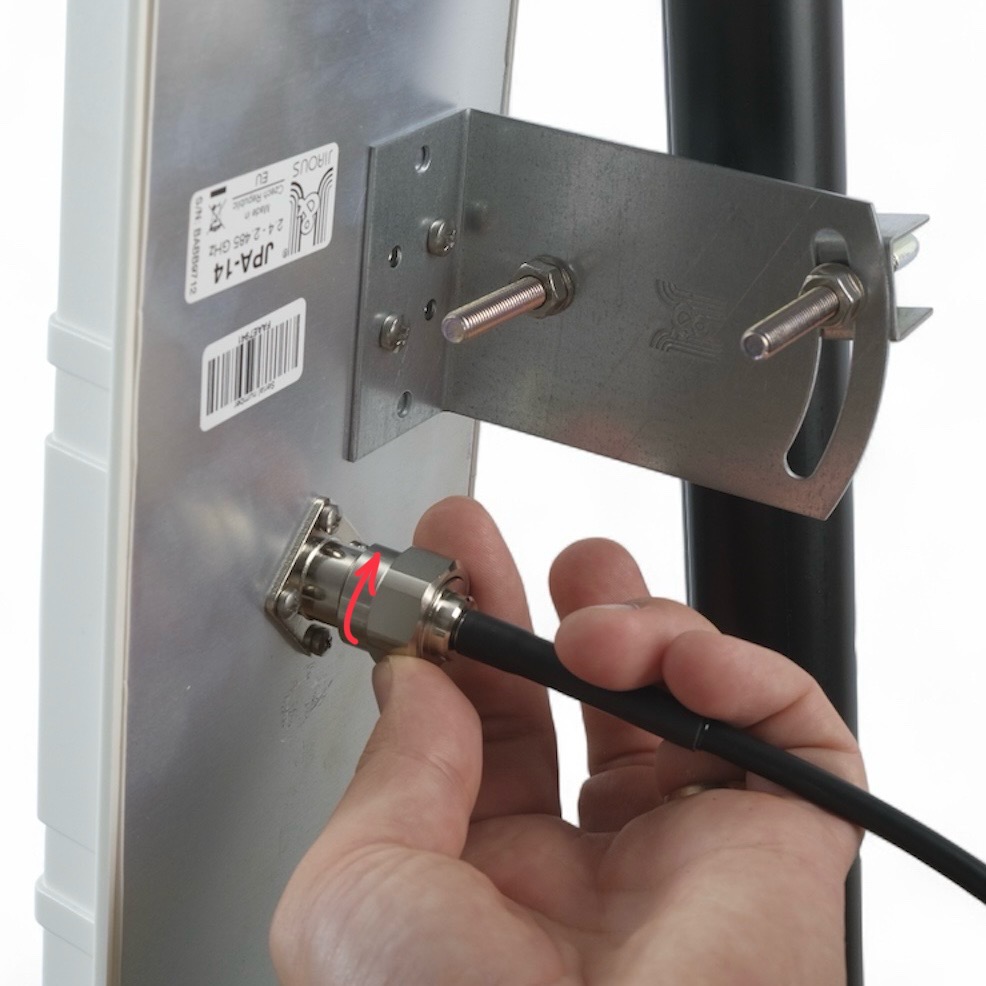
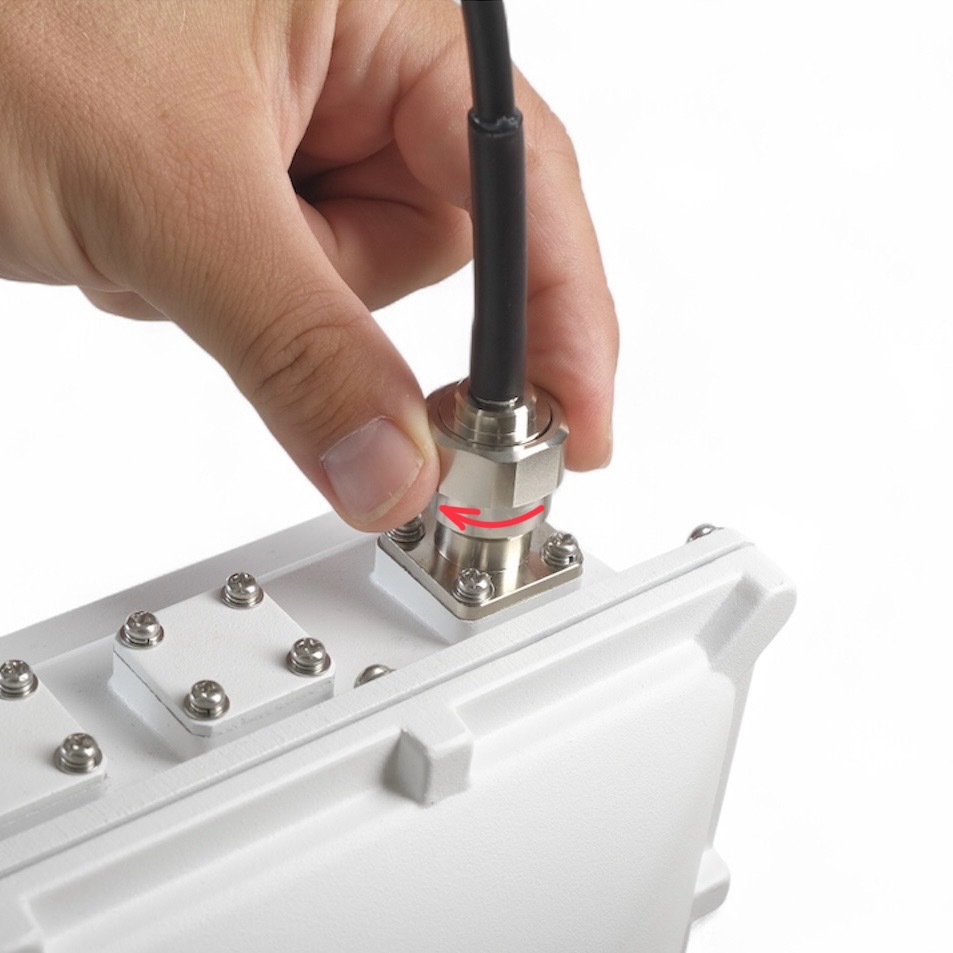
Plug the cable into the appropriate N-type port on the Scout.
Disclaimer
Every connector and antenna is labeled with a number indicating its designated port.
Ensure that each antenna is connected to the matching port number.
tip
To attach antennas to correct connectors check the Antenna Connector Diagram chapter at the top of this page.
Cut off about 50 cm of waterproof tape. Stretch it to double the length. Wrap three layers around the connector with a 50% overlap. Hold the tape in place with your hand for a few seconds.
Wrap three additional layers with PVC tape with natural uncoiling force and a 50% overlap. Make sure to cover the head and the tail of the connector.
Re-tighten all screws, check direction and stability of the antenna.
In windy areas, we recommend using additional reinforcement.
tip
If you are unsure about your antenna installation, feel free to contact us on support@dronetag.com and send us photos and location of your Scout installation.
Inserting the SIM Card
note
If you will operate the LTE version without connectivity ordered, plug your SIM card in first — OTHERWISE SKIP THIS STEP
To successfully change the SIM card and configure the APN, please follow these steps carefully. Adhere to this guide to ensure the process is completed correctly.
IMPORTANT
The new SIM card used in the Scout must not be protected by a PIN code.
Disconnect the Scout from the Ethernet connection (which also serves as the power source).
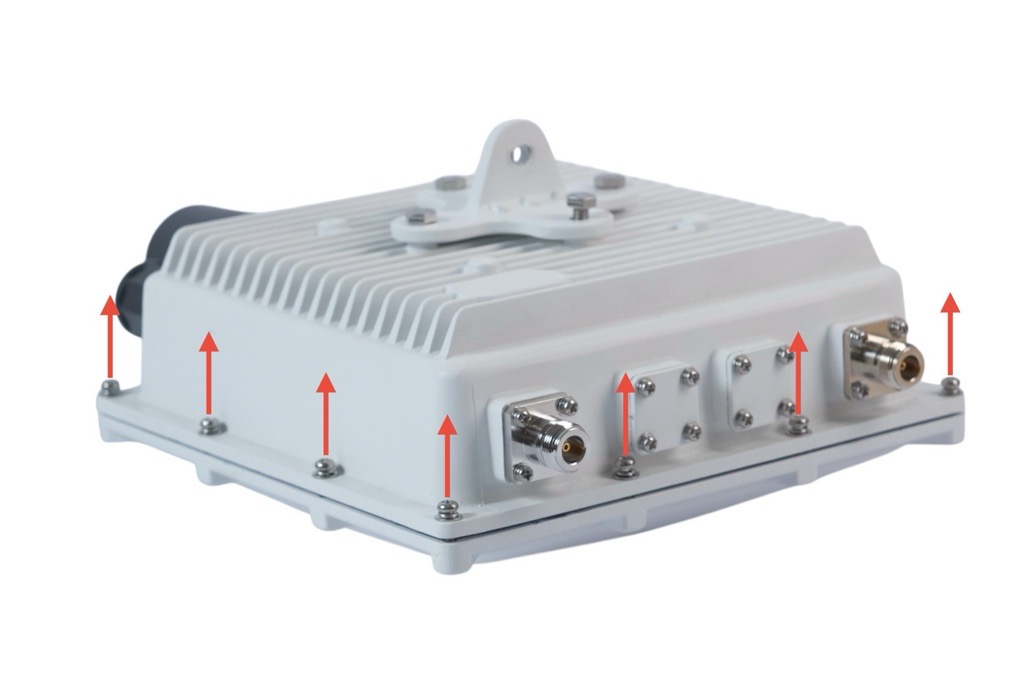
Unscrew all 12 bolts around the device perimeter.
Use a screwdriver that fits the bolts correctly to avoid damage.
Carefully flip the device over.
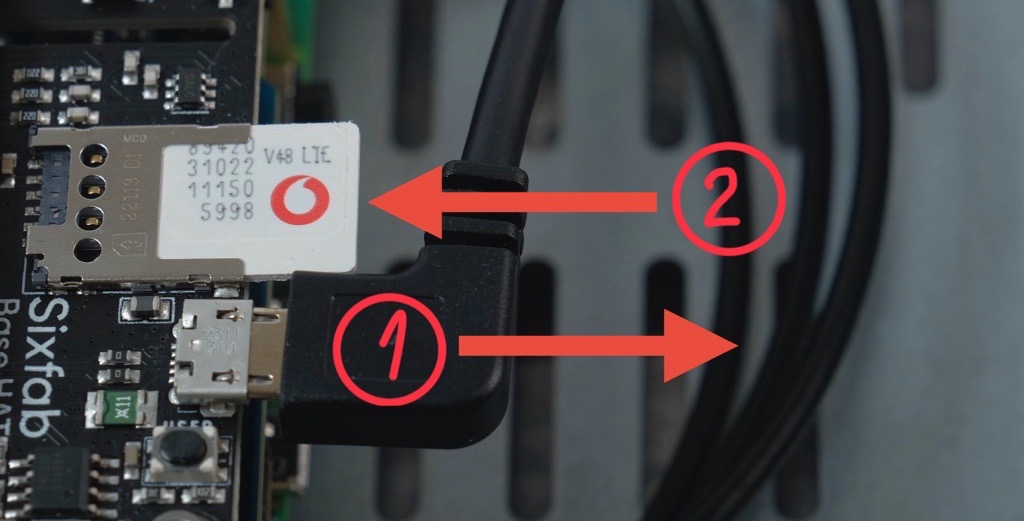
Remove the cover and disconnect the micro-USB cable inside the device (1).
warning
Before plugging the micro-SIM card in, ensure the SIM card works by testing it in a mobile phone to verify it is active and has no PIN lock.
warning
Do not use a triple-cut (multi-size punch-out) SIM card. The stepped edges can catch on the connector contacts and damage them — use a proper single-size micro-SIM.
Gently slide the micro-SIM card into the connector (2) — do not press on it or attempt to open the connector.
Reconnect the micro-USB cable to the same connector it was disconnected from in step 4.
caution
Do not skip this step. If the micro-USB cable stays disconnected, the LTE option will not appear in the management interface and the modem will not work.
Verify Functionality:
There are two options to verify the SIM card functionality:
If you use your Scout in Sensor Mode, connect the Scout to your local network and check its LTE status on the network management page.
If you use your Scout in Cloud Mode, you can view the LTE status in the Dronetag App.
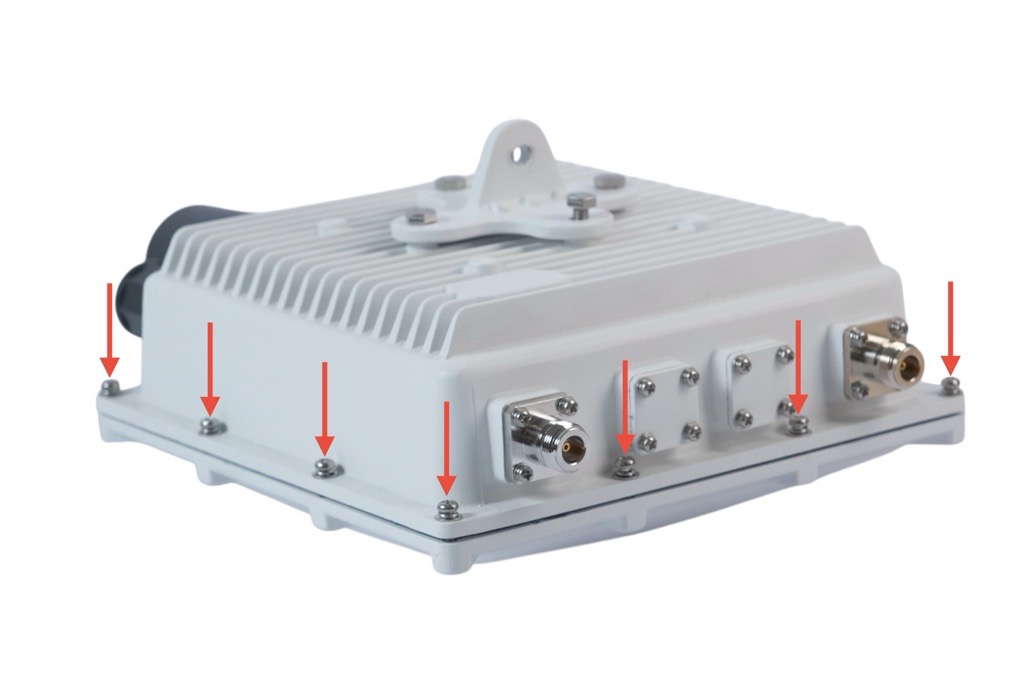
After confirming the device is functioning correctly, reattach the cover, carefully flip the device over, and tighten the 12 bolts (refer back to Step 2).
caution
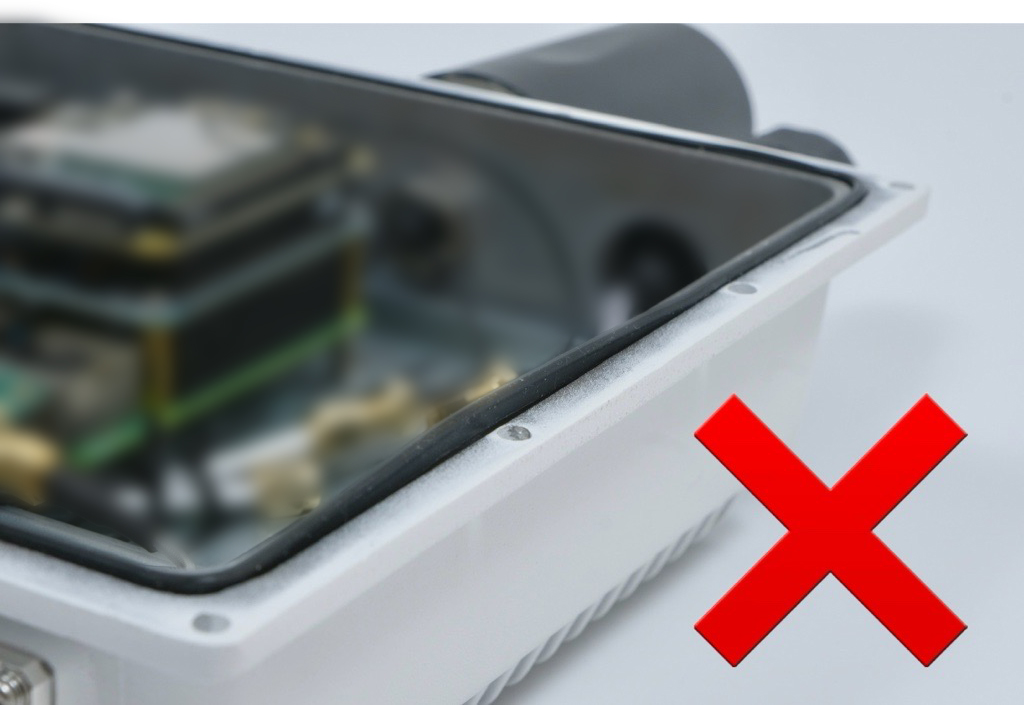
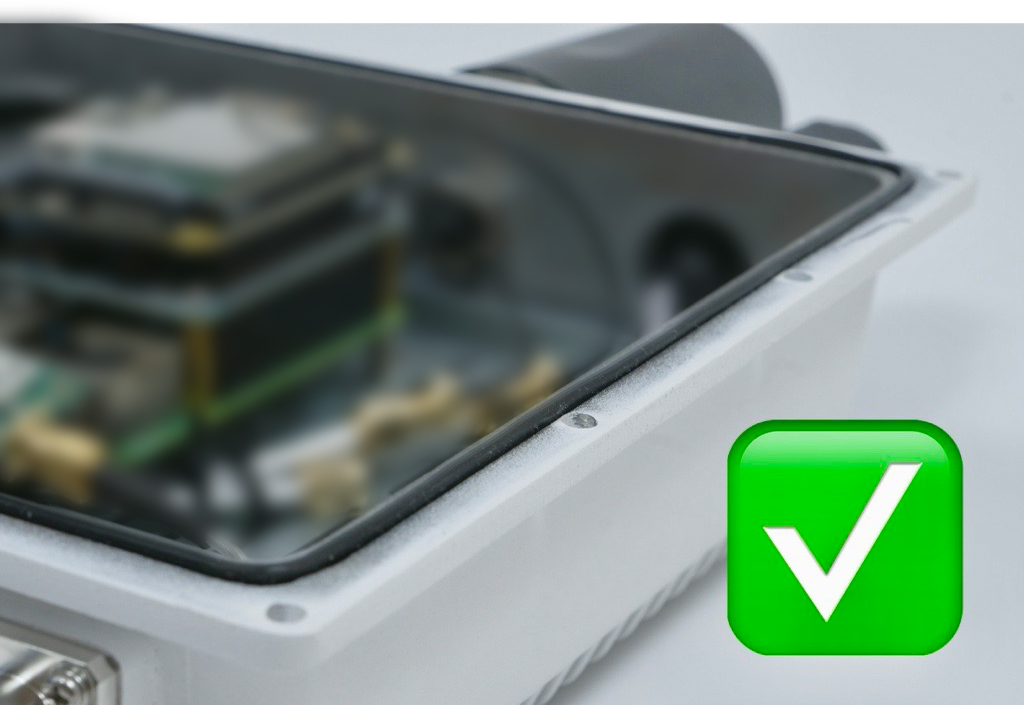
Pay special attention to assembling the device properly to prevent water ingress and avoid damaging the device.
Take extra care about the correct position of the sealing.
Dronetag Scout supports custom LTE SIM cards for independent connectivity. While the hardware is globally compatible, successful operation depends on your carrier’s plan and network policies.
Some carriers (especially for tablet or hotspot-specific plans) enforce an IMEI lock.
Dronetag Scout utilizes a Quectel modem that is not certified under specific carrier-proprietary programs (such as Verizon Open Development or AT&T IoT Certification).
If your plan is restricted to "certified devices only," the carrier will reject the connection based on the Scout's IMEI.
Solution: Use a "Bring Your Own Device" (BYOD) plan or a generic data/IoT plan that does not enforce hardware whitelisting.
LTE Only: Ensure your SIM supports 4G/LTE. SIM cards provisioned exclusively for 5G Standalone (SA) networks will not function in the Scout.
Local vs. Roaming SIMs: Global/roaming SIMs (e.g., Hologram, Emnify) work but may introduce higher latency. For time-critical operations, a local carrier SIM is recommended.
Coverage: Ensure your carrier provides LTE coverage in your area. Note that some carriers (like T-Mobile) use specific bands (e.g., B71) for rural coverage that may differ from standard phone reception.
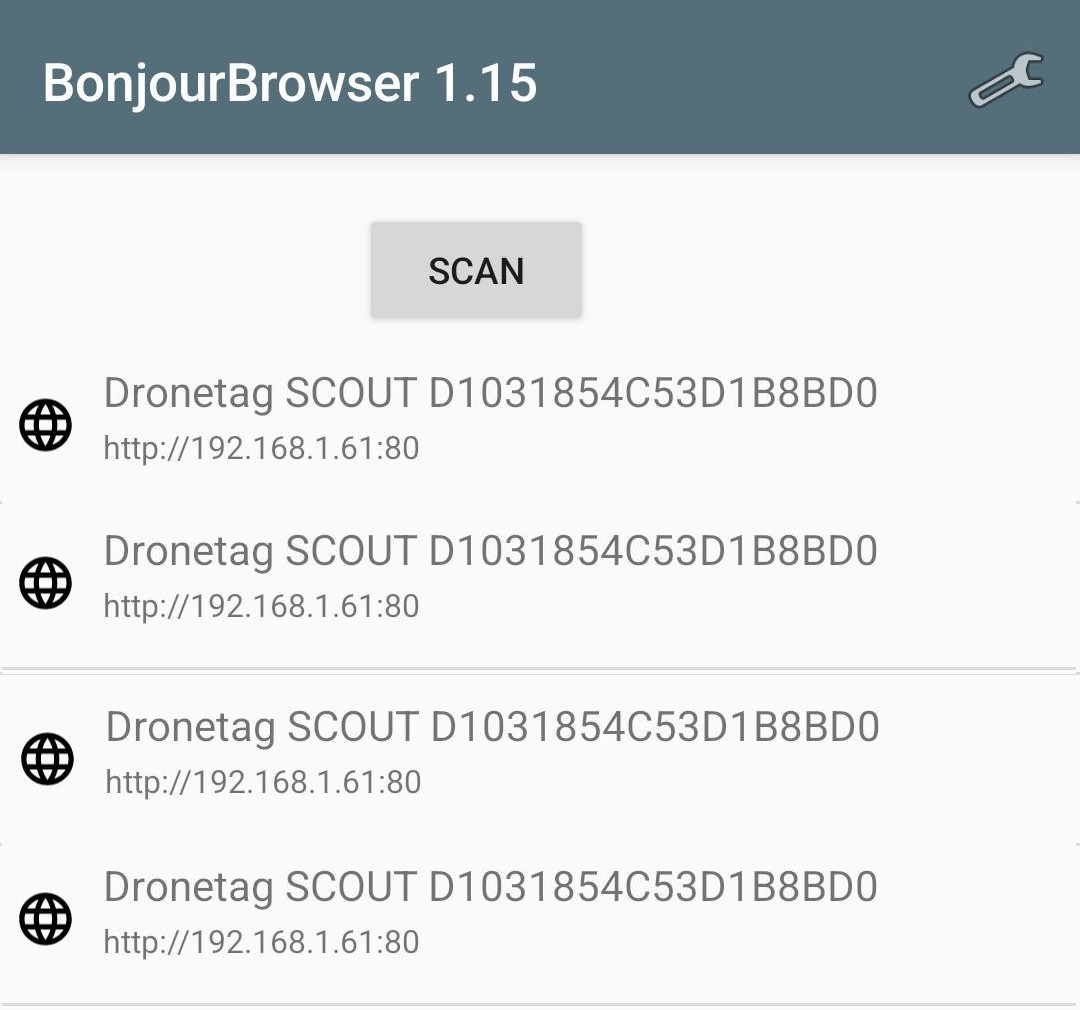
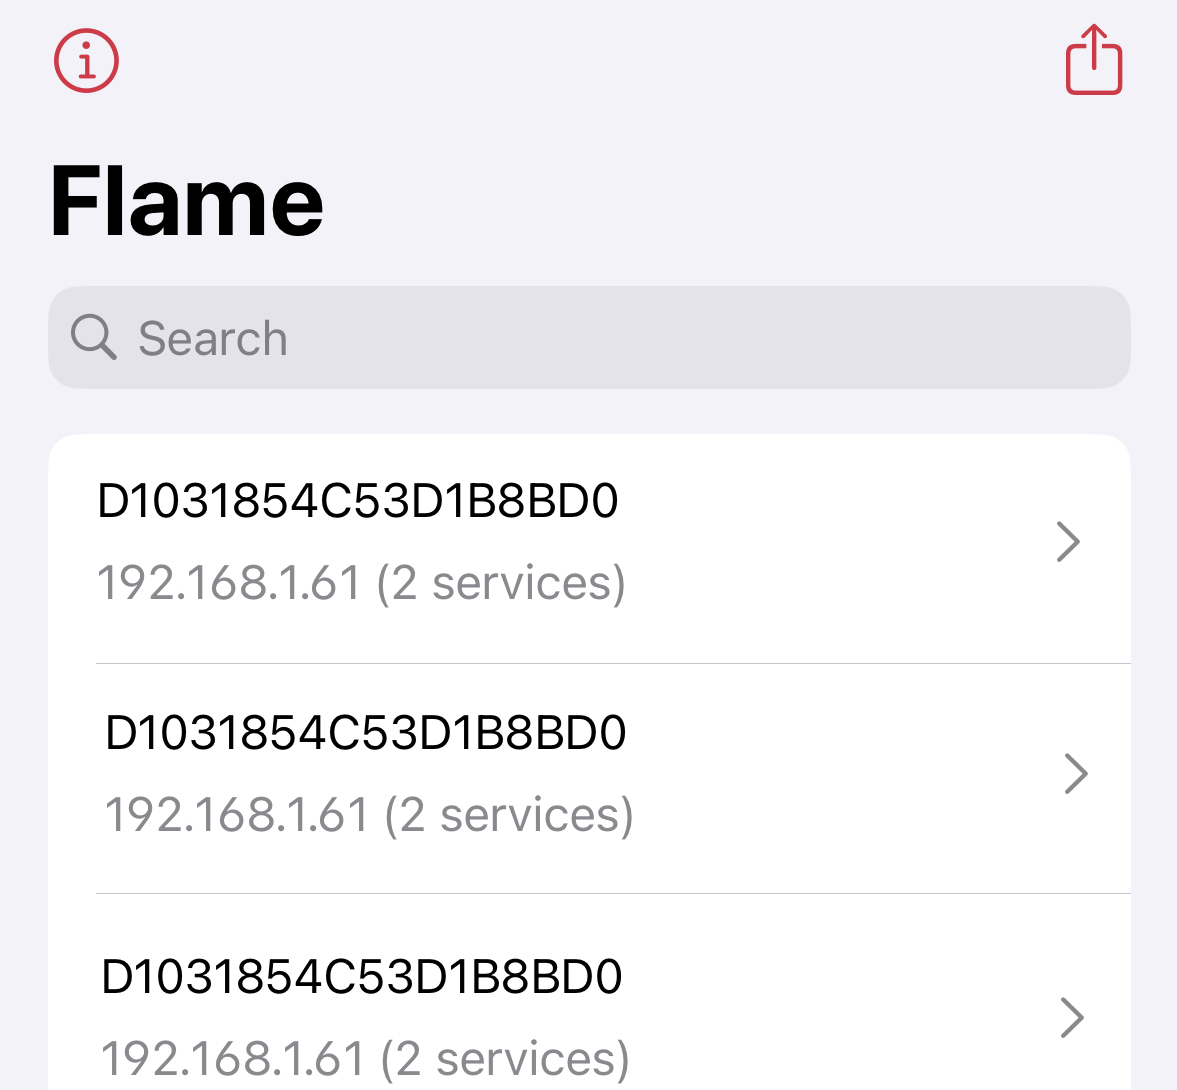
By default, the Scout is shipped with DHCP enabled. When powered and connected via Ethernet, the Scout will attempt to obtain an IP address automatically from your network's DHCP server.
If no DHCP server responds within 60 seconds, the Scout falls back to a static IP configuration — see Connecting Directly with a Static IP below. This fallback is temporary: the Scout keeps looking for a DHCP server and returns to a DHCP address automatically once one is available, so its address on your network may change from the fallback back to a DHCP-assigned one.
If you don’t know what IP address the Scout received from your DHCP server, use one of the following methods depending on your platform:
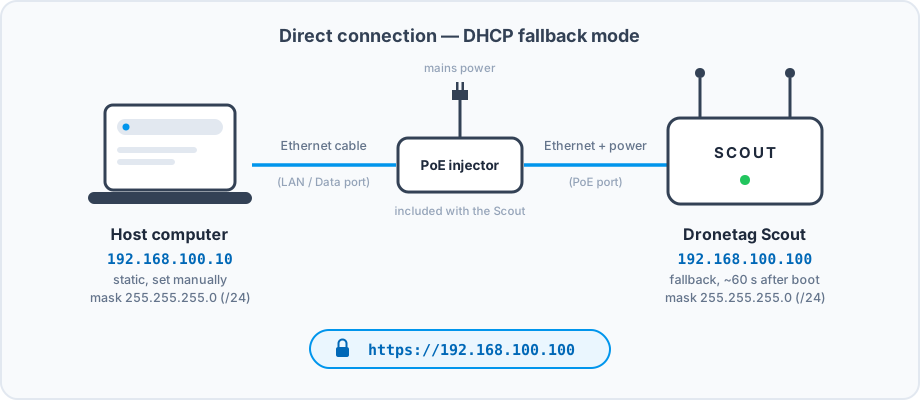
If there is no DHCP server available — for example during first setup on a desk, in an isolated field deployment, or while troubleshooting — you can connect your computer directly to the Scout with an Ethernet cable.
If the Scout does not receive an IP address from a DHCP server within 60 seconds after powering up, it automatically falls back to a static IP configuration:
IP Address:192.168.100.100/24
Default Gateway:192.168.100.1
This fallback keeps the Scout reachable whenever there is no DHCP server. It is temporary: while on the fallback the Scout keeps checking for a DHCP server in the background and automatically switches back to a DHCP address as soon as one becomes available, so on a network with working DHCP it will not stay on 192.168.100.100. If you need the Scout to hold a fixed address permanently, set a static IP in the management interface instead — see the note at the end of this section.
The Scout is powered over the Ethernet cable (PoE), so a direct connection always goes through the PoE injector included with your unit: connect your computer to the injector's LAN / Data port and the Scout to the PoE / Power+Data port.
To communicate, both devices must be in the same subnet. The Scout's fallback address is fixed, and you configure your computer to match:
Setting
Dronetag Scout
Your computer
IP address
192.168.100.100 (fixed fallback)
192.168.100.10 (recommended)
Subnet mask
255.255.255.0 (/24)
255.255.255.0 (/24)
Gateway
192.168.100.1
leave empty
DNS
—
leave empty
note
Any free address in the 192.168.100.2 – 192.168.100.254 range will work for your computer, except192.168.100.100 (used by the Scout) and 192.168.100.1. The examples below use 192.168.100.10.
Open Settings → Network and click the gear icon next to your wired connection.
Open the IPv4 tab and select the Manual method.
Fill in the values:
Address:192.168.100.10
Netmask:255.255.255.0
Gateway and DNS: leave empty
Click Apply, then toggle the wired connection off and on to apply the change.
Command line (NetworkManager):
# List connection names
nmcli connection show

# Set a static address on your wired connection
sudo nmcli connection modify "Wired connection 1" \
  ipv4.method manual ipv4.addresses 192.168.100.10/24

# Re-activate the connection
sudo nmcli connection up "Wired connection 1"
Temporary address (lost after reboot, replace eth0 with your interface name from ip link):
Once your computer's static IP is configured and the Scout has been powered on for at least 60 seconds, open your browser and navigate to:
https://192.168.100.100
tip
When you are finished, switch your computer's Ethernet adapter back to automatic (DHCP) — otherwise it will not connect properly to regular networks.
Permanent static address for the Scout
The fallback address is only a temporary safety net for direct access when no DHCP server is available — the Scout returns to DHCP automatically once a server is reachable again, so it will not stay on 192.168.100.100 on a network that has DHCP. If you want the Scout to permanently use a specific static IP on your network, configure it in the management interface — see Configuring a Static IP Address. Setting a static IP there disables DHCP, so the Scout keeps that address and never falls back to — or returns to — DHCP.
If you're unable to access the Scout’s interface, refer to the detailed network troubleshooting section.
🌐 Networking
The Dronetag Scout is equipped with a 100 Mbps Ethernet port that supports both DHCP and static IP address configurations. These settings can be modified through the device’s web-based management interface.
The Scout’s Ethernet port is designed to be powered via PoE (Power over Ethernet) using the following standards:
IEEE 802.3af Type 1 (also known as PoE)
IEEE 802.3at Type 2 (also known as PoE+)
Voltage: 48V DC
warning
Do not use passive PoE injectors, such as those used by some Ubiquiti or Mikrotik devices, which often provide lower, non-standard voltages (e.g., 24V).
These will not power the Scout and may cause improper operation.
To power the Scout correctly:
Use a compatible PoE switch that supports 802.3af Type 1 or 802.3at Type 2, or
Use the included PoE injector supplied with your unit.
Refer to What’s in the Box for more details.
Power supply note
The Scout PoE injector supports both EU and US power outlets and can be used with input voltages of 120 V or 240 V.
The static address is only a fallback, not a permanent setting — its job is to keep the Scout reachable while the network is unavailable. The Scout therefore keeps retrying DHCP in order to re-establish normal connectivity as soon as it returns: while on the fallback it checks in the background, roughly every couple of minutes, whether a DHCP server has become available.
As soon as DHCP works again, the Scout automatically switches back to a DHCP-assigned address — it does not stay on the static fallback once the network recovers. These background checks do not interrupt the fallback address, so the Scout remains reachable at 192.168.100.100 the whole time, right up until it obtains a DHCP lease.
Want a permanent static IP?
The 192.168.100.100 fallback is temporary — the Scout leaves it again the moment DHCP is restored. If you want the Scout to keep a fixed address that never changes, set a static IP in the Networking tab (see Configuring a Static IP Address below). Configuring a static address there disables DHCP, so the Scout uses only the address you set and never falls back to — or returns to — DHCP. This is the recommended way to run the Scout on a fixed address, even if that address is in the same range as the default fallback.
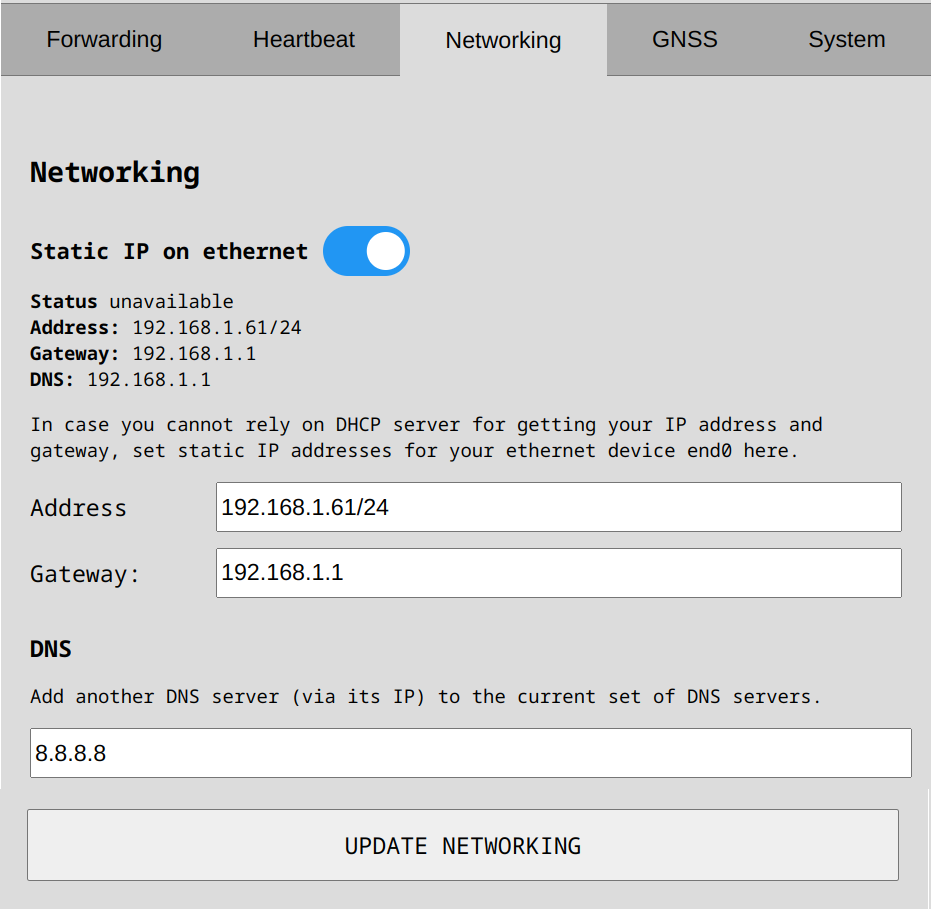
Navigate to the Networking tab within the web management interface.
Enter the desired static IP address using CIDR notation, for example: 192.168.1.61/24
The /24 suffix corresponds to the subnet mask 255.255.255.0.
💡 Not sure what subnet mask to use? Try jodies.de IP Calculator to determine the correct value.
Setting a static IP disables DHCP
When you configure a static IP here, the Scout uses only this address: DHCP is disabled and the 192.168.100.100 fallback no longer applies. The Scout will not request a DHCP lease or switch back to DHCP while a static IP is set. To return to automatic addressing, disable the static IP option in this same tab.
The Scout normally keeps its clock accurate automatically — it takes the time from the LTE network, GNSS, or the internet. You can add your own NTP server (by IP or hostname) in the NTP IP/host field of the Networking tab; it is added to the pool of time sources the Scout uses.
Set an NTP server on networks without internet access
On an isolated network with no internet access, the Scout cannot reach public time servers, so its clock can drift and the timestamps in your data may be wrong. On such networks we strongly recommend configuring a reachable NTP server (for example one running on your local network) so the Scout keeps accurate time and your data stays correctly timestamped.
Each SIM card provider supplies an APN, usually listed on their website. Enter it in the Desired APN field so the Scout can establish a mobile data connection.
The APN you set is applied on every start-up. If you change it and the new value fails to connect while the previous one was working, the Scout automatically reverts to the last working APN, so a typo won’t leave the device offline. You can also enter the APN for a new SIM before swapping cards, so the Scout comes up correctly with the new one already configured.
If the inserted SIM is protected by a PIN, the Networking tab shows a SIM PIN field. Enter the PIN and select Unlock SIM to bring the modem online. The Scout remembers a PIN that works and re-applies it automatically after a restart, so you only have to enter it once. PIN protection stays enabled on the card — it is only unlocked, never disabled.
warning
Enter the correct PIN. Repeated wrong attempts can permanently lock the SIM (a PUK lock), after which it must be recovered with the PUK code from your provider.
We recommend using a SIM card with no PIN code to avoid accidentally locking the card. If the Scout tries a stored PIN and it turns out to be wrong, it discards that PIN and stops retrying so it cannot exhaust the attempts and PUK-lock the SIM.
Provisioned SIM cards
When the Scout ships with a Dronetag-provided SIM, its APN and PIN are configured at the factory. While that SIM is inserted, these fields are hidden and cannot be changed — replace the SIM with your own if you want to set them yourself.
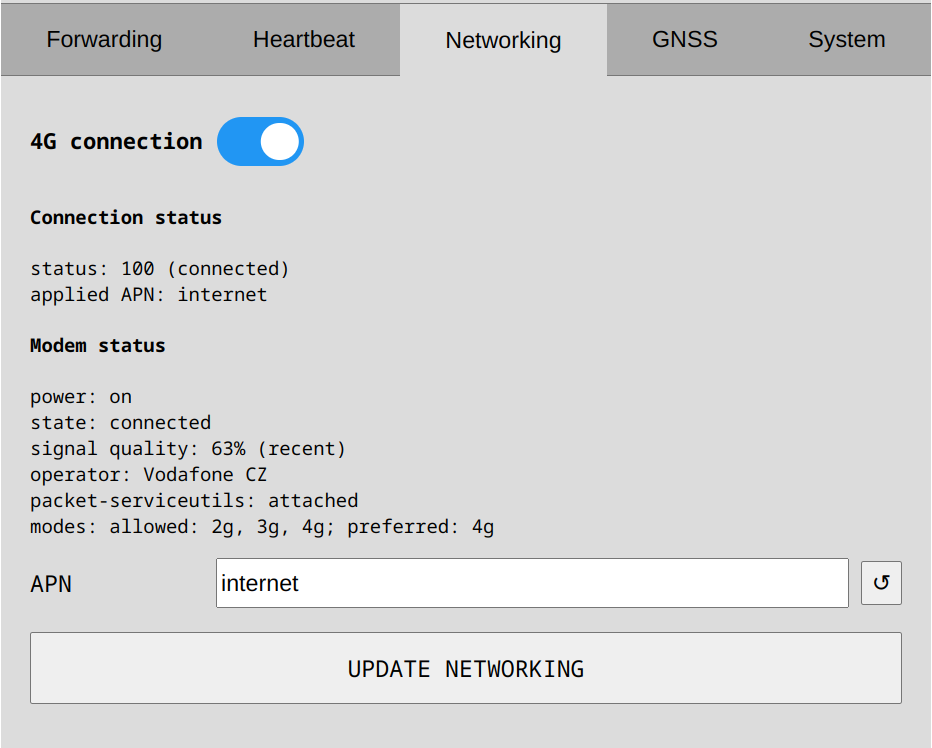
Open the Networking Tab
Once logged in, navigate to the Networking section in the management interface.
Check the LTE (4G) Switch
Confirm that the 4G switch is set to ON to enable LTE functionality.
Configure the APN
If your cellular provider requires specific APN settings, enter the APN value into the designated field in the networking tab.
Save Changes
Click the Update 4G connection button to save and apply your changes.
tip
If no data connection is established, double-check the APN settings and re-enter them if necessary. If the SIM is PIN-locked, make sure you have entered the correct SIM PIN and unlocked it (see SIM PIN above).
To further troubleshoot, test the SIM card in a mobile phone to confirm it has active service and good network coverage.
When the Scout has both an Ethernet connection and a working 4G connection, it normally sends its internet traffic — the Dronetag cloud, AWS instances and other remote integration servers — over Ethernet, keeping 4G as a backup. Traffic to devices on your local network always stays on Ethernet and is never sent over 4G.
Two switches in the 4G section of the Networking tab let you change this behaviour.
Turn Prioritize 4G on to make the Scout prefer the 4G connection for all internet traffic, even while Ethernet is connected. This is useful when the Ethernet network is used only for local access and does not provide reliable internet. Traffic to your local network still goes out over Ethernet as usual. This switch is off by default.
Automatic 4G failover lets the Scout switch to 4G on its own, and is on by default. Roughly once a minute the Scout checks whether the remote servers your integrations rely on can still be reached over Ethernet:
If they can be reached over Ethernet, the Scout keeps using Ethernet.
If they cannot be reached over Ethernet but are reachable over 4G, the Scout automatically switches its internet traffic to 4G.
As soon as the Ethernet connection can reach those servers again, the Scout switches back to Ethernet.
A few things to keep in mind:
The check only runs while 4G is enabled and connected.
Servers on your local network are ignored — failover reacts only to a loss of internet connectivity, not to local traffic.
If Prioritize 4G is on, that manual choice always wins and the connection stays on 4G.
In a typical installation you can leave both switches at their defaults: the Scout uses Ethernet whenever it provides working internet access and falls back to 4G only when it doesn’t.
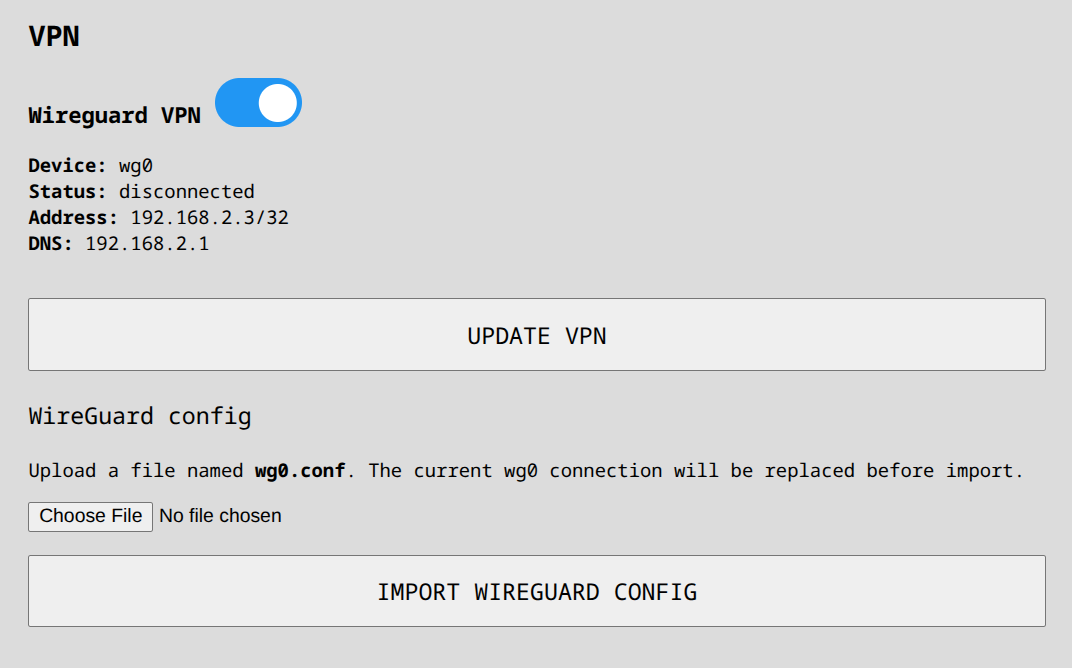
The Scout can be configured to use a VPN (Virtual Private Network) to provide access to the device even when you are not directly connected to its Ethernet port. This is useful when the Scout is deployed in a remote network and needs to be reached securely for maintenance, diagnostics, or integration with other services.
Using a VPN also helps securely transfer data by adding another layer of privacy between the Scout and the systems communicating with it.
warning
VPN is available only in Sensor+ mode or Cloud mode. It is not part of the Sensor mode.
Scout currently supports WireGuard configuration from the management interface. A WireGuard configuration can be uploaded to the Scout and then enabled or disabled from the VPN section in the Networking page.
WireGuard can be used to:
reach the Scout remotely without direct local Ethernet access
route traffic securely to resources available inside the VPN network
add an additional privacy layer for communication between the Scout and your remote infrastructure
When preparing a WireGuard configuration for Scout:
configure the client tunnel address in the [Interface] section
configure the reachable VPN subnet in [Peer] AllowedIPs
do not use 0.0.0.0/0 in AllowedIPs; this value is explicitly forbidden by Scout
Current implementation limitations:
AllowedIPs must be present in the [Peer] section
only one IPv4 network in AllowedIPs is currently supported, optionally together with the Scout address itself as /32
the Scout currently expects the [Interface] Address to be inside the AllowedIPs subnet
0.0.0.0/0 is explicitly blocked and full-tunnel VPN routing is not supported in the current implementation
if additional routes are needed beyond the main VPN subnet, they are not yet supported by the current UI flow
Example of a valid Scout WireGuard configuration:
# File must be named wg0.conf
[Interface]
# Private key assigned to this Scout client
PrivateKey = <scout-private-key>
# Tunnel address of this Scout inside the VPN subnet
Address = 192.168.205.85/32
# Optional DNS server reachable through the VPN
DNS = 192.168.205.1

[Peer]
# Public key of the remote WireGuard server or peer
PublicKey = <server-public-key>
# Scout supports one IPv4 VPN subnet here, optionally with the Scout address itself
AllowedIPs = 192.168.205.0/24, 192.168.205.85/32
# Remote server endpoint
Endpoint = 94.230.157.236:51821
In this example:
the Scout tunnel address 192.168.205.85/32 belongs to the allowed VPN subnet 192.168.205.0/24
the Scout address itself is also explicitly listed in AllowedIPs, which is allowed
traffic for the VPN subnet is routed through WireGuard
default routing for all device traffic is not used
Some switches or routers may experience auto-negotiation issues with the Scout. To resolve this, manually set the Ethernet port configuration in your switch or router's management interface to:
Speed: 100 Mbps
Duplex: Full duplex
This setting can often be found under port settings or advanced configuration in your network equipment's UI.
If you've made changes to the network configuration and can no longer access the device:
Perform a factory reset to restore default settings.
After resetting, the Scout will attempt to obtain an IP address via DHCP and fall back to its static IP (192.168.100.100) if no DHCP server is available.
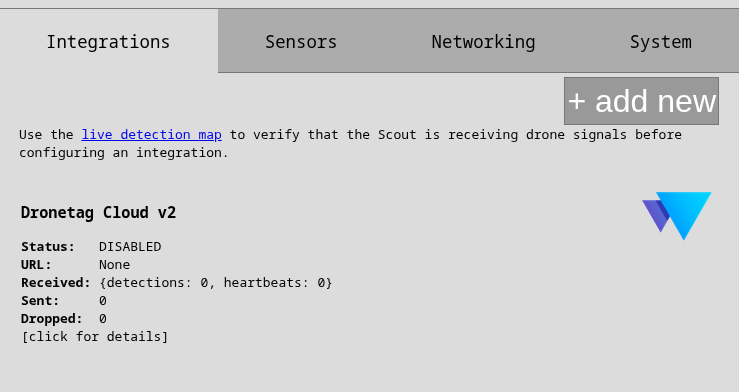
Integrations control where and how the Scout sends telemetries. Scout can run multiple Forwarders in parallel. If any instance is not processing the
data fast enough, other instances are not affected.
There are two basic forwarders:
Dronetag forwarders (one for Cloud and one for On-Premise) that can be only enabled/disabled and very basically configured
JSON forwarders are versatile and intended for user's integration.
See the data format description at the bottom of this page.
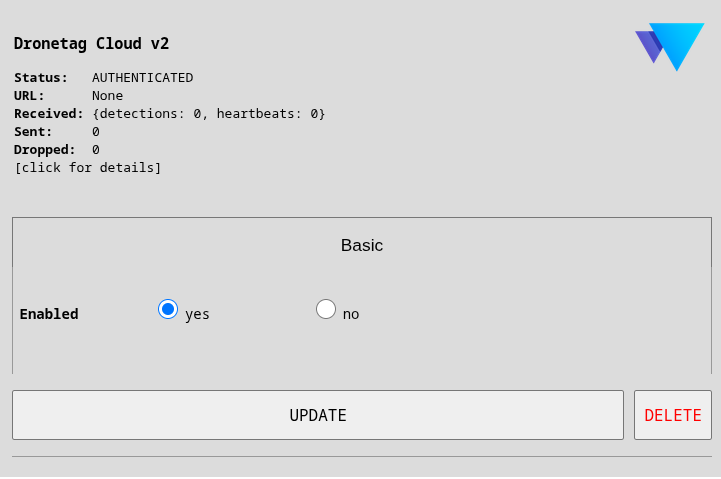
Dronetag Cloud is the only (user-visible) permanent forwarder. It cannot be deleted but can be disabled. By disabling the cloud forwarder,
you will not be able to see the Scout nor its detections in Dronetag App.
You can add an On-Premise Dronetag integration to have full control of your data with all benefits of our cloud backend.
The Dronetag Forwarder can be used simultaneously with any other forwarders. For further details on how to operate the Scout in Cloud/On-Premise,
please refer to this page.
JSON forwarders are intended for user integration.
All custom forwarders can be secured and support compression and batching.
MQTT
HTTP/HTTPS
It is better to specify port into URL, otherwise 1883 is used. For plain MQTT(s) protocol, only host:port is necessary.
If you are going to use WebSockets then you can specify path as well, otherwise / will be used.
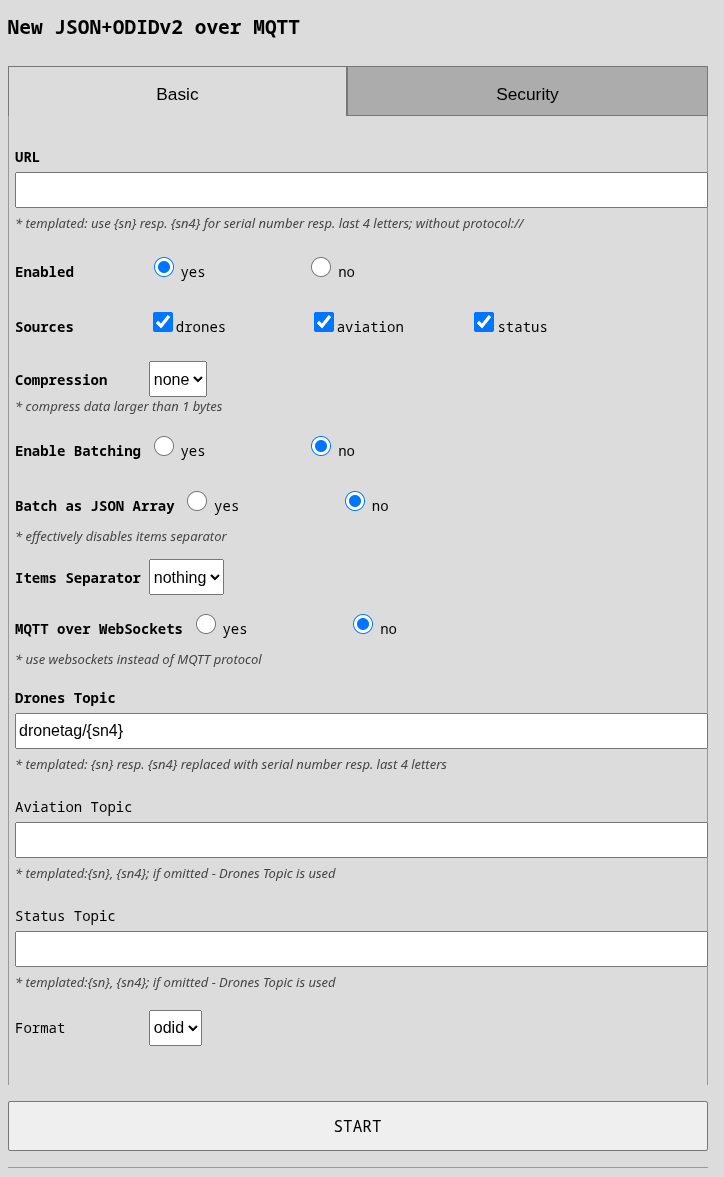
MQTT over WebSockets: Connect to MQTT broker using WebSockets instead of native MQTT protocol. Useful when you can only use HTTP/WebSocket connections (e.g., behind restrictive firewalls).
Drones Topic: MQTT topic for drone detections. Topics are like directories in a filesystem. Template: use {sn} for full serial or {sn4} for last 4 digits. Example: myorg/receivers/scout1/drones
Aviation Topic: Separate MQTT topic for aviation data. If empty, aviation data is sent to the Drones Topic.
Status Topic: Separate MQTT topic for Scout status/heartbeat. If empty, status is sent to the Drones Topic.
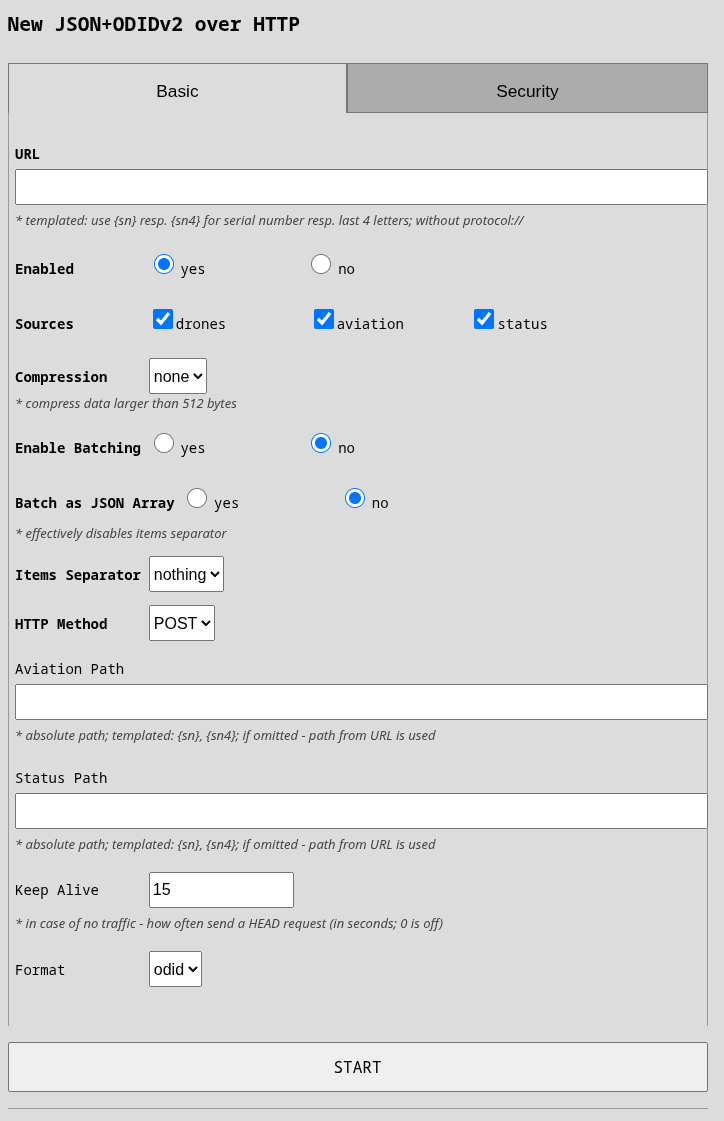
You can put a full path in the URL and all data will be sent to that path. Optionally, you can use
different paths for aviation and status (see below). All paths must be absolute.
Aviation Path: Override the URL path specifically for aviation data. If empty, uses the path from your URL. Allows sending drone and aviation data to different endpoints.
Status Path: Override the URL path specifically for status/heartbeat data. If empty, uses the path from your URL. Useful for separating status updates to a different API endpoint.
Keep Alive: Seconds between keep-alive ping requests when no data is being sent. Set to 0 to disable. Helps detect broken connections earlier.
HTTP Method: HTTP method to use: POST (standard, recommended) or PUT. Most APIs expect POST.
Here follow common options no matter the basic protocol (HTTP/MQTT).
These are the fundamental options required for every forwarder:
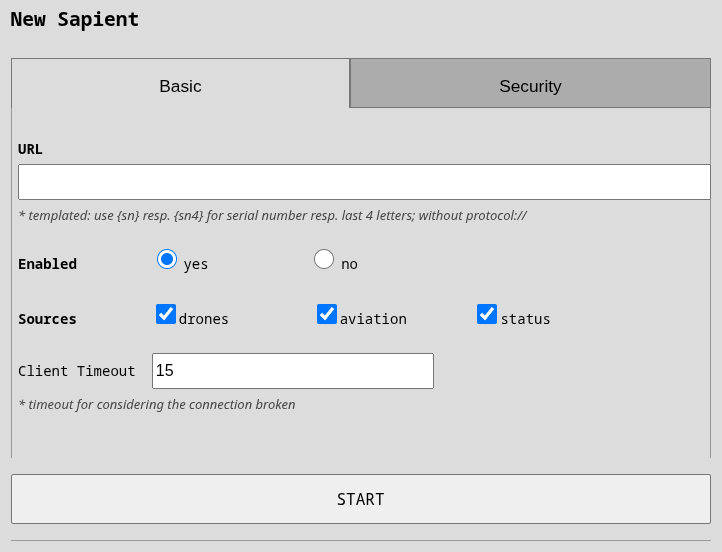
Enabled: Turn this forwarder on or off. When disabled, no data is sent through this forwarder.
URL: The destination where to send the data. Please, do not try to guess protocol - use clickable options to enable secured connection, mTLS and/or change the protocol to web sockets.
Sources: Select which types of data to forward: drones (detected drone telemetry), aviation (manned aircraft data from aviation module), status (Scout health and position updates). Please note that drones and aviation
are restricted by a global filter on altitude and radius.
Client Timeout: How long (in seconds) to wait for the server to respond before considering the connection broken. Default is 15 seconds. Increase this if your connection is not reliable or slow.
Batching groups multiple messages before sending them. This reduces network traffic and server load but adds slight delay. Here you control those delays
and how the data are formatted.
Enable Batching: Turn message batching on or off. Useful for high-volume scenarios.
Batch as JSON Array: When enabled, messages are grouped as [msg1, msg2, ...]. When disabled, messages are joined with a separator.
Items Separator: Character(s) between messages when batching is enabled: nothing (no separator), \r\n (carriage return + newline), or \n (newline).
Batch Size: Maximum number of messages to group before sending. Leave at 0 to disable, or set to a number like 100.
Batch Timeout: Maximum seconds to wait before sending a batch, even if it's not full. Example: 0.1 sends batches every 100ms. Disabled if set to 0.
Example: With Batch Size = 100 and Timeout = 0.1 seconds, batches are sent when either 100 messages arrive OR 0.1 seconds pass, whichever happens first.
Compression: Reduce bandwidth usage by compressing data before sending. Beware that for HTTP the data is optionally compressed only when it makes
sense. The compression is then noted in Content-Encoding header (with value "gzip"). If selected for MQTT, the data are compressed always because there
is no way how to hint on data compression.
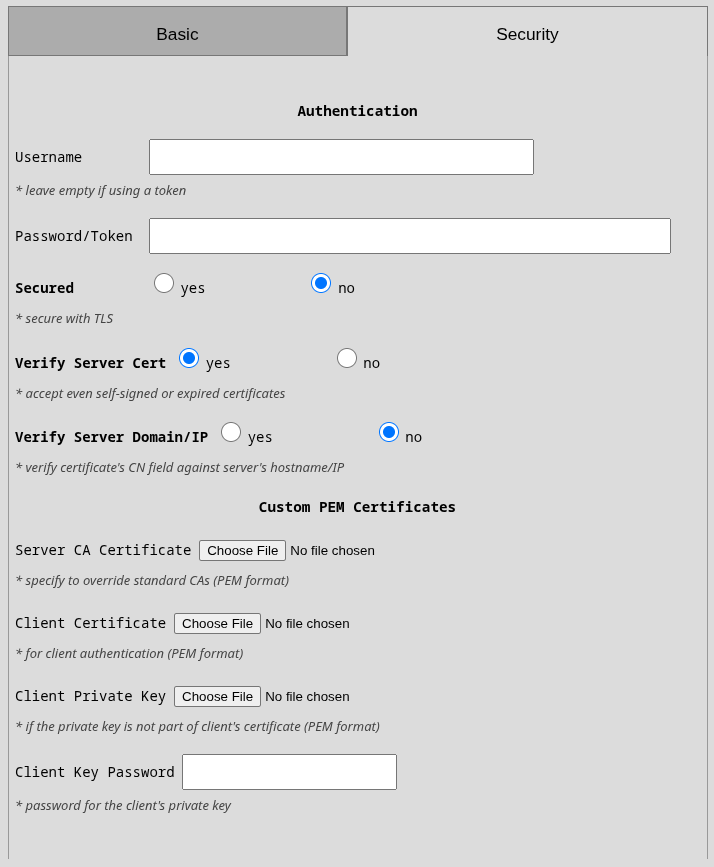
This section relates only to verification of the server certificate. This is the most common part of security and you most likely need to get this right.
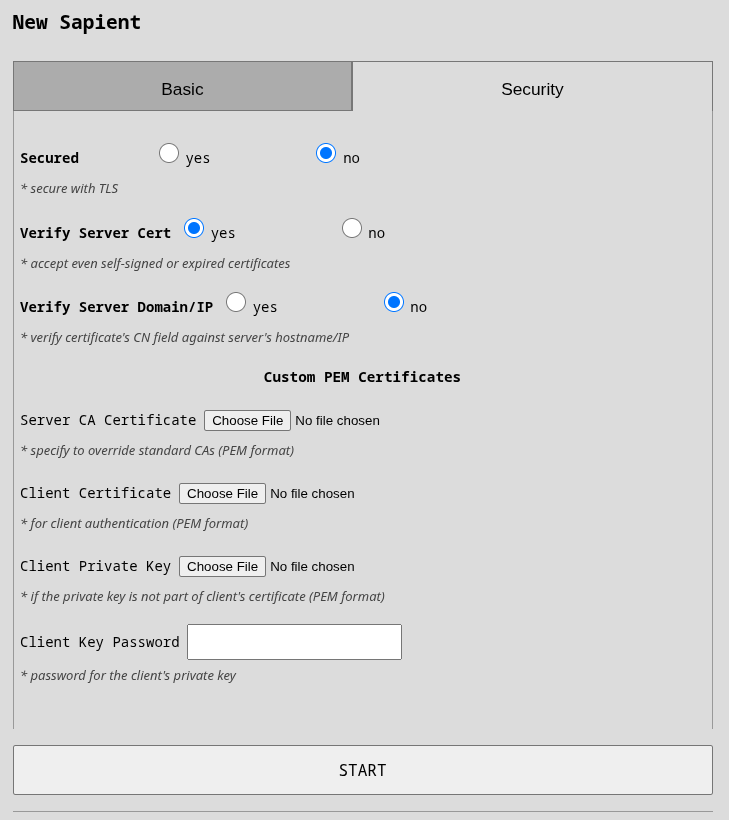
Secured: Enable TLS encryption for the connection. If your server uses HTTPS or MQTTs, enable this.
Verify Server Cert: Check if the server's certificate is valid and not expired. Disable only for testing with self-signed certificates. Warning: Disabling this makes you vulnerable to man-in-the-middle attacks.
Verify Server Domain/IP: Check if the certificate's hostname (CN field) matches the server you're connecting to. Enable this to prevent connection to impostor servers.
Server CA Certificate: Your custom CA certificate in PEM format (.pem or .crt file). This tells the Scout which certificate authority to trust. Typically needed when your organization has its own internal CA. Beware that it has to be the top-level CA in the server's certificate. Not an intermediate one.
This section allows you to specify your client certificates for mTLS. Quite usual in the MQTT world but more and more in HTTP also.
Client Certificate: Upload a certificate to authenticate the Scout to your server. Required if your server checks client certificates (mutual TLS). File format: PEM.
Client Private Key: The private key corresponding to your client certificate. Only needed if your key isn't embedded in the certificate file.
Client Key Password: If your private key is encrypted, enter the password here.
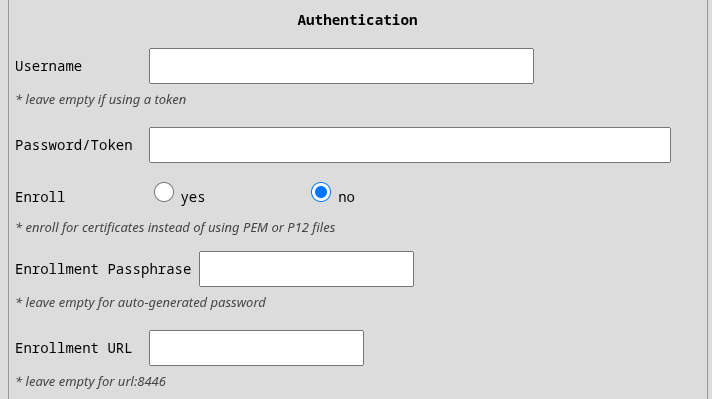
Username: Username for HTTP Basic Auth or MQTT authentication. Leave empty if using token-based authentication.
Password/Token: Password for Basic Auth or API token. Stored securely. For MQTT, this can be your password or token depending on your broker's configuration.
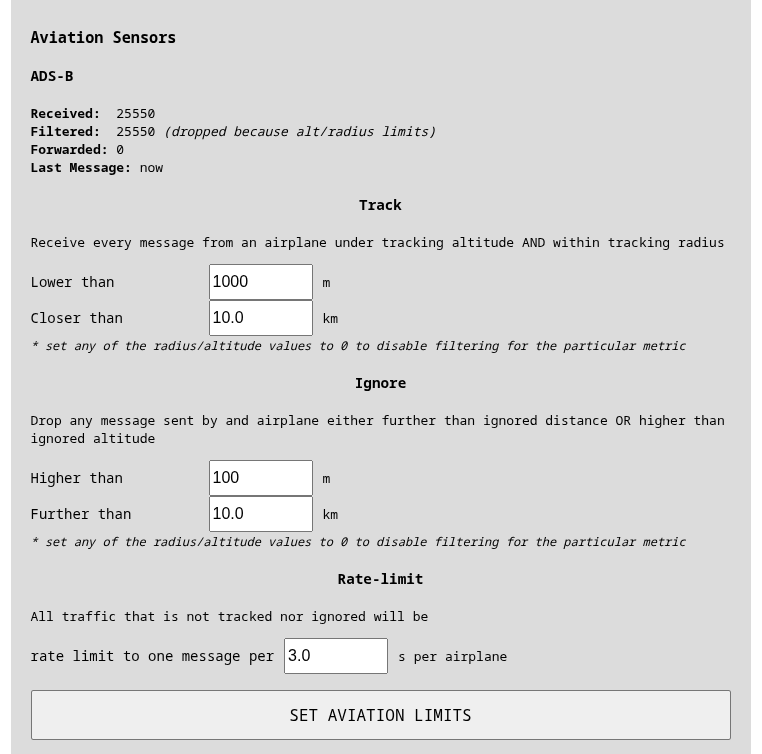
You can select thresholds for drones and aviation data:
ignore thresholds (radius, altitude): object farther OR higher than the limits will be silently dropped
tracking thresholds (radius, altitude): objects closer AND lower than the limits will be tracked
Tracking means that the messages will not be rate limited. Every message will be forwarded. Rate-limiting
means that only one message per (configurable) X seconds per object will be sent. Good limits are especially useful for
aviation where average data consumption near a mid-sized airport with no limits is around 150MB/day.
By default, rate limiting and ignore is turned off for drones by setting all values to 0.
Aviation is limited by default because the air traffic visibility is on long distances that are not useful
for normal operations. Hence the aviation traffic is ignored if further away than 100km regardless of altitude
(ignore threshold). Aviation tracking (not rate-limited) happens by default for any traffic within 10km radius
and bellow 1000m of altitude (landing objects).
caution
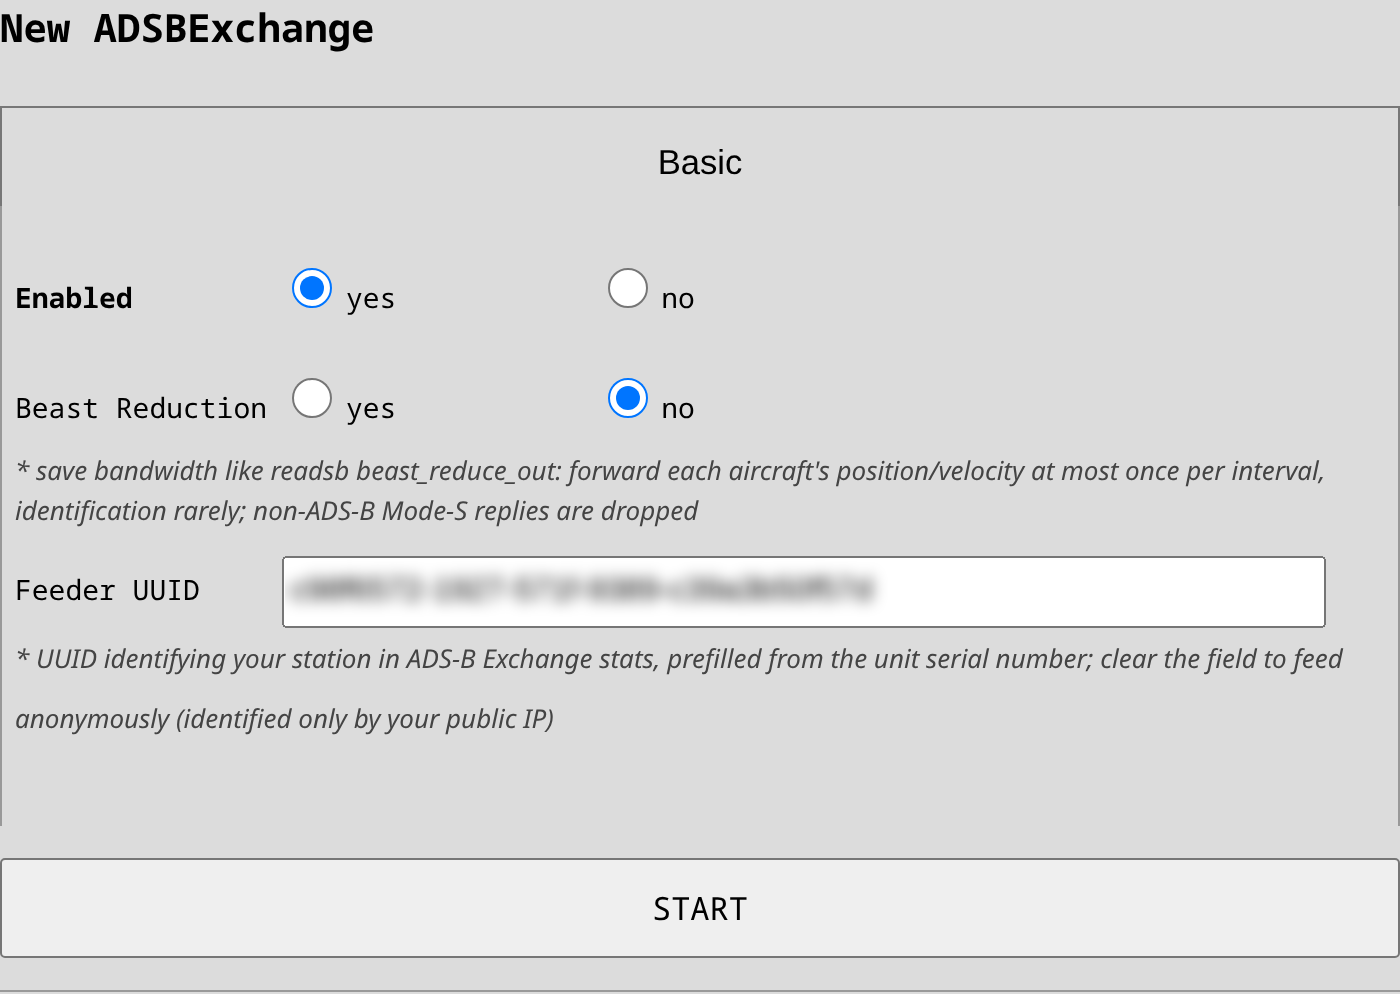
The BEAST and ADSBExchange integrations are not affected by these limits. They relay the
receiver's raw, undecoded BEAST stream, which carries no positions the Scout could filter on - everything
the receiver hears is forwarded regardless of radius or altitude. Beast Reduction only limits the
per-aircraft update rate, not the coverage.
All JSON-based forwarders support two formats: dri and odid. DRI format contains raw OpenDroneID message (as bytes) as it was received by the antenna.
ODID message is parsed and transformed OpenDroneID message so it is more pleasant to work with.
Each message is sent separately unless Batching is configured. See above details about batching messages.
Internal module type; the receiving frequency in MHz for aviation (1090, 978, 868)
msg_type
int
15
ODID message type; aviation always arrives as 15 (Pack)
noise_floor
int | null
-98
Noise floor in dBm, when the receiving chip reports one
registration
object | null
-
Drone maker/model resolved offline from the Remote ID serial. Only available on Scout Sensor+ with a valid license, null otherwise
odid
dict
-
This contains a preprocessed payload of the protocol. Regarding the possible values and message structure refer to ODID Library. Also for more details see the full protocol description below
The authoritative, versioned description of the whole JSON+ODID message is published
as a JSON Schema (draft 2020-12) generated directly from
the sensor's typed data models — every field carries a description with its units,
valid ranges and null semantics, including how aviation traffic (ADS-B, ADS-L, UAT,
FLARM, OGN) is flattened into the ODID structure (aircraft identifier in BasicID,
flight number or callsign in SelfID, never a System message).
The schema version (version and $id inside the file) is bumped whenever the wire
format changes, so your integration can pin against a specific schema revision. Use it
to generate typed client models or to validate received messages in CI.
warning
Textual JSON format with raw fields parsed from ODID sources below is just a representation formatted for clear understanding; the format sent will additionally be:
No indentation the object will be always a single line since it is sent in JSONL
All Invalid fields are processed and converted to null (Example: Lat,Lon 0,0 is converted to null)
Internal protobuf‑derived JSON that allows you to process the RAW OpenDroneID frames by your application. The format has additional fields regarding the reception such as technology, channels, timestamp, location, etc.
Key
Type / Value
Description
receiver_data
object
Details about the module that captured the frame (see below).
The fields are: wifi_beacon_info, wifi_nan_info, bluetooth_legacy_info, bluetooth_long_range_info
Field
Wi-Fi Beacon / NAN
BT Legacy / Long-Range
Description
mac
✔
✔
Transmitter MAC base64 encoded.
rssi
✔
✔
Signal level in dBm (signed int).
channel
✔ (Wi-Fi only)
—
Wi-Fi channel (1-165).
frequency
✔ (Wi-Fi)
—
0 = 2.4 GHz, 1 = 5 GHz.
noise_floor
✔ (optional)
✔ (optional)
dBm value if reported.
warning
Bluetooth Legacy, e.g. tech=B4, sends each message type (System, Location...) separately. PACKED messages are not supported over B4. Aggregation may be introduced later. Aggregation was introduced in ScoutOS 2026.05.29.
Bluetooth Legacy messages are aggregated until a valid Location message arrives and then the whole aggregate is sent further as PACKED message. The aggregate is then dumped with every updated
Location message because other fields rarely change.
Note: This behavior can be similar with the other technologies; it depends on the implementation of the transmitter. Generally Wifi Beacon, Wifi NaN and Bluetooth 5 Long range send all of the information in a single pack but it is not guaranteed. We do not know any transmitter that would do so but it is possible. So take into account that not all of the information has to be valid when processing to prevent unnecessary crashes.
TAK offers unsecured and secured communication. Secured communication uses certificates that come in three possible ways
to the Scout client
as separate PEM files (one for CA - the server certificate, one for client certificate, and one for client's private key);
as P12 bundle - this file contains all three mentioned PEM files bundled together;
from enrollment process (will be described later)
note
If your Scout runs in Cloud Mode, you don't need this integration to get drone tracks into TAK - the
Dronetag cloud can stream them to your TAK server for you over the
integration portal. Use that route whenever you don't need the direct
data flow from the Scout itself; the Sensor+ integration described here is what you want when the Scout must
reach the TAK server on its own, without any cloud in the path. See
Using Scout with the Dronetag App
for a video walkthrough of the cloud route.
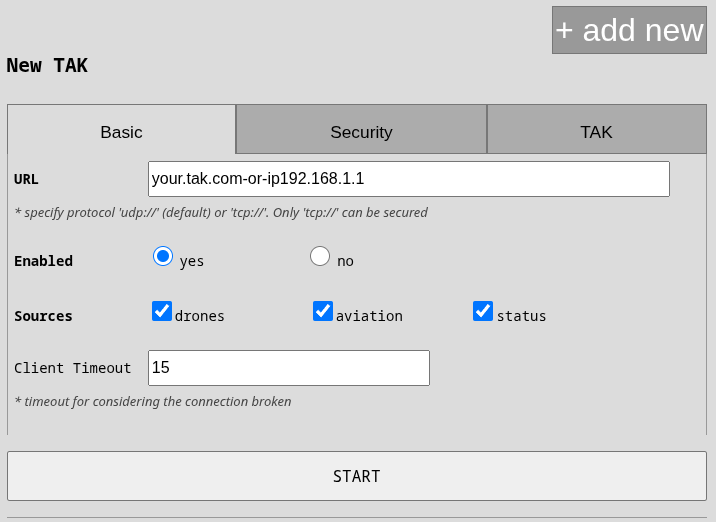
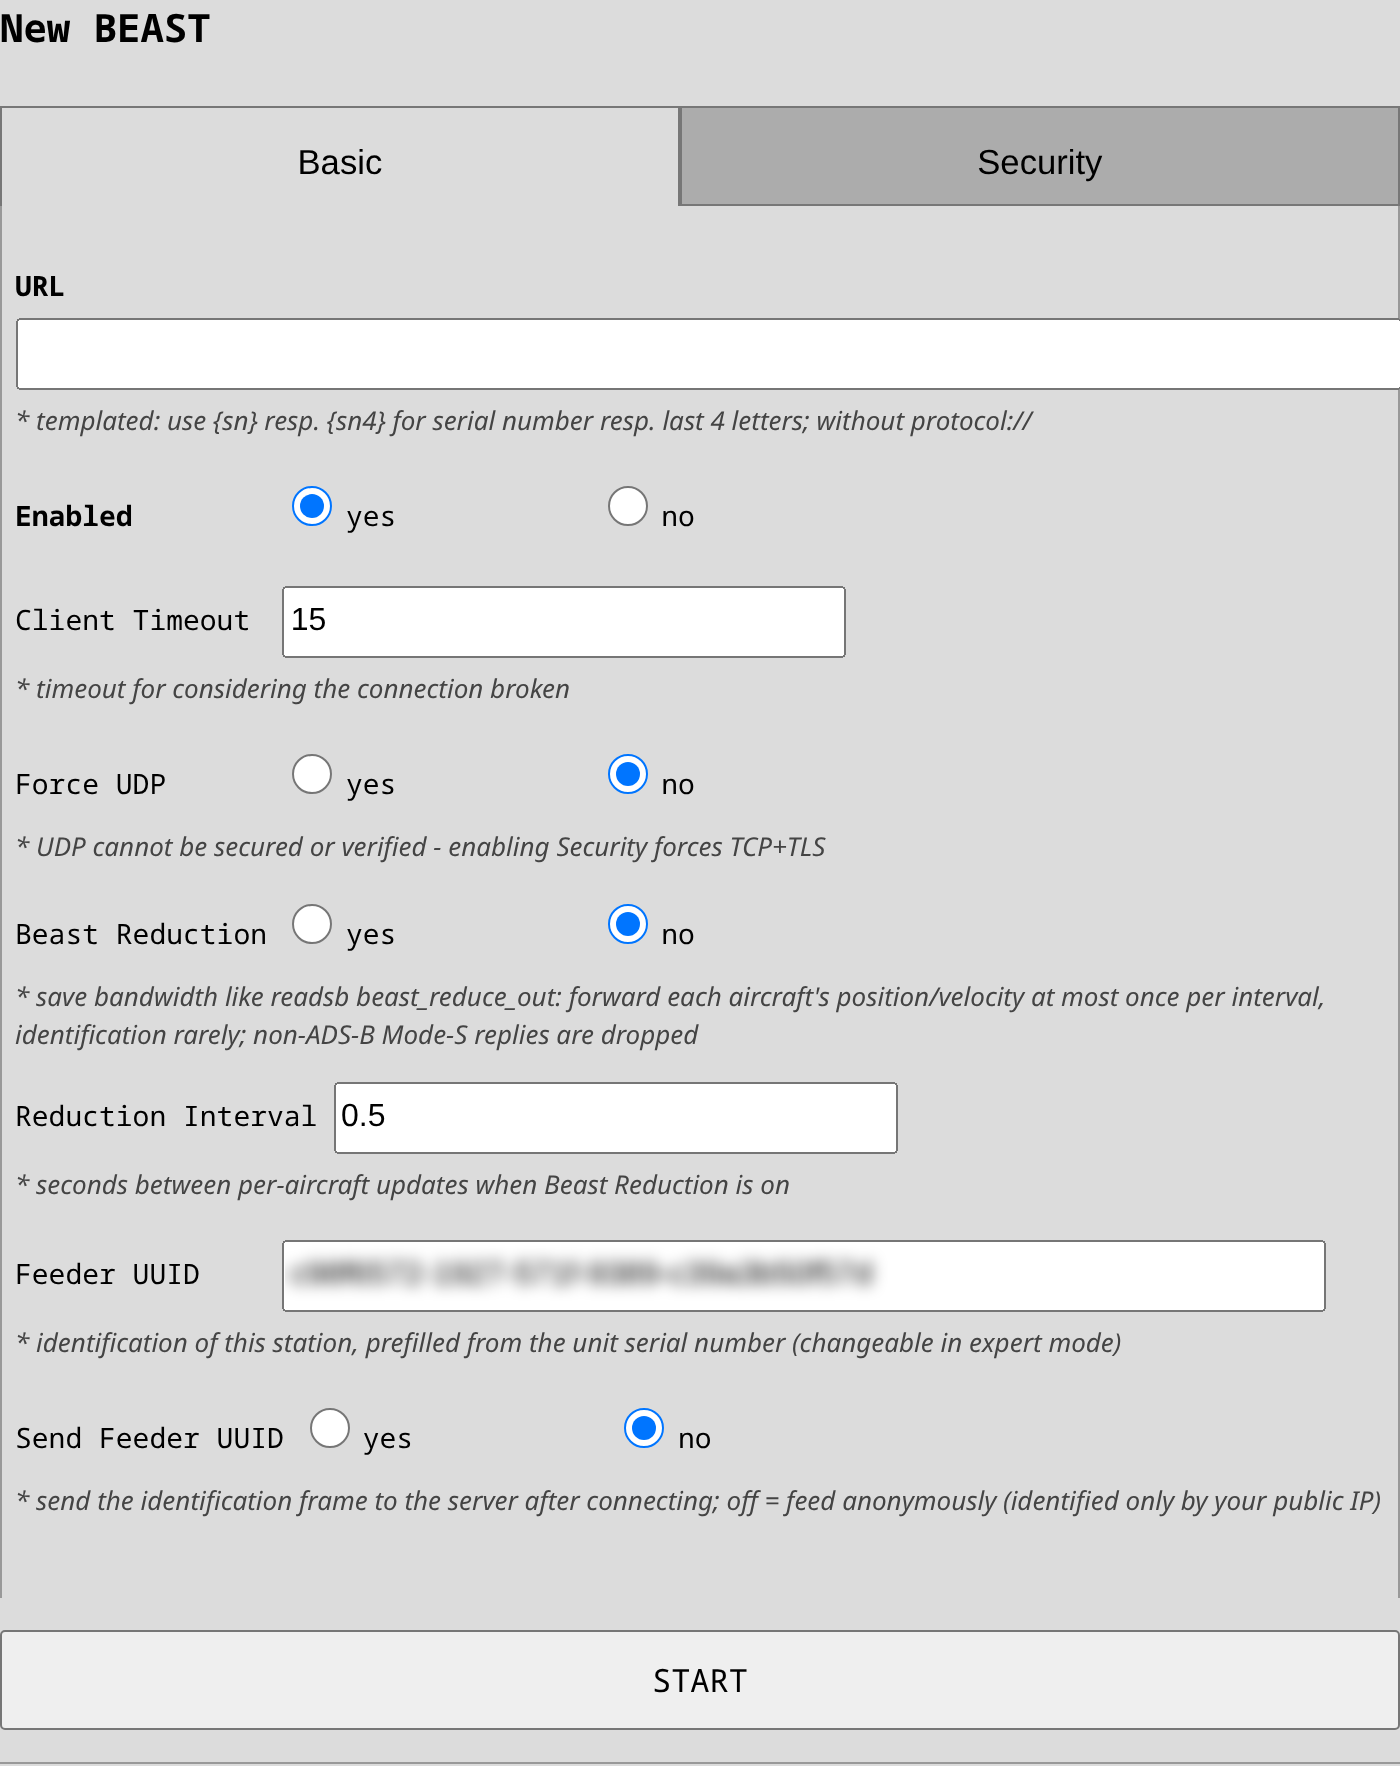
URL: specify host (e.g. tak.example.com) or IP (e.g. 10.1.1.25). If your server uses standard ports (8088 unsecured,
8089 secured) then you don't need to specify the port. If you want to use unsecured UDP version, use "Force UDP" switch.
SOURCES: you should keep drones and status messages. The only meaningful change is (un)checking aviation if
you don't want to see surrounding airplanes in your TAK.
Force UDP: if your server supports only UDP protocol then check this option. UDP cannot be secured nor verified (
connection failure will never be reported).
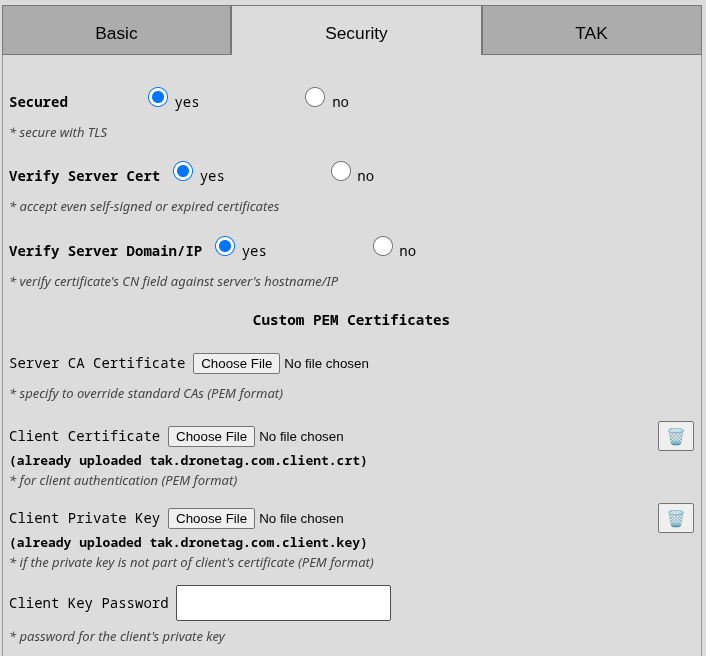
The suggested setup is to have all security features enabled (security, verify server cert, verify server domain).
This will ensure server certificate is enforced and thoroughly checked. If the server certificate doesn't have
its domain/IP correctly filled in, then you can disable the domain/IP check to accept even such certificate and
keep your comms secured. In this case, either your server needs to use globally recognized CA such as Let's Encrypt
or you need to supply your CA's certificate into the first field "Server CA Certificate" in PEM format. There is the
option to use p12 bundle with "P12 Trust Bundled RootCA" that will take CA certificate from the last certificate
from the bundle.
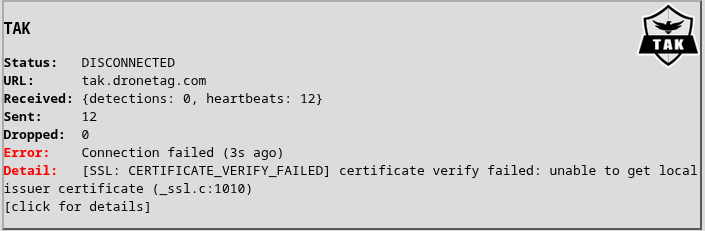
The image on the right shows the error when Scout cannot verify server's certificate. Please note that the CA certificate
must be server's root CA. It cannot be an intermediate CA. You have a few solutions
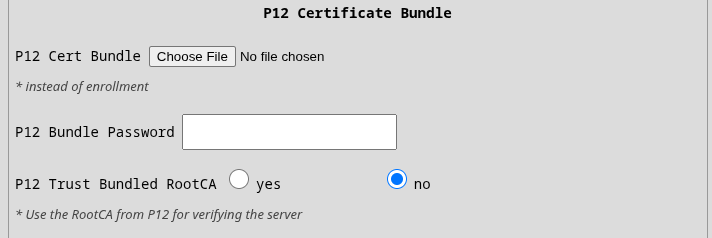
If you are using p12 bundle and the server's certificate has the same RootCA as the certificate in the bundle then
use "P12 Trust Bundled RootCA". This will extract the top-level certificate from the p12 bundle and use it as trusted
certificate for verifying the server.
If you are using p12 bundle (and have "P12 Trust Bundled RootCA" to "No") or not using the p12 at all - in both cases
the "Server CA Certificate" will be used if you have checked "Verify Server Cert". Make sure it is the top-level rootCA.
As a temporary fix, you can uncheck "Verify Server Cert" and "Verify Server Domain/IP" in case of problems and the
client will simply accept any certificate that the server gives you. This is not secure at all of course.
For secured communication from client to server, you must specify "Client Certificate" and "Client Key" either as separate PEM files
or in a P12 bundle. If you upload both PEM and P12, only the P12 will be used. Optionally, PEM Key can be password protected. In this
case use the "Client Key Password" field. Keys in P12 must not be password protected. Usually the bundle itself is protected hence
the field "P12 Bundle Password".
If any of those displayed errors appear, that means your client certificates were rejected by the server or are outright invalid.
If you don't have certificates but you were given username, password and optionally a passphrase then you should
use those in the authentication section together with setting Enroll to "yes". Those credentials are used in standard
enrollment process using Marti API on port 8446. We currently do not support custom certificates for secured communication
during enrollment but it will be part of the next release. If your enrollment server is running at a different port or even
URL, then use the provided Enrollment URL.
Friendlies: here you can define friendly drones one-per-line by their serial number or MAC address in standard colon-delimited format.
You can optionally add callsign under which they will appear on the map. Separate the callsign by a comma.
Example:
Scout is sending a heartbeat every 60s as a friendly ground sensor a-f-G-E-S instead of usual t-x-d-d. This
will place Scout on the map with callsign "SCOUT-<last-4-digits-of-serial-number>" while the uid of those messages is
"<serial-number>-sensor".
Scout by default marks drones as Unknown affiliation. If the drone's serial number or MAC address were specified in the
friendly settings, then they will be marked as Friend. Scout also distinguishes between fixed-wing and rotary drones.
So the possible COT types reaching the server are one of
a-u-A-C-F-q resp. a-f-A-C-F-q for unknown fixed-wing drone resp. friendly one
a-u-A-C-H-q resp. a-f-A-C-H-q for unknown rotary drone resp. friendly one
Drone's callsign is [UA]snxxxx where snxxxx is the last 6 digits of the drone's serial number. If the serial number is
not available then drone's MAC address is used instead (will have ":" inside).
Operator is visually linked to their drone by their callsign [OP]snxxxx that shares the drone's serial number.
Operator is also linked to their drone on COT level by the link_to element.
Operator's COT type is a simple ground unit a-u-G-U resp. a-f-G-U if the operator's drone is defined as friendly.
A single Remote ID detection produces up to two CoT events: the UAV track (from the drone's broadcast
location) and a separate operator marker (from the drone's broadcast system message). The operator event
references the drone via its <link> element, so the two appear connected on the map. Below is a real event
pair emitted by a Scout with serial D19D2405DD799BF9B5 for a rotary drone broadcasting UAS ID
MJJE3G894BIQV0Z:
If your Scout has aviation modules and you enable aviation to be sent to the TAK integration the airplanes will
appear as civilian fixed-wings a-u-A-C-F resp. helicopters a-u-A-C-H. In the UI, you should see their reported
flight number (e.g. EJU39FN). If the flight number is not available then ICAO ID is used (which is a number).
Scout uses strictly version "BSI Flex 335 v2.0". The connection is always over a TCP client and can be optionally
encrypted using SSL as any other TCP connection.
Currently, Scout supports only Registration command. Future releases will support other commands such as start, stop
and changes in detections diameter.
URL: fill in host or IP of your Sapient server. If you are using standard port 8080 then you don't need to
specify it.
Sources: you can select which messages will be forwarded to the server. Please note that drones and aviation
are restricted by a global filter on altitude and radius.
If your Scout has aviation modules and you enable aviation to be sent to Sapient server then
DetectionReport with classification "Air vehicle" -> "Manned fixed wing" or "Manned rotary wing"
will be used together with object_info:
Technology: possible values AL (ADS-L), AB (ADS-B), OG (OGN), UT (UAT), FL (FLARM)
ICAO ID: 24bit number assigned by ICAO to every manned air vehicle
Flight number: string assigned to the current flight of the airplane
Sapient security depends on certificates and there are no user names and passwords. Our client
supports custom server and client certificates.
Upon first connection, Sapient client generates a UUID that is deterministically derived from
Scout's serial number so it doesn't change even with device restart or power loss.
For details about certificates, please take a look at security section.
FlytBase is an enterprise platform for autonomous, docked-drone fleet operations.
Its third-party integrations are called Flinks (FlytBase Links). Through
the Dronetag Flink, detections from your Scout appear in FlytBase as intruders inside pre-defined boundaries,
giving remote operators live airspace awareness during autonomous and BVLOS missions.
First, you need to register your Scout at FlytBase. Navigate to the Flinks library and connect the Dronetag Flink.
Head to the Dronetag Flink and add your Scout. The name is arbitrary; Hardware ID must be your Scout's serial number.
Once the device is added to the Flink, you can display the credentials needed on the Scout side.
In Scout's UI, head to Forwarding and add the FlytBase integration. Copy each credential into the matching
field of the Authentication tab and the URL into the Basic tab.
Upon saving, the integration verifies the credentials and switches to the "AUTHENTICATED" state. If all
credentials and the URL were configured correctly, detections will start appearing in the FlytBase platform.
SafeSky is an airspace awareness network used by general aviation pilots and drone
operators. With this integration, Scout publishes its detections directly into the SafeSky network, so drones
and aircraft detected by your Scout appear as live traffic to all SafeSky users around you.
The integration is preconfigured to work with the production SafeSky environment out of the box -
no API key or URL needs to be entered. Traffic published by the Scout is credited to Dronetag as
the source.
In Scout's UI, head to Forwarding, add the SafeSky integration and press Start.
In Sources, keep drones and (un)check aviation depending on whether you want the surrounding
air traffic received by your Scout to be shared as well.
Expert mode additionally reveals the API Key and URL fields for using your own SafeSky
key or a different environment; the stored key is only ever displayed masked.
Upon saving, the integration verifies the key by reading back the surrounding traffic and switches to the
"AUTHENTICATED" state. Detections should then appear in the SafeSky app within seconds.
A drone detected via RemoteID appears in SafeSky with the UAV beacon type, identified by its serial
number (CTA-2063-A) - or by the RemoteID transmitter address when no serial is broadcast.
The drone's position, altitude, speed, course, vertical rate and airborne/grounded status are
forwarded when available. The call-sign is the drone's SelfID text (reduced to letters and digits,
which is what SafeSky accepts); a drone that broadcasts no SelfID gets the tail of its serial number
instead. The altitude is the drone's geodetic (GPS) altitude converted to metres above mean sea
level with the onboard EGM96 geoid model, exactly as SafeSky expects; the barometric (pressure)
altitude is only a fallback since it drifts with the weather.
If your Scout has aviation modules, detected aircraft are published with their real classification - MOTORPLANE, HELICOPTER, GLIDER,
BALLOON and so on - and the receiving technology (ADS-B, OGN, FLARM) as the transponder type, so
they appear correctly on SafeSky maps instead of being shown as drones. The ICAO address identifies the
aircraft and the flight number is forwarded as the call-sign.
The SafeSky API has no representation for the receiving sensor itself nor for the drone operator, so unlike
TAK or Sapient, this integration sends no Scout heartbeat and no operator position - only the detected
aircraft are shared.
BEAST forwards the raw binary ADS-B stream produced by the Scout's aviation receiver to your own server.
Unlike the other integrations, nothing is decoded or converted on the way - your server receives the exact BEAST
frames coming from the receiver, so you can feed any standard ADS-B consumer such as readsb, dump1090's
--net-ri-port, Virtual Radar Server, or a feeder of an aggregator network.
info
The BEAST integration is only offered on Scouts that have an aviation module installed. If you don't see it in
the catalogue of integrations, your Scout has no aviation module provisioned.
URL: host or IP of your server. If you don't specify a port, the ADS-B standard port 30005 is used.
Force UDP: sends the frames as UDP datagrams instead of a TCP connection. Every datagram carries only whole
BEAST frames. UDP cannot be secured nor verified (connection failure will never be reported).
Beast Reduction: saves bandwidth the way readsb's beast_reduce_out does - each aircraft's position and
velocity are forwarded at most once per interval (0.5 s by default, changeable in expert mode via
Reduction Interval) and identification messages only rarely. Trade-off: because the relay does not fully
decode Mode-S, replies whose aircraft address is not in the clear (non-ADS-B surveillance and Comm-B replies)
are dropped entirely in reduced mode - leave the reduction off if your server should track Mode-S-only targets.
Feeder UUID: identification of this station, prefilled with a UUID deterministically derived from the
unit's serial number (editable in expert mode). It is only transmitted when Send Feeder UUID is enabled -
with the switch off you feed anonymously: data is identified only by your public IP.
Enabling Security forces TCP and wraps the connection in TLS, overriding "Force UDP". Server verification and
client certificates work exactly as described in the TAK security section - use "Server CA Certificate" for a
private CA and "Client Certificate" + "Client Private Key" if your server requires mutual TLS.
The relay is a live feed: when your server is unreachable or too slow, frames are dropped (always whole
frames, so the stream stays decodable) and forwarding resumes automatically once the connection recovers.
Nothing is buffered or replayed. The stream also pauses briefly whenever the receiver restarts, for example
after a GNSS position change.
caution
The global Aviation limits (tracking/ignore radius and altitude on the Sensors page) do not apply
here: the relay forwards the raw, undecoded BEAST stream, which carries no positions to filter on. Every
frame the receiver hears goes to your server regardless of distance or altitude.
This integration feeds ADS-B Exchange with the raw BEAST stream from your
Scout's aviation module - no ADS-B Exchange feeder software is needed on the Scout. It is a preconfigured
variant of the BEAST integration, so everything described in the BEAST tab (live feed, whole-frame delivery,
automatic reconnects) applies here too.
info
Like BEAST, this integration is only offered on Scouts that have an aviation module installed.
URL: prefilled with the ADS-B Exchange ingest server (feed1.adsbexchange.com:30004). It is only
changeable in expert mode and you should not need to touch it unless ADS-B Exchange announces a different
ingest host.
Beast Reduction: works here as well - ADS-B Exchange's own feed client reduces with the same 0.5 s
interval by default, so enabling it is a safe way to save upstream bandwidth (see the BEAST tab for the
Mode-S-only trade-off).
Feeder UUID: identifies your station at ADS-B Exchange and is always transmitted here. It comes
prefilled with a UUID deterministically derived from the unit's serial number, so it stays stable across
reinstalls; it is editable in expert mode. If you clear the field, you are feeding anonymously - the
data is still contributed, but the station is identified only by its public IP address (you can check it at
adsbexchange.com/myip).
Linking the feeder to your ADS-B Exchange account
Link your Scout by its Feeder UUID, not by IP: a Scout on an LTE uplink sits behind carrier-grade NAT,
so its public IP address is shared with other customers and changes over time - IP-based matching (the
/myip/ page) is unreliable there. The UUID travels inside the feed itself and identifies the station
regardless of the network.
Copy the Feeder UUID from the integration settings.
Paste the UUID into the Feed UID field of Link your receiver (optionally enable the
"Device Down" notification) and press LINK RECEIVER.
The receiver appears in Linked receivers and counts as active once it has been connected to their
network within the past 24 hours; an active receiver also grants the account ad-free access to their map.
There is no registration step on the Scout itself - the UUID is the identity. The integration status
also shows the matching Feeder ShortID (ADS-B Exchange's short code derived from the UUID) together
with your personal map link globe.adsbexchange.com/?feed=<ShortID> where you can watch the traffic your
Scout contributes.
The Scout relays the complete ADS-B BEAST stream (positions, identification, velocities including the
receiver timestamps) - like BEAST, unfiltered by the global Aviation limits, which cannot apply to the
raw undecoded stream and also uploads the decoder statistics the same way the official
adsbexchange-stats package does, so your per-UUID stats page and their map coverage work without any
ADS-B Exchange software on the Scout. MLAT is not supported - it requires ADS-B Exchange's own
mlat-client and a different protocol. ADS-B Exchange accepts ADS-B-only feeds without MLAT.
The Open Glider Network (OGN) is a community network of ground receivers
tracking gliders and other light aircraft equipped with OGN-compatible trackers. A Scout with an aviation
module already receives this traffic for its own detections; with this integration enabled, the Scout
additionally relays everything it receives up to the public OGN network (APRS-IS), acting as a regular
OGN receiver station and contributing to the network's coverage in your area.
Aviation module required
This integration is only shown on Scouts equipped with an aviation module - without one there is no OGN
traffic to contribute. No additional license is needed.
Unlike the other integrations, which push data to a server of your choice, OGN is a public network:
everything your Scout relays becomes publicly visible, e.g. on live tracking sites such as
OGN Live. The integration is therefore disabled by default and must be
explicitly enabled per device.
In Scout's UI, head to Forwarding and add the OGN integration.
Callsign: the station name under which your Scout appears in the OGN network (max 9
characters). It defaults to the first 9 characters of your Scout's serial number - only
change it if you want a specific station name (e.g. an airfield ID).
Keep URL at the default aprs.glidernet.org unless you run your own APRS-IS server.
The station position is taken automatically from the Scout's GNSS receiver - there is nothing
to configure.
The relay is transparent: the aviation beacons received by the aviation module are forwarded to the OGN
network verbatim, together with the receiver status and position beacons, so your Scout appears in OGN
as a standard receiver station under your configured callsign. Drone detections (RemoteID) are never
sent to OGN.
The DJI O4 Ground Station can show the drones your
Scout detects. The Scout connects to the station over the DJI Edge SDK (ESDK V2), and the station
forwards the detections to DJI FlightHub 2, where they appear as airspace alerts next to your own
aircraft.
An Edge SDK application registered on the DJI Developer Center.
The next section describes how to create it.
The ground station activated and in Gateway Mode. Activate it over USB-C with the DJI
Enterprise app. Press the power button three times to switch modes - the mode indicator is
purple in Gateway Mode and blue in Relay Mode, which has no cloud connection.
The station joined to a FlightHub 2 project. Airspace alerts live inside a project. A station
that shows "No project joined" ingests the data but draws nothing on the map.
Update the ground station first
The station accepts third-party receivers only from a recent firmware. On an older firmware the
broker is simply not there: nothing listens on port 1883, the station sends no discovery broadcast,
and the Scout reports that it found no ground station. Update the station in the DJI Enterprise app
before you start, and give it a moment to restart afterwards.
note
The ground station is the MQTT broker, not a client. The Scout connects to the station, so
neither the Dronetag cloud nor the DJI cloud sits in this path. Detections travel from the Scout to
the station on your own network, and only the station talks to FlightHub 2.
The Scout identifies itself to the ground station with the credentials of an Edge SDK application.
Create the application once on the DJI Developer Center. One
application can serve more than one Scout.
Open Developer Center -> Apps and press CREATE APP. Set App Type to Edge SDK
first. The form then drops Software Platform and Package Name, which only a Mobile SDK
application needs, and asks for three values:
App Name: your own name for the application. It does not affect the connection.
Category: the closest match from the list. Remote ID describes this use.
Description: free text.
caution
App Type must be Edge SDK. A Cloud API or Mobile SDK application issues a different kind of
credential, and the ground station rejects it.
DJI then sends an activation e-mail. Confirm it before you go on, because the license stays empty
until you do.
Open the application again to read its credentials. The App Information page holds the three
values that the Scout needs:
APP ID - a short number.
App Key - a hexadecimal string.
App Basic License - a long block of base64 text. Copy all of it, up to the final ==.
Keep this page open. You paste the three values into the Scout form in the next section but one.
warning
The App Key and the App Basic License are secrets, and this page is the only place that
shows them. Anyone who holds them can act as your application. Do not paste them into a support
ticket, and hide them in any screenshot you share. The two values are masked in the image above for
that reason.
Put the Scout on the same network as the ground station. Connect the station with its WAN port
(the left network port), which is the port that also carries its connection to FlightHub 2, and give
the Scout an address on that same network.
You do not need to look the station up. It announces itself on the network about every ten seconds,
and the Scout listens for that announcement, so the broker address stays empty in the form. The
Scout remembers the last address it heard, so it still reconnects after a restart while the station
is switched off.
note
The station's LAN port is not used for this. It serves the station's own downstream equipment, and a
Scout connected there sits on a separate network from the rest of your fleet.
The Scout listens for the station's broadcast, so it knows when a ground station is on the network.
When it finds one that is not configured yet, the Forwarding page offers it:
Until a station answers, the integration stays greyed out in the list of integrations, with the
reason shown:
Press Configure, or add the integration by hand. The form has two tabs. The Basic tab holds
the connection and what to send:
Ground Station Broker: leave it empty. The Scout then follows the station's announcement and
keeps working when the router gives the station a different address. Fill it in only to pin one
address, as host:1883, when the announcement cannot reach the Scout.
Sources: drones sends the Remote ID detections, aviation sends the surrounding air traffic
from the aviation modules, and status supplies the Scout's own position. Keep status - FlightHub
centres the alert circle on it. The aviation option only appears on a Scout with an aviation module.
The Edge SDK Credentials tab holds what identifies this Scout to the station:
App ID, App Key, App License: copy them from the App Information page of your Edge SDK
application. The key and the license are stored masked and never shown again.
Device ID: your own name for this Scout. Leave it empty to use the Scout's serial number. It
becomes part of the identity the station authenticates, together with the App ID.
Press Start. The Scout declares what it can deliver and waits for the station to accept it. The
tile switches to "AUTHENTICATED" once the station answers. A refusal is shown on the tile with the
reason the station gave.
Open your FlightHub 2 project and go to Airspace Safety -> Airspace Alert. Turn on
DJI O4 Ground Station, then choose which Detection Types to show and set the
Alert Distance Threshold:
FlightHub draws a circle and shows every target inside it. The centre is the Scout's own position
(the status source), and the radius is the alert distance threshold. A detection outside the
threshold, either horizontally or vertically, is not drawn.
You can confirm the link on the Device Maintenance page, where the Scout appears under the ground
station as an Airspace Alert Receiver:
The Scout collects the detections and reports them every two seconds, as DJI requires. Drones and
aviation travel on separate reports, each on its own two-second cycle. A drone heard several times
inside one cycle is reported once, with its newest position.
Each drone is reported with its Remote ID serial number, its position, its geodetic and barometric
altitude, its height above the take-off point, its course, its horizontal and vertical speed, its
flight status and the signal strength the Scout measured. The operator position is included when the
drone broadcasts it. FlightHub shows the serial number as "Flight Information".
With aviation enabled, aircraft received by the aviation modules are reported with their ICAO
address, call sign, altitude, position, ground speed, heading and vertical rate.
note
Every DJI drone already carries AirSense, which receives manned ADS-B traffic on its own. The
aviation feed is therefore optional, and it is switched off by default. Remote ID is the part
AirSense cannot deliver.
The integration stays greyed out. No ground station answered. Check that the Scout and the
station are on the same network, that the station is activated and in Gateway Mode, and that its
firmware is up to date. A switch that does not forward broadcasts also hides the station - in that
case fill the station's address into Ground Station Broker by hand.
The tile shows a refusal. The station rejects a report it cannot read and names the field it
objected to. The reason is shown on the tile.
FlightHub shows nothing although the tile says AUTHENTICATED. The data reaches the station but
has nowhere to be drawn. Confirm in this order:
The station is joined to a FlightHub 2 project.
DJI O4 Ground Station is enabled under Airspace Safety -> Airspace Alert.
The Detection Type includes the kind of aircraft you expect to see.
The Alert Distance Threshold is large enough, vertically as well as horizontally.
Skydio DFR Command is a Drone as First Responder platform. With this integration,
Scout pushes its detections into Skydio Cloud as Markers, so drones and aircraft detected by your Scout appear
live on the map view of Remote Flight Deck - the same way Skydio displays Axon Dedrone or gunshot-detection
feeds.
Ask Skydio to enable UAS detection markers
Rich drone markers use Skydio's UAS detection marker type, which carries the drone's position, the pilot
position and the manufacturer/model fields. That marker type is a Skydio feature that must be enabled for
your organization by Skydio - contact Skydio support to turn it on. Until it is enabled, Scout automatically
falls back to plain incident markers (the detection still appears on the map, with the details in the
marker description), and the integration tile shows a note that UAS detection is not enabled.
The integration authenticates with a Skydio Cloud API token. There are two ways to get one. The
integration panel is the quicker way, and it sets the permissions for you. Create the token by hand
only if your Skydio Cloud does not list the integration yet.
Predefined integration
Creating the token by hand
Skydio Cloud ships a ready-made Dronetag Scout integration. It fills in the name, the group and
the permissions, so you only confirm it.
Open Skydio Cloud and select Integrations in the left menu. Only
users with the Organization Admin cloud role can add an integration.
Stay on the Available tab and find the Dronetag Scout card, built by Dronetag. The cards
are in alphabetical order, so it sits between DroneSense Live Streaming and Enforsys:
Select the card. The panel opens with Integration Name and Group Access already filled
in:
Keep Group Access at your entire organization, unless you restrict Skydio access by group.
Expand Permissions Summary to see what the token will carry. The panel requests the API
scopes Read Markers, Write Markers, Read Whoami and Read OpenAPI Spec, and no webhooks.
These are the same rights as the manual token in the other tab, so you do not set them yourself.
Select Configure. Skydio creates the integration and issues its API token. Copy the token
into the Scout, as Configuration below describes.
The integration then moves to the Configured tab. Open it there at any time to read its
Token ID, to change the group access, or to remove the integration again.
Use this route if your Skydio Cloud has no Dronetag Scout card. Follow the steps from Skydio's
API Authentication guide:
Open Skydio Cloud and sign in. Note that only users with the
Organization Admin cloud role can create API tokens.
Go to Settings, then API Tokens under the Developer section, and select Generate Token.
Give the token a Token Name (e.g. Dronetag Scout). Leave Groups at its default of your entire
organization unless you restrict Skydio access by group.
Under Permissions, set Markers to Read and write (this integration creates, moves and deletes
markers) and Whoami to Read-only so the token can identify itself. Leave every other permission at
No access.
Select Generate, then copy your token and store it in a safe place. Skydio hides it permanently after
the page refreshes or your login session expires. Keep it secret - it grants access to your organization's
data in Skydio Cloud - and per Skydio's guidance, do not reuse the same token for multiple integrations.
In Scout's UI, head to Forwarding and add the Skydio integration.
Paste the token into the API Token Secret field (Skydio Cloud shows the value under this name).
Keep URL at the default api.skydio.com/api unless Skydio gave you a different environment (e.g. a
trial/staging instance).
Drone detections are pushed by default; for most deployments there is nothing more to set. The options
below are advanced and appear only in expert mode:
In Sources, check aviation if surrounding air traffic should be pushed as well, and check
status if you want to use "Marker for this Scout".
Marker for this Scout (off by default): when enabled together with the status source, the Scout
itself appears on the DFR map as a marker named "SCOUT-<last-4-digits-of-serial-number>" at its
GNSS position.
Upon saving, the integration verifies the token with Skydio, shows the organization it is connected to, and
switches to the "AUTHENTICATED" state. It then re-checks once a minute, so a later problem - a revoked token
or a dropped connection - surfaces within a minute even when no detections are flowing. If the token is
rejected, re-check that it was copied whole and that it carries the Markers permission.
Skydio Markers are persistent objects. Scout creates one marker per detected object and moves it in place as
new detections arrive (at most ~5x per second per object, so a spoofed track cannot flood your Skydio Cloud).
A drone seen on a later day gets its own marker, so past days are kept rather than overwritten. Scout does not
delete markers - they remain on the map and are re-used the next time the same object is seen.
Each drone is pushed as a UAS detection marker titled <type> (Drone) - <serial>, e.g.
Multirotor (Drone) - 1596F319B877381F1BBF. The marker carries the drone's position, altitude, speed and
heading, the RF protocol it was detected on (Bluetooth 4/5, Wi-Fi Beacon/NaN), and the serial number. When
the drone broadcasts its operator's location, the pilot position is included on the same marker - Skydio
shows it as part of the UAS detection, there is no separate operator marker.
If your Scout carries the RID identification database, the manufacturer and model resolved from the serial
number (e.g. "Autel Robotics EVO Nano+") are filled into the marker as well.
With "Marker for this Scout" enabled, a single incident marker keyed to the Scout's serial number shows the
sensor's own location, altitude and the list of its detection technologies on the DFR map.
GNSS Position of the Scout
The Dronetag Scout is equipped with a GNSS receiver that enables:
Visibility on the map within our application
Time synchronization using the GNSS signal
Transmission of position data to the server via the network
All Scouts are delivered with GNSS location enabled by default. However, you can disable GNSS location or enter the location coordinates manually.
Turning off GNSS will prevent leaking Scout's location over the network. It will not be visible in Heartbeat/Status messages nor in data. Disabling
GNSS will not affect Scout's ability to correct its time using the embedded GNSS module.
Navigate to the GNSS Section
Go to the System tab and scroll down to the GNSS section. The GNSS position toggle controls sending the positioning information over the network.
Enter Coordinates
Fill in the desired latitude and longitude coordinates into the GNSS position field. If empty, the receiver is using the internal GNSS Unit to determine its current position.
Enter Altitude(optional)
Fill in the desired altitude in meters into the GNSS altitude field. If empty, the altitude measured by the internal GNSS Unit is used.
Save Your Changes
Click the Update GNSS button to save the manual location.
To enhance your Scout's security, it is highly recommended to change the default login credentials.
Access the Management Interface
Navigate to the Scout’s management UI and go to the System tab.
Authenticate with Current Password
You will need to enter the current password to authorize changes.
The unit itself has a label with the default password on the bottom of the device's body, in case the packaging is lost.
If necessary, you can perform the reset to factory defaults, which resets the password as well.
Set a New Password
Enter your new password twice to prevent typographical errors.
Save the Changes
Click the Update Password button to apply the new credentials.
caution
Don't forget to store your new username and password securely. If you perform a factory reset, the login credentials will revert to the default values.
To avoid browser security warnings and enable a trusted HTTPS connection, you can configure the Scout with a certificate trusted by your system. You can manage certificates directly from the Configuration section of the Scout’s web interface. It provides the following options:
Add Certificate (CA Upload):
Upload a Certificate Authority (CA) certificate that will be added to the Scout’s internal trust store.
This is useful if your organization uses a private CA and you'd like to trust client certificates issued by it.
Upload HTTPS Certificate and Private Key:
Use this to replace the default self-signed certificate with a certificate signed by your CA.
This will allow the Scout’s interface to be accessed via HTTPS without browser warnings, assuming the certificate is trusted by your local system.
If the uploaded HTTPS certificate becomes invalid or expires, the Scout will automatically regenerate a self-signed certificate.
This ensures that the device remains accessible via HTTPS, even if the trusted certificate can no longer be used.
tip
Using trusted certificates is especially helpful when integrating the Scout into enterprise networks or accessing it from managed devices with strict security policies.
The Scout periodically sends a status message (heartbeat) describing its overall health: the number and state of its sensor modules, the time of the last detection, GNSS availability and position, and LTE modem state and signal quality.
The same status message feeds every connected service that subscribes to the status message source:
Dronetag Cloud — keeps the sensor shown as online in the Drone Scanner app and the Dronetag Cloud.
Advanced integrations that support status, such as TAK (the marker of the Scout itself), Sapient (sensor status reports), or Skydio (Marker for this Scout). See the Sensor+ configuration page for details on each integration.
You can adjust the reporting behavior in the System tab under Status Reporting:
Fast reporting after start(enabled by default): right after start-up (or after a configuration change), status is first sent every 10 seconds and the rate gradually slows down until it reaches the interval below. This makes the Scout appear online promptly after installation or reboot while keeping the steady-state traffic low.
Send every(default 60 s): the steady-state interval between status messages.
When Fast reporting after start is disabled, the configured interval is used from the very first message.
tip
Keep the defaults unless you have a specific need. A shorter interval makes status changes (e.g. a sensor failure) visible sooner in all connected systems, at the cost of more traffic on a possibly metered LTE uplink. A longer interval saves data, but connected systems may consider the Scout offline if they expect more frequent status updates.
These services are not available on Scout EVK models.
Both of the following services operate only when the Scout is connected to our servers that handle these functions. They communicate securely via standard HTTPS connections, using asymmetric cryptography to ensure privacy and security. These services are accessible only by our team.
This service automatically updates the Scout whenever a new firmware release is available. It helps you to stay up to date with the latest features, improvements, and security patches we develop.
For more details about the automatic updates and how to perform manual firmware updates when the Dronetag Update service is off or no internet connection is available, please refer to the Firmware Update page.
This service enables our support team to remotely connect to your Scout to help diagnose and resolve any issues you encounter. If users experience difficulty accessing the Scout's Ethernet port, remote troubleshooting via the 4G network connection can be utilized.
Both services can be enabled or disabled according to your preference. We recommend disabling the Remote Troubleshooting Service once the Scout has been installed, since most of the troubleshooting requests come during the Scout installation period.
warning
Currently, these services are available on all Dronetag Scout devices, but in the future, they will only be included in the Scout Sensor+ package and in the Cloud Mode, due to infrastructure costs associated with maintaining these connections.
The Scout can send statistics to Dronetag. These are system statistics and reception-quality metrics — mainly signal sensitivities and background noise — together with the system's internal health indicators. They are indispensable for debugging poor reception performance.
Statistics contain no drone positions and not the sensor's own position, and no passwords or textual settings are transmitted.
Send diagnostics to Dronetag is opt-in error tracking. When one of the services experiences an issue or error, the relevant information is sent to Dronetag to help diagnose it. A report includes the error details, partial logs, and this device's serial number.
warning
Unlike Statistics, diagnostics reports include partial logs that may contain sensitive information, such as the position of the sensor or of detected drones. Outgoing traffic is strictly rate-limited so metered connections are not drained.
To restore your Scout device to its original factory settings, follow the instructions below.
This procedure will erase all local configuration, including network settings, APN, data privacy preferences, the password credentials (if updated), and custom changes.
ℹ️ Cloud registration is not erased — your Scout will remain linked to your Dronetag Cloud account.
This factory reset procedure does not apply to the Scout EVK model.
License
Dronetag Scout devices require valid licensing to ensure compliance with software usage terms and to unlock specific features. Licensing helps us provide ongoing updates, support, and new functionalities while ensuring proper usage across different deployment modes.
Scout EVK: A license is always required to operate the device.
Scout Sensor Mode: No license is required for basic Sensor Mode.
Scout Sensor+ Mode: A license is required for Sensor+ mode, which provides additional features.
Scout Cloud Mode: Requires a software license managed by our servers, not by the Scout device itself. This license is automatically handled and renewed on our side.
Licenses for current Scout units are provisioned and renewed remotely by Dronetag — there is no License tab on the management page and no license file to upload. If your license is active on your account, cloud features work; you can verify by checking that your Scout appears in the Dronetag App. To purchase or renew, contact support@dronetag.com with your serial number. The steps below apply to older units (Scout EVK) that still manage the license locally.
Access the Scout’s Management Page.
For detailed instructions on accessing the Management Interface, please refer to the Connecting to the Scout page.
Navigate to the License tab to view license details, including the expiration date.
tip
Licenses for Scouts operated in Cloud Mode are automatically managed by our servers and typically do not require manual renewal.
If you have any questions or need assistance with licensing, please contact support@dronetag.com.
⬆️ Firmware Update
You can monitor the current firmware version of your Scout in the Management UI. For details on accessing the Management Interface, please refer to the Connecting to the Scout page.
Keeping your Scout's firmware up to date is essential to ensure your device runs smoothly and securely. Firmware updates often include important security patches, bug fixes, and new features that enhance performance and functionality.
Checking your firmware version regularly helps you stay informed about your device’s status. In the near future, this page will also include a detailed changelog documenting the latest features and improvements.
warning
We strongly encourage you to keep your Scout updated to prevent vulnerabilities and enjoy the full benefits of the latest enhancements.
Automatic updates are driven by the Dronetag Update service on the System tab, and you can control when the Scout checks for and applies them:
Continuous (default) — with the Dronetag Update toggle on, the Scout checks for new firmware regularly and installs updates as soon as they are released.
Scheduled — turn on Dronetag Update Schedule to restrict update checks to specific days of the week and a time of day. Continuous checking is turned off and the Scout only checks — and installs, if an update is available — at the times you choose. This is useful for keeping updates, and the reboot they trigger, inside a maintenance window.
The Dronetag Update service stays enabled while a schedule is active — the update service must keep running to perform the scheduled checks. Leaving no weekday selected means the check runs every day at the chosen time.
Time zone
You pick the day and time in your web browser's local time. When you save, the Scout converts it to its own clock, which runs on UTC (the Scout has no geographic time zone; its clock is kept accurate over the network). So the same schedule fires at the same real-world moment no matter where you set it from. Note that if your region observes daylight-saving time, a schedule set once keeps its fixed UTC moment and will therefore appear to shift by an hour across a DST change — re-save it if you want to realign it.
note
Applying an update reboots the Scout, so pick a scheduled time when a brief reboot is acceptable. See Automatic Reboot After the Update.
Manual firmware updates are performed from the Firmware Update page of the Management UI:
Access the Management Page for your device.
Navigate to the firmware update page at http://<Scout-IP>/update (replace <Scout-IP> with your device’s IP).
The page offers two ways of updating:
🗘 Check Online — the Scout checks Dronetag servers for newer firmware and downloads and installs it on request. The Scout needs internet access for this.
Offline update — you upload a firmware bundle (a .local file provided by us) from your computer. This works even when the Scout itself has no internet access.
Click the 🗘 Check Online button. The page shows the Installed and the Latest available firmware versions.
If a newer firmware is available, an Update available badge appears and the button changes to ⬇ Download Update. Click it to download the update — a progress bar tracks the download.
When the download finishes, the button changes to ▶ Apply Update. Click it to install the update. The installation log is streamed to the page.
When the installation finishes, the device reboots automatically.
Windows removes the .local extension from downloaded files!
When you download an update bundle on Windows, the file is often saved without the .local extension — you end up with e.g. ScoutOS-2026.07.13.mender instead of ScoutOS-2026.07.13.mender.local.
Rename the file and add the .local extension back before uploading it, otherwise the Scout cannot process the uploaded bundle.
Download the update bundle (.local file) — the packages and the changelog can be found on the Firmware Changelog page.
In the Offline update row, click Choose File and select the downloaded .local file. The upload starts immediately after the file is selected.
The upload progress and the installation log are streamed to the page.
When the installation finishes, the device reboots automatically.
Offline update: uploading a .local firmware bundle, installation, and automatic reboot
Once the new firmware is installed (via either method), the Scout reboots automatically. The page dims and shows “Rebooting device…” while it waits for the device to come back online. You don’t need to do anything — the page detects the device again by itself.
When the device is back online, the page shows “Update installed — verifying system”. The Scout then verifies the new firmware for several minutes and finalizes the update.
warning
Keep the Scout powered during the entire update, and do not turn it off for at least 5 minutes after the reboot while the new firmware is being verified.
Waiting for rebootReboot finished — system verification
For Scout EVK, firmware updates are applied automatically:
Connect the Scout EVK to a network with internet access.
Keep the device powered on for at least 1 hour.
The management software will automatically download and install the latest firmware.
warning
We strongly recommend upgrading to the latest Scout hardware and firmware for improved security and features.
For specific details on upgrading your Scout EVK to the latest version, please refer to the Scout EVK Upgrade page.
If you have any questions or run into issues during the update process, please contact our support team at support@dronetag.com.
Firmware Changelog
Following is a detailed list of changes to the Dronetag Scout firmware.
Please note that the changelog is very technical and can be hard to understand for non-technical users. You can use this changelog to check if a specific issue you are experiencing has been fixed in a newer firmware version, or to see what new small features are available.
If you find this information confusing, we recommend you check our What's new page instead, where we try to introduce the most important changes and features to all of our products.
Using Scout with the Dronetag App
caution
Using Scout with Dronetag App is only possible when Scout is used in Cloud Mode.
This guide walks you through using your Dronetag Scout device with the Dronetag app.
The application requires version v2.126.1 or higher.
The Dronetag App is available on multiple platforms, offering a seamless experience whether you use it on the web or on your mobile or tablet device. While the web version might be the most comfortable for some tasks, all features are fully accessible on mobile and tablets as well.
Click the Register new button in the top-right corner.
Enter your Scout’s serial number.
tip
Some Scout kits come pre-registered to preconfigured accounts. If that’s your case, you have already received your log-in name and password from us. You may skip this step.
To verify if your device is already registered, head to the My Devices page and check if your Scout appears on the list.
Before you start using the app, take a moment to review your data visibility settings.
Go to your profile page and click on Cloud Data Visibility. This setting determines whether your drone data is visible to the public or kept private.
caution
This setting affects all devices associated with your account. If a device is moved to a different account, it will follow that account’s visibility settings.
From the app’s main map screen, you can see all drone traffic accessible to your account — including your own Scout and public drones from other users.
Click on icons in the map to view detailed information such as drone position, altitude, and speed.
This opens a list of all detections available to you.
Use the dropdown menu at the top to select a specific device (if you have more than one). Then choose the desired date — by default, it shows the current day.
note
We're improving this section with advanced filtering, sorting, and search tools to make it easier to navigate your detection history.
Go to File → Open local KML file and select your exported file.
Streaming Scout Data to a TAK Server (Cloud Mode)
In Cloud Mode your Scout's detections are not limited to the Dronetag App - the Dronetag cloud can also forward
them to your own TAK server as Cursor-on-Target tracks, without any extra hardware or firmware on your side.
The setup is done in the integration portal and is described in
Setting up TAK Server integration.
A three-minute walkthrough by Tactical Tech Lab showing Dronetag Remote ID
data appearing live on a TAK server through this cloud integration.
tip
If you need the Scout to reach your TAK server directly, without the cloud in the path, use the Sensor+ TAK
integration instead - see Sensor+ configuration.
The Dronetag App is fully cross-platform — meaning you can access all features from your mobile device just as you would on the web.
Our app is available for both iOS and Android, allowing you to use it on your smartphone or tablet. You can download it from the App Store or Google Play.
All web app features — including device registration, real-time tracking, and detection history — are also available in the mobile app.
LED Indications
important
Please note the LED on the bottom is only available on models manufactured after April 2026. The LED can be found on the bottom of the device, as shown in the picture below.
The LED on the bottom of the device provides immediate, high-level feedback during installation and maintenance. It is designed to save you trips between the rooftop and your laptop by confirming power, network connectivity, and configuration validity at a glance.
Solid yellow indicates that the unit is powered and software services are starting. The device is not ready for operation yet. Please wait for the initialization process to complete, which typically takes a few moments after power-up.
Fast blinking yellow means that although the configuration is valid, the unit cannot reach the LTE network or the data endpoint. Please check the following:
APN settings: Verify they match your carrier's requirements.
SIM card: Ensure it has an active data plan and the PIN request is disabled.
Physical connection: Check the Ethernet cable or ensure your firewall isn't blocking communication with the endpoint.
Slow blinking red indicates that the configuration is incomplete or invalid. The device cannot start its services because some parameters are missing or wrong (e.g., incorrect mode, missing data endpoint, or missing SIM card). Please log in to the web UI and fix the configuration.
Solid red signals a severe internal fault or hardware failure. This may be caused by a hardware issue or a system watchdog loop. Try to power cycle the unit. If the LED remains solid red after the restart, please contact support.
Slow blinking white means everything is working as expected. The configuration is valid, the device is connected to the network (LTE or Ethernet), the endpoint is reachable, and the unit is actively scanning and forwarding data.
Fast blinking blue indicates that the device is currently detecting nearby aircraft (drones or low-altitude manned aviation) based on your configured thresholds. This is a real-time activity indicator useful for verifying test flights or local traffic.
Fast blinking magenta indicates a critical system process, such as a firmware update or disk encryption. The device will reboot automatically once the process is complete.
WARNING: Do not disconnect the power during this time to avoid system corruption.
🛑 Troubleshooting
This page contains detailed troubleshooting information to help you identify and resolve the most common issues encountered while using the Dronetag Scout. Whether you’re facing connectivity problems, detection range limitations, or firmware concerns, the guidance below is designed to walk you through practical steps toward a solution.
Before contacting our support team, please ensure that your device is running the latest firmware version, as many issues are resolved through regular updates. You can follow our Firmware Update Guide for instructions on how to check and update your Scout.
We also encourage you to review the most common problems first, where we’ve listed known scenarios and their proven solutions. If you're still experiencing trouble after reviewing those, please proceed to the section on how to report a problem to our support team, where you’ll find a checklist of the information we need to assist you efficiently.
If you notice an issue not covered here, don’t hesitate to contact us at support@dronetag.com. Your feedback helps us improve and expand our documentation to serve you better.
To report a problem, send an email to our support team at support@dronetag.com.
Use the subject line: “Problem Report – [Insert Your Product Name]” to help us identify your request promptly.
Double-check that all the information and attachments are included. Then send it to support@dronetag.com.
Our support team will get back to you as soon as possible.
Some switches or routers may experience auto-negotiation issues with the Scout. To resolve this, manually set the Ethernet port configuration in your switch or router's management interface to:
Speed: 100 Mbps
Duplex: Full duplex
This setting can often be found under port settings or advanced configuration in your network equipment's UI.
If you've made changes to the network configuration and can no longer access the device:
Perform a factory reset to restore default settings.
After resetting, the Scout will attempt to obtain an IP address via DHCP and fall back to its static IP (192.168.100.100) if no DHCP server is available.
Registration fails with "Device is already registered"
This error has two common causes:
The Scout has no active Cloud license. Scouts delivered without a Cloud license run in Sensor Mode (raw data output for integration into your own system) and are intentionally not registrable in the Dronetag App — this error is the expected behavior for them. To use the Dronetag App, a Cloud license is required; contact support@dronetag.com with your serial number to purchase or renew one. A Cloud license can be added at any time after purchase, without extra hardware.
The Scout is registered to another account. Only one account can register a given Scout. Remove it from the original account first (Dronetag App > Profile > My Devices > Remove from account), then register it on the new account. Alternatively, keep the current registration and share detection data with other users. If you don't know which account owns the device, contact support with the serial number.
A licensed Scout that suddenly disappears from your device list usually means the Cloud license expired — contact support to renew it.
Antenna performance can be affected by the surrounding environment: buildings, natural obstacles, nearby Wi-Fi/Bluetooth transmitters, or shielding (e.g. human body).
Ensure that:
Scout is not close to strong signal sources (Wi-Fi hotspots, towers, Bluetooth devices, etc.).
Antennas do not touch any object or surface.
Scout is not shielded or placed within 40 cm of another antenna.
Drones are in line of sight.
Minimal radio interference from nearby devices.
Omnidirectional antennas are mounted vertically.
Directional antennas are aimed 5°–10° above the horizon.
Scout antennas are connected correctly:
Front view: Longer antenna → left, shorter antenna → right
Antennas are tight and water-insulated.
Possible solution:
Move the Scout to an open area with better visibility and fewer transmitters.
Contact support with:
Photos of the Scout (360° view from its location)
Email the Scout is registered to
Scout serial number
Description of the issue and steps to replicate it
All the settings, especially the network ones, are correct
Possible solution:
Double-check all physical connections.
Review Scout's configuration settings.
Contact support with required documentation and photos.
Scout is not connecting to the local switch/router
We have a dedicated in-depth troubleshooting section for networking here
Rattling sound inside the Scout / LTE stopped working after transport
The LTE modem's USB cable can come loose from its connector during shipping or handling. Open the enclosure (see the SIM insertion guide for how to open it safely) and reconnect the USB cable to the free connector between the Ethernet port and the other USB cable (the middle, bottom one). The USB cable can be safely disconnected and reconnected during handling.
Management page shows "drireader.error: No DRI devices found"
Check the age of the error shown in the red box. A large value (thousands of seconds) means it is an old, queued message that will clear itself — no action needed if detections work. If detections have genuinely stopped, open System on the management page, check how many modules are listed, use Obtain diagnostic logs, and send the logs to support.
Dronetag products are warranted to be defect-free in material and workmanship one year after the purchase. For the duration of the warranty period, Dronetag, at its sole option, will repair or replace any product which fails in normal use. Such repairs or replacement will be made at no charge to the customer for parts or labour, provided that the customer shall be responsible for any transportation cost.
Warranty does not apply to cosmetic damage, consumable parts, damage caused by accident, abuse, misuse, water, fire or flood, damage caused by unauthorized servicing, or product that has been modified or altered.
We kindly advise that our company cannot assume responsibility for the installation of our product by the user or any potential loss incurred as a result. While we strive to provide comprehensive guidance and support, the responsibility for proper installation lies with the user. Should you require any further assistance or clarification, please do not hesitate to contact our customer support team. Your understanding is greatly appreciated.
Warranty repair service shall be provided directly by Dronetag. Proof of purchase for the product from Dronetag or an authorized reseller is required to obtain and better expedite warranty service. The customer is responsible for transportation costs involved in getting the unit to the Dronetag facility. It is recommended to use a shipping method with tracking and insurance.
Please email us at support@dronetag.com with a description of the problem you are experiencing. Also, please provide the model, serial number (if applicable), shipping address and a daytime contact number. You will be promptly contacted with further troubleshooting steps or return instructions.
The Product has not been subjected to misuse, neglect or unusual physical, electrical or electromagnetic stress, or some other type of accident.
No modification, alteration or addition has been made to the Product by persons other than Dronetag s.r.o. or Dronetag s.r.o.'s authorized representatives or otherwise approved by Dronetag s.r.o.
The Product has been properly installed and used at all times in accordance, and in all material respects, with the applicable Product documentation.
The Product's lightning protection, surge protection and ESD has followed local rules and Dronetag's instructions.
Dronetag s.r.o. does not warrant that the operation of the products is error-free or that operation will be uninterrupted. In no event shall Dronetag s.r.o. be responsible for damages or claims of any nature or description relating to system performance, including coverage, buyer’s selection of products for buyer’s application and/or failure of products to meet government or regulatory requirements.
In the unlikely event a defect occurs, please work through the dealer or distributor from which this product was purchased.
If the Scout you want to return was bought directly from Dronetag, contact us at support@dronetag.com first and then send the product to the following address:
Besides warranty service, Dronetag also offers post-warranty repairs. Let us know at support@dronetag.com your problem, and we will try to do our best to find a solution for you.
Dronetag Scout and Scout EVK have been created for the most straightforward handling possible. Still, the following safety notes must be followed to reduce the risk of accidents, injuries and device malfunction to a minimum. If misused, it has the potential for causing fire, electrical shock or personal injury. Dronetag is not liable for damages arising from the use or misuse of this product. To help ensure accident-free operation, follow these guidelines:
This and the Dronetag App manual must be read carefully, and all instructions must be followed. Special attention must be taken to all warnings and precautions.
Use only attachments/accessories specified by the manufacturer. Dronetag, s.r.o. carries no responsibility for using other than specified attachments/accessories.
The user is solely responsible for the risk while installing and using this device. Dronetag is not responsible for any injuries or accidents that are a result of installation of the Scout.
The LTE antenna used for this receiver must be installed to provide a separation distance of at least 20 cm from all human bodies and must not be located or operating in conjunction with any other antenna or transmitter.
Keep antennas of other devices as far from the Scout as possible, at least 40 cm.
Do not allow liquid, small particles or other foreign objects to get into the system. Follow the installation manual for proper installation.
Mounting the Scout or Scout EVK in an improper way may lead to injuring people or damaging property
Do not expose the system to conditions which exceed the Scout's or Scout EVK's or accessories' IP rating and operating temperature.
Keep the system and accessories, including cable ties and fasteners, out of the reach of small children.
If the system is brought directly from a cold location to a warm one, moisture may condense inside the system. If this occurs, the system may not operate properly. In this case, unplug all cables/accessories immediately and leave the device in a dry place for several hours.
Stop using the system and disconnect it from any connectors immediately if the device functions abnormally, produces unusual sounds or smells, or becomes too hot to touch.
Compliance is required with respect to voltage, frequency, and current requirements indicated on the manufacturer’s label. Connection to a different power source than those specified may result in improper operation, damage to the equipment or pose a fire hazard if the limitations are not followed.
There are no operator serviceable parts inside the Dronetag Scout and included PoE connector, except for replacing or installing a SIM card. Service should be provided only by a qualified service technician.
Included PoE injector is provided with a detachable power cord which has an integral safety ground wire intended for connection to a grounded safety outlet.
Do not substitute the power cord with one that is not the provided approved type. Never use an adapter plug to connect to a 2-wire outlet as this will defeat the continuity of the grounding wire.
The equipment requires the use of the ground wire as a part of the safety certification, modification or misuse can provide a shock hazard that can result in serious injury or death.
Contact a qualified electrician or the manufacturer if there are questions about the installation prior to connecting the equipment.
Protective earthing is provided by Listed AC adapter. Building installation shall provide appropriate short-circuit backup protection.
Protective bonding must be installed in accordance with local national wiring rules and regulations.
Follow all suitable local regulations for installation of electric devices.
The maximum input voltage for PoE injector is 240V and should be applied only to included Power Cable.
Do not put any DC voltage to any antenna connectors.
Avoid using this product in a location that can be submerged by water.
Follow the local rules for installation of the lightning surge protection system when deploying the Scout and Scout EVK gateway, both outdoors and indoors. Such a protection system must be taken into consideration to ensure a fully functional gateway without interruptions or damage from lightning.
Avoid using this product during an electrical storm. There may be a remote risk of electric shock from lightning.
Antenna Grounding: Dronetag, s.r.o. recommends installing a lightning arrestor on all the antenna N-type terminals. The arrestors must be N-type Female to Male to fit the antenna and enclosure connectors. Ensure you use a 10 AWG or better wire to connect the screw terminals of the arrestors to the grounding rail mounted on the building wall (grounding bar in the case of field deployment).
Grounding of the Scout: We recommend grounding the device. We do not recommend grounding into the lightning conductor system. Additionally, it is recommended to use another 10 AWG or better grounding wire to connect the screw terminal on the bottom-left side of the gateway casing to the grounding rail (bar).
note
The grounding cable is included in the delivery of the Dronetag Scout.
Surge protector and lightning arrestor are not a part of the delivery of Dronetag Scout.
For protecting the indoor equipment and circuitry connected to the gateway, it is recommended to install an Ethernet surge protector. This device should be positioned along the cabling that connects the gateway to the PoE injector. Make sure you connect its grounding wire terminal to an appropriate building grounding point.
Regular maintenance of your Scout device helps ensure reliable operation and extends its lifespan. During maintenance checks, please verify the following:
Antenna Connections: Ensure all antennas are securely screwed in and have not loosened due to vibration or temperature fluctuations.
Antenna and Ethernet Port Insulation: Check that the insulation tape or protective seals applied to the antennas and the Ethernet port are intact and properly positioned to prevent moisture ingress.
Grounding Connection: Confirm that the grounding wire is firmly connected and not loose to maintain proper electrical safety and device protection.
Mounting Stability: Inspect the mounting hardware to make sure the Scout is securely fixed and there is no looseness that could cause mechanical stress or movement.
Perform these checks periodically, especially after harsh weather conditions or extended operation, to keep your Scout functioning optimally.
EXCEPT TO THE EXTENT PROHIBITED BY LOCAL LAW, IN NO EVENT WILL DRONETAG S.R.O. OR ITS SUBSIDIARIES, AFFILIATES OR SUPPLIERS BE LIABLE FOR DIRECT, SPECIAL, INCIDENTAL, CONSEQUENTIAL OR OTHER DAMAGES (INCLUDING LOST PROFIT, LOST DATA, OR DOWNTIME COSTS), ARISING OUT OF THE USE, INABILITY TO USE, OR THE RESULTS OF USE OF THE PRODUCT, WHETHER BASED IN WARRANTY, CONTRACT, TORT OR OTHER LEGAL THEORY, AND WHETHER OR NOT ADVISED OF THE POSSIBILITY OF SUCH DAMAGES
Should you fail to adhere to the recommendations in this document, Dronetag s.r.o. carries no responsibility for any damage your equipment incurs due to a lightning strike.
Dronetag s.r.o. carries no responsibility for usage or installation of Scout.
🔧 Scout EVK Upgrade Process
The Dronetag Scout EVK is an earlier evaluation kit model that will continue to receive essential updates and limited support. However, we strongly encourage all users to upgrade their units to the production-ready Dronetag Scout system.
The upgraded Scout offers a more robust system, improved long-term stability, and full access to all available features. Some important capabilities—such as factory reset, secure credential management, and cloud-based provisioning—are not available on the original Scout EVK.
This guide walks you through the upgrade process in detail, including:
How to request the upgrade
Flashing and using the required SD card images
Performing the physical upgrade
Registering the upgraded Scout with your account
After upgrading, your unit will receive a new serial number, and the old Scout EVK will need to be removed from your Dronetag Cloud account. You will register the new Scout using the provided serial number for continued access and management.
You may choose to flash the SD cards yourself or request pre-flashed cards from us. Instructions for both options are included below.
If you're not comfortable performing any technical work, we can offer a full replacement of the Scout unit. The upgrade will be handled at our facility, and you would be responsible for shipping costs.
Once you have received or prepared the required SD cards, follow the steps below to upgrade your Scout EVK.
There are two SD cards involved in the upgrade process:
If you are flashing the SD cards yourself, you can reuse a single SD card.
In this case, first flash it with the Preparation image, perform the preparation steps, then re-flash the same card with the Scout System image and continue with the remaining steps.
Whether you use one or two physical SD cards, the upgrade steps remain the same.
Warning
We recommend performing the upgrade on a tabletop setup rather than attempting it on an already installed Scout EVK in elevated or hard-to-reach locations.
Accessing the SD card slot can be difficult, and working at height introduces a risk of device damage or personal injury due to falls.
The upgraded Scout includes a login-protected management interface.
The default username and password will be provided by Dronetag Support together with your SD cards or download package.
Upon first login, please change the credentials immediately to something known only to you.
Warning
Be sure to store your new login credentials safely.
If the device is factory reset, it will revert to the original default username and password provided by Dronetag. If you lose both the new and default credentials, you may be locked out of the management interface.
If you need help accessing the UI or updating credentials, reach out to support@dronetag.com.
✈️ SD Migration Card Preparation
💾 SD Card Preparation
Important
You are expected to already have the correct SD card images by applying
to Scout EVK Upgrade Process
This page guides you through flashing new firmware onto a microSD card and upgrading
your Scout to a newer generation.
Use a microSD card with at least 8 GB of capacity. This SD card is used during
the Scout EVK upgrade process. All former data on the card will be permanently erased.
We recommend using a different SD card than the one currently used in your Scout EVK.
This allows you to keep your original setup as a backup.
You can use either Windows or Linux to prepare the SD card.
If you are confident and understand the risks, you may reuse the existing card —
but make sure to back up your current setup first.
Using the dd command incorrectly can permanently damage your system by overwriting the wrong disk.
Be very careful to identify the correct device path of your SD card (e.g. /dev/sdb) before running any command.
Flashing to your main system drive (e.g. /dev/sda) will result in data loss and an unbootable computer.
Always double-check the target device name using lsblk or fdisk -l before proceeding.
Wait for the process to complete. Once the prompt returns, remove the SD card safely:
sudo eject /dev/sdX
Case Studies
Scout secured one of the Netherlands’ largest music festivals.
Scout is drone-agnostic. It captures all Broadcast / Direct Remote ID signals (Wi-Fi and Bluetooth on 2.4 GHz and 5 GHz) from compliant drones and modules (e.g. DJI, Autel, Skydio). Data is forwarded to the Dronetag App or to your own system, depending on the operating mode.
note
Scout can only detect drones that actually transmit Remote ID.
tip
We are preparing an Aviation version of Scout, which will also support ADS-L, ADS-B, and FLARM to extend situational awareness to general aviation traffic.
Scout can be deployed worldwide. It detects drones that comply with Remote ID standards in the EU, US, Japan, Singapore, and other regions adopting these rules.
caution
Even though Scout can be deployed anywhere in the world, it will only detect drones in countries where drones are required to broadcast a Remote ID signal.
No. If a drone does not transmit Remote ID, Scout cannot detect it.
This includes some sub-250 g drones or drones in regions where Remote ID is not required.
Does the drone have to be airborne to be detected?
No. The drone does not need to be flying, but it must have a GNSS fix and the motors must be running.
Once these conditions are met, the drone starts broadcasting Remote ID, and Scout can detect it.
tip
Some drones only start broadcasting Remote ID after take-off.
If your drone is powered on but not detected, try arming or taking off to trigger Remote ID transmission.
Scout comes in a weatherproof IP-rated enclosure, built for outdoor, 24/7 monitoring (rooftops, poles, towers).
It works reliably in harsh environments.
Yes. Scout can deliver data via APIs for integration into C-UAS, UTM, or other third-party systems.
In Sensor Mode, raw data can be fed directly to your platform.
How can I share situational awareness from Scout?
note
Data from Scout can only be shared when used in Cloud Operating Mode.
In the Dronetag app, you can share live data from your Dronetag Scout with another user who also has a Dronetag account.
This allows them to see your device in their list and view its current position on the map in the app.
✅ The selected user will now see your Scout under My Devices, marked with a shared-device icon.
They will also see the device’s position on their map in the app.
Open Scout's UI, head to System and scroll to the Report a problem section. Describe what
happened and send the report to Dronetag - device logs and spectrum snapshots can be attached to
help with the diagnosis.
Sending reports requires the Send diagnostics to Dronetag switch (in the Diagnostics section
of the same page) to be enabled, and the Scout must have access to the internet to deliver the
report - see the firewall rules below for the endpoint that needs to be allowed.
Scout without internet access
If your Scout cannot reach the internet, use the Download logs button in the Logs section
of the same page and email the downloaded archive to
support@dronetag.com. Please include a screenshot of the top
header of Scout's UI - it shows the Scout version and serial number we need for the diagnosis:
SCOUT is making multiple outbound connections as TCP/HTTPS.
All of them are initiated by the Scout over outbound HTTPS (TCP port 443) — no inbound connections or port forwarding are required. To allow the Scout on a restricted network, permit outbound TCP 443 for its IP/MAC address; no other ports or rules are needed.
The Scout works on the local network (management page reachable, local map shows detections) but appears offline in the Dronetag App. Check Scout's management page for a connection error and verify outbound 443 is allowed on your firewall.