
🌐 Networking
The Dronetag Scout is equipped with a 100 Mbps Ethernet port that supports both DHCP and static IP address configurations. These settings can be modified through the device’s web-based management interface.
For instructions on accessing the interface, refer to the Connect to the Management Interface section.
🔌 Power over Ethernet (PoE)
The Scout’s Ethernet port is designed to be powered via PoE (Power over Ethernet) using the following standards:
- IEEE 802.3af Type 1 (also known as PoE)
- IEEE 802.3at Type 2 (also known as PoE+)
- Voltage: 48V DC
Do not use passive PoE injectors, such as those used by some Ubiquiti or Mikrotik devices, which often provide lower, non-standard voltages (e.g., 24V).
These will not power the Scout and may cause improper operation.
To power the Scout correctly:
- Use a compatible PoE switch that supports 802.3af Type 1 or 802.3at Type 2, or
- Use the included PoE injector supplied with your unit.
Refer to What’s in the Box for more details.
The Scout PoE injector supports both EU and US power outlets and can be used with input voltages of 120 V or 240 V.
📥 DHCP and the Static IP Fallback
By default the Scout's Ethernet is configured for DHCP, and it is designed to stay reachable even when no DHCP server is available:
- On start-up the Scout requests an address over DHCP and waits up to 60 seconds for a response.
- If a DHCP server answers, the Scout uses the address it is given — the normal case on a managed network.
- If no DHCP server answers within 60 seconds, the Scout falls back to a fixed static IP so it always stays reachable for a direct connection:
- IP Address:
192.168.100.100/24 - Default Gateway:
192.168.100.1
- IP Address:
Automatic return to DHCP
The static address is only a fallback, not a permanent setting — its job is to keep the Scout reachable while the network is unavailable. The Scout therefore keeps retrying DHCP in order to re-establish normal connectivity as soon as it returns: while on the fallback it checks in the background, roughly every couple of minutes, whether a DHCP server has become available.
As soon as DHCP works again, the Scout automatically switches back to a DHCP-assigned address — it does not stay on the static fallback once the network recovers. These background checks do not interrupt the fallback address, so the Scout remains reachable at 192.168.100.100 the whole time, right up until it obtains a DHCP lease.
The 192.168.100.100 fallback is temporary — the Scout leaves it again the moment DHCP is restored. If you want the Scout to keep a fixed address that never changes, set a static IP in the Networking tab (see Configuring a Static IP Address below). Configuring a static address there disables DHCP, so the Scout uses only the address you set and never falls back to — or returns to — DHCP. This is the recommended way to run the Scout on a fixed address, even if that address is in the same range as the default fallback.
🔧 Configuring a Static IP Address
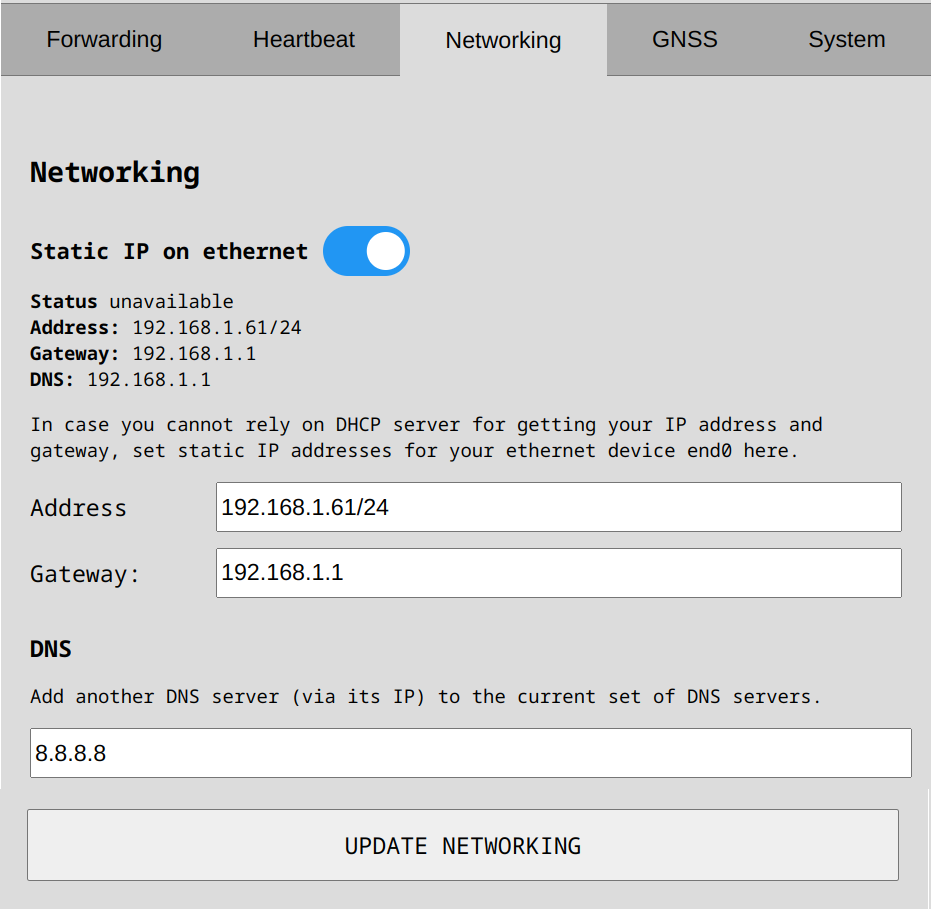
To assign a static IP:
- Navigate to the Networking tab within the web management interface.
- Enter the desired static IP address using CIDR notation, for example:
192.168.1.61/24- The
/24suffix corresponds to the subnet mask255.255.255.0.
- The
💡 Not sure what subnet mask to use? Try jodies.de IP Calculator to determine the correct value.
When you configure a static IP here, the Scout uses only this address: DHCP is disabled and the 192.168.100.100 fallback no longer applies. The Scout will not request a DHCP lease or switch back to DHCP while a static IP is set. To return to automatic addressing, disable the static IP option in this same tab.
🌍 Setting Gateway and DNS
If you need the Scout to send data to other networks or access internet services:
- Set the Default Gateway (usually your router's IP address).
- Optionally configure one or more DNS servers to enable domain name resolution instead of using raw IPs.
These settings are especially important if the Scout is connecting to cloud platforms or remote endpoints.
⏰ Time Synchronization (NTP)
The Scout normally keeps its clock accurate automatically — it takes the time from the LTE network, GNSS, or the internet. You can add your own NTP server (by IP or hostname) in the NTP IP/host field of the Networking tab; it is added to the pool of time sources the Scout uses.
On an isolated network with no internet access, the Scout cannot reach public time servers, so its clock can drift and the timestamps in your data may be wrong. On such networks we strongly recommend configuring a reachable NTP server (for example one running on your local network) so the Scout keeps accurate time and your data stays correctly timestamped.
📶 SIM Card Installation and LTE Setup
For LTE functionality, the Scout must be equipped with an LTE modem, which can be included when purchasing the unit.
You can also use your own SIM card—please refer to the SIM Card Installation Guide for detailed instructions.
We do not provide support for connectivity issues arising from third-party SIM cards.
If the LTE option does not appear in the Scout’s management UI, this means the device is not equipped with an LTE modem module.
APN (Access Point Name)
Each SIM card provider supplies an APN, usually listed on their website. Enter it in the Desired APN field so the Scout can establish a mobile data connection.
The APN you set is applied on every start-up. If you change it and the new value fails to connect while the previous one was working, the Scout automatically reverts to the last working APN, so a typo won’t leave the device offline. You can also enter the APN for a new SIM before swapping cards, so the Scout comes up correctly with the new one already configured.
SIM PIN
If the inserted SIM is protected by a PIN, the Networking tab shows a SIM PIN field. Enter the PIN and select Unlock SIM to bring the modem online. The Scout remembers a PIN that works and re-applies it automatically after a restart, so you only have to enter it once. PIN protection stays enabled on the card — it is only unlocked, never disabled.
Enter the correct PIN. Repeated wrong attempts can permanently lock the SIM (a PUK lock), after which it must be recovered with the PUK code from your provider.
We recommend using a SIM card with no PIN code to avoid accidentally locking the card. If the Scout tries a stored PIN and it turns out to be wrong, it discards that PIN and stops retrying so it cannot exhaust the attempts and PUK-lock the SIM.
When the Scout ships with a Dronetag-provided SIM, its APN and PIN are configured at the factory. While that SIM is inserted, these fields are hidden and cannot be changed — replace the SIM with your own if you want to set them yourself.
Verify Functionality and LTE
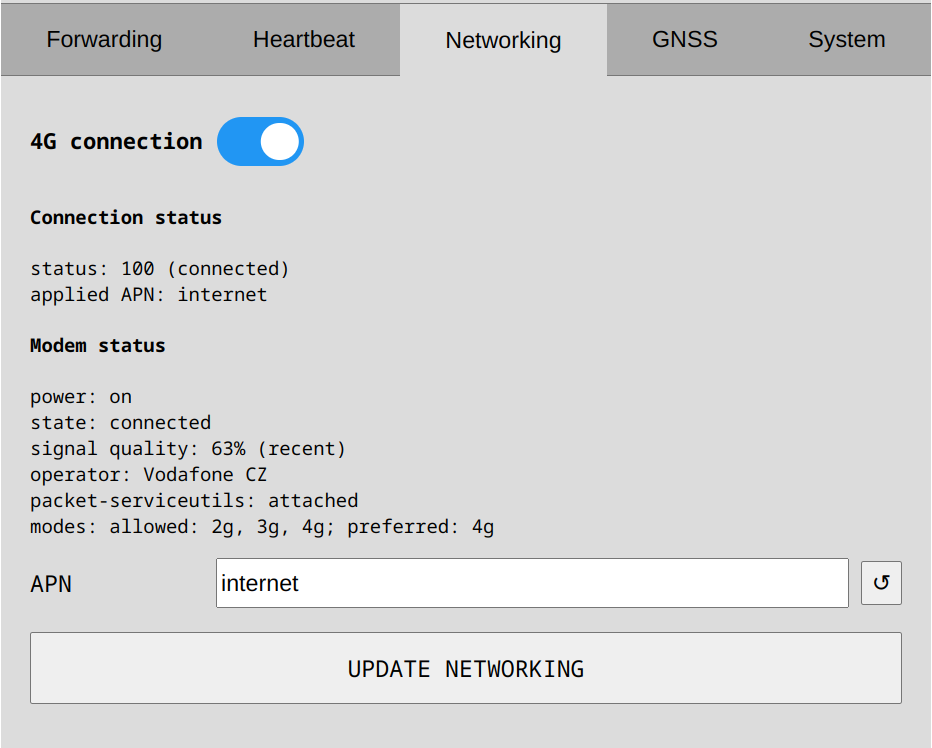
This section applies only to Scouts with LTE connectivity.
To verify LTE connectivity:
-
Connect to the Scout’s Management Interface
Follow the instructions in Connect to the Management Interface to access the Scout’s web UI. -
Open the Networking Tab
Once logged in, navigate to the Networking section in the management interface. -
Check the LTE (4G) Switch
Confirm that the 4G switch is set to ON to enable LTE functionality. -
Configure the APN
If your cellular provider requires specific APN settings, enter the APN value into the designated field in the networking tab. -
Save Changes
Click the Update 4G connection button to save and apply your changes.
If no data connection is established, double-check the APN settings and re-enter them if necessary. If the SIM is PIN-locked, make sure you have entered the correct SIM PIN and unlocked it (see SIM PIN above).
To further troubleshoot, test the SIM card in a mobile phone to confirm it has active service and good network coverage.
⚖️ Choosing between Ethernet and 4G
When the Scout has both an Ethernet connection and a working 4G connection, it normally sends its internet traffic — the Dronetag cloud, AWS instances and other remote integration servers — over Ethernet, keeping 4G as a backup. Traffic to devices on your local network always stays on Ethernet and is never sent over 4G.
Two switches in the 4G section of the Networking tab let you change this behaviour.
Prioritize 4G
Turn Prioritize 4G on to make the Scout prefer the 4G connection for all internet traffic, even while Ethernet is connected. This is useful when the Ethernet network is used only for local access and does not provide reliable internet. Traffic to your local network still goes out over Ethernet as usual. This switch is off by default.
Automatic 4G failover
Automatic 4G failover lets the Scout switch to 4G on its own, and is on by default. Roughly once a minute the Scout checks whether the remote servers your integrations rely on can still be reached over Ethernet:
- If they can be reached over Ethernet, the Scout keeps using Ethernet.
- If they cannot be reached over Ethernet but are reachable over 4G, the Scout automatically switches its internet traffic to 4G.
- As soon as the Ethernet connection can reach those servers again, the Scout switches back to Ethernet.
A few things to keep in mind:
- The check only runs while 4G is enabled and connected.
- Servers on your local network are ignored — failover reacts only to a loss of internet connectivity, not to local traffic.
- If Prioritize 4G is on, that manual choice always wins and the connection stays on 4G.
In a typical installation you can leave both switches at their defaults: the Scout uses Ethernet whenever it provides working internet access and falls back to 4G only when it doesn’t.
🔒 VPN Access
The Scout can be configured to use a VPN (Virtual Private Network) to provide access to the device even when you are not directly connected to its Ethernet port. This is useful when the Scout is deployed in a remote network and needs to be reached securely for maintenance, diagnostics, or integration with other services.
Using a VPN also helps securely transfer data by adding another layer of privacy between the Scout and the systems communicating with it.
VPN is available only in Sensor+ mode or Cloud mode. It is not part of the Sensor mode.
WireGuard
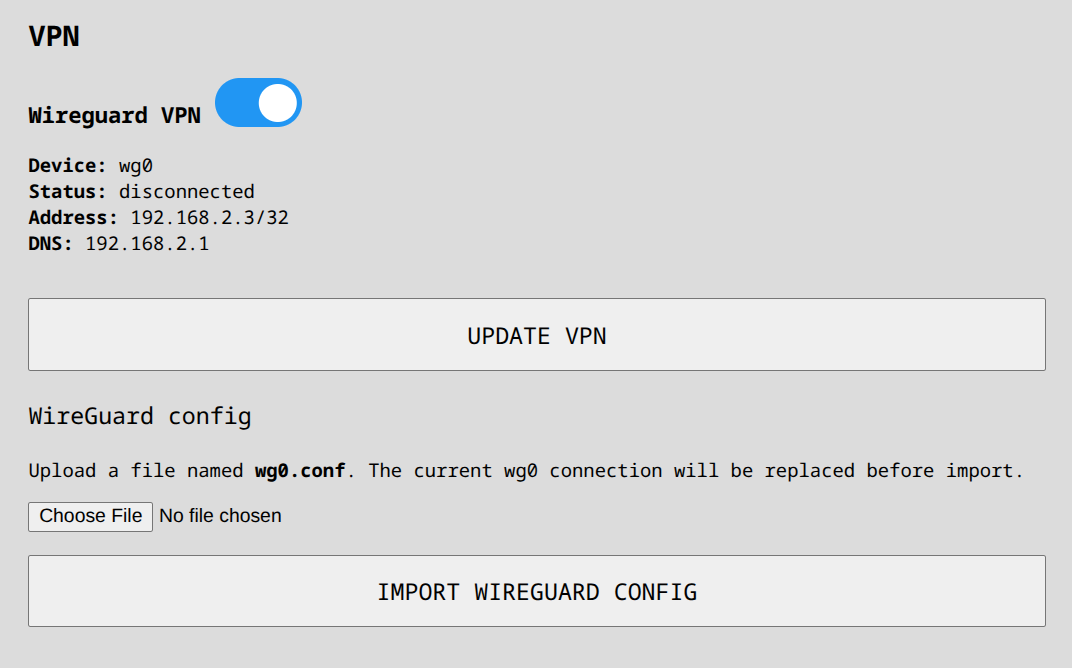
Scout currently supports WireGuard configuration from the management interface. A WireGuard configuration can be uploaded to the Scout and then enabled or disabled from the VPN section in the Networking page.
WireGuard can be used to:
- reach the Scout remotely without direct local Ethernet access
- route traffic securely to resources available inside the VPN network
- add an additional privacy layer for communication between the Scout and your remote infrastructure
When preparing a WireGuard configuration for Scout:
- configure the client tunnel address in the
[Interface]section - configure the reachable VPN subnet in
[Peer] AllowedIPs - do not use
0.0.0.0/0inAllowedIPs; this value is explicitly forbidden by Scout
Current implementation limitations:
AllowedIPsmust be present in the[Peer]section- only one IPv4 network in
AllowedIPsis currently supported, optionally together with the Scout address itself as/32 - the Scout currently expects the
[Interface] Addressto be inside theAllowedIPssubnet 0.0.0.0/0is explicitly blocked and full-tunnel VPN routing is not supported in the current implementation- if additional routes are needed beyond the main VPN subnet, they are not yet supported by the current UI flow
Example of a valid Scout WireGuard configuration:
# File must be named wg0.conf
[Interface]
# Private key assigned to this Scout client
PrivateKey = <scout-private-key>
# Tunnel address of this Scout inside the VPN subnet
Address = 192.168.205.85/32
# Optional DNS server reachable through the VPN
DNS = 192.168.205.1

[Peer]
# Public key of the remote WireGuard server or peer
PublicKey = <server-public-key>
# Scout supports one IPv4 VPN subnet here, optionally with the Scout address itself
AllowedIPs = 192.168.205.0/24, 192.168.205.85/32
# Remote server endpoint
Endpoint = 94.230.157.236:51821
In this example:
- the Scout tunnel address
192.168.205.85/32belongs to the allowed VPN subnet192.168.205.0/24 - the Scout address itself is also explicitly listed in
AllowedIPs, which is allowed - traffic for the VPN subnet is routed through WireGuard
- default routing for all device traffic is not used
🛠️ Troubleshooting Connectivity
If you're unable to access the Scout’s interface, try the following steps to identify and resolve common issues:
✅ Double-Check Network Settings
- Ensure your computer is on the same subnet as the Scout.
- If your network uses DHCP, confirm the DHCP server is running and has available IP addresses.
- If DHCP is not available, verify that your computer is manually configured to access the Scout’s fallback static IP (
192.168.100.100/24).- Example manual IP for your computer:
192.168.100.10
- Example manual IP for your computer:
🔌 Check Ethernet Link LEDs
Inspect the Ethernet port on your router/switch and if you have the device opened you can check these on the Scout mini computer:
- Green LED: Indicates a successful physical link.
- Amber/Yellow LED: Indicates network activity (blinks when data is being transferred).
- No lights: The cable may be faulty, the port may be disabled, or there may be no physical connection.
⚙️ Configure Ethernet Speed and Duplex
Some switches or routers may experience auto-negotiation issues with the Scout. To resolve this, manually set the Ethernet port configuration in your switch or router's management interface to:
- Speed: 100 Mbps
- Duplex: Full duplex
This setting can often be found under port settings or advanced configuration in your network equipment's UI.
🔄 Reset the Scout to Factory Defaults
If you've made changes to the network configuration and can no longer access the device:
- Perform a factory reset to restore default settings.
- After resetting, the Scout will attempt to obtain an IP address via DHCP and fall back to its static IP (
192.168.100.100) if no DHCP server is available.
Refer to the Factory Reset Instructions for detailed steps.