
Návody
- Document
- Developers — Návody
- Chapters
- 8
- Source
- help.dronetag.cz/cs/print/developers/guides
Choosing the Right Integration Method
This guide is for our customers and partners looking to integrate Dronetag solutions into their systems. Below, you’ll find helpful resources and links tailored to your specific integration needs.
Before proceeding, it's important to clarify your integration requirements:
- What type of data do you need, and in what formats? What protocols does your system prefer?
- What environment will the integration operate in—client-side, server-side, or both?
- Do you prefer to initiate the data exchange from your system, or would you rather have Dronetag stream data directly to you?
One-Time Data Import into Another Application
“I want to just import my flight data to another application.”
If real-time access and continuous data collection aren’t required, you can export data from our apps in open formats such as CSV, KML, or GPX.
Learn more about the Dronetag app here.
Scripting to Collect Historical Flight Data
“I want to write a script to collect all my flight data from last week in KML format.”
For automated collection of historical data, our REST API allows exporting in multiple formats. By default, we use our JSON format, but you can also request CSV, KML, GPX, or GeoJSON by specifying the desired MIME type in your Accept header.
Since you'll be accessing your own devices under your account, Personal Access Tokens are the most straightforward authentication method for you.
Refer to our guide on obtaining telemetry data or explore our API documentation for more details.
Accessing Real-Time Data for All Your Devices
“I want to display my Dronetag devices in real-time in different software.”
If real-time data is your priority, we recommend using either an existing integration, or a combination of our REST API and Socket.io real-time API.
Check our getting started page, which lists the currently available existing integrations with our partners and third-party software.
If such integration is not available, you're given an option to integrate with our REST API and Socket.io API. Since you'll be accessing your own devices under your account, Personal Access Tokens are the most straightforward authentication method for you.
See our guide on retrieving real-time data or check out the API documentation.
Displaying User Data in a Client-Side Application
“I have a web application and I want to allow Dronetag users to display their data in my application and manage their Dronetag assets.”
To allow your users to view their Dronetag data within your client-side application, we recommend integrating OpenID Connect. This enables seamless login using Dronetag accounts directly from your application.
Learn more about API authentication.
Sharing User Telemetry to a Server-Side Solution
“I have a cloud solution and I would like to collect data from Dronetag devices from other users.”
If you have a server-side application and want to give your users access to their telemetry data in it, we suggest using our integration portal. You can establish a persistent connection between the Dronetag Cloud Platform and your server. Users will then be able to authorize your integration through the Dronetag App, allowing telemetry data from their devices to be sent to your servers.
Start with the Data Push Getting Started guide.
Integrating U-Space Data
If you need to integrate with U-Space services, we also support U-Space reporting via InterUSS. We can send data to several DSS (Discovery and Synchronization Service) instances. If your system already implements the InterUSS protocol, we may be able to work with your existing DSS or include your DSS instance.
For more details on U-Space integration, refer to our InterUSS section.
Can’t Find What You Need?
We provide a robust real-time API available for general use. However, if your integration requirements are more complex, we offer dedicated support as part of our Enterprise subscription plan. Contact us to discuss your needs further.
Accessing Historical Telemetry
This detailed guide will show you how to retrieve flight data from our API after completing flights with your Dronetag devices.
There are two main approaches depending on what flight details you have. You can either retrieve a list of past flights, select one, and gather all available data for that specific flight, or if you only know the general time frame and location, you can pull a segment of the airspace history. Both options are supported via our REST API.
Retrieving Telemetry for a Single Flight
This method allows you to retrieve the full telemetry history for one specific flight from a single device. The API response will provide data collected by that device.
Authenticate Your API Requests
Before proceeding, ensure you have access to the necessary resources. Visit the authentication guide for instructions on how to authenticate your API requests.
List Available Flights
Retrieve a list of available flights associated with your authenticated Dronetag account. Take note of the
idof the flight you’re interested in.Request the Flight's Telemetry Data
Use the flight’s
idas theoperation_idquery parameter. This will give you the telemetry data for the selected flight without needing to specify time ranges or geographical areas.Our telemetry endpoints support multiple output formats. Choose your preferred format and set it in the
Acceptheader of your request.You can also access additional telemetry streams for tracking the UA operator or the RID system.
For more details, check out the DUMP guide.NoteYou may notice a
/v1/flights/{id}/telemetryendpoint. However, we recommend using the v2 endpoint, as v1 is planned for deprecation.
Retrieving Airspace History
This method allows you to pull historical airspace data for a defined location and time period.
Authenticate Your API Requests
Ensure you have access to the necessary resources. Visit the authentication guide for instructions on how to authenticate your API requests.
Choose Your Parameters
Based on the information you have, you can retrieve airspace history by either:
- Specifying a time range (
from,to) and geographical region (bbox), or - Specifying a time range (
from,to) and UAS ID (device serial number,uas_id).
- Specifying a time range (
Request the Airspace Telemetry Data
Select your preferred output format and set it in the
Acceptheader of your request.You can also access additional telemetry streams for tracking the UA operator or the RID system.
Learn more about these telemetry types in the DUMP guide.Request Operation Details
While the previous request provides telemetry data, it does not include all the information about the flight, such as the UA's identification and type. To gather additional details, use the Operation API endpoint to retrieve more comprehensive operation information.
Accessing Real-Time Telemetry
This guide explains how to access and visualize real-time telemetry, typically by using a combination of the REST API and real-time Socket.io to monitor airspace activity in real-time.
Authenticate Your API Requests
Make sure you have the required access to the necessary resources. For detailed instructions, refer to the authentication guide.
Set Your Observation Parameters
Decide whether you want to monitor a specific geographical area (
bbox) or a particular device (uas_id).Note: The geographical region has limitations. Large areas such as continents or countries cannot be observed. For details, see the REST API guide.
(Optional) Make an Initial Request to Get the Airspace State
Before starting real-time updates, we recommend fetching the initial airspace state. This helps initialize your application’s state. For example, retrieve the last 5 minutes of airspace data to create a starting point for real-time monitoring.
Receive Real-Time Telemetry Updates
Option 1: Connect to Socket.io for Real-Time Updates
Using Socket.io allows you to receive real-time updates with low latency, without needing to worry about time range query parameters. This is the preferred option for responsive applications.
Option 2: Poll the REST API for Updates
Alternatively, you can periodically poll the API for updates. However, this approach is less efficient for applications that need frequent updates.
If you choose this option, ensure you use the
Dateheader (needs to be converted to ISO 8601) from the last response for thefromparameter in subsequent calls, to avoid receiving duplicate data.Not RecommendedPolling is generally not suitable for high-frequency updates. Polling this endpoint with high frequency (> 1 per second) can result in rate limiting errors.
Retrieve Operation Details
While telemetry data provides real-time flight information, it may not include essential details such as UA identification and type. You can retrieve additional information about the operation itself.
Option 1: Listen for Operation Updates via Socket.io
With Socket.io, you can listen to the
operationchannel for updates when a new operation is created or existing operations are modified. However, network interruptions can cause data loss, so it's best to combine this with occasional HTTP requests to ensure your application remains in sync.Option 2: Use HTTP Requests as Needed
When necessary, you can request the operation details via the Operation API using the
operation_id. This will give you the stored information about the airspace operation.Keep Your Viewport Up-to-Date
If your application displays a dynamic map or the area of interest changes over time, ensure you update the
bboxquery parameter in your API requests or sendviewportevents when using Socket.io.For more information, refer to the API documentation and the Socket.io guide.
You can also access additional telemetry streams for tracking the UA operator or the RID system in real time. For more details, see the DUMP guide.
Accessing Real-Time Device Status
This guide explains how you can monitor the real-time status of your Dronetag device, such as battery charge, LTE, and GNSS signal strengths, and other key metrics. You can retrieve this data using either the REST API or the real-time Socket.io API.
Key Differences from Other Telemetry Types
Unlike other telemetry data such as Telemetry-UA or Telemetry-Operator, which are sent frequently, telemetry related to the device’s system status (Telemetry-System) is generally sent at lower intervals—typically every 10 to 15 seconds or more.
Learn more about all telemetry types in the DUMP guide.
Monitoring a Specific Device Using UAS ID
To retrieve the status of your Dronetag device in real-time, you must use the device’s UAS ID, which is equivalent to the serial number of the Dronetag device. Unlike other telemetry types that allow observation based on a geographical region (via bbox), this endpoint does not support monitoring by geographical region. Instead, you’ll need to specify the UAS ID to access data for a particular device.
Authenticate Your API Requests
Ensure you have access to the necessary resources by authenticating your API requests. You can find more details on the authentication process in the authentication guide.
Identify the Device by UAS ID
Before making any requests, confirm the UAS ID (serial number) of the device you wish to observe. You can find the UAS ID on the physical Dronetag device, within your account settings in the Dronetag App, or in other API responses.
Request Real-Time System Status Data
Option 1: Retrieve Data via REST API
To access the device's real-time status data through the REST API, use the following endpoint:
Set the
uas_idquery parameter to the serial number of the Dronetag device, and define a time range using thefromparameter, or bothfromandto.Option 2: Real-Time Updates via Socket.io API
Not available yetThis option is not yet available
For real-time updates, connect to the
telemetry_systemchannel via Socket.io. This method delivers lower-latency updates compared to REST polling.
Setting up TAK Server Integration
All of our cloud-connected Dronetag products can be integrated with TAK Server by using our integration portal and can stream their Drone Remote ID data in the Cursor on Target (CoT) format directly to your TAK server in real-time.
Network Remote ID (NRI) devices (such as Dronetag Mini) can stream their UA positions. Direct Remote ID (DRI) receivers (such as Dronetag RIDER or Dronetag Scout) can additionally stream the operator location, and the location of the receiver itself.
This article is about setting up TAK Server integration from our cloud environment over public internet. We're working on enabling Dronetag Scout in Sensor+ Mode to integrate with TAK directly. Please contact us if you're interested in direct TAK integration and would like to inquire about the current state of the integration.
Prerequisites
Before you begin, ensure you have:
- Dronetag account (create at https://dronetag.app/signup)
- Supported Dronetag product(s) registered on your account
- Supported are Dronetag Mini, Dronetag Mini 4G, Dronetag RIDER, or Dronetag Scout
- Active Pro or Enterprise subscription plan (required for integration portal access)
- TAK Server instance
- With publicly accessible TAK Server endpoint (IP address or domain name)
How to Set-up
Configure your TAK Server
Before setting up the integration, ensure your TAK Server is ready:
- Open the required port on your firewall
- Configure TAK Server to accept data feeds on this port
- Note your connection details:
- Server IP or domain (e.g.,
tak.yourcompany.comor203.0.100.200) - Port number (e.g.,
8087)
- Server IP or domain (e.g.,
If unfamiliar with TAK Server configuration, refer to the official TAK Server documentation.
Access the Integration Portal
Visit https://integrations.dronetag.app and sign in using your account credentials
Create New Distribution
Create a new distribution using the following configuration:
Required Settings
- Connection type — TCP or UDP Socket
- Target URI — Your TAK Server address (e.g.,
tak.yourcompany.comor203.0.100.200) - Target port — Your TAK Server port (e.g.,
8087) - Output format — Cursor on Target XML
Leave the other options to default values, or customize to your preferences. Please note that not all options are relevant to TCP+XML integration.
Data Source Selection
Take note of the selected data source. The default, "My account", streams data from all devices registered to your account. Other options include "Device Groups" (a static list of devices) and "Partnered Integration" (allows any Dronetag user to share data to your TAK server). Contact us for details.
Optional mTLS Authentication
If your TAK Server requires mutual TLS authentication, enable the mTLS option and upload the necessary client certificate and private key files in PEM format. This option is available only for TCP connections.
Verify the Connection
- Allow 2-3 minutes for the integration to initialize and establish connection
- Turn on your Dronetag device and ensure it's actively transmitting
- Open your TAK client (ATAK, WinTAK, or iTAK), look for the drone icon appearing on your map at the device's location
- Verify position updates are occurring in real-time
Troubleshooting
If you're experiencing issues, try these steps in order:
-
Verify TAK Server connectivity — Ensure your TAK Server IP/domain is correct and publicly accessible. Check that firewall rules allow incoming connections on the specified port.
-
Check device status — Confirm your Dronetag device is powered on, has GNSS lock, shows as "Online" and is visible on the map in your account at https://dronetag.app.
-
Review integration portal logs — Check the "Server logs" section in the integration portal and refresh the view several times (logs are not real-time). Look for connection errors or status messages.
-
Allow time for initialization — The integration needs 2-3 minutes to establish connection. If issues persist beyond this, restart the distribution in the integration portal by disabling and re-enabling the distribution.
If problems persist, contact support with your server logs and configuration details.
Relevant Resources
Understanding Altitude Values
When using our API, you will encounter three distinct altitude values related to flight telemetry data points. This section provides an overview of what these values represent, how they are obtained, and how you can utilize them in your applications.
Altitude Values
-
WGS84 HAE (Height Above Ellipsoid) — Altitude above the WGS84 ellipsoid, in meters
- This is the raw altitude reported directly by the internal GNSS sensor onboard Dronetag devices.
- It represents the height above the ellipsoid (not the geoid or Mean Sea Level). This is sometimes mistakenly interpreted as MSL, but it’s important to note that WGS84-HAE refers to the ellipsoid height, not sea level.
- This altitude can have variable accuracy depending on GNSS signal conditions and the limitations of the earth model stored in GNSS receivers.
- In APIs available as
HAE-WGS84
-
QNE (Pressure Altitude) — Altitude calculated from barometric pressure, in meters
- This value is derived from the onboard barometer using a standard sea-level pressure of 1013.25 hPa (QNE).
- It is highly accurate for relative measurements, such as comparing altitudes of nearby drones, but it may not represent an accurate absolute altitude compared to the ground.
- Often used in aviation for standard altitude readings, especially when flying at higher altitudes where atmospheric pressure decreases predictably.
- In APIs available as
PA-QNE
-
ATO (Above Takeoff Level) — Altitude above takeoff point, in meters
- This value is calculated as the difference between the current QNE (pressure altitude) and the pressure altitude at the moment of takeoff.
- It provides a relative height above the initial takeoff point, which can be useful for determining altitude changes during a flight.
- ATO values are sensitive to atmospheric pressure changes over time, meaning accuracy may degrade during longer flights or significant weather changes.
- This altitude can sometimes be perceived as AGL (Above Ground Level) when the environment remains consistent and flight has taken off at ground.
- In APIs available as
ATO
We are planning to introduce MSL (Mean Sea Level) altitudes soon, which will provide a more standardized altitude measurement based on global models.
Frequently Asked Questions
Why isn’t there a reliable AGL (Above Ground Level) altitude?
We do not offer AGL altitude because our devices do not have sensors capable of directly measuring the distance to the ground or terrain at all locations globally. Without consistent and accurate ground-level pressure or elevation data, calculating true AGL altitude is unreliable.
However, users can calculate their own AGL estimates if they have access to reliable ground-level pressure data from their region. Using the raw pressure values reported by the device, you could compare them to known ground-level pressure to estimate the altitude.
Why does my ATO altitude sometimes show negative values?
The ATO field is calculated relative to the recorded pressure altitude at takeoff. There are two key factors that can cause negative values:
-
Takeoff Pressure: If you start tracking your flight when the drone is already airborne (e.g., 10m above the ground), the takeoff pressure will reflect that height. When the drone lands, the height will then show a negative value (e.g., -10m) because it's now below the original takeoff point.
-
Pressure Changes Over Time: Atmospheric pressure changes throughout the day due to weather conditions. If you're tracking a long flight that spans hours, the height might gradually drift because the reference pressure from takeoff no longer matches the current ground pressure. This can lead to incorrect readings, especially for long-duration flights.
Why does my commercial drone show AGL altitudes, but Dronetag does not?
Most commercial drones do not actually show AGL altitude; instead, they use a method similar to our ATO (height above takeoff). The drone's controller records the takeoff pressure and subsequently displays the difference between the takeoff altitude and the current altitude. This is presented as the drone's height above ground, even though it's technically just height relative to the takeoff point, not true AGL.
Understanding DUMP Messages
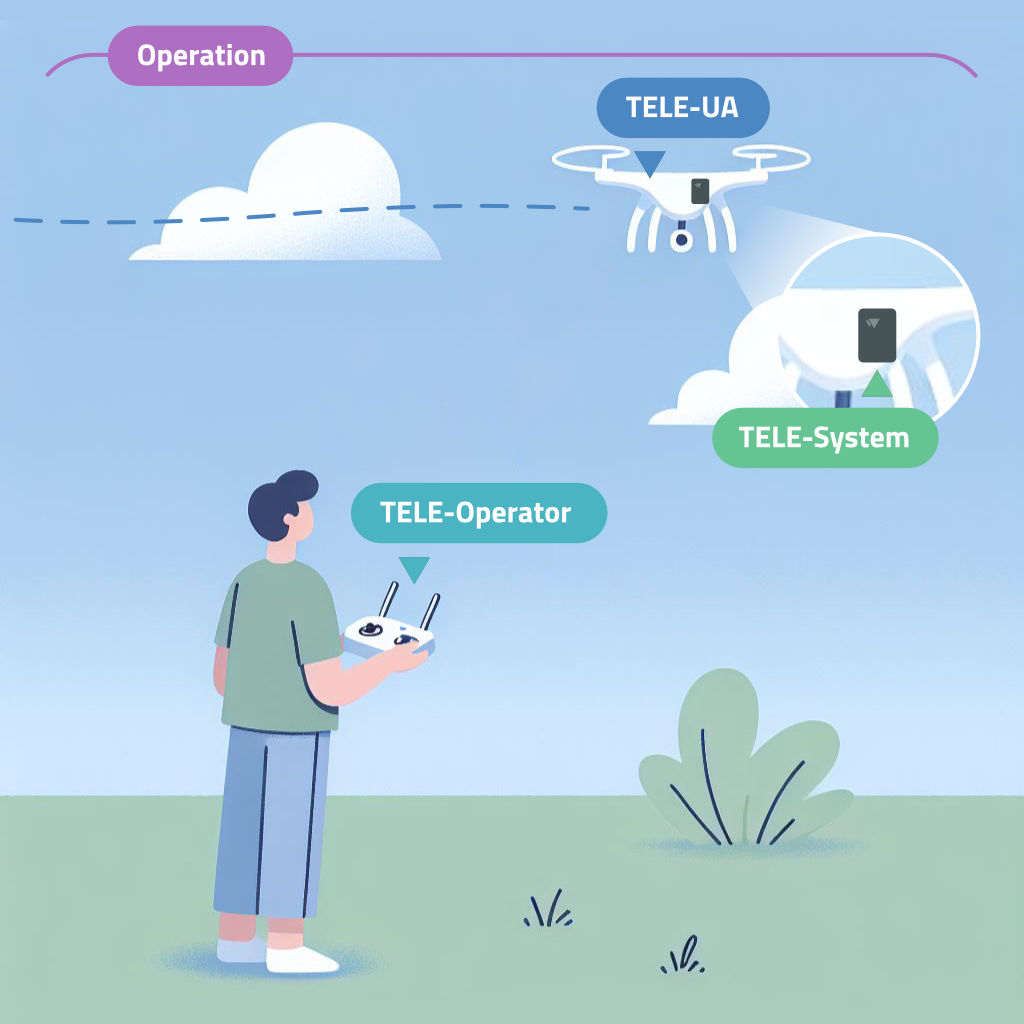
The DUMP (Dronetag Unified Message Protocol) is Dronetag's internal messaging format, used consistently across all our services. Whether you are interacting with our REST API, Socket.io, or integrating through our portal, you can rely on DUMP to be the standard data exchange format.
The current version is DUMP v1.
DUMP supports the following message types:
- Operation ⏺︎
- OperationUpdate ⏺︎
- Telemetry-UA ⏺︎ (often shortened as TELE-UA)
- Telemetry-Operator ⏺︎ (TELE-Operator)
- Telemetry-System ⏺︎ (TELE-System)
The details of these message types, including when and how they are used, are explained further below.
Although we aim for full consistency, some services may still use older message formats. We are actively working on migrating all services to the DUMP format, but backward compatibility with older APIs is required for now. Until we fully deprecate v1 APIs, you might encounter formats that are not DUMP-compliant.
DUMP Message Types
Operation (or OperationUpdate)
See JSON Schema Preview
| Property | Type | Description | Required |
|---|---|---|---|
id | string | Unique operation ID (typically in the form of a UUID) | Yes |
status | Object 'DUMPOperationStatus' | Current operation status | Yes |
sensor_id | string | The unique identifier for the sensor or device of this operation. | Yes |
uas_operator_id | any | ID of the UAS operator (typically in the form of a UUID) | No |
ua_classification | any | TODO | No |
ua_classification_type | any | TODO | No |
ua_identifiers | array of 'DUMPUAIdentifier' objects | Collection of UA identifiers | No |
authentication | array of 'DUMPSignature' objects | Collection of signatures to prove authenticity | No |
descriptions | array of 'DUMPOperationDescription' objects | Collection of various operation descriptions, for example for the purpose of verbosely describing the state of the operation | No |
warnings | array of 'DUMPWarning' objects | A list of warnings related to the operation. These warnings are usually produced while receiving the telemetry data which are non-compliant or have problematic values. For example, if the telemetry data contains invalid fields or timestamps, a warning will be generated. | No |
📋 See the full JSON schema in our API documentation
An Operation message contains static information about a specific flight. The purpose of separating this data into an operation object is to avoid repeating unchanged information, such as the drone’s serial number or the Remote ID (RID) module’s ID, in every telemetry message.
It’s important to understand that a single operation may not always correspond directly to a single flight. In cases where a flight is recorded using multiple systems—like a combination of Network Remote ID and ground-based Direct Remote ID receivers—the flight might be divided into multiple operations.
The difference between Operation and OperationUpdate is significant. The Operation message represents the full state of the flight at the time of the request and is returned when you query through the REST API. On the other hand, OperationUpdate messages represent partial updates, sent primarily in real-time scenarios (e.g., via Socket.io or our integration portal). OperationUpdate only includes recent changes, not the entire state.
Example
{
  "id": "a45cb00e-b600-4111-bd52-42537c28feb3",
  "status": "current",
  "uas_operator_id": "FIN87astrdge12k8",
  "ua_classification": "class1",
  "ua_classification_type": "open",
  "ua_identifiers": [
    {
      "type": "serial_number",
      "value": "15968AB92D361"
    },
    {
      "type": "caa_assigned",
      "value": "JA.JU12345ABCDE"
    }
  ],
  "authentication": [],
  "descriptions": []
}
Telemetry-UA
See JSON Schema Preview
| Property | Type | Description | Required |
|---|---|---|---|
timestamp | string (date-time) | The original telemetry timestamp. Time from GNSS receiver (UTC) | Yes |
timestamp_accuracy | number | Timestamp accuracy (max. error) [s] | No |
sensor_id | string | The unique identifier for the sensor or device that originally received the telemetry data. In Telemetry-System messages, this field specifies the originating system. | Yes |
operation_id | string | Operation ID (typically in the form of a UUID) | Yes |
operational_state | Object 'DUMPOperationalState' | UA’s current state | Yes |
location | any | UA’s location from GNSS | No |
altitudes | array of 'DUMPAltitude' objects | Collection of altitudes | No |
velocity | any | UA’s velocity and speed related information | No |
air_pressure | any | Measured air pressure [hPa] | No |
📋 See the full JSON schema in our API documentation
The Telemetry-UA message is the primary data object for Remote ID. It provides a snapshot of the unmanned aircraft’s (UA) geographical position, status, and other relevant information required by Remote ID regulations.
Each Telemetry-UA message is associated with an Operation through the operation_id field. Every Remote ID-enabled device generates Telemetry-UA messages during operation.
Example
{
  "operation_id": "a45cb00e-b600-4111-bd52-42537c28feb3",
  "timestamp": "2024-10-05T10:15:06.100Z",
  "timestamp_accuracy": 0.1,
  "operational_state": "airborne",
  "location": {
    "latitude": 50.073873, "longitude": 14.466586, "accuracy": 50
  },
  "altitudes": [
    { "type": "WGS84", "value": 192.5, "accuracy": 10 },
    { "type": "QNE", "value": 323.1, "accuracy": 0.5 },
    { "type": "AGL", "value": -10.0, "accuracy": 0.5 }
  ],
  "velocity": {
    "heading": 92, "horizontal_speed": 9.72, "vertical_speed": 1.22, "speed_accuracy": 0.5
  },
  "air_pressure": 1017.712
}
Telemetry-Operator
See JSON Schema Preview
| Property | Type | Description | Required |
|---|---|---|---|
timestamp | string (date-time) | The original telemetry timestamp. Time from GNSS receiver (UTC) | Yes |
timestamp_accuracy | number | Timestamp accuracy (max. error) [s] | No |
sensor_id | string | The unique identifier for the sensor or device that originally received the telemetry data. In Telemetry-System messages, this field specifies the originating system. | Yes |
operation_id | string | Operation ID (typically in the form of a UUID) | Yes |
location | Object 'DUMPLocation' | Location from GNSS | Yes |
altitude | Object 'DUMPAltitude' | Operator’s altitude | Yes |
source_type | Object 'DUMPOperatorSourceType' | The nature of the operator’s position | Yes |
📋 See the full JSON schema in our API documentation
The Telemetry-Operator message tracks the operator’s location. Some UAV systems report the pilot’s real-time position through their control equipment. Standard Remote ID drones can provide operator tracking, while Remote ID modules typically only supply the takeoff location.
Example
{
  "operation_id": "a45cb00e-b600-4111-bd52-42537c28feb3",
  "timestamp": "2024-10-05T10:15:06.100Z",
  "timestamp_accuracy": 0.1,
  "location": {
    "latitude": 50.073873, "longitude": 14.466586, "accuracy": 50
  },
  "altitude": {
    "type": "WGS84", "value": 202.5, "accuracy": 10
  },
  "source_type": "take_off"
}
Telemetry-System
See JSON Schema Preview
| Property | Type | Description | Required |
|---|---|---|---|
timestamp | string (date-time) | The original telemetry timestamp. Time from GNSS receiver (UTC) | Yes |
timestamp_accuracy | number | Timestamp accuracy (max. error) [s] | No |
sensor_id | string | The unique identifier for the sensor or device that originally received the telemetry data. In Telemetry-System messages, this field specifies the originating system. | Yes |
operation_id | any | Operation ID (typically in the form of a UUID) Optional, as Telemetry-SYSTEM are linked to Operations only in specific cases, such as the System being the NRI (Network Remote ID) system. | No |
system_type | Object 'DUMPSystemType' | Type of the device | Yes |
system_status | Object 'DUMPSystemStatus' | Current system state | Yes |
location | any | The current system location | No |
altitude | any | The current system altitude | No |
power_source | any | Current system’s power source and its state | No |
lte_connectivity | any | Current system’s LTE connection and its state | No |
gnss_connectivity | any | Current system’s GNSS connection and its state | No |
📋 See the full JSON schema in our API documentation
The Telemetry-System message provides information about the status of the Remote ID module itself, rather than the aircraft. It includes details on battery charge, GNSS connectivity, LTE signal, and other system parameters. Currently, only Dronetag devices generate Telemetry-System messages.
Example
{
  "operation_id": "a45cb00e-b600-4111-bd52-42537c28feb3",
  "timestamp": "2024-10-05T10:15:06.100Z",
  "timestamp_accuracy": 0.1,
  "system_type": "rid_module",
  "system_status": "operational",
  "power_source": {
    "type": "battery",
    "input_voltage": 4.11,
    "charge_percentage": 90,
    "is_being_charged": false
  },
  "lte_connectivity": {
    "status": "connected",
    "rsrq": -10,
    "rsrp": -97,
    "snr": 9,
    "tac": "291E",
    "cell_id": "555CA02"
  },
  "gnss_connectivity": {
    "status": "connected",
    "satellites": 12
  }
}
Using Simulated Data
Dronetag provides a simulation tool called Mocker that lets you test your integration during development without a physical device. With Mocker, you can create virtual flights and verify that your system correctly receives and processes Dronetag data.
The simulator is great for validating connections and general data exchange, but it may not produce data identical to real Dronetag devices. We strongly recommend testing with a physical device before going to production.
Prerequisites
- Dronetag account — create one for free if you don't have one
- Virtual Mocker device registered to your account (see below)
- Access to the Mocker application — typically granted along with your first virtual device
Obtaining virtual devices
To get a virtual device, contact us with your Dronetag account details. We are generally happy to provide virtual devices for testing and development purposes. Once a virtual device is registered to your account, you can use it to simulate flights and test your integration.
Creating a simulation
Mocker supports two simulation engines depending on the type of device you want to simulate:
| Engine | Device type | Example devices |
|---|---|---|
nri_via_live | NRI (Network Remote ID) device | Dronetag Mini |
dri_via_funnel | DRI receiver device | Dronetag Scout, RIDER |
NRI device simulation (nri_via_live)
An NRI simulation mimics a device that reports its own position to the network. Only one identifier is needed because the simulated device reports itself.
- Open the Mocker application and sign in
- Tap anywhere on the map to place a new simulation
- Select the
nri_via_liveengine - Choose a flight scenario
- Under UAS Identifier, select one of your Mocker devices — it will act as the NRI device
- Configure any remaining parameters for your chosen scenario and click Create
DRI receiver device simulation (dri_via_funnel)
A DRI receiver simulation mimics a device that detects and reports nearby Remote ID aircraft. This requires two identifiers: one for the receiver and one for the detected aircraft.
- Open the Mocker application and sign in
- Tap anywhere on the map to place a new simulation
- Select the
dri_via_funnelengine - Choose a flight scenario
- Under UAS Identifier, enter any valid Remote ID ANSI serial number — this represents the aircraft that your receiver detects
- Under Sensor ID, select one of your Mocker devices — it will act as the DRI receiver
- Configure any remaining parameters for your chosen scenario and click Create
Controlling simulations
Once created, the simulated device appears on the map and in the left sidebar. From the sidebar you can:
- Pause the simulation
- End the simulation gracefully
- Force kill the simulation — use this only to test a lost-connection scenario
Simulations continue running even if you close the browser and will automatically end once their time limit expires. Please dismiss any simulations you are no longer using.
Source pages
Every chapter of this document is a page of the Dronetag help site. Use these addresses to reach the latest version.
- 1Choosing the Right Integration Methodhelp.dronetag.cz/cs/developers/guides/choosing-right-method
- 2Accessing Historical Telemetryhelp.dronetag.cz/cs/developers/guides/accessing-historical-telemetry
- 3Accessing Real-Time Telemetryhelp.dronetag.cz/cs/developers/guides/accessing-realtime-telemetry
- 4Accessing Real-Time Device Statushelp.dronetag.cz/cs/developers/guides/accessing-device-status
- 5Setting up TAK Server Integrationhelp.dronetag.cz/cs/developers/guides/setting-up-tak
- 6Understanding Altitude Valueshelp.dronetag.cz/cs/developers/guides/understanding-altitude
- 7Understanding DUMP Messageshelp.dronetag.cz/cs/developers/guides/understanding-dump
- 8Using Simulated Datahelp.dronetag.cz/cs/developers/guides/using-simulated-data