
Configuration of Different Devices in Dronetag App
- Document
- Dronetag App — Configuration of Different Devices in Dronetag App
- Chapters
- 2
- Source
- help.dronetag.cz/cs/print/dronetag-app/different-devices
Receivers
(RIDER, Scout)
Dronetag App is the central hub for managing all Dronetag devices – both transmitters (that broadcast Remote ID) and receivers (that detect and process Remote ID).
You can use it on iOS, Android, or Web (dronetag.app).

Receivers (RIDER, Scout)
Device Registration
Registering RIDER or Scout is the same as transmitters:
- Power on the device.
- In the app, go to Profile > My Devices > Register new.
- Select RIDER or Scout and follow the steps.
Operating Modes (Scout only)
In the app, you can switch between Scout’s modes:
- Sensor / Sensor+ – raw detection data only (no license needed)
- On-Premise – local visualization without Internet
- Cloud – full remote monitoring via Dronetag App (license + Internet required)
👉 More info: Scout Operating Modes Help
Connectivity Plan (RIDER)
RIDER requires a Connectivity Plan (or free trial) for online use via LTE.
In the app you can:
- Purchase a Connectivity Plan
- Activate it on your RIDER
- Check expiry under Profile > My Devices > RIDER
Without a Connectivity Plan, RIDER can still be used via Bluetooth with Drone Scanner (Gen. 2) but without cloud features.
License Management (Scout)
For Cloud or On-Premise operation, Scout requires a license.
You can purchase and activate licenses in the app:
- Go to Profile > Account > Licenses
- Enter license code
- Assign license to your Scout
Changing Call Sign and Color Tag
You can customize your device’s Call Sign (name shown to others) and Color Tag (map indicator color) directly in the Dronetag app.
This feature is available for all Dronetag devices except Scout.
- Turn your Mini (or another Dronetag device) on.
- Open the Dronetag app.
- Go to Profile → My Devices → choose the Dronetag device you want to set up.
- Scroll down to Change Call Sign and Color Tag.
- Choose your new Call Sign and Color Tag.
- Confirm your selection.
Your updated Call Sign and Color Tag will now appear in the app and in live data views where your device is visible.
This setting is stored locally on the device and helps identify it visually in the app’s map and lists.
The SCOUT model does not support changing Call Sign or Color Tag.
Sharing Live Data from RIDER or Scout
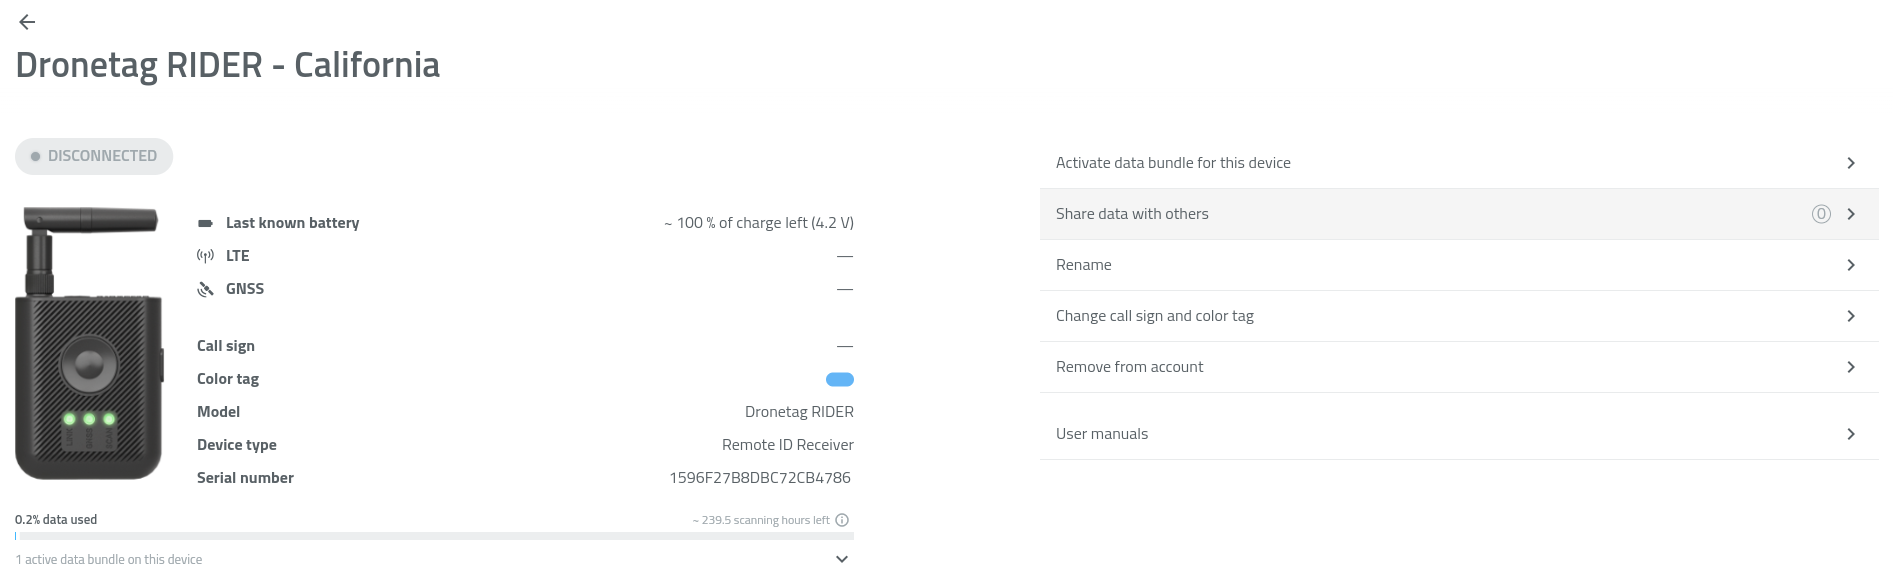
In the Dronetag app, you can share live data from your Dronetag RIDER or Dronetag Scout device with another user who also has a Dronetag account.
This allows them to see your device in their list and view its current position on the map in the app.
📱 How to Start Sharing
You can share data either in the Dronetag mobile app or in the Dronetag Web App:
- Go to Profile → My Devices.
- Select your Dronetag RIDER or Dronetag Scout.
- Tap Share data with others.
- Tap + Add more.
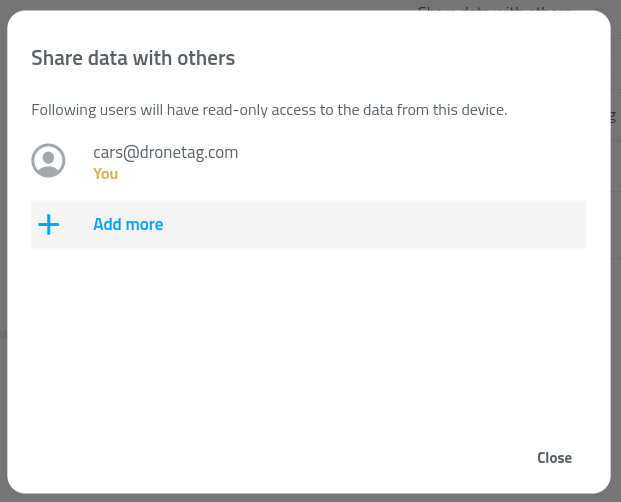
- Enter the email address of the user (the email must be registered in the Dronetag app).
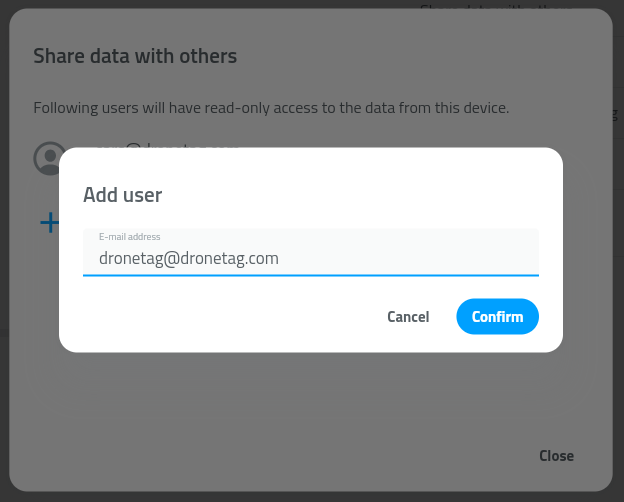
- Confirm by tapping Confirm.
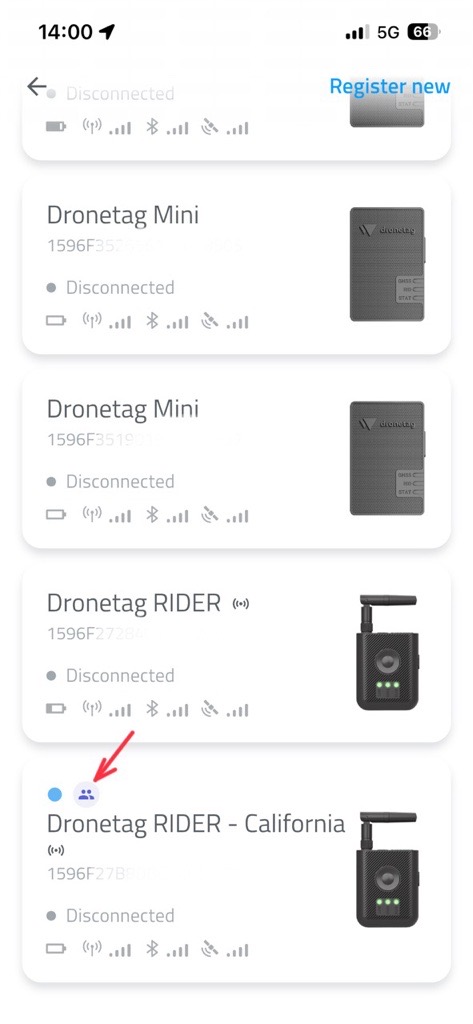
✅ The selected user will now see your RIDER or Scout under My Devices, marked with a shared-device icon.
They will also see the device’s live position on their map in the app.
🗑️ How to Stop Sharing
To remove sharing with a specific user:
- Go to Profile → My Devices.
- Select your Dronetag RIDER or Dronetag Scout.
- Tap Share data with others.
- Find the user in the list of accounts.
- Tap the trash bin icon next to their name.
- Confirm by tapping Delete.
General Data Visibility
As with transmitters, this setting applies to your entire account, not just a single RIDER or Scout.
Choose Public or Private under Profile > Preferences > Default data visibility.
Firmware Update
Update RIDER or Scout firmware directly through the app:
- Go to Profile > My Devices
- Select your device
- Tap Update Firmware
🛰️ Assisted-GNSS
To activate Assisted-GNSS for your Dronetag RIDER:
- Turn your RIDER on.
- Open the Dronetag app.
- Go to Profile → My Devices → Dronetag RIDER → A-GNSS.
- Follow the steps in the app to complete the process.
Once done, your RIDER will update its satellite assistance data and acquire a GNSS fix much faster.
⚙️ How It Works
Normally, a GNSS receiver needs to download satellite data (ephemeris and almanac) directly from orbiting satellites — a process that can take up to 30–60 seconds.
With Assisted-GNSS, this information is fetched via the Dronetag Cloud or your mobile internet connection, allowing the device to calculate its position almost instantly.
When uploaded, Assisted-GNSS allows your device to:
- Reduce time to first fix (TTFF) — get GPS lock within seconds instead of minutes.
- Stabilize position data more quickly after startup.
Use Assisted-GNSS when:
- You’ve just powered on the RIDER after a long time.
- You’ve moved to a new location (more than ~100 km from the last fix).
- You’re operating in urban, mountainous, or indoor environments where satellite visibility is limited.
Assisted-GNSS only accelerates satellite acquisition — it doesn’t replace GNSS signals.
Make sure your device has at least partial view of the sky to get an accurate fix.
Diagnostic Logs
If requested by support, you can send logs directly from the app:
- Open Profile > My Devices > RIDER/Scout
- Go to Troubleshooting > Obtain Diagnostic Logs
These will be automatically packaged and sent to the support team.
Troubleshooting Tools
From the app you can:
- Reset to Factory Defaults (works on firmware v1.4.1+)
- Perform Hard Reset by button combination on the device, or trigger reset from the app.
Setting Up Alerts and Alert Zones
The Alerts feature is currently in experimental mode. It allows you to receive real-time notifications when a new detection occurs.
Please note that this feature is still under development and may occasionally experience issues or unexpected behavior.
🔔 Alerts
Alerts work only when the Dronetag app is running in the foreground — the screen must be on and the app actively open.
Alert settings are stored locally on your device, meaning they:
- Are not synced with your Dronetag account.
- Do not affect alert settings physically stored on your Dronetag RIDER.
🔔 How to Enable Real-Time Alerts
- Open the Dronetag app.
- Go to Profile → Alerts.
- Toggle Enable real-time alerts to ON.
Your app will now start showing alert notifications (when active in the foreground) for newly detected drones.
🚫 How to Ignore Drones
You can choose which drones should be ignored — the app will then not trigger alerts for them.
- Go to Profile → Alerts.
- Scroll down to the Ignored drones section.
- In the UA Identifier field, enter the serial number of the drone you want to ignore.
- Tap Add.
The ignored drones will appear in a list below the input field.
🗺️ Alert Zones (GeoJSON)
You can set up geographical zones where alerts will be triggered only when a detected drone enters the defined area.
Alert zones use the GeoJSON format for defining geographic boundaries.
Learn how to set up Alert Zones in this chapter.
Account & General Settings
Profile Management
Manage your account details, password and linked devices.
Default Data Visibility
Set the default for all your data: Public or Private.
Adjust this under Profile > Preferences.
Purchase History
In the app you can see:
- Your active and expired Data Bundles
- Subscriptions for transmitters
- License purchases
Notifications
RIDER and Scout users will receive push and email notifications when bundles are nearly consumed.
You can configure notification preferences in the app.
Transmitters
(Beacon, Mini, Mini 4G, BS, DRI)
Dronetag App is the central hub for managing all Dronetag devices – both transmitters (that broadcast Remote ID) and receivers (that detect and process Remote ID).
You can use it on iOS, Android, or Web (dronetag.app).
Device Registration
To register your transmitter:
- Turn on the device.
- Open the Dronetag App and sign in.
- Go to Profile > My Devices > Register new.
- Select your device type and follow the on-screen instructions.
🆔 Entering Operator ID
Before you fly with your Dronetag device, you need to enter your Operator ID in the app. This ensures full compliance with Remote ID / UAS identification regulations in your region.
We support different formats and rules depending on the region you operate in: EU & Singapore, Japan, USA.
The format of the Operator ID and whether you need to enter it depends on your region. Follow the section below for your specific region.
EU & Singapore
Format
- EU: Your Operator ID consists of two parts: a public part (16 alphanumeric characters) and a private/suffix part (often 3 characters) which you do not normally affix to your drone.
- Example public part:
CZEabc123def456 - Private suffix: e.g.
-xyz(used internally, not for display)
- Example public part:
- Singapore: Similar format (12-digit Operator ID issued via UA Portal) effective from 1 Dec 2025.
How to Enter into Dronetag App
- Open the Dronetag app.
- Go to Profile → My Devices → [Choose Your Device] → Operator ID.
- Enter your 16-character public part (e.g.,
CZEabc123def456). - Do not enter the private suffix (e.g.,
-xyz) unless instructed. - Your Operator ID will be uploaded to the device and broadcast.
Where to Get the ID
- Register with the national aviation authority in your country (for EU residents) or via the UA Portal (for Singapore).
- Ensure the ID is visible on every drone you own.
Japan
Format
- A 15-character operator registration number issued by the Ministry of Land, Infrastructure, Transport and Tourism (MLIT) via the national UAS portal.
How to Enter into Dronetag App
- Open the Dronetag app.
- Go to Profile → My Devices → [Your Device] → Operator ID.
- Enter the full 15-character code as given by MLIT.
- Your Operator ID will be uploaded to the device and broadcast.
Where to Get the ID
- Register your drone/operator via Japan’s UAS registration portal.
USA
Format
- In the USA, you register as an operator with the Federal Aviation Administration (FAA) and receive a registration number. However — you typically do not need to separately enter an Operator ID in the Dronetag app for Remote ID purposes, since standard Remote ID drones broadcast the required info and the operator number is linked via the DroneZone system.
What to Do in the Dronetag App
- Since no extra Operator ID entry is required, simply ensure your drone is correctly registered with the FAA and that your device is Remote ID compliant.
Where to Get the ID
- Register via FAA DroneZone and obtain your operator registration number. Ensure your drone meets Remote ID rules.
Changing Call Sign and Color Tag
You can customize your device’s Call Sign (name shown to others) and Color Tag (map indicator color) directly in the Dronetag app.
This feature is available for all Dronetag devices except SCOUT.
- Turn your Dronetag device on.
- Open the Dronetag app.
- Go to Profile → My Devices → choose the Dronetag device you want to set up.
- Scroll down to Change Call Sign and Color Tag.
- Choose your new Call Sign and Color Tag.
- Confirm your selection.
Your updated Call Sign and Color Tag will now appear in the app and in live data views where your device is visible.
This setting is stored locally on the device and helps identify it visually in the app’s map and lists.
🛰️ Assisted-GNSS
To activate Assisted-GNSS for your Dronetag device:
- Turn your Dronetag device on.
- Open the Dronetag app.
- Go to Profile → My Devices → your Dronetag device → A-GNSS.
- Follow the steps in the app to complete the process.
Once done, your Dronetag device will update its satellite assistance data and acquire a GNSS fix much faster.
⚙️ How It Works
Normally, a GNSS receiver needs to download satellite data (ephemeris and almanac) directly from orbiting satellites — a process that can take up to 30–60 seconds.
With Assisted-GNSS, this information is fetched via the Dronetag Cloud or your mobile internet connection, allowing the device to calculate its position almost instantly.
When uploaded, Assisted-GNSS allows your device to:
- Reduce time to first fix (TTFF) — get GPS lock within seconds instead of minutes.
- Stabilize position data more quickly after startup.
Use Assisted-GNSS when:
- You’ve just powered on the Dronetag device after a long time.
- You’ve moved to a new location (more than ~100 km from the last fix).
- You’re operating in urban, mountainous, or indoor environments where satellite visibility is limited.
Assisted-GNSS only accelerates satellite acquisition — it doesn’t replace GNSS signals.
Make sure your device has at least partial view of the sky to get an accurate fix.
Configuration
Transmitters can be configured directly in the app:
- Set device name
- Adjust flight profile
- Configure signal parameters (e.g., GNSS, SBAS, etc.)
General Data Visibility
Data Visibility is an account-wide setting (not per device).
You must decide whether to share all your flight and detection data with other Dronetag users or keep them private.
- Public: Default setting for shared airspace awareness
- Private: Data visible only to you
Adjust this in the app under Profile > Preferences > Default data visibility.
Firmware Update
Keep your device updated for stability and new features:
- Open the Dronetag App
- Go to Profile > My Devices > [Your Device]
- Select Update Firmware
Troubleshooting Tools
In the app you can also:
- Reset to Factory Defaults
- Obtain Diagnostic Logs for support
Subscriptions
Some transmitters require subscriptions or credits. Manage and view your subscription status in the app under Profile > Account.
Source pages
Every chapter of this document is a page of the Dronetag help site. Use these addresses to reach the latest version.
- 1Receivershelp.dronetag.cz/cs/dronetag-app/different-devices/receivers
- 2Transmittershelp.dronetag.cz/cs/dronetag-app/different-devices/transmitters