
Dronetag Mini 4G
- Document
- Dronetag Mini 4G
- Chapters
- 13
- Source
- help.dronetag.cz/cs/print/dronetag-mini-4g
Dronetag Mini 4G
Connectivity: Mini 4G uses LTE Cat 1 bis; standard Mini uses LTE-M / NB-IoT.
Form factor: Mini 4G has different dimensions/weight (slightly larger and heavier).
Charging: USB-C on Mini 4G vs Micro-USB on Mini.
SIM options: Choose an integrated SIM (e-shop) or SIM slot (bring your own SIM). The SIM-slot version is ideal for evaluating the full Dronetag solution before bigger decisions. For SIM-slot evaluations or custom SIM integration, contact sales@dronetag.com
Make sure you’re following the right guide for your device to avoid setup hiccups.
Dronetag Mini 4G makes your drone visible to other airspace participants and lets you track it in real time. It mounts on any drone regardless of manufacturer.
Mini 4G connects over the cellular network to our cloud service to meet Network Remote ID (NRI) requirements. It also broadcasts identification and position locally to comply with Direct (Broadcast) Remote ID (DRI) rules. Both NRI and DRI transmissions follow the relevant standards: prEN 4709-002 for the EU and ASTM F3411 for the US.
The device includes internal antennas, an all-day battery, and a durable enclosure with a reclosable 3M Dual Lock mount, so it can run standalone and be quickly moved across drones in your fleet. It works hand in hand with the Dronetag Web & Mobile app for setup, monitoring, and updates.
For demanding RF environments, Mini 4G also provides two MMCX connectors to attach external LTE and Bluetooth antennas, improving signal strength and connection reliability.
Controls
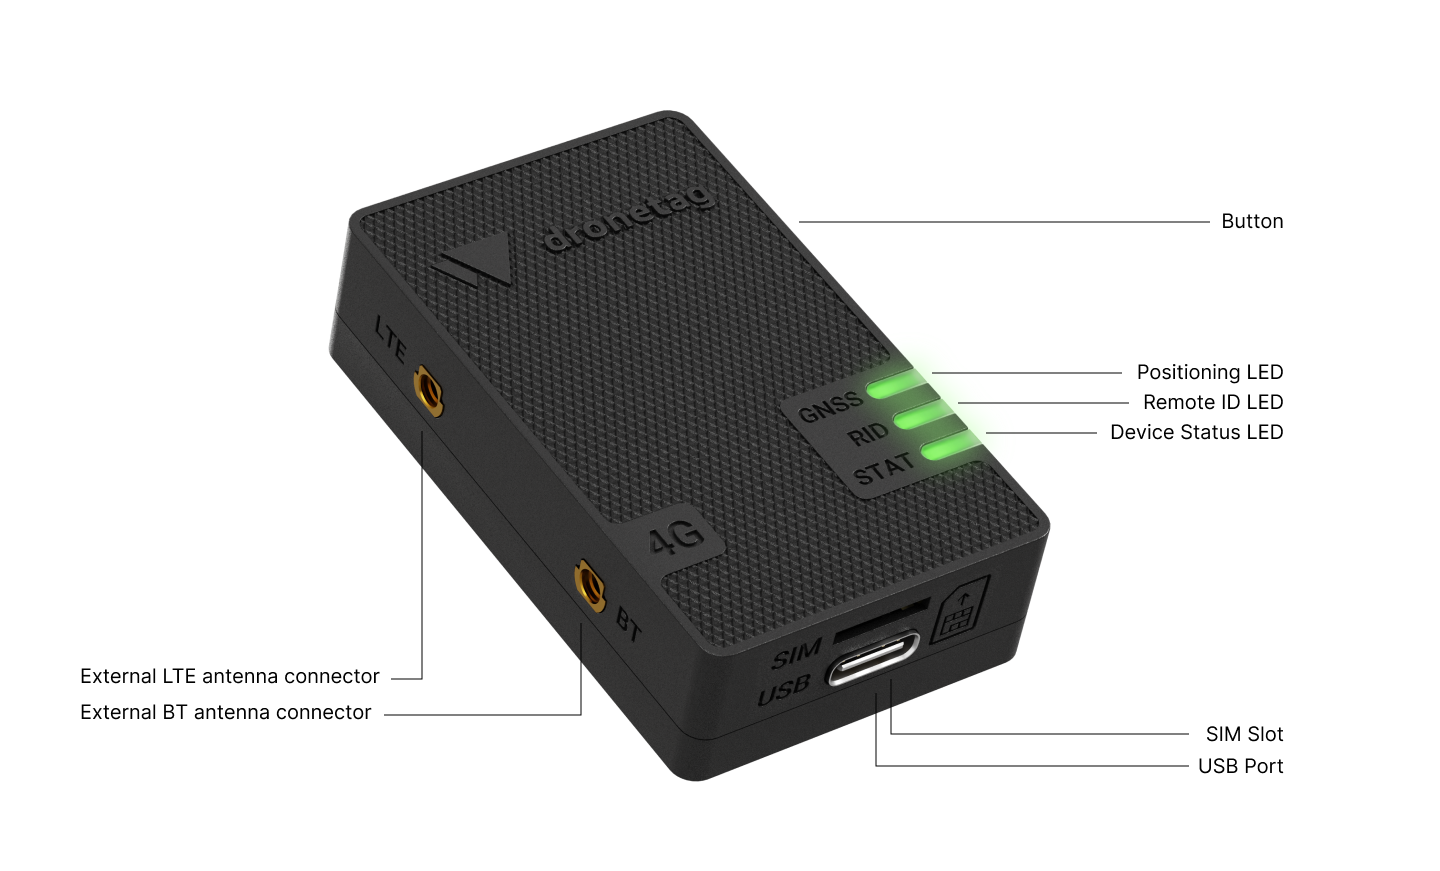
User Interactions
Dronetag Mini 4G is operated with the button located on the longer side of the device.
- Long press (2 s): Switch the device on or off
- Short press (0.1 s): Start flight or end flight (while the device is turned on)
- Short press (0.1 s): Battery indication (while the device is turned off)
- Extra-long press (5-15 s): Force device reset to factory defaults (Press and hold the power button until the LEDs turn purple and the countdown finishes)
General usage
The device usually works in all outdoor areas with a GNSS signal and cellular coverage. To quickly start your flight (assuming that you already registered your device):
- Check the battery level while the device is turned off by a short button press (0.1 s).
- Turn on the device by long-pressing the button (2 s).
- Wait until all device components are ready and 3 LEDs transition to solid green.
- The flight will start automatically, or you need to confirm it with a short button press (based on your Flight auto start configuration).
- Do your mission.
- End the flight by a short button press (0.1 s).
- Switch off the device by a long button press (2 s).
What's in the Box
After the Mini 4G is delivered to you, the following package contents should be present:
- 1 × Dronetag Mini 4G
- 1 × USB-C cable
- 3 × Dual Lock counterpart for drone
- 1 × Alcohol cleaning pad
- 1 × Quick start guide
- 1 × Dronetag sticker
Network Remote ID vs. Direct/Broadcast Remote ID
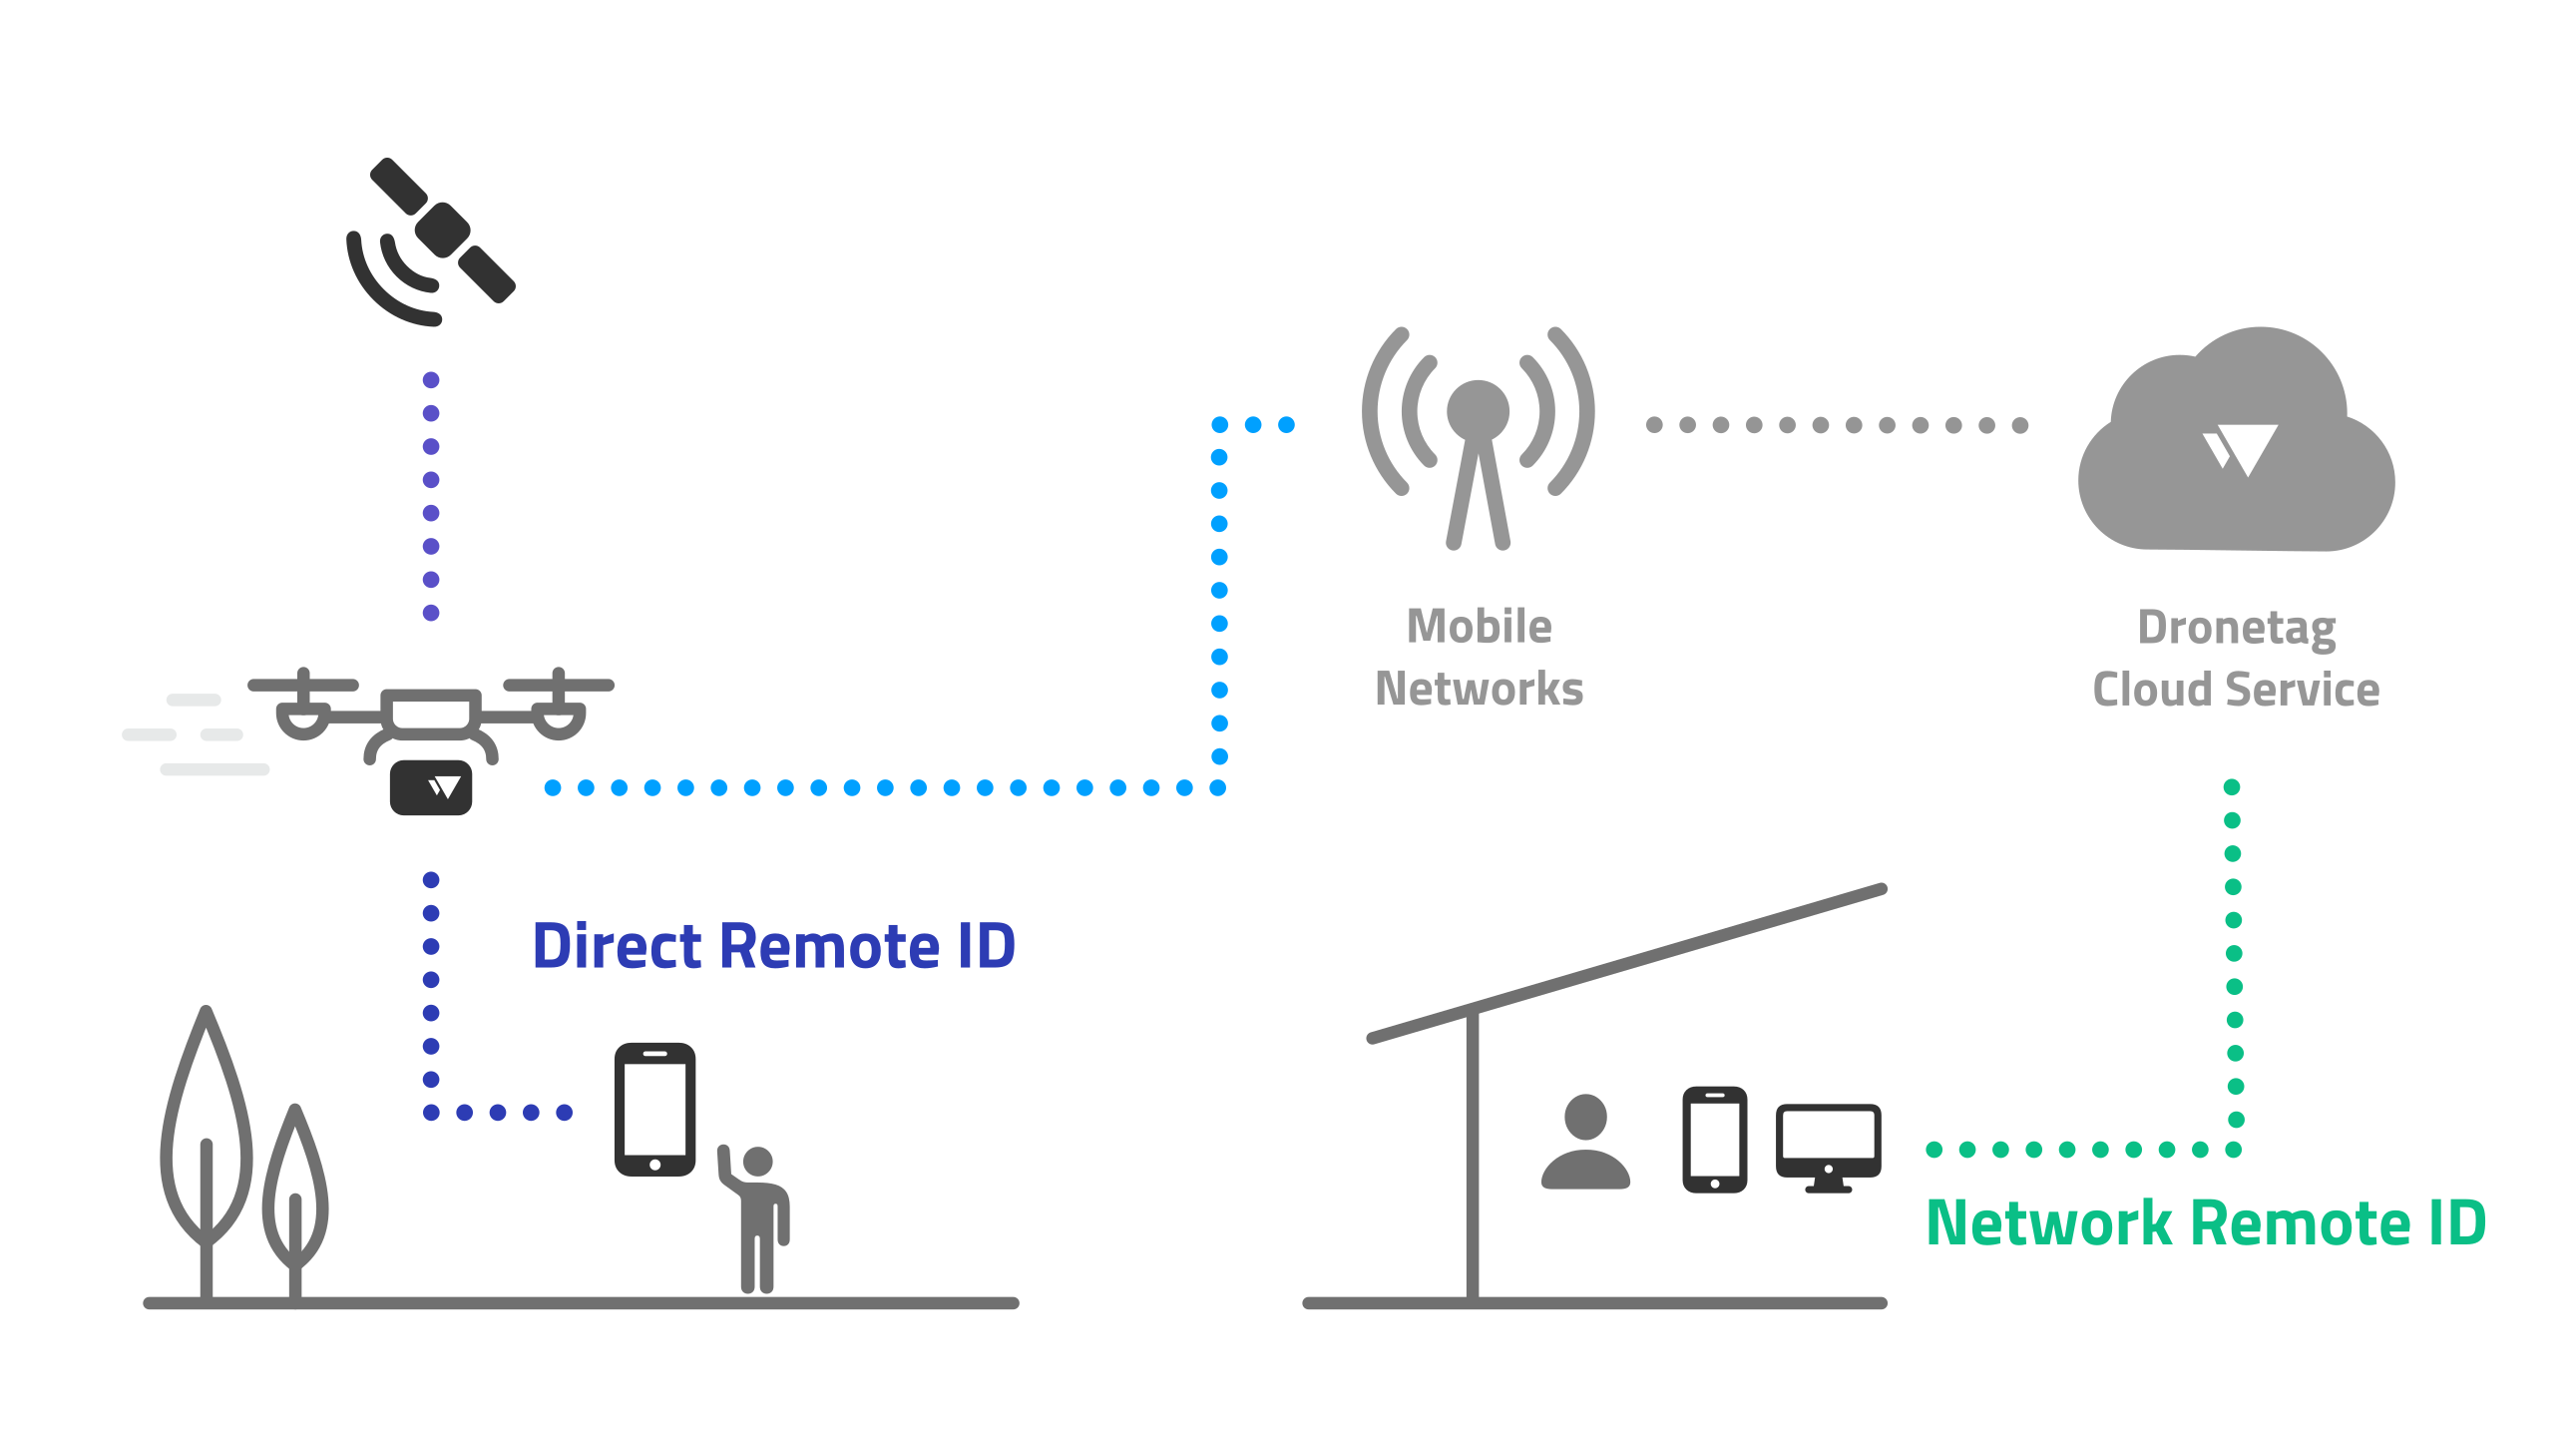
Connectivity & SIM options
Mini 4G includes an embedded Emnify MFF2 SIM (chip SIM). LTE connectivity works with an active subscription, which covers both Cloud features and cellular data.
Nano-SIM slot: Mini 4G also provides a nano-SIM slot. You can insert your own SIM, and the device will use your SIM for LTE connectivity instead of the embedded one.
Specification
Dronetag Mini 4G transmits position and identification data adhering to Direct (Broadcast) and Network Remote ID regulations. Its transmission follows the standards outlined in prEN 4709-002 for the EU and ASTM F3411 for the US. Dronetag Mini is officially recognized as a Remote ID solution on the EASA website.
| Parameter | Value |
|---|---|
| Cellular | LTE CAT-1 bis |
| Frequency range | (703* external antenna only, band 28) 791-960 MHz, 1710-2170 MHz, 2500-2690 MHz |
| Cellular bands | LTE-FDD: 1, 3, 5, 7, 8, 20, 28* |
| Cellular transmitting power | Power Class 3 |
| Bluetooth (phone connection) | Bluetooth 4, Bluetooth 5 |
| Bluetooth output power | 8 dBm |
| Sensors | GNSS, barometer, accelerometer |
| Positioning | GPS L1, GLONASS L1, Galileo E1, BeiDou B1C, SBAS, QZSS |
| SIM card | Integrated SIM chip on the mainboard and slot for nano SIM |
| Built-in antennas | Internal LTE, Bluetooth and GNSS |
| Optional antennas | External LTE and Bluetooth via MMCX jacks |
| Battery | Li-Po 3.7 V 600 mAh |
| Battery life | up to 10 hours |
| Charging | 5 V USB-C |
| Charging time | 3 hours from a discharged state |
| Enclosure | SLA resin 3D printed |
| Fastening mechanism | 3M Dual-lock SJ4570 |
| IP rating | IP43 |
| Operating temperature | -20°C to +60°C (-4°F to 140°F) |
| Dimensions | 57.5 x 35 x 16 mm (2.26 x 1.37 x 0.63 in) |
| Weight | 36 grams (1.27 oz) |
Cellular Coverage
LED Indications
Three LEDs indicate the status of the device and its components - Positioning (GNSS), Remote ID (RID) and Status (STAT).
- Positioning (GNSS) informs about the current state of the satellite positioning system.
- Remote ID (RID) informs about everything related to the Network & Direct Remote ID functionality.
- Status (STAT) informs about the overall device status.
Device States
Possible states are the following:
Blue gradually pulsing on all indicators
The number of non-pulsing LEDs shows the current battery charge. E.g. 50% charged, 1 solid and 1 pulsing blue LEDs, 100% charged = 3 solid blue LEDs. Battery charge can be briefly checked by short pressing the button once while turned off.
One or more indicators are pulsing yellow
Yellow means that the pulsing component is not ready for a flight or has a temporary outage. Wait for the component to get ready (green). In cases of poor signal, move to an area with better coverage. Find more information about this subject in Troubleshooting.
All indicators are green lit
In this state, the device is ready for the flight to be started. Do the short press of the button to start your flight.
Running green on all indicators
For the proper function of Network Remote ID, each flight needs to be successfully created and then ended on our cloud. It is indicated by running green LEDs (please keep in mind this may take some time). The communication may fail due to a poor cellular signal or internal error on the server-side. In this case, the device might end up in an error state and then it needs to be restarted.
Flashing white on one or more indicators
In this state, the device sends the Network Remote ID data to our cloud and broadcasts Direct Remote ID data to everyone around via Bluetooth. The particular Remote ID technology is defined in the Configuration and cannot be changed during the flight.
Flashing white on STAT and pulsing yellow on RID/GNSS
GNSS or RID (or both) can have a temporary outage (e.g. lost GNSS or weak LTE). This will be indicated by pulsing a yellow LED on a component that is affected. Please note that Remote ID data cannot be refreshed in this state.
STAT and GNSS indicators are flashing white, RID indicator is red lit
If cloud communication fails during flight, the flight continues without interruption. This condition is indicated by a solid red RID indicator.
RID indicator is blinking red
When the device has no active subscription / cannot connect to any account / detect an inserted SIM card, the red RID indicator blinks rapidly every 5 seconds.
STAT and GNSS indicators are green, the RID indicator is red lit
After a flight ends with cloud communication failure, the device returns to the 'Flight Ready' state. However, cloud connectivity remains unavailable, indicated by a solid red RID indicator.
Running cyan on all indicators
The device is performing shutdown tasks and will soon turn off. Please wait until it finishes. If the device's cellular signal is poor or the configuration has changed, powering off might take up to one minute.
Running rainbow on all indicators
The firmware on the device is being updated to the latest version / Reset to factory defaults is in progress. Please, do not turn off the device or disconnect it from the USB (if already connected). Wait for the update / reset to be finished.
All indicators are pink lit
Hold the button for 15 seconds to perform device power reset. All LED indicators will light up solid pink to indicate the power reset got executed.
Pink indicators turn off sequentially
Immediately after the Power Reset, if the button remains held, the device enters a factory reset countdown. The LEDs turn off one by one during the countdown. To complete the Settings Factory Reset, continue holding the button until all LEDs turn off and the RGB animation begins. Once finished, the LEDs light up white for 1 second, and the device restarts with factory settings.
All indicators are white lit
The device has entered recovery mode. There are two situations when it might happen:
- Device encountered a fatal error in the firmware and needs to be hard restarted (15 s button press).
- You have plugged the recovery dongle inside the EXT port. In recovery mode, you are able to update the device firmware via USB. To quit this mode, hold the button for 15 s.
One of the indicators is red lit
An unrecoverable error happened on the device side. It might be caused by various reasons, from GNSS/LTE timeout to the unreachable cloud for Network Remote ID functionality. Please turn the device off and on with a button long press (2 s). If the problem persists, go to Troubleshooting.
One or more indicators are blinking red
Some user-oriented actions may fail due to the unreadiness of the device or its components. For example, this can happen if you want to start a flight before the GNSS/RID is fully prepared or if you're going to turn on the device when discharged. Please try to repeat the action once the device is in the proper state.
Configuration
The Mini 4G is a highly customizable piece of hardware to suit your flight's needs. It allows you to configure various device parameters, which will help you optimize the performance and battery usage. Configuration is manageable in the Mobile app via Bluetooth.
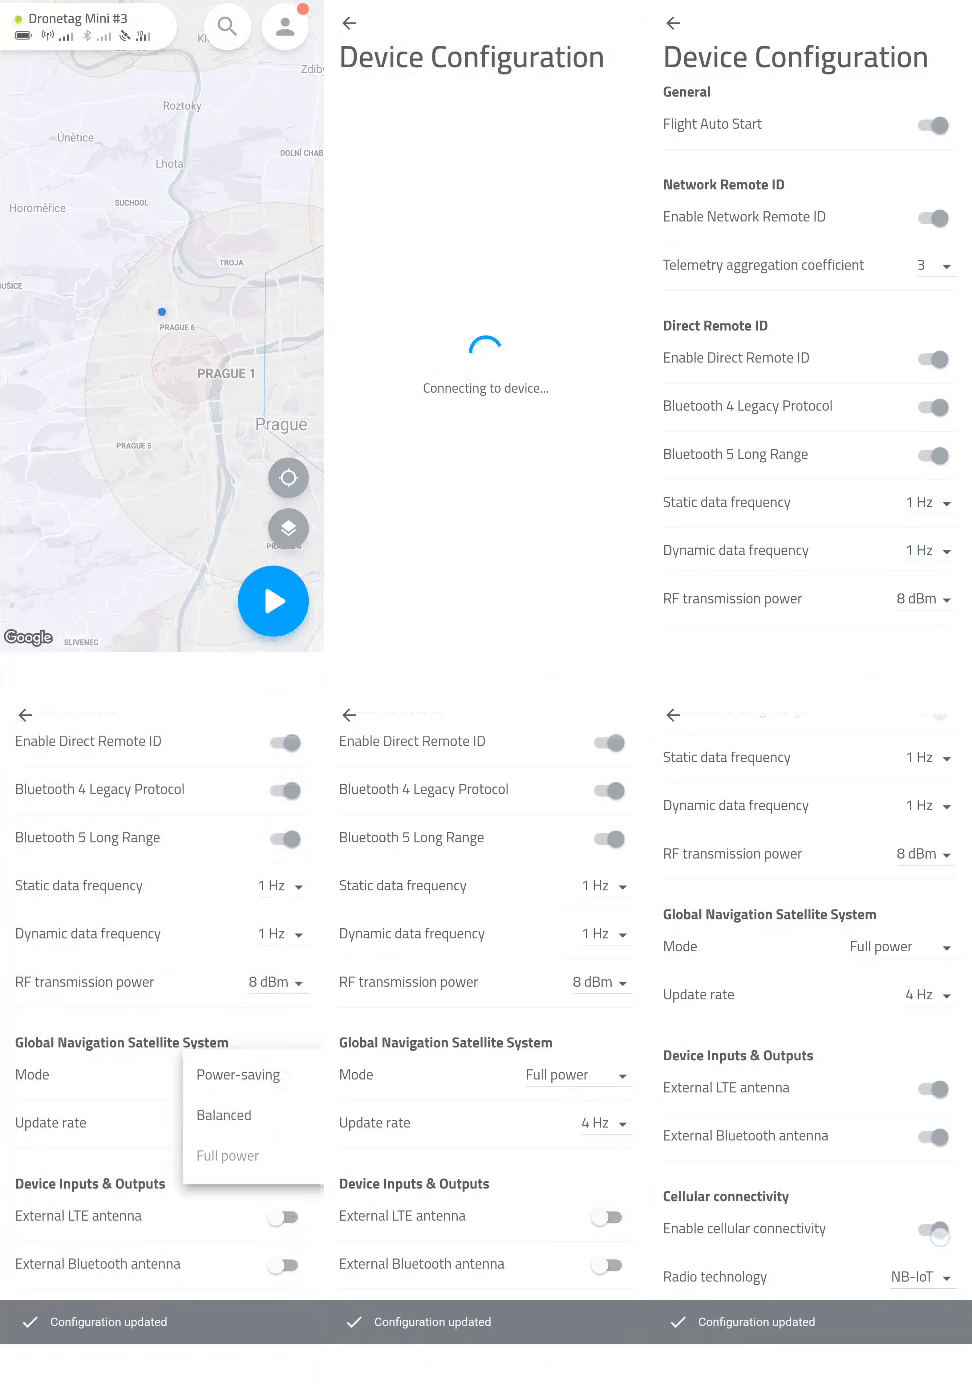
General
- Button flight control is an option (enabled by default) that controls whether the Dronetag Mini 4G button can be used for starting/ending the flight. Disable this option only if you think the button can be accidentally pressed by something inside the drone while it is in flight.
- USB Mode (disabled by default) ensures that the device operates in tandem with the drone's activation. It's crucial to enable this mode only when planning to connect the device directly to your drone and utilize the drone's power source to operate it. Activating USB Mode may affect the device's ability to undergo firmware updates while not connected to USB.
- LED Brightness adjusts the brightness level of the LED indicators.
- Auto Power Off interval defines the idle time (in minutes) after which the device will automatically shut down.
- Flight auto-start is an option (enabled by default) that automatically initiates the flight when the device is ready for the flight (has a GNSS fix and NRI/DRI is set). If you disable this option, a short button press in Flight Ready state is needed to start the flight manually.
Flight Auto-Start may consume subscription flight hours
- When Auto-Start is enabled, Mini 4G will automatically start a flight as soon as it acquires a GNSS fix. If you power the device on (e.g., on a desk, indoors, or during transport) without intending to fly, this can create unintended flights and use up your subscription flight hours.
How to avoid this
- Disable Auto-Start when bench-testing or transporting the device (Dronetag App → Profile → My devices → Dronetag Mini 4G → Configuration → Enable Flight auto-start → Off).
- If you started a flight by mistake, end the flight by Power Button short press or in the app and power off the device when not in use.
- For routine operations, power the device on only when you’re ready to fly.
🆔 Entering Your Operator ID in the Dronetag App
Before you fly with your Dronetag device, you need to enter your Operator ID in the app. This ensures full compliance with Remote ID / UAS identification regulations in your region.
We support different formats and rules depending on the region you operate in: EU & Singapore, Japan, USA.
What is an Operator ID?
An Operator ID is a unique identifier issued to you (or your organisation) by your national aviation authority when you register as a drone operator.
- It identifies the operator, not just one drone.
- It must be displayed on each drone you operate and in many cases broadcast via Remote ID systems.
- You will enter this ID into the Dronetag app so that your device broadcasts the correct identifier.
- Where to get it? You register with your national authority (e.g., in the EU via your country’s CAA, in Japan via MLIT, in USA via FAA).
- EU: Register with your national CAA → receive your Operator ID. oaicite:0
- Japan: Register on the MLIT drone portal. oaicite:1
- USA: Register via FAA DroneZone. oaicite:2
- EU: Register with your national CAA → receive your Operator ID.
The format of the ID and whether you need to enter it depends on your region. Follow the section below for your specific region.
EU & Singapore
Format
- EU: Your Operator ID consists of two parts: a public part (16 alphanumeric characters) and a private/suffix part (often 3 characters) which you do not normally affix to your drone.
- Example public part:
CZEabc123def456 - Private suffix: e.g.
-xyz(used internally, not for display)
- Example public part:
- Singapore: Similar format (12-digit Operator ID issued via UA Portal) effective from 1 Dec 2025.
How to Enter into Dronetag App
- Open the Dronetag app.
- Go to Profile → My Devices → [Choose Your Device] → Remote ID set-up.
- Enter your 16-character public part (e.g.,
CZEabc123def456). - Do not enter the private suffix (e.g.,
-xyz) unless instructed. - Your Operator ID will be uploaded to the device and broadcast.
Where to Get the ID
- Register with the national aviation authority in your country (for EU residents) or via the UA Portal (for Singapore).
- Ensure the ID is visible on every drone you own.
Japan
Format
- A 15-character operator registration number issued by the Ministry of Land, Infrastructure, Transport and Tourism (MLIT) via the national UAS portal.
How to Enter into Dronetag App
- Open the Dronetag app.
- Go to Profile → My Devices → [Your Device] → Operator ID.
- Enter the full 15-character code as given by MLIT.
- Your Operator ID will be uploaded to the device and broadcast.
Where to Get the ID
- Register your drone/operator via Japan’s UAS registration portal.
USA
Format
- In the USA, you register as an operator with the Federal Aviation Administration (FAA) and receive a registration number. However — you typically do not need to separately enter an Operator ID in the Dronetag app for Remote ID purposes, since standard Remote ID drones broadcast the required info and the operator number is linked via the DroneZone system.
What to Do in the Dronetag App
- Since no extra Operator ID entry is required, simply ensure your drone is correctly registered with the FAA and that your device is Remote ID compliant.
Where to Get the ID
- Register via FAA DroneZone and obtain your operator registration number. Ensure your drone meets Remote ID rules.
- After entering your Operator ID, power on your device, go to the device details in the app, and check that the Operator ID is synchronised.
- Make sure that the ID you entered exactly matches the one issued by the authority (uppercase/lowercase, hyphens, etc.).
- Confirm the ID is visible on your drone (as required in your region).
- For the EU: Only the public part of the Operator ID is broadcast; keep the suffix/private part secure and do not share it.
- If unsure, check with your national aviation authority or your Dronetag supplier.
Flights
-
Store flight data is an option (disabled by default) that automatically stores all flight data, such as duration, path and altitude directly on the device. This feature becomes useful when there is a lack of cellular signal and your flight data cannot be shared to cloud or when you decide not to use a Mini 4G without subscription.
-
The device has limited storage, so you should download your flight data regularly (Dronetag App → Profile → My devices → Dronetag Mini 4G → Synchronize flights → Follow the steps via the app).
Network Remote ID (Cellular)
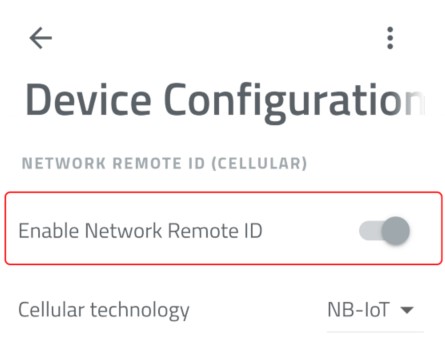
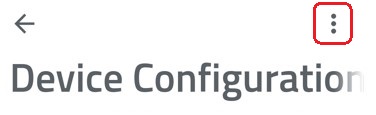
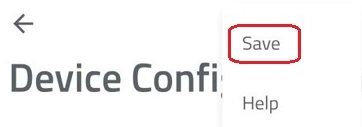
- Enable Network Remote ID - Network Remote ID broadcast service is enabled by default. If you want to turn this option off, navigate to Network Remote ID in Device Configuration and switch off the toggle, save the settings and restart the device.
This is a necessary step in case you decide to use the Free subscription plan
-
Configure bands automatically - when enabled, the device will automatically detect LTE bands based on the device location.
-
Selected bands - this option is configurable only when "Configure bands automatically" is disabled. You can manually select your region or country, and the device will use only the LTE bands available for that region. Available options:
- Europe (bands 1, 3, 7, 8, 20, 28)
- United Kingdom (bands 1, 3, 8, 20, 28)
- North America (bands 2, 4, 5, 12, 13, 14, 66, 71)
- Israel (bands 1, 3, 7)
- South Korea (bands 1, 3, 5, 8)
- Japan (bands 1, 3, 8)
- All bands (enables all supported LTE frequency bands)
-
Configure PLMN & APN automatically - when enabled (default), the device automatically detects the Public Land Mobile Network (PLMN) and selects the correct Access Point Name (APN) based on the inserted SIM card and operator profile.
-
PLMN code - configurable only if "Configure PLMN & APN automatically" is disabled. Allows you to manually specify the PLMN code (a combination of MCC – Mobile Country Code and MNC – Mobile Network Code) to force the device to connect to a specific mobile network operator.
-
Access Point Name (APN) - configurable only if “Configure PLMN & APN automatically” is disabled. Defines the APN used for establishing a data connection to your operator’s network.
Direct / Broadcast Remote ID
- Static data frequency configures the frequency of the Direct / Broadcast Remote ID messages containing takeoff location, UAS Operator ID, and Aircraft ID.
- Dynamic data frequency configures the frequency of the Direct / Broadcast Remote ID messages with telemetry data.
- LTE Fallback Mode
- When enabled (default state), the device prioritizes continuous transmission of Direct / Broadcast Remote ID messages. If any issue occurs with the cellular or cloud connection, it will disconnect from the cloud and continue transmitting the Remote ID messages with the possibility to store telemetry data locally (if Flight Store enabled).
- When disabled, the device prioritizes maintaining a cloud connection - Network Remote ID. Connection issues may cause automatic restarts, which can temporarily interrupt transmission of Direct / Broadcast Remote ID messages and telemetry data recording.
Sensors
-
GNSS input configures which GNSS receiver is used as an input for sending the NRI and Direct / Broadcast Remote ID.
-
Internal GNSS mode configures the mode of the internal GNSS receiver. The Full power mode has just a slightly higher power consumption than the Power-saving mode. Therefore, it is recommended to use Full power mode.
-
SBAS configuration configures the Satellite-Based Augmentation System (SBAS) to improve GNSS accuracy and reliability.
- Auto – the device automatically selects the appropriate SBAS system based on the current location.
- WAAS – enables the Wide Area Augmentation System, primarily covering North America.
- EGNOS – enables the European Geostationary Navigation Overlay Service, primarily covering Europe.
-
Location update rate configures the update and navigation rate of the GNSS receiver in Hz. A higher value means more up-to-date data for Direct / Broadcast / Network Remote ID and consumes slightly more power. Thus 1 Hz is recommended for general use.
-
Takeoff position accuracy - specifies the accuracy of the takeoff position data. Please note that high accuracy requirements in non-ideal conditions may prevent the device from obtaining a GNSS fix with the required accuracy, and could therefore prevent the flight from starting.
- Excellent Precision - Maximum takeoff accuracy. May struggle to get a GNSS fix in non-optimal conditions.
- Good Precision - Offers high accuracy with a risk of delay in acquiring the GNSS fix.
- Moderate Precision - A balanced option, providing reliable accuracy and a quicker GNSS fix.
- Basic Precision - Prioritizes a fast GNSS fix but offers only a basic level of takeoff accuracy.
Device Inputs & Outputs
- External LTE antenna allows selecting internal or optional external LTE antenna.
- External Bluetooth antenna allows selecting internal or optional external Bluetooth antenna.
Cellular Connectivity
Settings in this section are country-specific and you shouldn’t change the values unless you know what you are doing. If you change the country, please tap on Configure network automatically and turn the device off and on to find the new cellular settings.
For more information about Dronetag cellular coverage and possible settings, visit this page. Contact the Dronetag team if you are unsure about your settings.
Attaching to the Drone
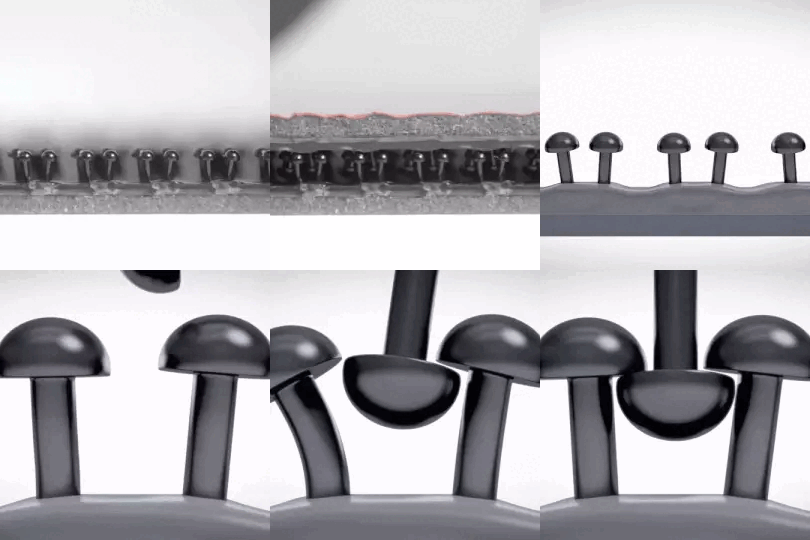
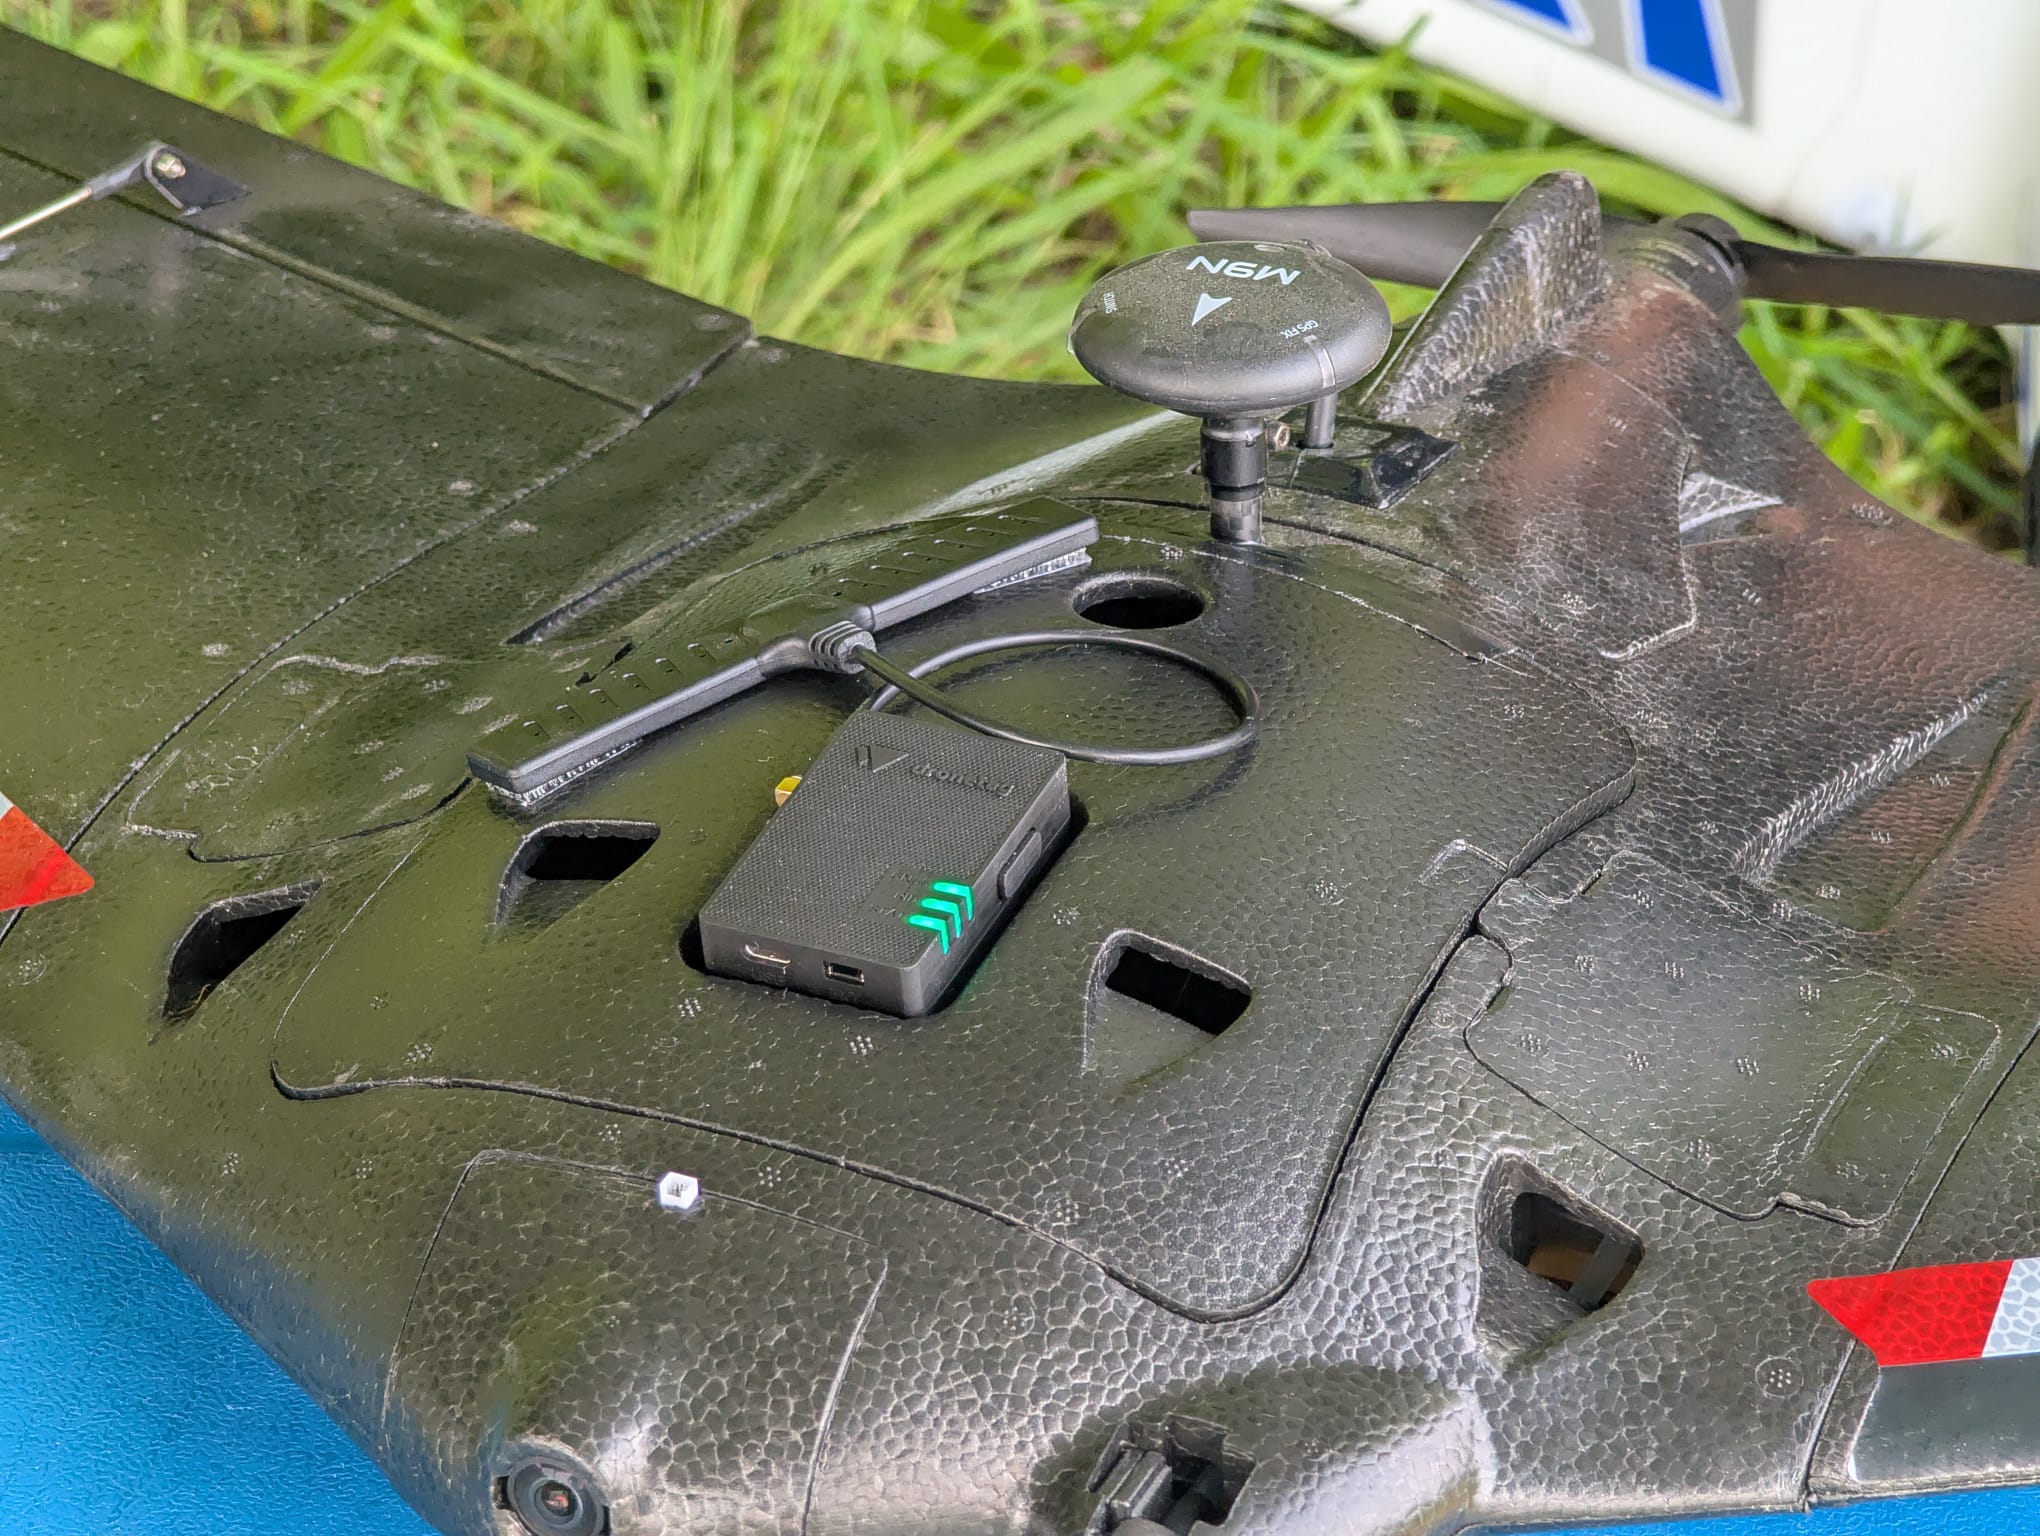
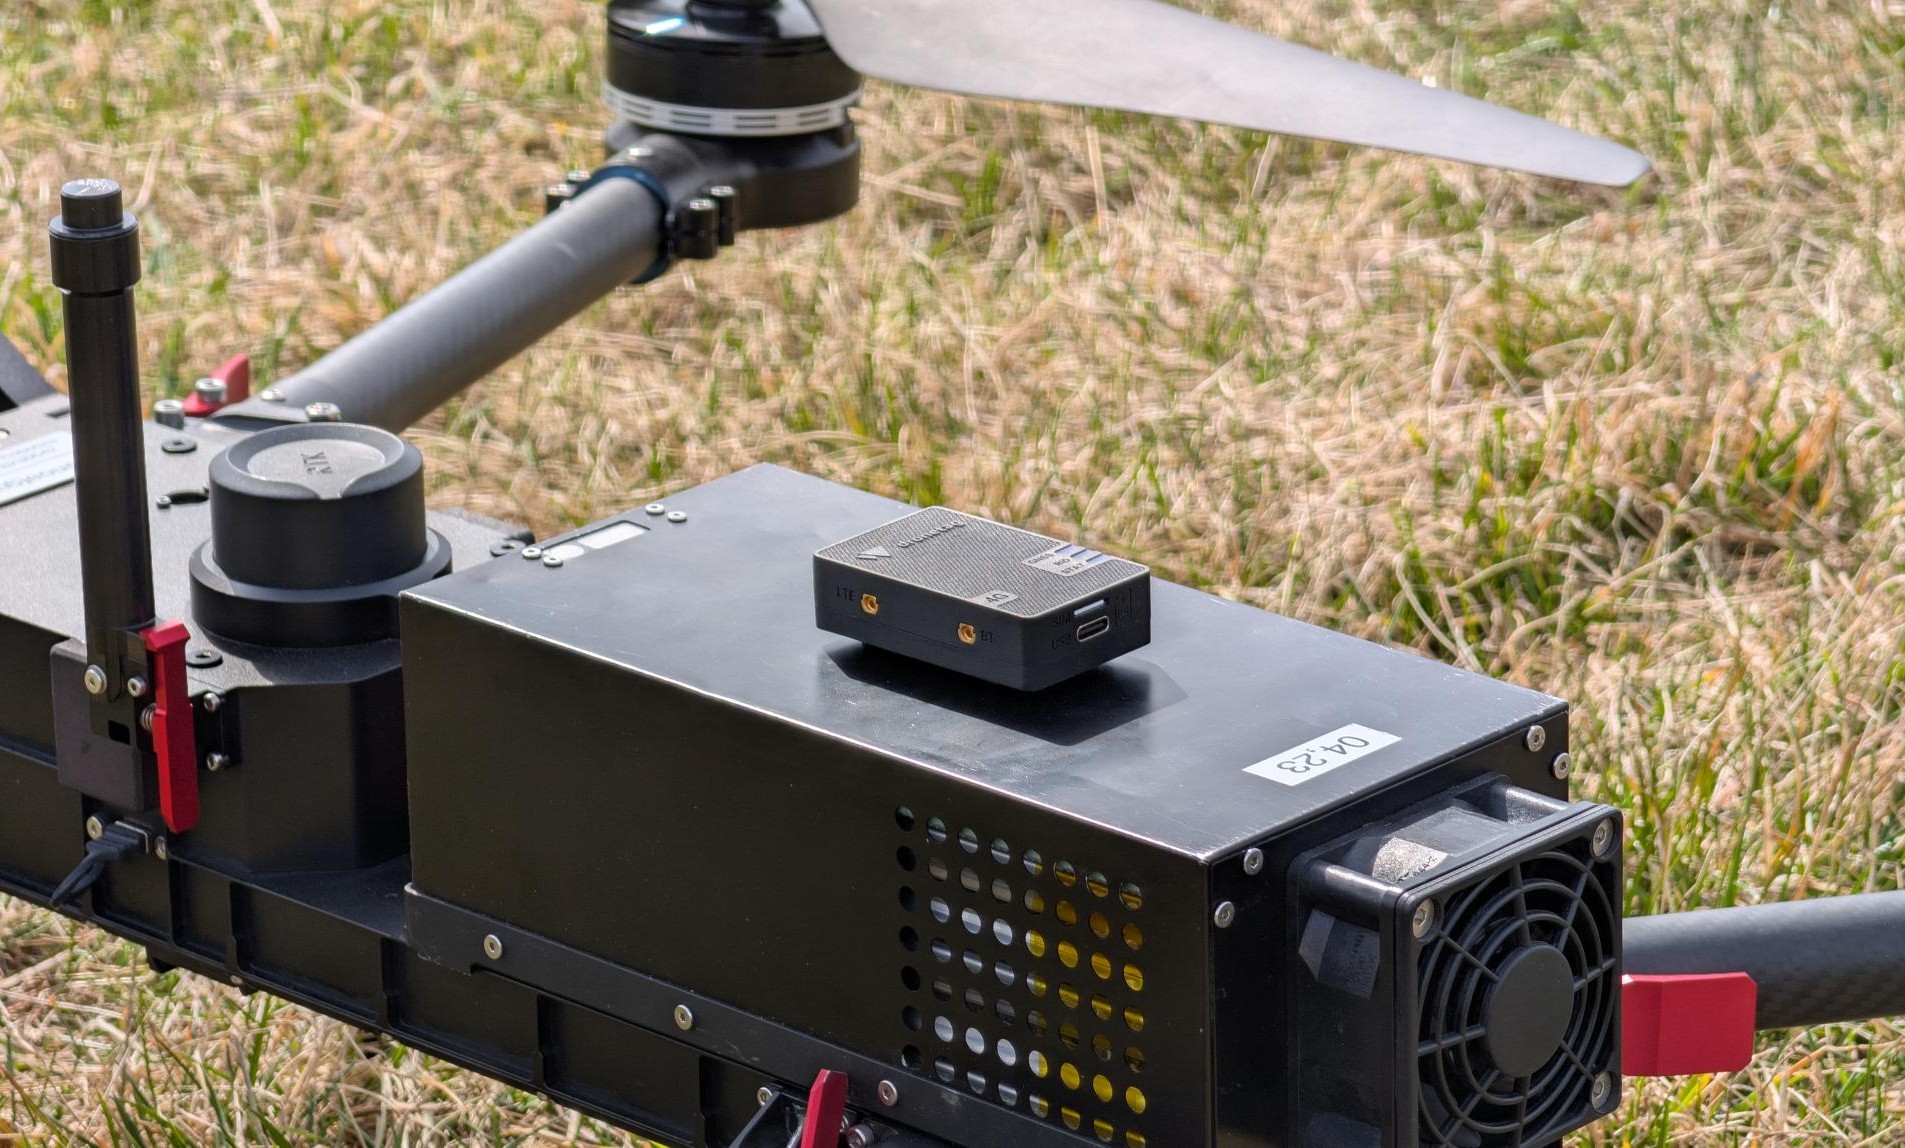
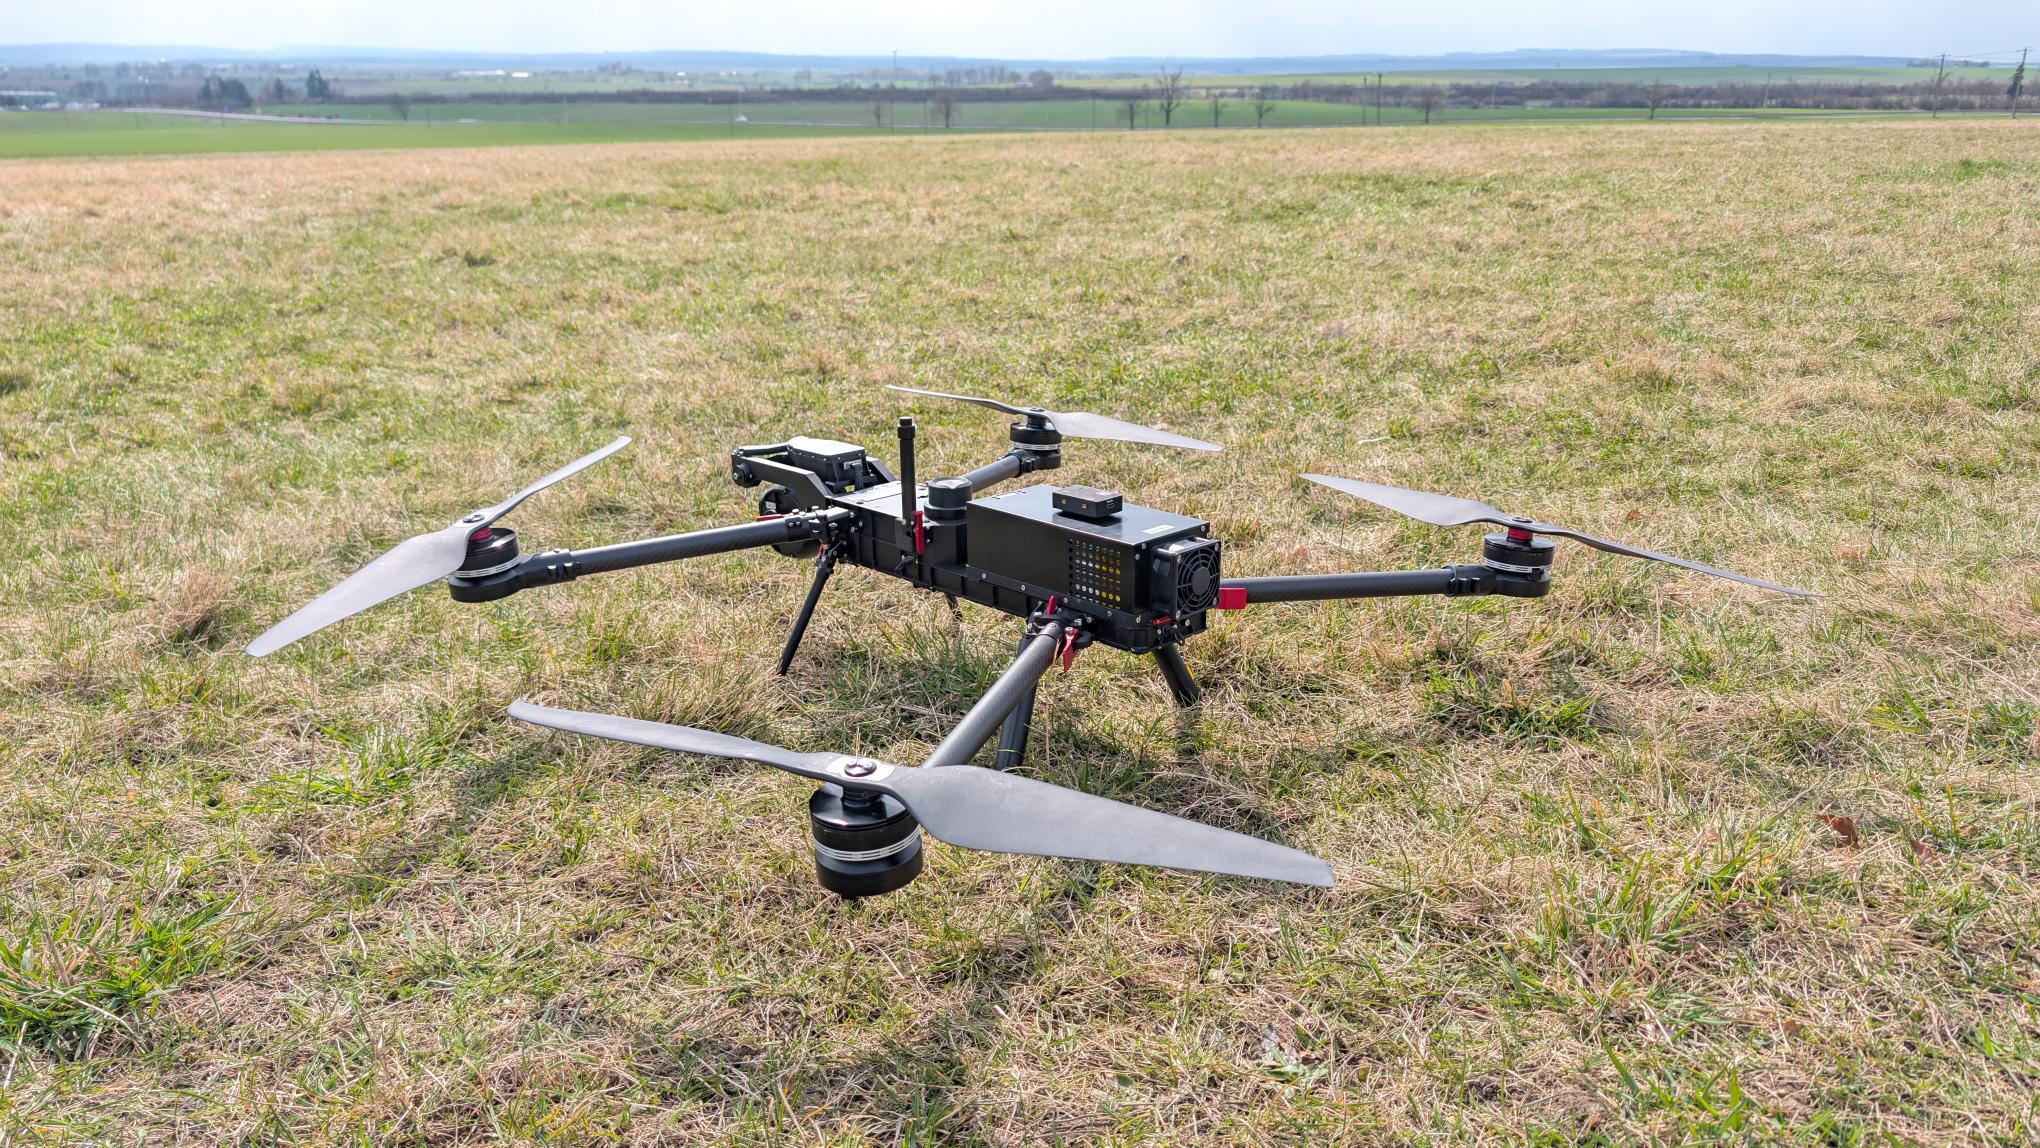
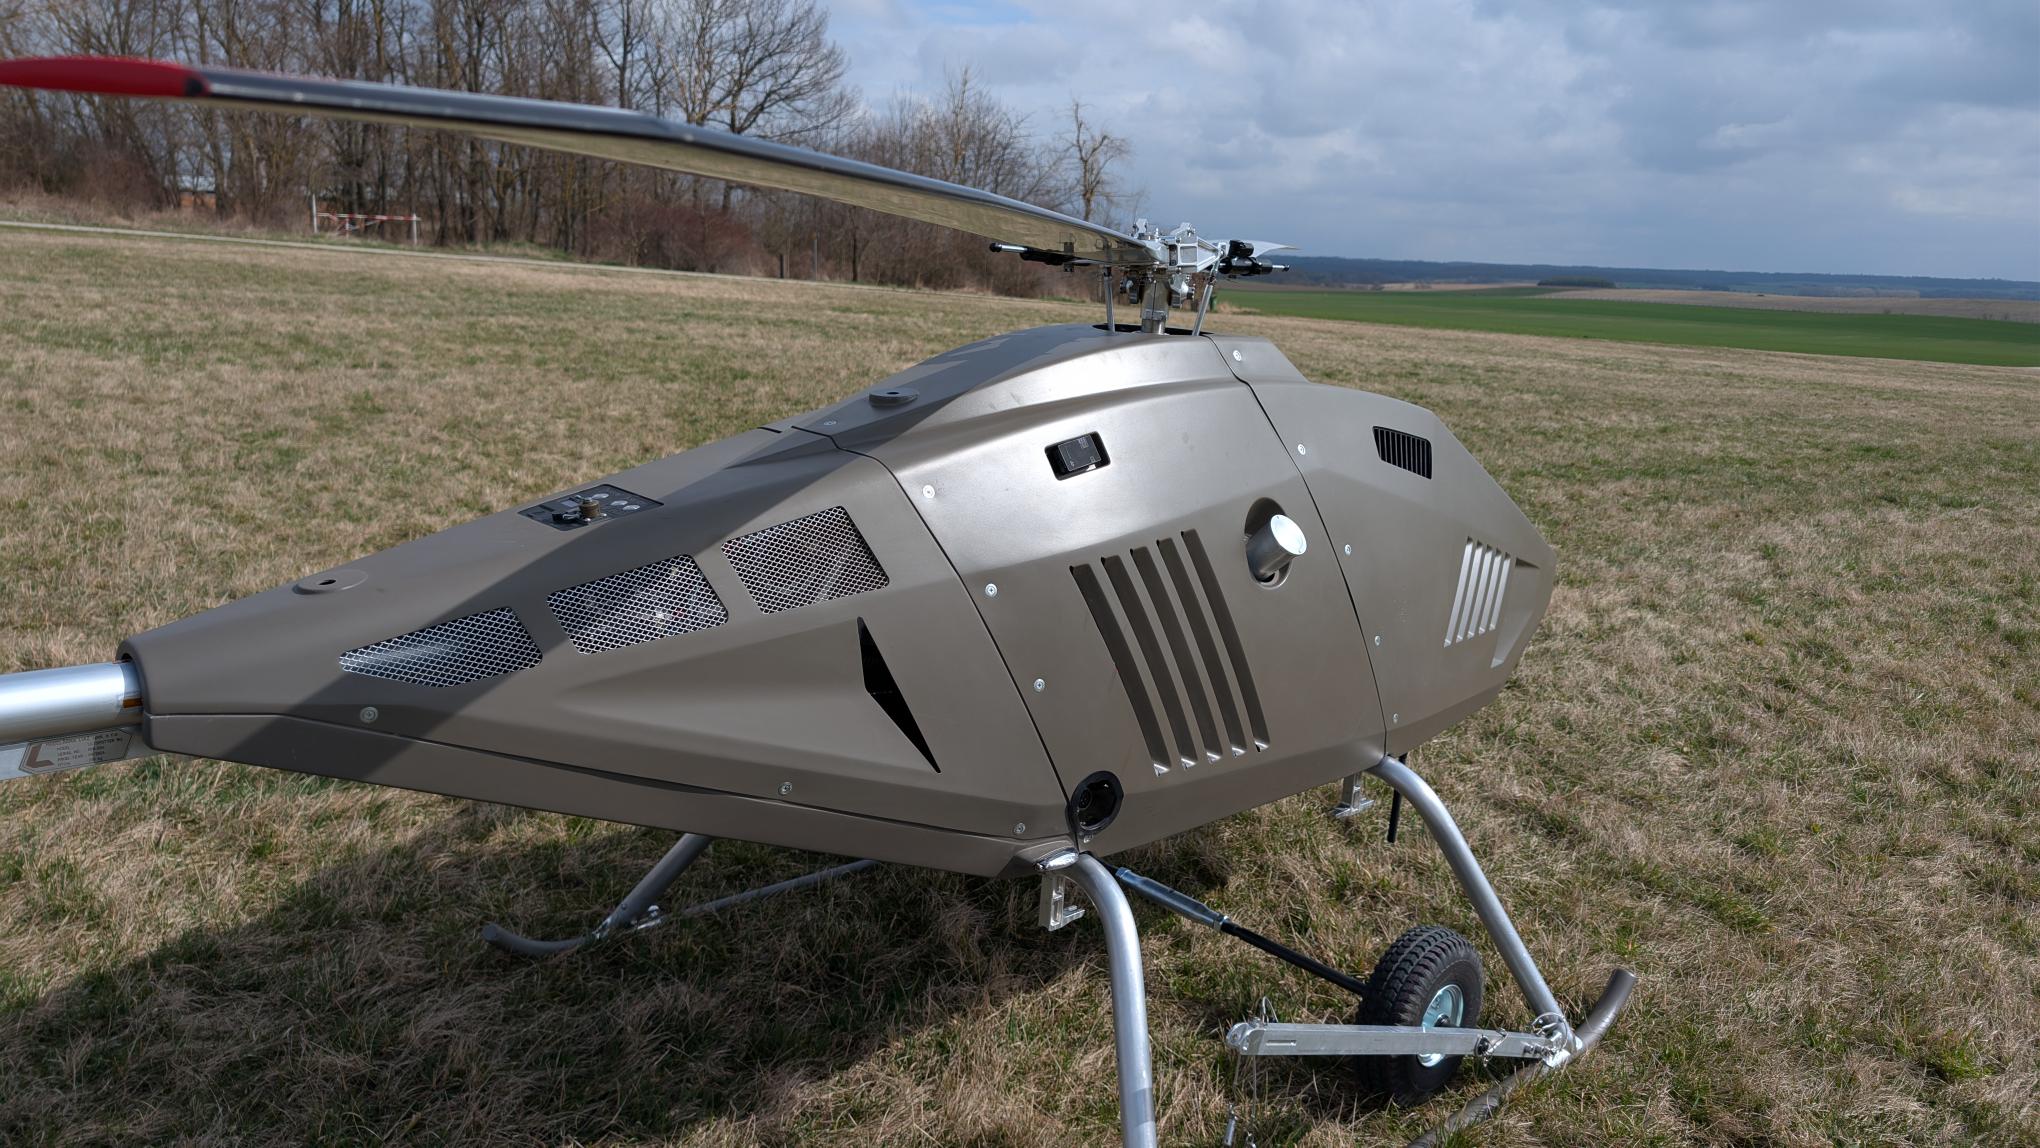
The Mini 4G uses a 3M Dual Lock reclosable fastener to be quickly & safely attached and detached from your drone. The Dual Lock holds firm when mated. The interlocking mushroom-shaped heads slide past each other to close with a snap and peel apart easily when you need to separate them by simply pulling the strips by hand.
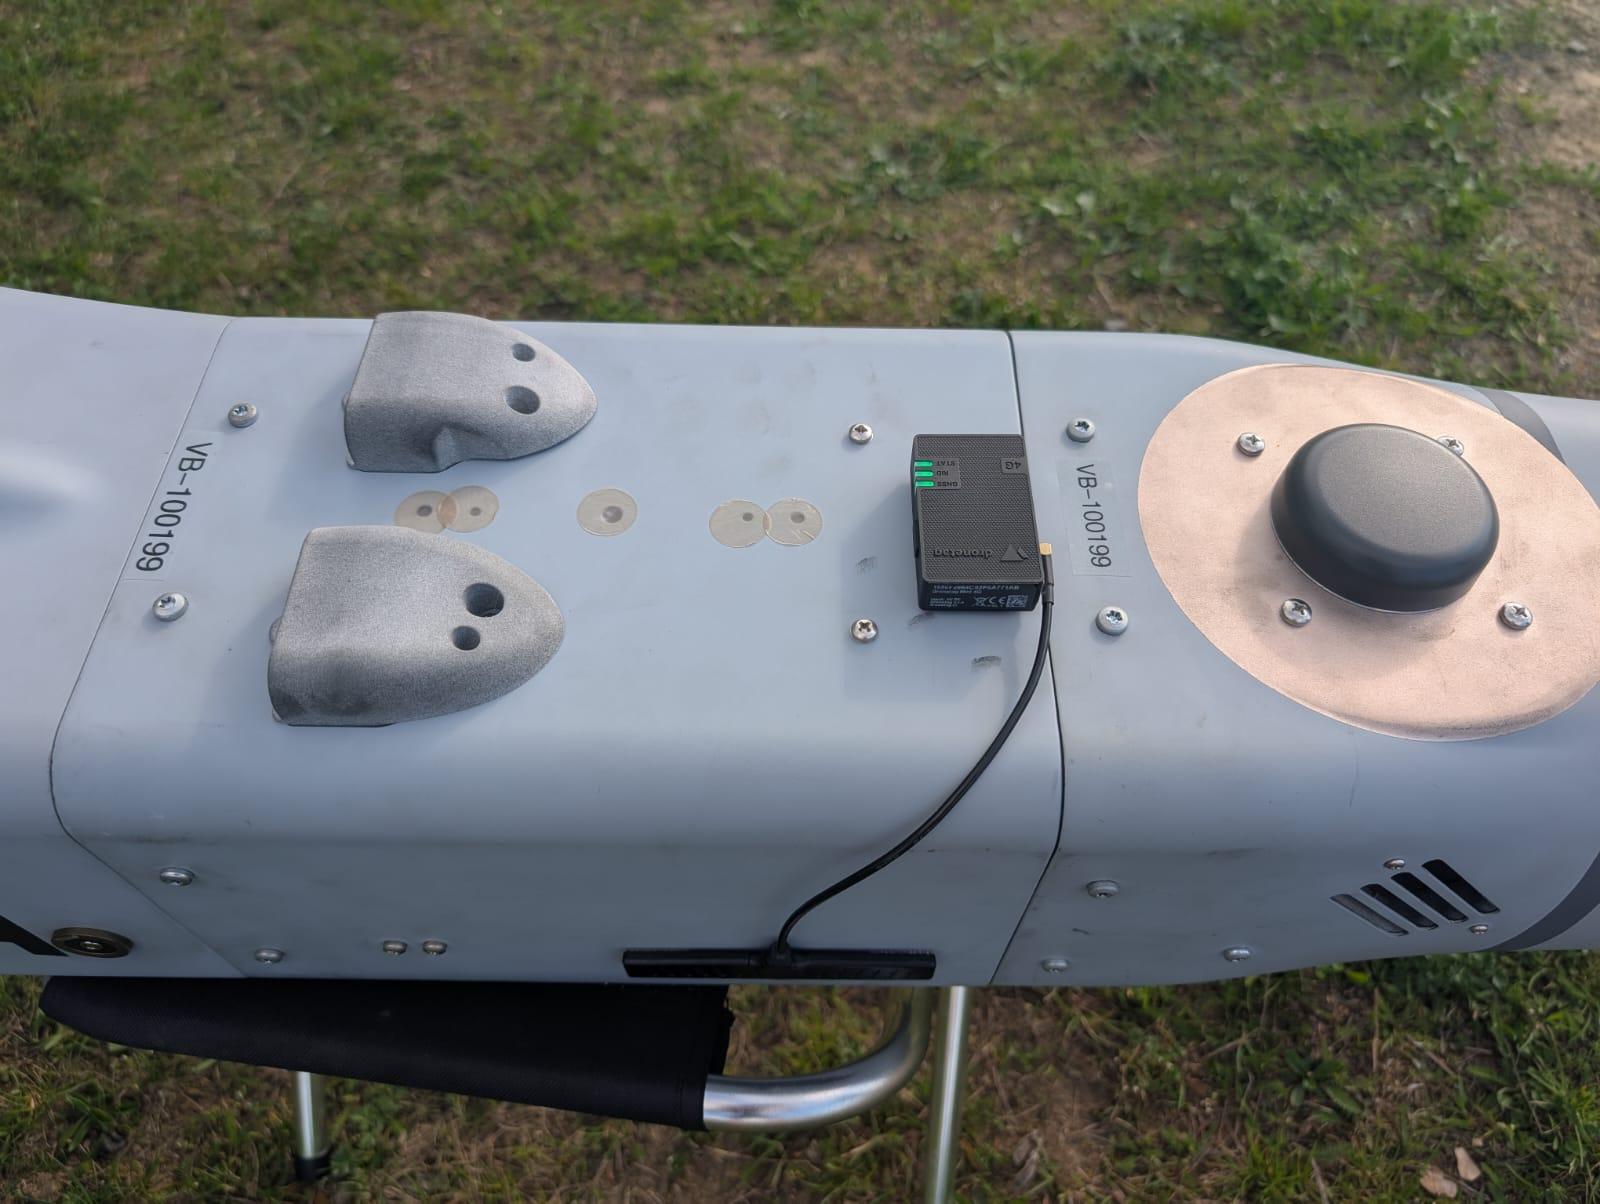
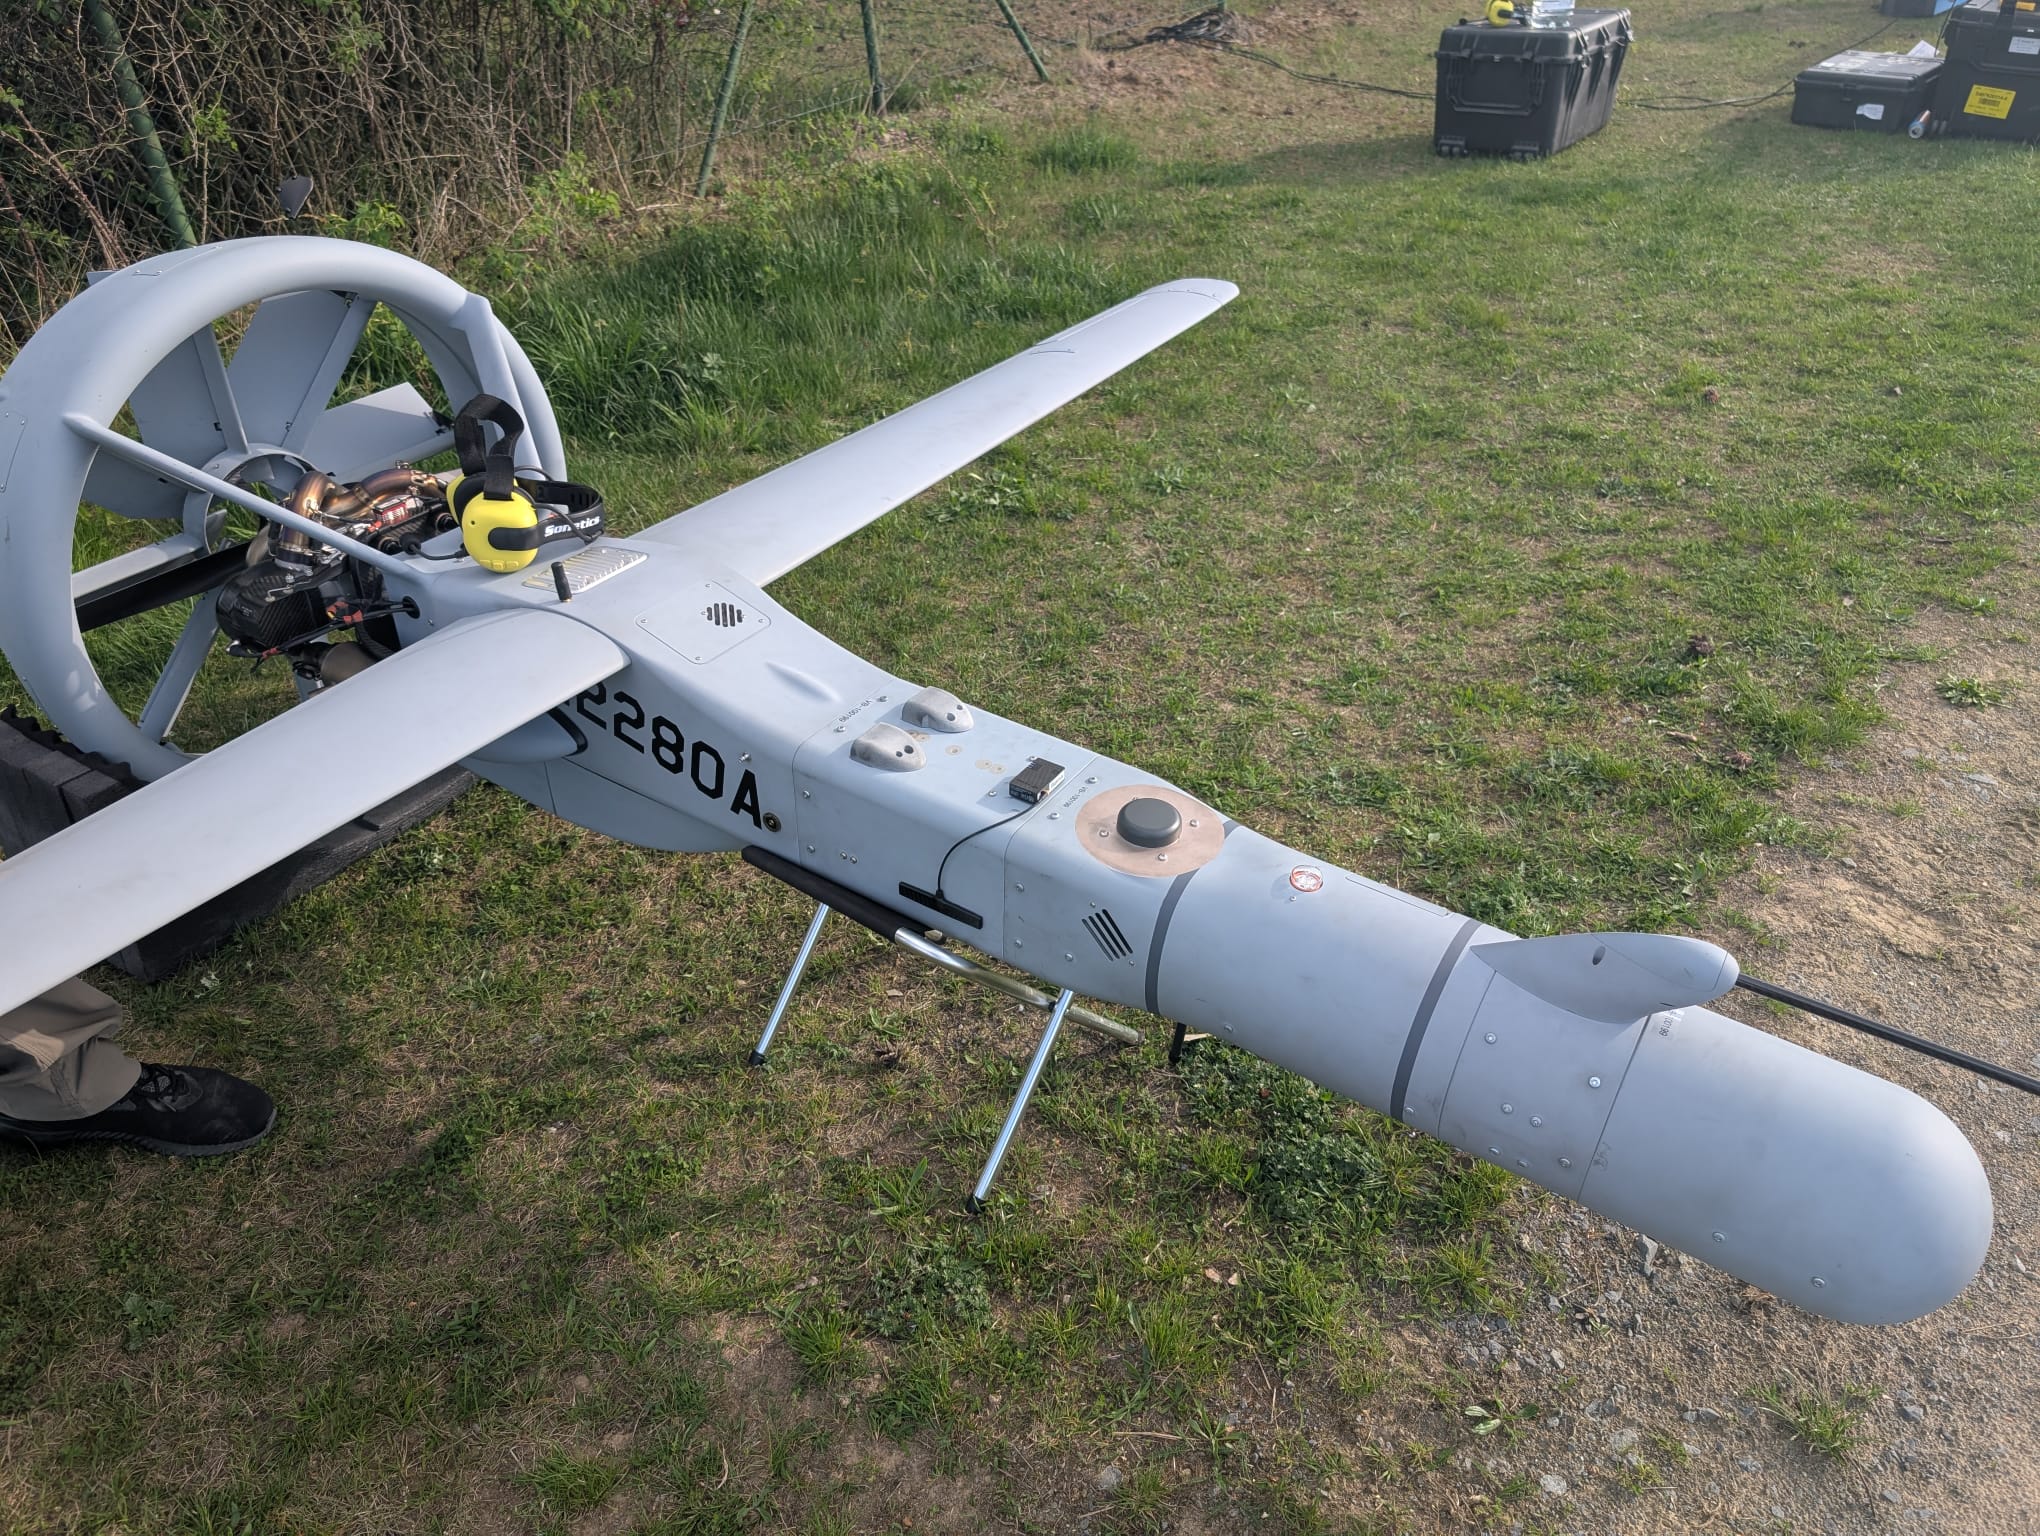
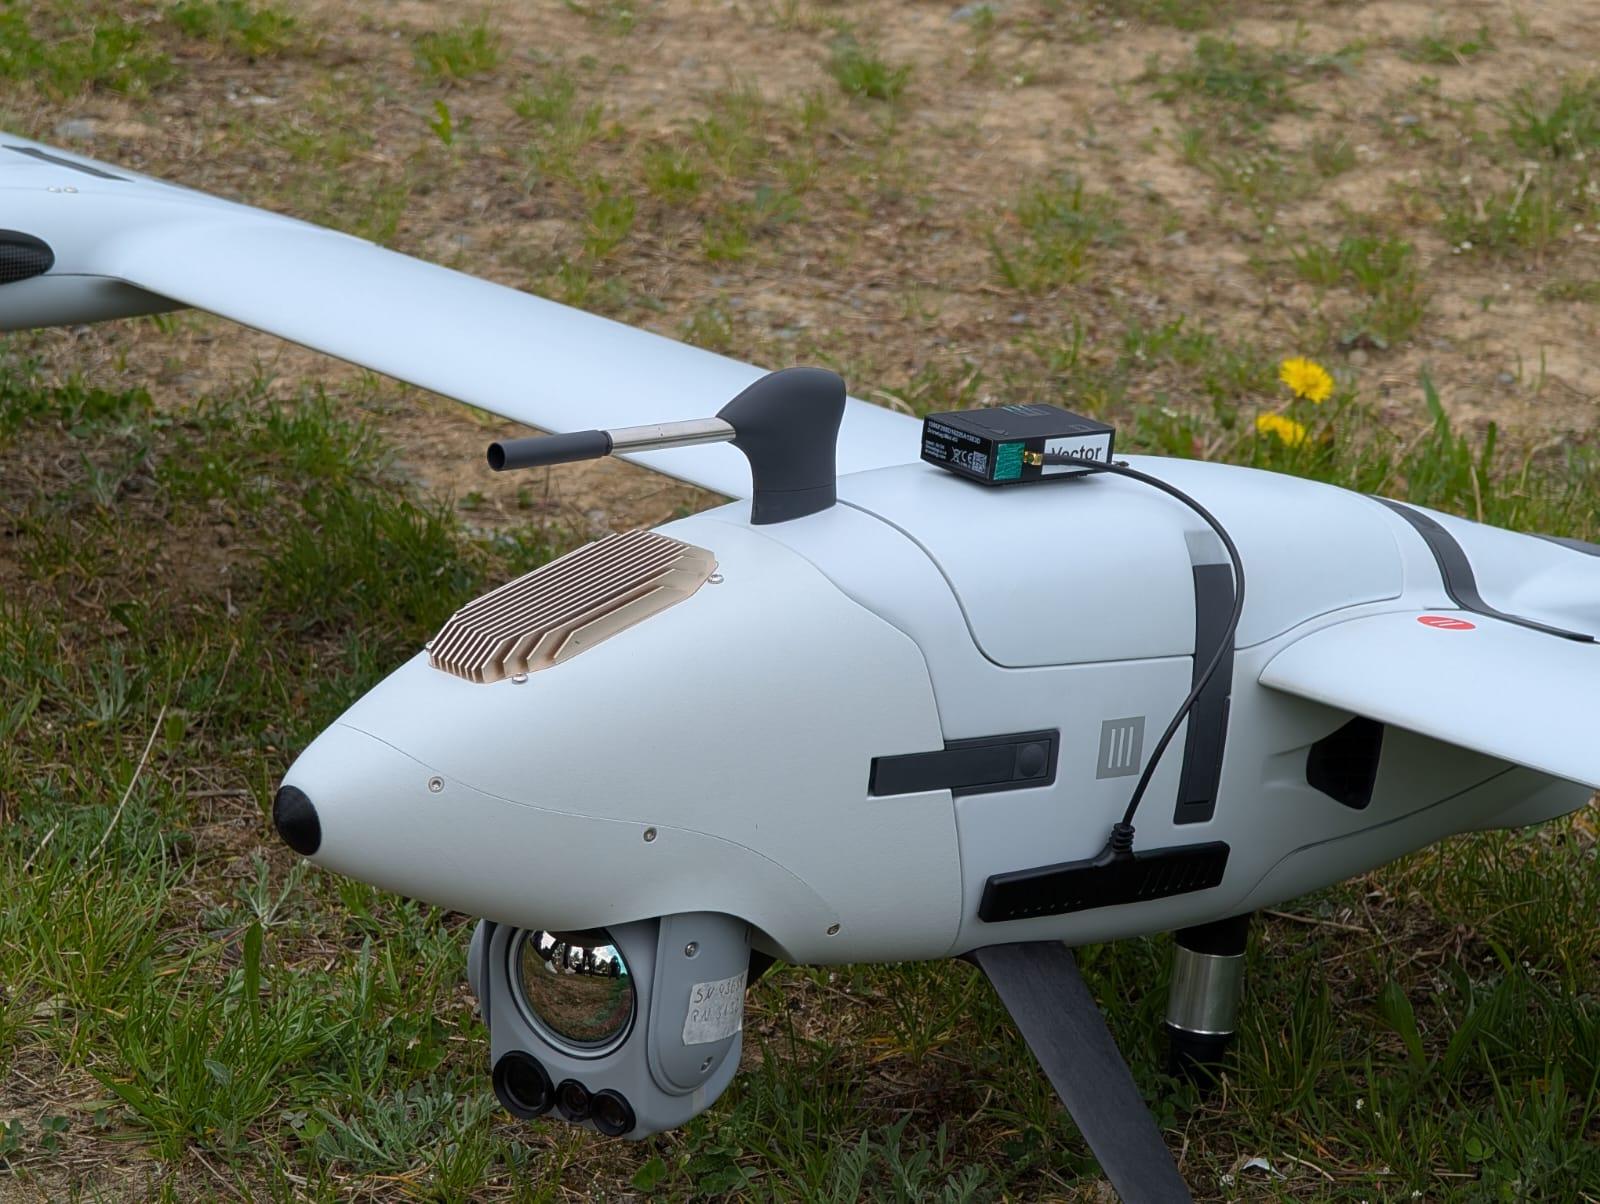
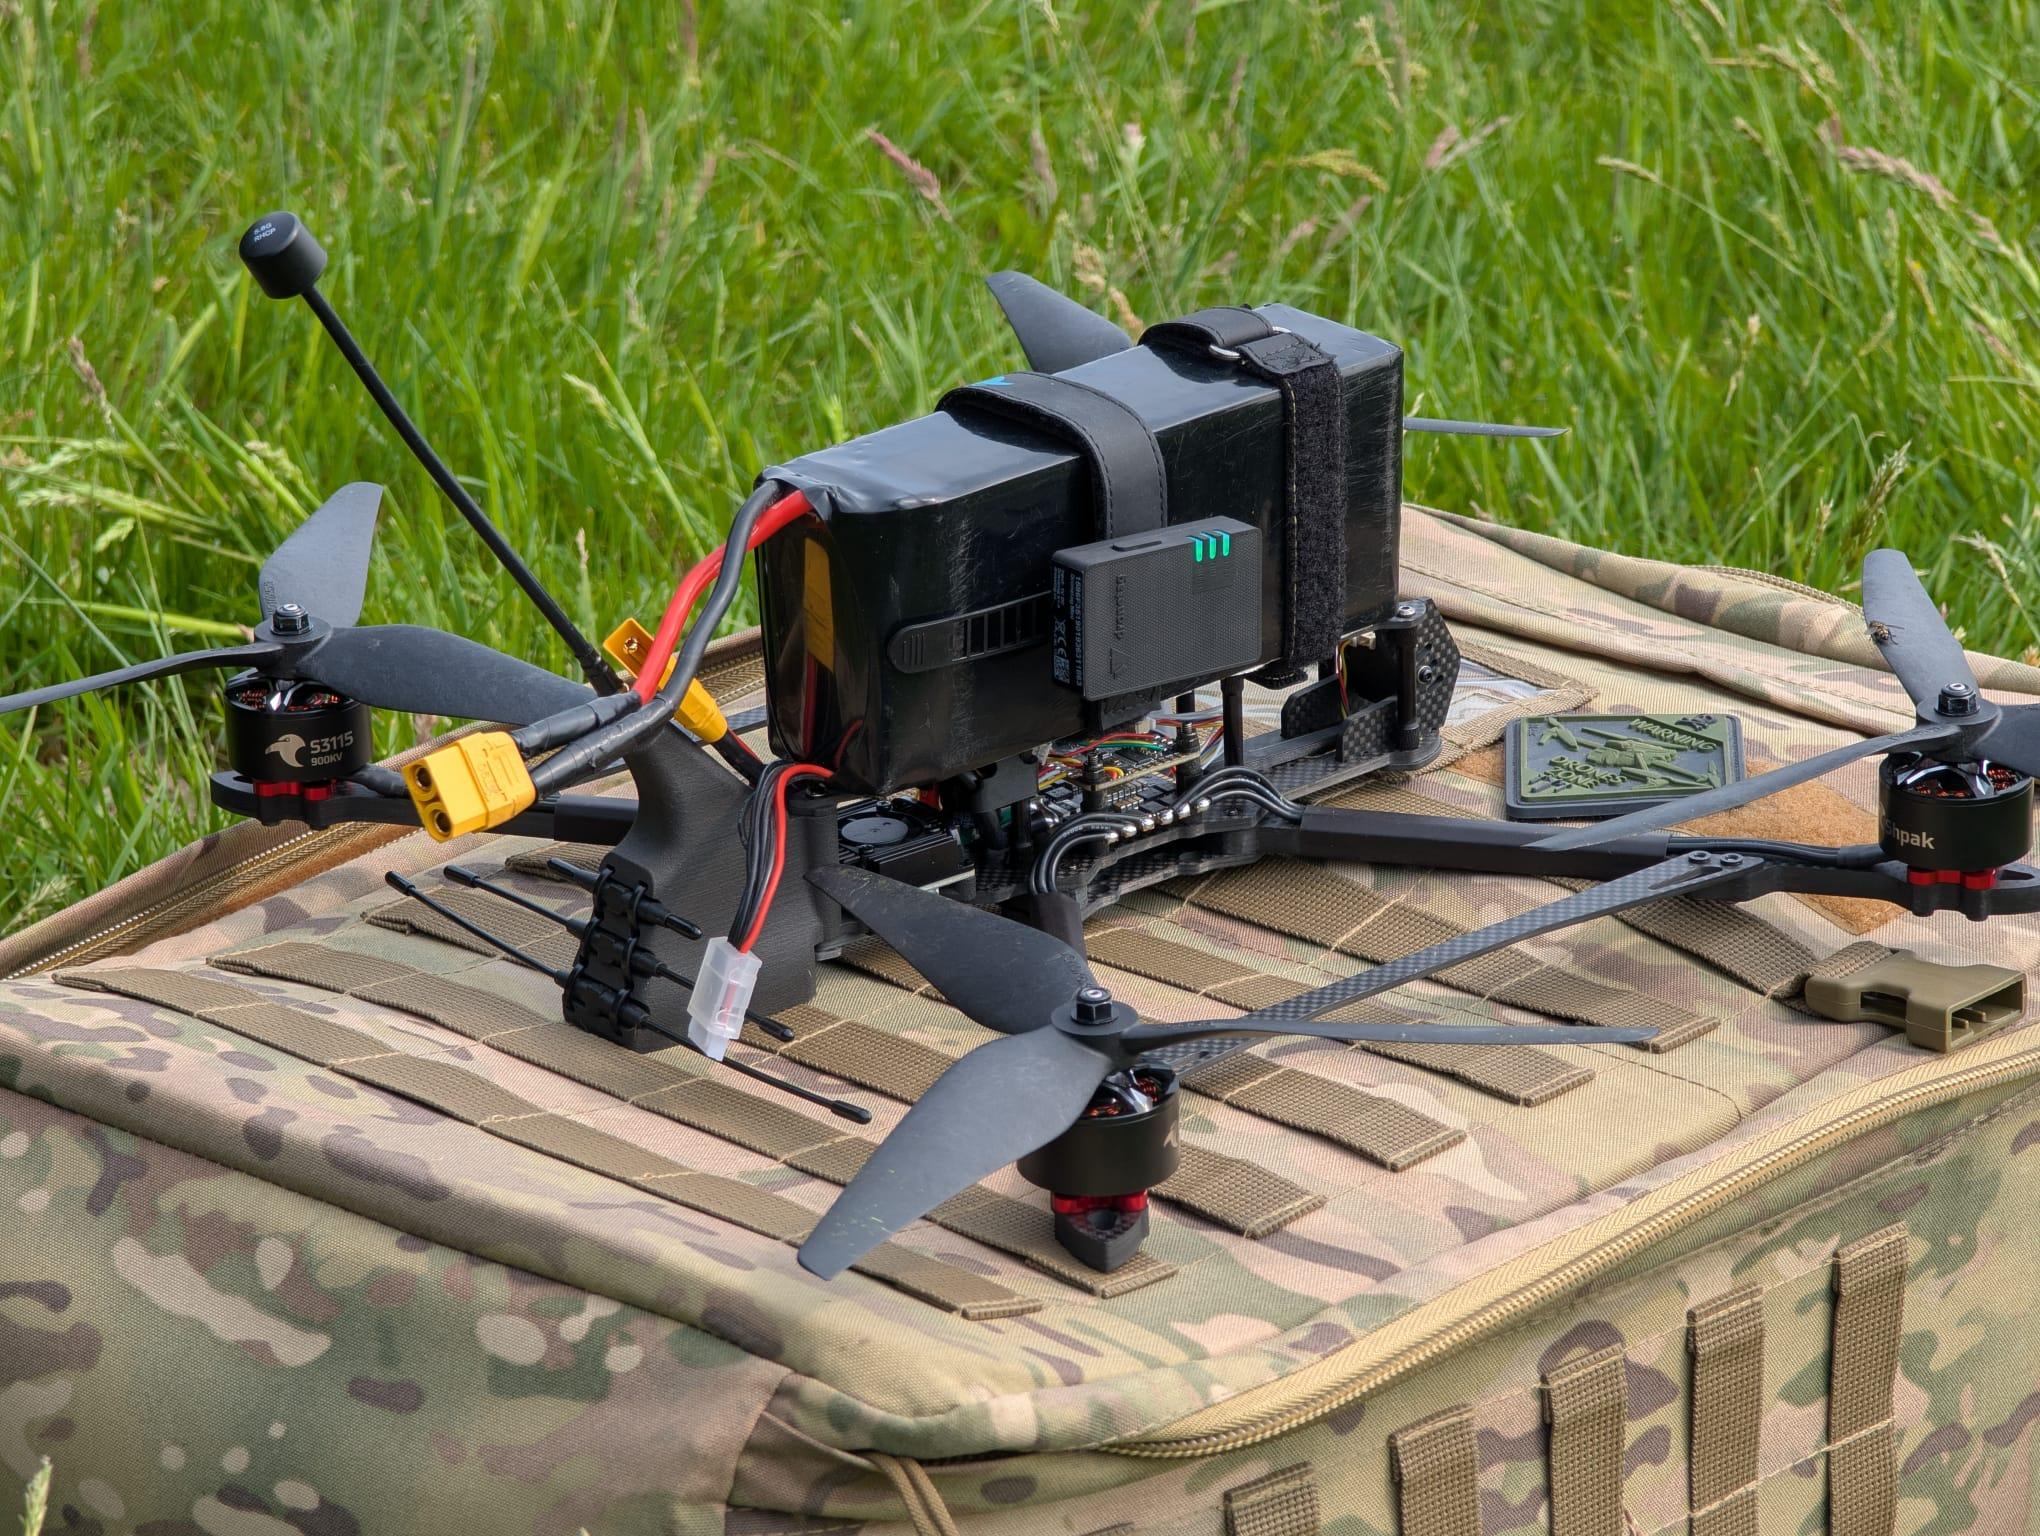
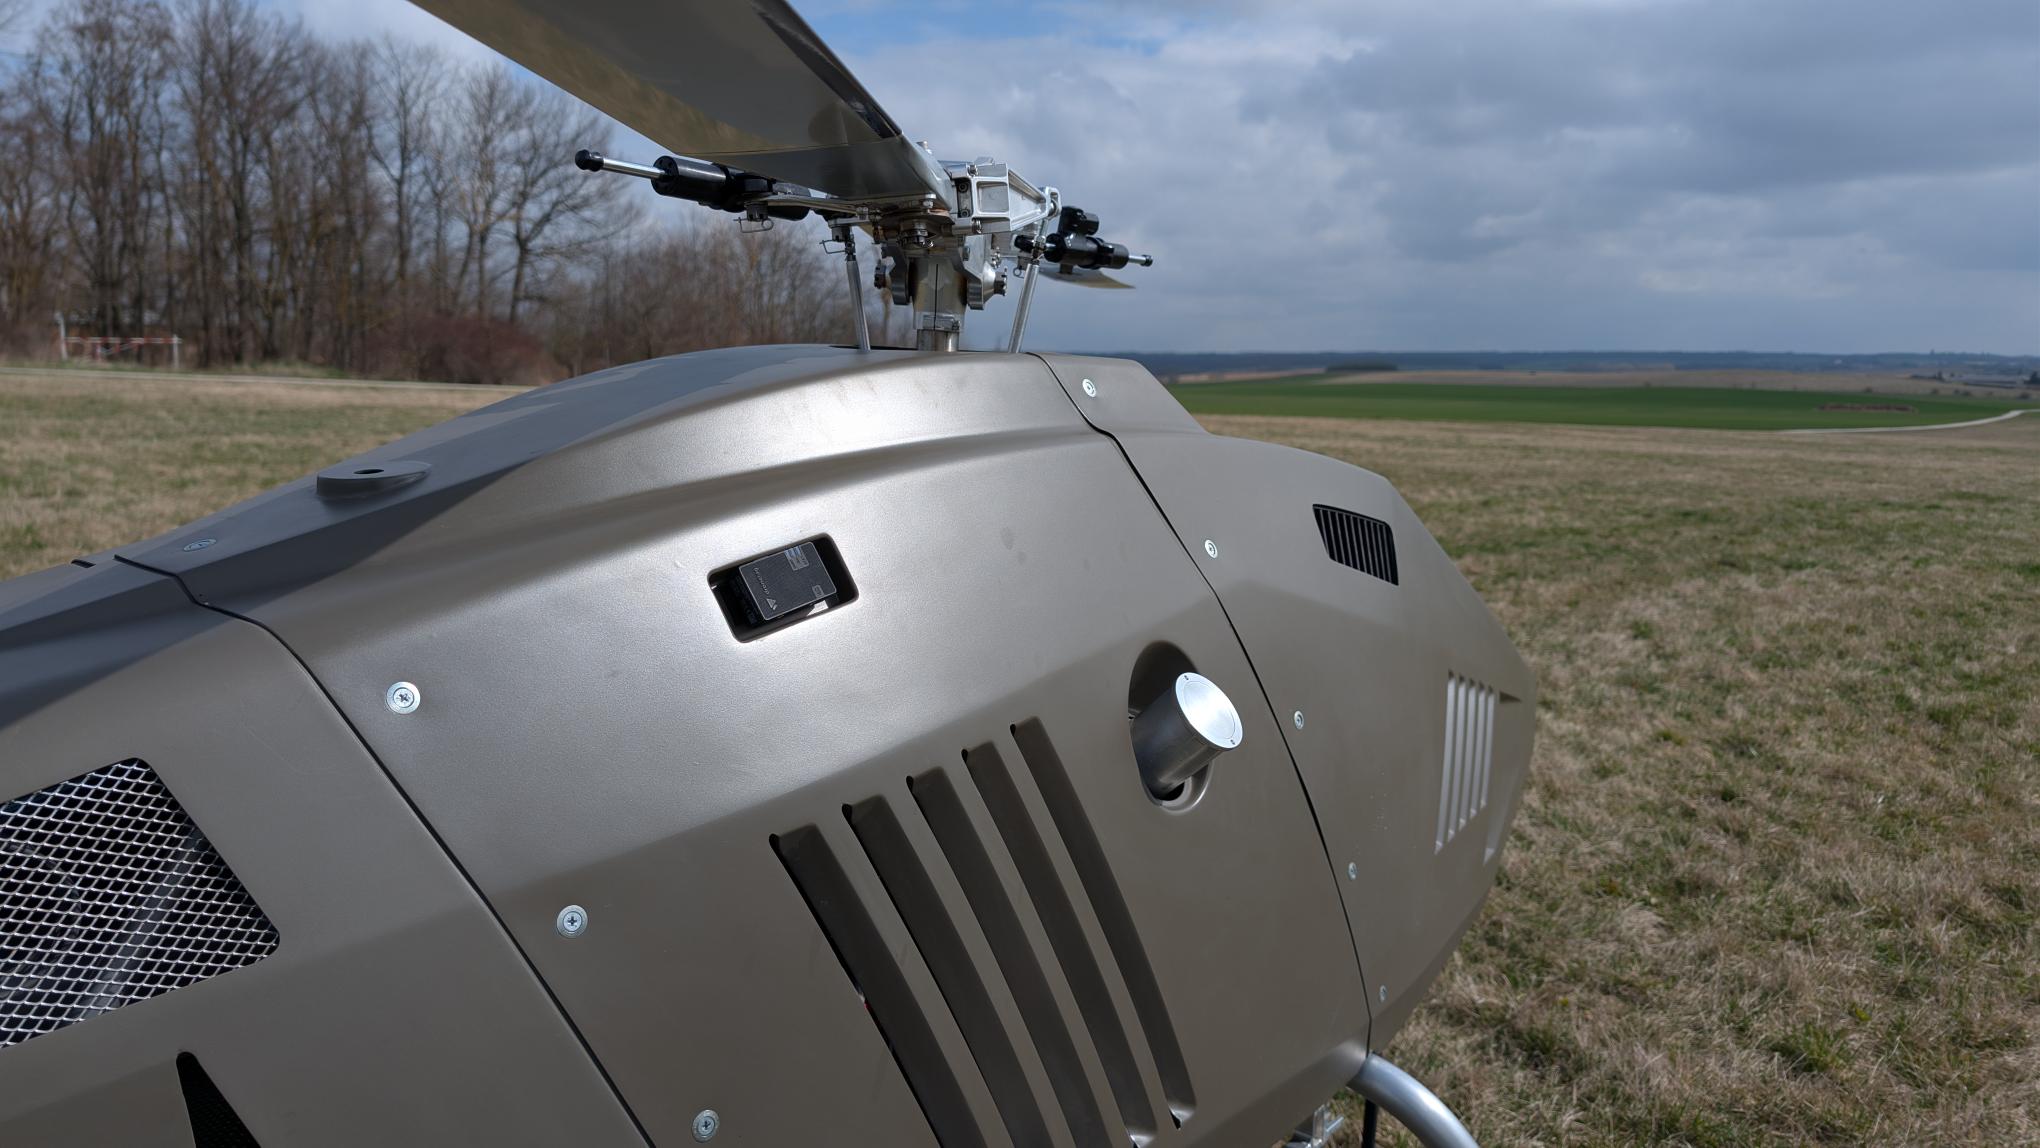
Proper Location
When looking for a suitable location to place the Mini on your drone, you need to watch out for four potential issues.
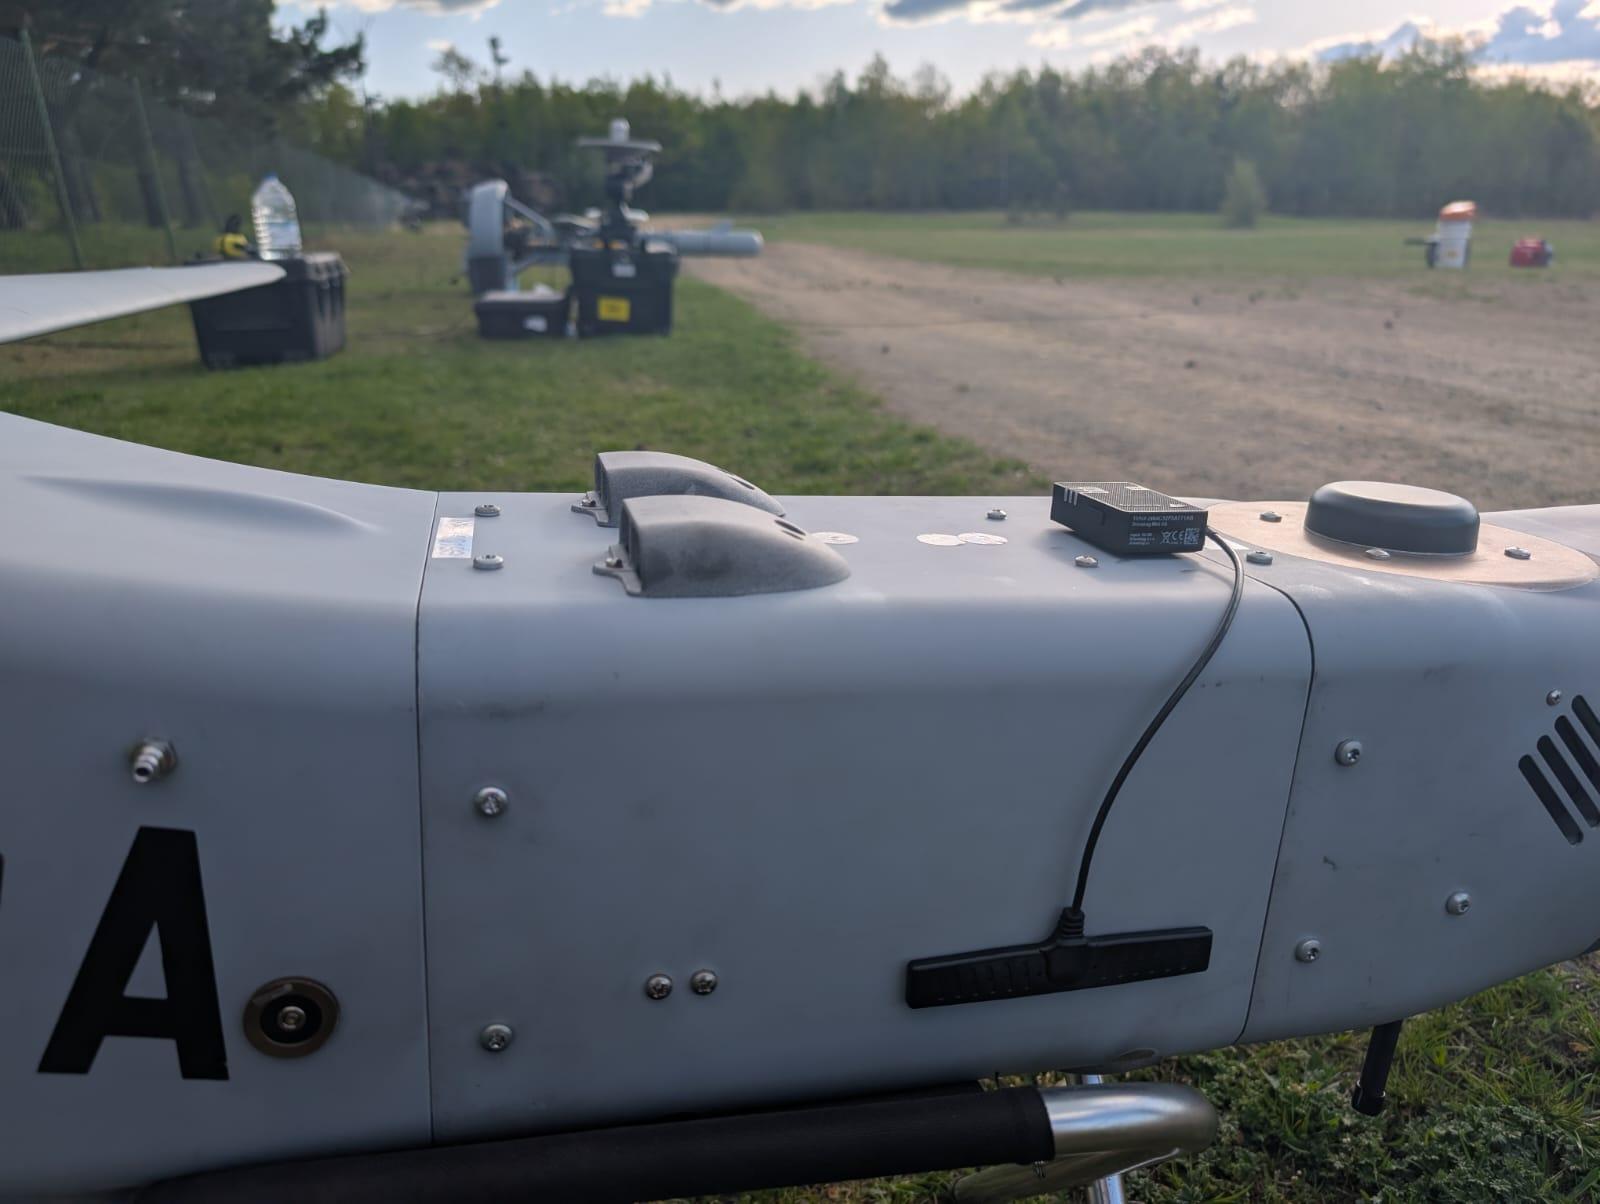
- Don't place Mini 4G over a curved surface because it might unsnap during the flight.
- Don't place Mini 4G on a soft material that can bend during mating (such as plastic covers). The Dual Lock may not hold properly.
- Don't place Mini 4G over or close to other electrical components such as flight controller, IMU, GNSS antennas, RF transceivers.
- Don't place Mini 4G in inaccessible locations. You should have the button and all the LEDs always reachable and visible.
Remember, if you put your Mini on top of your drone, you can expect a better GNSS signal. When underneath, a better range for Bluetooth Direct / Broadcast Remote ID + better cellular signal is expected. Therefore, the proper location might also depend on your use case.
Dual Lock Counterpart Installation
One part of the Dual Lock is already firmly glued to the bottom of your Dronetag Mini device. Besides that, we have supplied you with a self-adhesive counterpart, which must be placed on your drone, and a clean alcohol pad to prepare the surface.
- Find the proper surface on the drone for the Dual Lock counterpart.
- Clean the surface with an alcohol cleaning pad.
- Wait at least one minute to let the alcohol evaporate.
- Remove the foil from the mating piece and stick it onto the area.
- Wait five minutes, so the glue hardens.
- Snap the device into the mating piece on the drone.
- Ensure the glue on both parts holds firmly by repeatedly removing the device from the drone.
Attaching the Mini 4G with Drone Counterpart
- Align the Mini with the Dual Lock counterpart on the aircraft so it is centered.
- Press the Mini straight down toward the drone until you feel and hear a clear “snap” as the mushroom heads interlock.
Removing Dronetag Mini
- To detach, peel from one corner of the device and lift steadily until the Dual Lock releases.
- Do not twist or slide the Mini off. Peeling from a corner reduces stress on the adhesive and airframe.
Where to Get a Replacement?
If you need more counterpart pieces, you can order Dual Lock parts on our e-shop. Alternatively, use your local 3M distributor to order a replacement. If you use an alternative distributor, you must ensure that the Dual Lock counterpart is type 3M SJ4570 and has a proper size.
Disclaimer
We kindly advise that our company cannot assume responsibility for the installation of our product by the user or any potential loss incurred as a result. While we strive to provide comprehensive guidance and support, the responsibility for proper installation lies with the user. Should you require any further assistance or clarification, please do not hesitate to contact our customer support team. Your understanding is greatly appreciated.
MMCX Antenna Installation Guide
The MMCX (Micro-Miniature Coaxial) antenna is designed for reliable connections in wireless communication modules and is widely used for its compact size. Follow this guide to ensure proper installation, handling, and safe disconnection to avoid damaging the connector on your Dronetag device.
Step-by-Step Installation
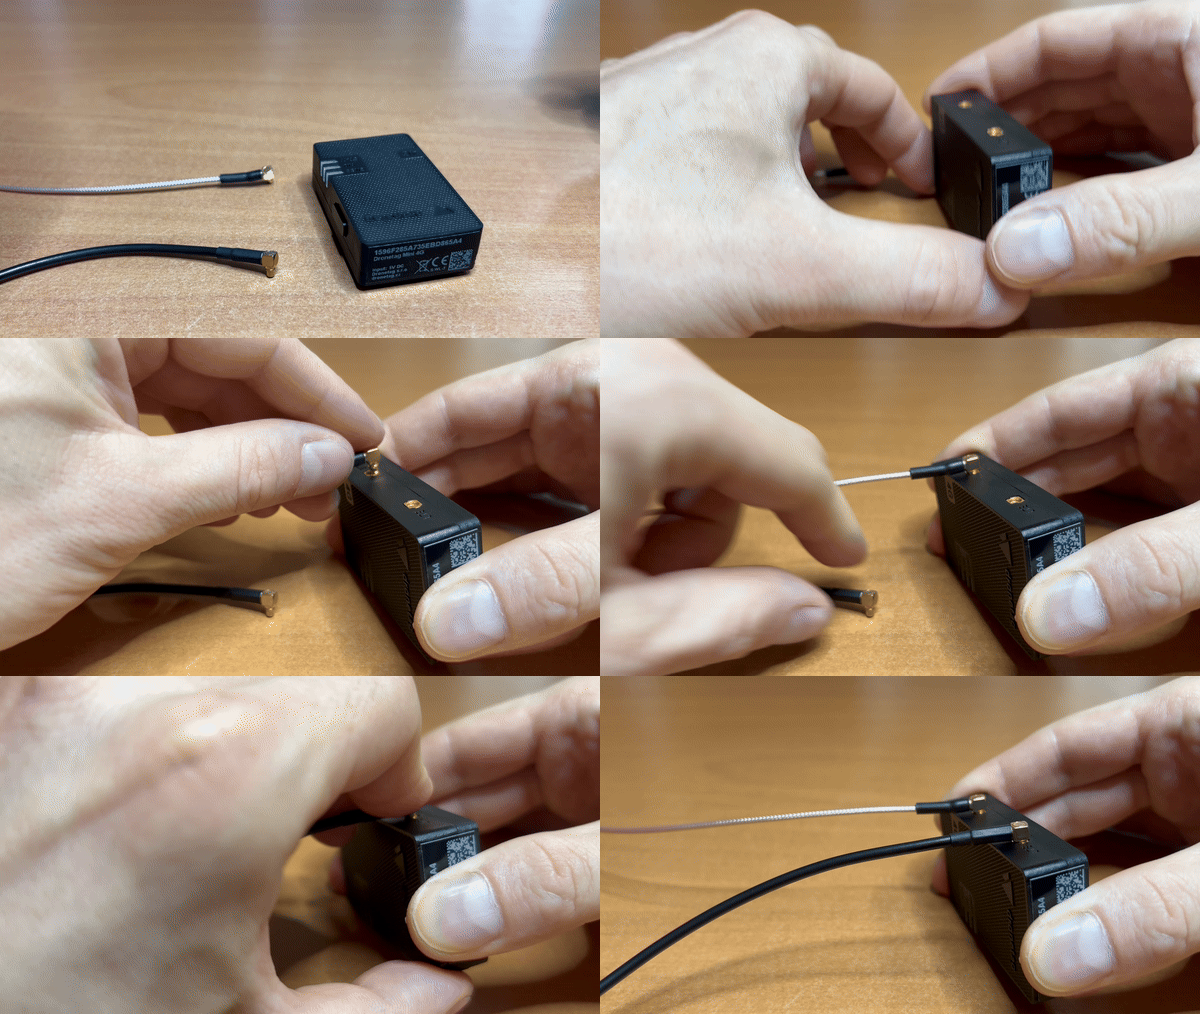
How to safely connect MMCX Connector
1. Prepare Your Workspace
- Work in a static-free environment to avoid potential damage to the device.
- Ensure all components, including the antenna and the Dronetag device, are clean and free of debris.
2. Locate the MMCX Port
- Identify the MMCX port on the Dronetag device. It is a small, round connector located near the edge of the circuit board.
3. Align the MMCX Antenna
- Carefully position the MMCX antenna connector over the MMCX port.
- Align the connector straight above the port to avoid damaging the pins inside.
4. Secure the Connection
- Gently press the MMCX antenna into the port until you hear or feel a "click," signaling a secure connection.
Do not apply excessive force when attaching the antenna, as it may damage the port or connector.
5. Route the Antenna
- Position the antenna cable to ensure it doesn’t interfere with other components.
- Use tape or cable ties to secure the antenna in place, if necessary, to prevent it from moving during operation.
6. Test the Antenna
- Power on the Dronetag device and check the signal strength or run a connectivity test to confirm the antenna is functioning properly.
Safe Disconnection Process
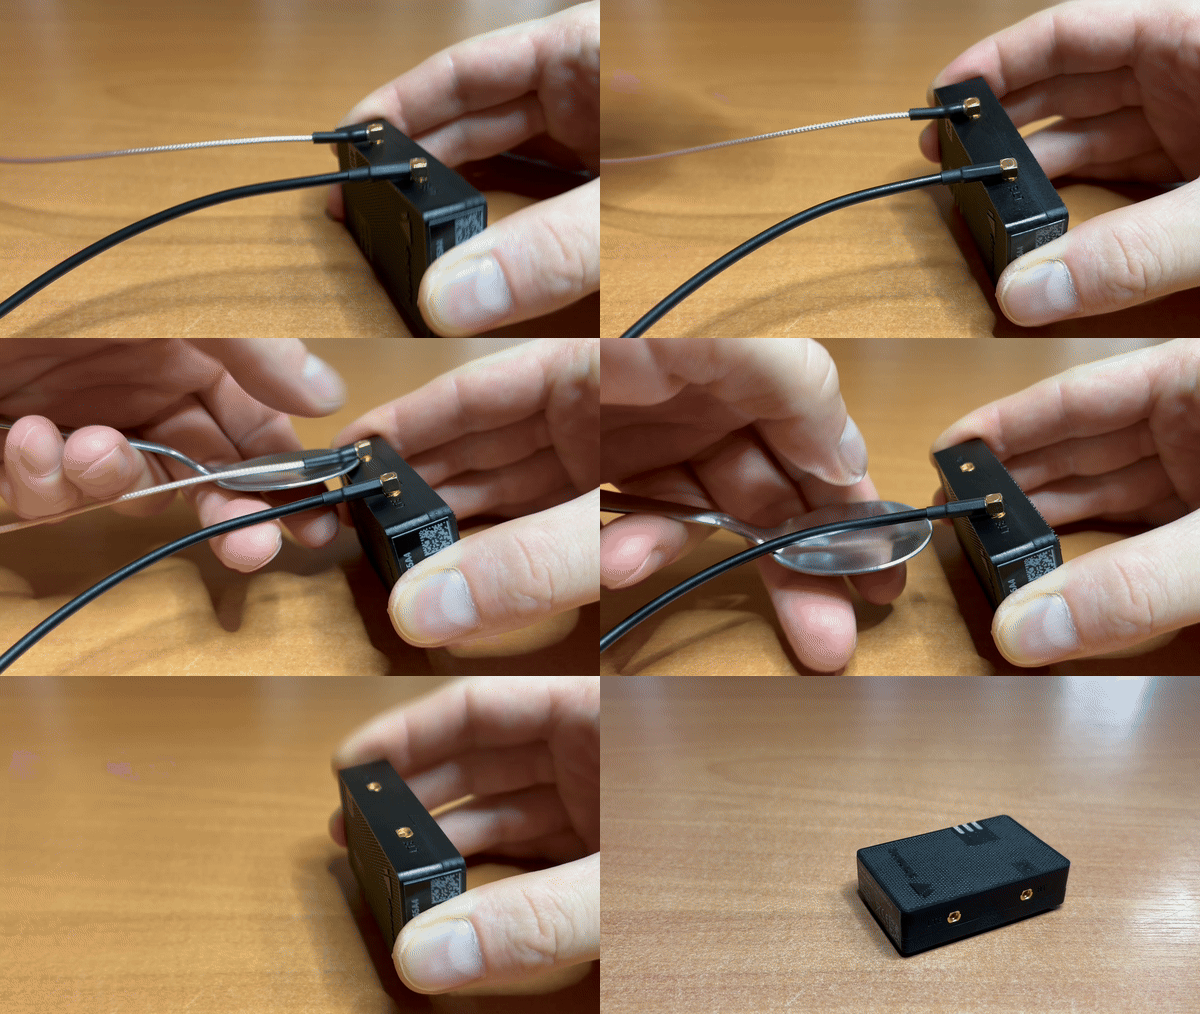
How to safely disconnect MMCX Connector
The MMCX connector is designed for a limited number of connect and disconnect cycles. To extend the lifespan of the connector and prevent damage:
1. Use a Suitable Tool
- Instead of pulling the antenna directly, use a small tool like the edge of a spoon to carefully lift the antenna connector from underneath.
- Gently lever the connector upwards while supporting the antenna base. This prevents applying excessive force to the connector and port.
2. Avoid Direct Pulling
Pulling the antenna out by the cable can stress the connector and cause it to break. Always disconnect using the recommended method.
Improper handling or forceful removal of the MMCX connector that results in damage will void the warranty or eligibility for repair. Always follow the guidelines provided to ensure the proper handling of your Dronetag device.
Battery Charging
When not in use, the device should be stored with at least 50% battery charge to prevent potential battery degradation and ensure long-term reliability.
The Mini can be charged by any 5 V compatible source such as a computer, power bank or charging adapter from a smartphone. Charging follows the standard Li-Po charge cycle that takes approximately 2.5 hours to charge fully. However, after two hours, the device is charged to about 90%. When the device is on the USB and fully charged, the LEDs will turn off.
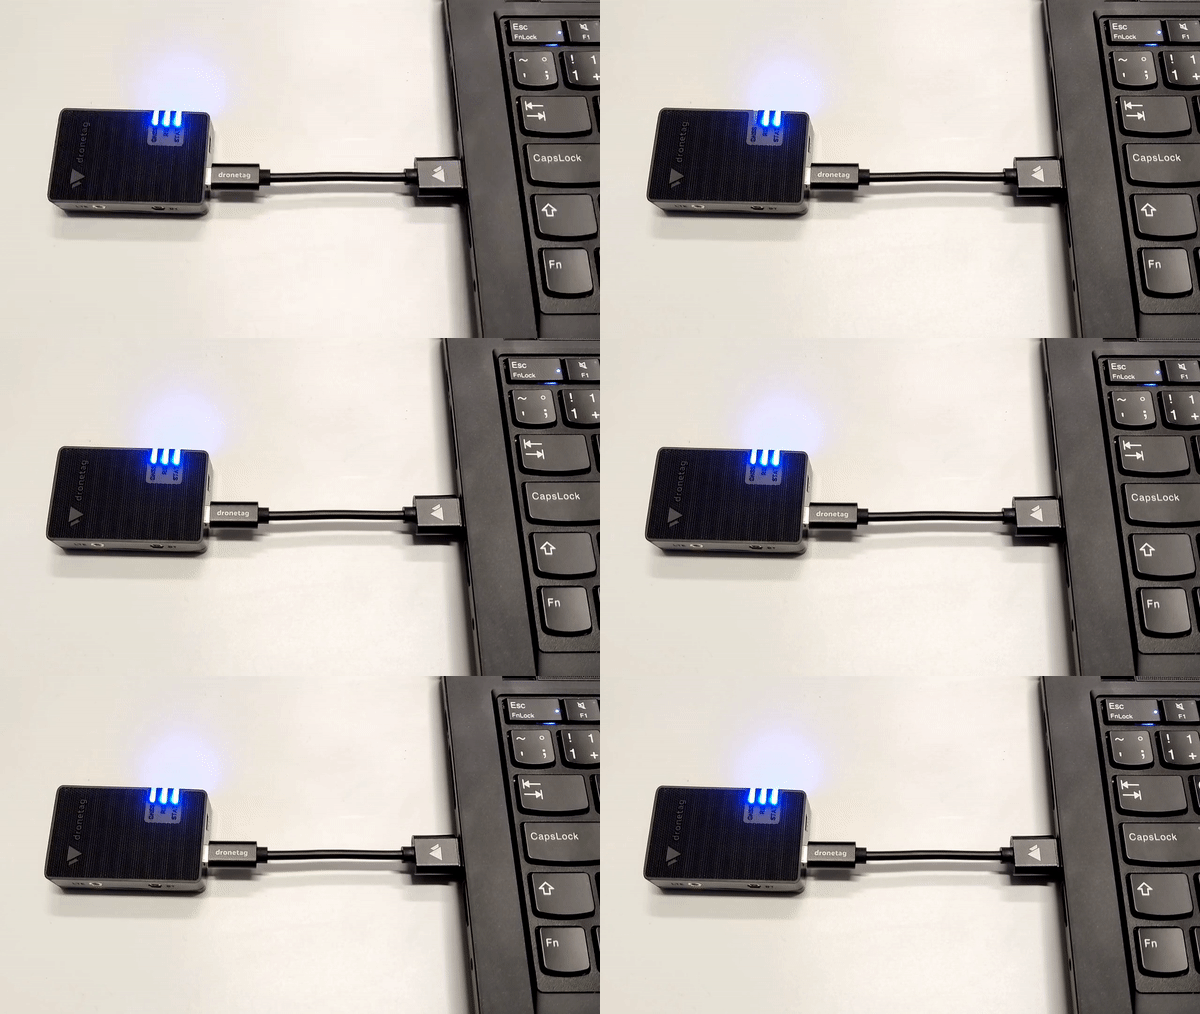
If you don't want to remove the Mini 4G from your drone, you can connect the Mini to the drone's internal power source and charge it while flying – meaning there is no need to ever detach the device from your drone. If this is your preferred way, please:
Guidelines
- Input: 5 V over USB-C.
- Use a quality USB-A→USB-C or USB-C→USB-C cable.
- Avoid non-compliant or “exotic” fast-charging bricks that don’t provide a normal 5 V fallback. If in doubt, use a basic 5 V charger.
- Don’t use damaged cables or adapters.
Firmware Update
We are still adding new features to Dronetag Mini 4G. To follow the latest trends in our development, use this short guide to keep your firmware up to date.
Check for new firmware updates regularly in the Dronetag app:
- Turn your Mini 4G on and go to Dronetag app, navigate to Profile, then go to My devices and choose Dronetag Mini 4G. Then scroll down to Firmware update and see if there is a new one. If so, follow the steps in the app.
Prerequisites
Before you start updating the firmware and during the process, please be sure to:
- Ensure your mobile phone with the Dronetag app is charged to at least 30%.
- Ensure your device is turned on and charged to at least 50%.
- Connect your phone to a stable internet network (around 10 MB must be downloaded).
- Do not start a flight, as the firmware cannot be updated in the Flight state.
- Do not restart, turn off, or interact with the device during the update.
Make sure to stick to the instructions above to keep your device safe and working as expected.
Update via the Bluetooth
The Bluetooth update is a fast and easy option to update your Mini firmware to the latest version. To update the Dronetag Mini 4G firmware, our Dronetag mobile app or Dronetag Toolbox app must be used.
- Turn on the Bluetooth on your smartphone.
- Turn on the device and open the Dronetag mobile application.
- Go to Profile → My Devices and select the Dronetag Mini 4G you would like to update.
- Click on Firmware Update to see if your device has the latest firmware version.
- If you have update available, click on Download & Update.
- Read the instructions for update procedure and confirm it with Proceed Update.
- Wait until update is finished which is indicated with a success message in the app.
It is possible that intermediate FW update would be needed if your actual firmware version is older. Go ahead and proceed fw updates until you have the actual one.
In the case the firmware update fails, go ahead and try to perform firmware update again.
Safety Notices
The Dronetag device has been created for the most straightforward handling possible. Still, the following safety notes must be followed to reduce the risk of accidents, injuries and device malfunction to a minimum. If misused, it has the potential for causing fire, electrical shock or personal injury. Dronetag is not liable for damages arising from the use or misuse of this product. To help ensure accident-free operation, follow these guidelines:
- This and the Dronetag App manual must be read carefully, and all instructions must be followed. Special attention must be taken to all warnings and precautions.
- The user is solely responsible for the risk while using this device. Dronetag is not responsible for any injuries or accidents that are a result of improper use.
- The maximum input voltage is 5V and should be applied to only the USB-C connector during the charging or data transfer.
- Do not open the device. There are no parts that the user can service. Opening the device leads to the loss of warranty and infringes the general terms and conditions.
- Do not allow liquid, small particles or other foreign objects to get into the system or accessories.
- Do not expose the system or accessories to high temperatures, high humidity or direct sunlight for a prolonged duration.
- Keep the system and accessories, including cable ties and fasteners, out of the reach of small children.
- If the system is brought directly from a cold location to a warm one, moisture may condense inside the system. If this occurs, the system may not operate properly. In this case, unplug all cables/accessories immediately and leave the device in a dry place for several hours.
- Stop using the system and disconnect it from any connectors immediately if the device functions abnormally, produces unusual sounds or smells, or becomes too hot to touch.
- Do not put any DC voltage to any antenna connector
Heat and Temperature Safety
During normal operation, your Dronetag device may become slightly warm. When charging, it can heat up even more.
This is expected, but it’s important to avoid overheating:
- Do not expose the Dronetag device to direct sunlight for long periods (e.g., on a car dashboard).
- Do not operate or charge the device in high ambient temperatures.
- During operation or charging, the device may feel warm - this is normal.
- However, if you ever notice the device swelling or bulging, it indicates a battery issue.
- In that case, stop using the device immediately and contact Dronetag support or your local dealer.
Overheating protection
Your Dronetag device is equipped with built-in thermal protection:
- If the temperature becomes too high, the device will shut down automatically.
- When charging, if the device overheats, charging will slow down or pause completely.
- If you notice that your Dronetag device is not charging (or charges very slowly), make sure it is not in a hot environment.
Dronetag device cases and heat
Dronetag device cases are made from thermoplastic material.
When the case gets hot, the material can become soft and prone to dents, scratches, or deformation.
Be careful not to press or store the Dronetag device under load when it is warm - this can cause permanent damage to the case.
Limited Warranty
Dronetag products are warranted to be defect-free in material and workmanship one year after the purchase. For the duration of the warranty period, Dronetag, at its sole option, will repair or replace any product which fails in normal use. Such repairs or replacement will be made at no charge to the customer for parts or labour, provided that the customer shall be responsible for any transportation cost.
Restrictions
Warranty does not apply to cosmetic damage, consumable parts, damage caused by accident, abuse, misuse, water, fire or flood, damage caused by unauthorized servicing, or product that has been modified or altered.
Disclaimer
We kindly advise that our company cannot assume responsibility for the installation of our product by the user or any potential loss incurred as a result. While we strive to provide comprehensive guidance and support, the responsibility for proper installation lies with the user. Should you require any further assistance or clarification, please do not hesitate to contact our customer support team. Your understanding is greatly appreciated.
Warranty Service
Warranty repair service shall be provided directly by Dronetag. Proof of purchase for the product from Dronetag or an authorized reseller is required to obtain and better expedite warranty service. The customer is responsible for transportation costs involved in getting the unit to the Dronetag facility. It is recommended to use a shipping method with tracking and insurance.
Please email us at support@dronetag.com with a description of the problem you are experiencing. Also, please provide the model, serial number (if applicable), shipping address and a daytime contact number. You will be promptly contacted with further troubleshooting steps or return instructions.
Different Warranty Durations for Various Product Components
It is important to note that specific components, including batteries and others, may entail varying warranty terms due to their distinct usage and material properties. As per our warranty policy, the standard warranty duration for most products stands at one (1) year. However, it is pertinent to highlight that the warranty period for batteries is limited to six (6) months.
Post-Warranty Service
Besides warranty service, Dronetag also offers post-warranty repairs. Let us know at support@dronetag.com your problem, and we will try to do our best to find a solution for you.
Manufacturer
The device is designed and assembled in the Czech Republic. Use the following facility address for any shipment of warranty or repair items.
- Dronetag s.r.o., Benesovska 2270/34, 10100 Prague, Czech Republic
Maintenance
You should closely inspect the device once in a while for potential cracks or other defects. Such issues can affect the device's reliability and can lead to possible injury. Contact us if you are unsure about the state of your device. After prolonged / frequent usage, replacing the Dual Lock glued on the Mini's bottom is advised. Ideally, as soon as it shows noticeable wear. The recommended period for this maintenance is once per year or after 250 mating cycles. Before any new installation of 3M Dual Lock, follow the rules in this section.
Device cleaning & connector care
Regular inspection and gentle cleaning keep your Mini 4G in good condition. Always handle connectors with care to avoid damage.
MMCX ports
- Check the MMCX connectors for dust or debris before attaching antennas.
- If needed, clean carefully with compressed air or a soft, dry brush.
- Never insert metal tools inside — the center pin is fragile and can be damaged permanently.
USB-C connector
- Inspect the USB-C port for dust or dirt.
- Clean gently using compressed air.
- Avoid liquids and sharp objects.
SIM slot
- Ensure the nano-SIM slot is free of dirt.
- Blow out debris carefully with compressed air.
- Do not insert objects that could bend the contacts.
Device surface
- Wipe the enclosure to remove dust or mud with a soft, dry cloth.
- Remove debris from the Dual Lock fastener (e.g., dirt or fibers). If it no longer holds properly, replace the Dual Lock strip.
Chemicals & labels
- Do not use solvents (ethanol, IPA, acetone, etc.) on the housing or label.
- These chemicals may damage the enclosure or make the serial number label unreadable.
- If cleaning is necessary, use only a slightly damp microfiber cloth with clean water.
Troubleshooting
Please find all relevant troubleshooting pieces of advice below. If you come across another interesting topic, please let us know at support@dronetag.com.
List of Basic Operations
Many of the issues listed below can be resolved by updating your device to the latest firmware version.
Firmware and software update
Firmware and software update
At Dronetag, we're committed to improving our products continually.
To ensure optimal performance, please make sure you're using the latest version of the Dronetag App and device firmware.
Kindly follow the provided instructions for updating your firmware.
Reset to Factory Defaults
Reset to Factory Defaults
There are two ways to reset your device to factory defaults:
1. Using the Device Button
To reset the device using the power button:
- Press and hold the power button for 15 seconds. The device will perform a power reset, and all LEDs will light up solid pink.
- Continue holding the button after the power reset. The LEDs will begin a countdown animation.
- Keep the button pressed until all LEDs turn off and an RGB animation starts, indicating the factory reset is in progress.
- Once the reset is complete, the LEDs will briefly flash white for 1 second, and the device will automatically restart with factory settings restored.
For more information on the indicators see LED indications
2. Using the Dronetag App
Dronetag App is required for this approach.
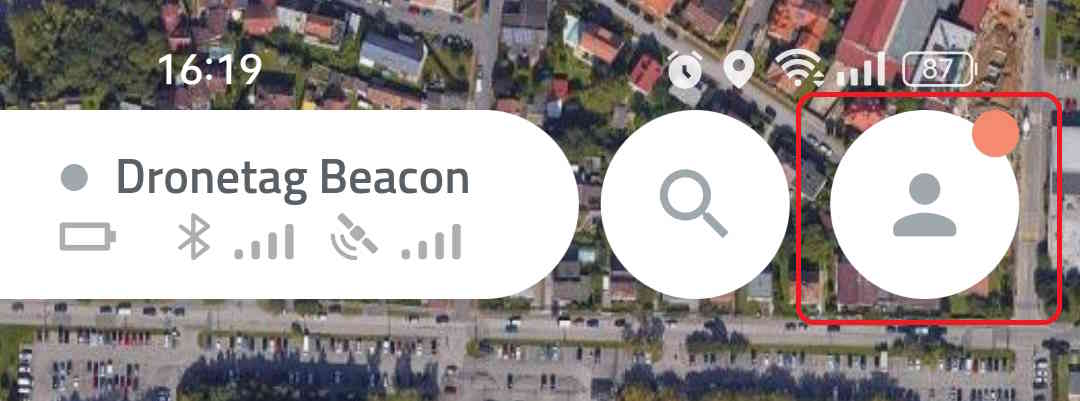
Open My devices
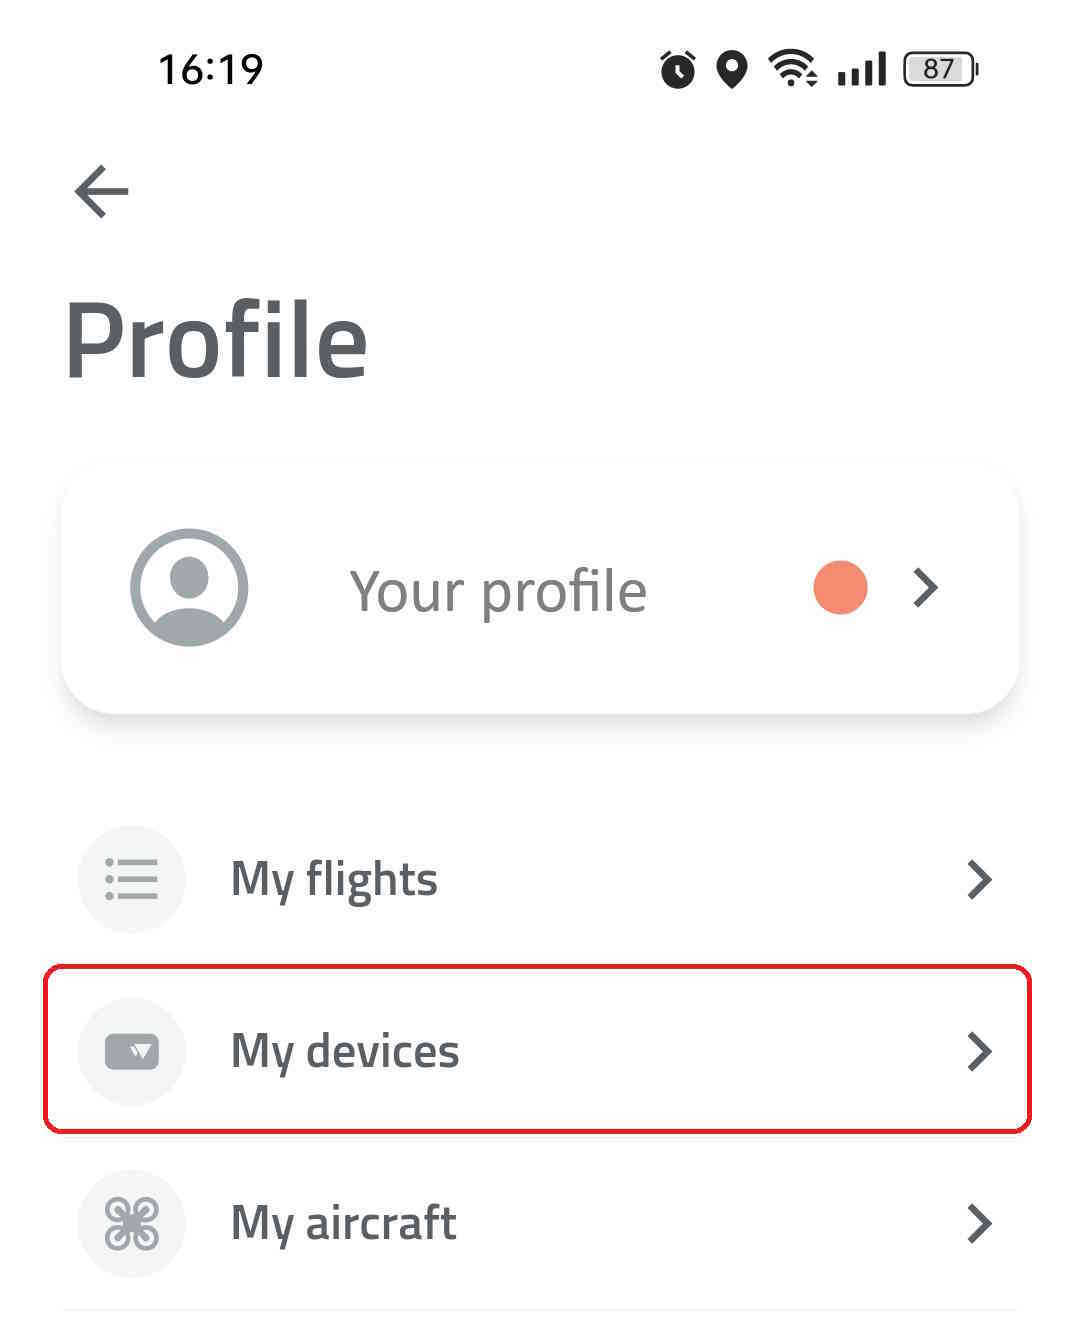
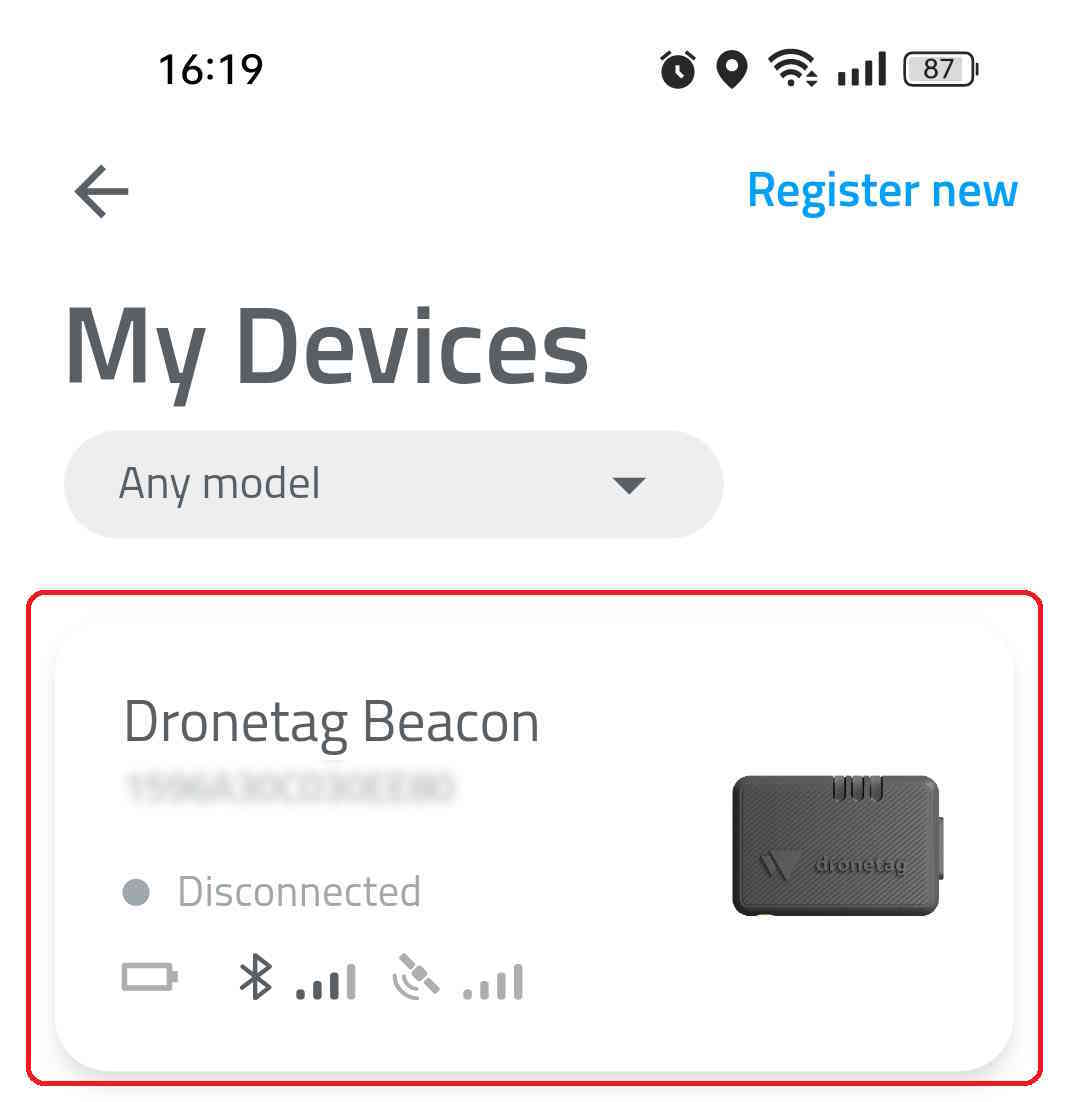
Select your device
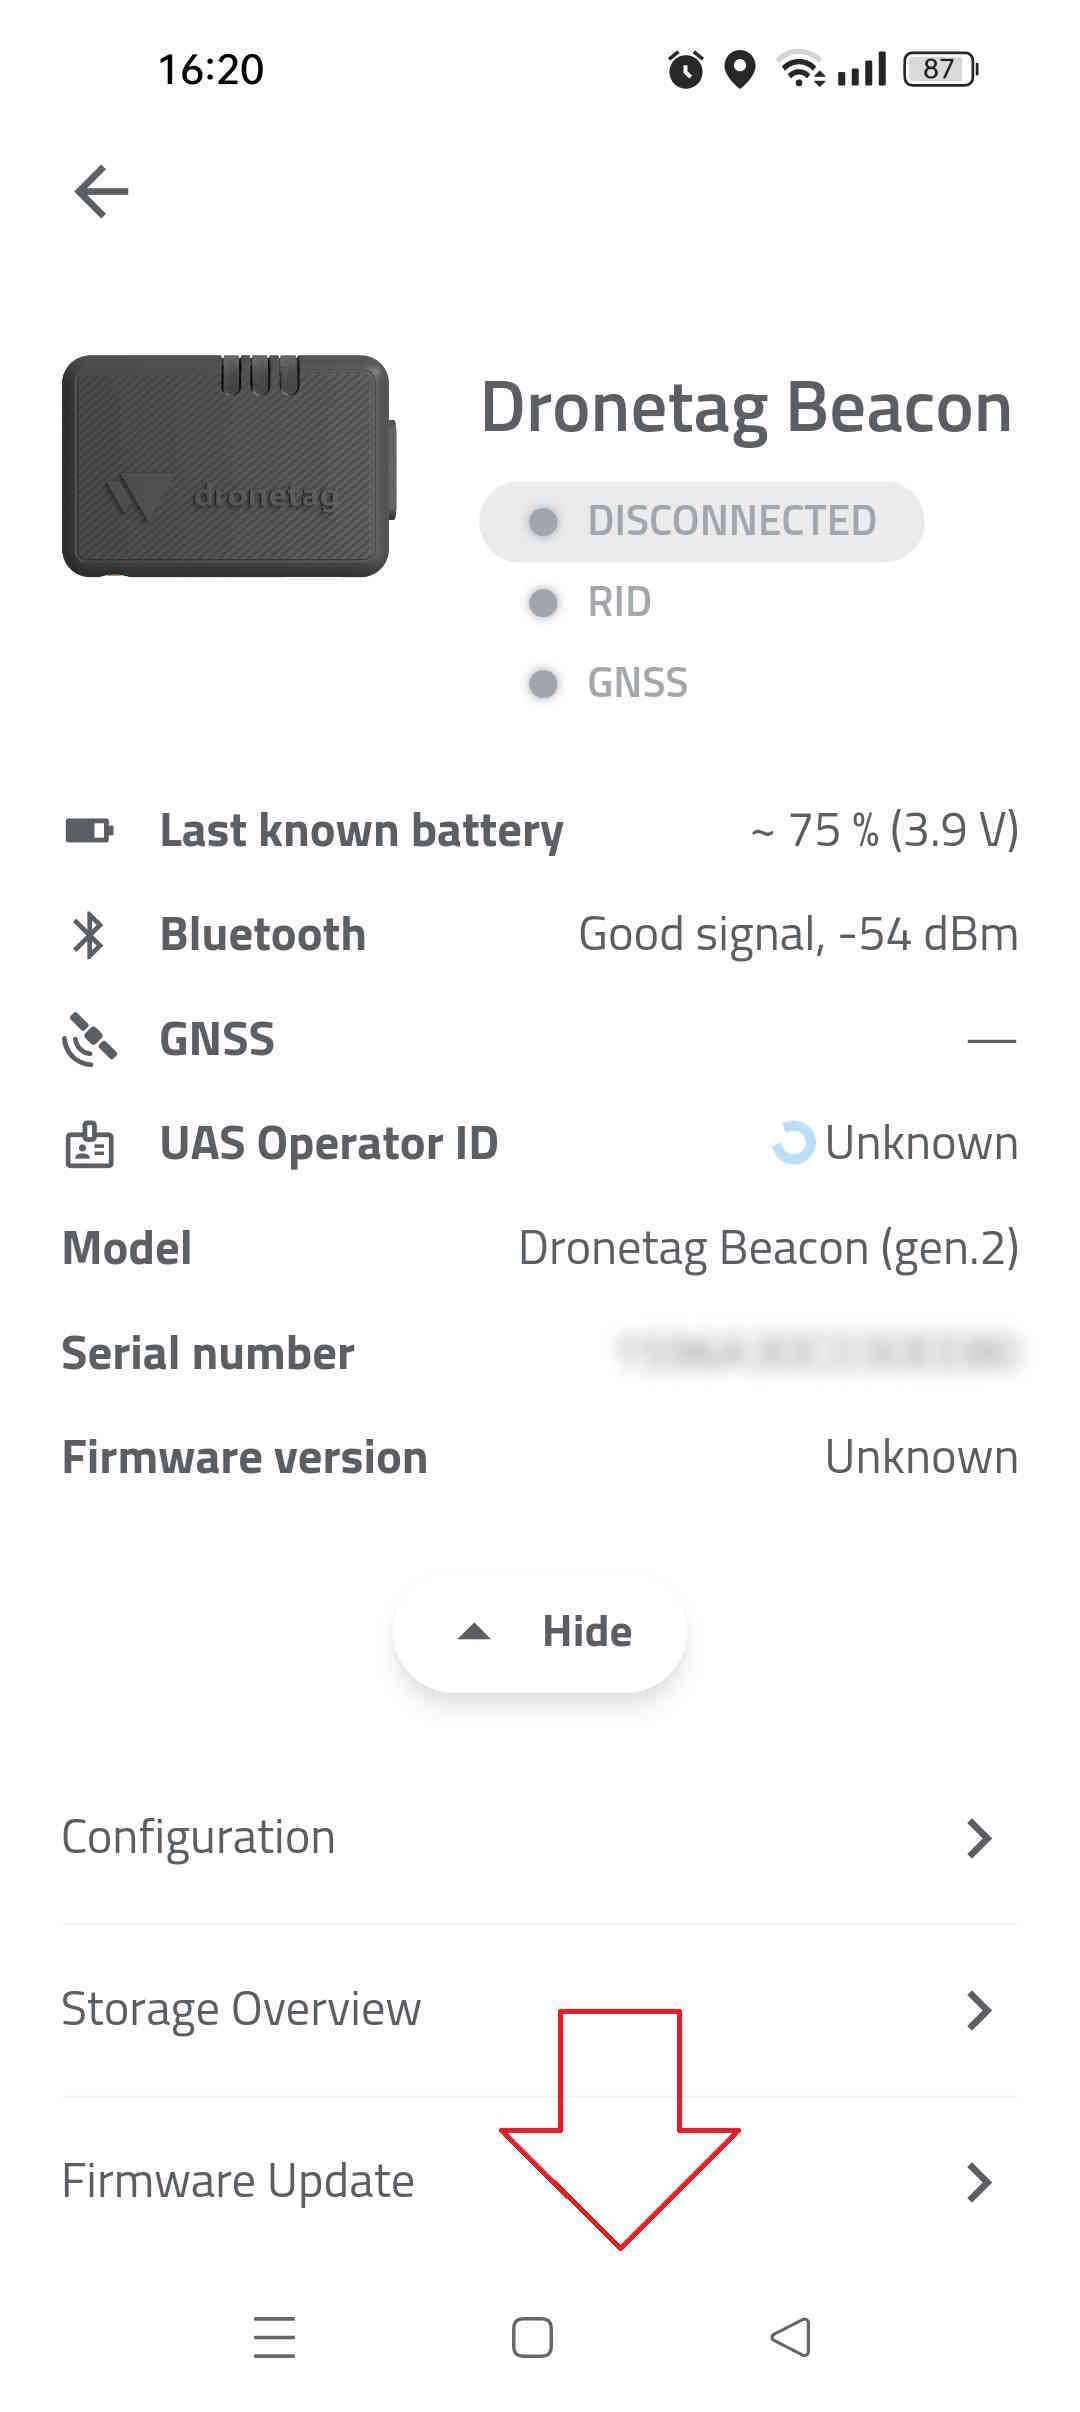
These steps are common for all Dronetag models
Navigate down to Troubleshooting
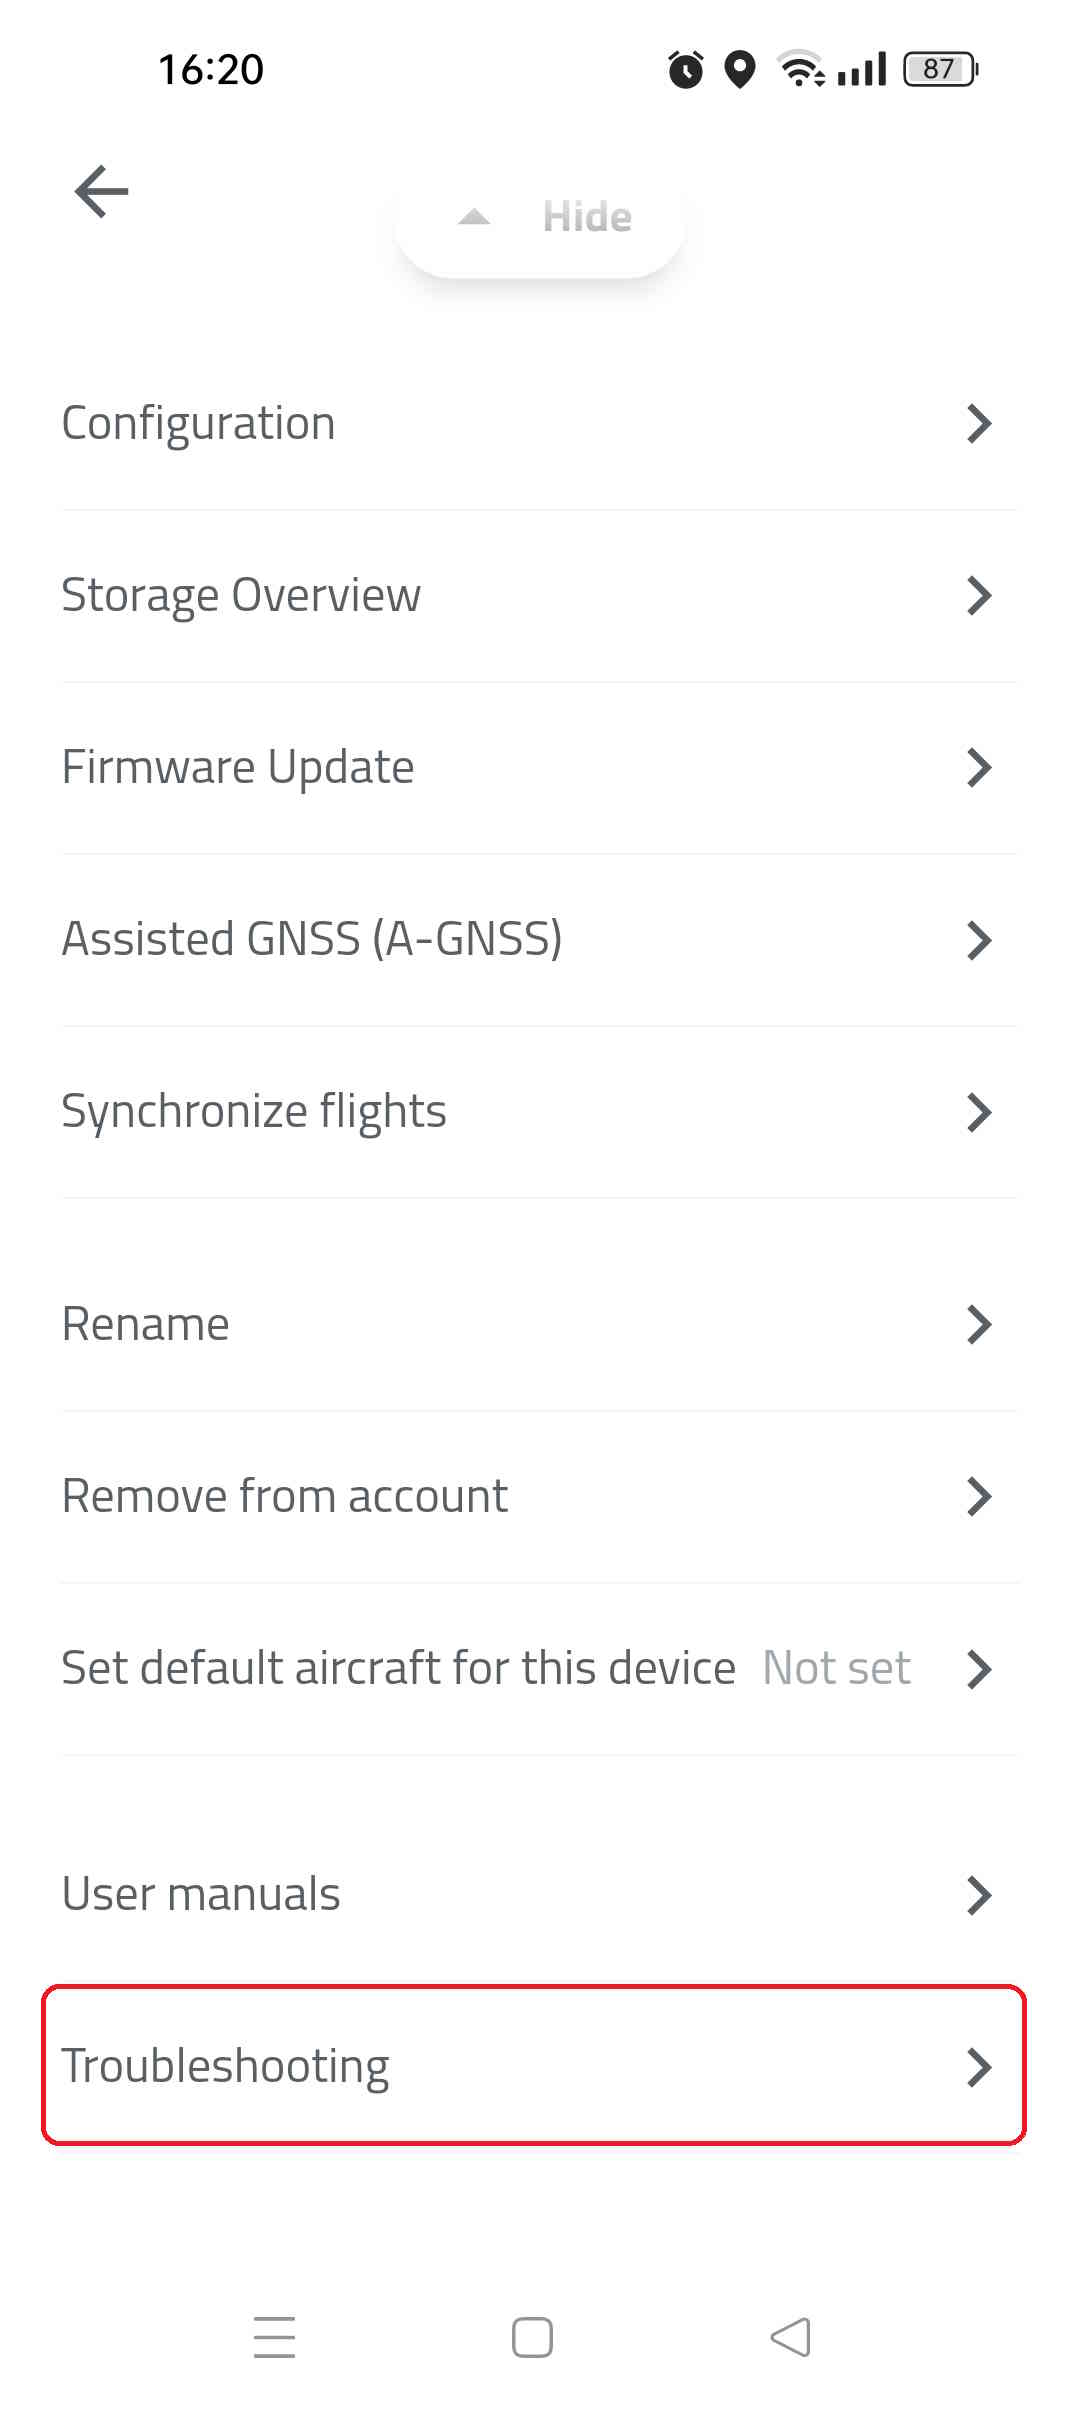
Select Reset to factory defaults

Confirm Factory reset
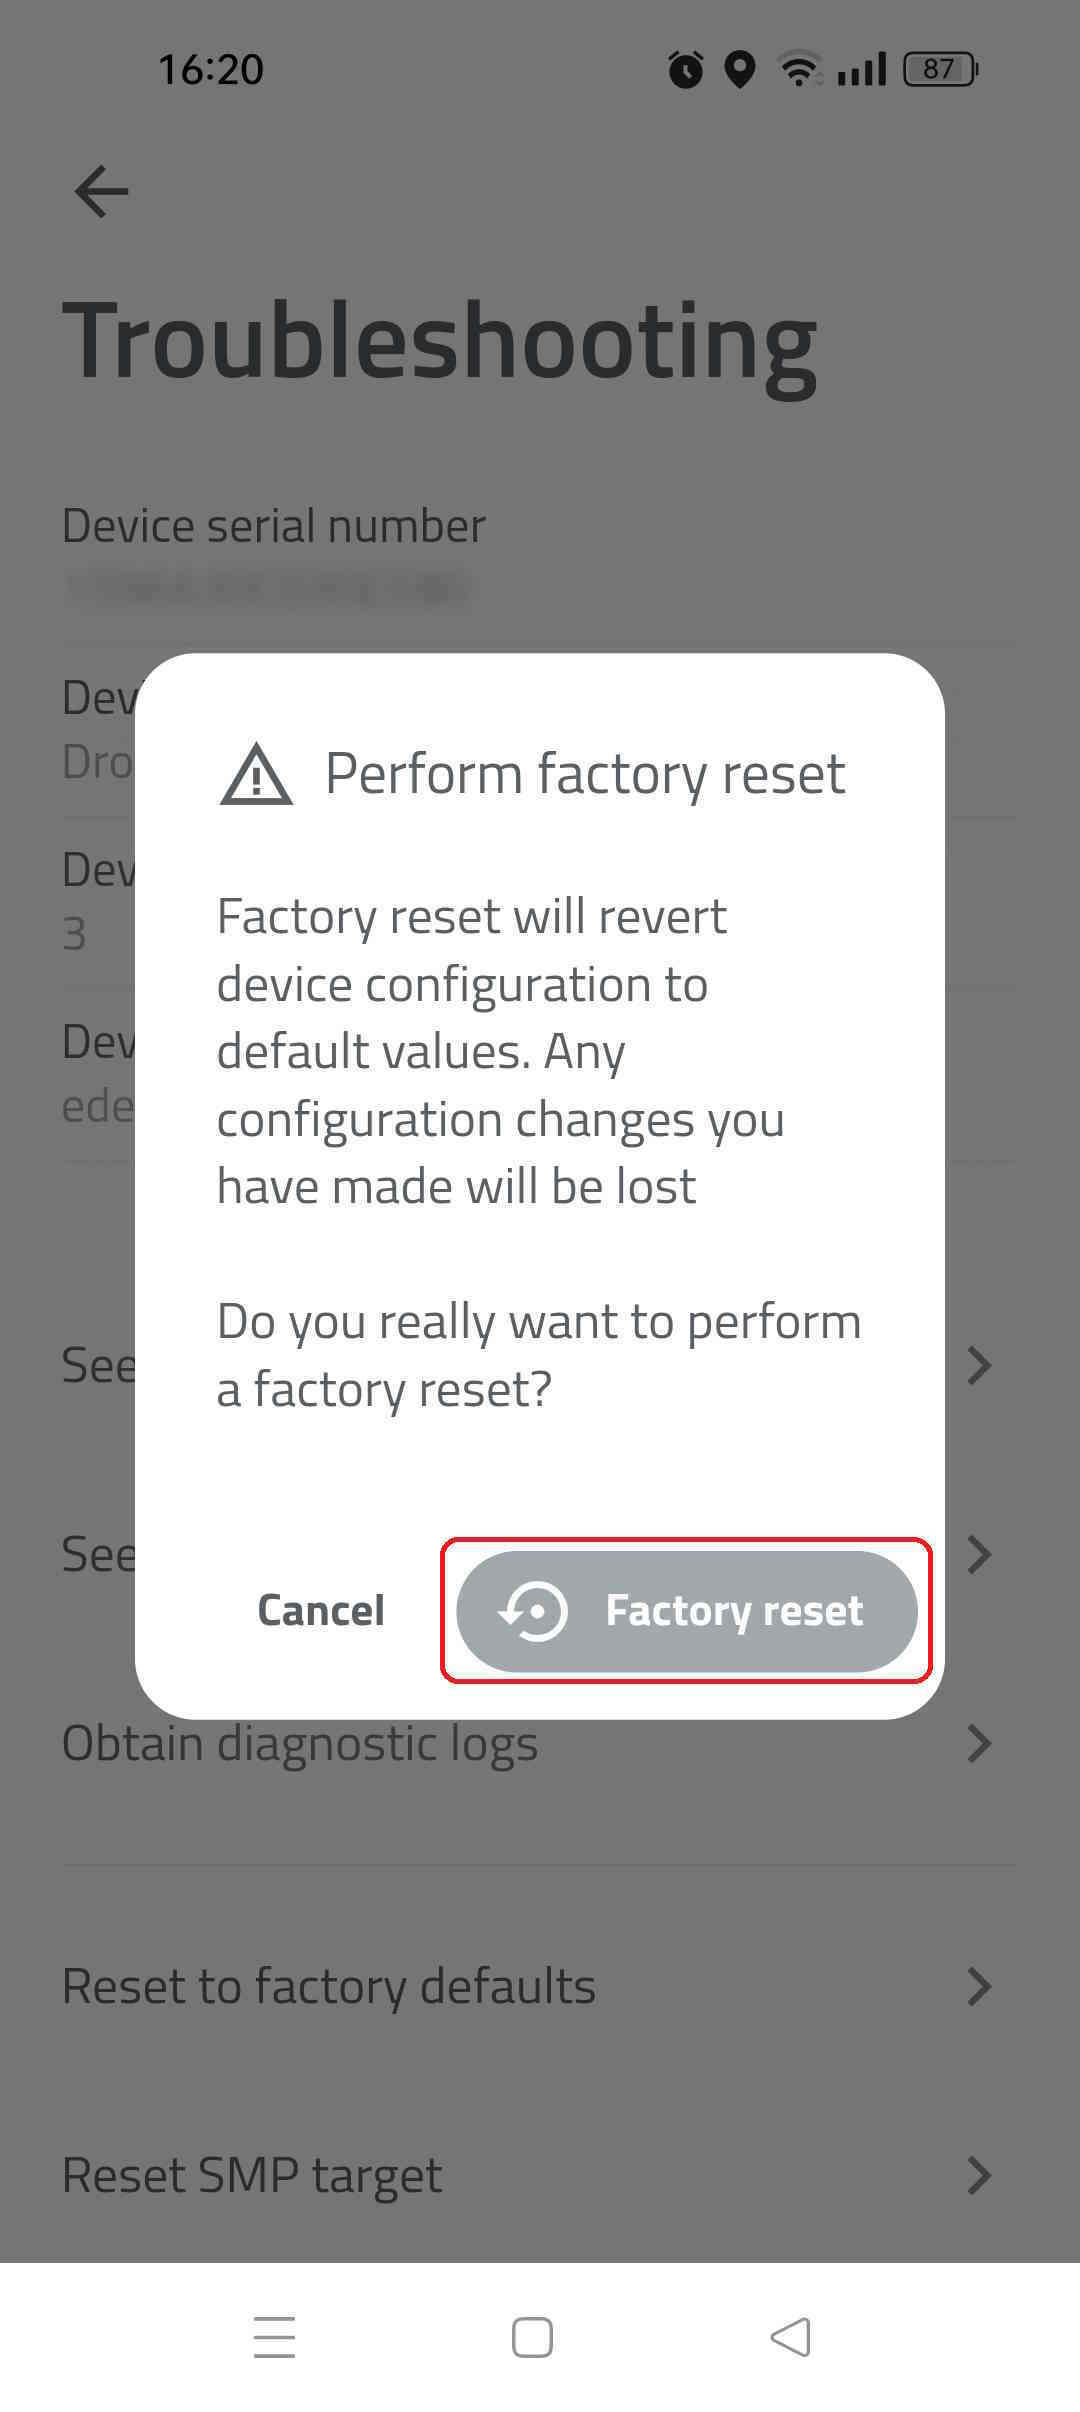
This action takes several moments and the device restarts after the process is done.
Obtain Diagnostic Logs
Obtain Diagnostic Logs
To help resolve extraordinary issues, the Dronetag Support Team might request that you download diagnostic logs. If you haven’t received guidance from our support team and are experiencing an issue, please contact us at support@dronetag.cz and also download your diagnostic logs for faster assistance.
- Turn on your device and open the Dronetag App.
- Go to your profile and select "My Devices."
- Choose your device, navigate to "Troubleshooting," and select "Obtain Diagnostic Logs."
These logs will be downloaded from your device and sent to our development team for review.
How to report a problem to our Support Team
1. Troubleshoot before you report a problem
Carefully review the possible causes of the problem (described below) before reporting it.
2. Compose an Email
To report a problem, send an email to our support team at support@dronetag.com.
Use the subject line: “Problem Report – [Insert Your Product Name]” to help us identify your request promptly.
3. Provide a Detailed Description
Include the following details in your email:
- Email Address: Your account email address.
- Product Name: The product you are reporting the issue with.
- Serial Number: 16-digit serial number from the bottom of the Scout or the
:8080management page. - Interface Used: Web browser and OS (e.g. Chrome on Windows 11, Safari on iOS 18, etc.)
- Problem Definition: What is the problem? What were you expecting? What happened?
- Steps to Reproduce: A clear list of steps to replicate the issue.
- Video Recording: A short screen recording if the issue can be visualized.
- Screenshot or Drone Scanner Record: Attach if applicable.
- Additional Information: Logs, photos, or anything that might help us understand the situation.
4. Send the Email
Double-check that all the information and attachments are included. Then send it to support@dronetag.com.
Our support team will get back to you as soon as possible.
List of Possible Issues
The device is stuck in Waiting for component GNSS
The device is stuck in Waiting for component GNSS
The orange GNSS indication means that the device is unable to obtain a GNSS fix.
Ensure that:
- You are outside the building and in a free unobstructed area.
- The Mini 4G is facing the sky.
- You have waited at least 2 minutes for the GNSS signal.
If you are in an area with a poor GNSS signal, you can boost the reception by changing the GNSS configuration. If you have cellular enabled on the device, you can see the number of satellites in the device detail.
The device is stuck in Waiting for component RID
Device is stuck in Waiting for component RID
The orange RID indication means that the device cannot communicate with our cloud or it has no cellular signal. The latter is more common. If the orange is combined with red, then it is probably not registered with any account.
Connect to your Mini 4G via Dronetag and see the LTE signal quality. If the number is between -110 dBm and 0 dBm, then your LTE signal is good.
Ensure that:
- You are in one of the supported countries.
- You are in the same country as the last time the NRI worked for you.
- You are in an area with cellular coverage.
- Your Mini 4G is registered with your account.
- Your subscription is active.
- If you use Mini 4G without a subscription, the Network Remote ID feature has to be off (check in the app, Configuration section).
- You have configured the correct antenna input in antenna configuration.
If you have moved to a different country, you need to click Configure network automatically in device configuration. If the problem with the connectivity persists, contact the Dronetag team for support. If you are in an area with a poor GNSS signal, you can boost the reception by changing the GNSS configuration. If you have cellular enabled on the device, you can see the number of satellites in the device detail.
The Direct / Broadcast Remote ID range is poor
Remote ID range is poor
Ensure that:
- The antenna in the device's configuration (in Dronetag app) is set to internal (not external).
- The external antenna is connected properly if you use your Mini 4G with external one.
The range of the DRI depends on three main factors:
- Placement of the device on the drone – the Bluetooth antenna is on the longer side of the device where MMCX connectors are placed. Therefore, this side should be unobstructed.
- The ground receiver's capabilities – flagship smartphones typically have better ranges because they support Bluetooth 5 Long Range.
- Environment – city vs. rural areas will have different ranges due to the 2.4 GHz interference in urban areas.
The distance range covered by Direct / Broadcast Remote ID (based on Bluetooth 4 Legacy and Bluetooth 5 long range) differs based on the aforementioned variables. It can reach anything from 200 m to 10 km. If you need a better range, you can get external Bluetooth antennas on our e-shop.
The RID LED is blinking red
The RID LED is blinking red
This means your Mini 4G can get no access to the Dronetag cloud or is not registered to any account.
Ensure that:
- Your subscription is active.
- Your Mini 4G is registered with your account.
- If you use your Mini 4G without a subscription, don't use the Network Remote ID feature.
Possible solutions:
- Make your subscription active.
- Register your device in the Dronetag app.
- If you use your Mini 4G without a subscription, check the Network Remote ID setting in the Dronetag app. Go to the Dronetag app while the Mini 4G is on and go to Mini 4G profile > Configuration > Enable Network Remote ID > OFF.
Downloads
Firmware Changelog
Following is a detailed list of changes to the Dronetag Mini 4G firmware.
Please note that the changelog is very technical and can be hard to understand for non-technical users. You can use this changelog to check if a specific issue you are experiencing has been fixed in a newer firmware version, or to see what new small features are available.
If you find this information confusing, we recommend you check our What's new page instead, where we try to introduce the most important changes and features to all of our products.
Source pages
Every chapter of this document is a page of the Dronetag help site. Use these addresses to reach the latest version.
- 1Introductionhelp.dronetag.cz/cs/dronetag-mini-4g
- 2Specificationhelp.dronetag.cz/cs/dronetag-mini-4g/specification
- 3LED Indicationshelp.dronetag.cz/cs/dronetag-mini-4g/led-indications
- 4Configurationhelp.dronetag.cz/cs/dronetag-mini-4g/configuration
- 5Attaching to the Dronehelp.dronetag.cz/cs/dronetag-mini-4g/attaching-to-drone
- 6Battery Charginghelp.dronetag.cz/cs/dronetag-mini-4g/battery-charging
- 7Firmware Updatehelp.dronetag.cz/cs/dronetag-mini-4g/firmware-update
- 8Safety Noticeshelp.dronetag.cz/cs/dronetag-mini-4g/safety-notices
- 9Limited Warrantyhelp.dronetag.cz/cs/dronetag-mini-4g/limited-warranty
- 10Maintenancehelp.dronetag.cz/cs/dronetag-mini-4g/maintenance
- 11Troubleshootinghelp.dronetag.cz/cs/dronetag-mini-4g/troubleshooting
- 12Downloadshelp.dronetag.cz/cs/dronetag-mini-4g/downloads
- 13Firmware Changeloghelp.dronetag.cz/cs/dronetag-mini-4g/firmware-changelog