Quick Start Guide
This section describes the basic operations of the device getting you from a new device to successfuly scanning.
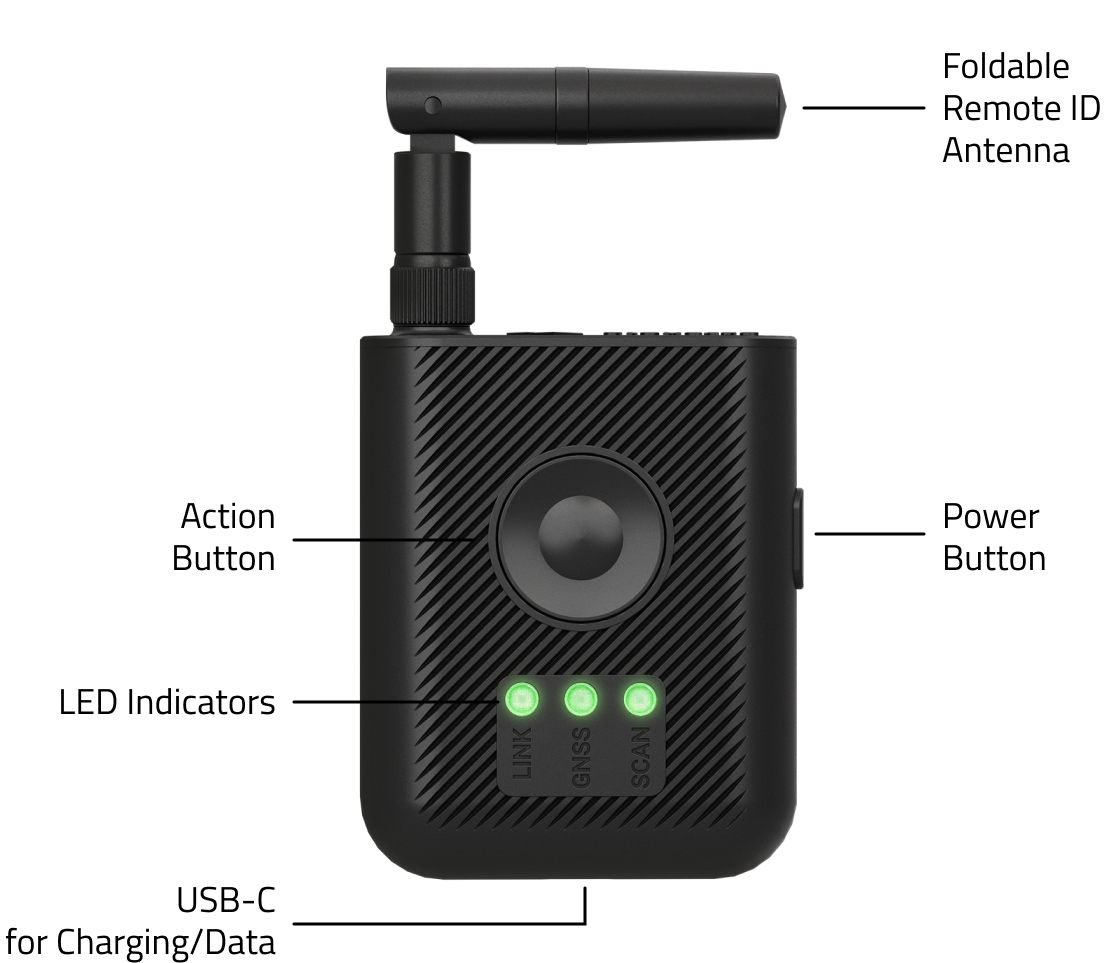
User Interactions
Dronetag RIDER is operated with the Power Button located on the side of the device and Action Button located in the middle of front side of the device.
Power Button:
- Long Press (2 s): Switch the device ON or OFF
- Short press (0.1 s): Start or stop scanning
- Short press (0.1 s): Battery indication (while the device is turned off)
- Extra-long press (15 s): Force device hardware restart
Action Button:
- Short press (0.1 s): Turn Sound Alarm ON or OFF (RIDER will confirm sturning Sound Alarm ON or OFF with a sound signal) More programmable functions will follow in the future.
Power Button + Action Button:
- Extra-long press (20 s): Force device reset to factory defaults
General Usage
Your device works in most outdoor areas where a GNSS signal is available.
Here’s how to get started quickly:
- Check the battery: While the device is off, press the Power Button briefly (0.1 s). The LEDs will show the current battery level.
- Turn it on: Press and hold the Power Button for 2 seconds.
- Wait for readiness: Once all components are ready, the three LEDs will turn solid green.
- Start scanning: Depending on your auto-scan settings, scanning will either start automatically or you’ll need to press the Power Button once to begin.
- Do your mission: The device will continue scanning during your operation.
- Turn it off: When finished, press and hold the Power Button for 2 seconds to power down.
Getting Started with Dronetag RIDER
To start live-viewing flights with the Dronetag RIDER, follow these steps:
1. Charge the device
Before your first flight, give the RIDER a full charge using the included USB-C cable.
A full battery ensures smooth operation without interruptions.
2. Power it on
Press and hold the Power Button to turn the RIDER on.
After a few seconds, the LEDs will light up to show status:
- LINK – connection to the cloud or mobile device
- GNSS – satellite positioning status
- SCAN – readiness to detect Remote ID signals
3. Connect with your Dronetag account
Pair the RIDER with the Dronetag App on your phone.
The app is available for iOS, Android, or as a Web App.
- If you don’t have a Dronetag account yet, create one in the app or at dronetag.app/signup.
- In the app, go to Profile → My Devices → Register new.
- Select Dronetag RIDER and follow the instructions.
- If registering in the Web App, you’ll need to enter the device serial number manually.
4. Activate the device
When using the RIDER for the first time, you need to activate it. Activation is neccessary only when LTE connectivity is enabled.
To activate your device, perform one of the following steps:
- Connect to the device via Bluetooth using the Dronetag App.
- Or wait at least 10 minutes while the device is powered on. This works only if you have previously registered RIDER to your Dronetag account and have active subscription.
After activating the device, wait until the RIDER is connected to the network and has acquired GNSS fix.
You're ready when all leds turned green:
- LINK = connected
- GNSS = satellite fix acquired
- SCAN = ready to detect Remote ID signals
5. Start scanning
Once the LEDs are green, the RIDER begins detecting nearby Remote ID signals.
- If Auto Scanning is enabled, it starts automatically.
- If it’s disabled, press the Power Button once to start scanning.
All detections appear in real time in the Dronetag App.
6. Test before real use
We recommend a quick table test to be sure everything works:
- Turn on the RIDER following the steps above.
- Place a Remote ID compliant drone nearby (or a Dronetag Beacon / Mini / BS).
- Remember: drones only broadcast Remote ID once they take off.
- Check in the app that the RIDER detects the device and shows live data.
Avoid testing RIDER close to devices using 2.4 GHz or 5 GHz frequency. Examples of these devices are following:
- drone controllers
- mobile hotspots
- wearables
- modern in-car Wi-Fi systems such as Apple CarPlay and Android Auto
Basically it is every smart device using wireless communication.