
Dronetag Rider
- Document
- Dronetag Rider
- Chapters
- 19
- Source
- help.dronetag.cz/cs/print/dronetag-rider
Dronetag RIDER
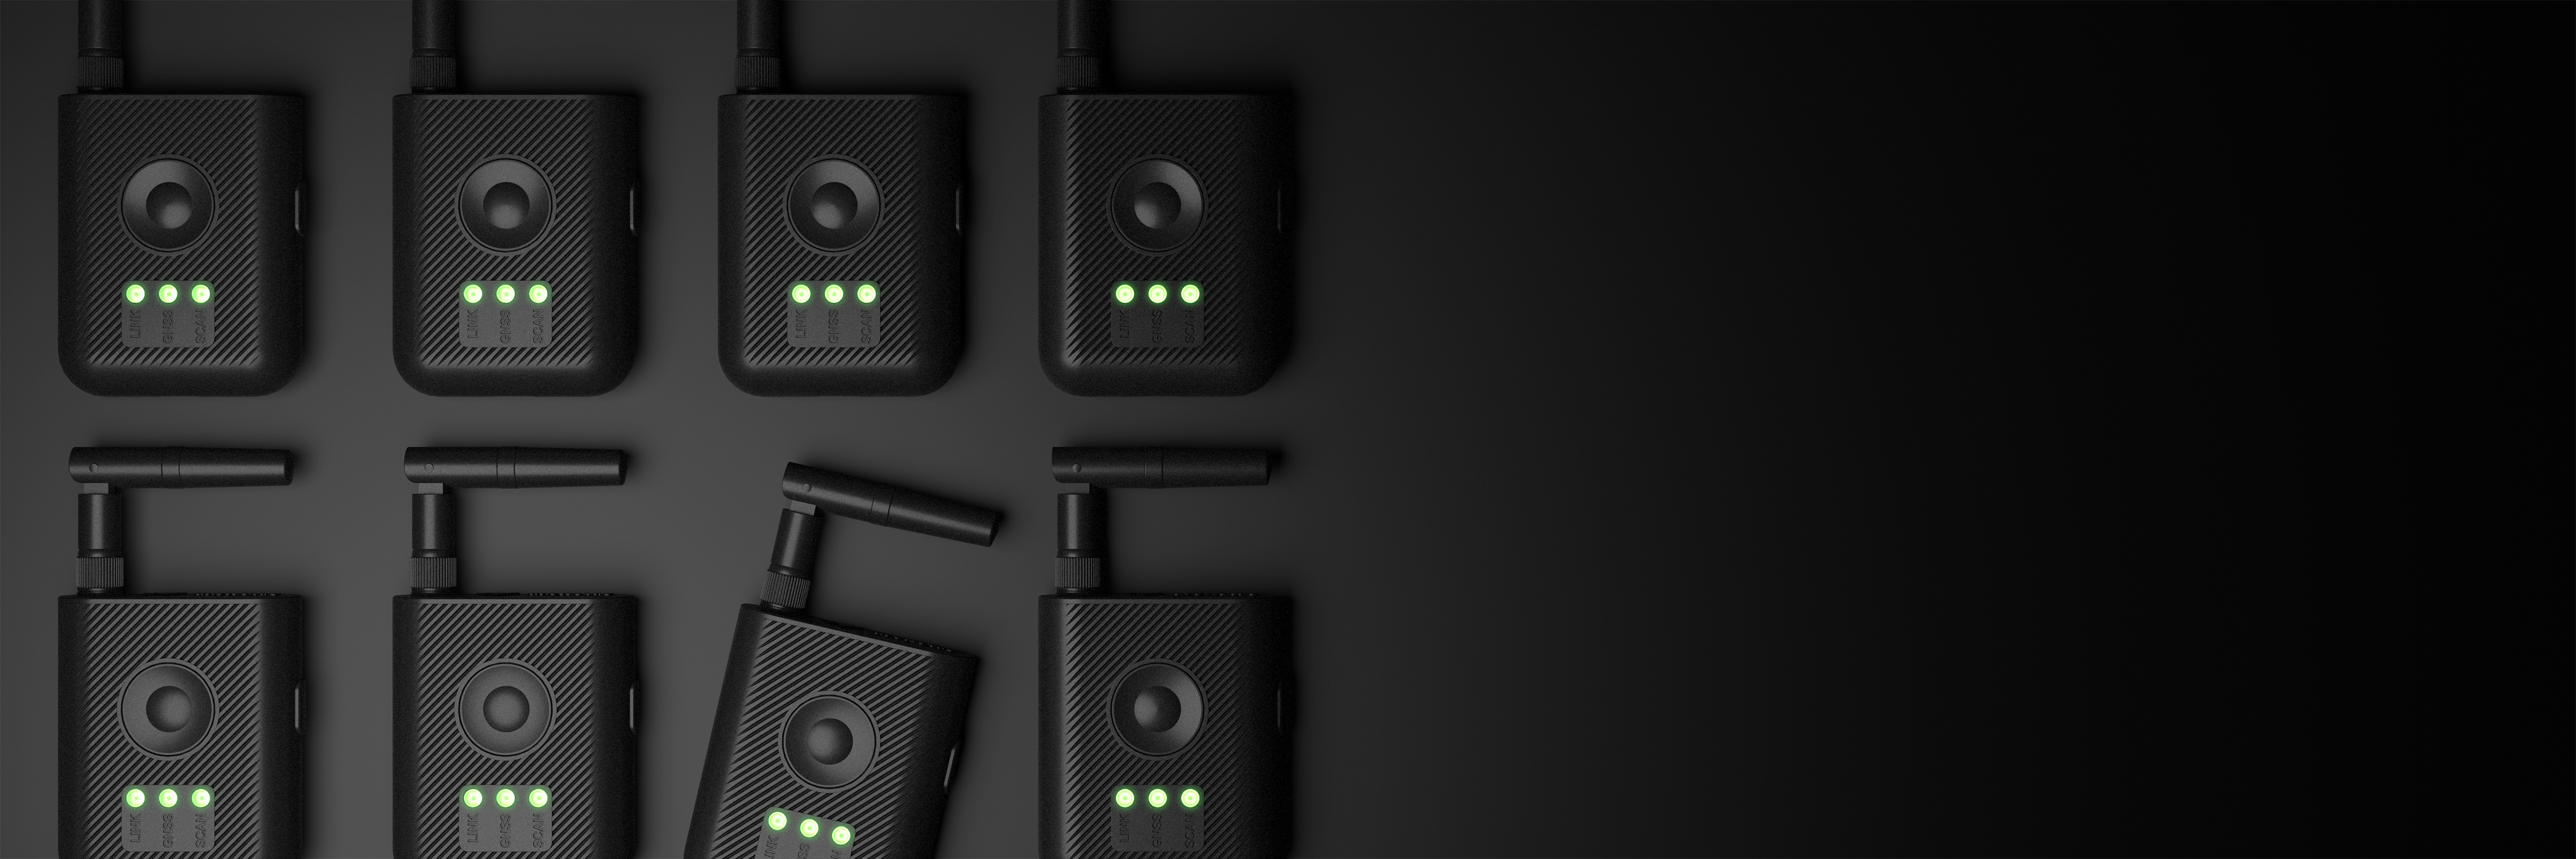
Dronetag RIDER is a compact, wireless, battery-powered Remote ID receiver, designed for public safety organizations and professional pilots.
What RIDER detects
The Dronetag RIDER is fully drone-agnostic. It captures Broadcast / Direct Remote ID signals transmitted by compliant aircraft and external modules - including popular brands like DJI, Autel, and others - at ranges up to 5 km (extendable with an optional antenna).
All detected data is sent in real time to the Dronetag App, where it can be visualized and used for airspace alerts.
RIDER supports Remote ID standards in the EU, US, Japan, and Singapore, with additional regions expected to follow. It works seamlessly whether the drone has built-in Remote ID or uses an external module.
RIDER only detects aircraft that broadcast Remote ID signals. If a drone does not transmit any Remote ID, it cannot be detected by RIDER.
Here you can find all information about Remote ID.
For a detailed and up-to-date list of Remote ID compatible drones, please contact the official agencies:
Remote ID and Location Rules
Usually drones are designed to decide automatically whether to transmit Remote ID based on their current location.
If Remote ID broadcasting is mandatory in the region, the drone will enable it.
If the rules in that area do not require Remote ID, the drone may switch it off.
This feature explains why the same drone may be detected by your RIDER in one country, but not detected in another — it depends on whether Remote ID broadcasting is required in that region.
This behavior depends on the drone manufacturer and regional regulations. Always check the requirements for the airspace where you fly.
Remote ID Requirements by Country (as of October 2025)
| Country / Region | Status | Effective Date | Notes | Source |
|---|---|---|---|---|
| EU / EASA framework | ✅ | 2024-01-01 | Mandatory Direct Remote ID for specific category and class-marked in open. | EASA (general) (easa.europa.eu) |
| Austria | ✅ | 2024-01-01 | Under EASA framework | EASA |
| Belgium | ✅ | 2024-01-01 | Under EASA framework | EASA |
| Bulgaria | ✅ | 2024-01-01 | Under EASA framework | EASA |
| Croatia | ✅ | 2024-01-01 | Under EASA framework | EASA |
| Cyprus | ✅ | 2024-01-01 | Under EASA framework | EASA |
| Czechia (Czech Republic) | ✅ | 2024-01-01 | Under EASA framework | EASA |
| Denmark | ✅ | 2024-01-01 | Under EASA framework | EASA |
| Estonia | ✅ | 2024-01-01 | Under EASA framework | EASA |
| Finland | ✅ | 2024-01-01 | Under EASA framework | EASA |
| France | ✅ | 2024-01-01 | Under EASA framework | EASA |
| Germany | ✅ | 2024-01-01 | Under EASA framework | EASA |
| Greece | ✅ | 2024-01-01 | Under EASA framework | EASA |
| Hungary | ✅ | 2024-01-01 | Under EASA framework | EASA |
| Ireland | ✅ | 2024-01-01 | Under EASA framework | EASA |
| Italy | ✅ | 2024-01-01 | Under EASA framework | EASA |
| Latvia | ✅ | 2024-01-01 | Under EASA framework | EASA |
| Lithuania | ✅ | 2024-01-01 | Under EASA framework | EASA |
| Luxembourg | ✅ | 2024-01-01 | Under EASA framework | EASA |
| Malta | ✅ | 2024-01-01 | Under EASA framework | EASA |
| Netherlands | ✅ | 2024-01-01 | Under EASA framework | EASA |
| Poland | ✅ | 2024-01-01 | Under EASA framework | EASA |
| Portugal | ✅ | 2024-01-01 | Under EASA framework | EASA |
| Romania | ✅ | 2024-01-01 | Under EASA framework | EASA |
| Slovakia | ✅ | 2024-01-01 | Under EASA framework | EASA |
| Slovenia | ✅ | 2024-01-01 | Under EASA framework | EASA |
| Spain | ✅ | 2024-01-01 | Under EASA framework | EASA |
| Sweden | ✅ | 2024-01-01 | Under EASA framework | EASA |
| Iceland (EASA) | ✅ | 2024-01-01 | Under EASA framework | EASA |
| Norway (EASA) | ✅ | 2024-01-01 | Under EASA framework | EASA |
| Liechtenstein (EASA) | ✅ | 2024-01-01 | Under EASA framework | EASA |
| Switzerland | ✅ | 2024-01-01 | Harmonized with EASA rules | EASA |
| USA | ✅ | 2024-03-16 | Mandatory under 14 CFR Part 89 (except in FRIA areas) | eCFR / FAA (ecfr.gov) |
| Japan | ✅ | 2022-06-20 | Registration and Remote ID functionality mandatory | MLIT / JCAB |
| Singapore | ✅ | 2025-12-01 | B-RID required for UA > 250 g | CAAS / Singapore government |
| United Kingdom | ✅ | 2026-01-01 | Direct RID required under UK regime | CAA UK |
| South Korea | ✅ | 2024-01-01 | 2024-01-01 | MOLIT / Korea Government |
| Canada | ❌ | — | No national broadcast RID mandate to date | Transport Canada |
| Australia | ❌ | — | Under consultation for future Remote ID, no mandate yet | Australian Infrastructure / Govt |
| India | ❌ | — | Digital Sky / NPNT system in place, broadcast Remote ID not declared | DGCA India |
Features
- Remote ID Compatibility: Supports Bluetooth 2.4 GHz and Wi-Fi 2.4 GHz Remote ID technologies to detect drones compliant with global standards.
- Multi-GNSS Support: Utilizes GPS, Galileo, GLONASS, and BeiDou for enhanced positioning.
- Real-Time Monitoring: Provides live data access via the Dronetag App, enabling situational awareness in monitored airspace.
- Data Transmission Modes:
- Online Mode: Cellular data transmission for real-time cloud connectivity.
- Offline Mode: Data transmission directly to a paired mobile device.
- Sound Alert: RIDER starts a sound alert when a drone is detected.
Detection and Tracking Range
The range is defined by the Remote ID transmitter power on the drone and the environment in which the receiver is located. For this User Guide, we divided it into Detection Range and Tracking Range:
Detection Range
- Ability to sporadically pick up drone activity at greater distances.
| Antenna type | Urban Area | Rural Area |
|---|---|---|
| Omnidirectional | up to 2.5 km / 1.5 mi | up to 5 km / 3.1 mi |
Tracking Range
- Real-time, continuous reception for reliable monitoring.
| Antenna type | Urban Area | Rural Area |
|---|---|---|
| Omnidirectional | up to 1 km / 0.6 mi | up to 2.5 km / 1.5 mi |
Tests were based on real internal testing. Drones were flown at different altitudes and distances. A Dronetag Beacon (Bluetooth) and DJI Mavic 3 (Wi-Fi) were used as transmitters, and results comply with EU signal power regulations.
Detection range can vary significantly based on factors like environmental conditions, interference, and obstacles. For instance, in urban or built environments, the range may be considerably reduced due to physical obstructions and radio interference. Generally, open and clear areas allow for greater detection distances, while densely built locations can lead to a reduction in effective detection range.
Please note that the expected detection range is subject to ongoing testing. Factors like regional signal strength limits (such as those in the EU) and variations among drone manufacturers may impact detection. Some drone models may perform better or worse than expected due to differences in signal output or technology used, which may affect the practical detection range.
Dronetag App for Online Mode
The recommended way to use your RIDER is in online mode together with the Dronetag App.
In this setup, the app becomes your main interface for viewing and working with all data.
When operating in online mode:
- You can see live information from the RIDER as well as review recorded data directly in the app.
- The RIDER automatically saves all recorded data to the cloud via LTE, so it is always available and backed up.
- Because the device is connected to the cloud, you can keep your RIDER in a safe or protected location and still have situational awareness at the desired location anywhere you are through the Dronetag App.
This makes online mode ideal when you want reliable access to your data without having to physically interact with the device after every session.
To use online mode, you need to have the Dronetag App installed and ensure your mobile phone has an active data connection.
Drone Scanner (gen. 2) App for Offline Mode
You can also use your RIDER in offline mode together with the Drone Scanner app.
This option is useful when LTE connectivity is not available, not required or you just want to use it without any subscription.
When operating in offline mode:
- The RIDER is not connected to LTE; instead, it sends detection data via Bluetooth directly to the Drone Scanner (gen. 2) app.
- To access this data, you need to have your RIDER physically with you and use the Drone Scanner (gen. 2) app to scan the surrounding area.
- This setup allows you to work fully offline, but it requires that the device remains close to your mobile phone at all times.
- If you have an Android phone, you can also connect it with RIDER via USB-C cable.
Offline mode is a good choice for quick checks or in environments where LTE coverage is limited.
For more information about combining RIDER with the Dronetag App, see the chapter Using RIDER with Dronetag App.
What is in the Box
After the RIDER is delivered to you, the following package contents should be present:
- 1x Dronetag RIDER with antenna
- 1x USB-C for charging and data transfer
- 1x Dronetag sticker
- 1x Quick Start Guide
Safety Notices
Dronetag RIDER has been created for the most straightforward handling possible. Still, the following safety notes must be followed to reduce the risk of accidents, injuries and device malfunction to a minimum. If misused, it has the potential for causing fire, electrical shock or personal injury. Dronetag is not liable for damages arising from the use or misuse of this product. To help ensure accident-free operation, follow these guidelines:
- This and the Dronetag App manual must be read carefully, and all instructions must be followed. Special attention must be taken to all warnings and precautions.
- The user is solely responsible for the risk while using this device. Dronetag is not responsible for any injuries or accidents that are a result of improper use.
- The maximum input voltage is 5V and should be applied to only the USB-C connector during the charging or data transfer.
- Do not open the device. There are no parts that the user can service. Opening the device leads to the loss of warranty and infringes the general terms and conditions.
- Do not allow liquid, small particles or other foreign objects to get into the system or accessories.
- Do not expose the system or accessories to high temperatures, high humidity or direct sunlight for a prolonged duration.
- Keep the system and accessories, including cable ties and fasteners, out of the reach of small children.
- If the system is brought directly from a cold location to a warm one, moisture may condense inside the system. If this occurs, the system may not operate properly. In this case, unplug all cables/accessories immediately and leave the device in a dry place for several hours.
- Stop using the system and disconnect it from any connectors immediately if the device functions abnormally, produces unusual sounds or smells, or becomes too hot to touch.
- Do not put any DC voltage to the RID antenna connector
- The RIDER antenna connector is SMA Female.
- Always use antennas with an SMA Male connector.
Using an incompatible connector can result in:
- At best, no Remote ID reception.
- At worst, permanent damage to the connector.
Heat and Temperature Safety
During normal operation, your RIDER may become slightly warm. When charging, it can heat up even more.
This is expected, but it’s important to avoid overheating:
- Do not expose RIDER to direct sunlight for long periods (e.g., on a car dashboard).
- Do not operate or charge the device in high ambient temperatures.
- During operation or charging, the device may feel warm - this is normal.
- However, if you ever notice the device swelling or bulging, it indicates a battery issue.
- In that case, stop using the device immediately and contact Dronetag support or your local dealer.
Overheating protection
RIDER is equipped with built-in thermal protection:
- If the temperature becomes too high, the device will shut down automatically.
- When charging, if the device overheats, charging will slow down or pause completely.
- If you notice that RIDER is not charging (or charges very slowly), make sure it is not in a hot environment.
RIDER cases and heat
RIDER cases are made from thermoplastic material.
When the case gets hot, the material can become soft and prone to dents, scratches, or deformation.
Be careful not to press or store RIDER under load when it is warm - this can cause permanent damage to the case.
Quick Start Guide
This section describes the basic operations of the device getting you from a new device to successfully scanning.
User Interactions
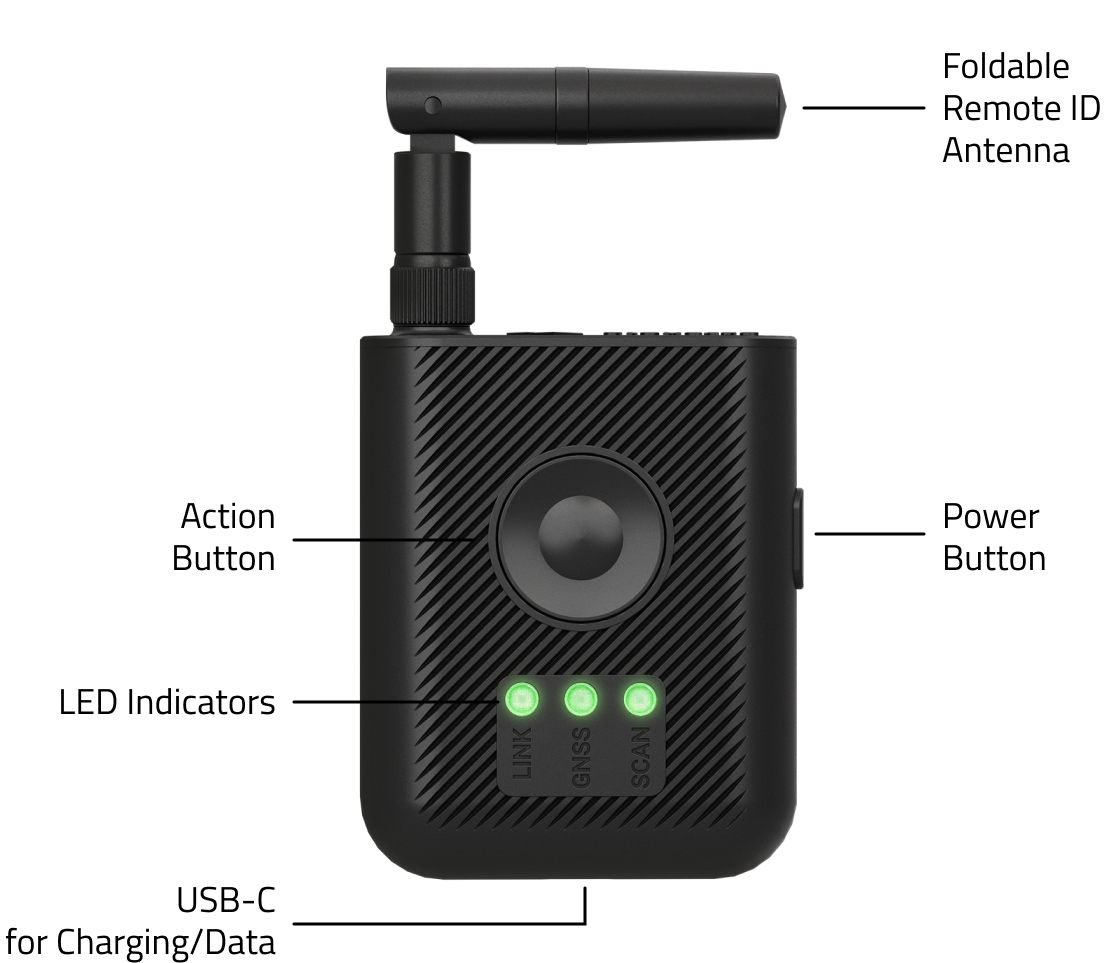
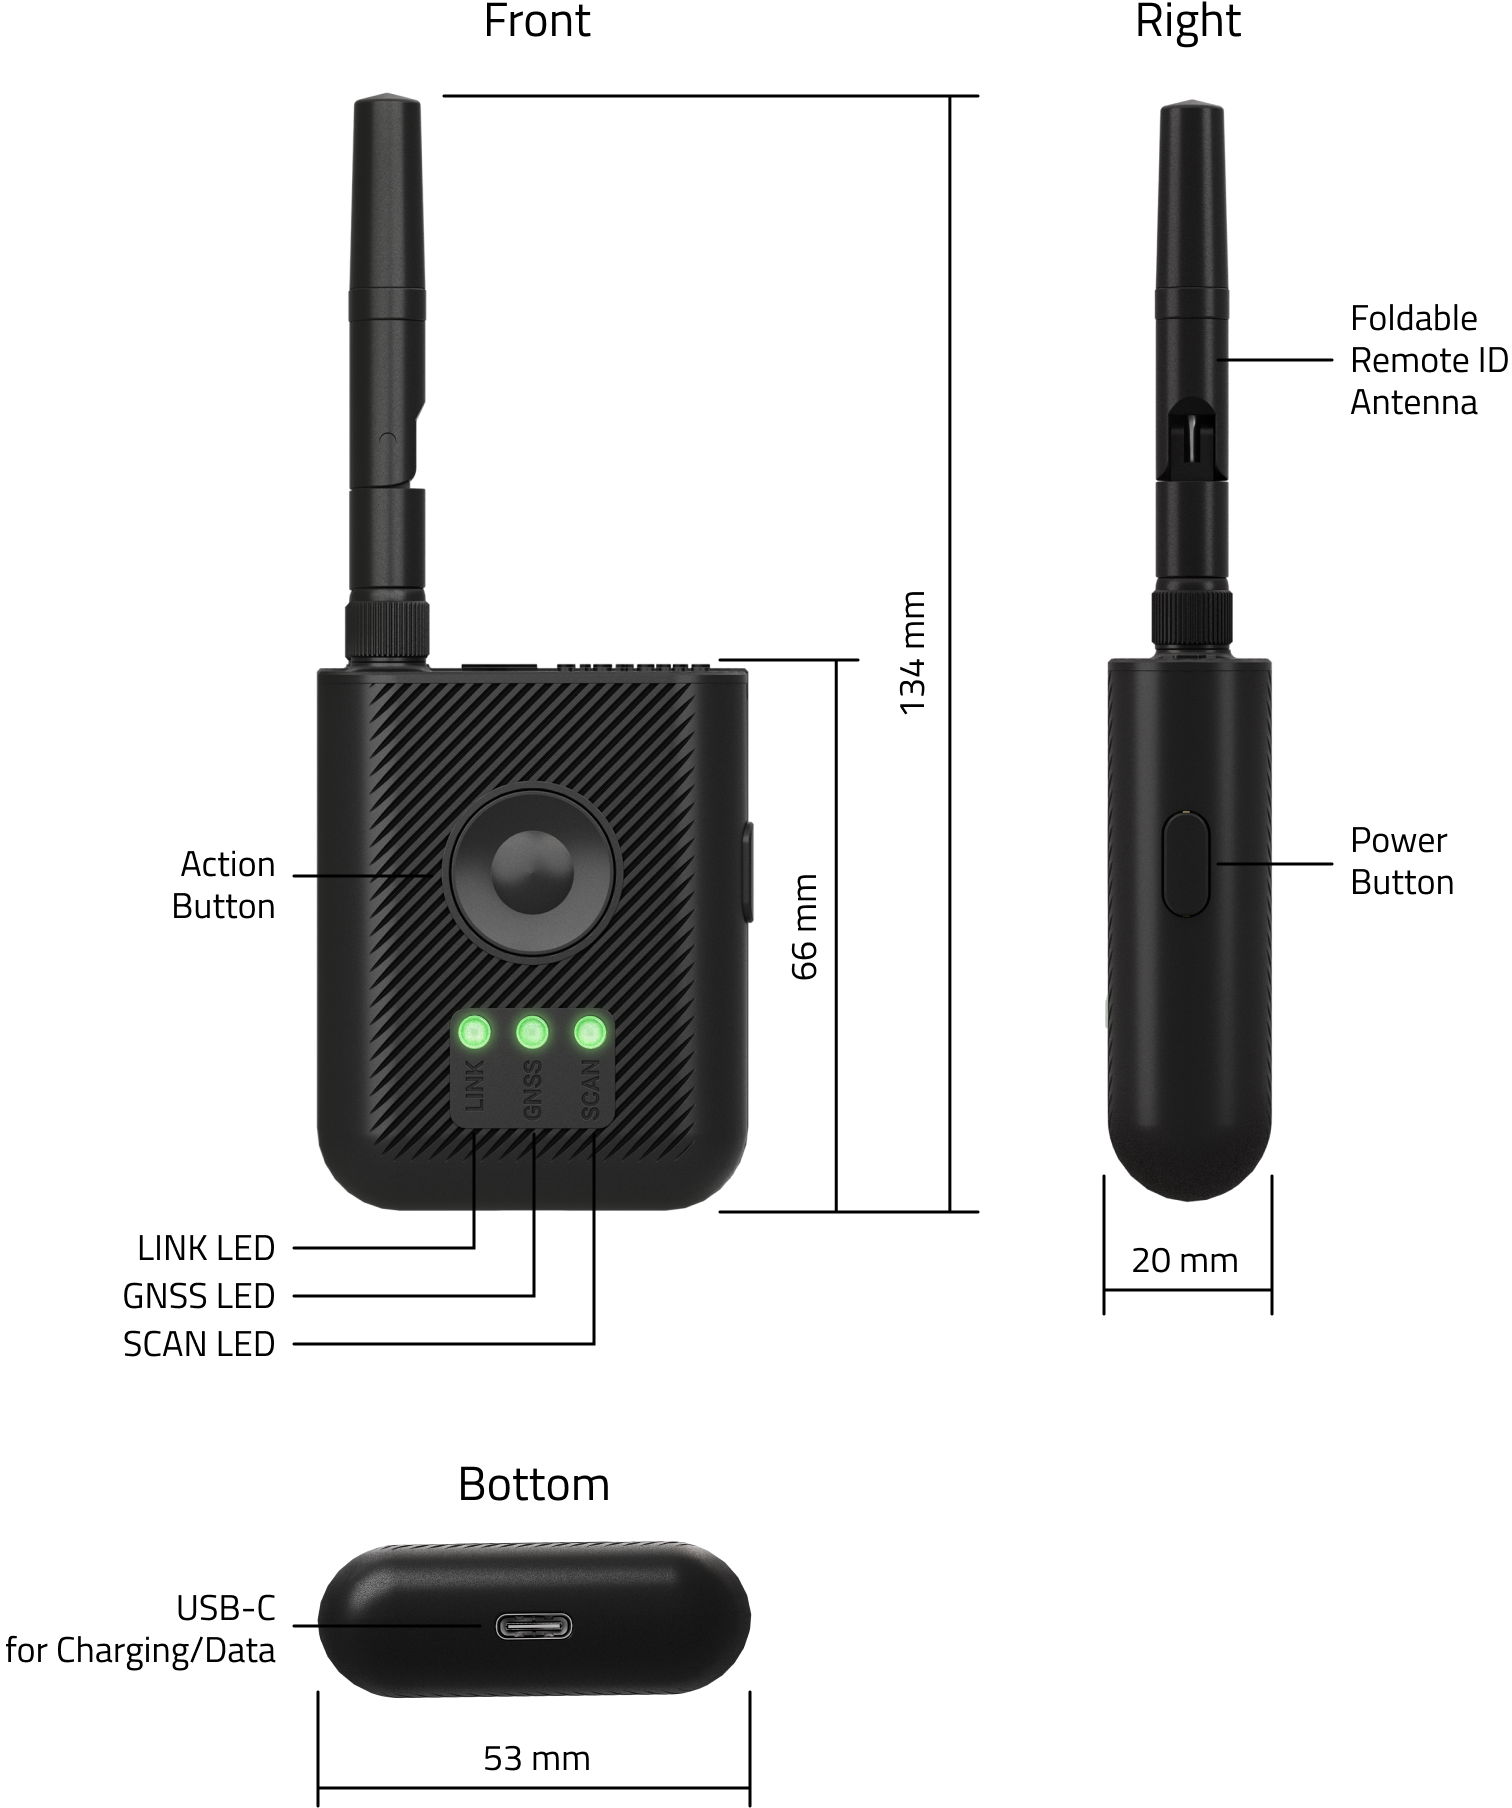
Dronetag RIDER is operated with the Power Button located on the side of the device and the Action Button located in the middle of the front side of the device.
Power Button:
- Long Press (2 s): Switch the device ON or OFF
- Short press (0.1 s): Start or stop scanning
- Short press (0.1 s): Battery indication (while the device is turned off)
- Extra-long press (15 s): Force device hardware restart
Action Button:
- Short press (0.1 s): Turn Sound Alarm ON or OFF (RIDER will confirm turning the Sound Alarm ON or OFF with a sound signal) More programmable functions will follow in the future.
Power Button + Action Button:
- Extra-long press (20 s): Force device reset to factory defaults
General Usage
Your device works in most outdoor areas where a GNSS signal is available.
Here’s how to get started quickly:
- Check the battery: While the device is off, press the Power Button briefly (0.1 s). The LEDs will show the current battery level.
- Turn it on: Press and hold the Power Button for 2 seconds.
- Wait for readiness: Once all components are ready, the three LEDs will turn solid green.
- Start scanning: Depending on your auto-scan settings, scanning will either start automatically or you’ll need to press the Power Button once to begin.
- Do your mission: The device will continue scanning during your operation.
- Turn it off: When finished, press and hold the Power Button for 2 seconds to power down.
Getting Started with Dronetag RIDER
To start live-viewing flights with the Dronetag RIDER, follow these steps:
1. Charge the device
Before your first flight, give the RIDER a full charge using the included USB-C cable.
A full battery ensures smooth operation without interruptions.
2. Power it on
Press and hold the Power Button to turn the RIDER on.
After a few seconds, the LEDs will light up to show status:
- LINK – connection to the cloud or mobile device
- GNSS – satellite positioning status
- SCAN – readiness to detect Remote ID signals
3. Connect with your Dronetag account
Pair the RIDER with the Dronetag App on your phone.
The app is available for iOS, Android, or as a Web App.



- If you don’t have a Dronetag account yet, create one in the app or at dronetag.app/signup.
- In the app, go to Profile → My Devices → Register new.
- Select Dronetag RIDER and follow the instructions.
- If registering in the Web App, you’ll need to enter the device serial number manually.
4. Activate the device
When using the RIDER for the first time, you need to activate it. Activation is necessary only when LTE connectivity is enabled.
To activate your device, perform one of the following steps:
- Connect to the device via Bluetooth using the Dronetag App.
- Or wait at least 10 minutes while the device is powered on. This works only if you have previously registered RIDER to your Dronetag account and have an active subscription.
After activating the device, wait until the RIDER is connected to the network and has acquired a GNSS fix.
You're ready when all LEDs turn green:
- LINK = connected
- GNSS = satellite fix acquired
- SCAN = ready to detect Remote ID signals
5. Start scanning
Once the LEDs are green, the RIDER begins detecting nearby Remote ID signals.
- If Auto Scanning is enabled, it starts automatically.
- If it’s disabled, press the Power Button once to start scanning.
All detections appear in real time in the Dronetag App.
6. Test before real use
We recommend a quick table test to be sure everything works:
- Turn on the RIDER following the steps above.
- Place a Remote ID compliant drone nearby (or a Dronetag Beacon / Mini / BS).
- Remember: drones only broadcast Remote ID once they take off.
- Check in the app that the RIDER detects the device and shows live data.
Avoid testing RIDER close to devices using 2.4 GHz or 5 GHz frequency. Examples of these devices are the following:
- drone controllers
- mobile hotspots
- wearables
- modern in-car Wi-Fi systems such as Apple CarPlay and Android Auto
Basically it is every smart device using wireless communication.
Mounting Options
Below are recommended mounting options depending on your deployment scenario.
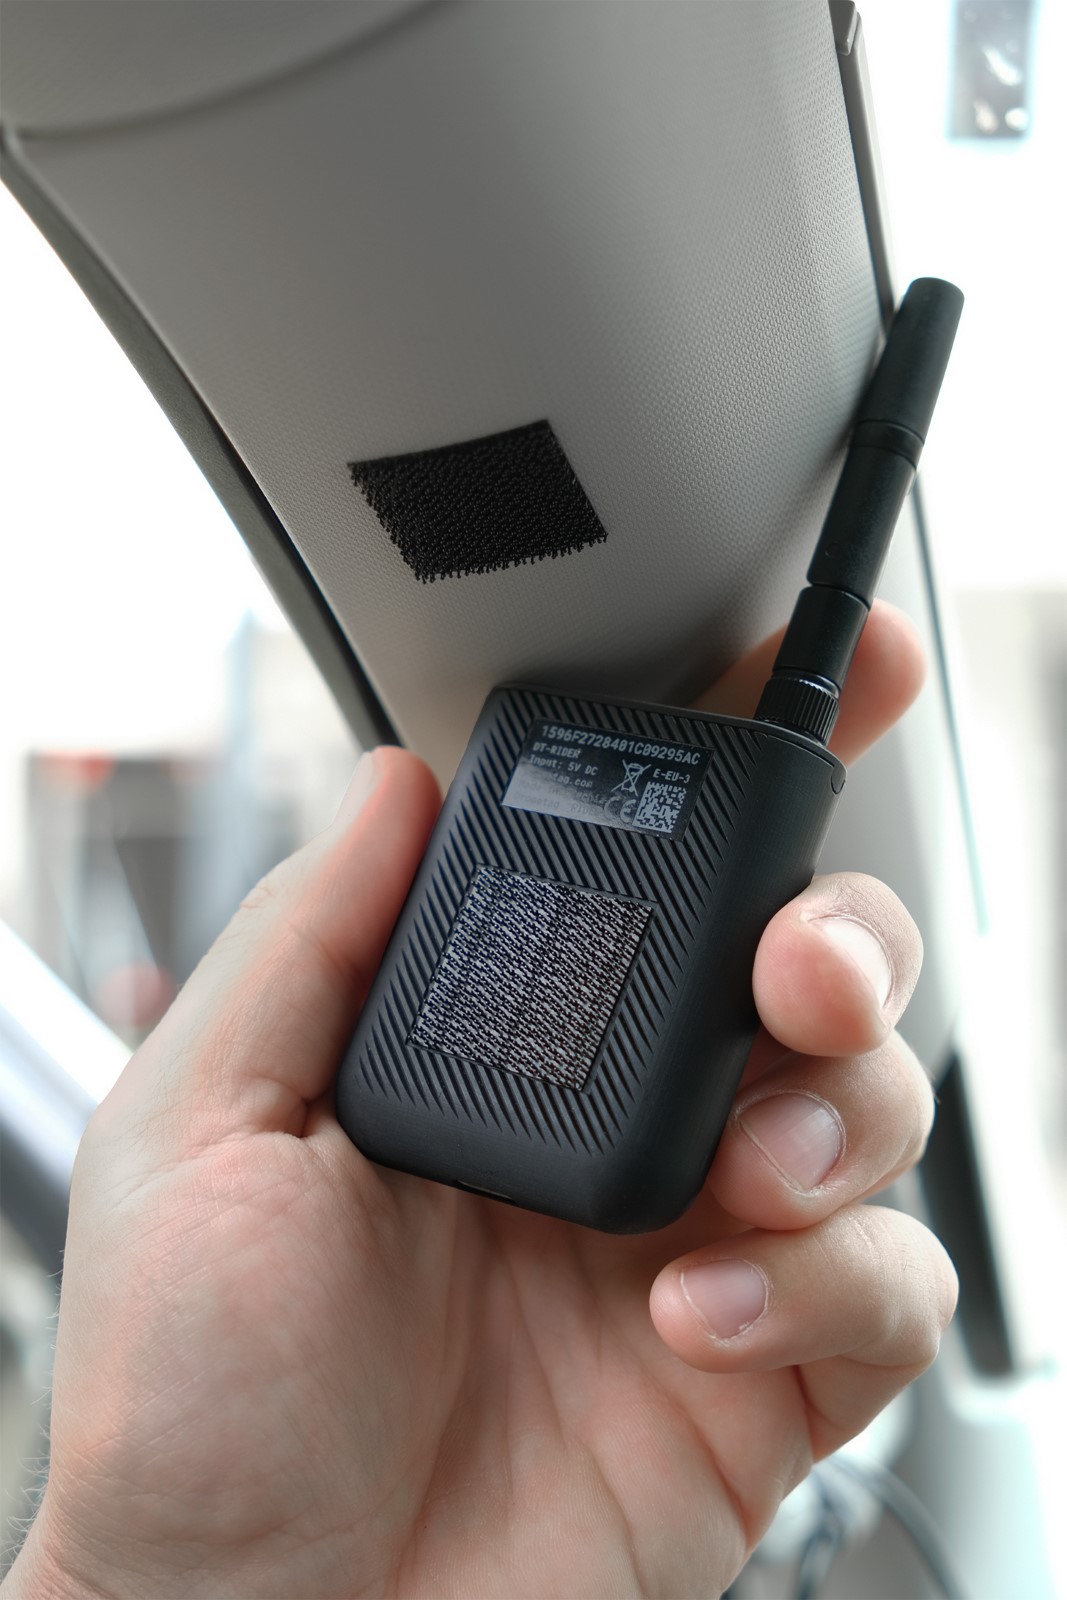
Quick Mount - Adhesive 3M Dual Lock
Use 3M Dual Lock to create a strong yet removable snap-on mount.
- How it works: Stick one piece on the back of the RIDER and the other on the target surface (e.g., metal, powder-coated surfaces, or many plastics). Press the two pieces together until you feel/hear a click as the interlocking stems engage and the mount holds firm.
- Removal: Lift from one corner to detach.
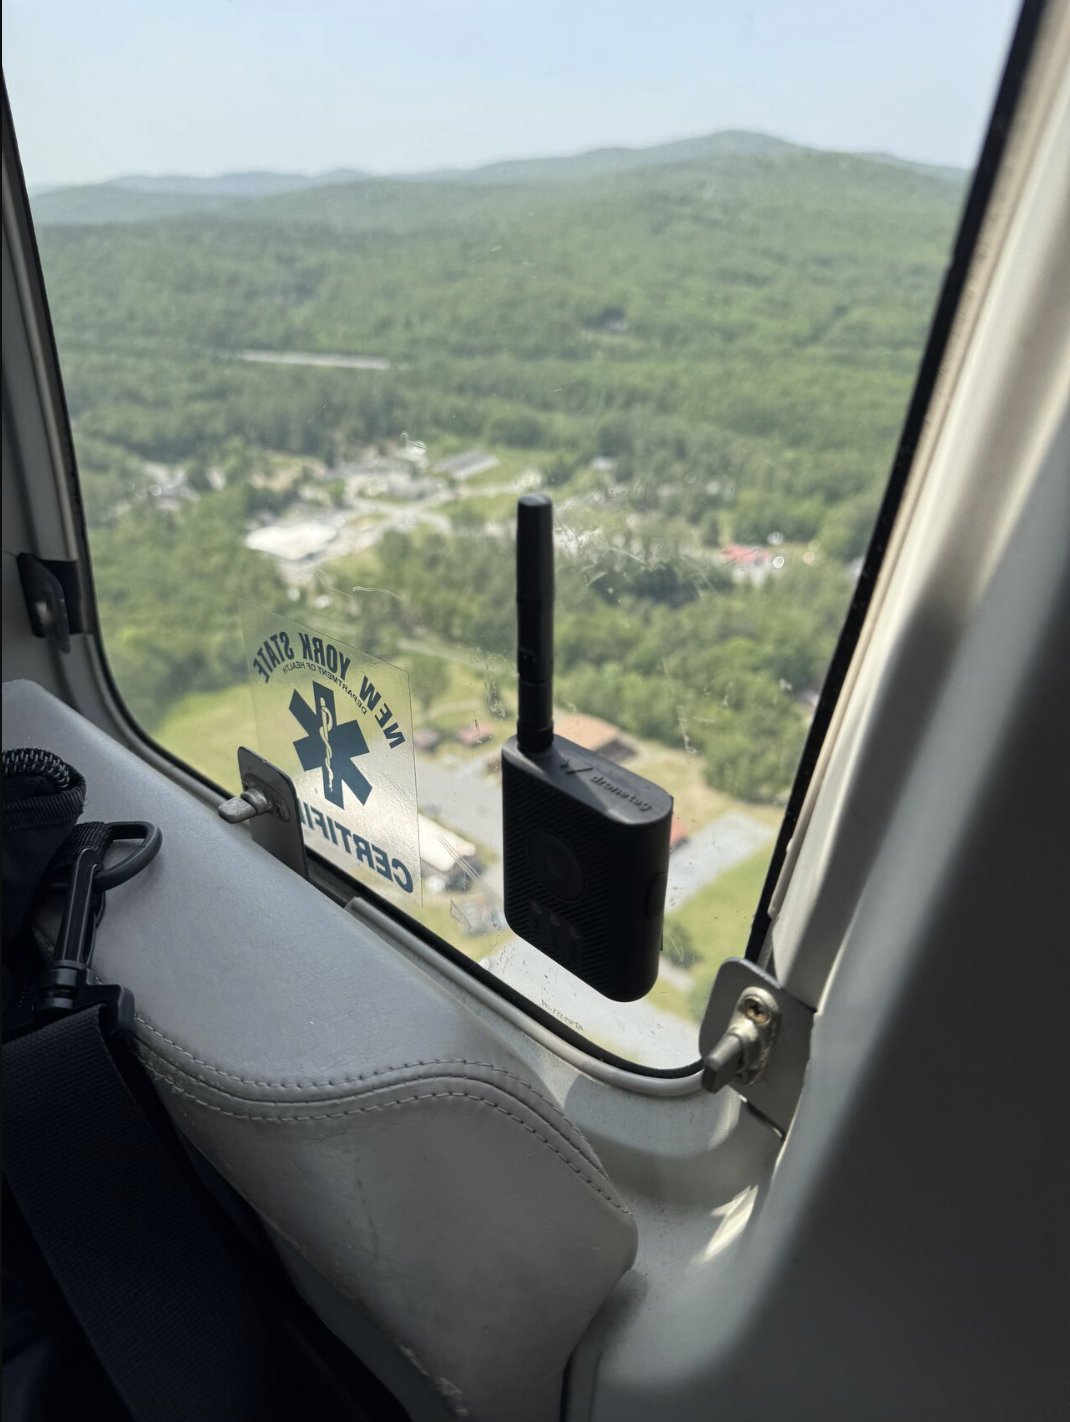
- Where it fits: car dashboard, interior front corner pillar (where the windshield meets the front side window), cockpit/flight deck panels, windows, and other flat, smooth surfaces.
Make sure to degrease both surfaces before applying for optimal hold.
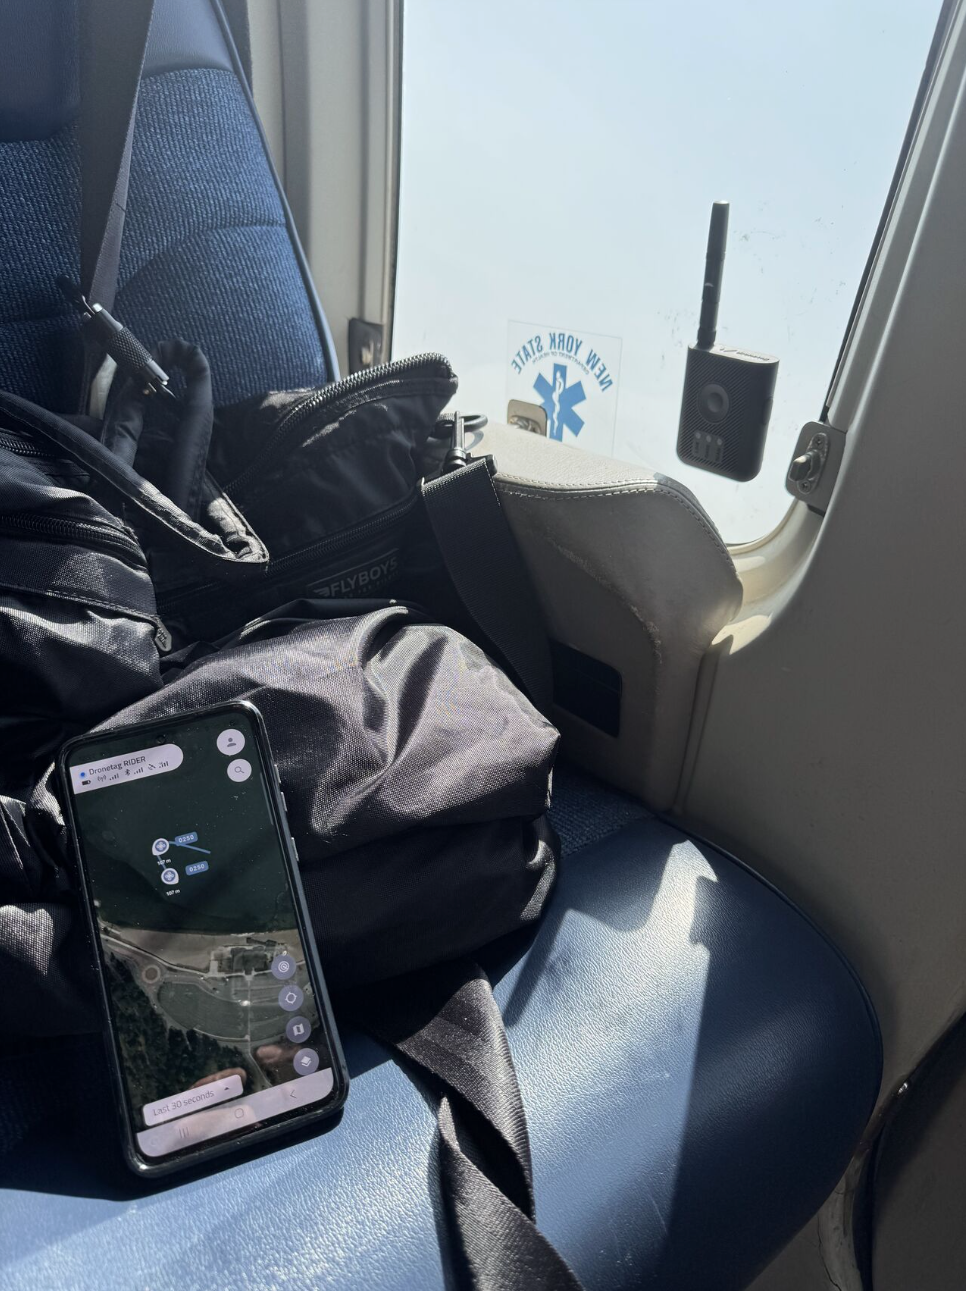
General Recommendations
- Orientation: Keep the antenna upright with a clear view of the sky for best reception.
- Interference: Avoid placing the antenna directly behind large metal panels or very close to high-power electronics or close to sources of 2.4 GHz Wi-Fi or Bluetooth signals.
On-Body Carry - RIDER Case
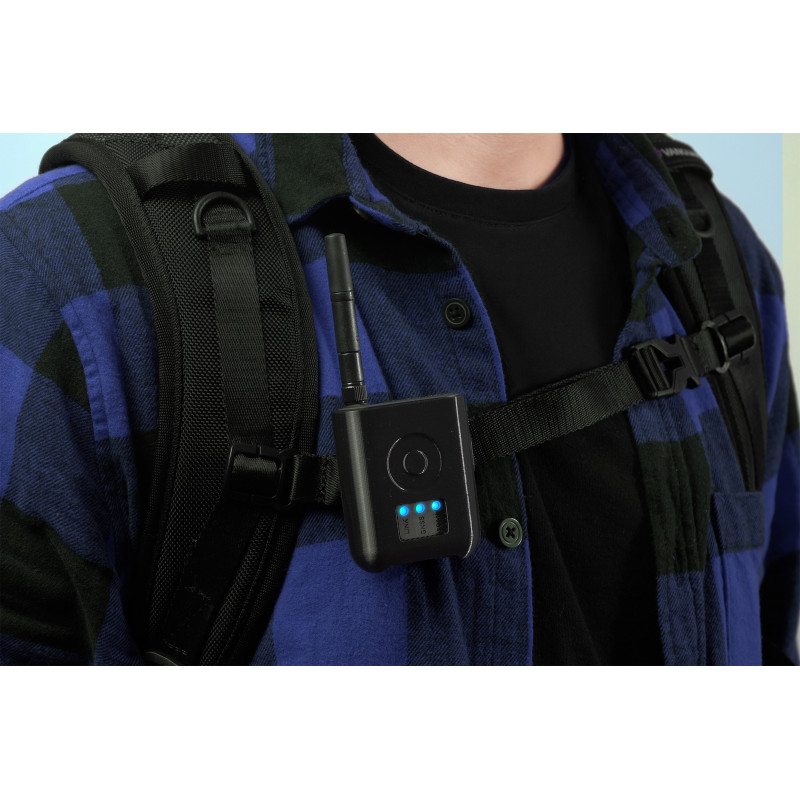
The custom 3D-printed RIDER Case offers a secure, lightweight (≈31 g) way to carry the device on your gear in the field.
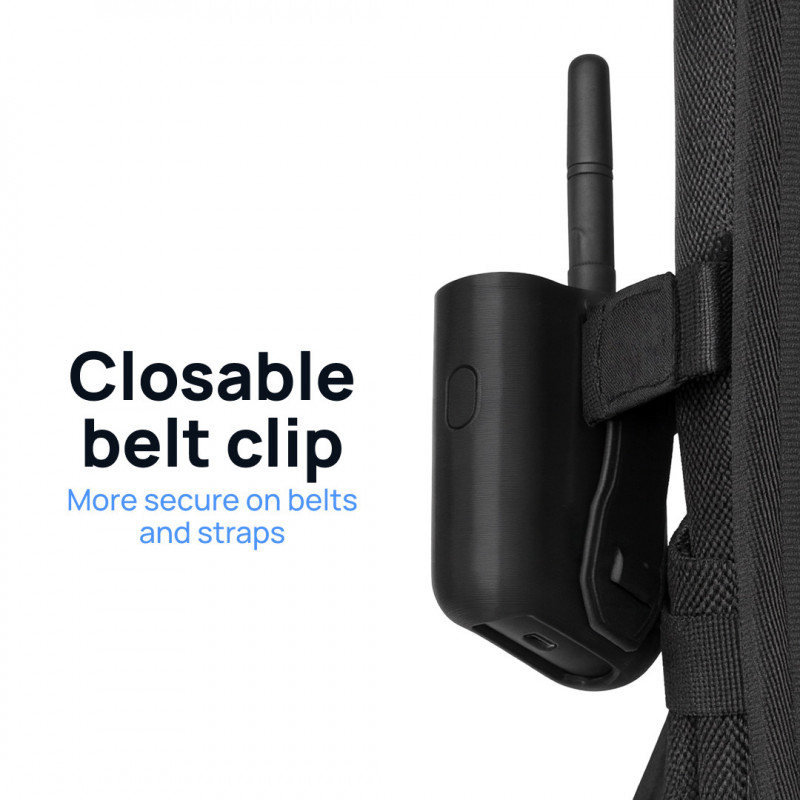
- MOLLE-compatible Clip: attach to a belt, backpack strap, or tactical vest.
- Easy Assembly: slide RIDER into the clip until it fits snugly.
- Full Access: precise openings for the button and antenna.
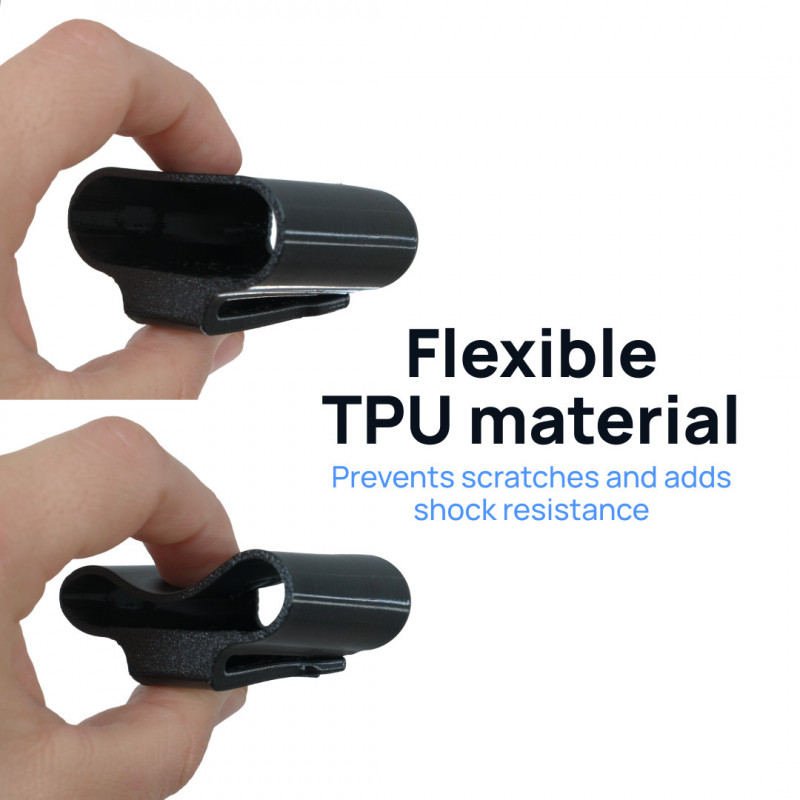
- Flexible TPU material: enhances grip, protection and shock resistance.
- Snap Lock: safety mechanism on the back clip allows the user to attach RIDER to belts, vests, harnesses or straps.
For best reception, keep the antenna vertical with a clear view of the sky.
Make sure the case is firmly attached. Dronetag is not liable for damage or loss.
General Recommendations
- Orientation: Keep the antenna upright with a clear view of the sky for best reception.
- Interference: Avoid placing the antenna directly behind large metal panels or very close to high-power electronics or close to sources of 2.4 GHz Wi-Fi or Bluetooth signals.
Vehicle Setup – 2.4 GHz Omnidirectional Magnetic Antenna
For vehicle-based operations, keep the RIDER inside the cabin and use an external antenna for robust reception.
- Antenna: 2.4 GHz Omnidirectional Magnetic Antenna
- Connector: SMA male
- Cable length: 1 m
- Placement: car roof or other metal surfaces
- Wind resistance: when properly attached, the antenna can withstand speeds up to 140 km/h (87 mph).
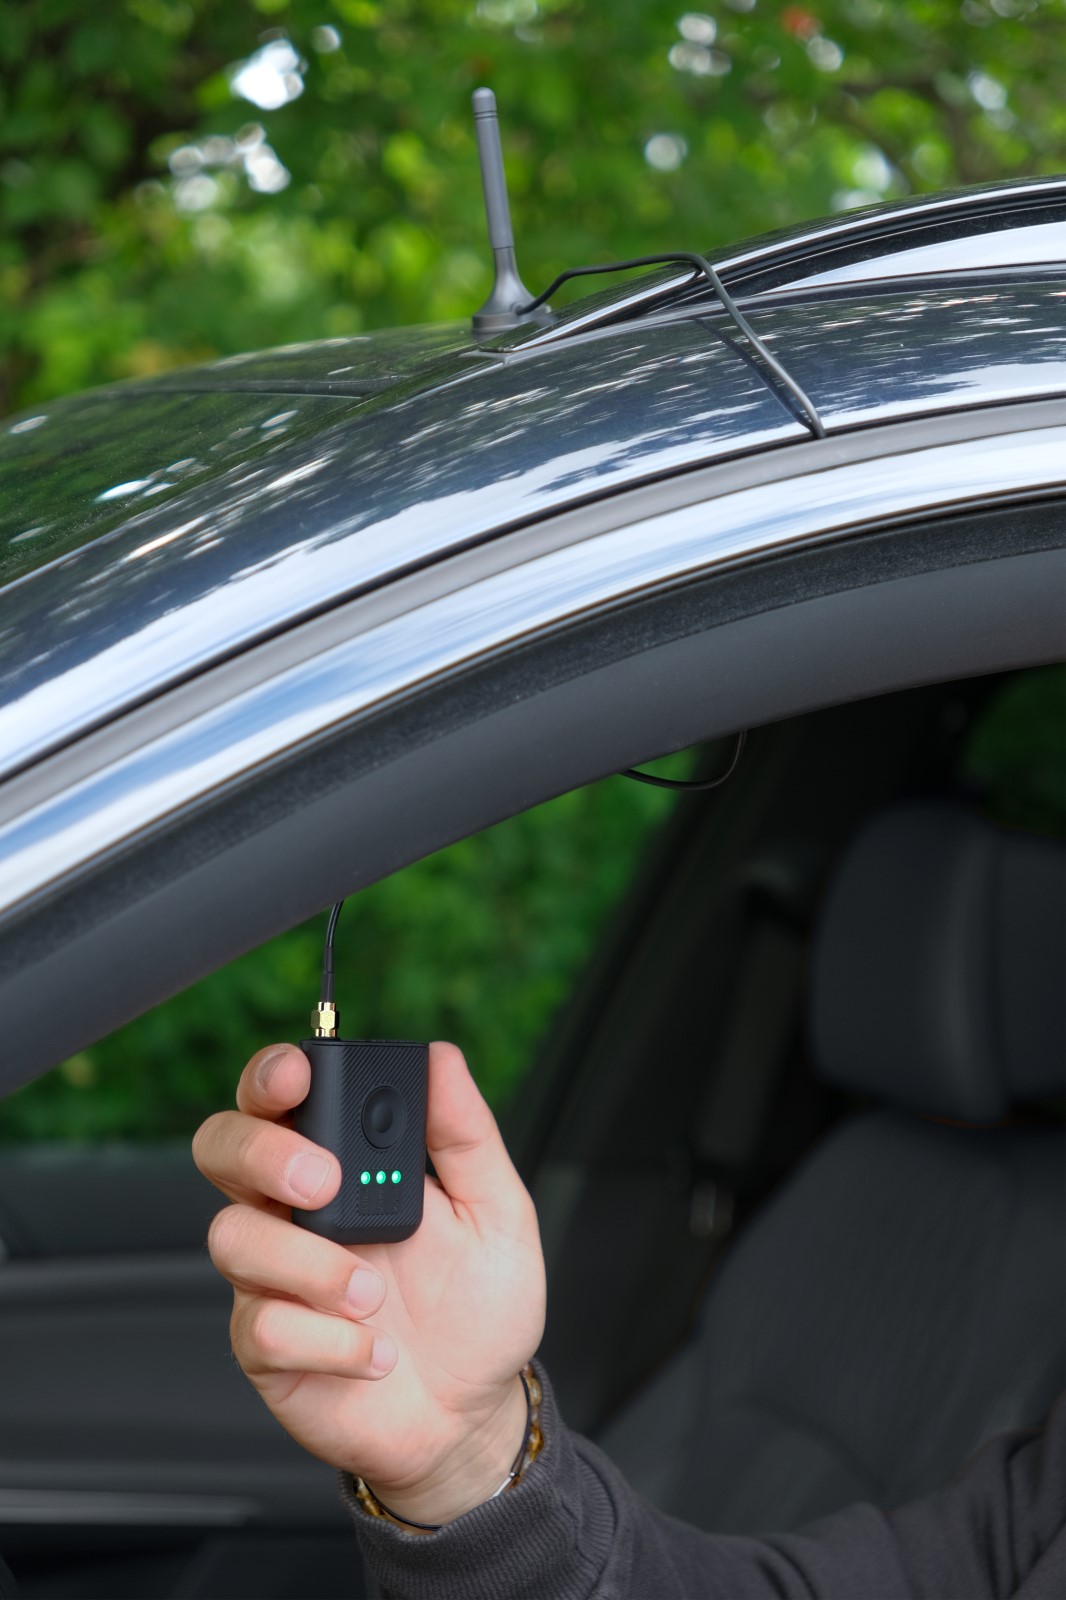

- Clean the roof area; place the magnetic antenna on the metal surface.
- Route the antenna cable into the cabin and connect it to the RIDER’s SMA port.
Combine the magnetic antenna with the 3M Dual Locks on RIDER for an ideal car setup.
General Recommendations
- Orientation: Keep the antenna upright with a clear view of the sky for best reception.
- Interference: Avoid placing the antenna directly behind large metal panels or very close to high-power electronics or close to sources of 2.4 GHz Wi-Fi or Bluetooth signals.
- Cabling: Route the antenna cable so it’s not pinched or under tension; leave a small strain relief near the SMA connector.
- Ground-plane Dependent Design: The antenna requires a conductive surface beneath it to function correctly. Without a ground plane, performance is reduced.
Specification
Dronetag RIDER is a mobile Remote ID receiver designed to detect and track drones compliant with Remote ID standards in the EU, US, and Japan. It supports both Bluetooth and Wi-Fi-based detection technologies, making it capable of identifying drones regardless of whether they have built-in Remote ID or are using a module. This functionality ensures seamless integration with diverse drone ecosystems.
| Parameter | Value |
|---|---|
| Weight | 64 grams with antenna, 55.5 grams without antenna |
| Dimensions | 138×55×18 mm with extended antenna, 75×55×18 mm without extended antenna |
| Power Supply | 5 V via USB-C |
| Battery | Li-Po 1000 mAh |
| Battery Life | up to 10 hours |
| Charging Time | 2.5 hours from 0% to 100% |
| Operating Temperature | -20°C to +60°C (-4°F to 140°F) |
| Range | Up to 5 km (10 km extendable with optional high-performance antenna) |
| IP Rating | IP54 |
| Supported LTE Bands | 1, 2, 3, 4, 5, 8, 12, 18, 19, 20, 26, 28 |
| Supported GNSS Frequencies | GPS L1, GLONASS L1, Galileo E1, BeiDou B1C, SBAS, QZSS |
| Remote ID Technologies | Bluetooth 4, Bluetooth 5 Long Range, 2.4 GHz Wi-Fi Beacon, 2.4 GHz Wi-Fi NAN |
| Antenna connector | SMA female |
For further details or inquiries, contact Dronetag Support.
📡 Why Dronetag RIDER Has a GNSS Module
The GNSS module (Global Navigation Satellite System) in your Dronetag RIDER provides precise location and time data for the device itself.
This is essential for several key functions:
- To display the exact position of your RIDER on the map in the Dronetag app.
- To correctly associate the RIDER’s position with nearby detected drones.
- To ensure accurate time synchronization for detection events.
- To improve situational awareness during drone operations.
Thanks to its built-in GNSS, your RIDER can show where it is physically located on the map — helping you understand which detections belong to your device, even if you have multiple RIDERs deployed.
Unlike SCOUT, which is usually installed at a fixed location, the RIDER is portable and may be used in different areas.
That’s why having its own GNSS receiver is crucial — it lets the system know where the RIDER is, not just where detected drones are.
Drone Detection
How Does RIDER Detect Drones?
RIDER is capable of receiving Remote ID messages transmitted over both Bluetooth and Wi-Fi. These messages allow RIDER to detect and identify drones in its vicinity.
RIDER cannot detect drones that do not transmit Remote ID messages.
Detecting Bluetooth Remote ID
Remote ID messages over Bluetooth are transmitted using a process called Bluetooth Advertising. This mechanism broadcasts data packets over three dedicated advertising channels: 37, 38, and 39.
Here's how it works:
- When a drone transmits a Remote ID message, it sends it simultaneously on all three channels.
- RIDER, like most Bluetooth receivers, can only listen on one channel at a time.
- However, since the same message is broadcasted on all three channels, RIDER can reliably receive the message as long as there is no significant interference.
Detecting Wi-Fi Remote ID
Wi-Fi-based Remote ID detection works differently and presents more challenges.
- The 2.4 GHz Wi-Fi band used for Remote ID has 13 channels.
- Wi-Fi receivers can listen to only one channel at a time, while most drones transmit on a single fixed channel.
- This creates a problem: if RIDER is listening on a different channel than the drone is transmitting on, the message may be missed.
To mitigate this issue, RIDER is using an intelligent channel hopping mechanism to improve the chances of message reception.
-
Passive Scanning
Used when no drones have been detected yet. RIDER cycles through all 13 channels periodically, looking for the first signs of any drone. -
Active Scanning
Once a drone is detected, RIDER switches to a mode that prioritizes the channel where the drone has been seen. This increases the chance of receiving additional messages from the same drone.
Most drone manufacturers currently use channel 6 for Wi-Fi Remote ID, so the channel hopping mechanism often yields very good results without significantly compromising detection performance.
Drone Whitelisting
Drone whitelisting will help you recognize your own drones and either mute or completely ignore them, helping you avoid unnecessary notifications and save valuable scanning hours.
For enabling this feature, make sure your RIDER is updated to firmware 1.4.1 (or higher), and your version of Dronetag App is 2.138.1 (or higher).
Difference between Muted and Ignored drone
- Muted drones – RIDER detects your whitelisted drones and sends their data to Dronetag cloud / Drone Scanner App, but you won’t get any LED or sound notifications for them. This allows you to later replay the full airspace situation, including both your drones and unknown drones, which can be valuable when analyzing flights or reviewing incidents.
- Ignored drones – RIDER fully ignores whitelisted drones. It doesn’t collect their data at all, letting you save scanning time and focus entirely on external drones. Information about ignored drones is not even stored in the RIDER's internal memory.
How to whitelist a drone:
- Open the map and tap the icon of the drone you want to whitelist.
- A bottom panel will appear with drone details — the serial number is displayed at the top. Long-press the serial number to copy it.
- Open your Dronetag RIDER device window. Below the scanning time usage graph, you’ll find a section called Filtering configuration.
- Tap “Filtering configuration”, then paste the serial number into the Muted or Ignored list:
- Tap “Add serial number” in your preferred mode.
- Long-press the input field to paste the copied number.
- Tap the save icon.
- To enable or disable muted or ignored drones at any time, simply use the checkbox on the right side of each entry.
For detailed instructions, please refer to the video below:
If you are having issues with replaying the video, right-click in the player and "Open video in new tab" or download it to replay locally.
Future Updates
The drone whitelisting feature in the RIDER is still in its early stages, and we’re actively working on enhancements. Upcoming improvements include:
- Automatic drone identification – Displaying the drone's manufacturer and model in the whitelisting section, so you won’t need to rely solely on serial numbers.
- One-tap whitelisting – Adding drones to the Muted or Ignored list directly from the map dashboard for faster and more intuitive control.
- Custom labels and colors – Assigning names, labels, or color tags to your whitelisted drones to enhance situational awareness and airspace clarity.
Data Transmission Modes
In order to view and work with the real-time data, you need to use our Dronetag App for online access, or our Drone Scanner app for offline access.
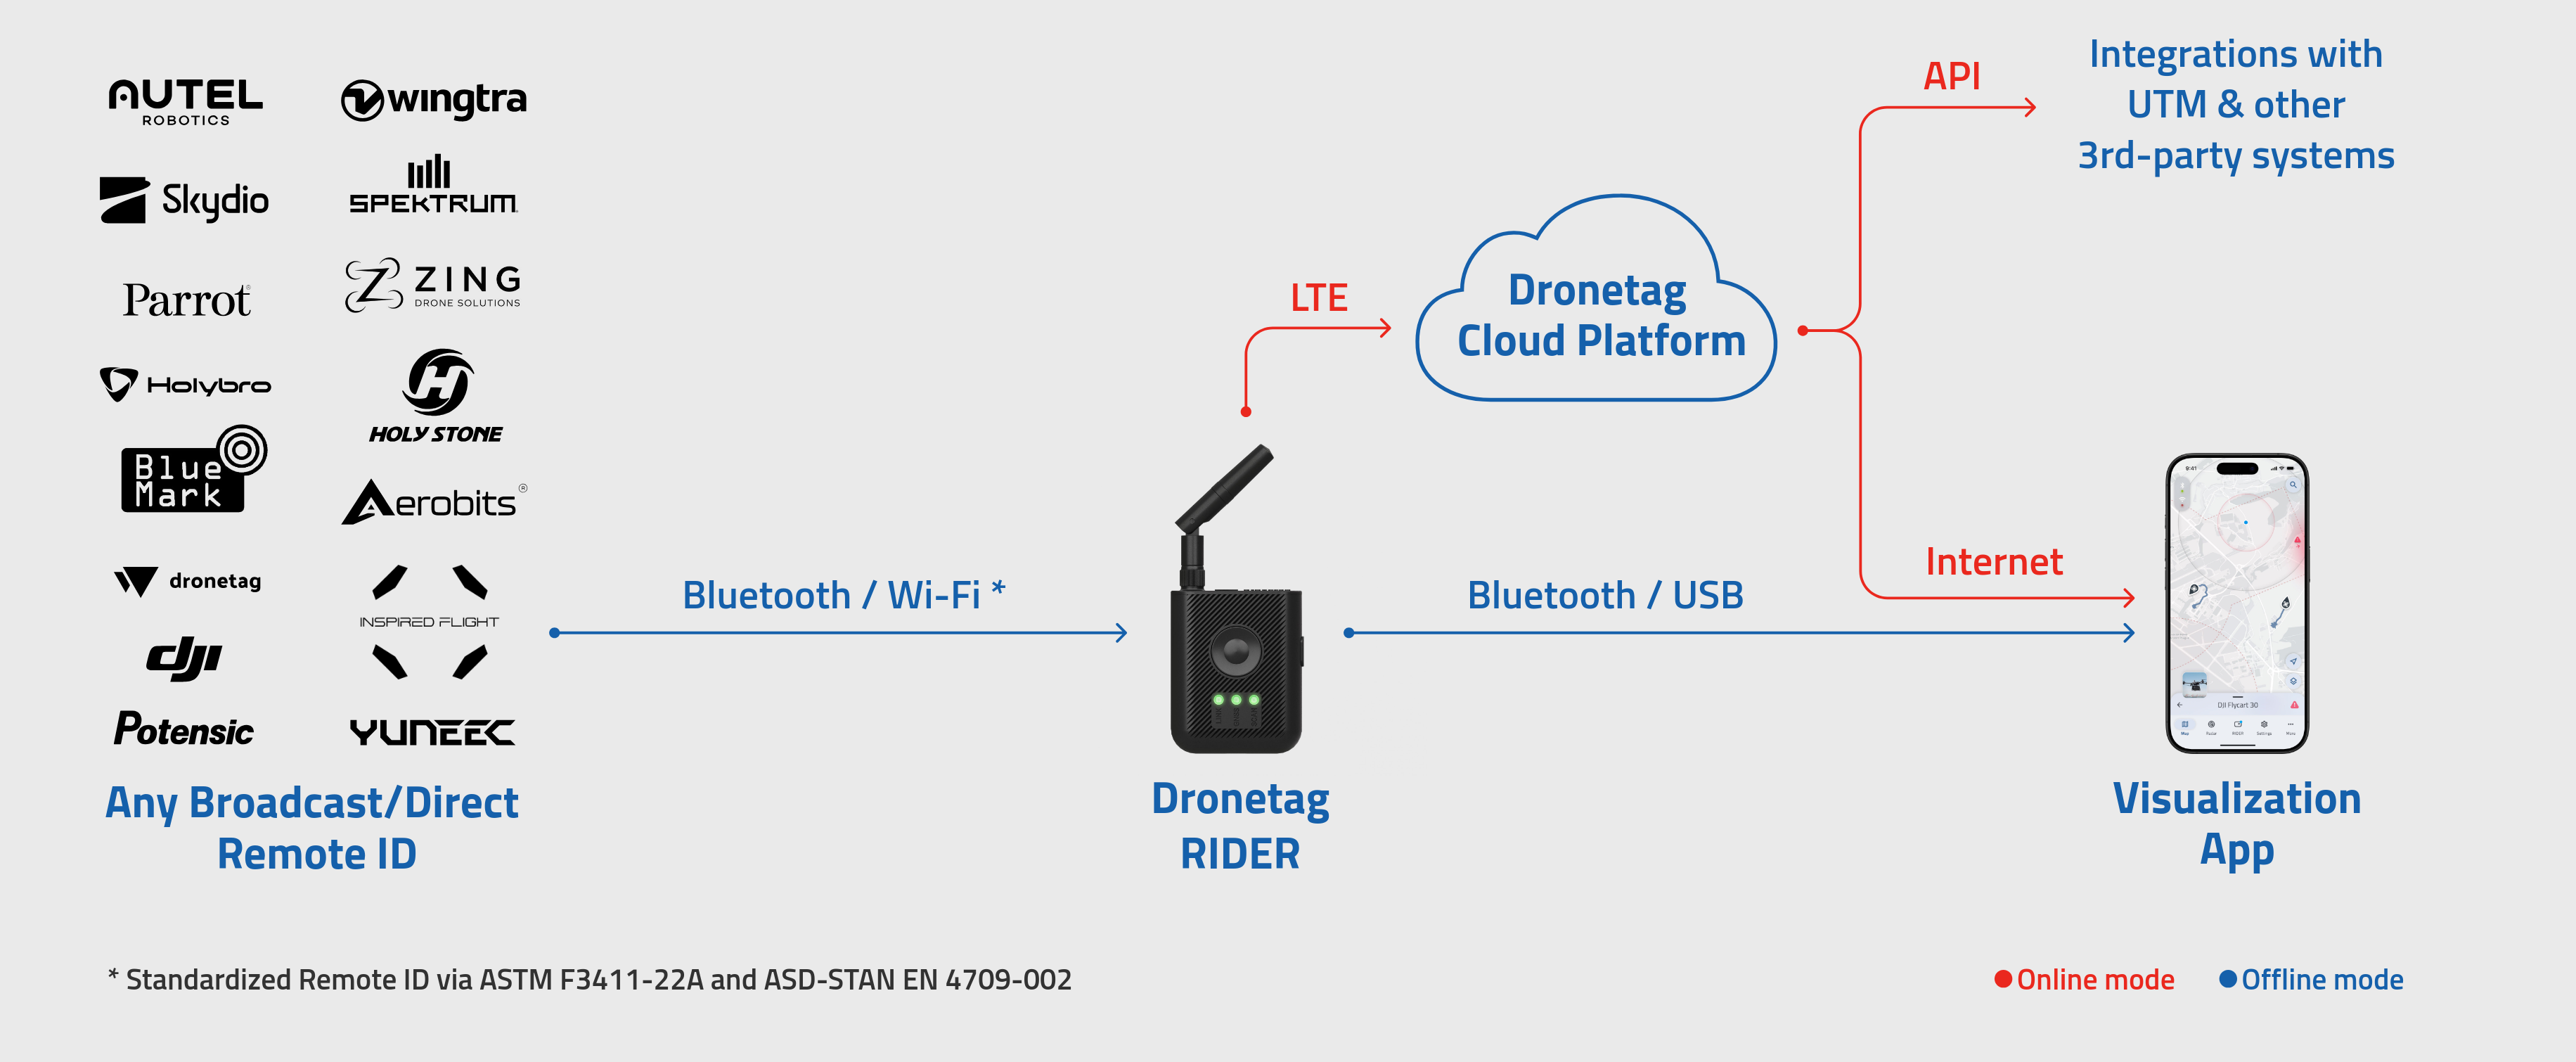
Using RIDER with the Dronetag App (Online Mode)
The best way to use your RIDER is together with the Dronetag App in online mode.
This setup unlocks all features of the device and gives you the most flexibility.
With an active data bundle (after the trial period ends), RIDER connects to the Dronetag Cloud over LTE.
Here’s why this is the recommended way:
-
All detections are stored automatically in the cloud.
You can return to them later, analyze flights, or share reports — nothing is lost. -
You can leave your RIDER scanning in a fixed location (for example, in a window or on a rooftop) and still check detections remotely in real time on your phone.
-
You can see the current situation in the desired area's airspace, no matter where you are, so you don’t need to stand next to the device to know what’s happening.
-
All data is synchronized seamlessly between the RIDER and your account, so you can access it from any phone or web app login.
In short:
Online mode with a data bundle = the full RIDER experience — automatic data storage, remote monitoring, and maximum convenience.
After the free trial, you only need an active data bundle to keep using online mode. Without it, RIDER will still work offline, but you’ll lose cloud storage and remote access features.
Available for iOS, Android and on https://dronetag.app
The application requires version v2.126.1 or higher. If you are using an older version, please update it via Google Play or the App Store.
Using RIDER with the Drone Scanner App
The Drone Scanner (gen. 2) mobile app lets you see nearby drones directly on your phone.
When paired with the RIDER, you can run it in offline mode — no cellular data or subscription required.
In this setup:
- RIDER sends detection data to your phone over Bluetooth or USB only.
- You can see live detections instantly in the Drone Scanner app.
- There’s no need to purchase data bundles for the RIDER.
Keep in mind:
- Detections are not saved to the cloud, so you won’t have access to past records.
- The RIDER needs to stay physically close to your phone to maintain a stable Bluetooth connection.
This makes Drone Scanner + RIDER offline mode a great choice if you need a simple, no-subscription way to monitor drones in real time.
Connection Options: Wired vs Wireless
Drone Scanner supports wired or wireless connection to the RIDER:
Wireless Connection (Bluetooth)
- Uses Bluetooth to wirelessly connect RIDER to your mobile device.
- Convenient for quick setup without cables.
- ⚠️ Note: Bluetooth connectivity can interfere with Remote ID message reception over Bluetooth, potentially reducing scanning performance.
Wired Connection (USB)
- Connect RIDER to your phone using a USB cable.
- While connected via USB, RIDER is also charged by your phone.
- Recommended when you need maximum scanning performance, as this avoids any potential Bluetooth interference.
- This feature is supported by Android devices only.
Using the Dronetag App
This section covers how to use the Dronetag RIDER with the Dronetag App. The app is available for mobile devices (both iOS and Android), but also for the web. Get it from one of the links below and simply create your account for free.
Roles of Dronetag App
The Dronetag App serves two main purposes when used with your RIDER:
-
Displaying detections from RIDER
With an active Data Bundle or during the free trial, the app visualizes detection data sent from your RIDER through its built-in LTE connection. This gives you access to detection history, cloud storage, and remote monitoring. -
Checking device status and configuration
You can always use the app to view the current status of your RIDER (e.g., battery, connectivity, and LEDs) and adjust its configuration.
This feature does not require a Data Bundle or trial.
How to preview real-time traffic detected by Dronetag RIDER?
In order to preview nearby detected traffic, you need to switch to “global map” view.
You will see detected flights in your surroundings visible on the map. You can filter and preview data in real-time by selecting a time range from the dropdown menu at the bottom of the screen.
Each real-time detection can be tapped on to expand details, display pilot position and identification data.
How to preview detection history?
You can view a list of recent detections and open a detailed view for each of them. The detailed view allows you to re-play the flight, see the properties of the detection, and more. Detections can also be exported to CSV, JSON or KML.
How to export detection history?
You can preview the exported data in various mapping software, such as Google Earth, QGIS, Mapbox, OpenStreetMap (OSM).
For example, let's take a look at how to import the data into Google Earth.
- Open a detection in Dronetag App, tap 'Export' and choose the KML format.
- Visit https://earth.google.com/web/ and create a new project.
- Navigate to File > Open local KML file and select the exported file.
When viewing the detection history, you can filter for a specific timeframe
This feature allows you to look at recorded flight history within a set timeframe at a specific place.
On the main screen, navigate to a place where you wish to display the historical view, and change the "Live" view into "History" view and choose the desired time range.
Please note that selecting a large time frame can take a while to load. Please be patient when selecting wide time frames.
It's also important to note that you currently cannot re-play the flights in this view (but only view them as a static snapshot). If you wish to re-play flights, please use the 'My detections' screen and search for a specific detection.
RIDER Connectivity Plan
Online vs. Offline Mode
The Dronetag RIDER can work in two different ways:
- Offline Mode – RIDER connects to your phone via Bluetooth (or USB-C for Android devices). No data goes to the cloud. You get live situational awareness, but no history or remote access.
- Online Mode – RIDER uses its built-in LTE SIM to send detection data to the Dronetag Cloud. This unlocks features like detection history, remote monitoring, and integrations with third-party platforms (e.g. Aloft, SafeSky).
- To use Online Mode, you need a Data Bundle.
- To use Offline Mode, you need the Drone Scanner (gen. 2) app.
What is a Connectivity Plan?
Think of a Connectivity Plan as a prepaid package with a validity period (how long you can use RIDER in online mode before expiration). It’s similar to a mobile data plan, but tailored for Remote ID detections.
Every RIDER comes with a 2-month free trial.
This free trial lets you explore Online Mode right away.
When the trial ends, you can keep using RIDER in Online Mode by purchasing a Connectivity Plan - or switch to Offline Mode for free.
Connectivity Plan Options
We currently offer the RIDER Connect plan, which is available as a 1, 2, or 3-year license coming at $300/year per device.
Looking to scale? For mass deployments (5+ devices), API integrations, custom development, or on-premise requirements, our team is ready to help. Contact us at sales@dronetag.com to discuss a solution tailored to your organization’s needs.
Activation & Flexibility
- Once activated, the Connectivity Plan is locked to that device for the specific time period, depending on the Connectivity Plan variant you chose.
RIDER only works in Offline Mode via Bluetooth with the Drone Scanner (Gen. 2) app.
You still see nearby drones, but you lose cloud features like history, remote access, and sharing.
Don't forget to turn the LTE off in your RIDER's configuration page in the Dronetag app.
Connectivity Plan Purchase History
You can check your current Connectivity Plan status anytime in the Dronetag App (mobile or web):
Option 1 – From Home Screen
On the home screen with the map, tap your RIDER profile card to open the device detail screen.
You’ll see the current state of your Connectivity Plan usage.
Option 2 – From Profile
Open Profile → Account Details, where you’ll find a list of all your active, expired, or pending bundles.
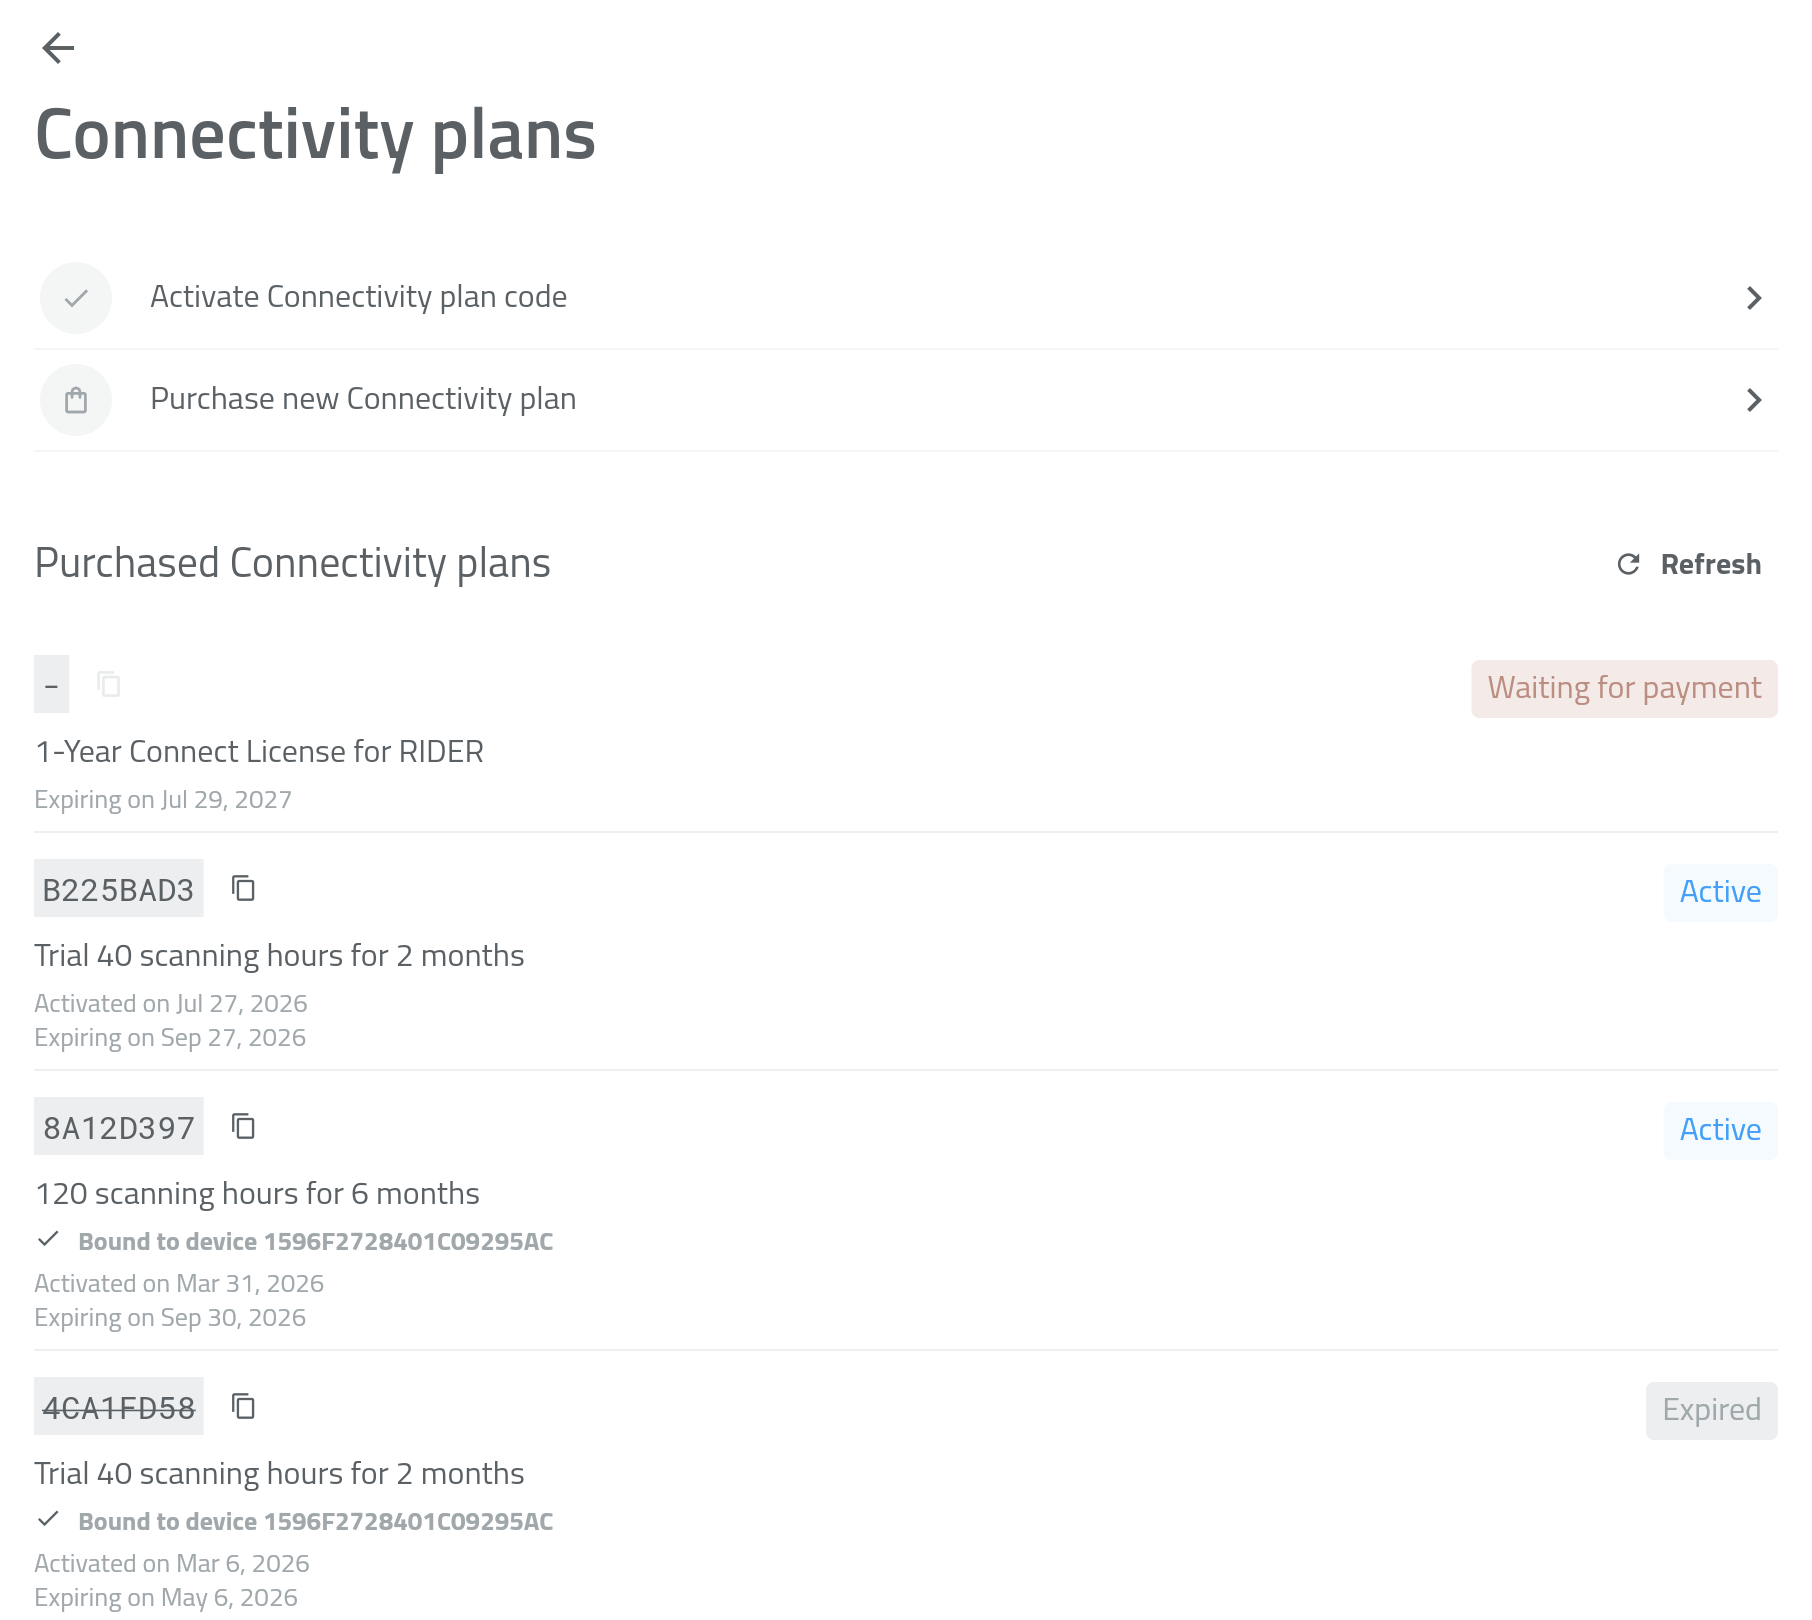
Purchasing a New Connectivity Plan
A Connectivity Plan lets your RIDER stay connected to the Dronetag Cloud via its built-in LTE SIM.
It enables:
- Real-time data sync
- Detection storage and history
- Remote monitoring
- API and third-party integrations
You can purchase and activate a Connectivity Plan directly in the Dronetag App (mobile or web).
A Dronetag account is required for activation.
Before purchasing, make sure you’ve used your 2-month free trial that comes with every new RIDER.
How to Purchase a New Connectivity Plan
👉 Follow our guide to purchase a RIDER Connect in app.
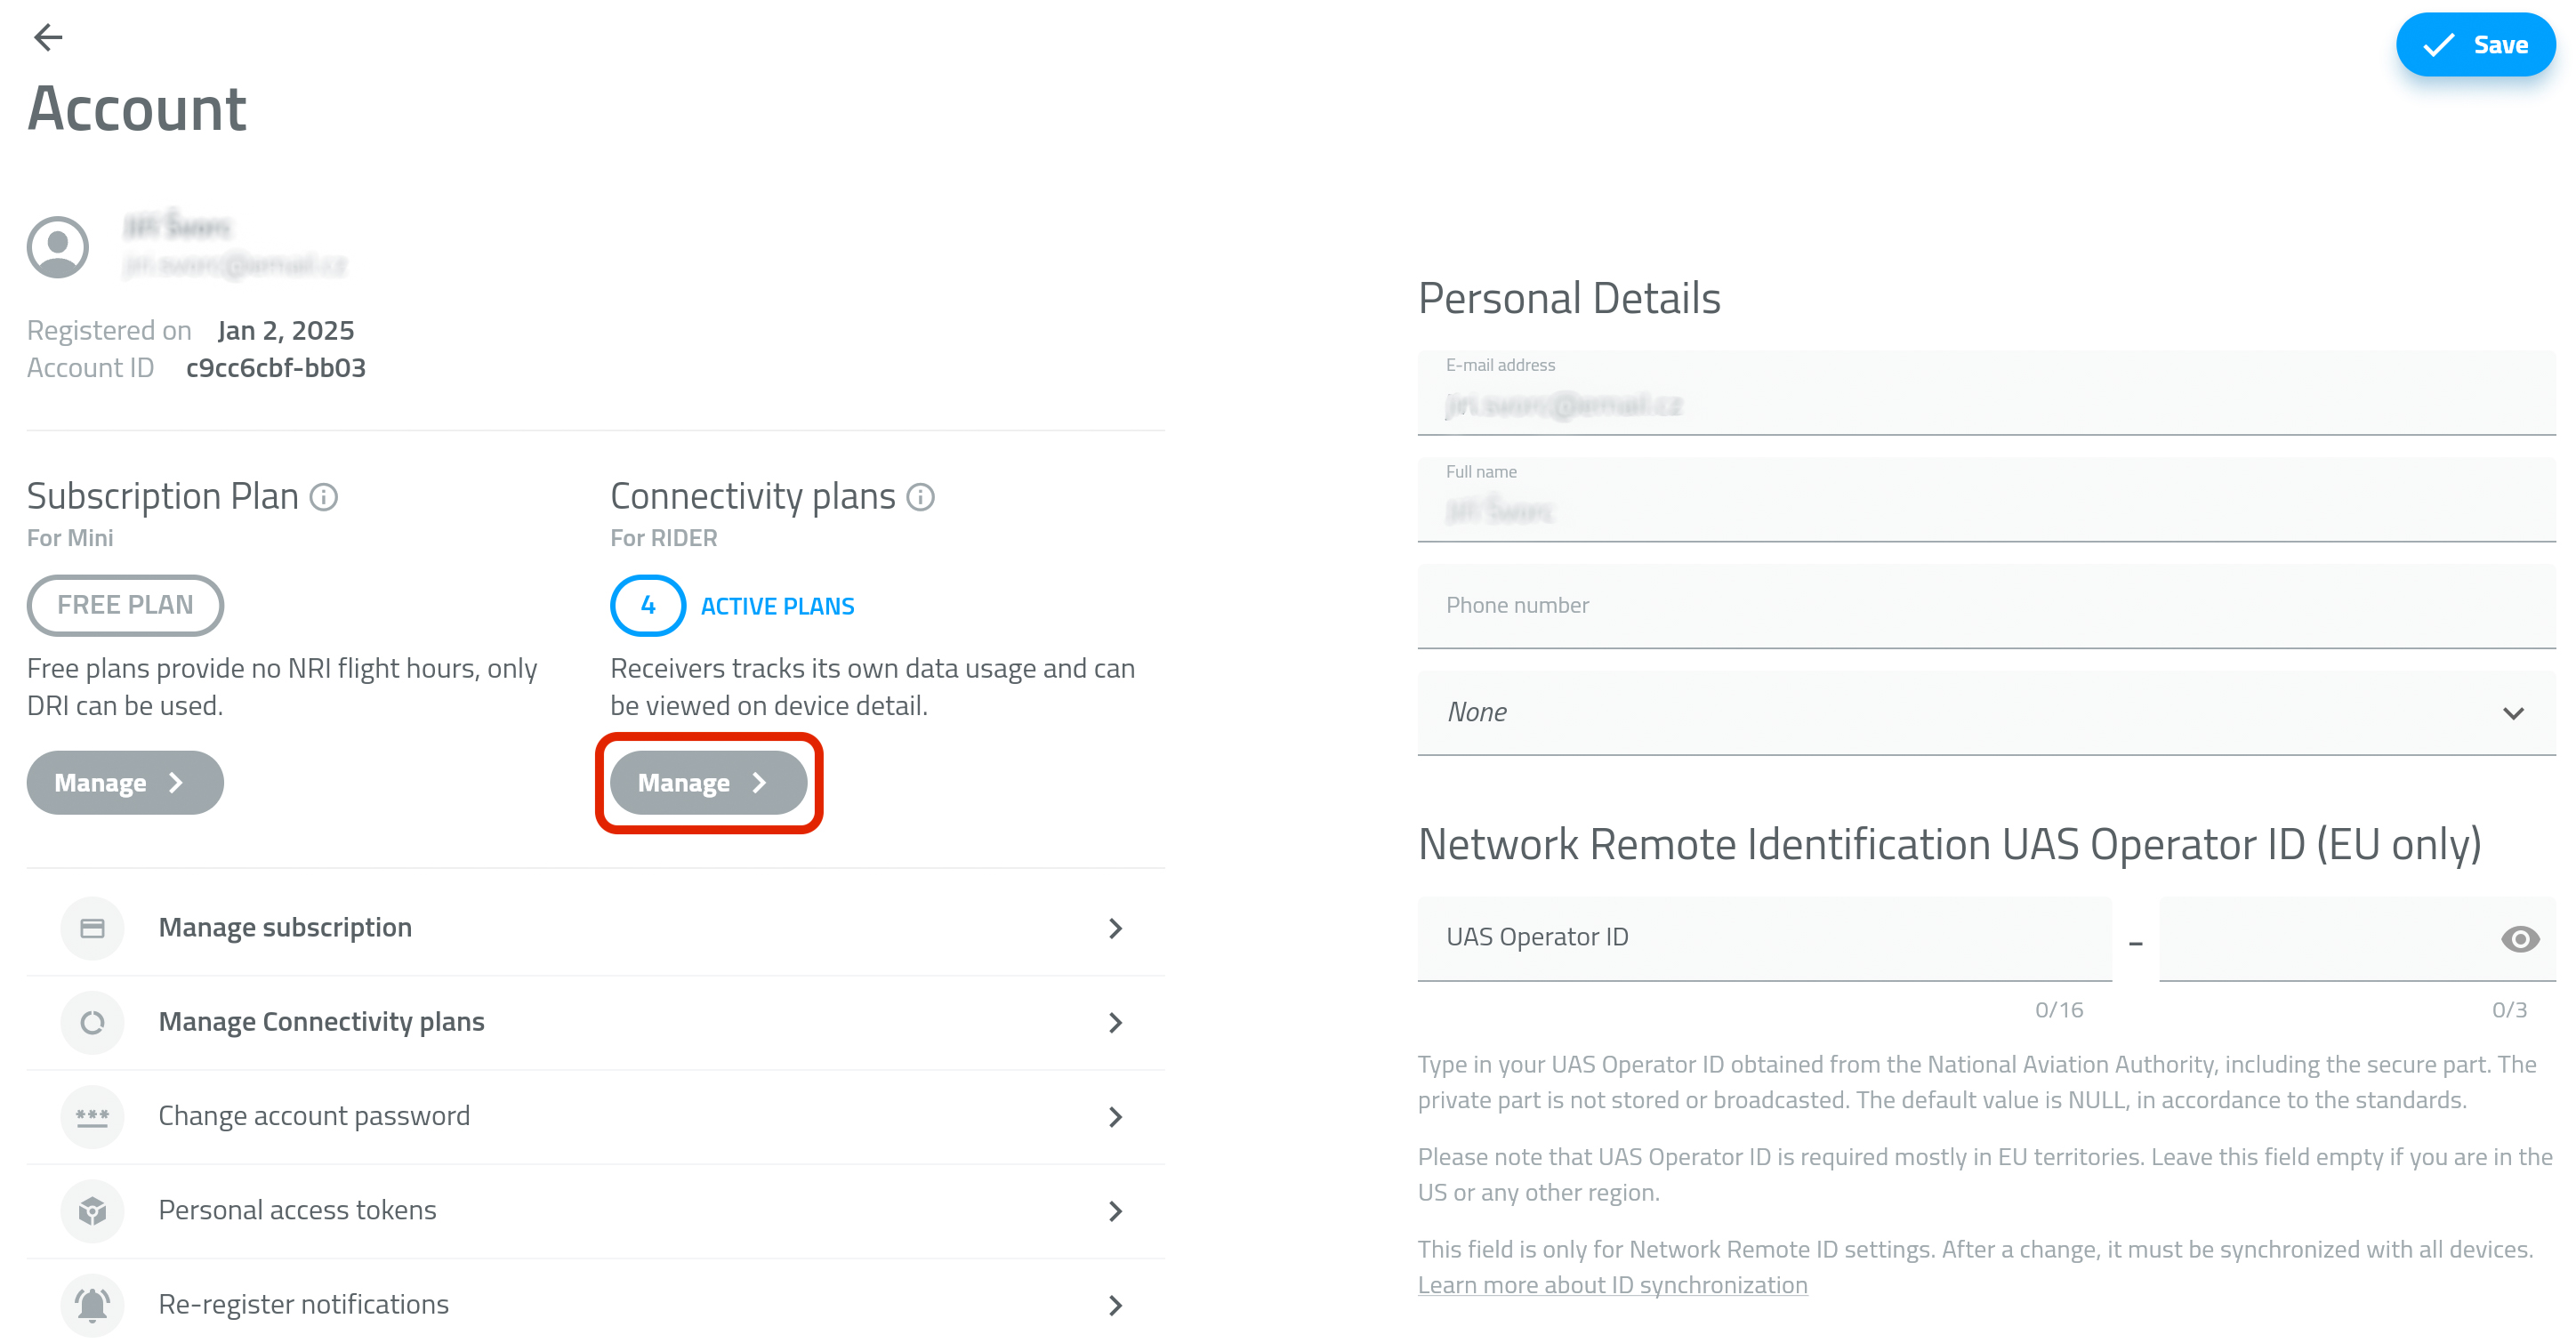
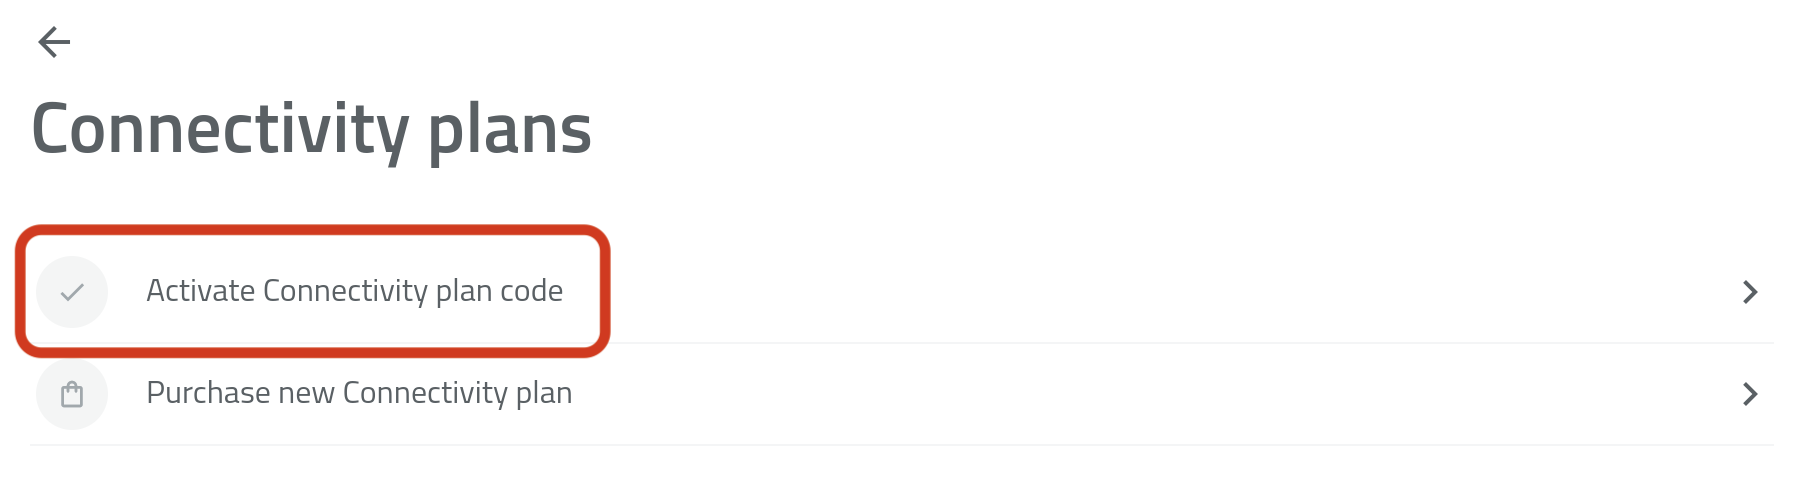
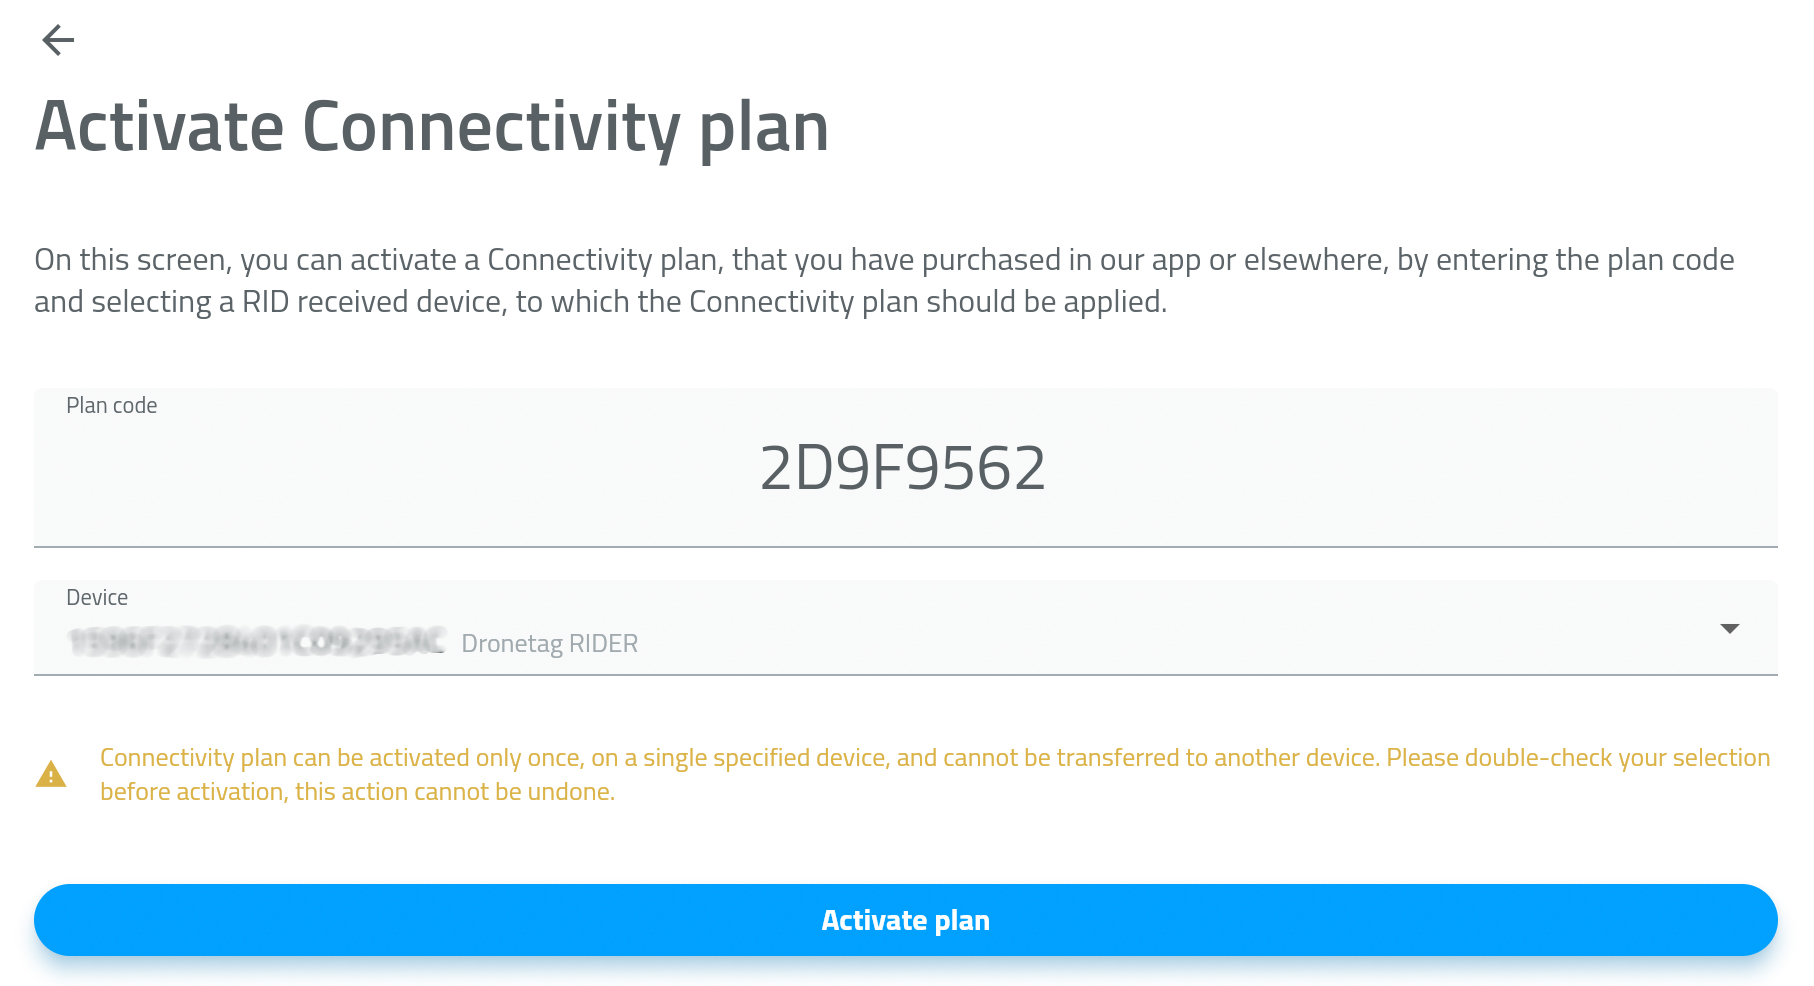
Activating a Connectivity Plan:
- Open the Profile tab and go to Account details.
- In the Connectivity plans section, tap Manage - PICTURE 1
- Tap Activate Connectivity Plan Code - PICTURE 2
- Enter or paste the activation code from the previous screen.
- Select the RIDER device you want to activate the plan for - PICTURE 3
- Tap Activate Plan.
Your Connectivity Plan is active now.
Using RIDER without a Connectivity Plan
Even without a Connectivity Plan, RIDER still works in Offline Mode:
- Turn off the LTE feature in your RIDER's configuration page in the Dronetag app
- Use the Drone Scanner (Gen. 2) app over Bluetooth
- See live nearby drones on your phone
- But no cloud features (history, remote monitoring, data sharing)
Battery Charging
When not in use, the device should be stored with at least 50% battery charge to prevent potential battery degradation and ensure long-term reliability.
RIDER can be charged by any 5 V compatible source such as a computer, power bank or charging adapter from a smartphone. Charging follows the standard Li-Po charge cycle that takes up to 2.5 hours to charge fully (0% - 100% takes 2.5 hrs). However, after one and a half hours, the device is charged to about 90%. When the device is on the USB and fully charged, the LEDs will turn off.
When the device is overheating, battery charging will be disabled to protect the internal battery.
LED Indication – Charging Status
The RIDER uses three LEDs to show the charging state of the battery.
Each LED represents one third (≈33%) of the total battery capacity.
- 0–33% charged → The first LED blinks blue while charging. Once fully charged, it stays solid and the second LED starts blinking.
- 34–66% charged → The second LED blinks blue while charging. Once fully charged, it stays solid and the third LED starts blinking.
- 67–100% charged → The third LED blinks blue while charging.
When the device is fully charged, all LEDs turn off.
Battery Status in the Dronetag App and Toolbox
Besides the LED indication, you can also check the exact battery percentage in:
- The Dronetag App
- The Dronetag Toolbox app
This allows you to monitor the battery level more precisely than by LED alone.
Guidelines
- Input: 5 V over USB-C.
- Use a quality USB-A→USB-C or USB-C→USB-C cable.
- Avoid non-compliant or “exotic” fast-charging bricks that don’t provide a normal 5 V fallback. If in doubt, use a basic 5 V charger.
- Don’t use damaged cables or adapters.
LED Indications
Three LEDs indicate the status of the device and its components - LINK, Positioning (GNSS) and SCAN.
- LINK Indicates whether the device is connected to the cloud via the mobile network or linked to a Dronetag account.
- GNSS Indicates the current GNSS state.
- SCAN Shows whether the device is ready to scan for Remote ID signals.
Device States
Possible states are the following:
If you have LTE connectivity enabled, you have to activate your device when using it for the first time.
Connect to the device via Bluetooth using the Dronetag App or wait 10 minutes while the device is powered on. Waiting for 10 minutes works only if your RIDER is registered to your Dronetag account and you have an active subscription.
One or more LEDs are blinking yellow.
Yellow means that the pulsing component is not ready for scanning. Wait for all three to turn green, meaning the device is ready to scan. In cases of poor signal, move to an area with better coverage.
Component LED blinking red when the power button is pressed.
Blinking RED on LINK means RIDER is not registered to any account or has no active data bundle and is out of data.
All indicators are green lit.
In this state, the device is ready for scanning. Do the short press of the Power Button to start scanning.
In this state, the device is starting or stopping scanning.
Flashing white on all LED indicators.
In this state, the device scans Remote ID data in the area.
Device detected drone in scanned area. Device also alerts with a sound alarm (when enabled by user).
Once you notice an alert, you can see the drone's position and the pilot's location (or take-off position) in the app.
One or more indicators are pulsing yellow while scanning.
One or more indicators are lit red.
Hard reset the device by a long press of the Power Button.
In this state, the device is powering off.
LEDs pulse blue sequentially (first, second, then third) to indicate the charging progress.
The number of non-pulsing LEDs shows the current battery charge. E.g. 50% charged, 1 solid and 1 pulsing blue LEDs, 100% charged = 3 solid blue LEDs. Battery charge can be briefly checked by short pressing the Power Button once while turned off.
RIDER is updating its firmware or in hard reset mode.
This state follows after an extra-long press of the Power Button and Action Button.
When pressing both the action and power button for about 20 seconds, a countdown to factory reset will be started. To perform a factory reset, keep pressing both buttons until all LEDs are off and the RGB animation is started.
RGB animation running when performing firmware update or resetting to factory default settings.
Configuration
The Dronetag RIDER offers versatile configuration options to adapt to different operational environments. This guide explains how to manage connectivity, scan modes, and notification settings to optimize your device's performance.
Scan Modes
The RIDER provides flexible scanning options:
Auto Scanning
- Automatically starts detecting drones (all three LEDs are blinking white) when the device is powered on and GNSS and LINK conditions are met.
- Ensure the Auto Scanning feature is enabled in the app under Profile > My Devices > Dronetag RIDER > Configuration > Auto Scanning.
Manual Scan
- If Auto Scanning is disabled (all three LEDs are green lit), you need to press the power button to initiate scanning manually.
- When scanning is manually initiated, all three LEDs are blinking white.
- This mode gives you more control over when the device starts scanning.
USB mode (stationary mode)
When USB mode is enabled RIDER will automatically power on when it is powered over USB. After USB power is lost, RIDER will automatically power off.
Enable USB mode when you use your RIDER permanently connected to the USB power source.
Even if RIDER has USB mode on, you can still turn it on by Power Button.
LEDs Configuration
- LEDs brightness can be changed under Profile > My Devices > Dronetag RIDER > Configuration > LED brightness.
Sound Notifications
- Enable sound alerts to receive an audio signal whenever RID signal is detected.
- Manage this setting in the app under Profile > My Devices > Dronetag RIDER > Configuration > Enable Sound Alerts.
- Useful in high-traffic environments or when visual monitoring is limited.
Action Button
Currently the following functions are supported:
- Toggle sound alerts - Pressing the Action Button will enable or disable sound alerts.
Power Saving Configuration
It is possible to further enhance battery life of your RIDER by changing power saving configuration. Power saving works by reducing scanning time while no drones are being detected. Keep in mind that setting a more aggressive power saving option will negatively affect the time required to detect a drone for the first time, but once it is detected, RIDER keeps detecting without any reduction. Then when the drone leaves, RIDER goes to power saving mode again.
Power saving options affect only detection of drones that transmit Remote ID messages over Wi-Fi.
Power Saving Configuration can be found under Profile > My Devices > Dronetag RIDER > Configuration > Power mode.
| Option | Maximum time to first detection* | Battery life (online / offline)** |
|---|---|---|
| Full Power | 3.4 seconds | 6 hours / 8 hours |
| High Performance | 6.8 seconds | 8 hours / 10 hours |
| Balanced | 10 seconds | 9 hours / 11 hours |
| Low Power | 20 seconds | 10 hours / 12 hours |
* Maximum time to first detection when drone transmits remote id message every 1000 ms, this is the worst case scenario.
** Measured battery life when no drone has been detected.
Using your RIDER in offline mode will improve battery life
Drones Whitelisting
Focus on what matters most. This functionality of Dronetag RIDER enables you to recognize your own drones and either mute or completely ignore them, helping you avoid unnecessary notifications and save valuable scanning hours.
Muted drones: RIDER detects your whitelisted drones and sends their data to the cloud, but you won’t get any LED or sound notifications for them. This allows you to later replay the full airspace situation — including both your drones and unknown drones — which can be valuable when analyzing flights or reviewing incidents.
Ignored drones: RIDER fully ignores whitelisted drones — it doesn’t collect their data at all, letting you save scanning time and focus entirely on external drones.
- Dronetag RIDER firmware version 1.4 or higher
- Dronetag App version 2.138.0 or higher
- (Optional) Dronetag Toolbox version 1.66.0 for advanced setup
LTE Configuration
RIDER can work in online or offline mode. You can change between these modes by changing Enable Cellular Connection option. When the Enable Cellular Connection option is enabled, RIDER works in online mode and requires a valid subscription. To use RIDER in offline mode disable Enable Cellular Connection option.
Depending on your location, LTE connection is available only on specific bands (frequencies). RIDER can automatically change bands configuration based on your location when option Configure bands automatically is enabled. If you are having issues with LTE connection you can try to manually set LTE bands by disabling Configure bands automatically option and selecting appropriate bands for your location under Selected bands.
All LTE configuration options:
- Enable Cellular Connection - Use RIDER online or offline.
- Cellular technology - Force use of selected cellular technology.
- Prefered Cellular technology - Set the preferred cellular technology.
- Configure bands automatically - When enabled, bands are configured automatically based on your location.
- Selected bands - Manually select LTE bands.
- Configure PLMN & APN automatically - Automatically set PLMN and APN.
- PLMN code - Manually set PLMN code.
- APN - Manually set APN.
If you decide to use RIDER in offline mode without any Data Bundle and with Drone Scanner (gen. 2) via Bluetooth, you need to disable RIDER cellular connectivity in Configuration.
Using RIDER Without GNSS Fix
RIDER can also be used without a GNSS fix.
This is handy if you need to operate RIDER in areas with no GNSS signal – for example, indoors.
To do this, simply disable the GNSS option in settings.
Keep in mind that if GNSS is disabled, the Dronetag App will not display RIDER’s position on the map.
Additional GNSS Settings
In RIDER's Sensor settings (under Configuration menu), you will also find options such as:
- GNSS Constellation – choose which GNSS system to use
- SBAS Configuration – select which SBAS system to use
- These options are intended for advanced users.
- We recommend not changing them unless you are sure about the effect, as incorrect settings may reduce positioning accuracy.
🛰️ What Is Assisted-GNSS and Why It Matters
Assisted-GNSS (A-GNSS) is a feature that helps your Dronetag device get a GNSS fix faster — especially after startup, relocation, or when operating in areas with weak satellite signals.
It combines data from satellites with assistance information from online servers to speed up positioning and improve accuracy.
When uploaded, Assisted-GNSS allows your device to:
- Reduce time to first fix (TTFF) — get GPS lock within seconds instead of minutes.
- Stabilize position data more quickly after startup.
⚙️ How It Works
Normally, a GNSS receiver needs to download satellite data (ephemeris and almanac) directly from orbiting satellites — a process that can take up to 30–60 seconds.
With Assisted-GNSS, this information is fetched via the Dronetag Cloud or your mobile internet connection, allowing the device to calculate its position almost instantly.
📲 How to Use Assisted-GNSS
To activate Assisted-GNSS for your Dronetag RIDER:
- Turn your RIDER on.
- Open the Dronetag app.
- Go to Profile → My Devices → Dronetag RIDER → A-GNSS.
- Follow the steps in the app to complete the process.
Once done, your RIDER will update its satellite assistance data and acquire a GNSS fix much faster.
Use Assisted-GNSS when:
- You’ve just powered on the RIDER after a long time.
- You’ve moved to a new location (more than ~100 km from the last fix).
- You’re operating in urban, mountainous, or indoor environments where satellite visibility is limited.
Assisted-GNSS only accelerates satellite acquisition — it doesn’t replace GNSS signals.
Make sure your device has at least partial view of the sky to get an accurate fix.
Sharing Live Data from Dronetag RIDER or Scout
In the Dronetag app, you can share live data from your Dronetag RIDER or Dronetag Scout device with another user who also has a Dronetag account.
This allows them to see your device in their list and view its current position on the map in the app.
📱 How to Share Data
You can share data either in the Dronetag mobile app or in the Dronetag Web App:
- Go to Profile → My Devices.
- Select your Dronetag RIDER or Dronetag Scout.
- Tap Share data with others.
- Tap + Add more.
- Enter the email address of the user (the email must be registered in the Dronetag app).
- Confirm by tapping Confirm.
✅ The selected user will now see your RIDER or Scout under My Devices, marked with a shared-device icon.
They will also see the device’s live position on their map in the app.
🗑️ How to Stop Sharing
To remove sharing with a specific user:
- Go to Profile → My Devices.
- Select your Dronetag RIDER or Dronetag Scout.
- Tap Share data with others.
- Find the user in the list of accounts.
- Tap the trash bin icon next to their name.
- Confirm by tapping Delete.
General Data Visibility
The Data Visibility setting applies to your entire account, not just one device.
This means the option you choose will affect all flight and detection data recorded by every device linked to your account.
You can choose between:
- Public – Default setting, ideal for shared airspace awareness. All your recorded data will be visible to other Dronetag App users.
- Private – Keeps your recorded data visible only to you, without sharing it with others.
Once RIDER is registered with your Dronetag account, the Dronetag app automatically switches the data visibility to Private.
You can adjust this in the app under:
Profile > Preferences > Default data visibility
Once you select Public or Private, the choice applies to all devices in your account (RIDER, Mini, Beacon, etc.), not just a single unit.
Firmware Update
We are still adding new features to Dronetag RIDER. To follow the latest trends in our development, use this short guide to keep your firmware up to date.
Prerequisites
Before you start updating the firmware and during the process, please be sure to:
- Your mobile phone with the Dronetag app and battery charged to at least 30%
- Have your device charged to at least 50 % and turned on.
- Have a stable internet connection available on your phone (around 10 MB must be downloaded).
- Don't start the flight as the firmware cannot be updated in the Flight state.
- Don't restart, turn off or manipulate the device during the update.
Make sure to stick to the instructions above to keep your device safe and working as expected.
Update via the Bluetooth
The Bluetooth update is a fast and easy option to update your RIDER firmware to the latest version. To update the Dronetag RIDER firmware, our Dronetag mobile application must be used. It can take up to 10 minutes.
- Turn on the Bluetooth on your smartphone.
- Turn on the device and open the Dronetag mobile application.
- Go to Profile > My Devices and select the Dronetag RIDER you would like to update.
- Click on Firmware Update to see if your device has the latest firmware version.
- If you have an update available, click on Download & Update.
- Read the instructions for the update procedure and confirm it with Proceed Update.
- Wait until the update is finished, which is indicated by a success message in the app.
Firmware Changelog
Following is a detailed list of changes to the Dronetag RIDER firmware.
Please note that the changelog is very technical and can be hard to understand for non-technical users. You can use this changelog to check if a specific issue you are experiencing has been fixed in a newer firmware version, or to see what new small features are available.
If you find this information confusing, we recommend you check our What's new page instead, where we try to introduce the most important changes and features to all of our products.
Limited Warranty
Dronetag products are warranted to be defect-free in material and workmanship one year after the purchase. For the duration of the warranty period, Dronetag, at its sole option, will repair or replace any product which fails in normal use. Such repairs or replacement will be made at no charge to the customer for parts or labour, provided that the customer shall be responsible for any transportation cost.
Restrictions
Warranty does not apply to cosmetic damage, consumable parts, damage caused by accident, abuse, misuse, water, fire or flood, damage caused by unauthorized servicing, or product that has been modified or altered.
Disclaimer
We kindly advise that our company cannot assume responsibility for the installation of our product by the user or any potential loss incurred as a result. While we strive to provide comprehensive guidance and support, the responsibility for proper installation lies with the user. Should you require any further assistance or clarification, please do not hesitate to contact our customer support team. Your understanding is greatly appreciated.
Warranty Service
Warranty repair service shall be provided directly by Dronetag. Proof of purchase for the product from Dronetag or an authorized reseller is required to obtain and better expedite warranty service. The customer is responsible for transportation costs involved in getting the unit to the Dronetag facility. It is recommended to use a shipping method with tracking and insurance.
Please email us at support@dronetag.com with a description of the problem you are experiencing. Also, please provide the model, serial number (if applicable), shipping address and a daytime contact number. You will be promptly contacted with further troubleshooting steps or return instructions.
Different Warranty Durations for Various Product Components
It is important to note that specific components, including batteries and others, may entail varying warranty terms due to their distinct usage and material properties. As per our warranty policy, the standard warranty duration for most products stands at one (1) year. However, it is pertinent to highlight that the warranty period for batteries is limited to six (6) months.
Post-Warranty Service
Besides warranty service, Dronetag also offers post-warranty repairs. Let us know at support@dronetag.com your problem, and we will try to do our best to find a solution for you.
Manufacturer
The device is designed and assembled in the Czech Republic. Use the following facility address for any shipment of warranty or repair items.
- Dronetag s.r.o., Benesovska 2270/34, 10100 Prague, Czech Republic
Maintenance
You should closely inspect the device once in a while for potential cracks or other defects. Such issues can affect the device's reliability and can lead to possible injury. Contact us if you are unsure about the state of your device.
Device cleaning & connector care
Regular inspection and gentle cleaning keep your RIDER in good condition. Always handle connectors with care to avoid damage.
USB-C connector
- Inspect the USB-C port for dust or dirt.
- Clean gently using compressed air.
- Avoid liquids and sharp objects.
Device surface
- Wipe the enclosure to remove dust or mud with a soft, dry cloth.
Chemicals & labels
- Do not use solvents (ethanol, IPA, acetone, etc.) on the housing or label.
- These chemicals may damage the enclosure or make the serial number label unreadable.
- If cleaning is necessary, use only a slightly damp microfiber cloth with clean water.
Troubleshooting
Below you will find all the essential troubleshooting steps for RIDER.
If you run into an issue not covered here, please let us know at support@dronetag.com.
Basic Operations
Many problems can be solved simply by updating your RIDER to the latest firmware. Always start here.
Firmware and software update
Firmware and software update
We keep improving RIDER all the time.
Make sure you are using the latest Dronetag App and device firmware for best performance.
Follow the guide here: Firmware Update
Hard reset
Hard reset
Use hard reset to force the device to restart.
This should be your first step if RIDER behaves unexpectedly.
How to do it:
- Press and hold the Power Button for 15 seconds
- LEDs will turn purple → reset is complete
Reset to Factory Defaults (buttons)
Reset to factory defaults
Resetting to factory defaults clears your configuration and restores RIDER to the default state.
How to do it:
- Hold Action + Power buttons for 20 seconds
- Keep holding when LEDs show purple
- Release when no LED is purple and the RGB animation starts
Reset to Factory Defaults (App)
You can also reset RIDER via the Dronetag App:
- Turn RIDER on and open the Dronetag App
- Go to Profile → My Devices → Dronetag RIDER
- Open Troubleshooting → Reset to factory defaults
Reset via buttons is only available on firmware 1.4.1 or newer
Diagnostic logs
Diagnostic logs
Sometimes our support team will ask you for diagnostic logs.
These help us understand what’s going on inside RIDER.
How to obtain logs:
- Turn on RIDER and open the Dronetag App
- Go to Profile → My Devices → Dronetag RIDER
- Open Troubleshooting → Obtain Diagnostic Logs
The logs will be downloaded and ready to share with our support.
Contacting Support
When emailing support@dronetag.com, please include:
- Your account email
- Device name and 20-digit serial number
- Phone OS (e.g. iOS 16, Android 14)
- Problem description – what’s happening, what you expected
- Steps to reproduce – if possible
- Screenshots / screen recording – super helpful for us
This makes it much faster for our support team to help you.
Common Issues
LINK LED stays red
Link LED stays red
If the LINK LED is red for more than 5 minutes, check:
- RIDER is registered with your Dronetag account
- Trial or Data Bundle is active
- Firmware is up to date
- LTE signal is strong
Try this:
- Register RIDER in the app
- Buy or activate a new Data Bundle, or switch to Drone Scanner (gen. 2) app to use it offline
- Move to an area with better LTE signal
- Set the LTE band to "auto detect" and APL/PLMN to "Auto"
- Upload a new firmware version.
- Factory reset your device.
- Wait for 24 hours while keeping the device on (keep it connected to a charger).
- Update your firmware.
If the red LINK persists, contact support@dronetag.com
Waiting for GNSS
Waiting for GNSS
The yellow GNSS LED means RIDER can’t get a satellite fix.
- Make sure you are outdoors with a clear sky
- Wait at least 2 minutes
Try this:
- If you are in an area with a poor GNSS signal, you can boost the reception by changing the GNSS configuration. If you have cellular enabled on the device, you can see the number of satellites in the device detail.
- Update firmware
- Hard reset (hold Power 15 s)
- Reset to factory defaults (hold Power + Action 20 s)
RIDER detects only at short range
RIDER detects only at short range
Range can be affected by:
- Buildings or natural obstacles
- Strong Wi-Fi/Bluetooth interference
- How the antenna is positioned
Try this:
- Move away from strong transmitters (Wi-Fi, radars, towers, Bluetooth devices with permanent communication like headphones,...)
- Keep antenna vertical, not touching other objects
- Don’t block RIDER with your body
RIDER does not detect anything
RIDER does not detect anything
The most common cause: using the wrong antenna.
Check that you are using a 2.4 GHz antenna with SMA male connector.
Also:
- Move to an area with less interference
- Hard reset RIDER
- Ensure the antenna is not in contact with any other object
- Keep antenna vertical, not touching other objects
Device feels hot or inflates
Device feels hot or inflates
- It is normal for RIDER to feel warm during operation
- If it gets too hot or the case starts inflating, turn it off immediately
Then:
- Keep away from flammables
- Contact support@dronetag.com
All three LEDs are lit red
All three LEDs are lit red
When all three LEDs stay red, RIDER is in error mode.
Most often this happens because of:
- Wrong LTE band settings in the app
- Expired subscription
- Outdated firmware
Check first:
- LTE bands are set correctly in the app
- Your subscription is valid
- Firmware is up to date
Try this:
- Hard reset RIDER
- Correct the LTE band setting
- Activate your subscription plan
- Update to the latest firmware
- Factory reset the device
If the LEDs stay red after these steps, contact your reseller or support@dronetag.com.
Battery is discharging too fast
Battery is discharging too fast
Fast battery drain is usually caused by:
- Using RIDER in freezing temperatures (< 0 °C)
- Running outdated firmware
- Device accidentally left turned on
Check first:
- You are not using RIDER in freezing conditions for a long time
- Latest firmware is installed
- Device has not been switched on by accident
Try this:
- Avoid prolonged use in freezing conditions
- Accept that cold weather always shortens battery life
- Update to the latest firmware
- Prevent accidental power-on
If RIDER still discharges quickly after these checks, contact support@dronetag.com.
Battery is not charging
Battery is not charging
Charging may be disabled due to high temperature.
RIDER automatically stops charging when it gets too hot to protect the battery.
Try this:
- Place RIDER in a cool location
- Try charging again once the device has cooled down
Impossible to turn RIDER on
Impossible to turn RIDER on
RIDER won’t turn on if:
- The battery is completely discharged
- Overheating protection has been triggered
Check first:
- Battery is charged to at least 5%
- Device is not overheating
Try this:
- Attempt to power on while charging
- If RIDER is hot, let it cool down first
- Perform a hard reset
If none of these steps work, contact support@dronetag.com.
RIDER only turns on when connected to a charger
RIDER only turns on when connected to a charger
This usually means USB mode was enabled accidentally.
In this setting, RIDER only powers on while charging.
Check first:
- In the Dronetag App:
Profile → My Devices → Dronetag RIDER → Configuration → USB mode → OFF
Try this:
- Disable USB mode
- Perform a factory reset
If the battery % in the Dronetag App stays at 0% even after charging, the problem is likely hardware-related. Contact your reseller or support@dronetag.com.
Button doesn’t work
Button doesn't work
This can be caused by dirt under the button or a manufacturing defect.
Try this:
- Contact your reseller or support@dronetag.com
Firmware update is crashing
Firmware update is crashing
Sometimes firmware updates fail if the conditions are not right.
Before starting, make sure:
- Your phone has a stable internet connection
- RIDER is charged to at least 50%
- You are not using or moving the device during the update
Try this:
- Run the firmware update again
- Perform a hard reset
- If needed, perform a factory reset
- Retry the firmware update after the reset
If the update keeps failing, contact your reseller or support@dronetag.com.
RIDER is in a reset loop
RIDER is in a reset loop
If RIDER keeps restarting on its own:
Try this:
- Perform a hard reset
- Reset to factory defaults
- Let the battery fully discharge, then recharge completely and try powering on again
If the reset loop continues, contact your reseller or support@dronetag.com.
LTE signal is interrupted
LTE signal is interrupted
Most LTE interruptions are caused by poor signal coverage from the provider.
Check first:
- You are in an area with good LTE coverage
Try this:
- Hard reset the device
- If coverage remains weak, consider switching RIDER to offline mode
Case Studies
RIDER helped Wellesley Police secure Boston Marathon
Wellesley Police Department Secures Boston Marathon with Dronetag RIDER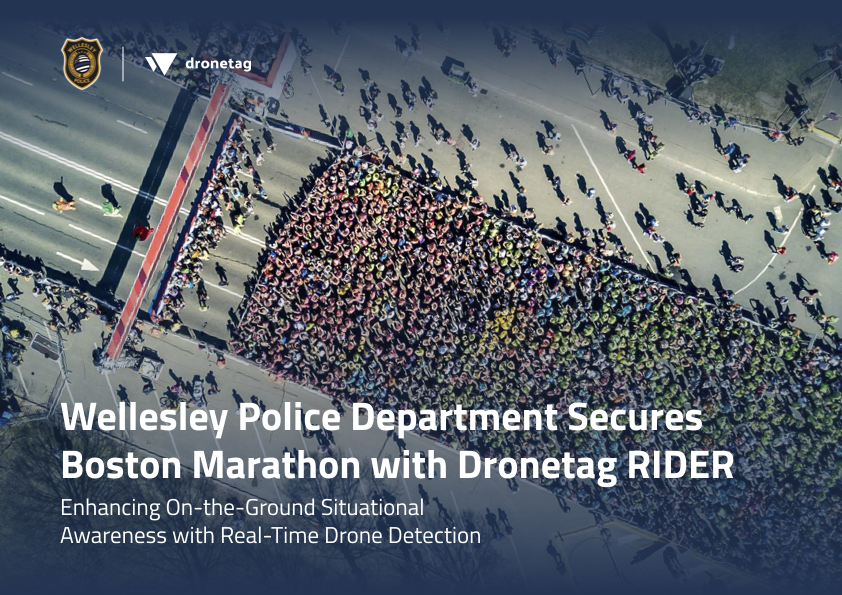
RIDER is helping the Hawaii Fire Department during emergencies.
Hawaii Fire Department Case Study
FAQ
Which drones is RIDER compatible with?
RIDER is drone-agnostic – it detects Remote ID from any compliant drone or module, including DJI, Autel and many others.
If a drone does not transmit Remote ID (for example, some sub-250 g drones), RIDER cannot detect it.
Where can I view detected data?
- Dronetag App (with an active Data Bundle or free trial) – provides cloud storage, history, and remote access.
- Drone Scanner app (Gen. 2) – free offline use via Bluetooth, without cloud history.
Can RIDER locate the pilot?
Yes. If the Remote ID message includes pilot position data, RIDER displays it alongside the drone location.
If not, RIDER will show the take-off position instead.
What is the detection range and speed?
- Range: Up to 5 km with the default omnidirectional antenna, extendable with optional directional antennas.
- Speed: Detection is real-time – messages are processed immediately.
How long does RIDER last on battery?
RIDER runs 8–12 hours on a full charge and is rechargeable via USB-C.
How durable is RIDER in the field?
RIDER is compact, portable, and resistant to regular outdoor use.
It’s best suited for mobile operations where flexibility and portability are key.
Can RIDER data be exported or integrated?
Yes. Data can be exported from the app or integrated into third-party systems via APIs or through the Dronetag Cloud.
How fast is RIDER deployment?
Deployment is very fast – even the first time.
Just turn it on, register it in the Dronetag App, and start scanning. Ready in minutes.
Who typically uses RIDER?
- Law enforcement and police units
- Security teams
- First responders
- Event organizers needing portable airspace monitoring
I got an email saying I need a new Data Bundle. Why?
Every RIDER includes a 2-month free trial. After this period, you have two options:
- Purchase a new Data Bundle and keep using RIDER with the Dronetag App.
- Use RIDER for free with the Drone Scanner (Gen. 2) app.
We know it might feel confusing why you need a Data Bundle. Here’s the reason:
-
With the Dronetag App, RIDER sends detection data to the cloud via its built-in LTE SIM. The Data Bundle covers this data usage and gives you:
- Access to detections anywhere, even when you are not near RIDER
- Shared access for other users on the same account
- Stored detection history
-
With the Drone Scanner app, RIDER connects to your phone via Bluetooth only. No data is sent to the cloud, so there is no history, but you still get live situational awareness.
👉 More details here: RIDER Subscriptions Help
My RIDER is blinking red on the LINK LED.
This usually means:
- RIDER is not registered to any account, or
- You are out of Data Bundle.
Check in the Dronetag App or Web App that your RIDER is registered.
If it is registered but still blinking red, open the app and check your Data Bundle status under Account.
My RIDER is not working in some countries.
RIDER can only detect drones that broadcast Remote ID. It is mandatory to broadcast a Remote ID signal in the EU, USA, Japan and Singapore. In countries where Remote ID is not mandatory, drones may not transmit anything unless they have an external Remote ID module.
Modern drones often decide automatically whether to broadcast Remote ID based on GNSS location.
That’s why the same drone may be visible in one country but invisible in another.
RIDER has a short range. Why?
Unfortunately, this is both law and physics:
- Remote ID must be transmitted on 2.4 GHz and 5 GHz, the same frequencies used by Wi-Fi and many smart devices.
- These bands are crowded, so signals can suffer from interference.
- As a result, RIDER may only pick up Remote ID messages when the drone is close enough.
My RIDER is not detecting small drones.
By law, drones under 250 g are not required to broadcast Remote ID.
Since RIDER is a Remote ID receiver, it cannot detect drones that don’t transmit.
Does the drone have to be airborne to be detected?
No. The drone does not need to be flying, but it must have a GNSS fix and the motors must be running.
Once these conditions are met, the drone starts broadcasting Remote ID, and RIDER can detect it.
Some drones only start broadcasting Remote ID after take-off.
- If your drone is powered on but not detected, try arming or taking off to trigger Remote ID transmission.
Source pages
Every chapter of this document is a page of the Dronetag help site. Use these addresses to reach the latest version.
- 1Introductionhelp.dronetag.cz/cs/dronetag-rider
- 2Quick Start Guidehelp.dronetag.cz/cs/dronetag-rider/quick-start-guide
- 3Mounting Optionshelp.dronetag.cz/cs/dronetag-rider/mouning-opt
- 4Specificationhelp.dronetag.cz/cs/dronetag-rider/specification
- 5Drone Detectionhelp.dronetag.cz/cs/dronetag-rider/drone-detection
- 6Data Transmission Modeshelp.dronetag.cz/cs/dronetag-rider/data-transmission-modes
- 7Using the Dronetag Apphelp.dronetag.cz/cs/dronetag-rider/using-dronetag-app
- 8RIDER Connectivity Planhelp.dronetag.cz/cs/dronetag-rider/subscription
- 9Battery Charginghelp.dronetag.cz/cs/dronetag-rider/battery-charging
- 10LED Indicationshelp.dronetag.cz/cs/dronetag-rider/led-indications
- 11Configurationhelp.dronetag.cz/cs/dronetag-rider/configuration/
- 12Firmware Updatehelp.dronetag.cz/cs/dronetag-rider/firmware-update
- 13Downloadshelp.dronetag.cz/cs/dronetag-rider/downloads
- 14Firmware Changeloghelp.dronetag.cz/cs/dronetag-rider/firmware-changelog
- 15Limited Warrantyhelp.dronetag.cz/cs/dronetag-rider/limited-warranty
- 16Maintenancehelp.dronetag.cz/cs/dronetag-rider/maintenance
- 17Troubleshootinghelp.dronetag.cz/cs/dronetag-rider/troubleshooting
- 18Case Studieshelp.dronetag.cz/cs/dronetag-rider/case-studies
- 19FAQhelp.dronetag.cz/cs/dronetag-rider/faq