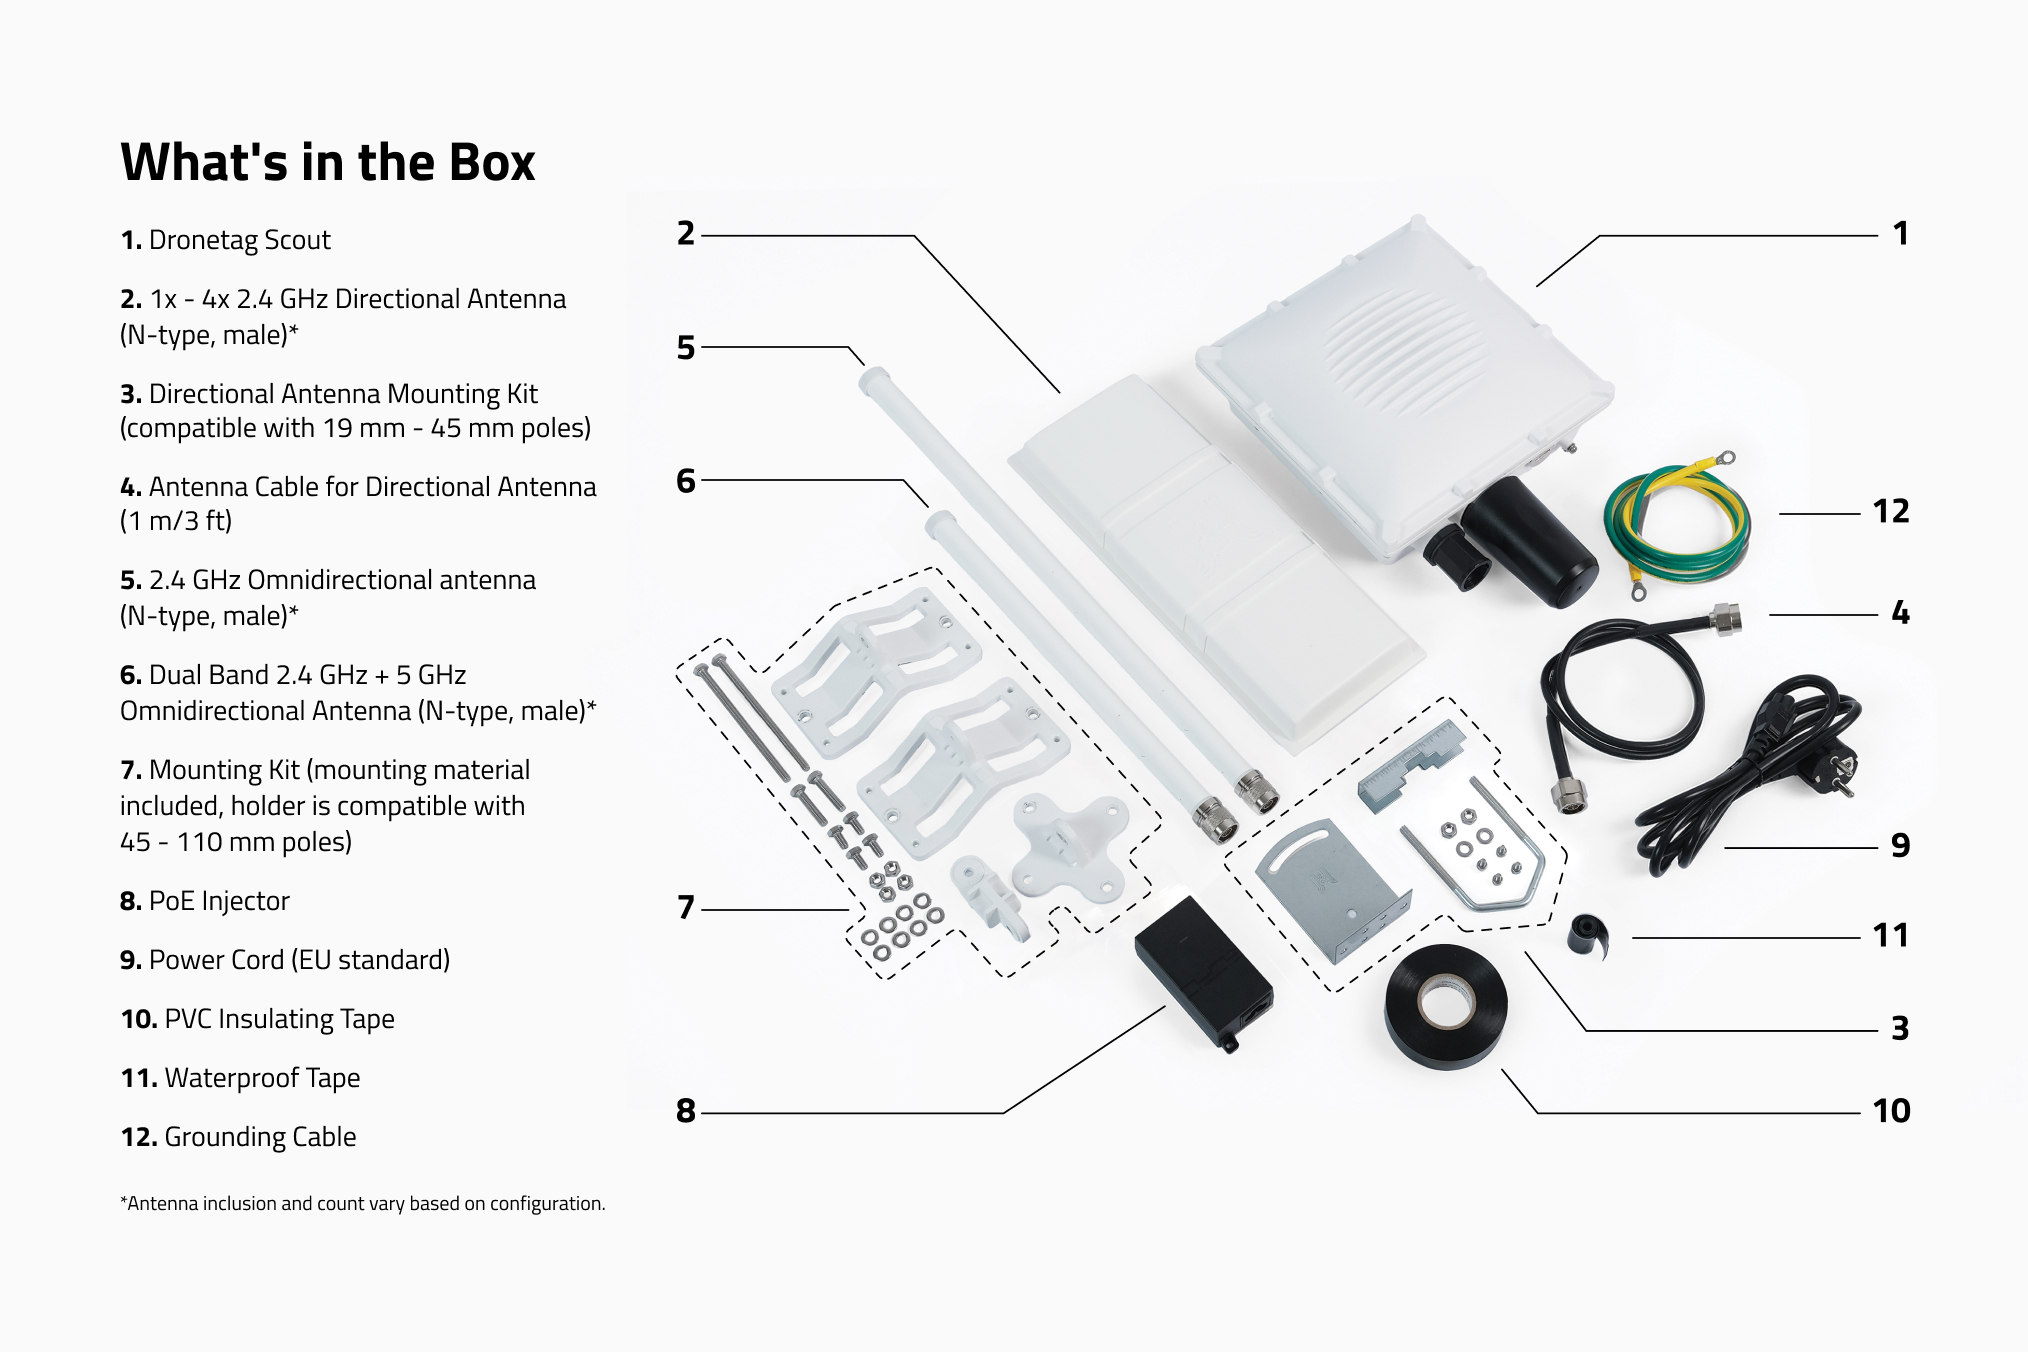
Mounting the Antennas
This guide explains how to install the directional antenna mount for Dronetag Scout.
Follow the steps carefully to ensure a secure installation and reliable antenna performance.
Antenna Connector Layout
- Scout Baseline - 2x Omnidirectional Antennas

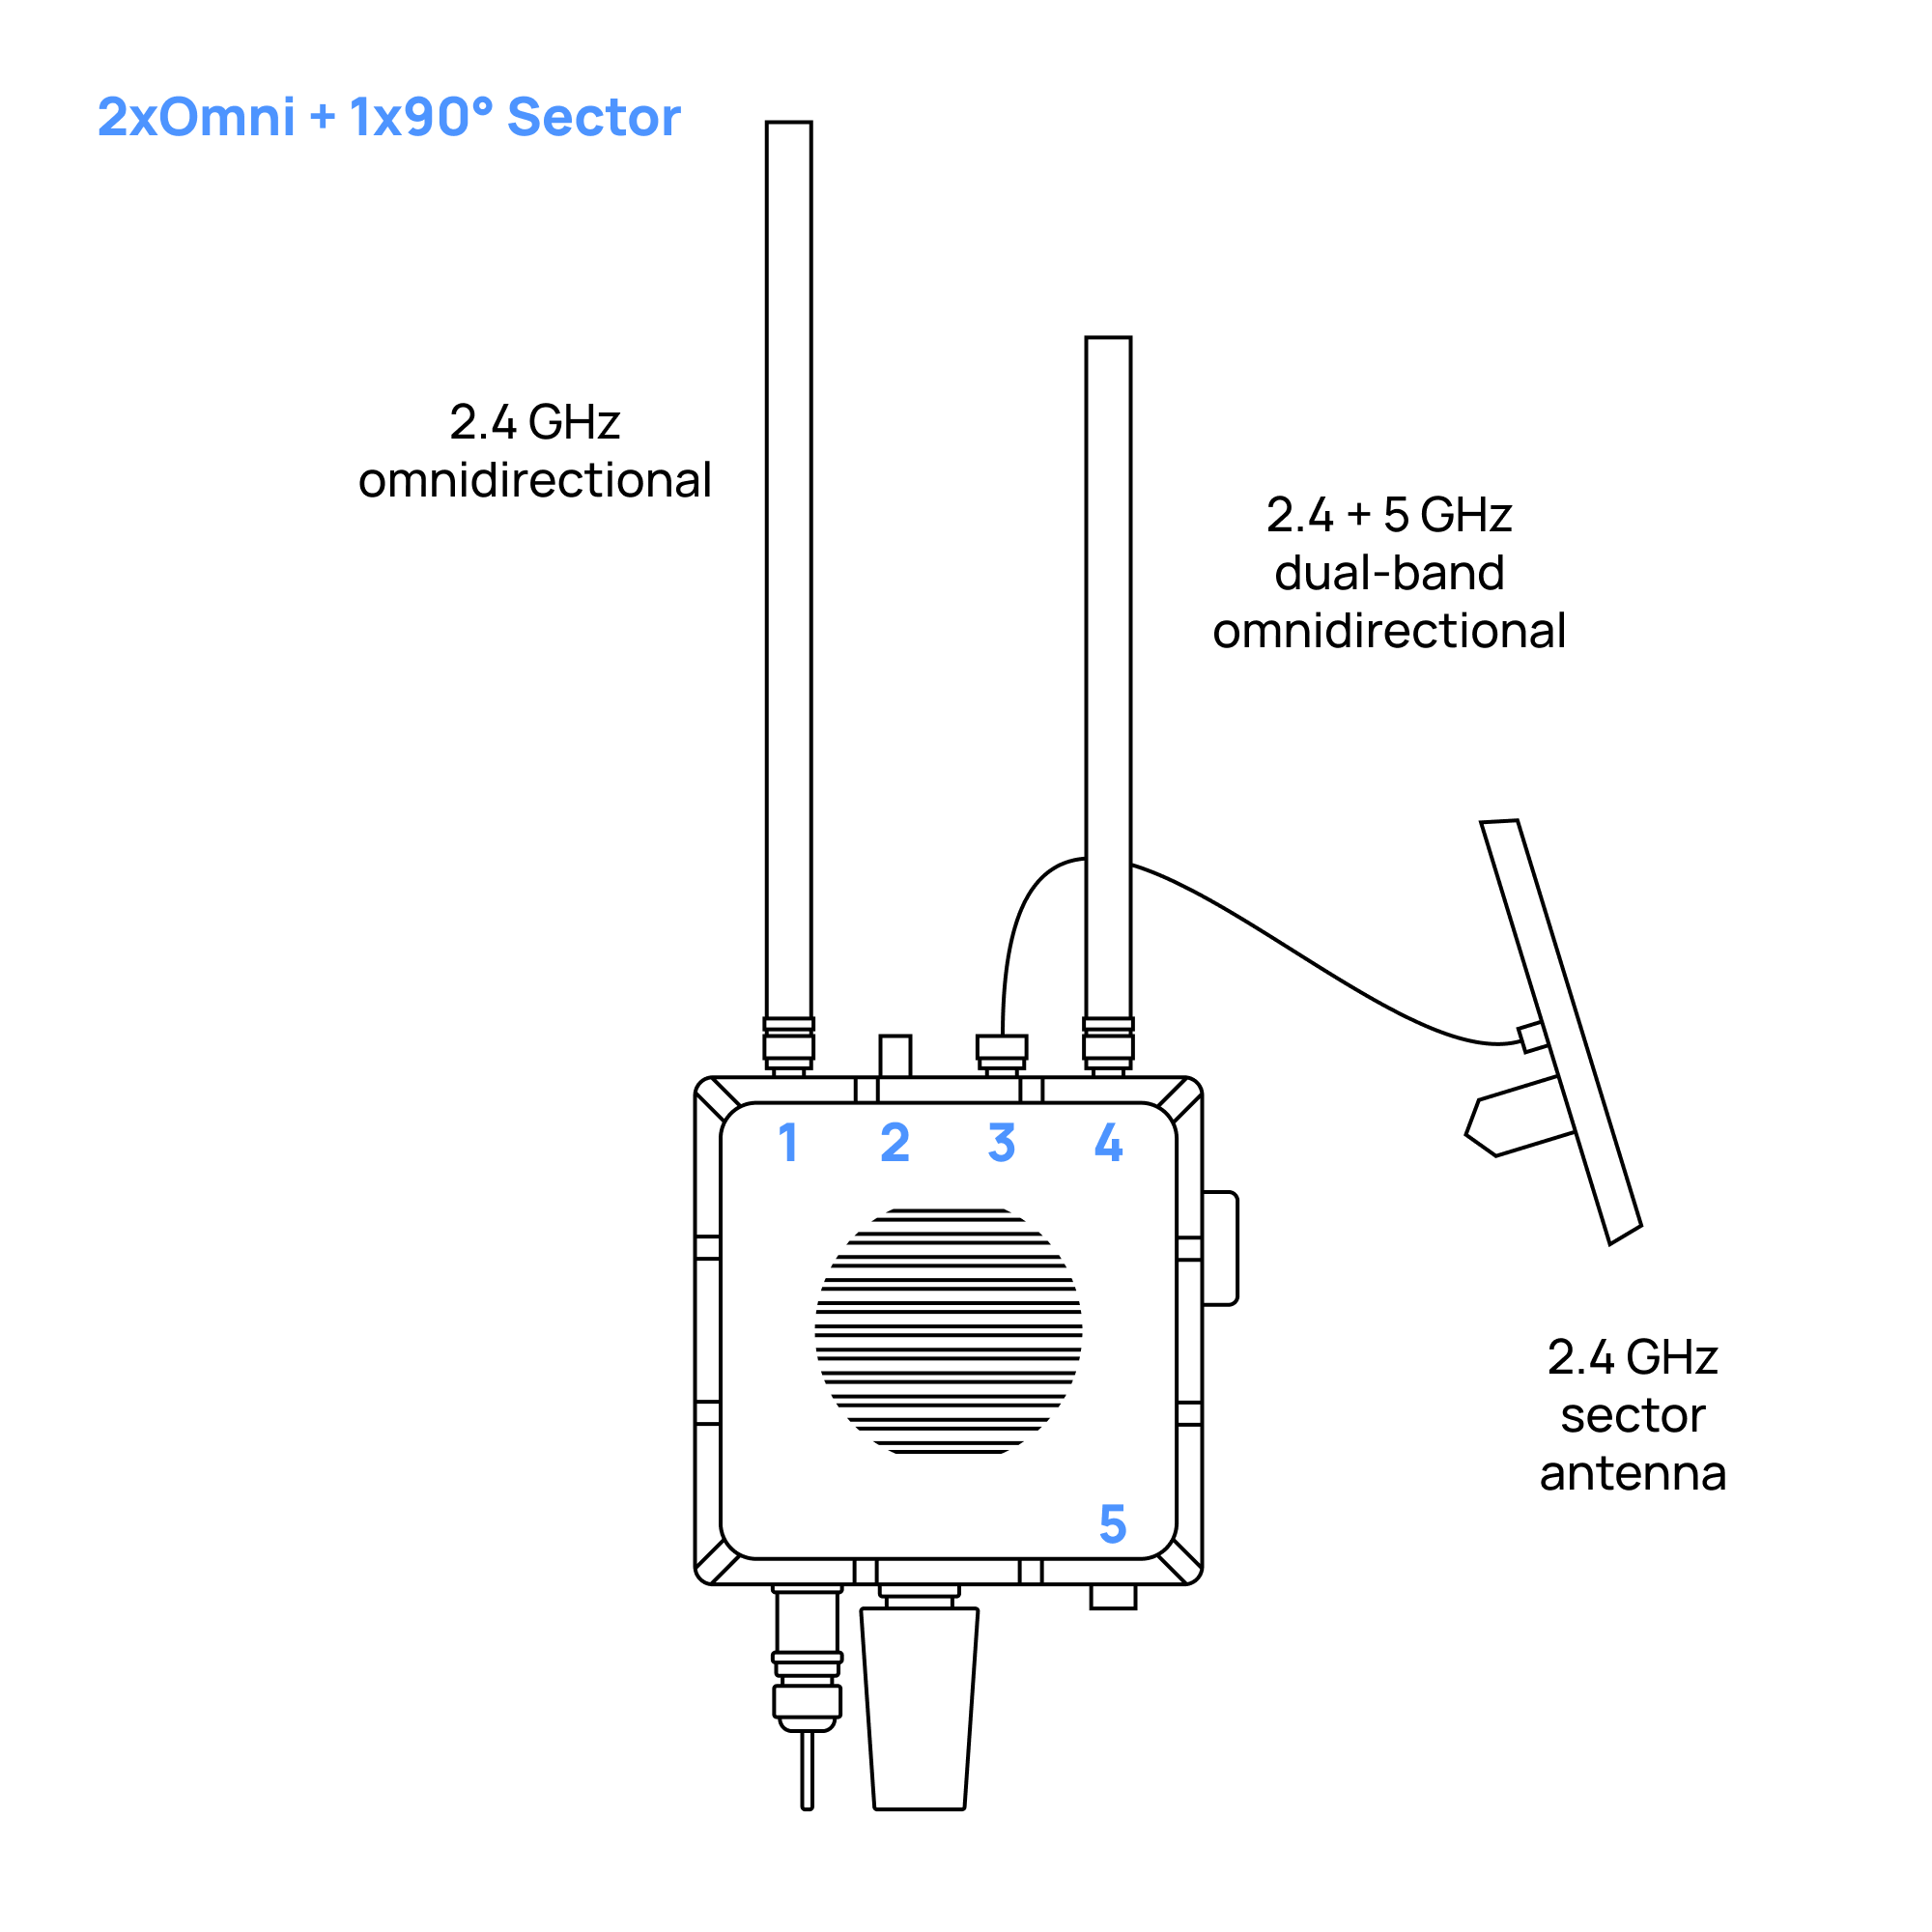
- Scout with 2x Omnidirectional Antennas + 1x Sector (Directional) Antenna
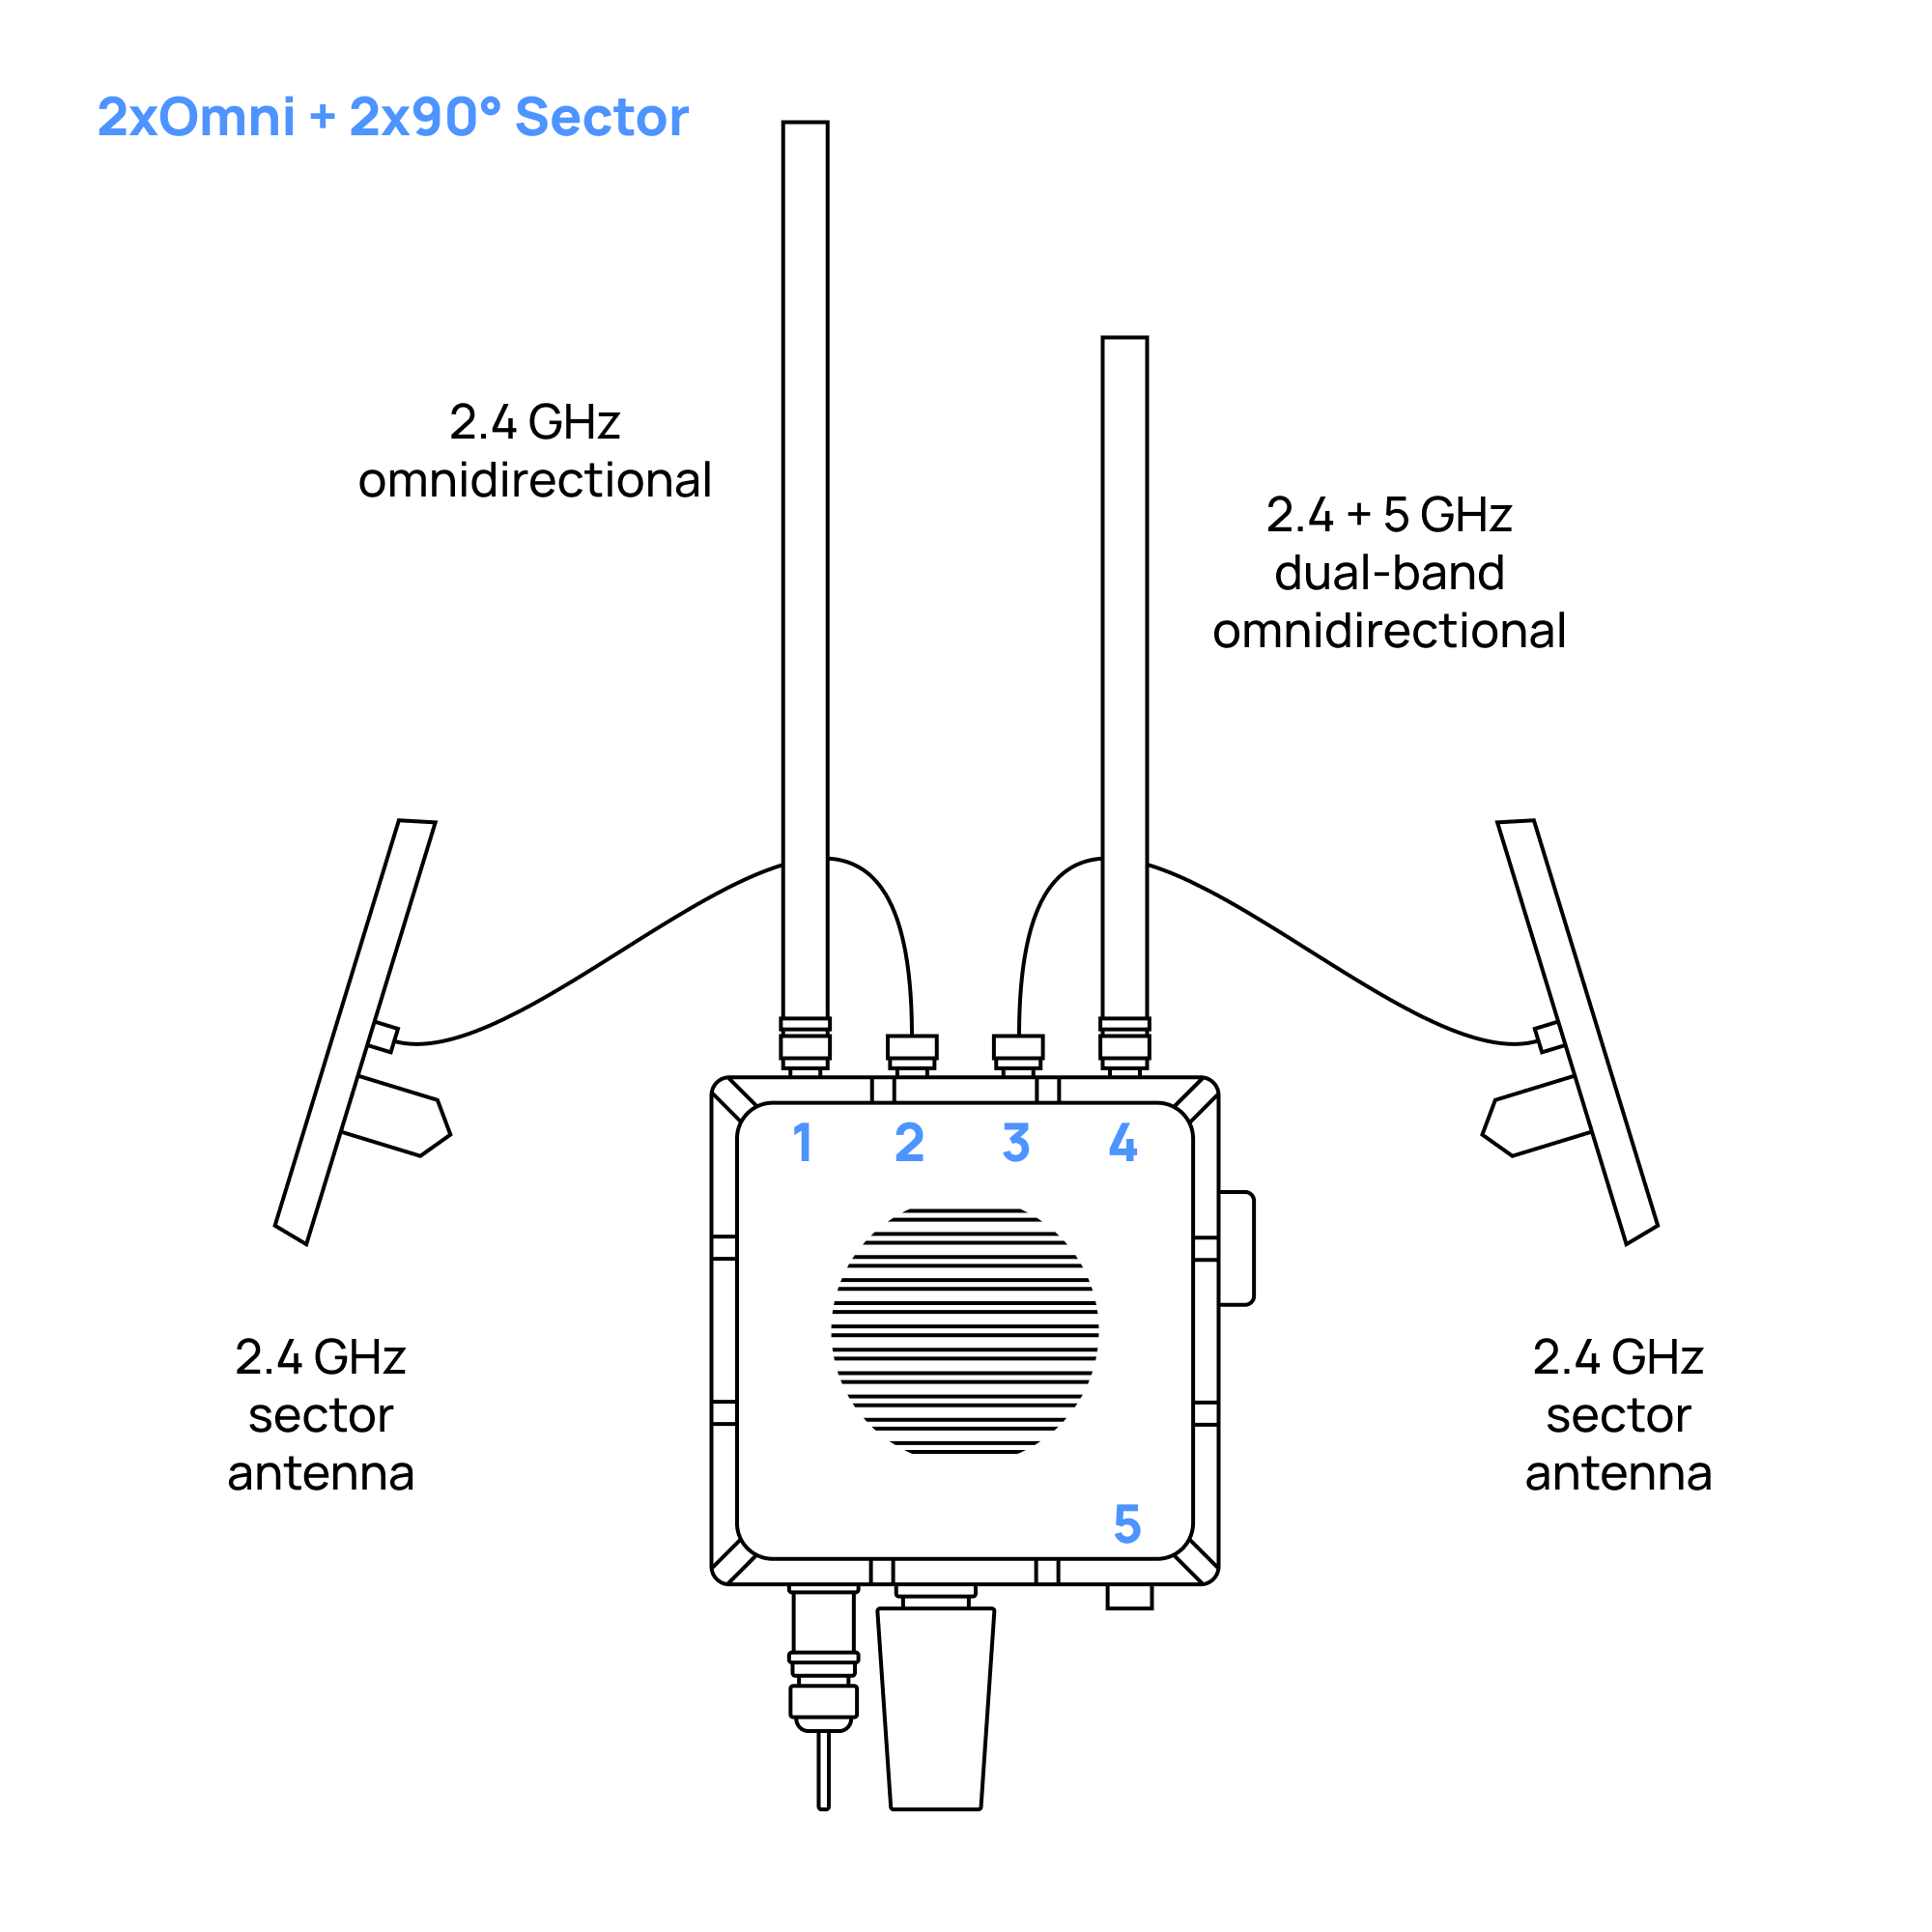
- Scout with 2x Omnidirectional Antennas + 2x Sector (Directional) Antennas
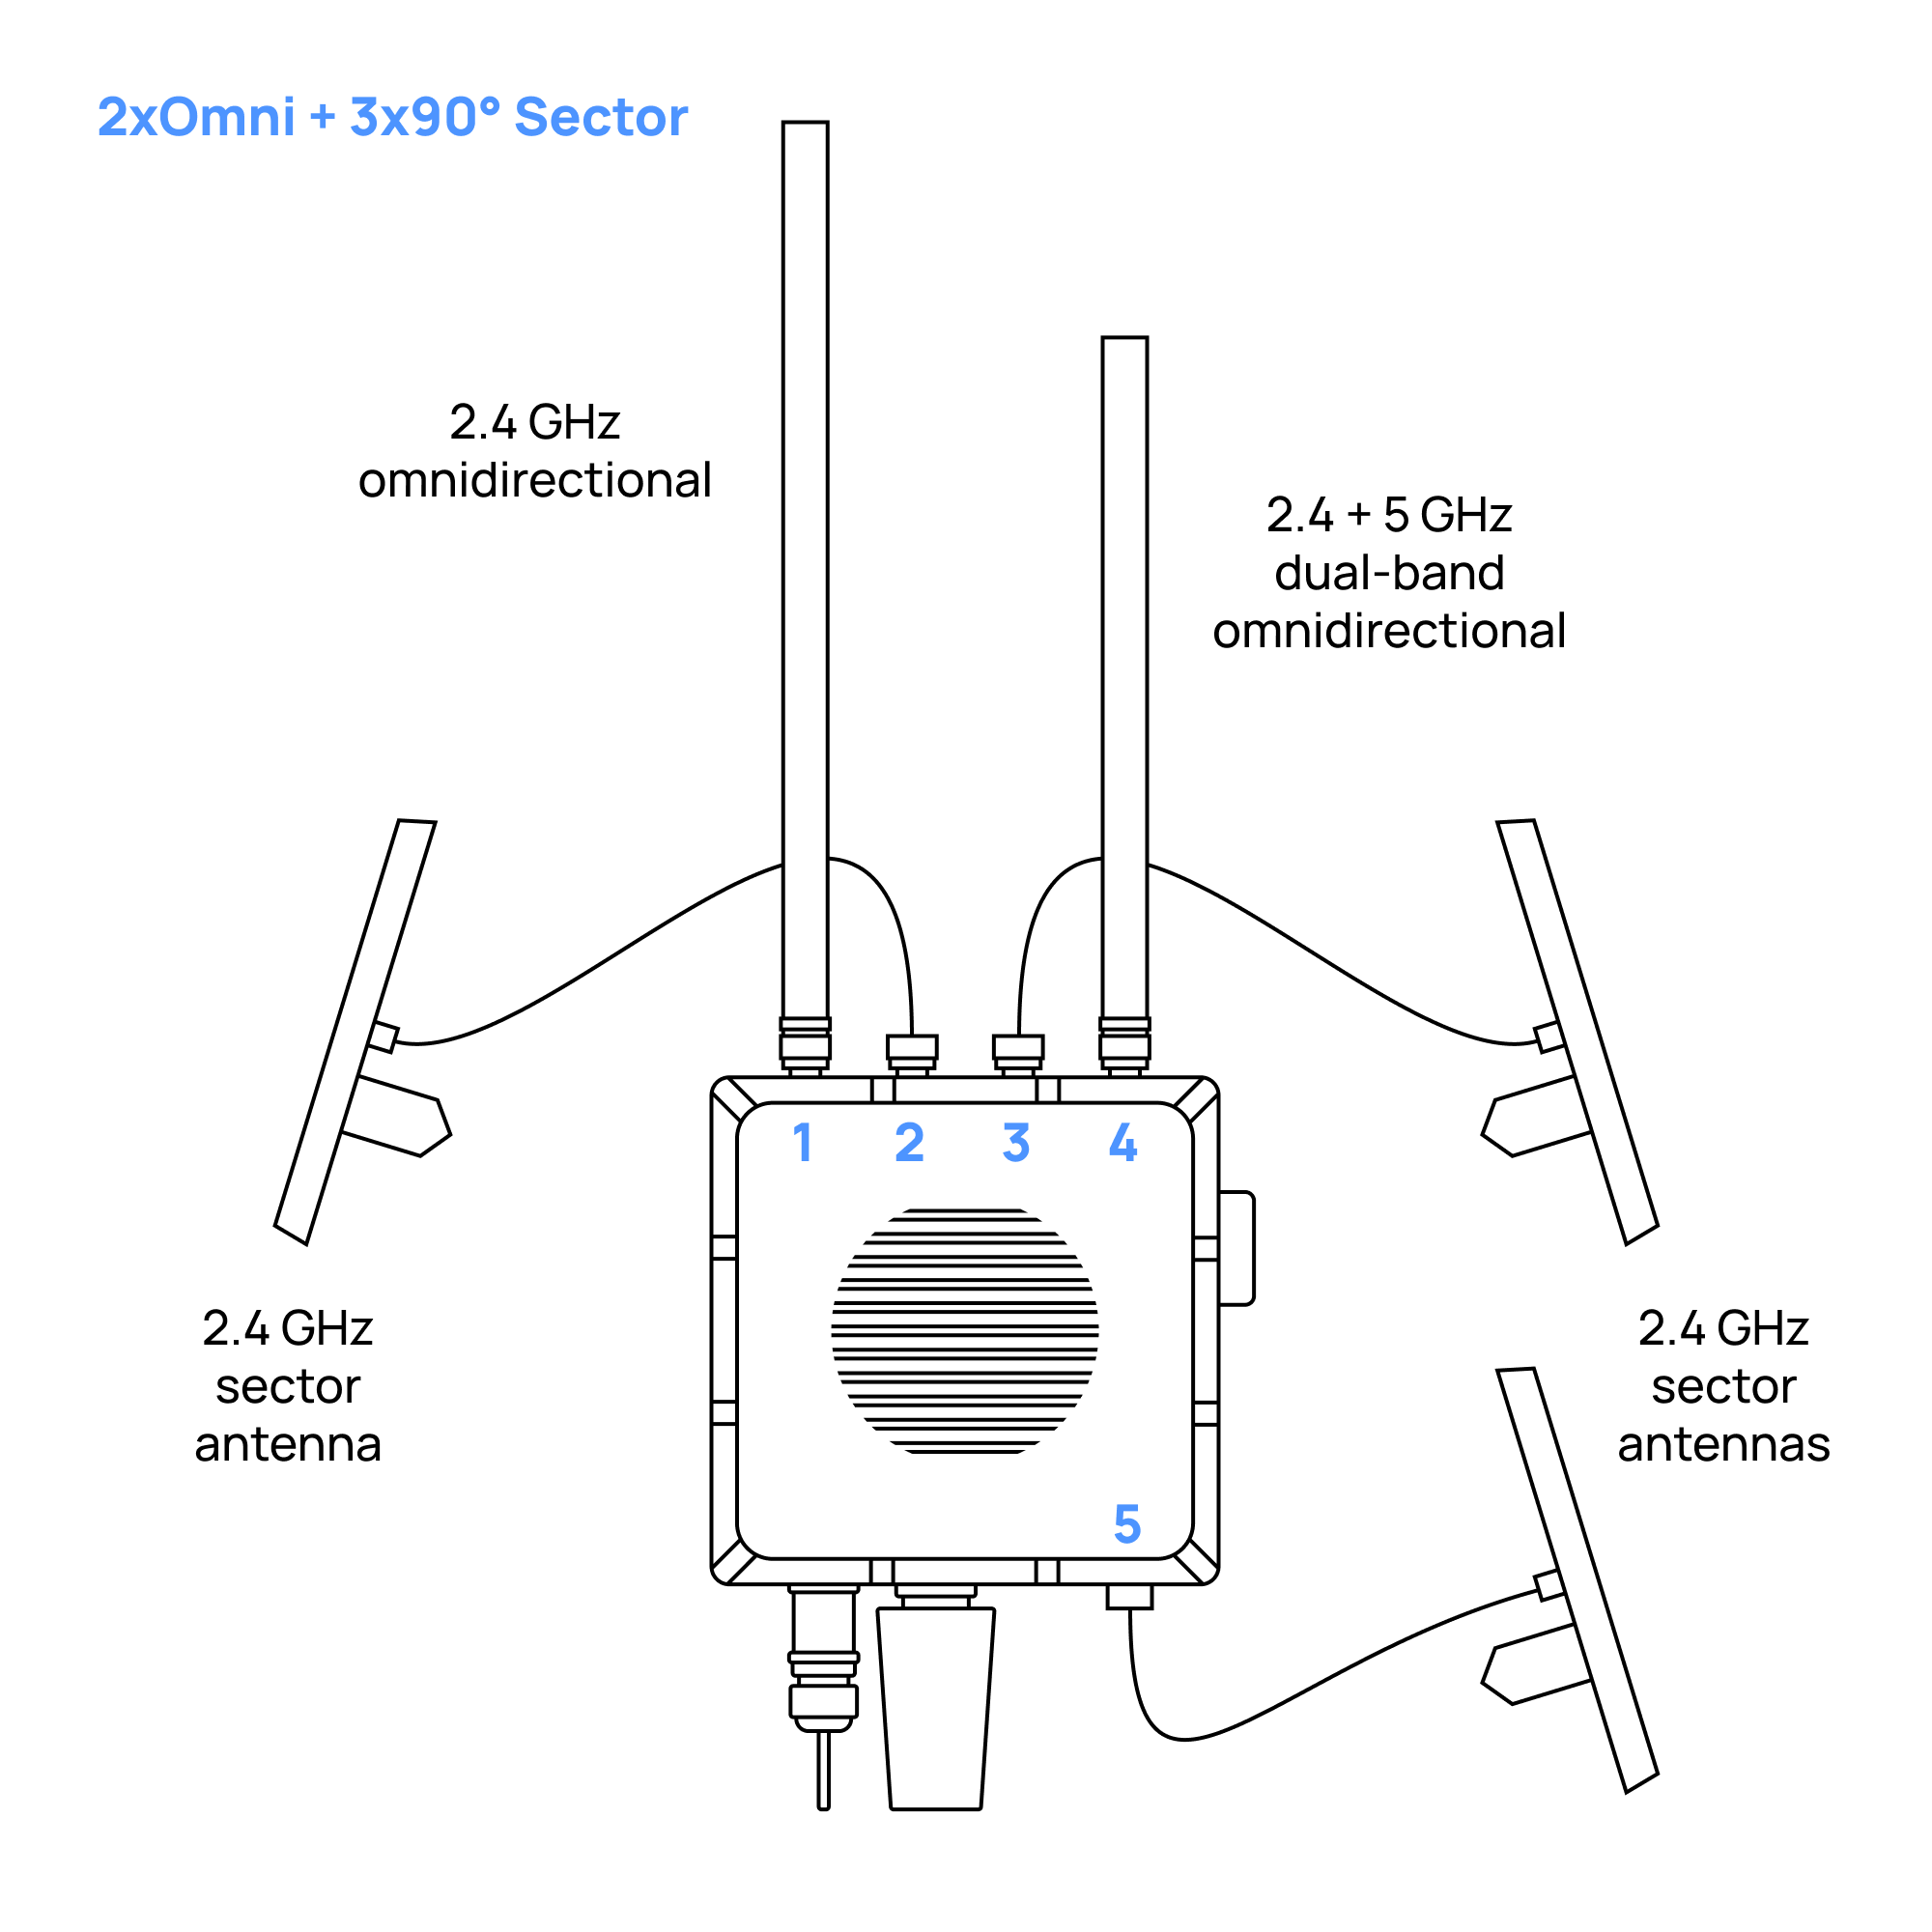
- Scout with 2x Omnidirectional Antennas + 3x Sector (Directional) Antennas
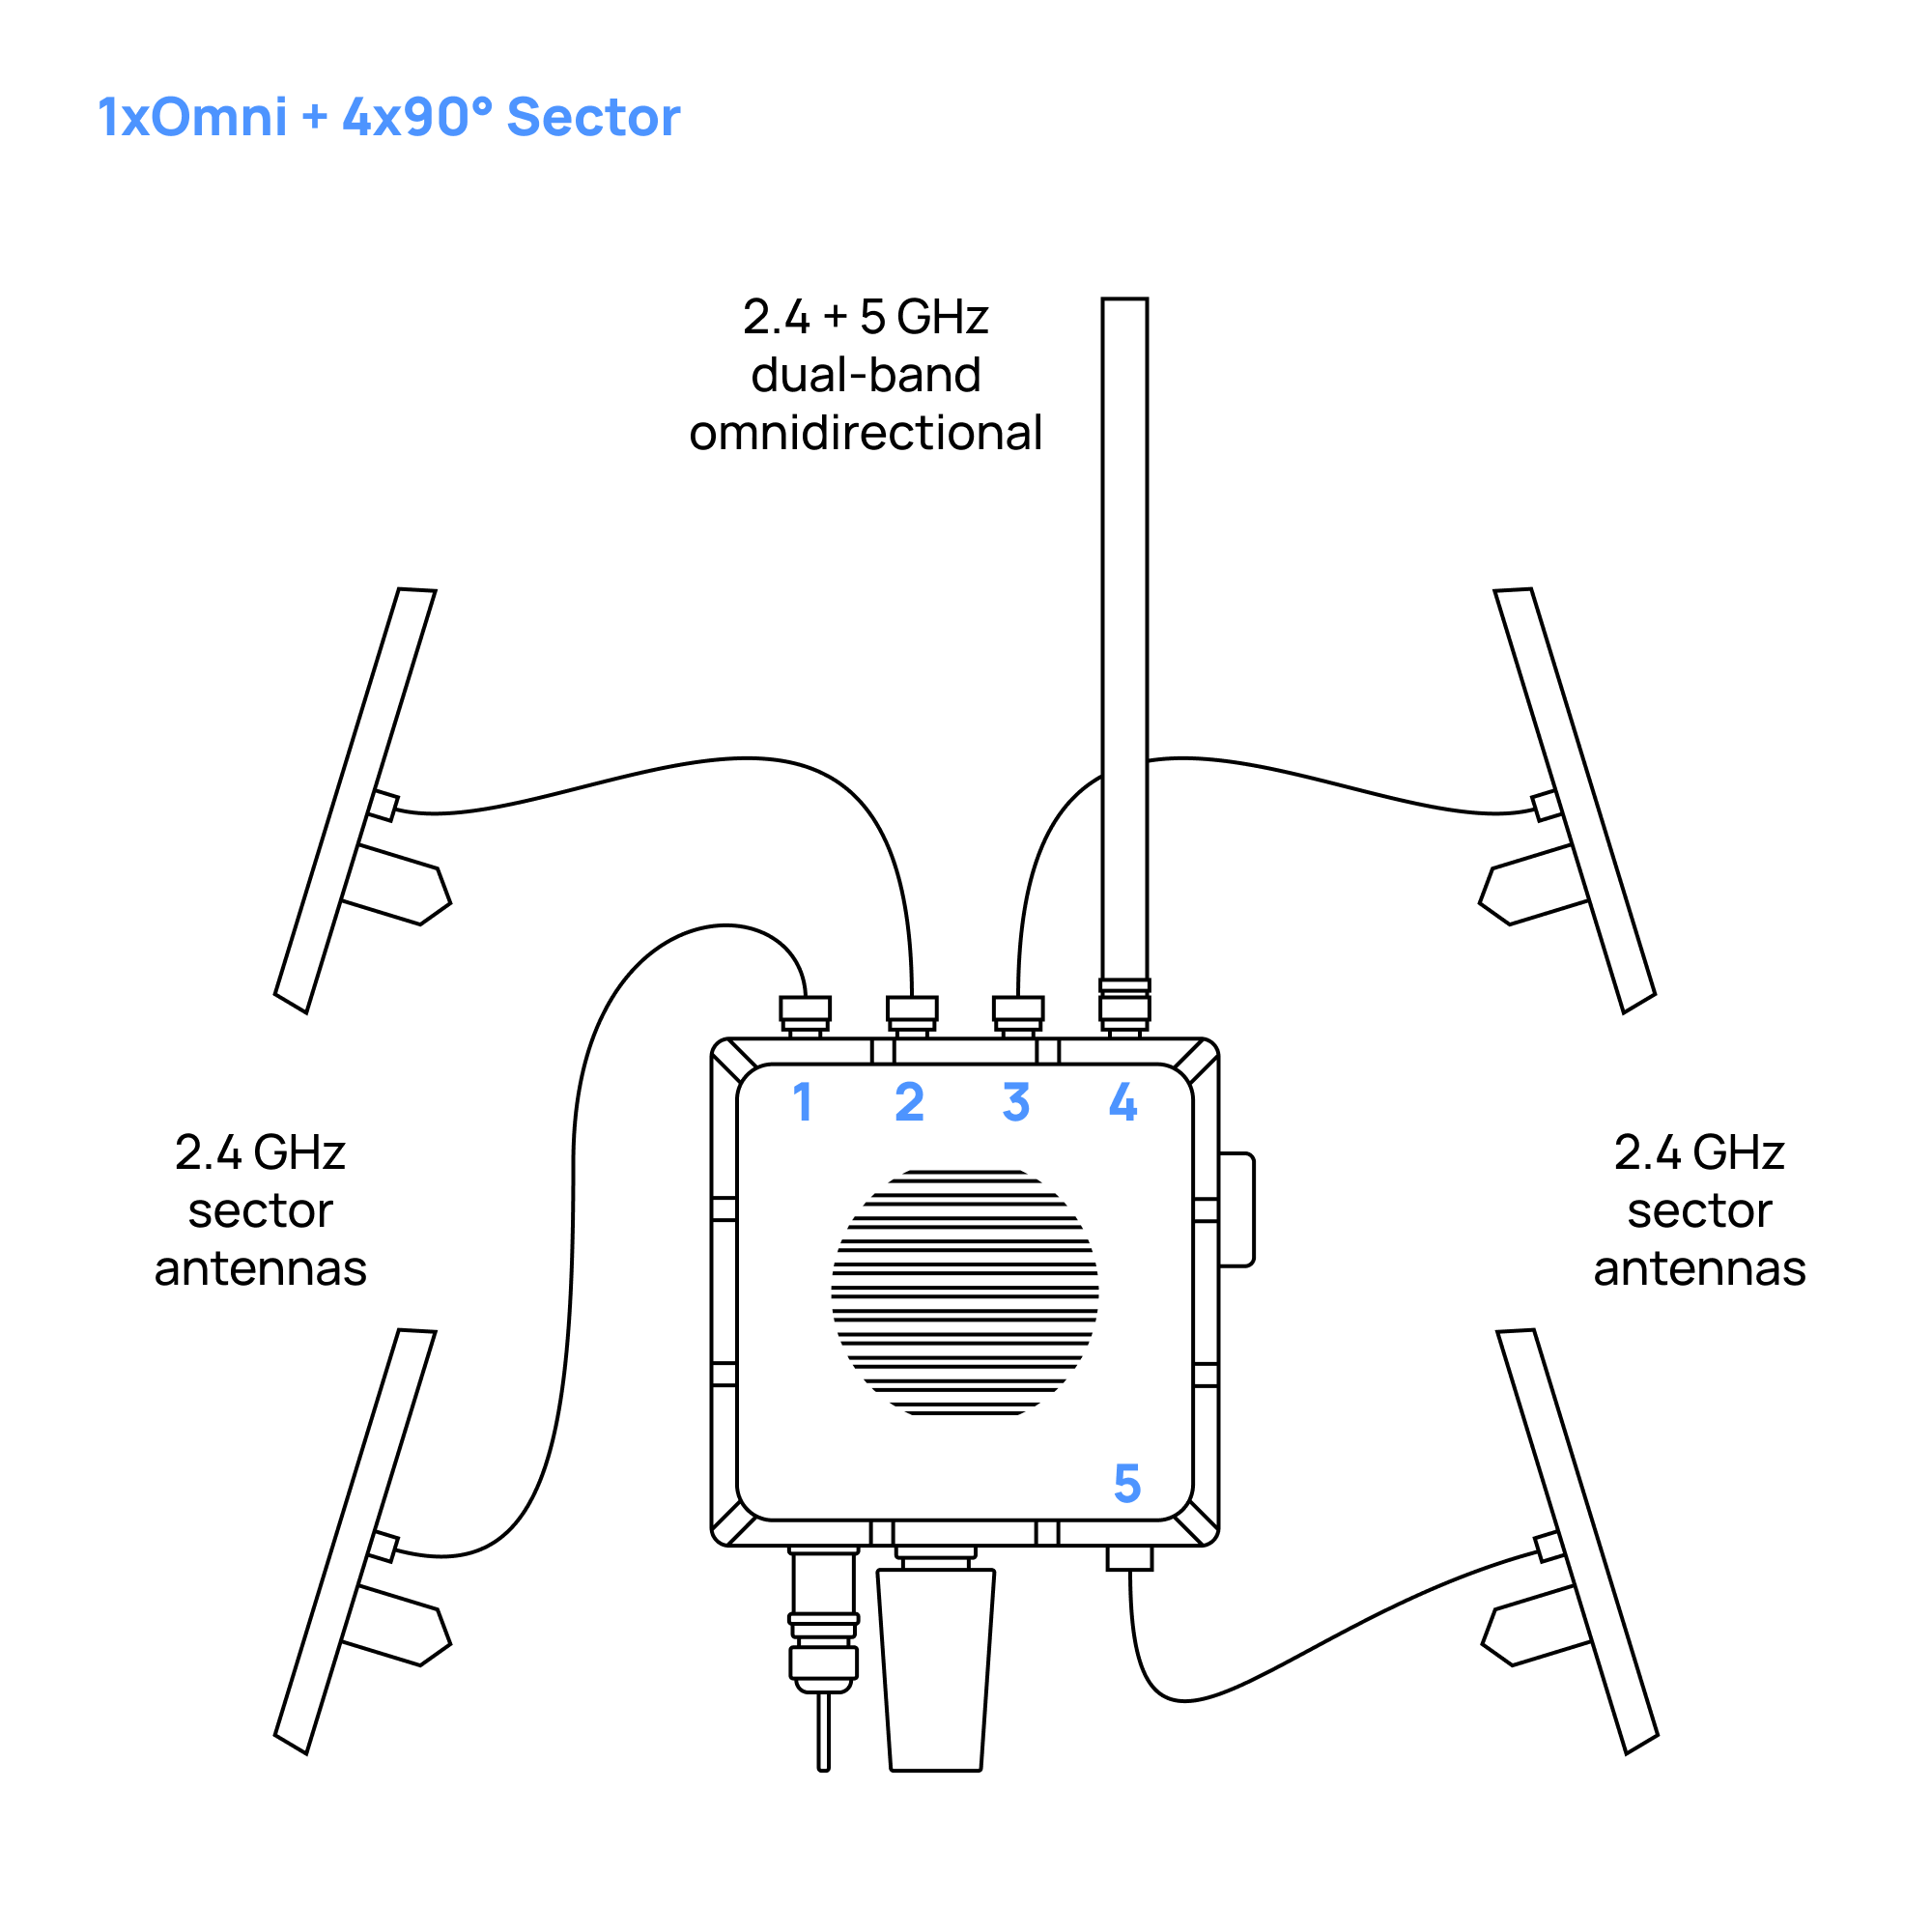
- Scout with 1x Omnidirectional Antenna + 4x Sector (Directional) Antennas
- Omnidirectional Antennas
- Holder for Four Directional Antennas
- Holder for Two Directional Antennas
- Directional Antennas with No Holder
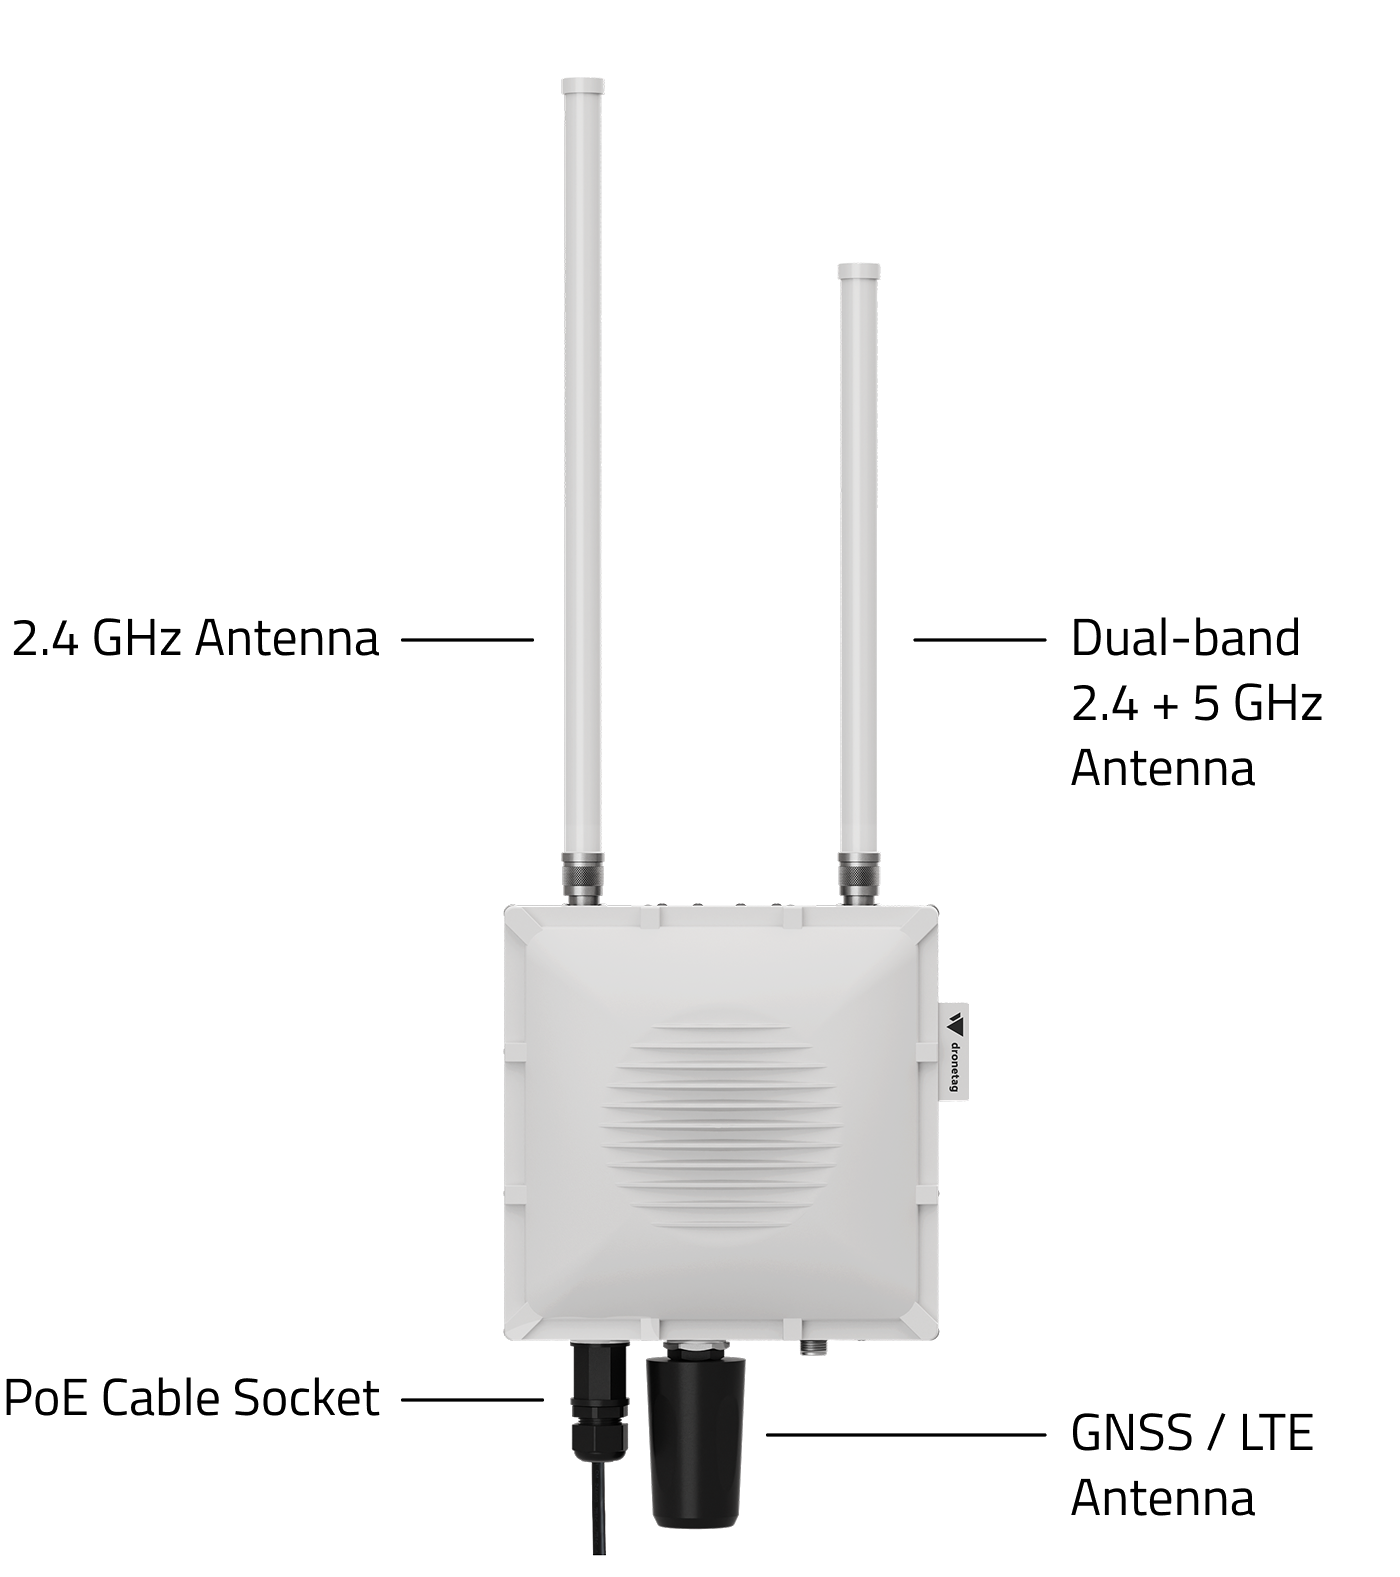
Omnidirectional Antennas on Scout Baseline
3D Model
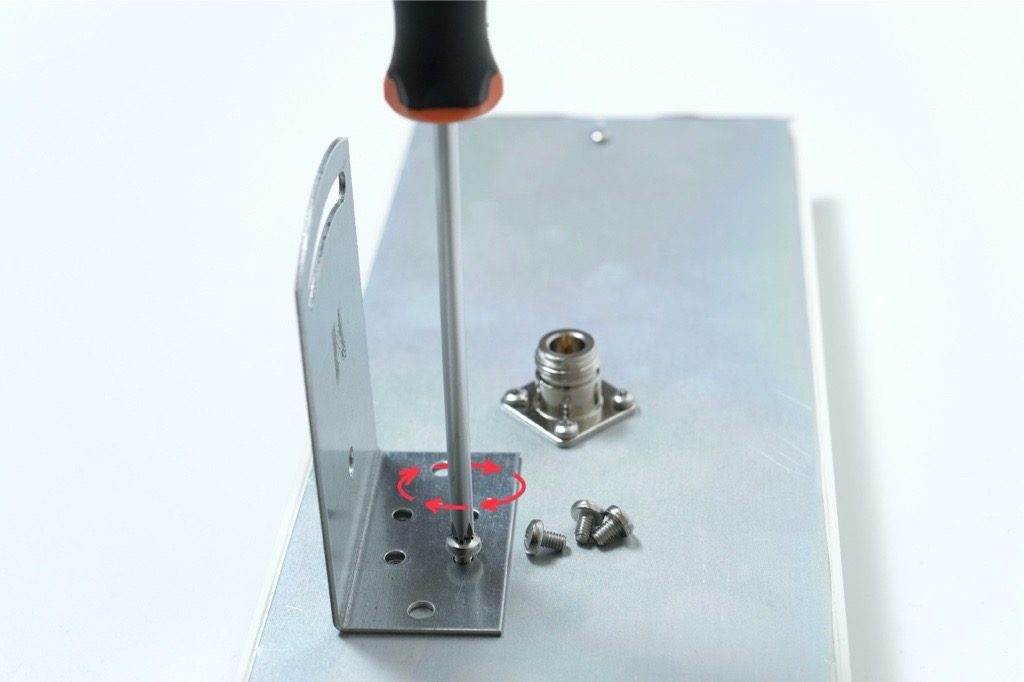
Mount the 2.4 GHz Antenna
Screw the antenna marked with "1" sticker on its box to the connector marked with the same sticker
In case you lost the sticker with number or forgot what was the number of the antenna: the longer antenna has to be mounted on the left side of the device from the front view.
Mount the Dual-Band Antenna
Screw the antenna marked with "4" sticker on its box to the connector marked with the same sticker (the shorter antenna has to be mounted on the right side of the device from the front view)
In case you lost the sticker with number or forgot what was the number of the antenna: the shorter antenna has to be mounted on the right side of the device from the front view.
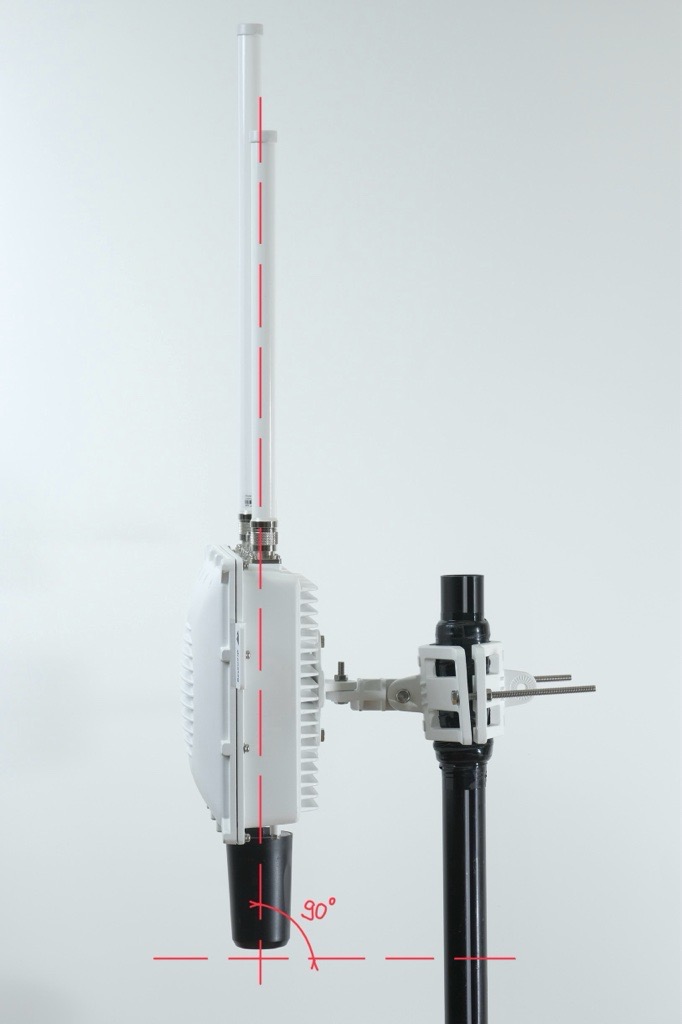
Correct Scout Orientation
The Scout must be mounted perpendicular to the ground.
This ensures the omnidirectional antennas have a clean and even field of view.
If the unit is tilted, one side of the antennas points into the sky and the other into the ground, which reduces performance.
Insulate connectors
-
Cut off about 50 cm waterproof tape. Stretch it to double the length. Wrap three layers around the connector with a 50% overlap. Hold the tape in place with your hand for a few seconds.
-
Wrap three additional layers with PVC tape with natural uncoiling force and a 50% overlap. Make sure to cover the head and the tail of the connector.
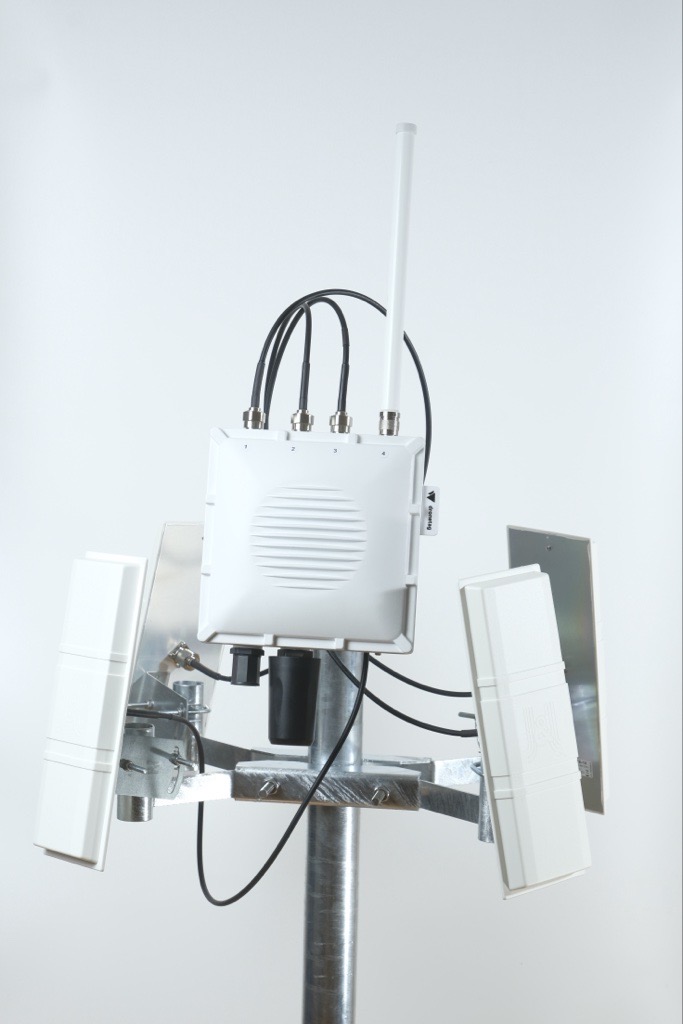
Four Directional Antennas and One Omnidirectional Antenna on Scout
3D Model
In case you ordered Scout with four directional antennas, you automatelly received a holder for these antennas, tailormade to be used with Scout.
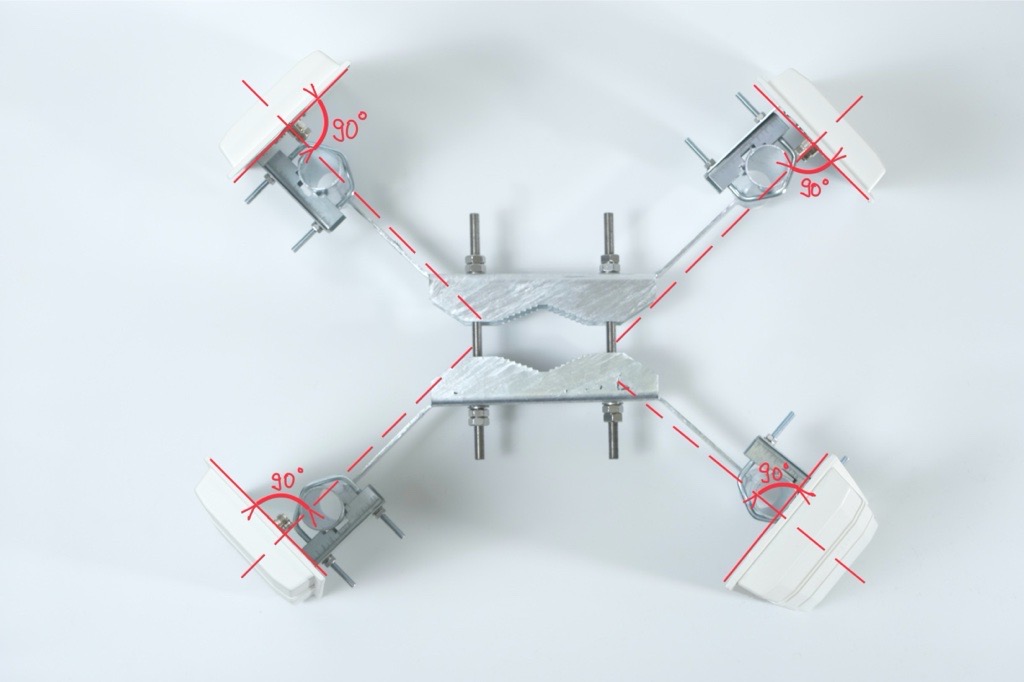
Each directional antenna covers a 90° sector horizontal and 30° sector vertical with 14 dBi gain, so by combining multiple panels you can shape coverage according to your needs.
This setup can significantly improve detection range and reliability in your target sector.
In the guide below, you’ll find step-by-step instructions on how to properly mount, align, and connect a directional antenna to your Scout device:
Each antenna box includes a number label. Make sure you know each antenna’s number so you can connect it to correct connector later.
Directional antennas work best when there are no large obstacles nearby.
Avoid placing them close to satellite dishes, metal plates, masts, railings or any other surfaces that can block the signal and create blind spots.
For the best performance, the Scout and antennas should be mounted at the top of the pole, with a clear view in all directions.
1. Prerequisites
See prerequisites
Before starting the installation, make sure you have everything prepared.
Required Hardware
- A pole at the installation site with pole diameter 45 - 110 mm
- Directional antenna mount
- Dronetag Scout already installed on the same pole
Required Tools
- Two 17 mm wrenches for attaching the mount to the pole
- Two 10 mm wrenches for attaching antennas to the mount
- Antenna cables are 1 meter long. Plan the position so cables are not stretched or under tension.
- The directional antenna mount must be installed below the Scout, so the directional antennas doesn´t block or shadow the omnidirectional antennas on the Scout.
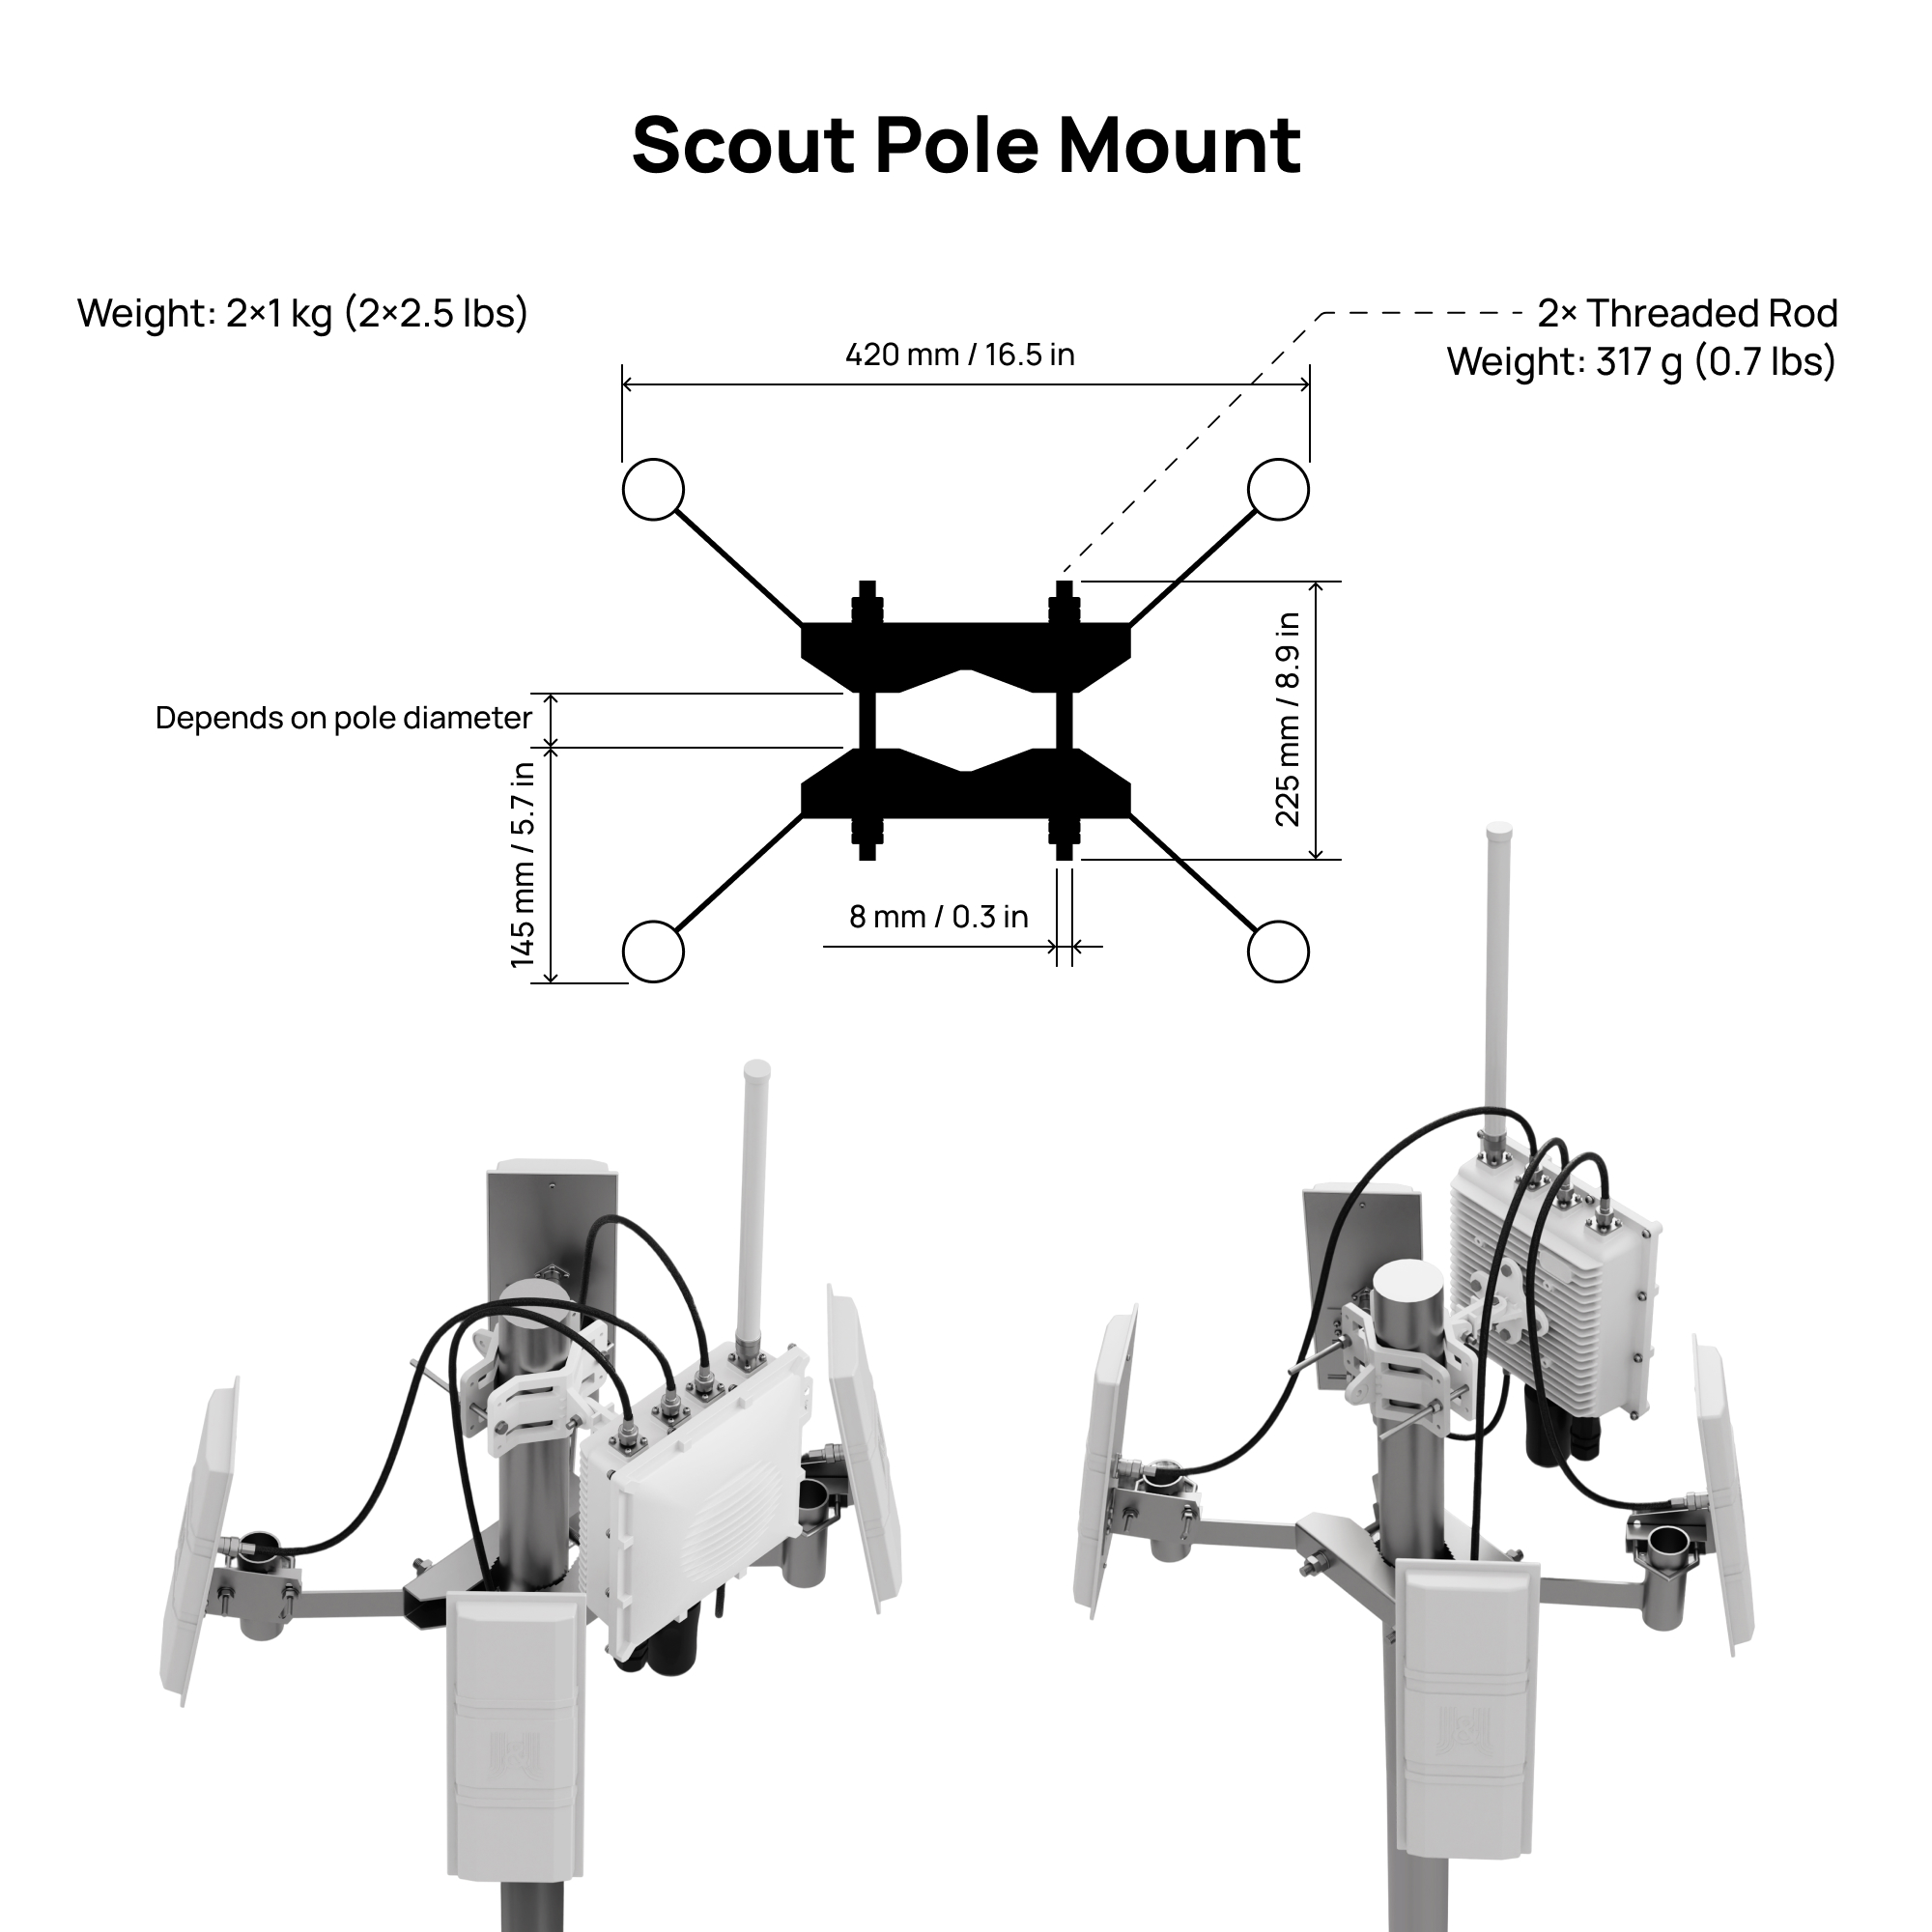
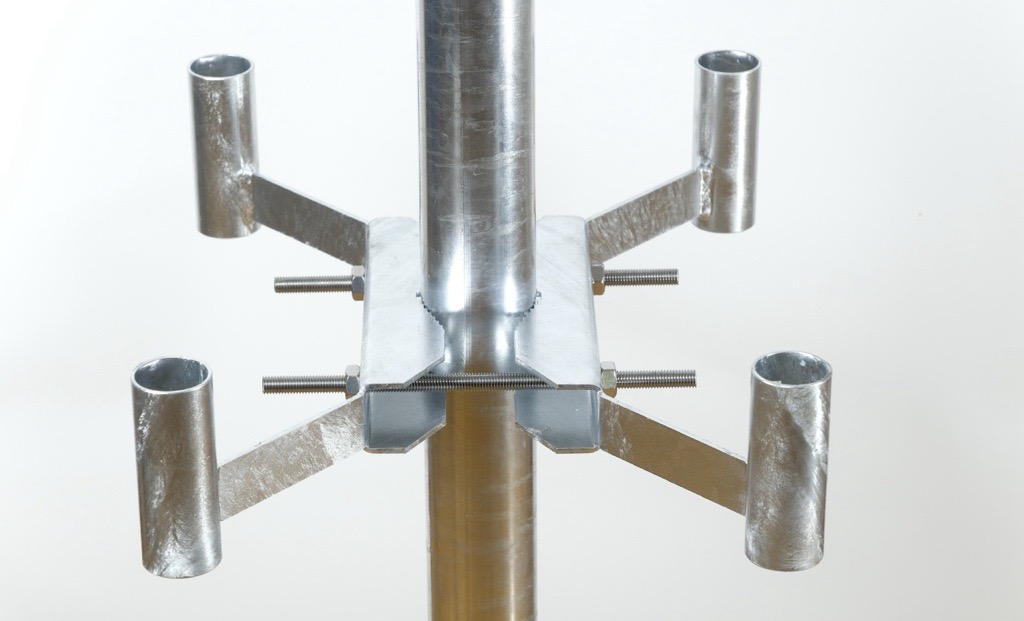
2. Installing the Mount for Four Directional Antennas
Follow these steps after the Scout is already mounted on the pole:
Correct Scout Orientation
The Scout must be mounted perpendicular to the ground.
This ensures the omnidirectional antennas have a clean and even field of view.
If the unit is tilted, one side of the antennas points into the sky and the other into the ground, which reduces performance.
Prepare both steel counter-pieces
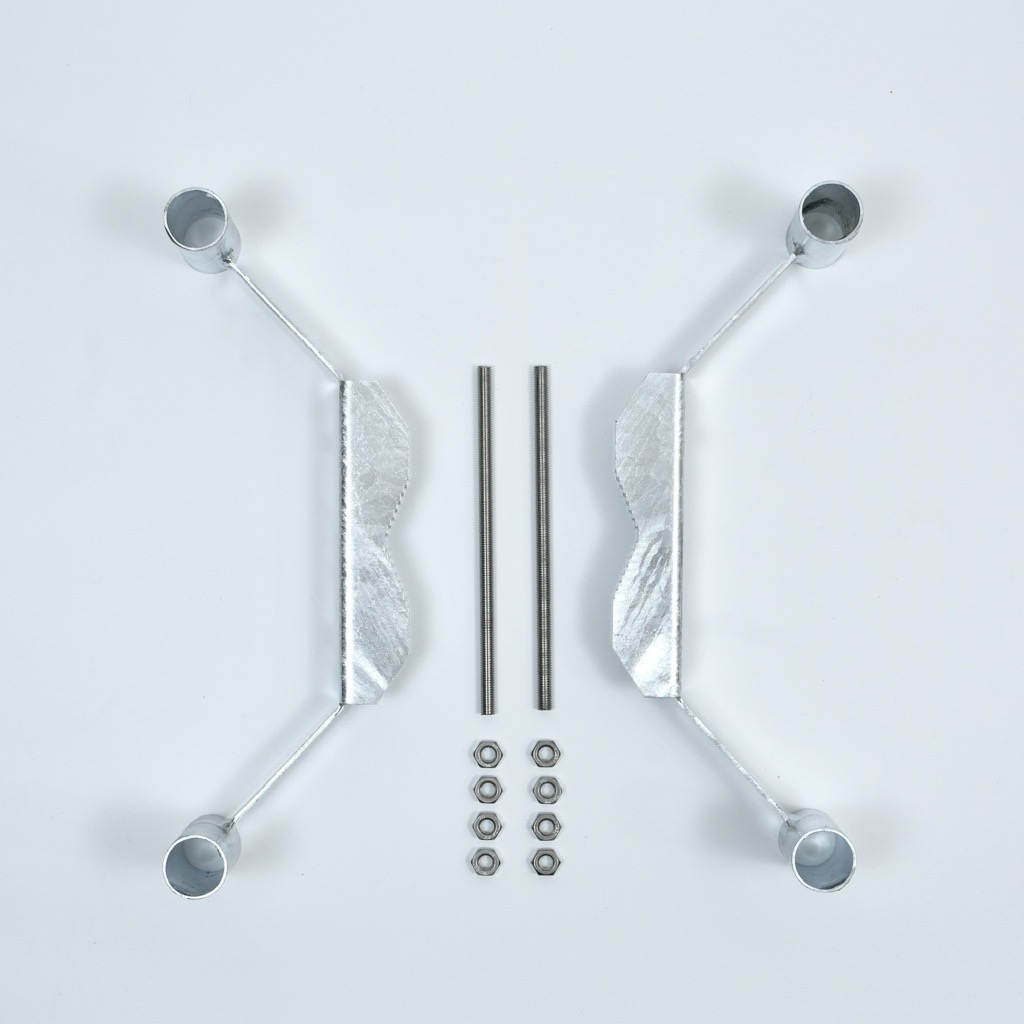
- Lay out the two mirrored steel counter-pieces.
- Insert the first threaded rod through the prepared holes and screw a nut onto each side.
- Do not tighten the nuts fully yet.
Installing this part can be difficult for one person.
An extra pair of hands helps a lot, and this is the only step in the entire installation where having two people is recommended.
If you need to install it alone, you can make the process easier by pre-assembling the counter-pieces:
Insert one threaded rod through the holes of both counter-pieces and screw the nuts on tightly.
This creates a stable assembly that can be placed onto the pole more easily.
- Once the pre-assembled counter-pieces are on the pole, insert the second threaded rod through the aligned holes and screw on the nuts.
Tighten the nuts on both threaded rods so that the gap between the counter-pieces is even on both sides.
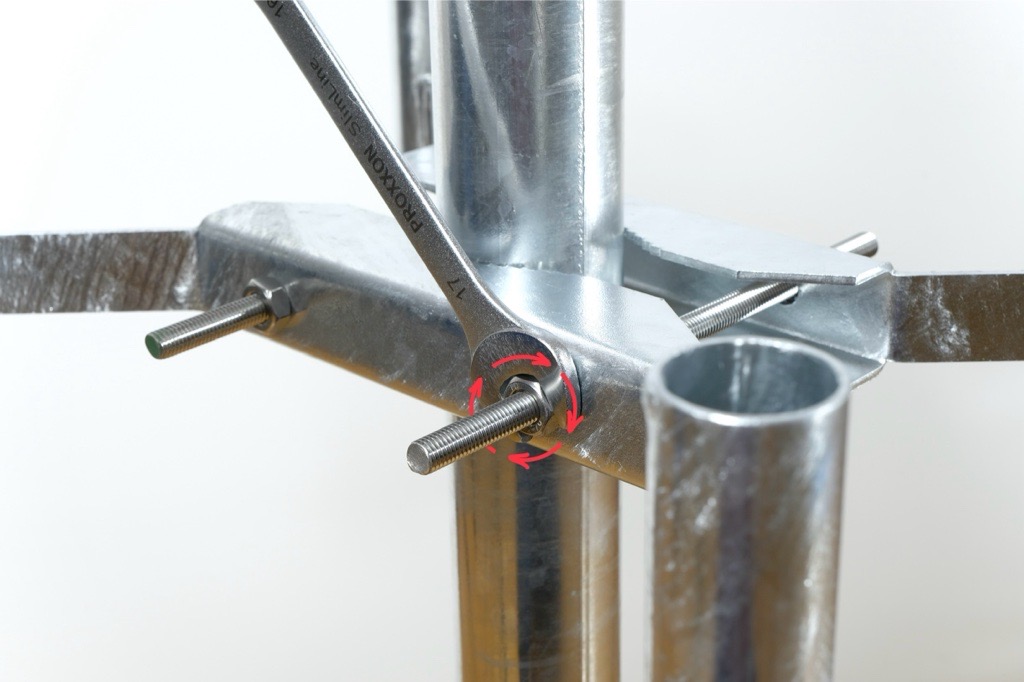
Tighten the nuts evenly
- Using the two 17 mm wrenches, tighten the nuts on both threaded rods.
- Check that the gap between the mount and both counter-pieces is even on both sides.
Secure with lock-nuts
- Once the mount is firmly attached and correctly aligned, screw on the lock-nuts to secure the position and prevent loosening.
3. Preparing Each Directional Antenna for Mounting
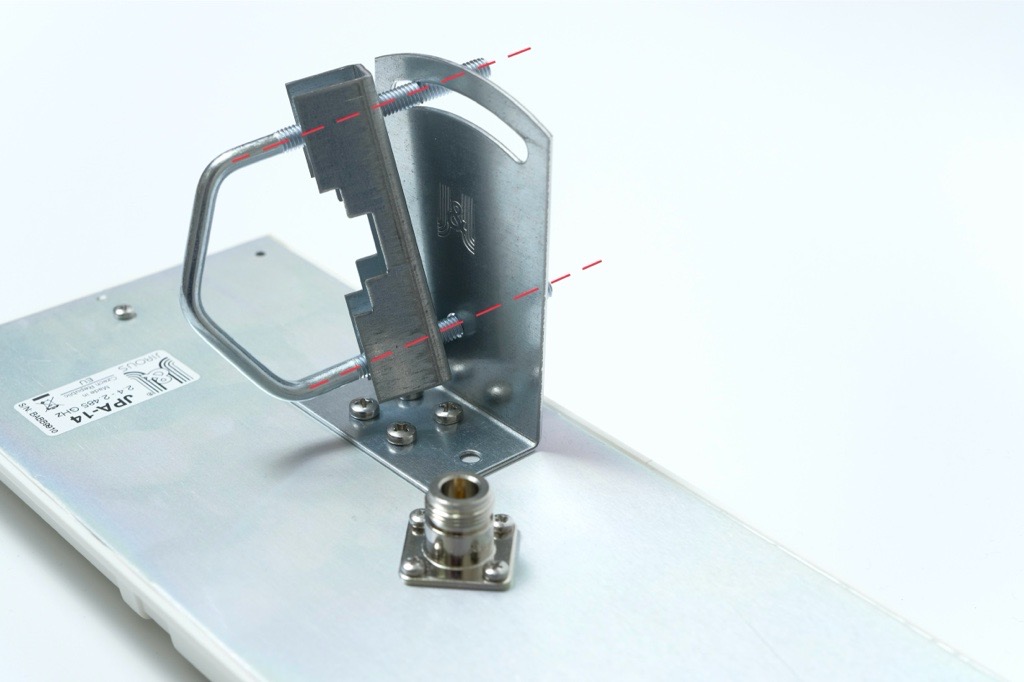
Prepare the L-shaped bracket
- Each antenna has four screws pre-installed on the backplate. Loosen and remove all four screws.
-
Place the L bracket onto the backplate so the vertical part of the bracket points toward the side of the antenna.
-
The bracket must not be centered and should sit offset to the side as shown in the photo bellow.
-
Align the holes and fasten the L bracket using the four original screws.
-
Tighten them firmly.
4. Attaching the Counter-Piece and U-shaped Rod
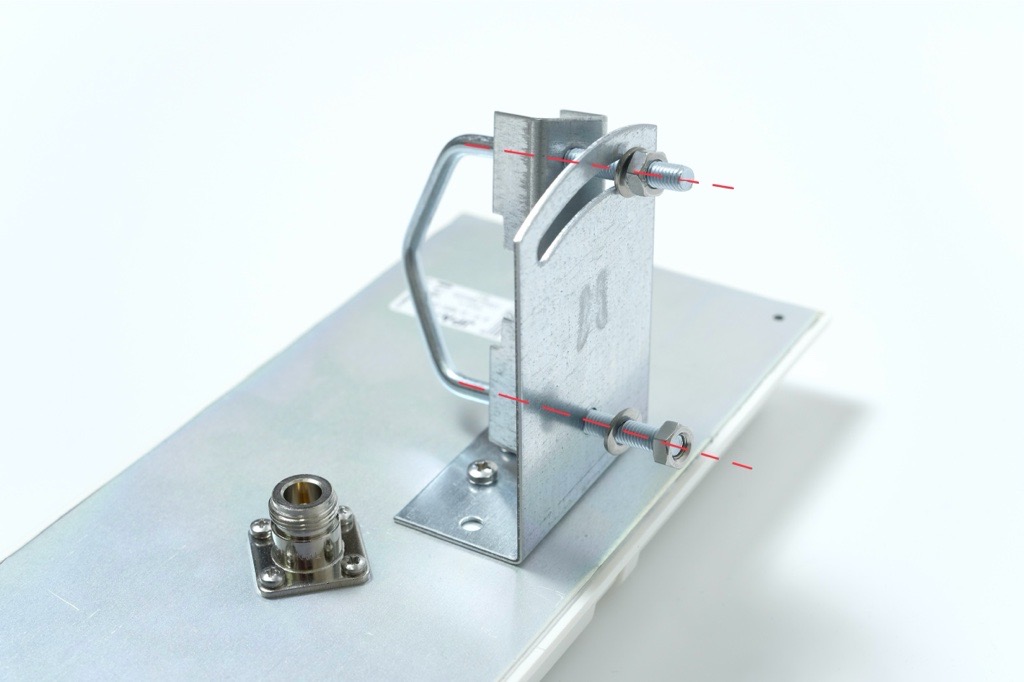
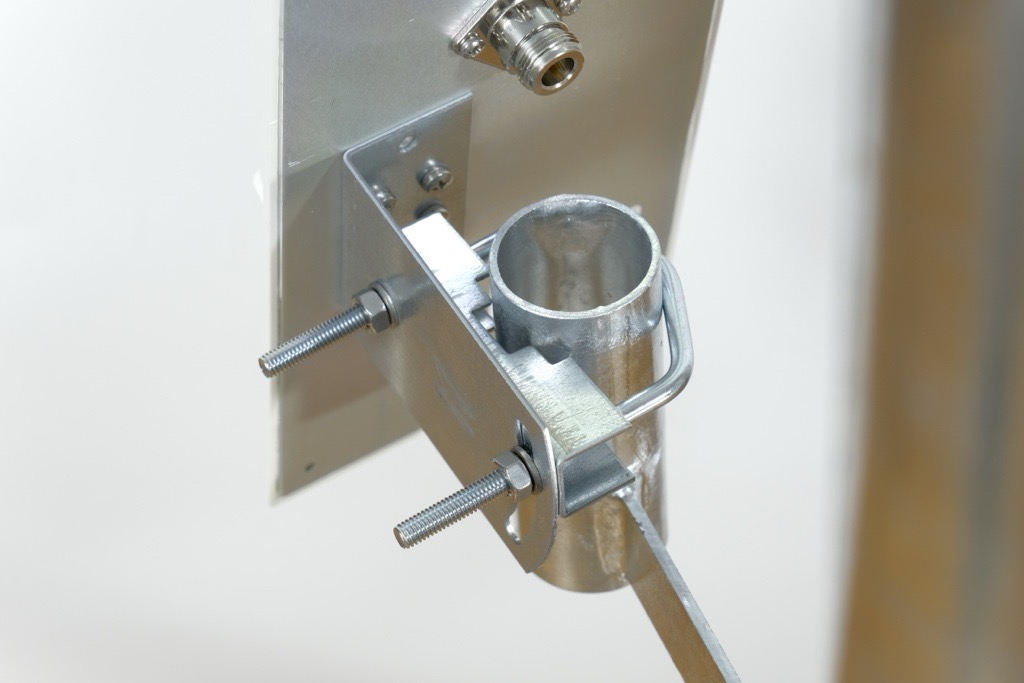
Attach the counter-piece to the L bracket
- Take the U-shaped threaded rod and the matching counter-piece with teeth.
- Place the toothed counter-piece directly against the L bracket, aligning the holes.
- Insert the U-shaped threaded rod through both aligned holes.
Add washers and nuts loosely
- Place washers and nuts onto both ends of the threaded rod.
- Tighten the nuts only lightly so the assembly stays together while allowing movement.
5. Mounting the Antenna onto the Holder
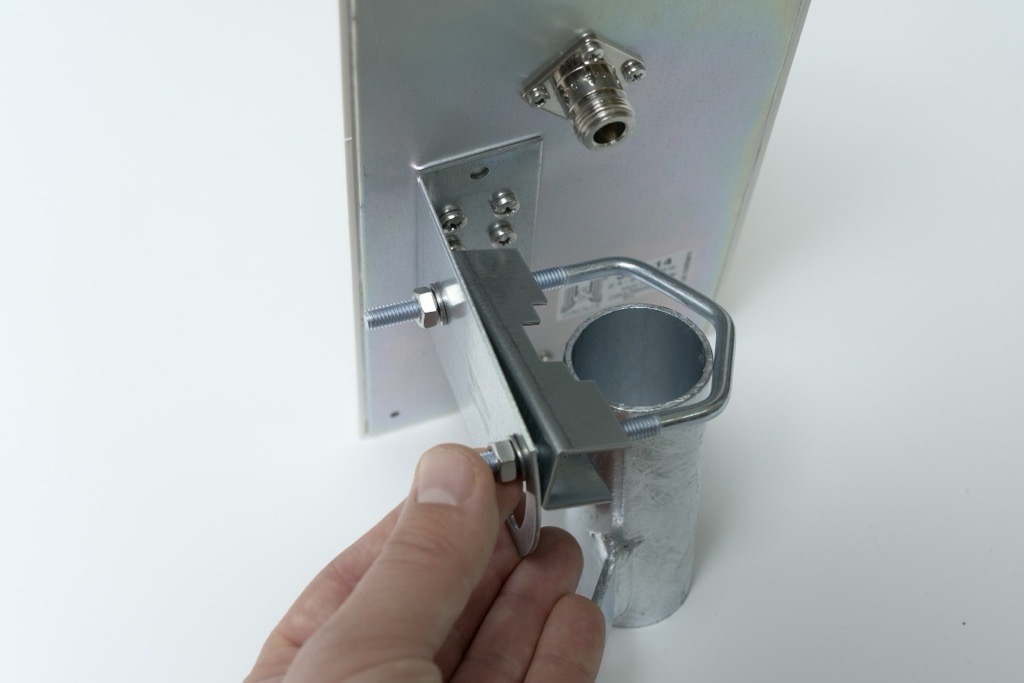
Position the antenna on the holder
- Take the antenna assembly and place it onto the directional antenna holder mounted on the pole.
- Slide the U-shaped threaded rod into the corresponding openings on the holder.
Do not mount the antenna too far down the holder.
The farther it is from the edge of the pole, the harder it becomes to access and tighten the mounting hardware.
For best installation comfort and stability, place the antenna approximately 1 cm (about ½ inch) below the top edge of the tube.
Set the antenna angle
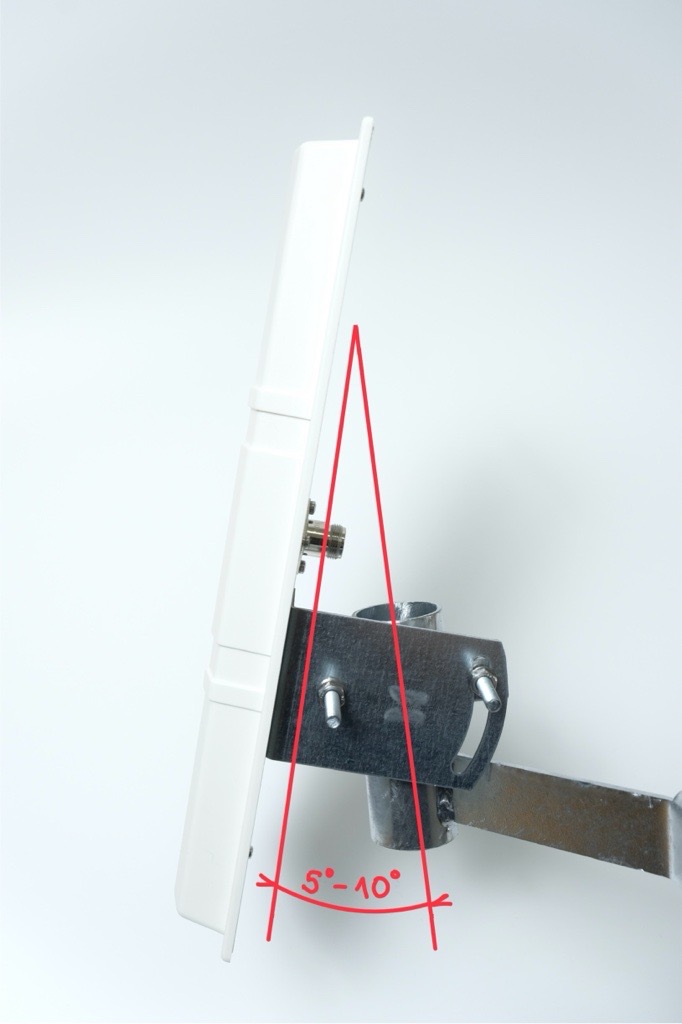
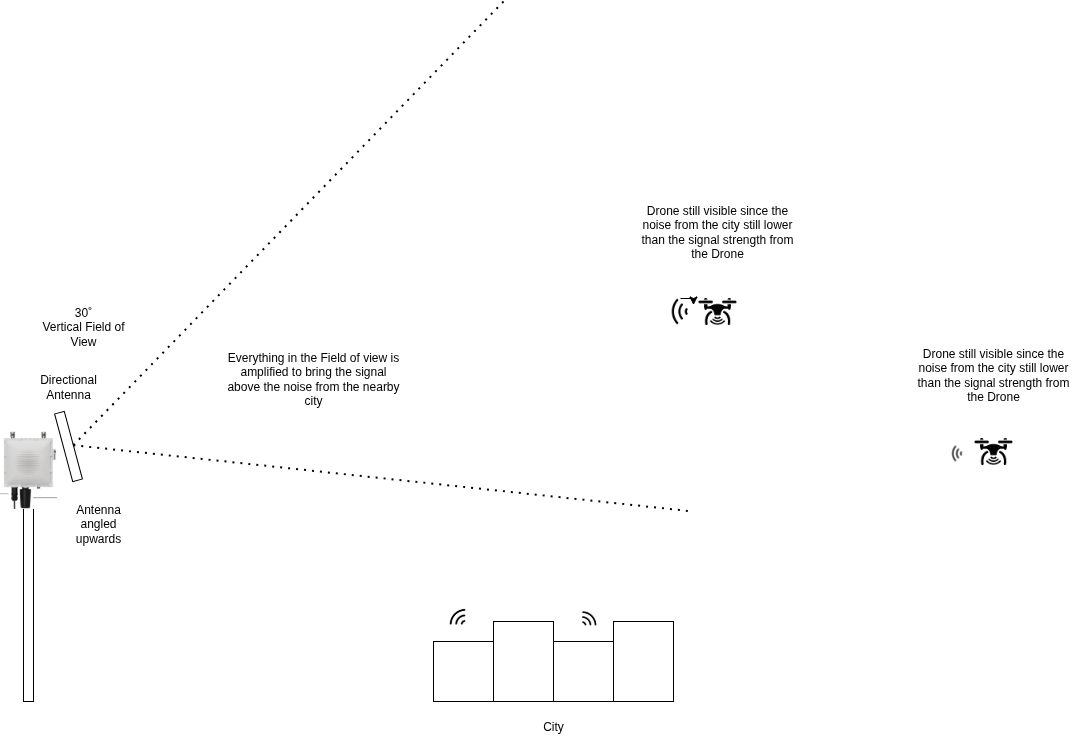
- Adjust the tilt of the antenna to between plus 5° and plus 10° above the horizon.
If the environment includes higher obstacles such as buildings, hills or trees, select a steeper angle within this range.
This is super-important when these antennas are installed in city environment, where using this antenna angle can prevent interferences with other signals.
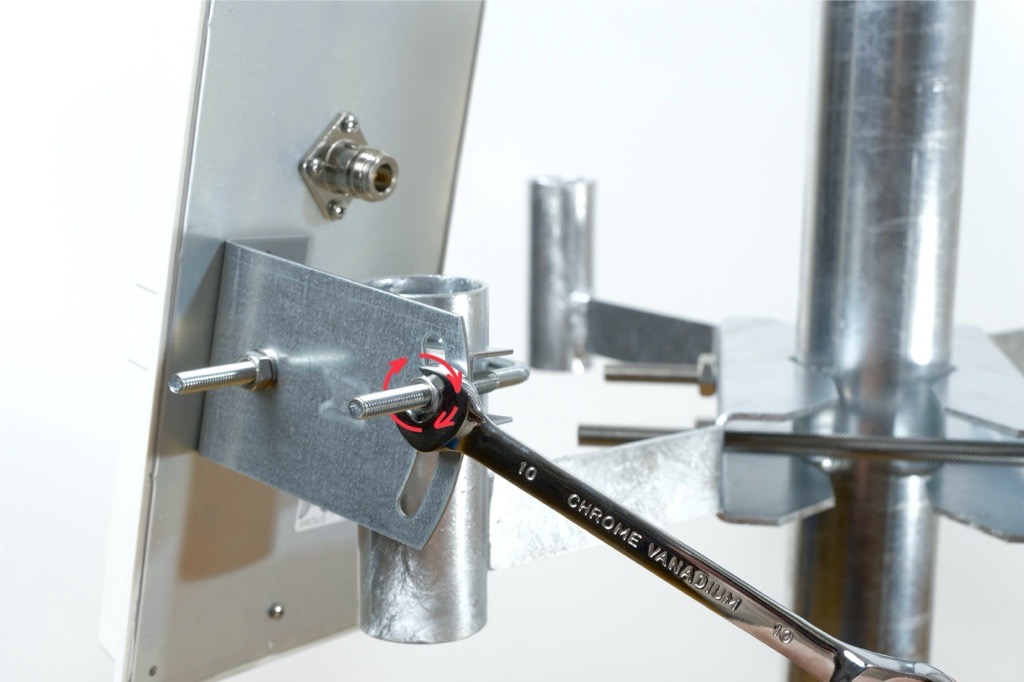
Tighten all nuts
- Once the antenna is positioned correctly, tighten all nuts firmly using the 10 mm wrenches.
- Ensure the antenna is stable and does not shift.
6. Connecting the Antennas to the Correct Ports
Match antenna numbers
Each antenna box includes a number label.
Connect the antenna cable to the RF port with the matching number on the Scout.
The numbers must match.
Route the antenna cables carefully so they are not stretched, pinched or rubbing against sharp edges.
Remember that the installation will be exposed to real weather. Rain, ice, snow, falling branches or even birds landing on the pole can put extra stress on the cables.
Keep the cables loose enough to move slightly, avoid tight bends and always guide them along the pole or the mount in a way that prevents tension. Good cable management helps prevent damage, signal loss, and long-term wear.
Pro tip: Plan the cable paths before tightening anything. A clean layout now saves a lot of pain later.
- Antenna nuts are made to be tighted by hand. In case you want to thighten it by wrench, don´t tighten it more than 1.5 Nm (13 inch pounds).
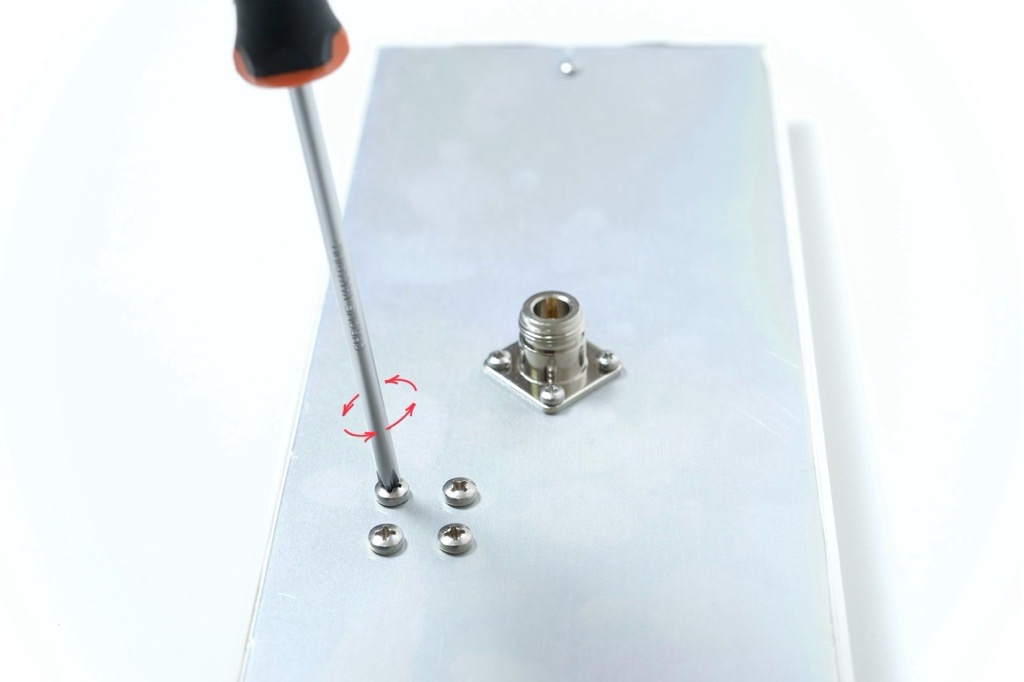
7. Weatherproofing the Connections
Seal the connectors
- After all antennas are mounted and tested, seal each RF connector with the supplied PVC tape.
- Wrap the tape tightly around the connector three times.
- The tape should overlap itself by at least fifty percent of its width and extend beyond the connector to prevent moisture from entering.
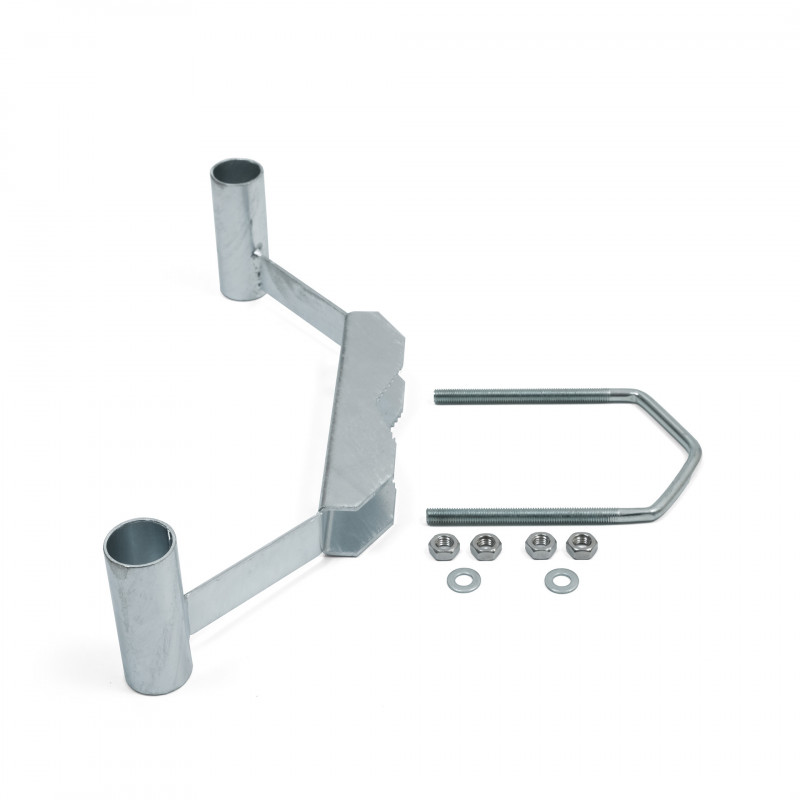
Two Directional Antennas and Two Omnidirectional Antennas on Scout

Holder for two directional antennas is tailormade to be used with Scout.
Each directional antenna covers a 90° sector horizontal and 30° sector vertical with 14 dBi gain, so by combining multiple panels you can shape coverage according to your needs.
This setup can significantly improve detection range and reliability in your target sector.
- In the guide below, you’ll find step-by-step instructions on how to properly mount, align, and connect a directional antenna to your Scout device.
Each antenna box includes a number label. Make sure you know each antenna’s number so you can connect it to correct connector later.
Directional antennas work best when there are no large obstacles nearby.
Avoid placing them close to satellite dishes, metal plates, masts, railings or any other surfaces that can block the signal and create blind spots.
For the best performance, the Scout and antennas should be mounted at the top of the pole, with a clear view in all directions.
1. Prerequisites
See prerequisites
Before starting the installation, make sure you have everything prepared.
Required Hardware
- A pole at the installation site with pole diameter 45 - 110 mm
- Directional antenna mount
- Dronetag Scout already installed on the same pole
Required Tools
- 17 mm wrench for attaching the mount to the pole
- Two 10 mm wrenches for attaching antennas to the mount
- Antenna cables are 1 meter long. Plan the position so cables are not stretched or under tension.
- The directional antenna mount must be installed below the Scout, so the directional antennas doesn´t block or shadow the omnidirectional antennas on the Scout.
2. Installing the Mount for Four Directional Antennas
Package Contents
The mounting kit includes:
- 1× Mount for two directional antennas
- 1× U-shaped threaded rod (compatible with poles Ø 45–110 mm)
- 4× Nuts (17 mm wrench)
- 2× Washers
Follow these steps after the Scout is already mounted on the pole:
Check for Correct Scout Orientation
The Scout must be mounted perpendicular to the ground.
This ensures the omnidirectional antennas have a clean and even field of view.
If the unit is tilted, one side of the antennas points into the sky and the other into the ground, which reduces performance.
Holder installation
1. Place the mount against the pole (mast or pipe) with a diameter of 45–110 mm.
2. Wrap the U-shaped threaded rod around the pole and insert it through the mounting holes in the mount.
3. Place the washers and nuts onto both ends of the threaded rod.
4. Before tightening, rotate the mount so it is facing the intended direction of antenna coverage.
5. Tighten both nuts evenly using a 17 mm wrench until the mount is firmly secured.
3. Preparing Each Directional Antenna for Mounting
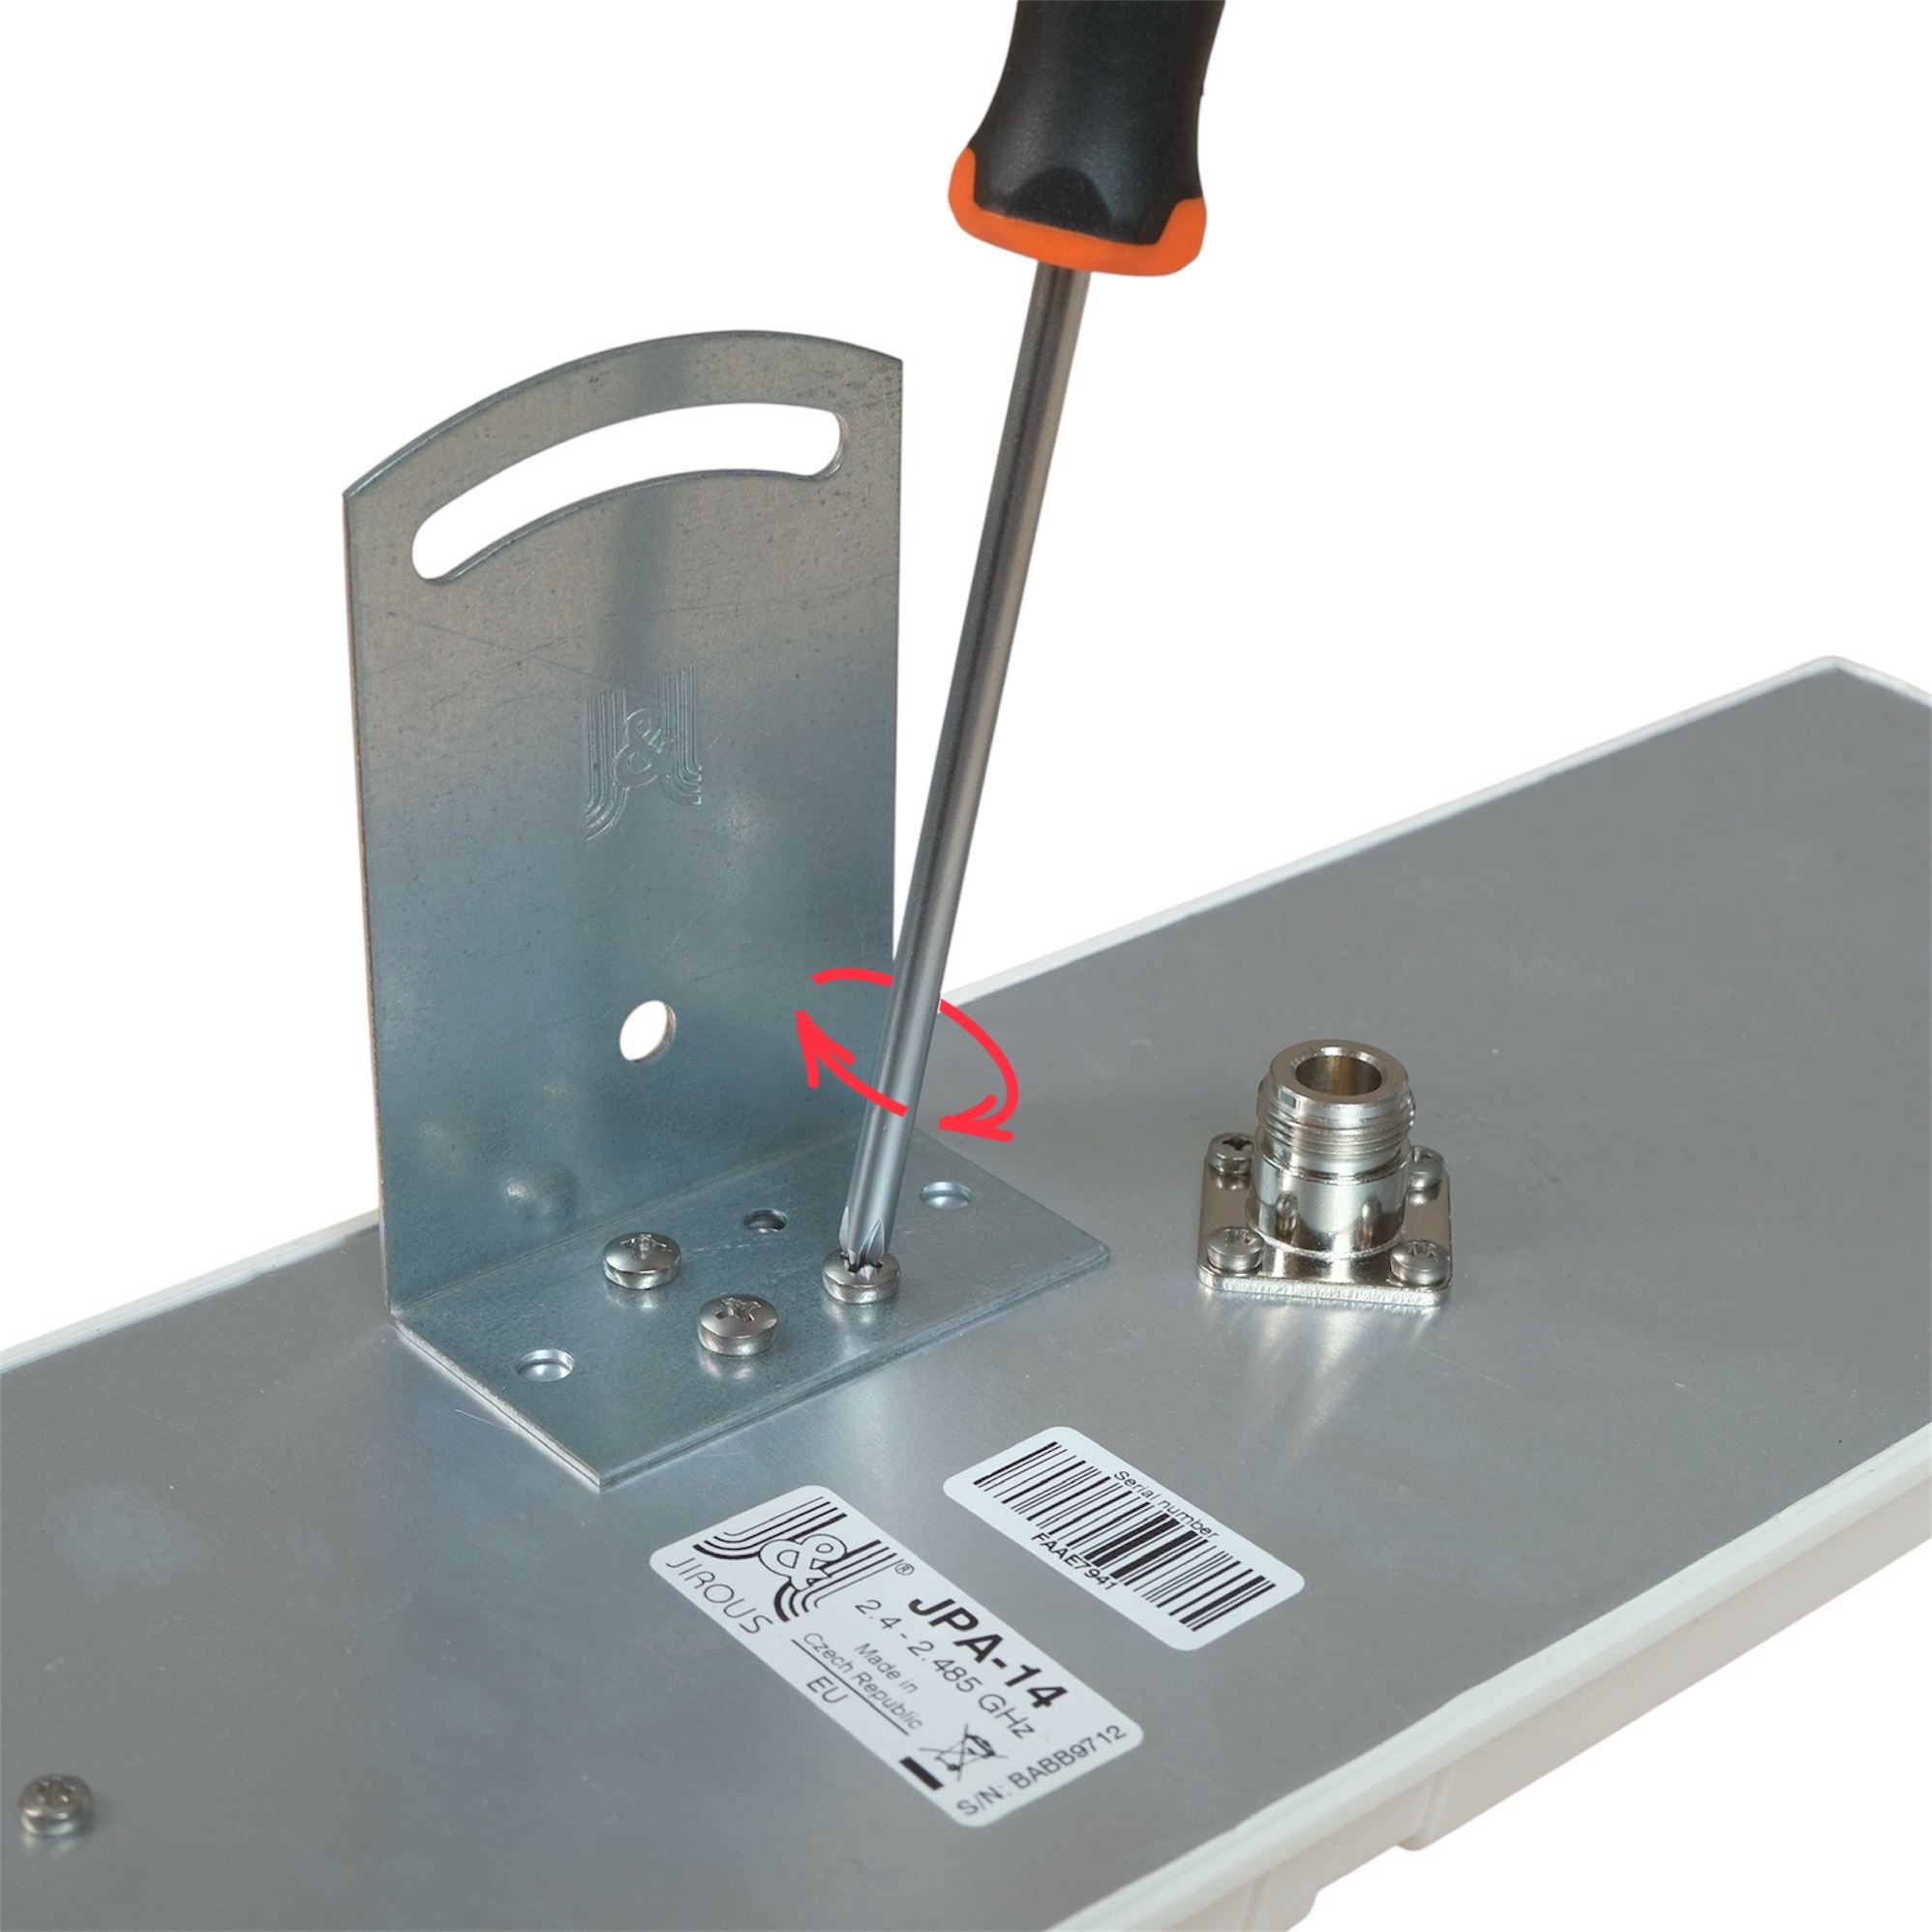
Prepare the L-shaped bracket
- Each antenna has four screws pre-installed on the backplate. Loosen and remove all four screws.
-
Place the L bracket onto the backplate so the vertical part of the bracket points toward the side of the antenna.
-
The bracket must not be centered and should sit offset to the side as shown in the photo bellow.
-
Align the holes and fasten the L bracket using the four original screws.
-
Tighten them firmly.
4. Attaching the Counter-Piece and U-shaped Rod
Attach the counter-piece to the L bracket
- Take the U-shaped threaded rod and the matching counter-piece with teeth.
- Place the toothed counter-piece directly against the L bracket, aligning the holes.
- Insert the U-shaped threaded rod through both aligned holes.
Add washers and nuts loosely
- Place washers and nuts onto both ends of the threaded rod.
- Tighten the nuts only lightly so the assembly stays together while allowing movement.
5. Mounting the Antenna onto the Holder
Position the antenna on the holder
- Take the antenna assembly and place it onto the directional antenna holder mounted on the pole.
- Slide the U-shaped threaded rod into the corresponding openings on the holder.
Do not mount the antenna too far down the holder.
The farther it is from the edge of the pole, the harder it becomes to access and tighten the mounting hardware.
For best installation comfort and stability, place the antenna approximately 1 cm (about ½ inch) below the top edge of the tube.
Set the antenna angle
- Adjust the tilt of the antenna to between plus 5° and plus 10° above the horizon.
If the environment includes higher obstacles such as buildings, hills or trees, select a steeper angle within this range.
This is super-important when these antennas are installed in city environment, where using this antenna angle can prevent interferences with other signals.
Tighten all nuts
- Once the antenna is positioned correctly, tighten all nuts firmly using the 10 mm wrenches.
- Ensure the antenna is stable and does not shift.
6. Connecting the Antennas to the Correct Ports
Match antenna numbers
Each antenna box includes a number label.
Connect the antenna cable to the RF port with the matching number on the Scout.
The numbers must match.
Route the antenna cables carefully so they are not stretched, pinched or rubbing against sharp edges.
Remember that the installation will be exposed to real weather. Rain, ice, snow, falling branches or even birds landing on the pole can put extra stress on the cables.
Keep the cables loose enough to move slightly, avoid tight bends and always guide them along the pole or the mount in a way that prevents tension. Good cable management helps prevent damage, signal loss, and long-term wear.
Pro tip: Plan the cable paths before tightening anything. A clean layout now saves a lot of pain later.
- Antenna nuts are made to be tighted by hand. In case you want to thighten it by wrench, don´t tighten it more than 1.5 Nm (13 inch pounds).
7. Weatherproofing the Connections
Seal the connectors
- After all antennas are mounted and tested, seal each RF connector with the supplied PVC tape.
- Wrap the tape tightly around the connector three times.
- The tape should overlap itself by at least fifty percent of its width and extend beyond the connector to prevent moisture from entering.
Directional Antennas without Holder
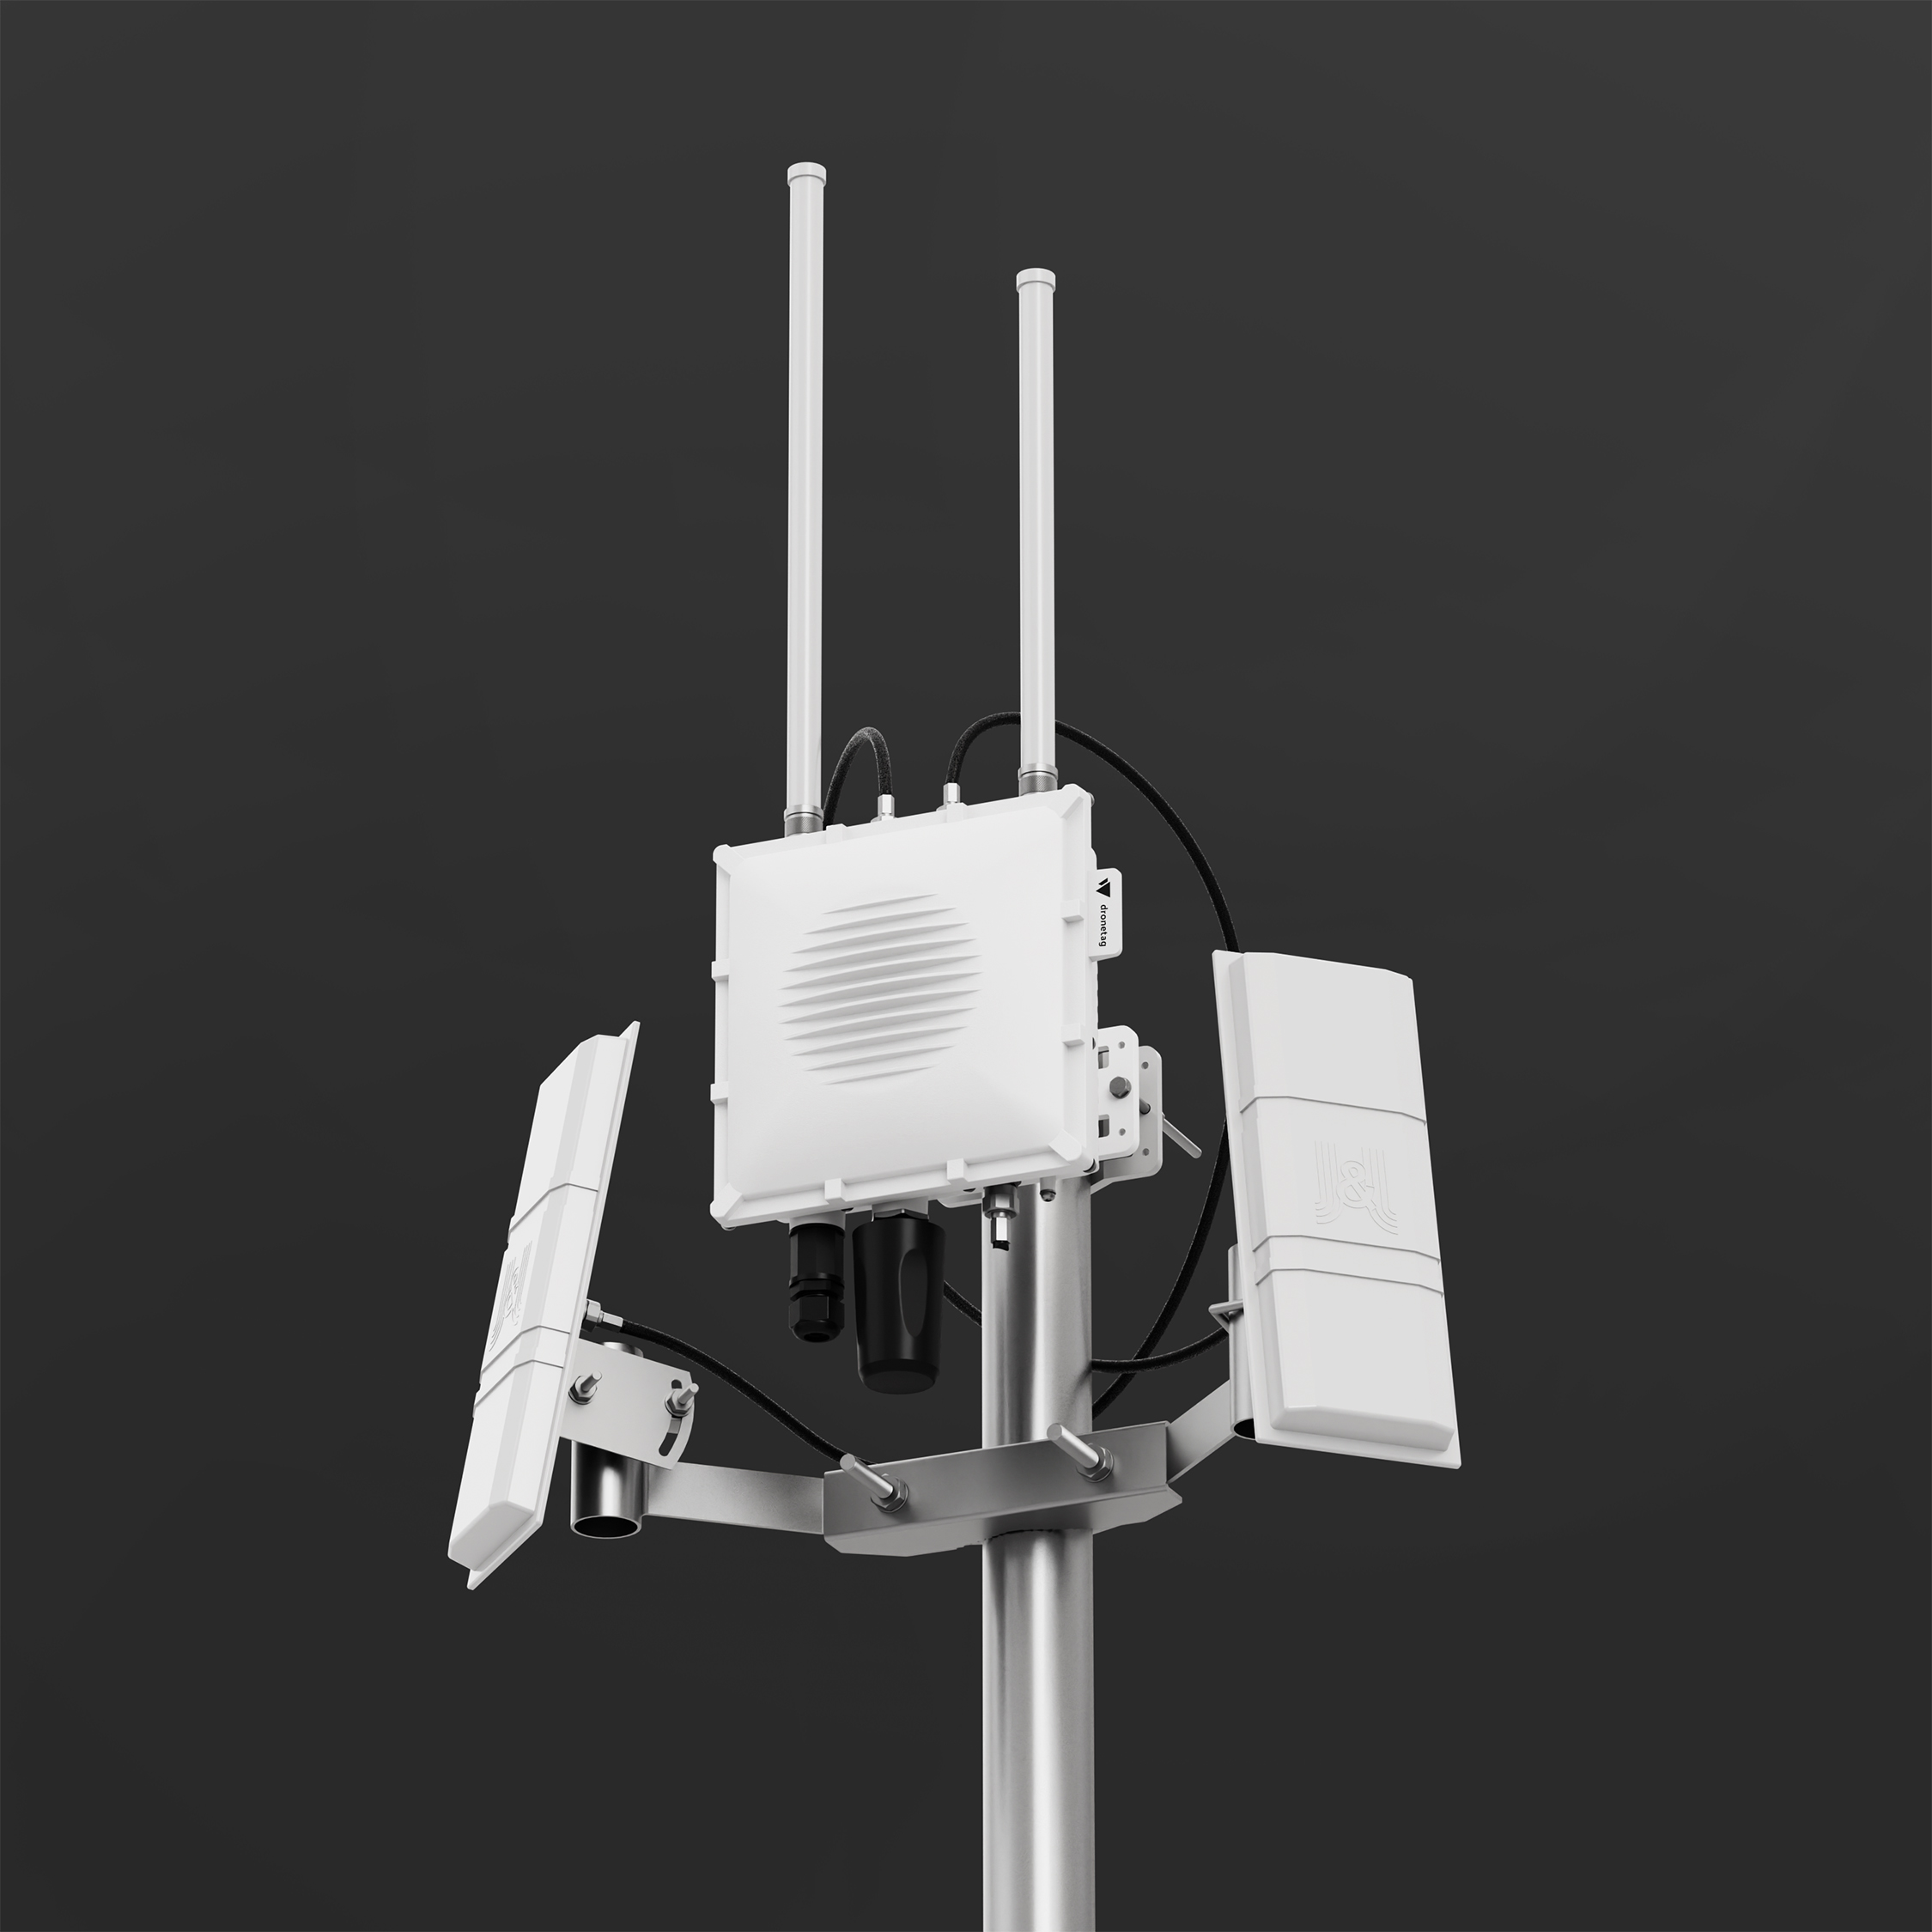
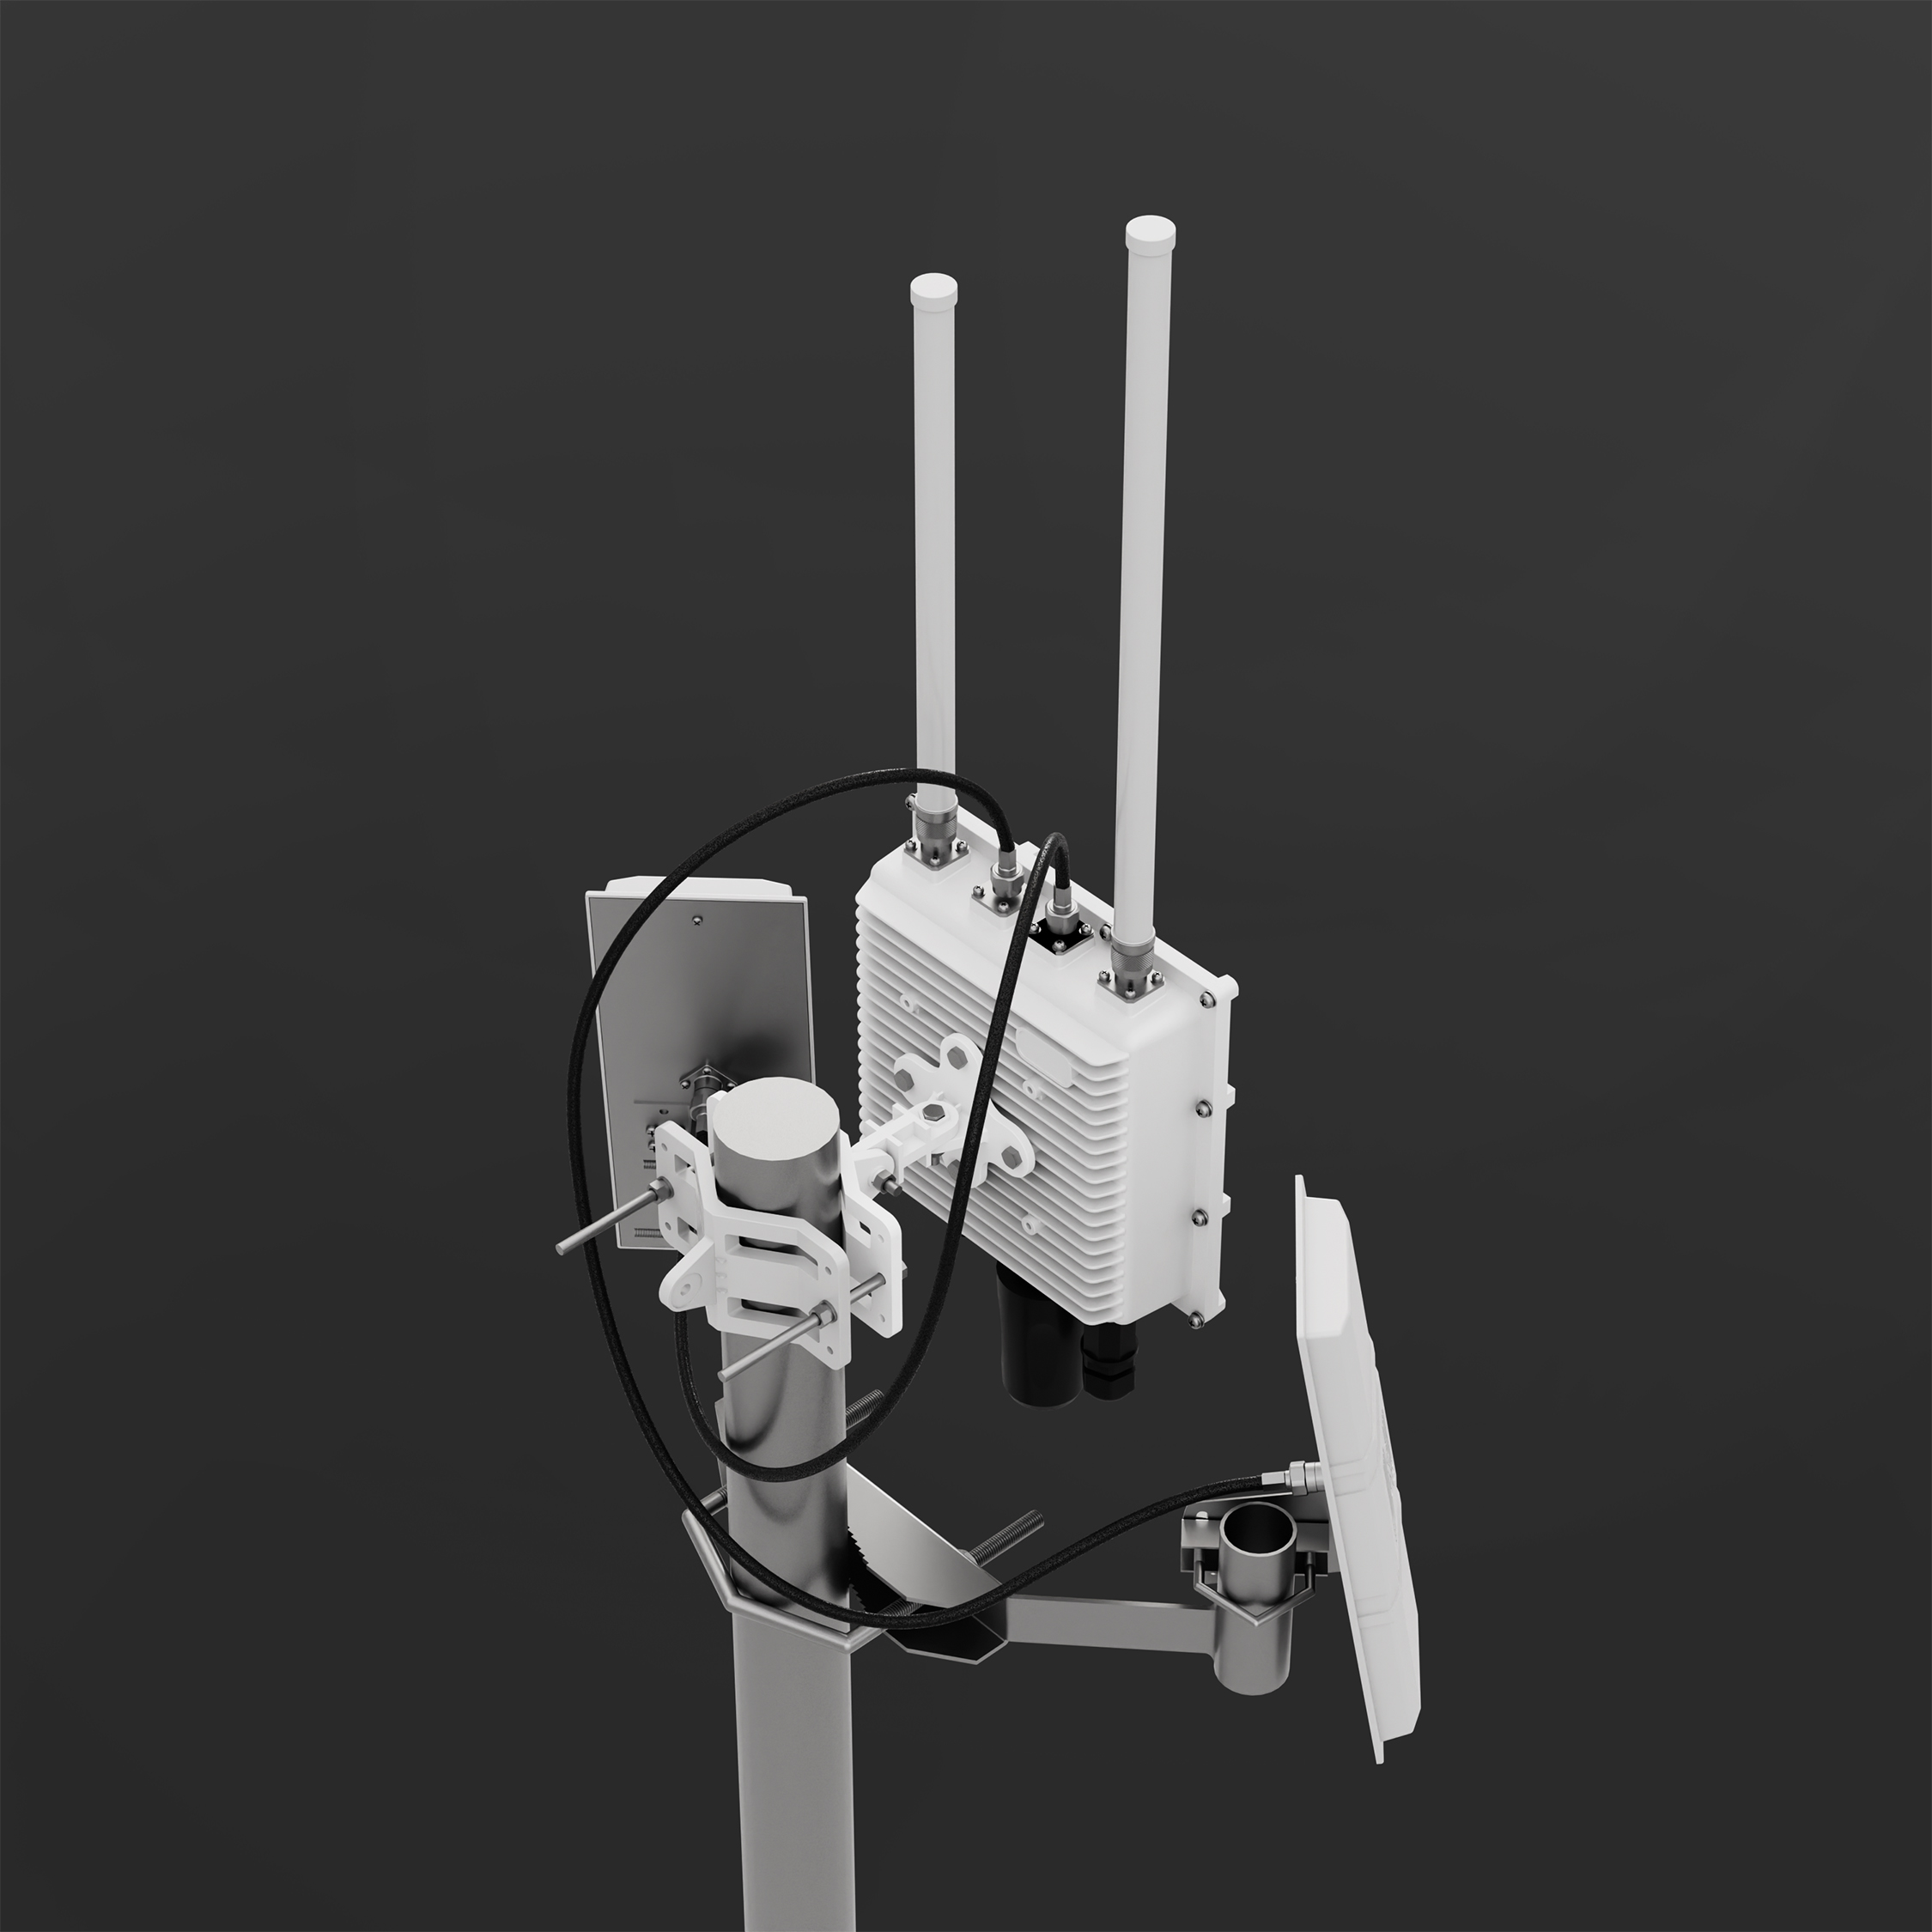
While Scout comes with omnidirectional antennas by default, you can also equip it with directional antennas for focused monitoring in a specific area.
Each directional antenna covers a 90° sector horizontal and 30° sector vertical with 14 dBi gain, so by combining multiple panels you can shape coverage according to your needs.
This setup can significantly improve detection range and reliability in your target sector.
In the guide below, you’ll find step-by-step instructions on how to properly mount, align, and connect a directional antenna to your Scout device.
1. Mounting the Bracket on Scout
The package includes a mounting bracket for poles with a diameter of 19–54 mm.
Ideally, install the antenna outdoors with a clear line of sight to the monitored sector.
Items 2, 3 and 4 on the picture are needed to install the directional antenna.
2. Attaching the L-Bracket to Antenna Body
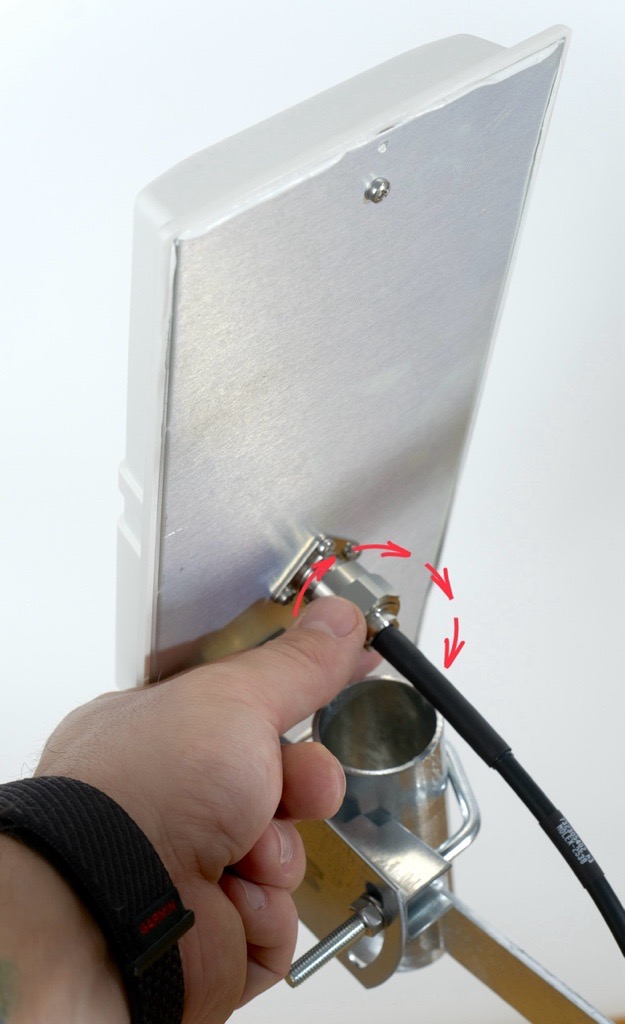
First, screw the L-bracket onto the back side of the antenna.
3. Installing the U-Bolt to the pole
Place the U-bolt with the washer on the pole first, and then attach the antenna panel with the mounted L-bracket.
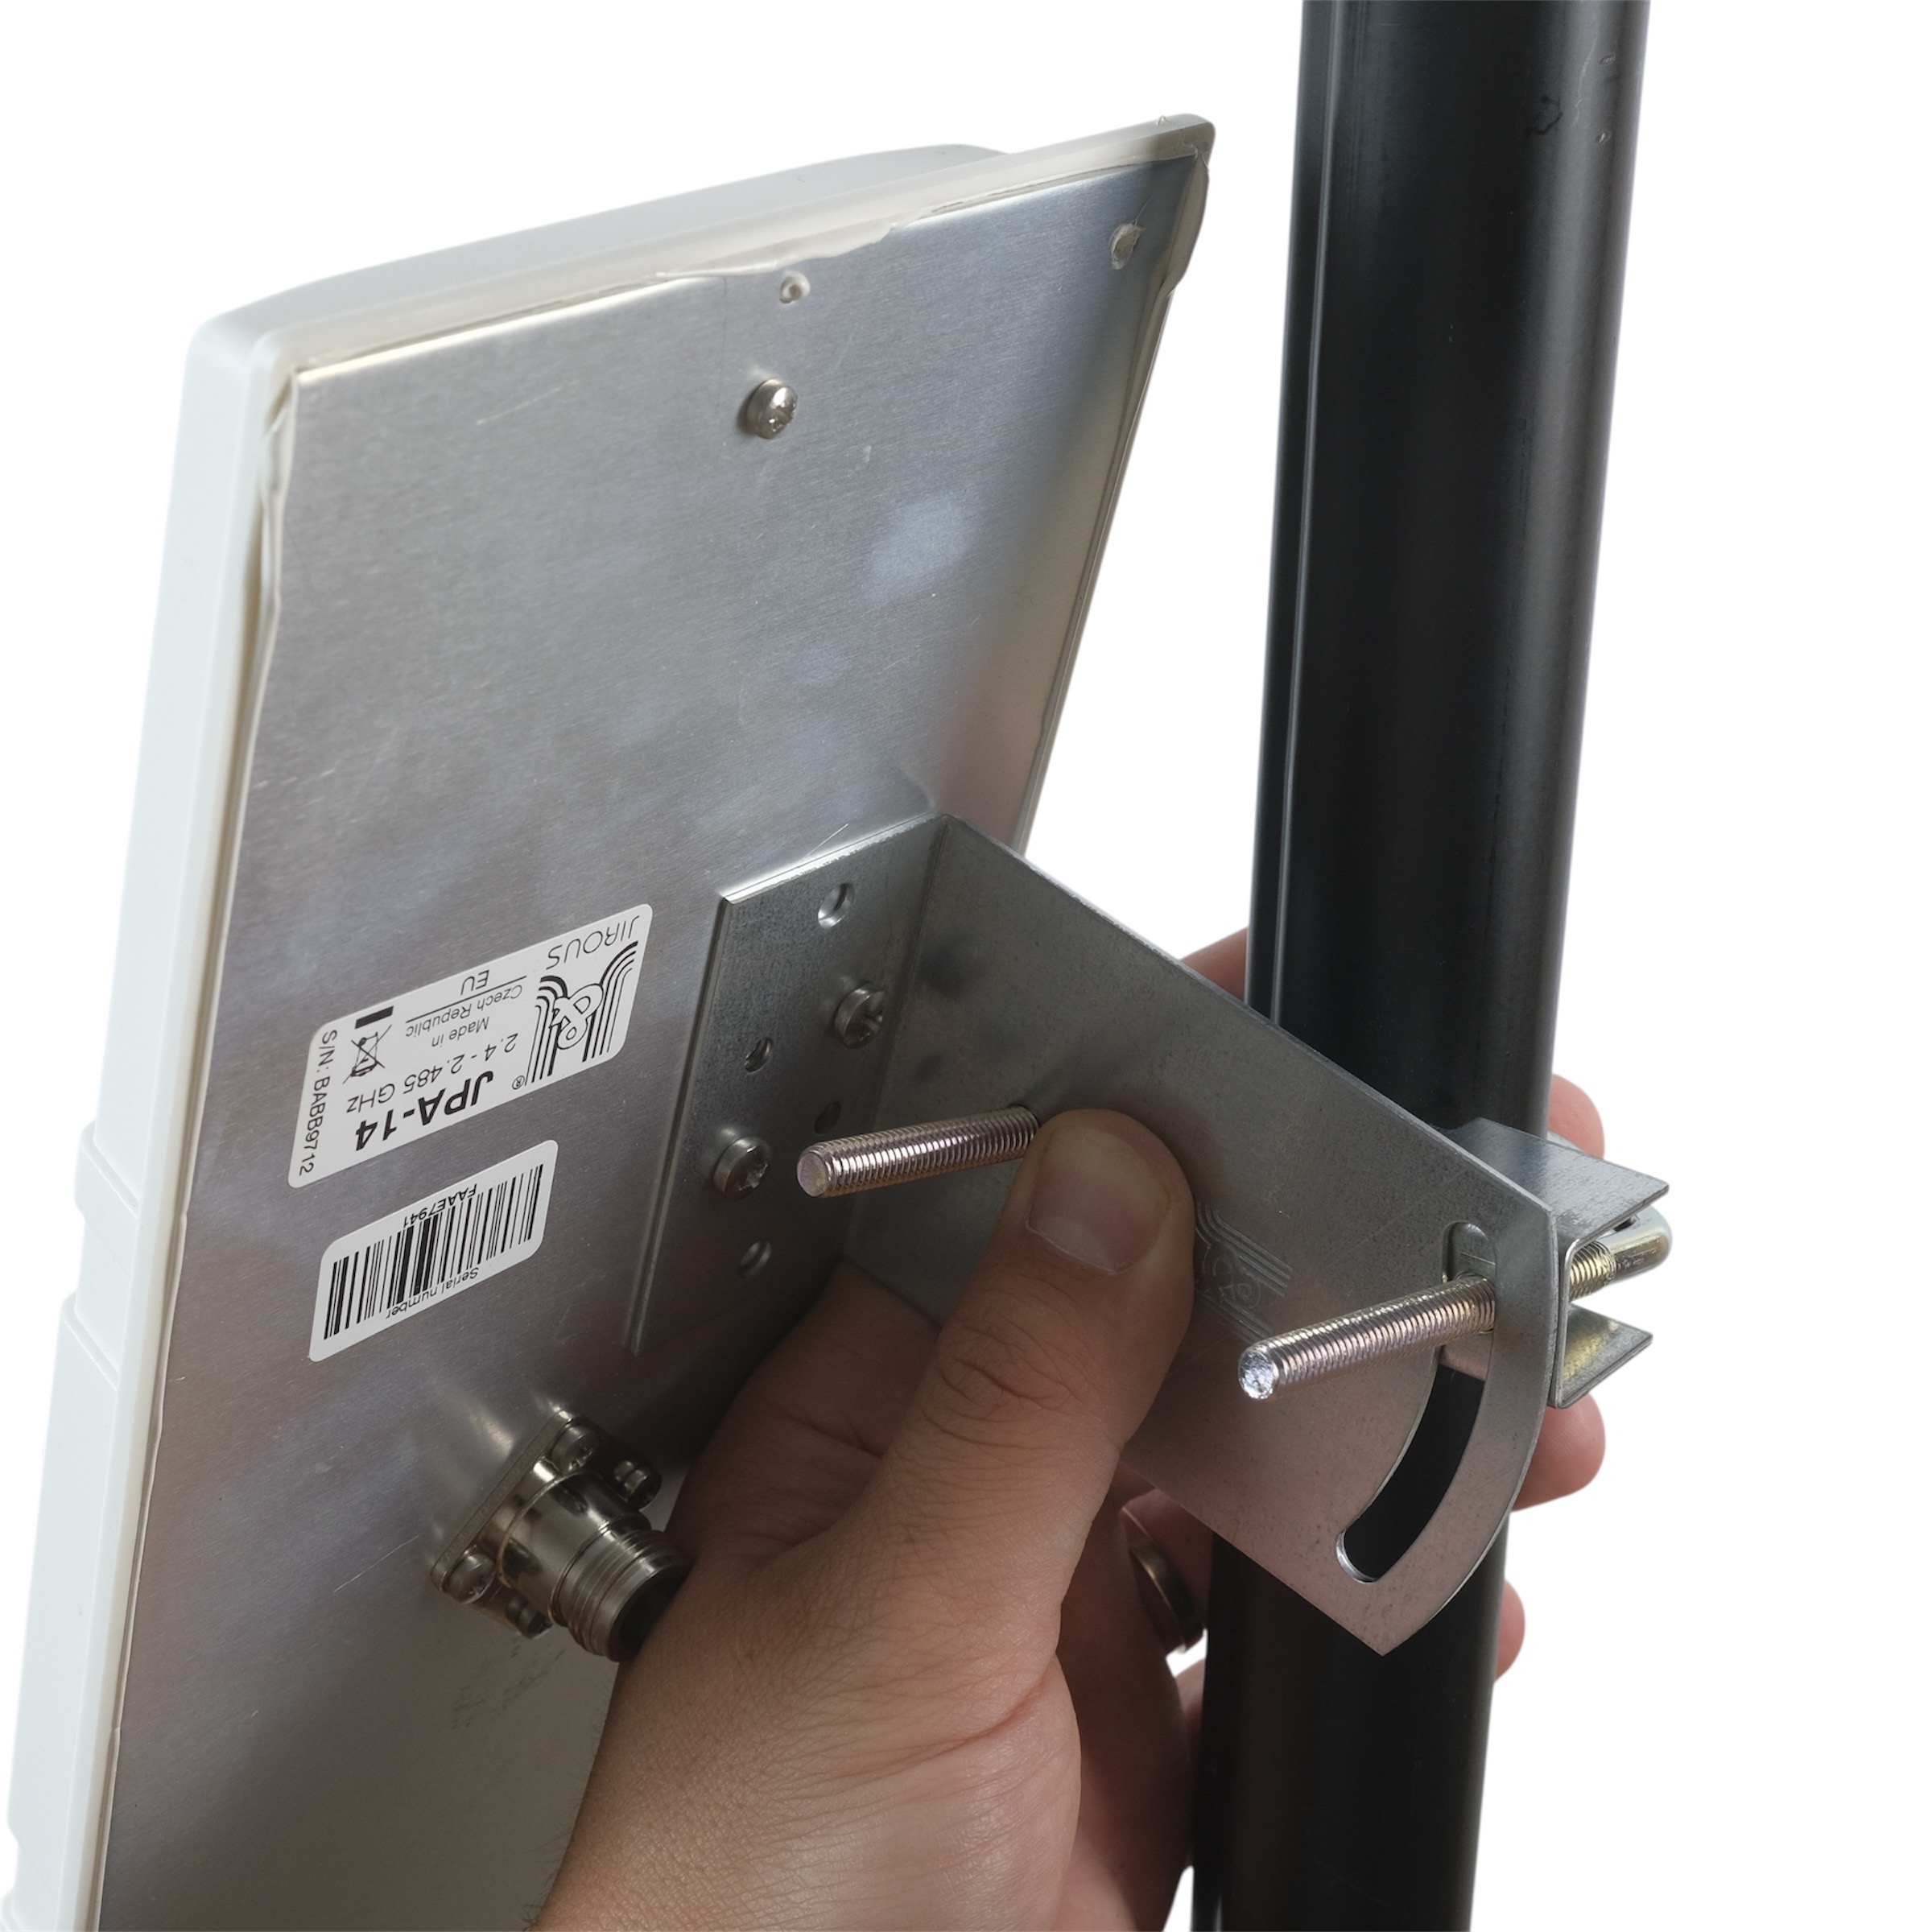
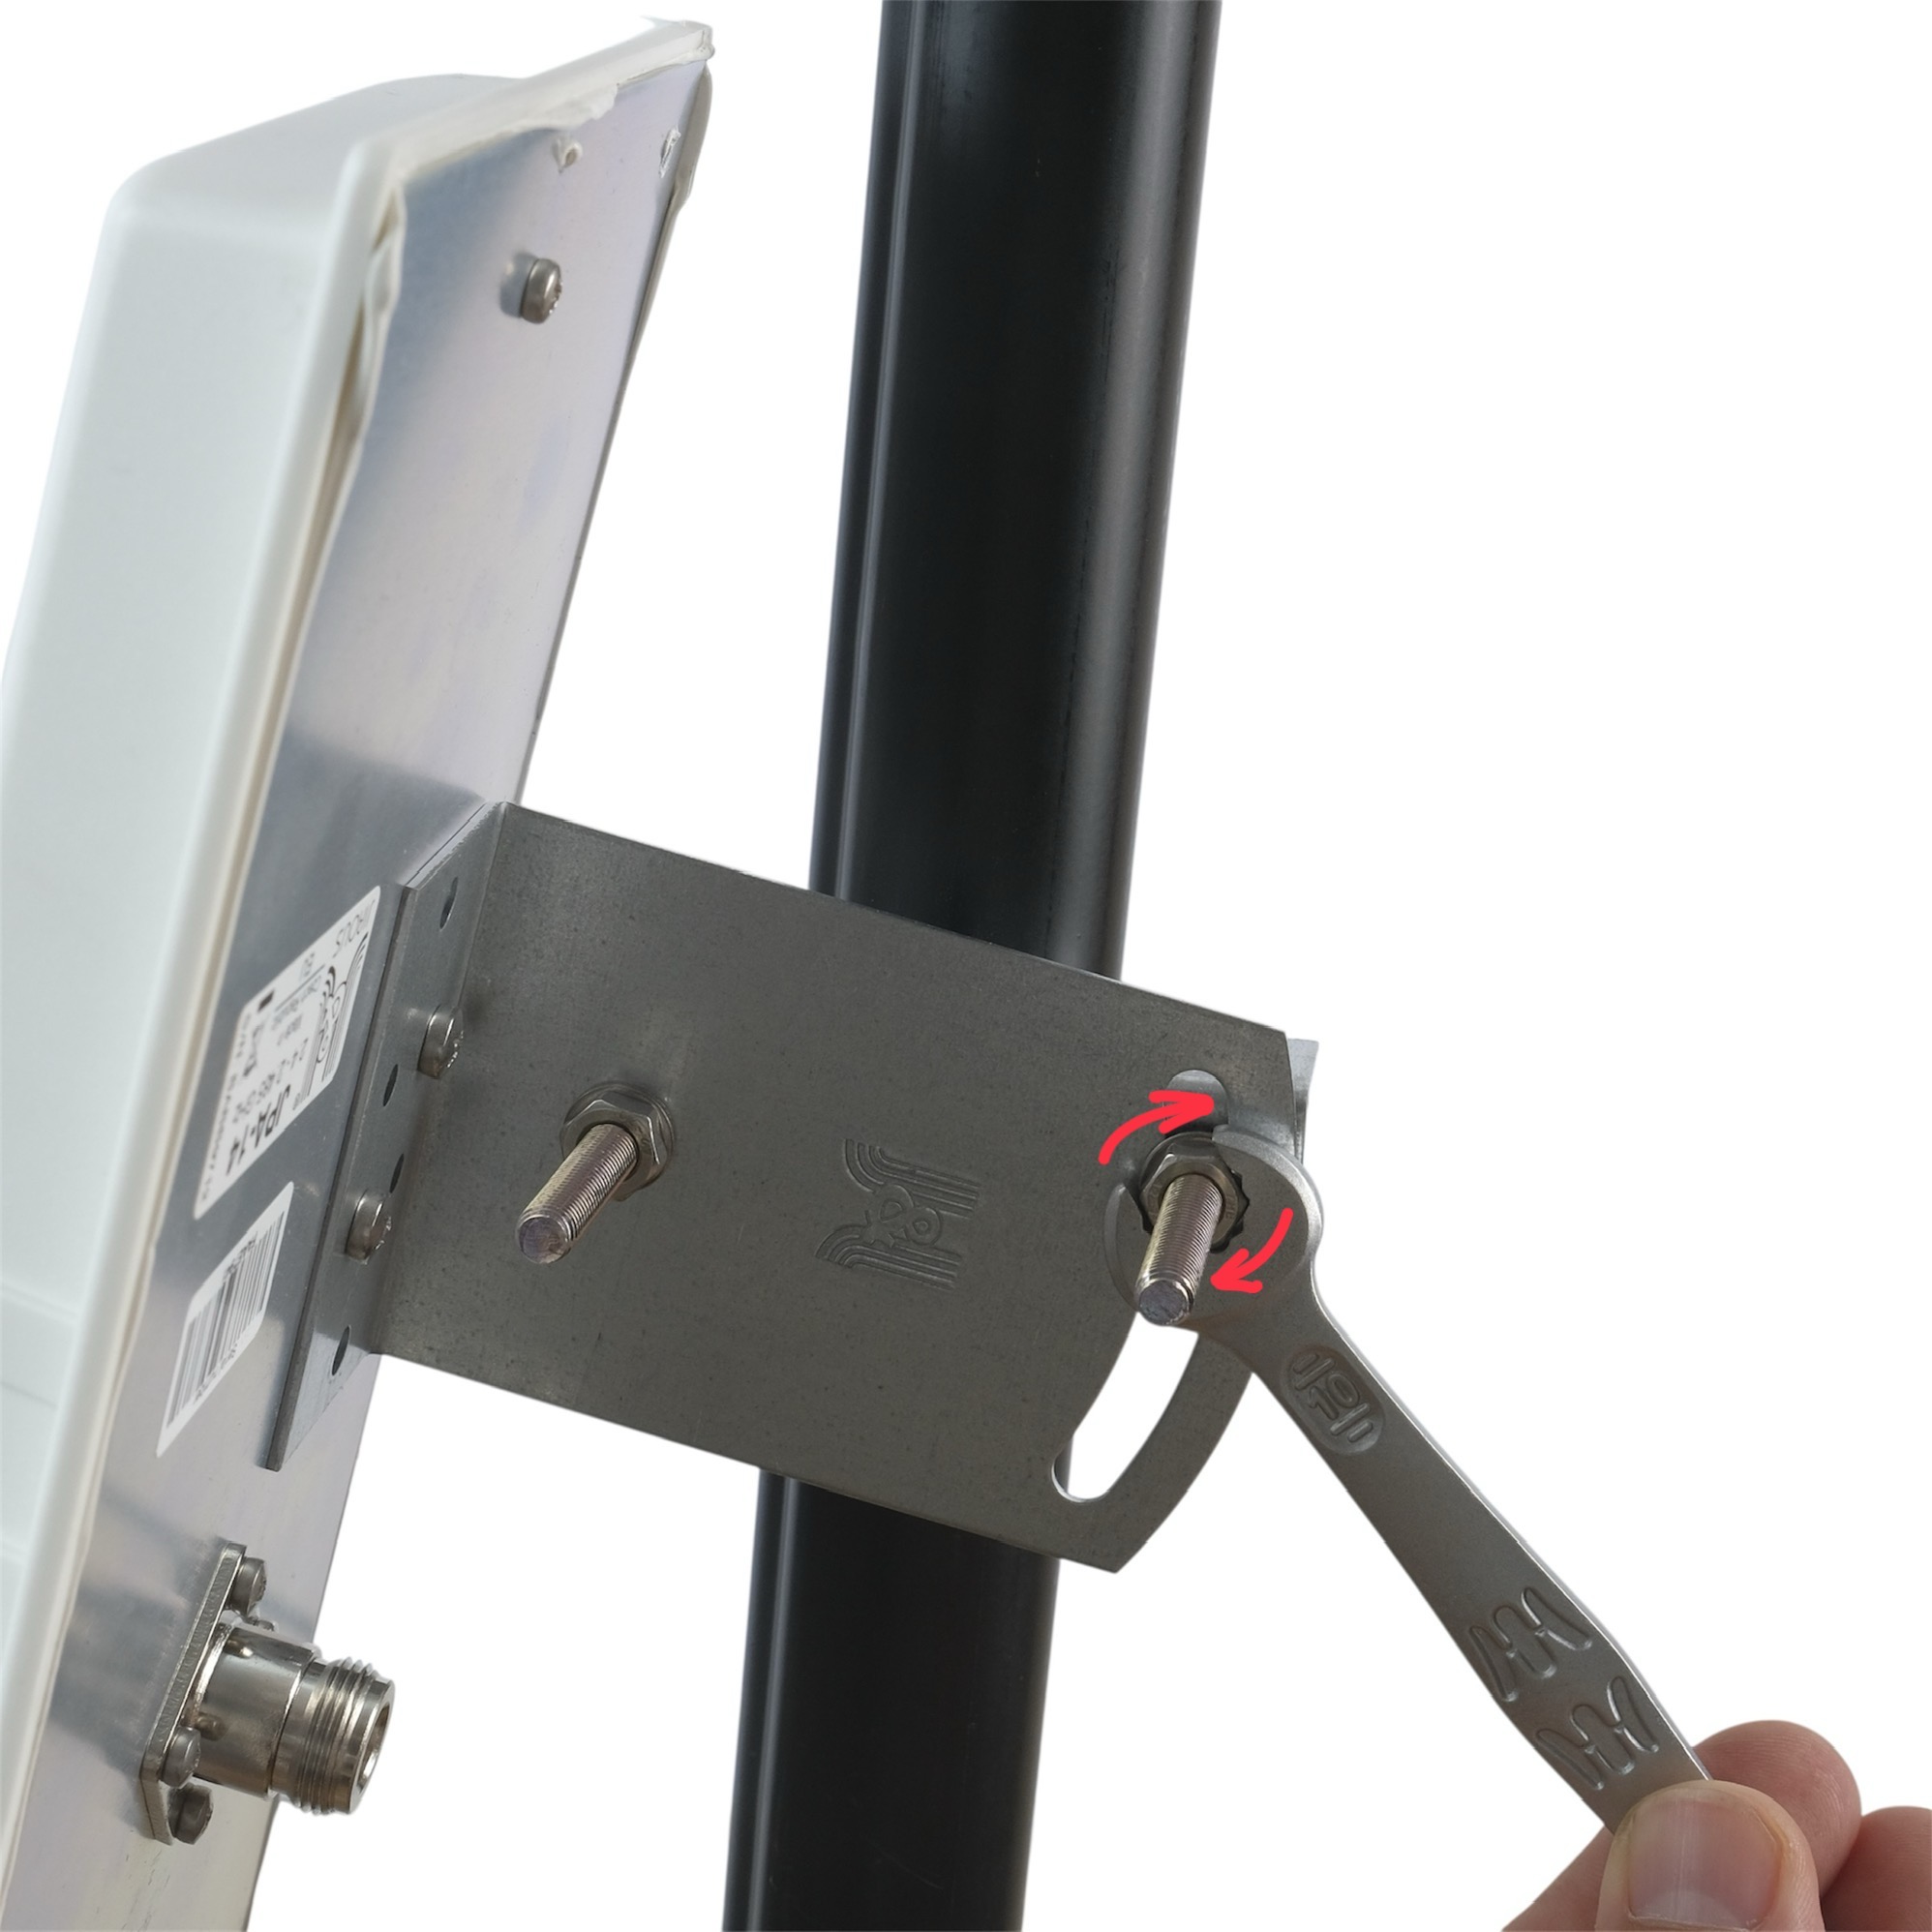
4. Tightening the Nuts
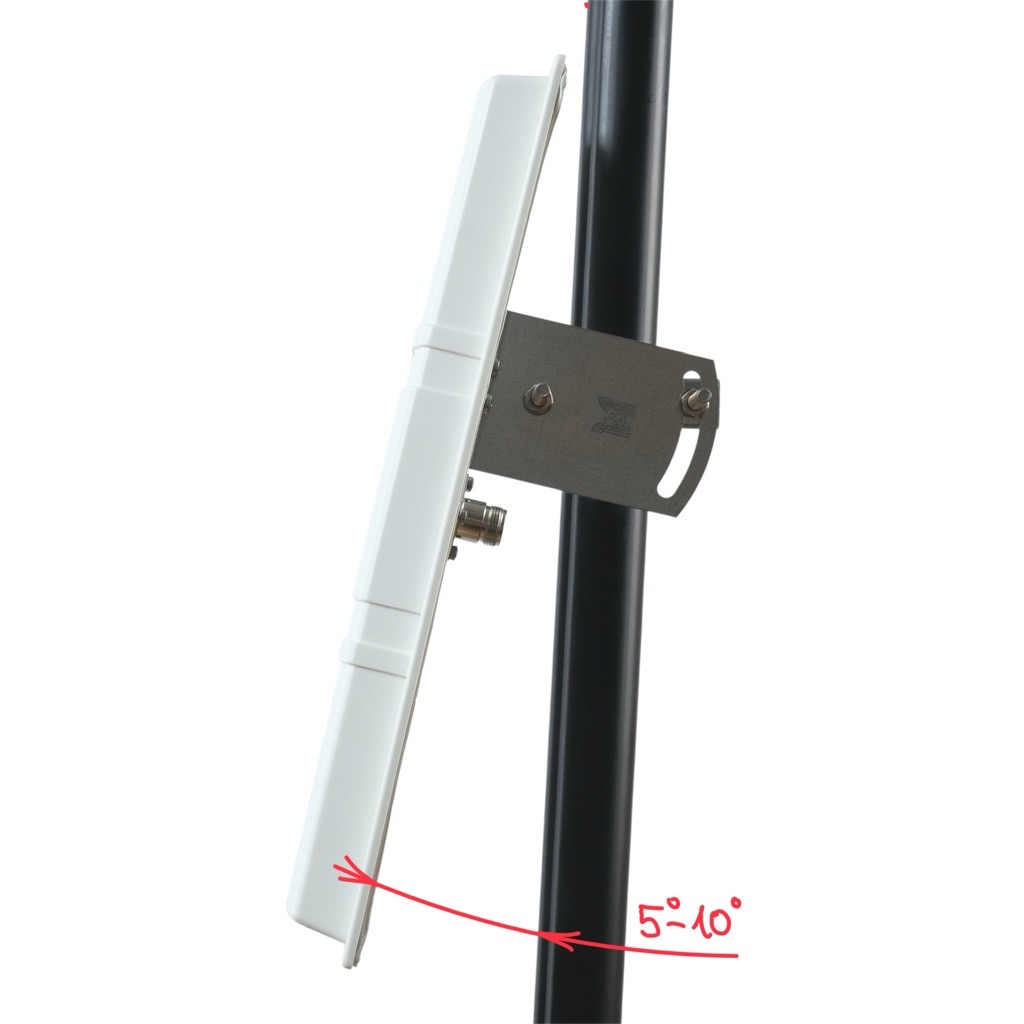
Tighten the nuts so that the antenna points 5–10° above the horizon in the target direction and then tighten.
5. Alignment
The front (flat) side of the panel must face the monitored sector.
Fine-tune the direction after connecting and checking signal levels in the app.
Important:
Make sure to align the directional antenna correctly. Avoid pointing it toward strong interference sources or other antennas.
Do not aim it at buildings or dense obstacles such as trees or skyscrapers — keep a clear line of sight to the monitored area for the best performance.
Tip:
Better placement = better signal. Avoid obstacles such as walls, trees, or metal structures.
Note:
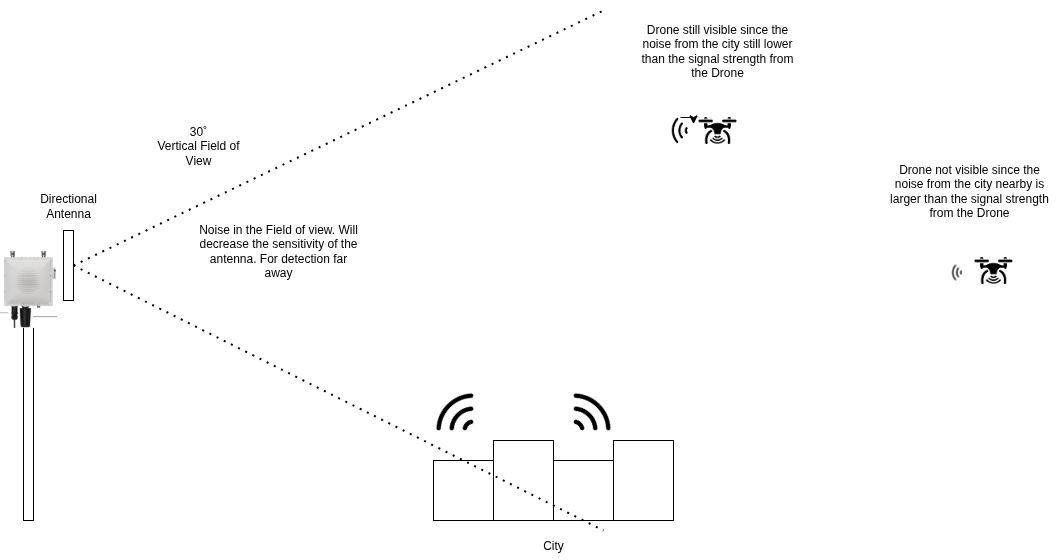
In the following images, you can find an explanation of why it is important to set directional antennas at an angle of 5°–10° above the horizon.
 ¨
¨
 ¨
:::
¨
:::
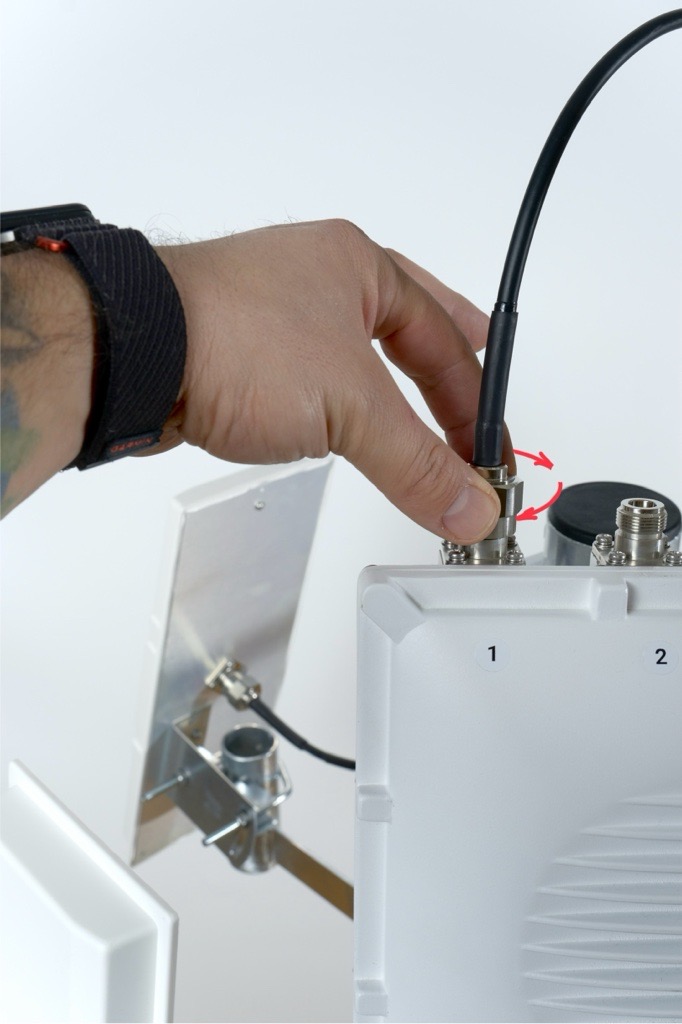
6. Cabling
The antenna comes with a 1 m cable included.
Ensure the cable is not bent, especially near the connectors, and that it has enough slack to move freely — avoid sharp bends.
Sharp bends or excessive tension on the cable may damage the connectors and reduce signal quality.
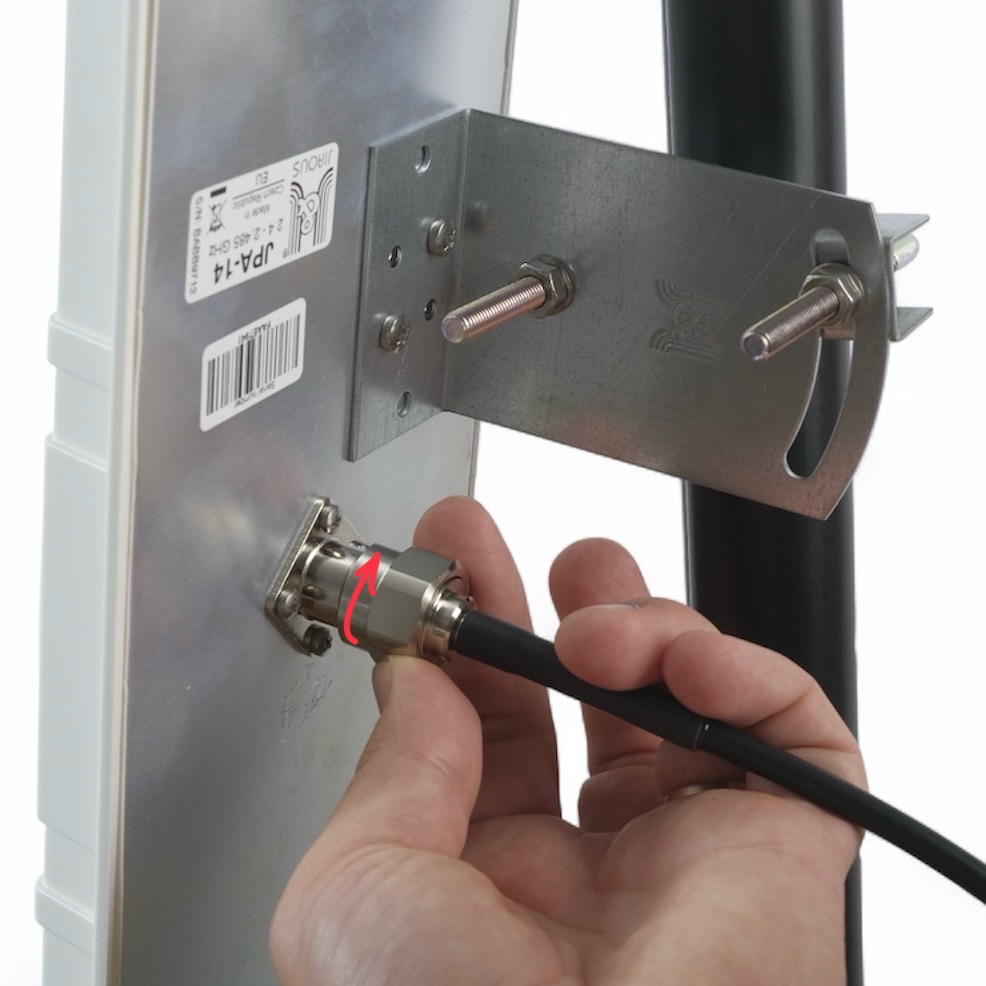
7. Connecting Antennas to Scout
Plug the cable into the appropriate N-type port on the Scout.
Every connector and antenna is labeled with a number indicating its designated port. Ensure that each antenna is connected to the matching port number.
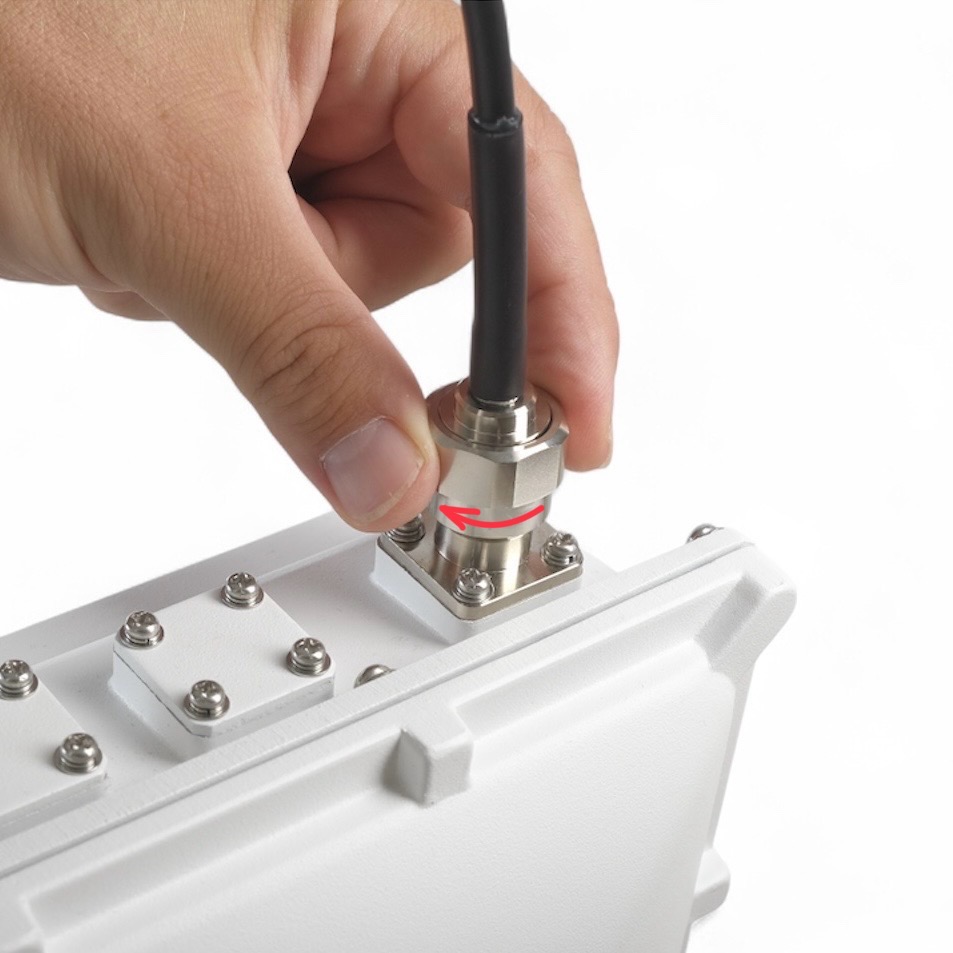
To attach antennas to correct connectors check the Atnenna Connector Diagram chapter at the top of this page.
8. Insulate connectors
-
Cut off about 50 cm waterproof tape. Stretch it to double the length. Wrap three layers around the connector with a 50% overlap. Hold the tape in place with your hand for a few seconds.
-
Wrap three additional layers with PVC tape with natural uncoiling force and a 50% overlap. Make sure to cover the head and the tail of the connector.
9. Check & Secure
Re-tighten all screws, check direction and stability of the antenna.
In windy areas, we recommend using additional reinforcement.
If you are unsure about your antenna installation, feel free to contact us on support@dronetag.com and send us photos and location of your Scout installation.